
ESP32 S2: pinout, specs and Arduino IDE configuration – 1
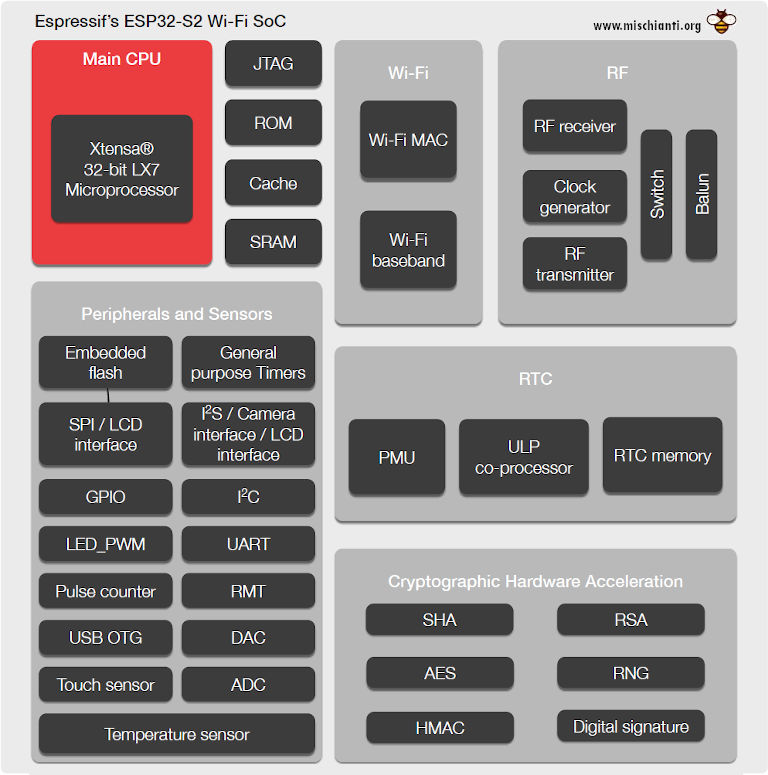
Esp32 s2 details
In this article, I will present the ESP32 S2 family of devices. These devices are under development, and some parts may be modified in the future.
In 2019, a new ESP32 board was born, the S2 family. At first, only the ESP-IDF platform was supported, but now the version for the Arduino ecosystem is also quite mature, although the official version for the Arduino IDE has not yet been released.
The ESP32-S2 has no Bluetooth or Ethernet MAC, but it includes new features to make it more attractive to the IoT device market.
It has a lower cost than the ESP32 and has USB-OTG, LCD, and camera support.
The ESP32-S2 can also dynamically turn off the Wi-Fi transceiver when not in use to save power.
It also now features a powerful single core, so many programming problems, such as CPU resource management, are solved.
Here the development modules ESP32 S2 Saola 1 - Ai-thinke ESP-12K - ESP32 S2 Mini
Specs
Remember that there are many variations of this device, some have specialized functions, but here we put a basic description of the specifications.
- CPU and Memory
- Xtensa® single-core 32-bit LX7 microprocessor, up to 240 MHz
- 128 KB ROM
- 320 KB SRAM
- 16 KB SRAM in RTC
- Embedded flash (None, 2Mb or 4Mb)
- SPI/QSPI/OSPI supports multiple flash and external RAM chips
- Wi-Fi
- IEEE 802.11 b/g/n-compliant
- Supports 20 MHz, 40 MHz bandwidth in 2.4 GHz band
- Single-band 1T1R mode with data rate up to 150 Mbps
- WMM
- TX/RX A-MPDU, RX A-MSDU
- Immediate Block ACK
- Fragmentation and defragmentation
- Advanced Peripheral Interfaces
- 43 × programmable GPIOs
- 2 × 12-bit SAR ADCs, up to 20 channels
- 2 × 8-bit DAC
- 14 × touch sensing IOs
- 4 × SPI
- 1 × I2S
- 2 × I2C
- 2 × UART
- RMT (TX/RX)
- LED_PWM, up to 8 channels
- 1 × full-speed USB OTG
- 1 × temperature sensor
- 1 × DVP 8/16 camera interface, implemented using the hardware resources of I2S
- 1 × LCD interface (8-bit serial RGB/8080/6800), implemented using the hardware resources of SPI2
- 1 × LCD interface (8/16/24-bit parallel), implemented using the hardware resources of I2S
- Security
- Secure boot
- Flash encryption
- 4096-bit OTP, up to 1792 bits for users
- Cryptographic hardware acceleration:
- AES-128/192/256 (FIPS PUB 197)
- Hash (FIPS PUB 180-4)
- RSA
- Random Number Generator (RNG)
- HMAC
- Digital signature
Pinouts
This device is very powerful, and you can see there are capacitive touch pins, more than one UART, and various analog pins.
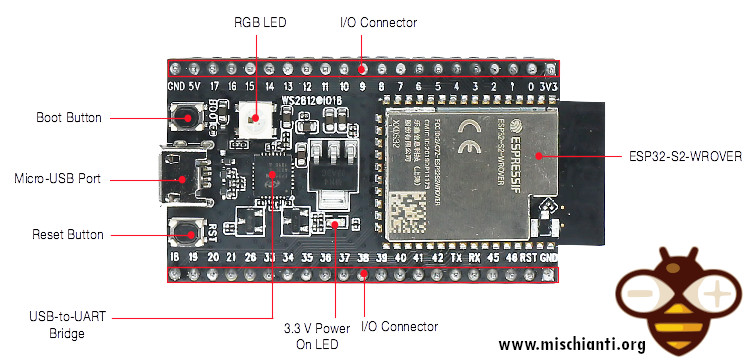
ESP32 S2 Saola 1MI
Equipped with ESP32-S2-WROVER-I, there is 2 version of this board, the 1M and 1MI. The only difference is that the 1MI has an IPEX antenna.
This board has three add-ons to the basic configuration: 4MB SPI flash, 2MB PSRAM and an addressable RGB LED (WS2812).
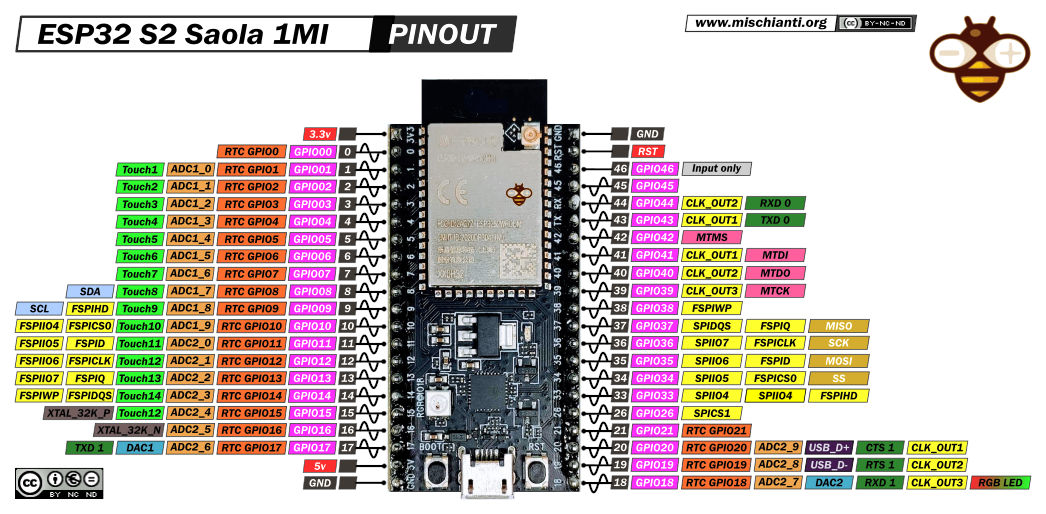
ESP32 S2 Saola 1MI detail and high resolution pinout image
Ai-thinker ESP-12K
Ai-thinker uses an SoC from Ensink Technology that has the same specs as ESP32-S2-WROVER. This board has a simple status LED.
There are 2 versions of this board:
- ESP-12K(00) without PSRAM
- ESP-12K(08) with 8MByte PSRAM
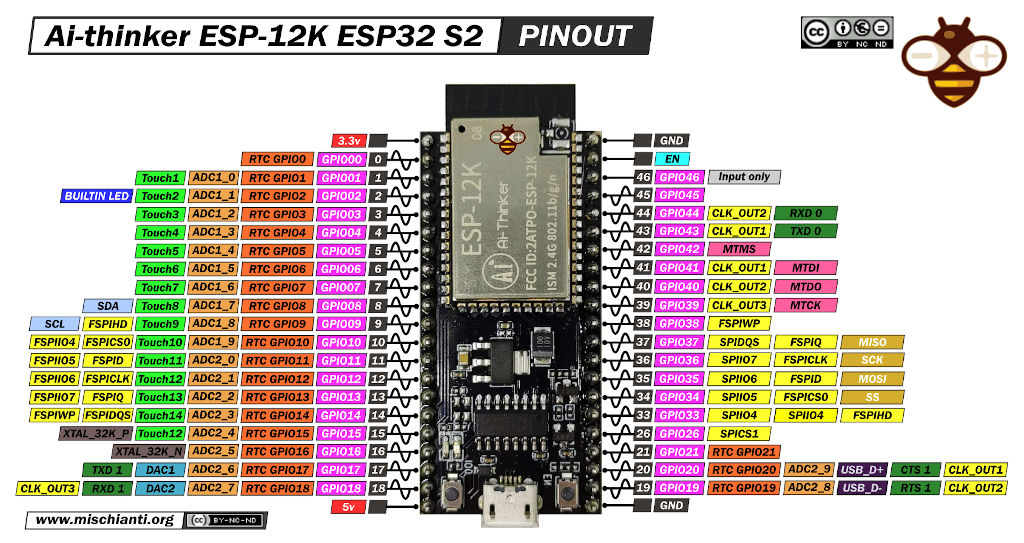
Ai-thinker ESP 12K ESP32 S2 pinout high resolution image
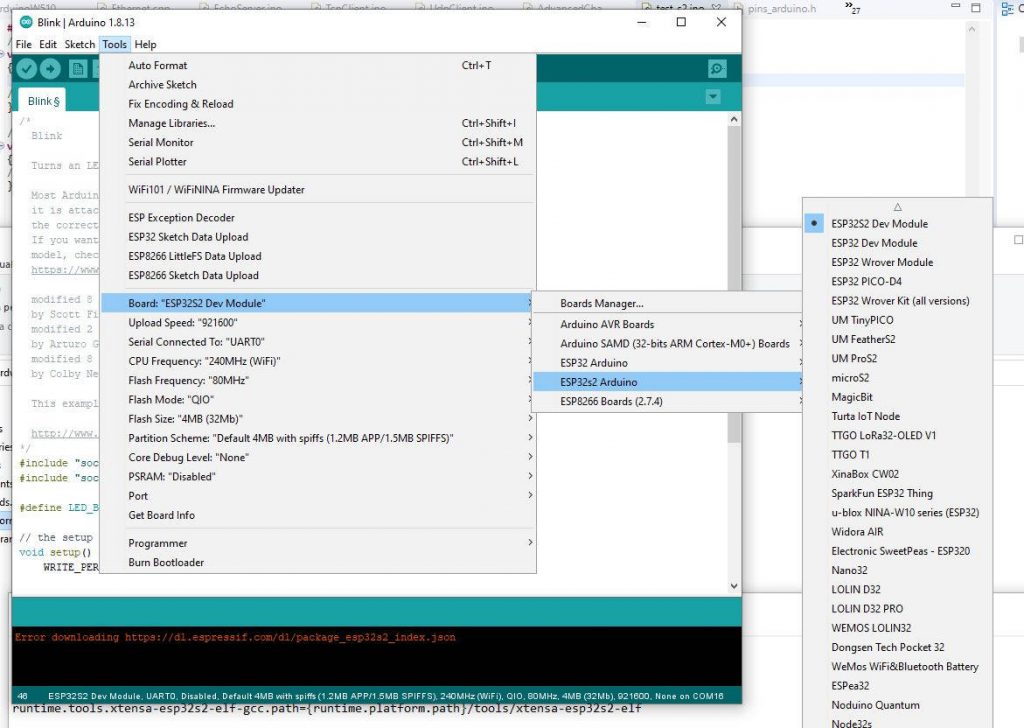
Arduino IDE configuration (Using the updated JSON dev)
Add boards to the Arduino IDE
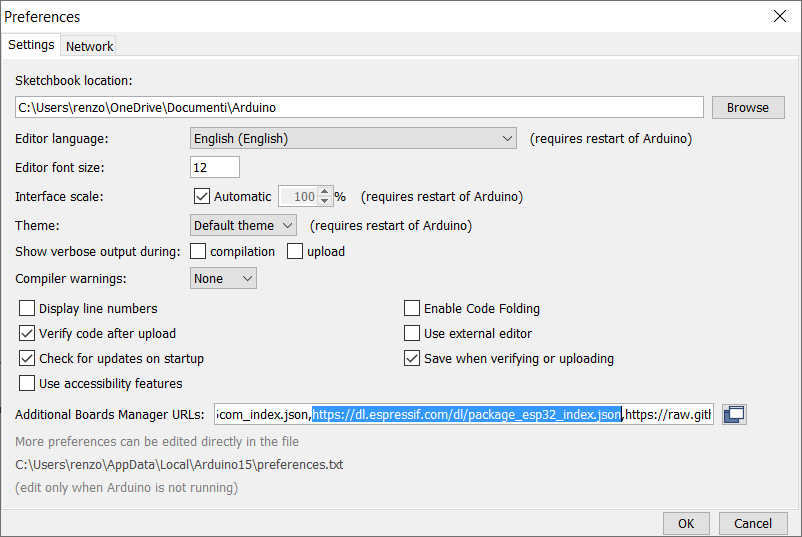
First, you need to add the esp32 URL descriptor to your IDE
https://raw.githubusercontent.com/espressif/arduino-esp32/gh-pages/package_esp32_dev_index.json
Go to File -> Preferences and add the URL to “Additional Boards Manager URLs“
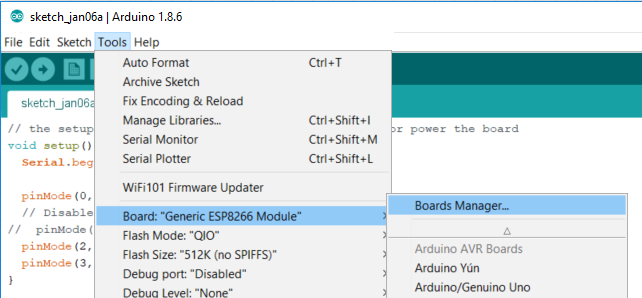
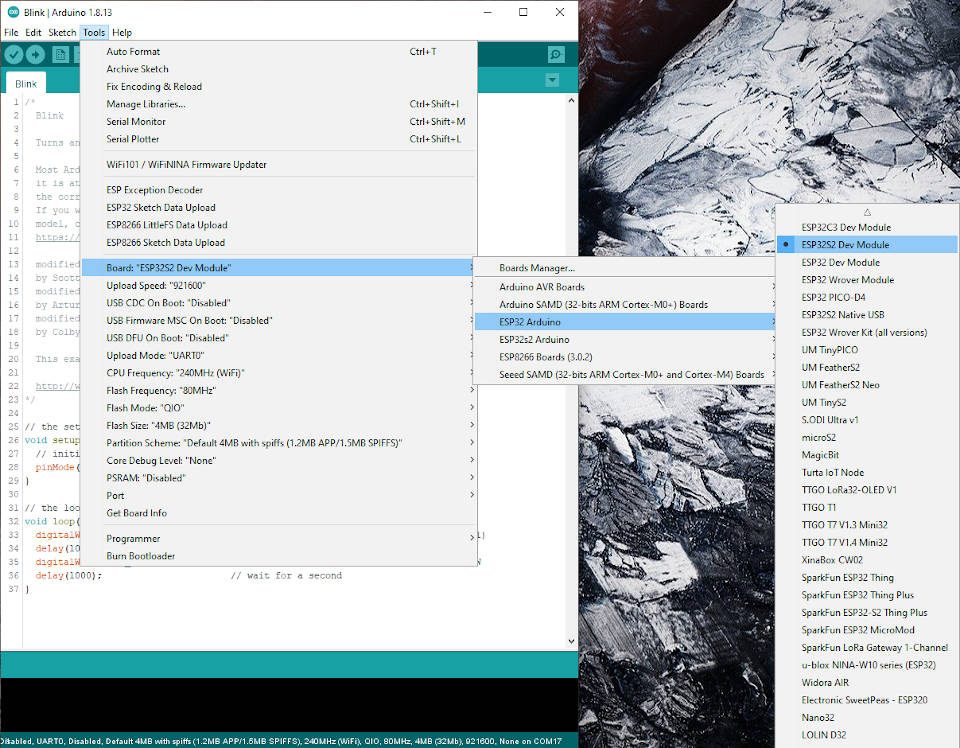
Then you have to add the new board to the Board Manager
The card to select is esp32
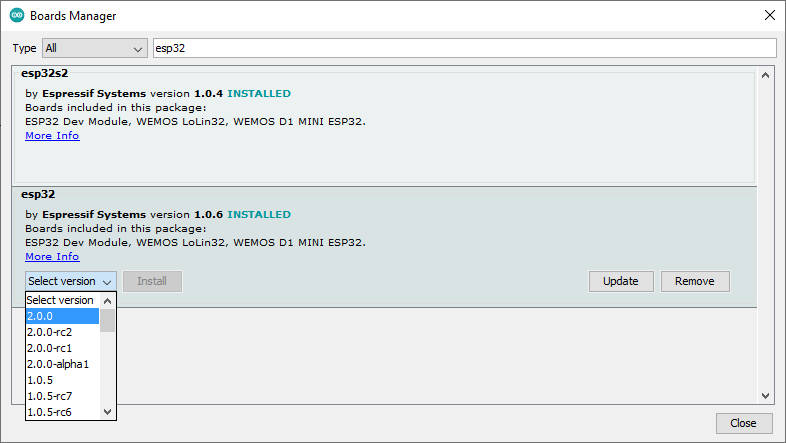
It is important that you choose a version of the esp32 core> = 2.
Arduino IDE configuration (manual installation of esp32s2 branch) (Deprecated)
The branch was changed in esp32c3 or Master no more esp32s2.
As you can understand from the title, there is not yet a simplified procedure, so we will have to take several steps to be able to use our esp32 s2 on the Arduino IDE.
Install standard ESP32 cards from the IDE card manager
First, you must add the esp32 URL descriptor to your IDE
http://arduino.esp8266.com/stable/package_esp8266com_index.json
https://dl.espressif.com/dl/package_esp32_index.json
Go to File –> Preferences and add the URL on “Additional Boards Manager URLs”
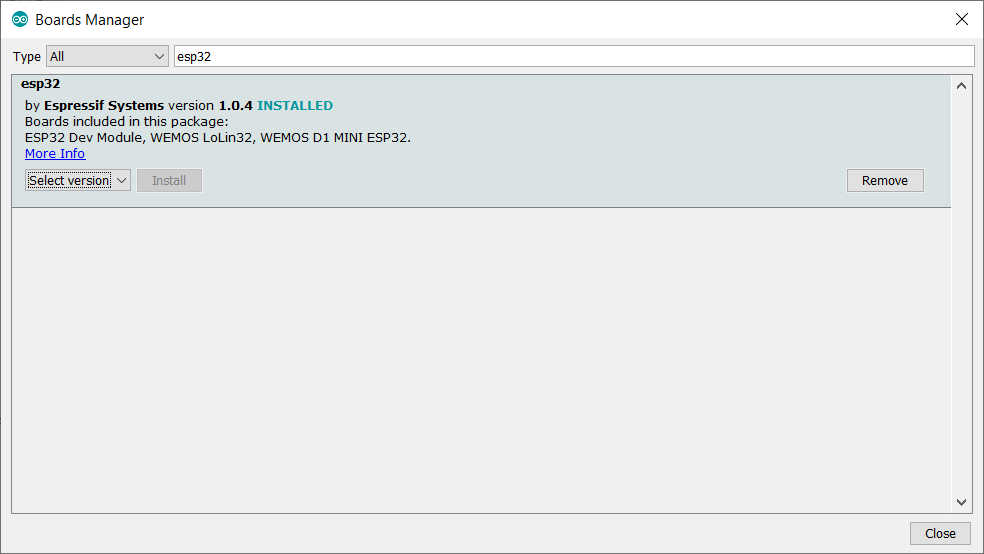
Then you must add a new board in Boards Manager
The board to select is esp32
Download the manager from the ESP32s2 branch
The branch was changed in esp32c3 and master no more esp32s2.
But now we have installed the stable branch of the master on the IDE, and there is no ESP32 S2 implementation.
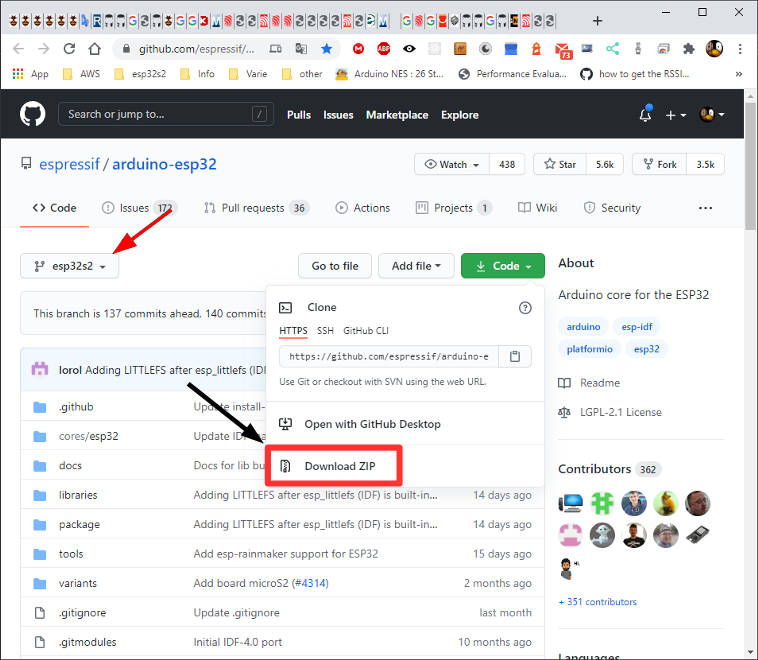
So you must download this branch
ESP32s2 GitHub branch or Master
then you have to open the path where the Arduino IDE stores its preferences:
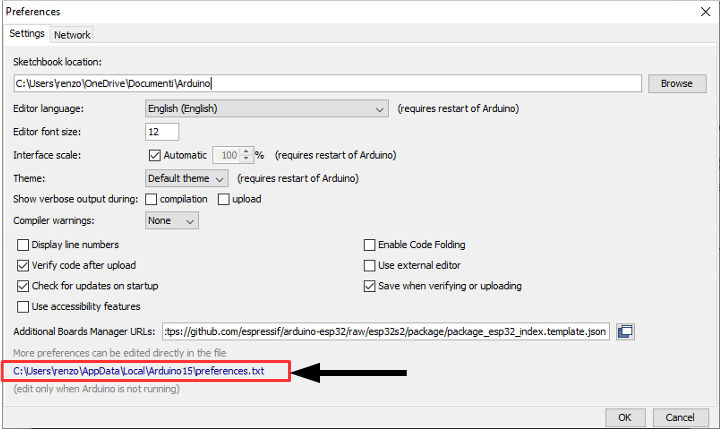
Now find the esp32 implementation. In my case, it’s the folder
<Arduino IDE preferences path>\packages\esp32\hardware\esp32\1.0.4
The result becomes
C:\Users\renzo\AppData\Local\Arduino15\packages\esp32\hardware\esp32\1.0.4
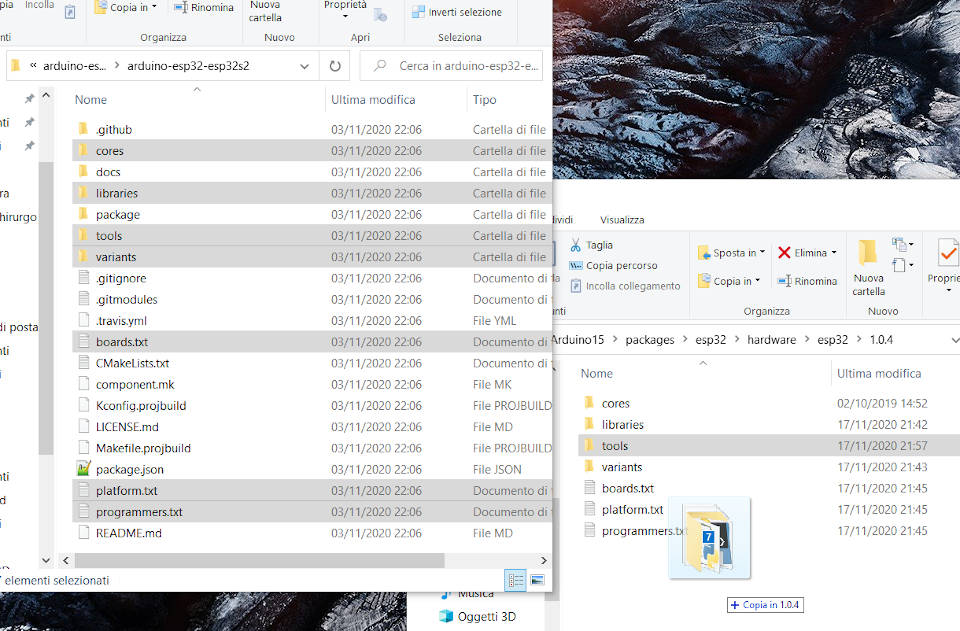
First create a copy of the folder packages\esp32 if you want revert the operation in the future.
Than open the zip of the branch and copy the same file and folder to the esp32 path
Now you can find the ESP32s2 Dev Kit implementation on your Arduino IDE:
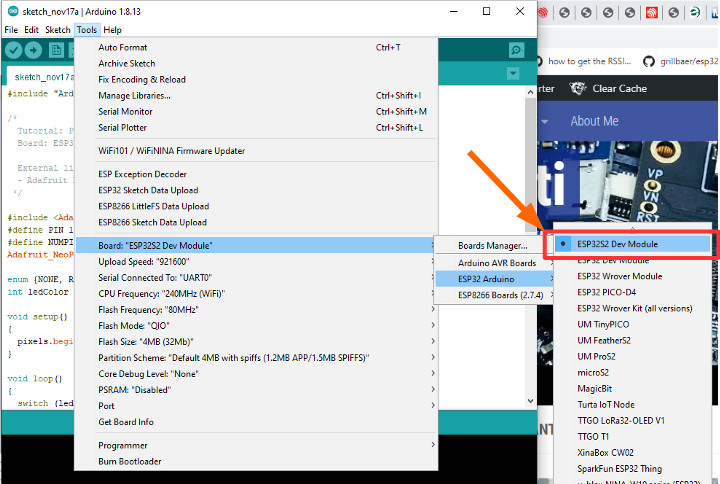
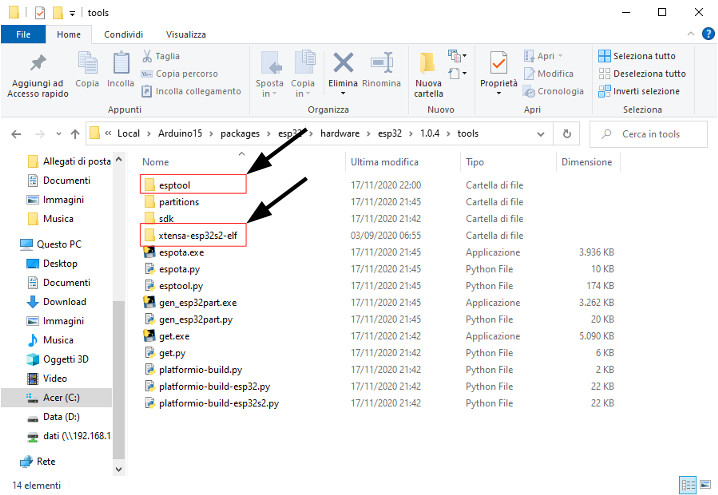
But you can’t compile and upload anything because you need 2 other updated tools.
Download xtensa-esp32s2-elf
But nothing can work because this board does not use xtensa-esp32-elf but xtensa-esp32s2-elf, you must download it from here:
The version for my operating system, Windows 10, is win64.
Download ESPTools
And you need the latest version of esptool, and you can check the latest version from here.
The first version that supports ESP32 s2 is 3.0.0, and we are going to download that version from this link.
Put all together
Now you must copy in the
<Arduino IDE preferences folder>\packages\esp32\hardware\esp32\1.0.4\tools
These two tools.
Now your IDE works correctly, I’m moved.
Your first ESP32 s2 sketch
ESP32 S2 Saola 1MI
Now we are going to manage the addressable RGB LED (Addressable RGB LED (WS2812), driven by GPIO18) installed on the board.
You need to install Adafruit_NeoPixel.h library from the libraries manager.
Here is the simple sketch:
/*
 *  Here a simple sketch to test the upload of ESP32 S2 Saola 1MI.
 *  The addressable RGB LED (WS2812), driven by GPIO18 need
 *  Adafruit NeoPixel library
 *  by Mischianti Renzo <https://mischianti.org>
 *
 *  https://mischianti.org/
 *
 */

#include <Adafruit_NeoPixel.h>
#define PIN 18
#define NUMPIXELS 1
Adafruit_NeoPixel pixels(NUMPIXELS, PIN, NEO_GRB + NEO_KHZ800);

enum {NONE, RED, GREEN, BLUE};
int ledColor = NONE;

void setup()
{
  pixels.begin();
}

void loop()
{
  switch (ledColor) {
    case NONE:
      pixels.setPixelColor(0, pixels.Color(0, 0, 0));
      pixels.show();
      break;
    case RED:
      pixels.setPixelColor(0, pixels.Color(20, 0, 0));
      pixels.show();
      break;
    case GREEN:
      pixels.setPixelColor(0, pixels.Color(0, 20, 0));
      pixels.show();
      break;
    case BLUE:
      pixels.setPixelColor(0, pixels.Color(0, 0, 20));
      pixels.show();
      break;
    default:
      break;
  }

  ledColor++;
  if (ledColor == 4) {
    ledColor = NONE;
  }

  delay(1000);
}
Ai-thinker ESP-12K
Now a blink sketch for this microcontroller:
/*
 *  Here a simple sketch to test the upload of Ai-thinker ESP-12K.
 *  by Mischianti Renzo <https://mischianti.org>
 *
 *  https://mischianti.org/
 *
 */

#define LED_BUILTIN 2

// the setup function runs once when you press reset or power the board
void setup() {
  // initialize digital pin LED_BUILTIN as an output.
  pinMode(LED_BUILTIN, OUTPUT);
}

// the loop function runs over and over again forever
void loop() {
  digitalWrite(LED_BUILTIN, HIGH);   // turn the LED on (HIGH is the voltage level)
  delay(1000);                       // wait for a second
  digitalWrite(LED_BUILTIN, LOW);    // turn the LED off by making the voltage LOW
  delay(1000);                       // wait for a second
}
Both custom and standard installations are running on your Arduino IDE
Many people ask me how to switch between the new and old installations easily. Here is a small guide.
Rename the new esp32s2 installation inside <Arduino IDE preferences folder>/preferences from esp32 in esp32s2 and the “old” standard directory in esp32.
Now you have the previous installation in esp32 (like normal) and esp32s2 the GitHub installation.
Add to “Additional Boards Manager URLs” a fake URL like
https://dl.espressif.com/dl/package_esp32s2_index.json
Now duplicate from <Arduino IDE preferences folder> the file package_esp32_index.json and rename It in package_esp32s2_index.json.
In the new file change name in esp32s2 like so:
{
  "packages": [
    {
      "name": "esp32s2",
      "maintainer": "Espressif Systems",
Now go to
<Arduino IDE preferences folder>\packages\esp32s2\hardware\esp32\1.0.4
Open file platform.txt and change the first line from name=ESP32 Arduino in name=ESP32s2 Arduino. Restart the IDE.
Thanks
- ESP32: pinout, specs and Arduino IDE configuration
- ESP32: integrated SPIFFS Filesystem
- ESP32: manage multiple Serial and logging
- ESP32 practical power saving
- ESP32 practical power saving: manage WiFi and CPU
- ESP32 practical power saving: modem and light sleep
- ESP32 practical power saving: deep sleep and hibernation
- ESP32 practical power saving: preserve data, timer and touch wake up
- ESP32 practical power saving: external and ULP wake up
- ESP32 practical power saving: UART and GPIO wake up
- ESP32: integrated LittleFS FileSystem
- ESP32: integrated FFat (Fat/exFAT) FileSystem
- ESP32-wroom-32
- ESP32-CAM
- ESP32: use ethernet w5500 with plain (HTTP) and SSL (HTTPS)
- ESP32: use ethernet enc28j60 with plain (HTTP) and SSL (HTTPS)
- How to use SD card with esp32
- esp32 and esp8266: FAT filesystem on external SPI flash memory
- Firmware and OTA update management
- Firmware management
- OTA update with Arduino IDE
- OTA update with Web Browser
- Self OTA uptate from HTTP server
- Non-standard Firmware update
- Integrating LAN8720 with ESP32 for Ethernet Connectivity with plain (HTTP) and SSL (HTTPS)
- Connecting the EByte E70 to ESP32 c3/s3 devices and a simple sketch example
- ESP32-C3: pinout, specs and Arduino IDE configuration
- Integrating W5500 with ESP32 Using Core 3: Native Ethernet Protocol Support with SSL and Other Features
- Integrating LAN8720 with ESP32 Using Core 3: Native Ethernet Protocol Support with SSL and Other Features
- Dallas ds18b20:
- Guide to I2C on ESP32: Communication with Heterogeneous 5V and 3.3V Devices, Additional Interface Management and Scanner
- Display
- Complete Guide: Using an ILI9341 Display with the TFT_eSPI Library
- Integrating Touch Screen Functionality with Your ILI9341 TFT Display
- SSD1683 eInk Display with GxEPD and ESP32 (and CrowPanel 4.2″ HMI): basics and configuration
- SSD1683 eInk Display with GxEPD and ESP32 (and CrowPanel 4.2″ HMI): fonts, shapes, and images
- ESP32 e Display eInk SSD1683: come realizzare una Semplice Stazione Meteo (anche su CrowPanel 4.2″ HMI) con le API di OpenWeatherMap
- How to Send Emails with Attachments on ESP32/ESP8266 (EMailSender v4.0.0 & STARTTLS)
- ESP32 High Performance FTP Server: A Deep Dive into the MultiFTPServer Library (v3.x)
- Ultra WideBand (Positioning system)
- Reyax RYUW122_Lite (UWB): Pinout, Datasheet, Schema & Specs
- Precision Indoor Positioning (cm) with UWB, ESP32 & Arduino: Hardware & Basics
- UWB Indoor Positioning: Standard Architecture (Anchor & Tag) with RYUW122
- Standalone UWB Positioning: The “IPS” Reverse Architecture (GPS-like) with RYUW122
- HC-SR04 Ultrasonic Sensor with ESP32 and Arduino: Complete Guide
- How to connect multiple HC-SR04 sensors with PCF8574 (3 methods)
- Fix slow HC-SR04 sensors with PCF8574: the hybrid approach trick [Guide]


Thank you! Worked like a charm with ESP32-S2-Saola-1
Thanks to you for your feedback..
Bye Renzo
Aaaaand it worked fine with Ai-thinker ESP-12K too !
Thank you , now I have to try to compile EspEasy on it and that will be… something else.
Thank you for your nice work and step by step.
Hehehe… Good, keep us updated on how the compilation is progressing.
Bye Renzo
I have some problem with wifi connection. I did all the steps as described but when I upload advanced web server example into s2, Wifi fails sometimes connected sometimes take too long time to connect, that is not stable as in the esp32. What might be the problem ?
Hi Kadir,
I think that the library used isn’t updated for esp32 s2 or there is a bug, but if you open an issue on library creator he’s going to fix It.
Bye Renzo
Thanks for this awesome Tutorial, works great for ESP32S2, now I can no longer use IDE for ESP32. (xtensa-esp32-elf-g++: error: unrecognized command line option ‘-mfix-esp32-psram-cache-strategy=memw’)
I have moved copies of folders back and forth, to allow working with both processors, but this is tedious. Is there a way you are aware of to have the IDE work for both the ESP32 and the ESP32S2? (Or, at least, do you know what the minimum list of files to move back & forth are?)
Hi ziegl,
I think you can configure the esp32 folder, but now I have arduino ide to compile esp32s2 and sloeber ide to write code and compile esp32.
I don’t check alternative solution.
Bye Renzo
Sorry, I also meant to mention, the Pinout picture you post on this web page, lists Pin 36 as FSPICLK(which is correct) and also as MISO, which it is not. Consequntially, Pin 37 is Listed as FSPIQ and SCK, again, FSPIQ is correct, but this is actually the MISO Pin. Obviously, correct me if I am wrong.
Yes, I’m wrong, the pins are
static const uint8_t TX = 43;
static const uint8_t RX = 44;
static const uint8_t SDA = 8;
static const uint8_t SCL = 9;
static const uint8_t SS = 34;
static const uint8_t MOSI = 35;
static const uint8_t MISO = 37;
static const uint8_t SCK = 36;
Thanks i’m going to fix.
I was hoping I was wrong, I have been looking for Pinout info on the ESP-12K, & nearly everything I see has been copied from your site. So, a lot of others will see the misinfo as well.
I did figure out a solution for quickly switching back and forth between the ESP32 & ESP32S2, in the Arduino IDE.
Install ESP32, make a copy of the 1.0.4 folder, name it 1.0.4ESP32, Put 1.0.4ESP32 in your appdata/local folder.
Install ESP32S2 (Make a copy in case anything goes wrong later.
Create 2 batch files, with the following code:
Call this ESP32S2.bat, put it on your desktop.
Finally, create a text file called ESP32S2.txt, and put this file on your desktop as well.
You will be starting with the ESP32S2 files installed, and the copy of the 1.0.4 folder for ESP32 (named 1.0.4ESP32, and copied ito your appdata/local folder) , so, when you run the ESP32.bat file, it will “MOVE” your ESP32S2 files to the appdata\local folder, Re-naming the Folder to “1.0.4ESP32S2”, then will “MOVE” your “ESP32” Folder to the correct location, and finally rename your desktop “ESP32S2.txt” file to “ESP32.txt”. (so that you can tell at a glance at the name of this text file whether you are setup for ESP32, or ESP32S2.)
The “Magic” here, is that a “move” command in Windows does not actually move the files, it merely writes a new location for the files to the NTFS table, so, moving all these files happens nearly instantaneously.
The other nice thing about this method, if you apply any updates to the library files stored in appdata, the changes are all automatically saved to each “Instance” of the IDE separately. (I store any library files I add, on a separate Drive, but otherwise, your Library files would be double the normal storage space)
If this isn’t clear, feel free to ask questions. Also, I just set this up minutes ago, so, no real testing per se, but, it seems to work as expected.
I see the extra space was stripped out of my comment, so, all formatting is gone. Is there a way to post the Batch code with the correct formatting? Or, a way to upload a properly formatted file?
Maybe this works?
Hi Ziegl,
thanks again for your report on pins issue, I add a little guide on this article on how to have the 2 installation active at the same time in your Arduino IDE.
Give me a feedback on It.
Bye Renzo
I must not be reading your instructions correctly, I screwed up the first time, & removed Arduino completely, & re-installed.
I think I followed your instructions the second time, but, still not working. I ended up with what looks like an ESP32 only (No ESP32S2) but, get the error
“Error downloading https://dl.espressif.com/dl/package_esp32s2_index.json” when I try to compile an ESP32 project.
Hi Ziegl,
you must download esp32, than as described in the tutorial copy the standard folder like esp32_old.
do the path for esp32s2 on esp32 folder, at the end rename es32 in esp32s2 and the esp32_old in esp32.
The error in download is normal, but there isn’t problem about that.
I think you mean this.
Bye Renzo
I’ve been struggling with esp boards for a while, and your step-by-step tutorial really helped. Thank you very much.
Hi JC,
thank you very much for your feedback, I’m happy to help you.
Bye Renzo
Hello,
Thank you for sharing. Thanks to you I’m able to flash the example you provide on my board.
However I’m experiencing some issue when I’m trying to compile a painlessmesh example code. Here is the warning:
C:\Arduino\libraries\Painless_Mesh\src/painlessmesh/router.hpp:162:26: warning: lambda capture initializers only available with -std=c++14 or -std=gnu++14
Do you have an idea how to manage to use the c++14 compiler
You can try to change the file platform.txt setting in this path
and the c extra_flag
with something like
Give me a feedback, if I had some time I try to do the change in my env.
Bye Renzo
Hello again,
I have checked in my platform.txt file (haven’t found the platform.local.txt) and change the following variable:
from compiler.cpp.flags.esp32=-std=gnu++11 to compiler.cpp.flags.esp32s2=-std=gnu++14 ………………
from compiler.cpp.flags.esp32s2=-std=gnu++11 to compiler.cpp.flags.esp32s2=-std=gnu++14 …………..
I’m not sure if it was what you were suggesting anyway since my warning disapear 🙂
Thanks,
Djamel
Hehehehhe.. The important thing is the result.
Bye Renzo
Hello,
For info the ESP32s2 GitHub branch is not anymore available :/
Hi Djamel,
It’s true, the branch It’s moved on https://github.com/espressif/arduino-esp32/tree/idf-master .
Thanks to alert me Renzo
The link does not work, I am assuming you mean that it is just in the Master branch? Also when I try to run any sort of wifi connection, it simply loads forever. A Question: if the wifi does not have a password to I just remove the password part?
like this (“ssid”) instead of (“ssid”, “password”)
Hehehe, they change the repository again now is
but now It’s also support on master.
If you add the link in this comment you have the support for esp32c3 and esp32s3 also.
Bye Renzo
Great explanation and video, man, well done! Thanks a lot
Thanks to you for your support.
Hi, I folowed the tutorial, all seems to be working but when I compile code I’m getting this error :
A fatal error occurred: Segment loaded at 0x3f000120 lands in same 64KB flash mapping as segment loaded at 0x3f000020. Can’t generate binary. Suggest changing linker script or ELF to merge sections.
exit status 2
C:\Program Files\WindowsApps\ArduinoLLC.ArduinoIDE_1.8.49.0_x86__mdqgnx93n4wtt\arduino-builder a retourné 2
It seems that the xtensa version create an issue but I don’t know how to fix it
Hi Theo,
It looks like a bad partition table, try to change It.
Bye Renzo
Hi, Which partition do I have to change ? and how ?
Hi Theo,
I don’t know what did you do but I’m goolging something and I find this
I can’t give you more help with the information you gave me, if you don’t find the solution open a topic in the forum and we try to help you to solve this issue.
Bye Renzo
Hi Renzo,
I am working on SPI for esp32 S2 dev module, the SPI Pins (SCK-36,MISO-37,MOSI-35,SS-34) used are shown, but i would like to use the Two SPI’s available on S2 module. i tired with defining the SPI type as shown below:
SPIClass spiBus1 = SPIClass(HSPI); // SPI for Display (SCK-36,MISO-37,MOSI-35,SS-34)
SPIClass spiBus2 = SPIClass(VSPI); // SPI for SD card (SCK-12,MISO-13,MOSI-11,SS-10)
But to my hard luck this doesnt work with S2 module.
so could you please guide me on how to use two SPI bus of esp32 s2 module in Arduino ide.
With Regards
Lakshminarayana KS
Hi Lakshminar,
Open a topic on Forum and post your code; we will check where the problem is.
Bye Renzo