

Raspberry Pi Pico, W, and other rp2040 boards: pinout, specs, and Arduino IDE configuration – 1


It’s time to explore the new series of microcontrollers based on the rp2040 chip from the Raspberry Pi Foundation. As usual, we are going to use the generic Arduino IDE and C language.
Introduction
Raspberry Pi Foundation designed a new chip named RP2040. The chip features a dual-core Arm Cortex-M0+ processor with 264kB internal RAM and support for up to 16MB of off-chip flash. A wide range of flexible I/O options includes I2C, SPI, and – uniquely – Programmable I/O (PIO).
After some time and about two million devices sold, Raspberry Pi also released the W version with WiFi to offer an IoT solution.
Here my selection of rp2040 boards Official Pi Pico - Official Pi Pico W - Waveshare rp2040-zero - WeAct Studio rp2040
rp2040 boards specs
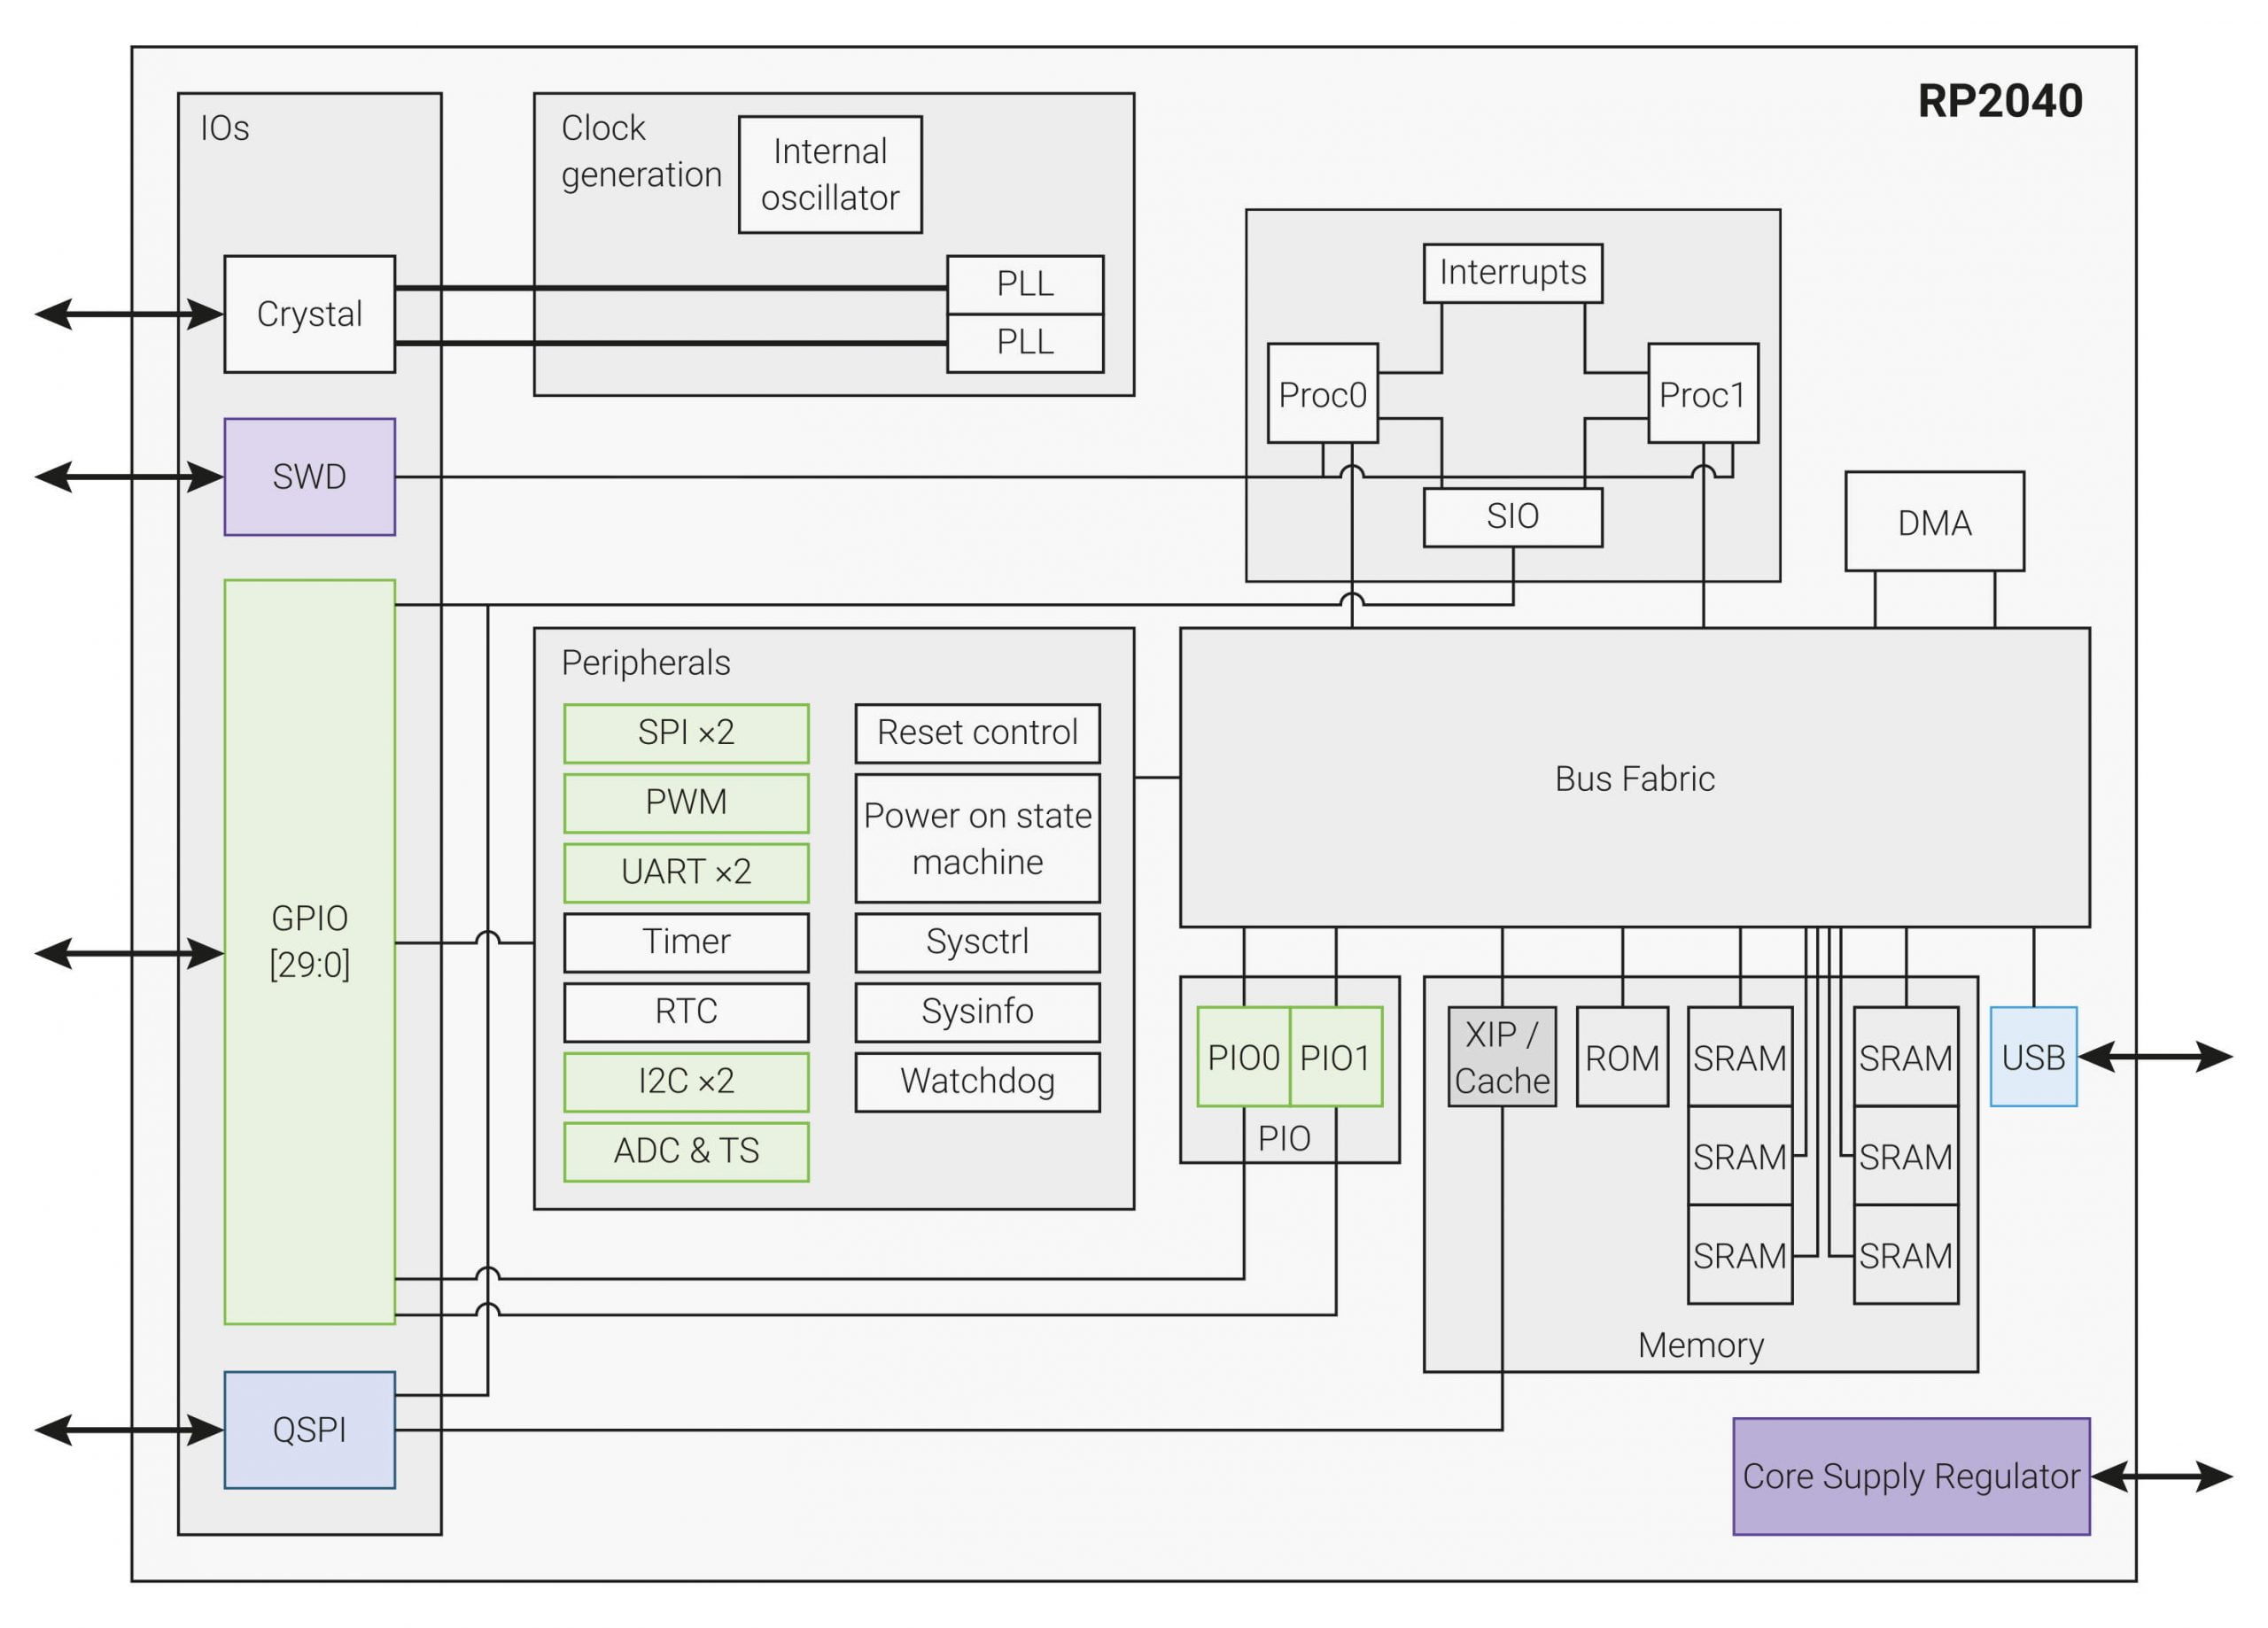
- Dual ARM Cortex-M0+ @ 133MHz
- 264kB on-chip SRAM in six independent banks
- Support for up to 16MB of off-chip Flash memory via dedicated QSPI bus
- DMA controller
- Fully-connected AHB crossbar
- Interpolator and integer divider peripherals
- On-chip programmable LDO to generate a core voltage
- 2 on-chip PLLs to generate USB and core clocks
- 30 GPIO pins, 4 of which can be used as analog inputs
- Peripherals
- 2 UARTs
- 2 SPI controllers
- 2 I2C controllers
- 16 PWM channels
- USB 1.1 controller and PHY, with host and device support
- 8 PIO state machines
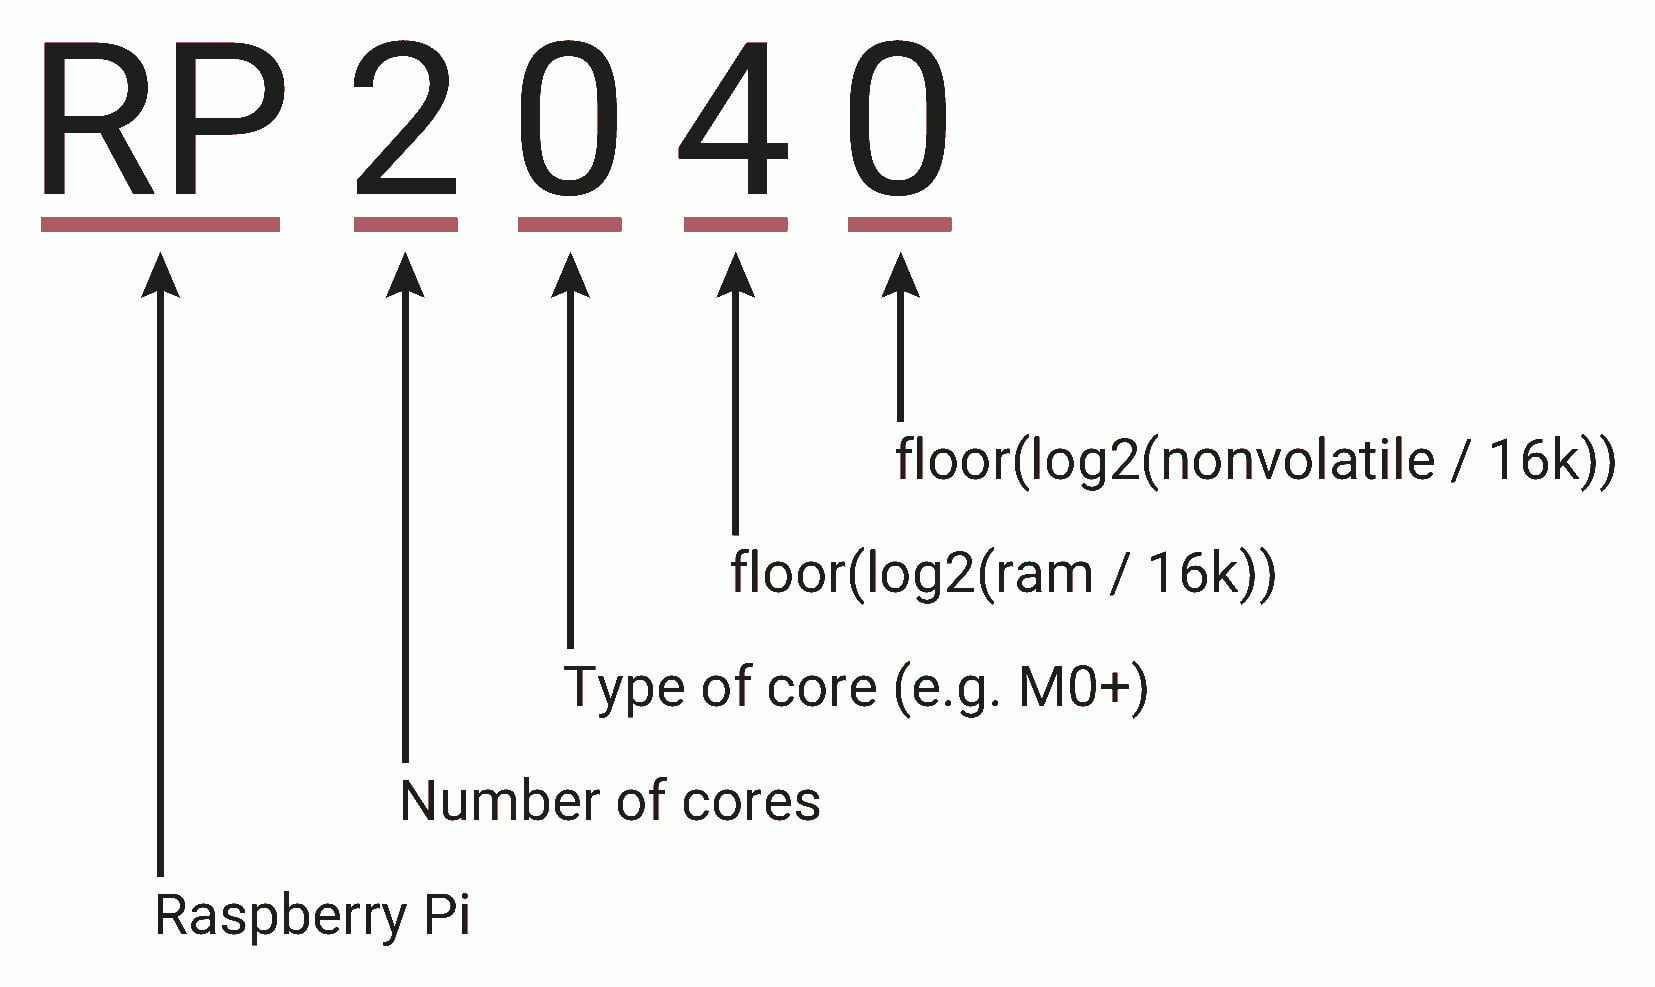
rp2040 identifies the chip type, so we expect this to be the first chip of a long series. In the code, you can read the number of cores, the processor variant, ram, etc. look at the diagram.
Infineon’s AIROC CYW43439
Only for the Raspberry Pi Pico W we can check the WiFi coprocessor specifications.
WiFi
- Wi-Fi 4 (802.11n), Single-band (2.4 GHz);
- 1×1 SISO;
- 20 MHz channels, up to 96 Mbps PHY data rate;
- The integrated internal PA, LNA, and T/R switch supports a single antenna shared between Wi-Fi and Bluetooth.
Bluetooth (Not active now)
- Class 1 (100 m) and Class 2 (10 m) operation;
- Bluetooth® 5.2;
- Supports BDR (1Mbps), EDR (2/3Mbps), and Bluetooth® LE.
Raspberry Pi Pico
The firstborn is the Pico board which has a good quantity of pins and a suitable form factor for breadboard.
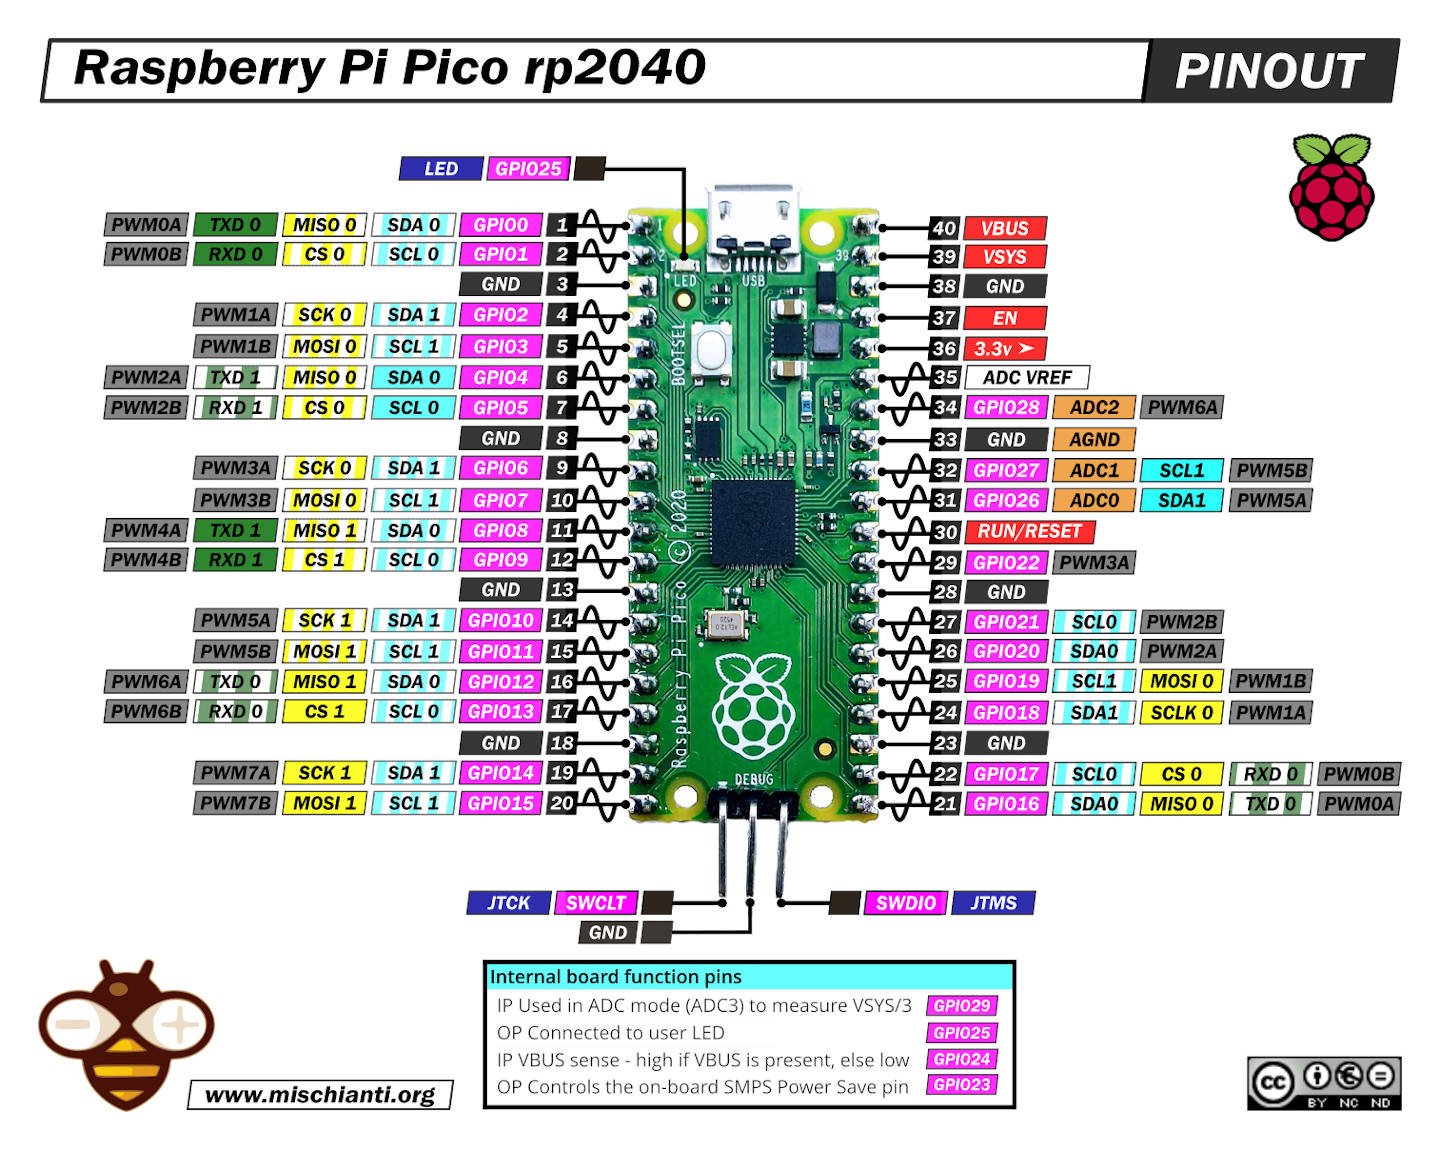
Raspberry Pi Pico: high-resolution pinout and specs
PINs
Power Pins
- VBUS – micro-USB input voltage
- VSYS – main system input voltage
- 3V3 – regulated 3.3V output, 300mA max
- GND – main ground reference
- AGND – ground reference for GP26-29 and ADC0 and ADC1
GPIO Pins
- GP0 to GP28 – General Purpose Input Output (GPIO) as well as Pulse Width Modulation (PWM)
I2C Pins
- SCL0 – I2C port 0 clock
- SDA0 – I2C port 0 data
- SCL1 – I2C port 1 clock
- SDA1 – IC2 port 1 data
SPI Pins
- SCLK0 – SPI port 0 clock
- MOSI0 – SPI port 0 data out
- MISO0 – SPI port 0 data in
- SCLK1 – SPI port 1 clock
- MOSI1 – SPI port 1 data out
- MISO1 – SPI port 1 data in
ADC Pins
- ADC0 – Analog to Digital Converter (ADC) 0
- ADC1 – Analog to Digital Converter (ADC) 1
- ADC2 – Analog to Digital Converter (ADC) 2
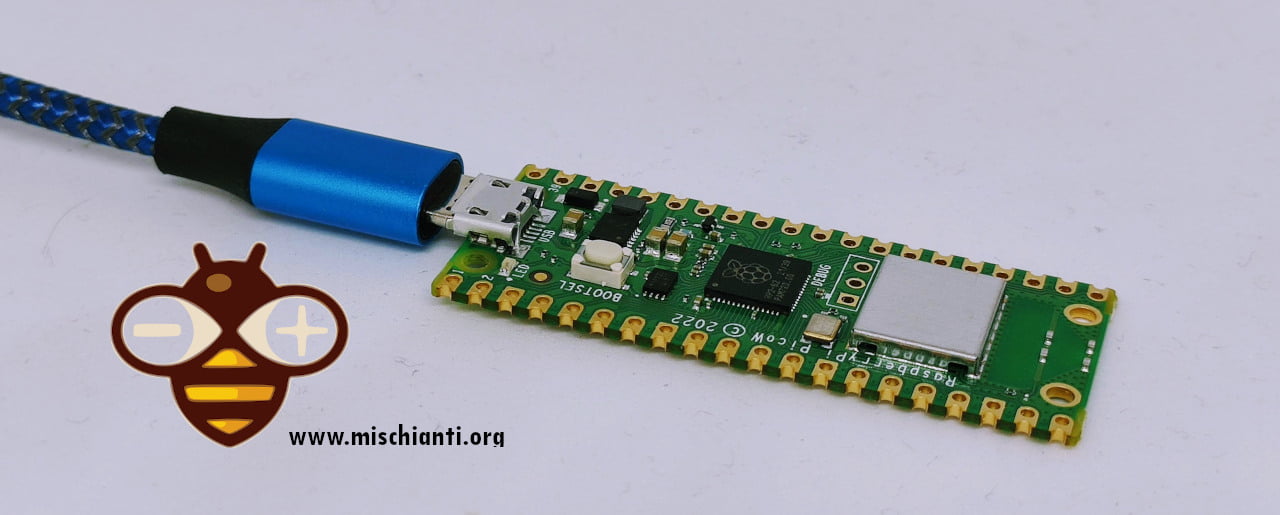
Raspberry Pi Pico W
The W version has the same specs as Pico but with an Infineon’s AIROC CYW43439 coprocessor to get a Wifi connection.
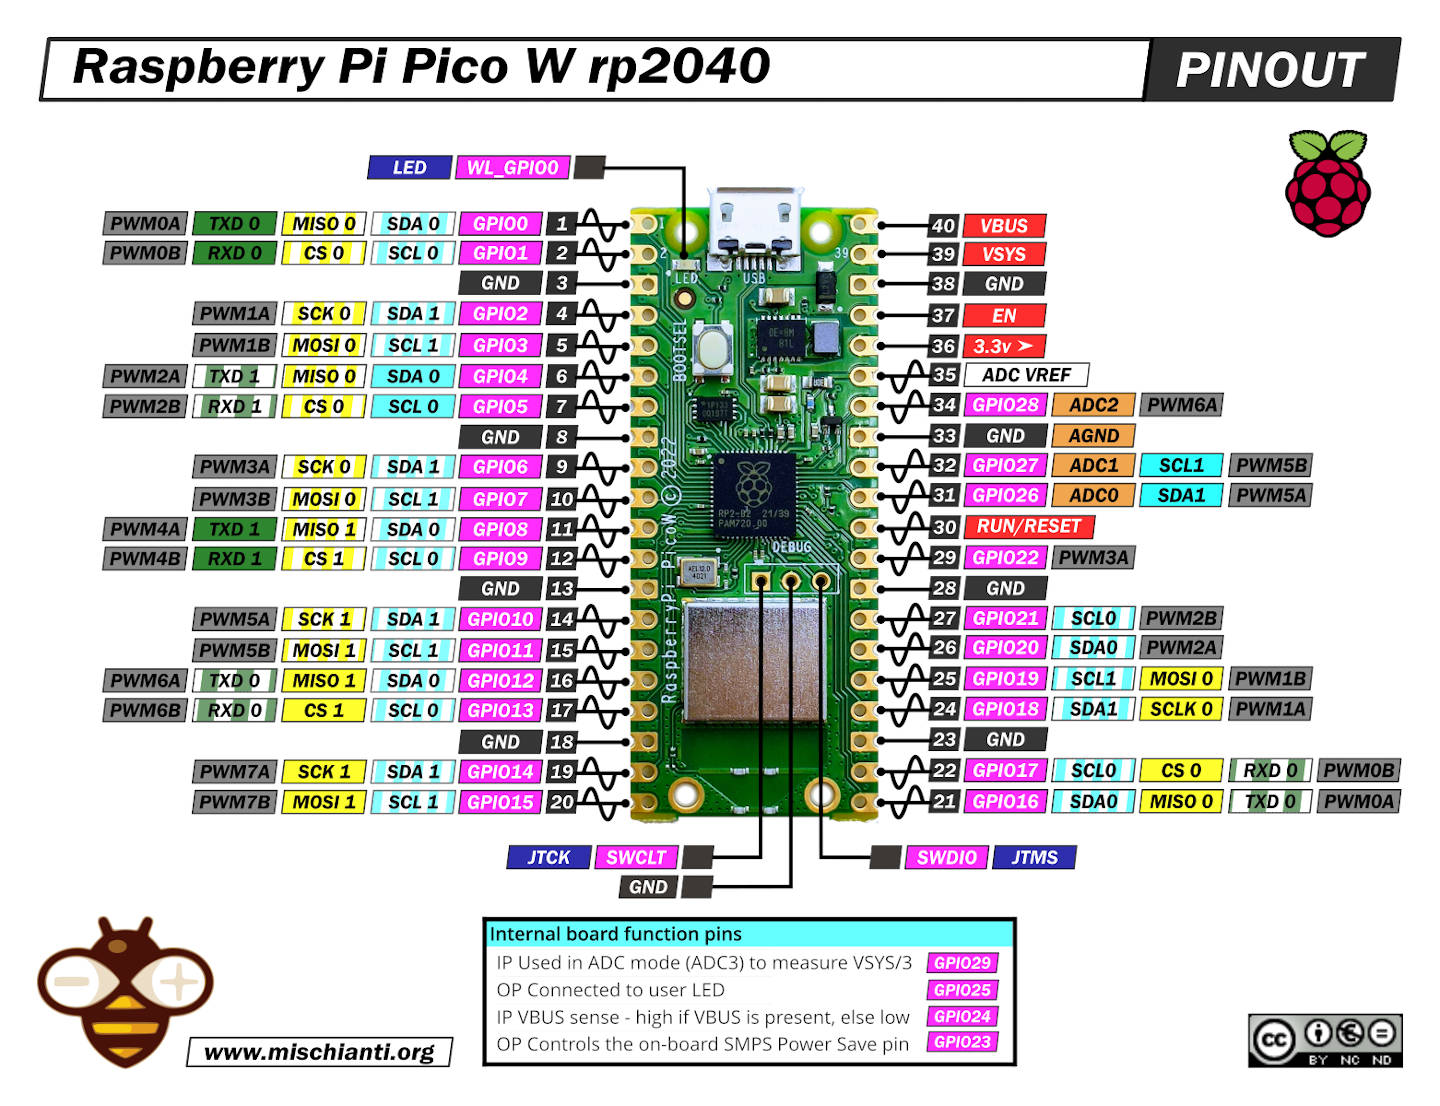
Raspberry Pi Pico W: high-resolution pinout and specs
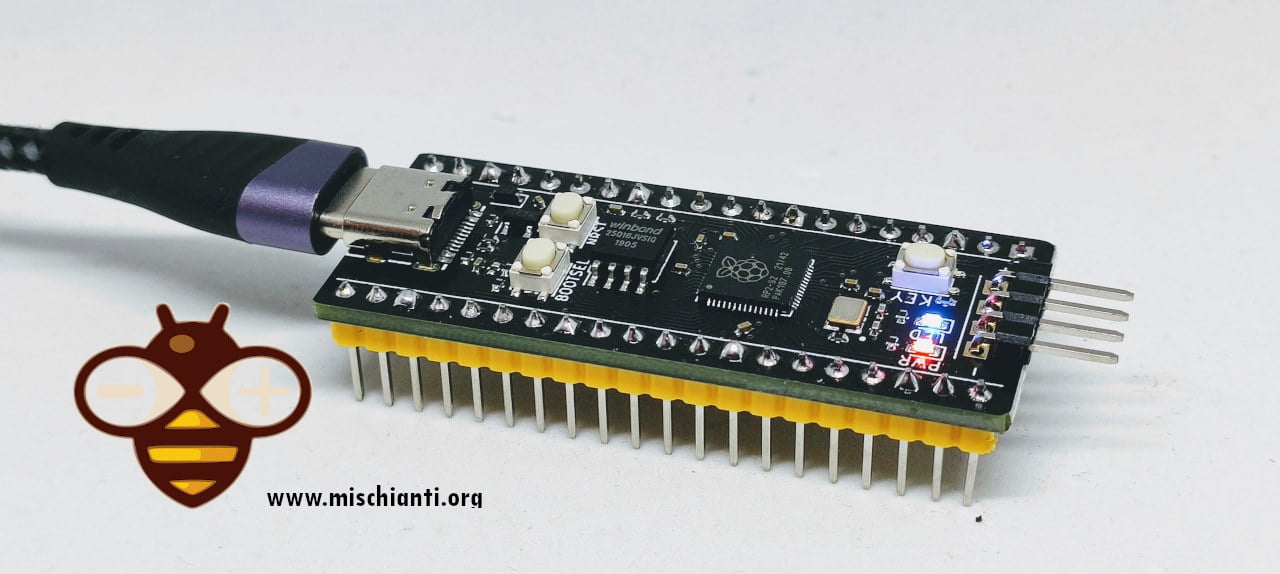
WeAct Studio rp2040 Pico
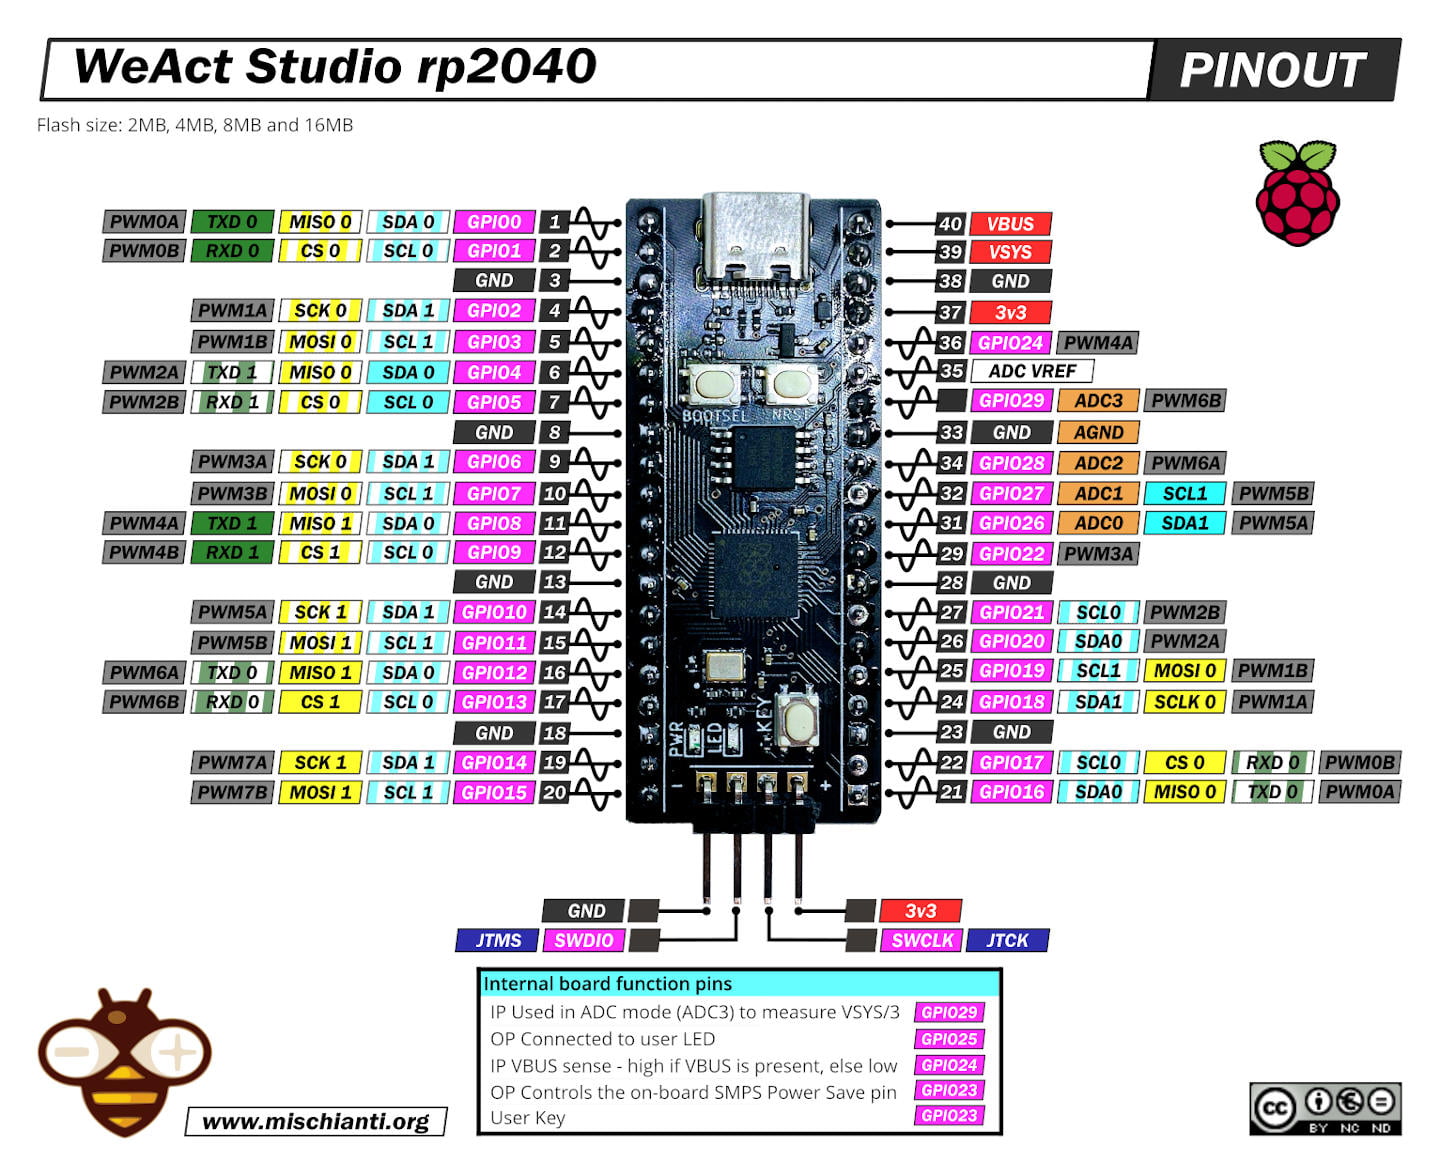
WeAct Studio rp2040: high-resolution pinout and specs
WeAct Studio is a factory that builds a very good quality board, and I already publish the STM32F4 Black pill (WeAct STM32F411CEU6 Black-Pill WeAct STM32F401CCU6) variants, here they propose a Raspberry Pi Pico clone with a selectable Flash size.
In addition to the Raspberry Pi Pico, here we have:
- USB Type-C connector
- BOOTSEL button and Reset button
- User button
- The debug port includes a 3V3 pin for powering the board
- 2MB, 4MB, 8MB, or 16MB of flash
- Similar but non-identical pinout
Waveshare rp2040-zero
Another alternative with a reduced size factor is proposed by Waveshare.
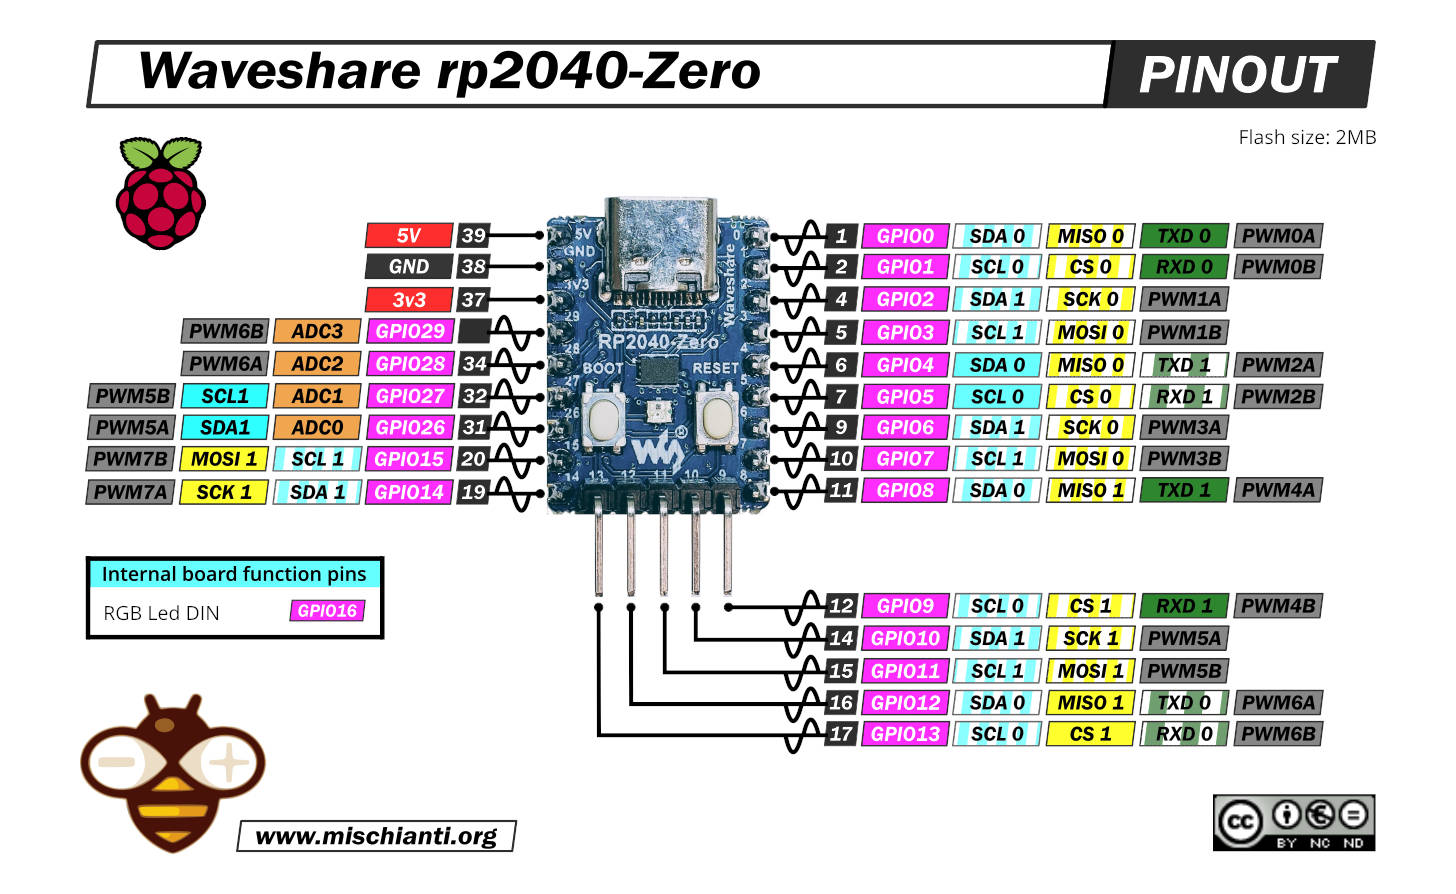
Waveshare rp2040-zero: high-resolution pinout and specs
Arduino IDE configuration
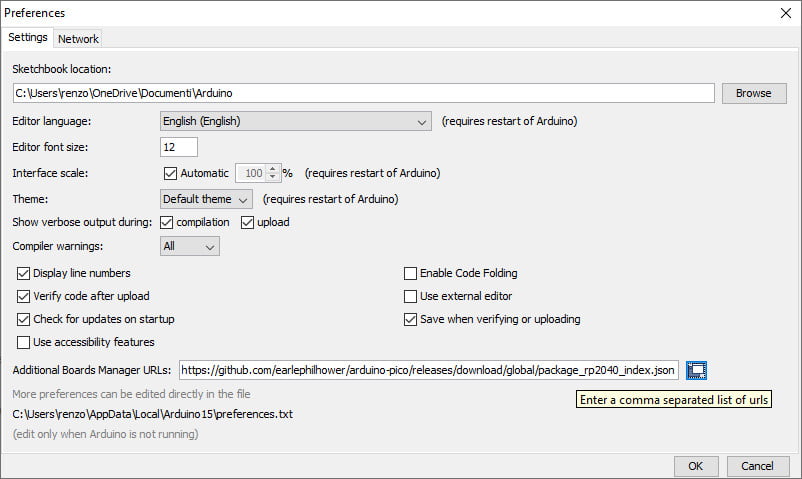
First of all, you must add this URL
https://github.com/earlephilhower/arduino-pico/releases/download/global/package_rp2040_index.json
to your Additional Boards Manager URLs in File --> Preferences.
Now you can go to:Tools --> Boards ... --> Boards manager and search “Pico”.
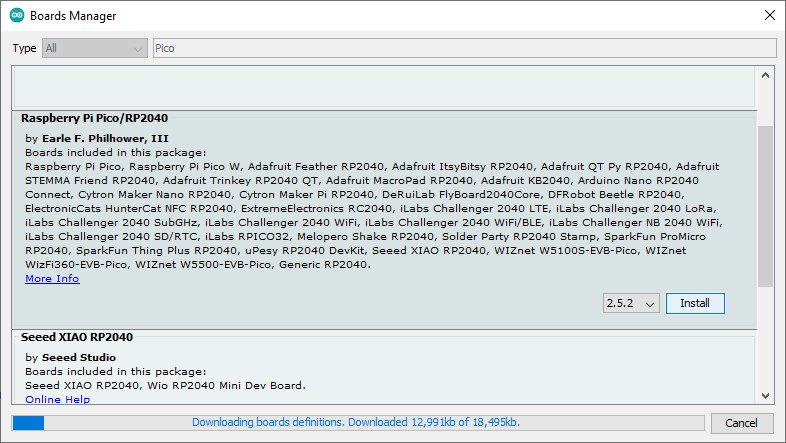
Now you can select your rp2040 board

Arduino IDE board manager alternative
Arduino offer also an alternative to the rp2040 URL manager already see, you can go to:Tools --> Boards ... --> Boards manager and search “mbed rp2040”.

But I discourage that approach. You can have trouble.
Upload mode
A little note about upload mode on Raspberry Pi Pico like devices. For the official boards, you can follow two approaches, for me very tedious.
To enter upload mode, you can:
- disconnect the board and then reconnect It with the button BOOTSEL pushed;
- add a reset button (or use a single wire) like so

Or like so:

The other boards has a built-in reset button, and you must simply do these steps:
- Push the BOOTSEL button;
- Push and release the Reset button;
- Release the BOOTSEL button.
First sketch
Blink sketch for Pi Pico, W, and WeAct rp2040
You can use a standard blink sketch for Raspberry Pi Pico, W, and WeAct Studio rp2040.
// the setup function runs once when you press reset or power the board
void setup() {
  // initialize digital pin LED_BUILTIN as an output.
  pinMode(LED_BUILTIN, OUTPUT);
}

// the loop function runs over and over again forever
void loop() {
  digitalWrite(LED_BUILTIN, HIGH);   // turn the LED on (HIGH is the voltage level)
  delay(1000);                       // wait for a second
  digitalWrite(LED_BUILTIN, LOW);    // turn the LED off by making the voltage LOW
  delay(1000);                       // wait for a second
}
For the official boards, you can select the board from the list.

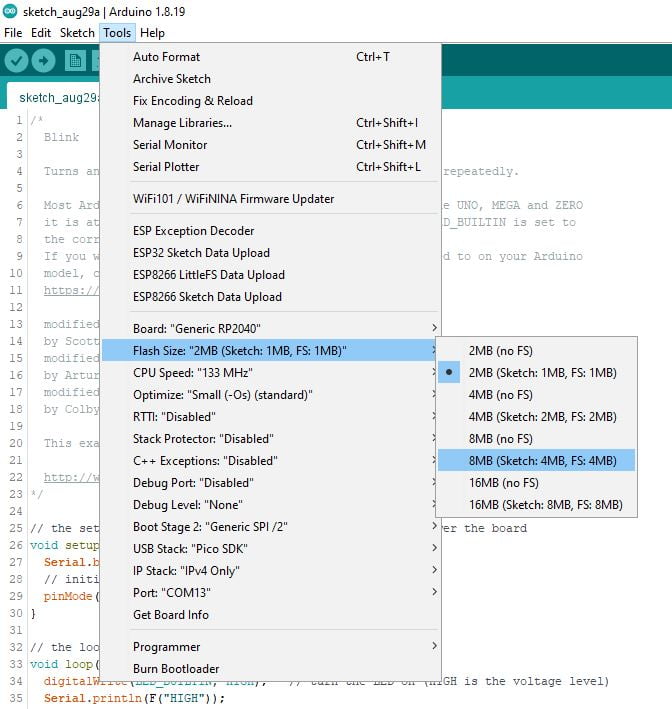
For the WeAct Studio rp2040, if you have only 2Mb of flash, you can select Raspberry Pi Pico board, else you can select a Generic rp2040 board and then the correct flash size.
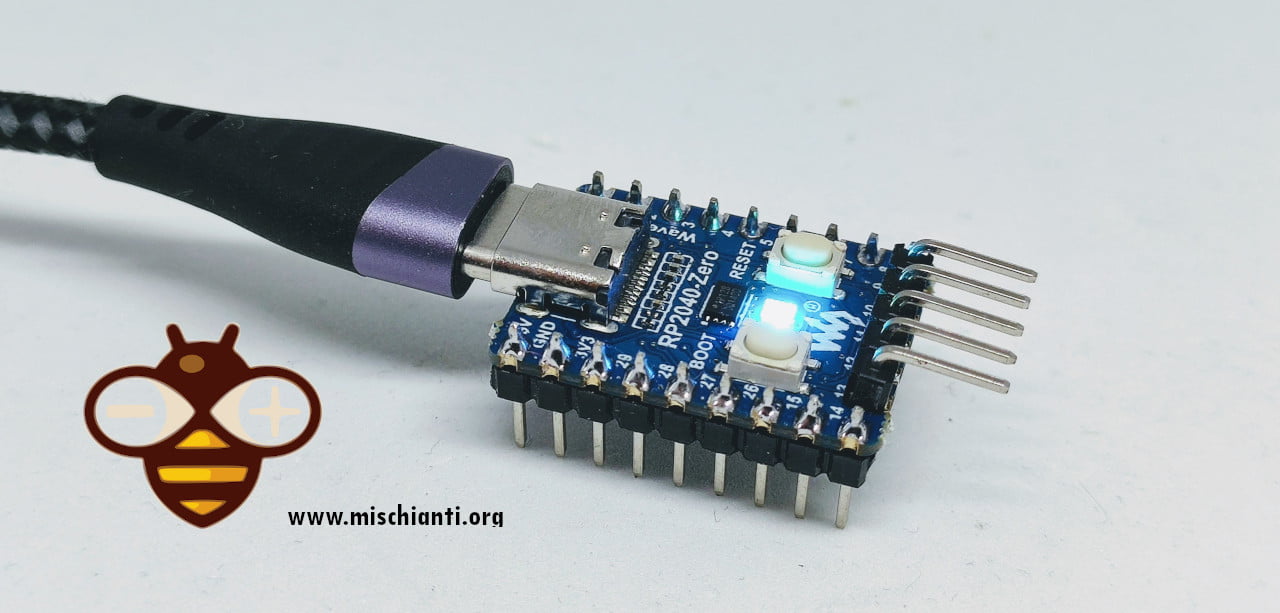
RGB LED on Waveshare rp2040-zero
There is a different situation for Waveshare rp2040-zero that have an RGB led built-in.
Now we are going to manage the addressable RGB led (Addressable RGB LED (WS2812), driven by GPIO16) installed on the board.
You need to install Adafruit_NeoPixel.h library from the libraries manager.
Here is the simple sketch:
/*
 *  Here a simple sketch to test the upload on Waveshare rp2040-zero.
 *  The addressable RGB LED (WS2812), driven by GPIO16 need
 *  Adafruit NeoPixel library
 *  by Mischianti Renzo <https://mischianti.org>
 *
 *  https://mischianti.org/
 *
 */

#include <Adafruit_NeoPixel.h>
#define PIN 16
#define NUMPIXELS 1
Adafruit_NeoPixel pixels(NUMPIXELS, PIN, NEO_GRB + NEO_KHZ800);

enum {NONE, RED, GREEN, BLUE};
int ledColor = NONE;

void setup()
{
  pixels.begin();
}

void loop()
{
  switch (ledColor) {
    case NONE:
      pixels.setPixelColor(0, pixels.Color(0, 0, 0));
      pixels.show();
      break;
    case RED:
      pixels.setPixelColor(0, pixels.Color(20, 0, 0));
      pixels.show();
      break;
    case GREEN:
      pixels.setPixelColor(0, pixels.Color(0, 20, 0));
      pixels.show();
      break;
    case BLUE:
      pixels.setPixelColor(0, pixels.Color(0, 0, 20));
      pixels.show();
      break;
    default:
      break;
  }

  ledColor++;
  if (ledColor == 4) {
    ledColor = NONE;
  }

  delay(1000);
}
And here is the result.
Network test with Raspberry Pi Pico W
I’d like to show the basic scan network sketch for the Raspberry Pi Pico W.
// Simple WiFi network scanner application
// Released to the public domain in 2022 by Earle F. Philhower, III
#include <WiFi.h>

void setup() {
  Serial.begin(115200);
}

const char *macToString(uint8_t mac[6]) {
  static char s[20];
  sprintf(s, "%02X:%02X:%02X:%02X:%02X:%02X", mac[0], mac[1], mac[2], mac[3], mac[4], mac[5]);
  return s;
}

const char *encToString(uint8_t enc) {
  switch (enc) {
    case ENC_TYPE_NONE: return "NONE";
    case ENC_TYPE_TKIP: return "WPA";
    case ENC_TYPE_CCMP: return "WPA2";
    case ENC_TYPE_AUTO: return "AUTO";
  }
  return "UNKN";
}

void loop() {
  delay(5000);
  Serial.printf("Beginning scan at %d\n", millis());
  auto cnt = WiFi.scanNetworks();
  if (!cnt) {
    Serial.printf("No networks found\n");
  } else {
    Serial.printf("Found %d networks\n\n", cnt);
    Serial.printf("%32s %5s %17s %2s %4s\n", "SSID", "ENC", "BSSID        ", "CH", "RSSI");
    for (auto i = 0; i < cnt; i++) {
      uint8_t bssid[6];
      WiFi.BSSID(i, bssid);
      Serial.printf("%32s %5s %17s %2d %4d\n", WiFi.SSID(i), encToString(WiFi.encryptionType(i)), macToString(bssid), WiFi.channel(i), WiFi.RSSI(i));
    }
  }
  Serial.printf("\n--- Sleeping ---\n\n\n");
  delay(5000);
}
And the result is:
Beginning scan at 16543
Found 7 networks

                            SSID   ENC     BSSID         CH RSSI
                reef-casa-centro  WPA2 00:E0:20:74:B4:99  6  -76
                 reef-casa-sotto  AUTO 04:95:E6:81:67:51 11  -82
                    TIM-18355607  WPA2 20:B0:01:18:15:97 11  -82
                 reef-casa-sopra  WPA2 4C:ED:FB:1C:8C:10  1  -44
                   Vodafone-WiFi  NONE 92:16:05:19:3F:D2  2  -92
                  reef-casa-orto  AUTO C8:3A:35:C3:8F:F1  8  -49
                reef-casa-centro  WPA2 F0:B0:14:79:6D:70  6  -62

--- Sleeping ---
Thanks
- Raspberry Pi Pico and rp2040 boards: pinout, specs, and Arduino IDE configuration
- Raspberry Pi Pico and rp2040 boards: integrated LittleFS filesystem
- Raspberry Pi Pico and rp2040 board: ethernet w5500 with plain (HTTP) and SSL (HTTPS) requests
- Raspberry Pi Pico and rp2040 boards: WiFiNINA with ESP32 WiFi Co-Processor
- Raspberry Pi Pico and rp2040 boards: how to use SD card
- Dallas ds18b20
- Connecting the EByte E70 to Raspberry Pi Pico (rp2040) devices and a simple sketch example


