
Raspberry Pi Pico and rp2040 board: ethernet w5500 with plain (HTTP) and SSL (HTTPS) requests
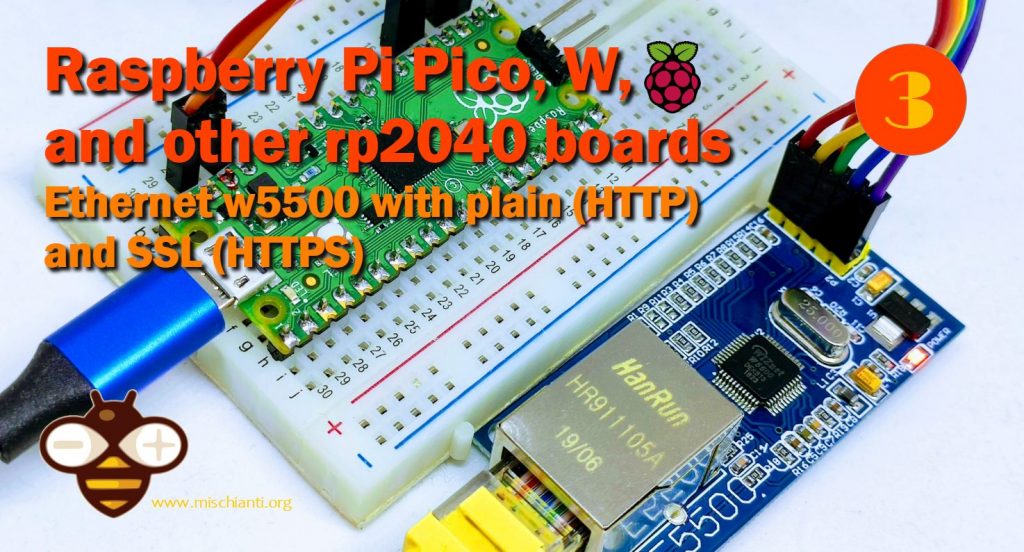
In this article, we are going to explore the w5500 module with our rp2040 boards. w5500 is a quite powerful device that allows a wired connection.
We will also try to give a solution to a tedious problem: the device does not provide an SSL connection, and in a trusted world like this, It’s another big limit, fortunately, OPEnS developed a wrapper that contains in one packet all BearSSL implementation, and this, with a quiet amount of resources, allows standard Arduino Ethernet to use secure connections.
Devices
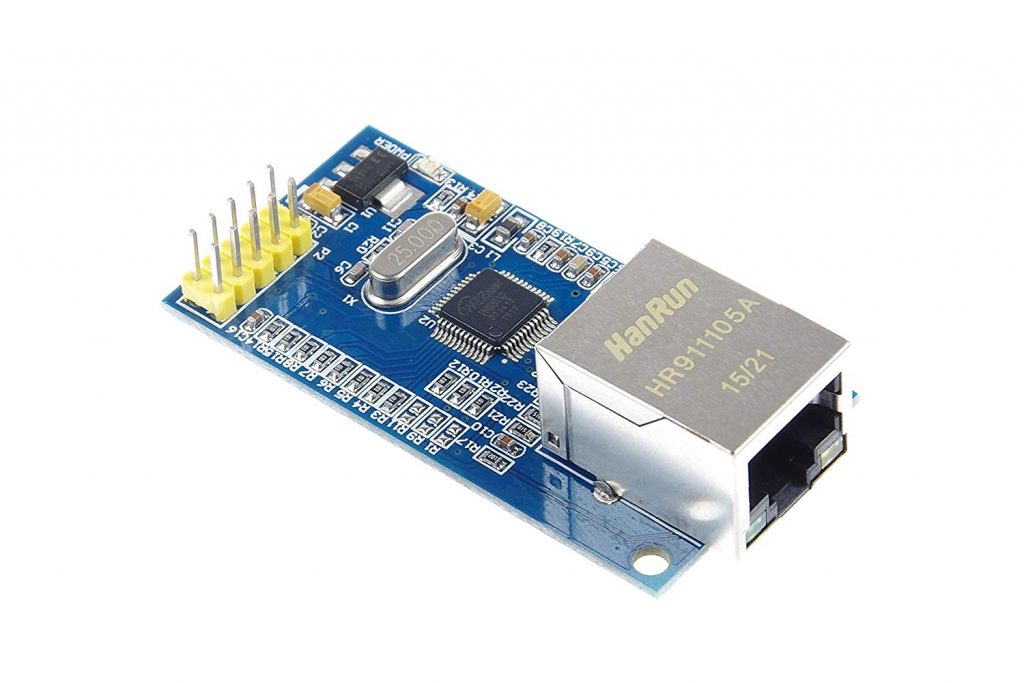
The W5500 chip is a Hardwired TCP/IP embedded Ethernet controller that provides an easier Internet connection to embedded systems. W5500 enables users to have Internet connectivity in their applications just by using the single chip in which TCP/IP stack, 10/100 Ethernet MAC, and PHY are embedded.
WIZnet‘s Hardwired TCP/IP supporting TCP, UDP, IPv4, ICMP, ARP, IGMP, and PPPoE protocols. W5500 embeds the 32Kbyte internal memory buffer for the Ethernet packet processing. If you use W5500, you can implement the Ethernet application by adding a simple socket program. It’s a faster and easier way rather than using any other Embedded Ethernet solution. Users can use eight independent hardware sockets simultaneously.
SPI (Serial Peripheral Interface) is provided for easy integration with the external MCU. The W5500’s SPI supports 80 MHz speed and a new efficient SPI protocol for high-speed network communication. To reduce the system’s power consumption, W5500 provides WOL (Wake on LAN) and power-down mode.
Features
- Supports Hardwired TCP/IP Protocols: TCP, UDP, ICMP, IPv4, ARP, IGMP, PPPoE
- Supports 8 independent sockets simultaneously
- Supports Power-down mode
- Supports Wake on LAN over UDP
- Supports High-Speed Serial Peripheral Interface(SPI MODE 0, 3)
- Internal 32Kbytes Memory for TX/RX Buffers
- 10BaseT/100BaseTX Ethernet PHY embedded
- Supports Auto-Negotiation (Full and half-duplex, 10 and 100-based )
- Not supports IP Fragmentation
- 3.3V operation with 5V I/O signal tolerance
- LED outputs (Full/Half duplex, Link, Speed, Active)
- 48 Pin LQFP Lead-Free Package (7x7mm, 0.5mm pitch)
There is a wide series of w5500 devices, but the most popular are 2 in particular.
The less expensive one is the w5500 that you can see in the photo.
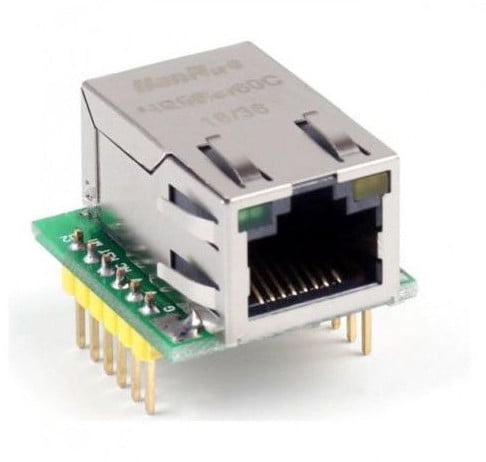
But now there is a compact version named w5500 lite, very interesting as a device for production.
Here my selection of tested ethernet devices w5500 lite - w5500 - enc26j60 mini - enc26j60 - lan8720
Wiring
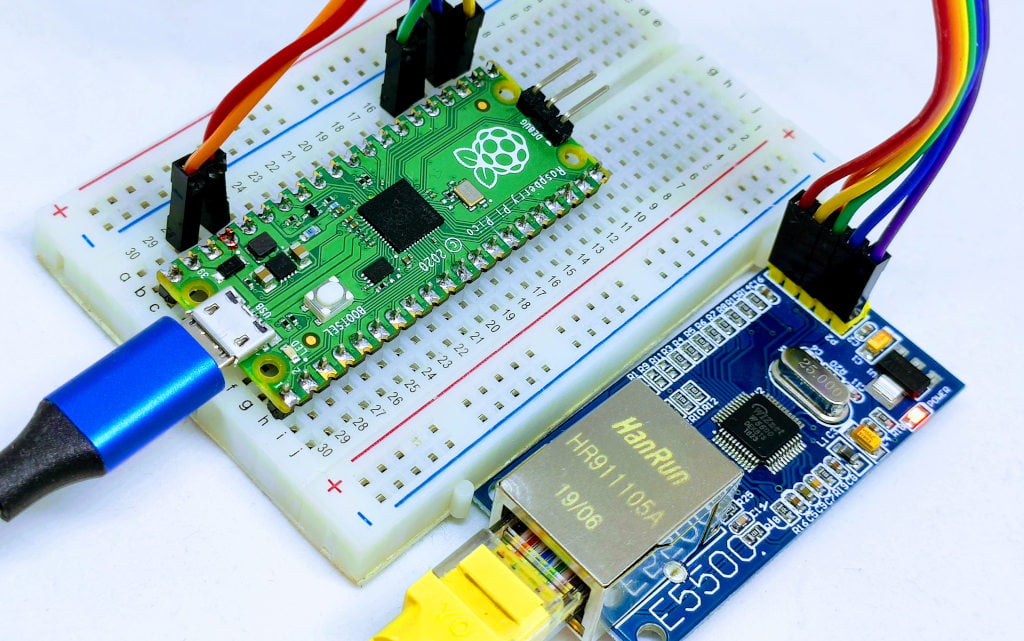
Here my selection of rp2040 boards Official Pi Pico - Official Pi Pico W - Waveshare rp2040-zero - WeAct Studio rp2040
This device uses an SPI interface; by default, I will use a base SPI interface.
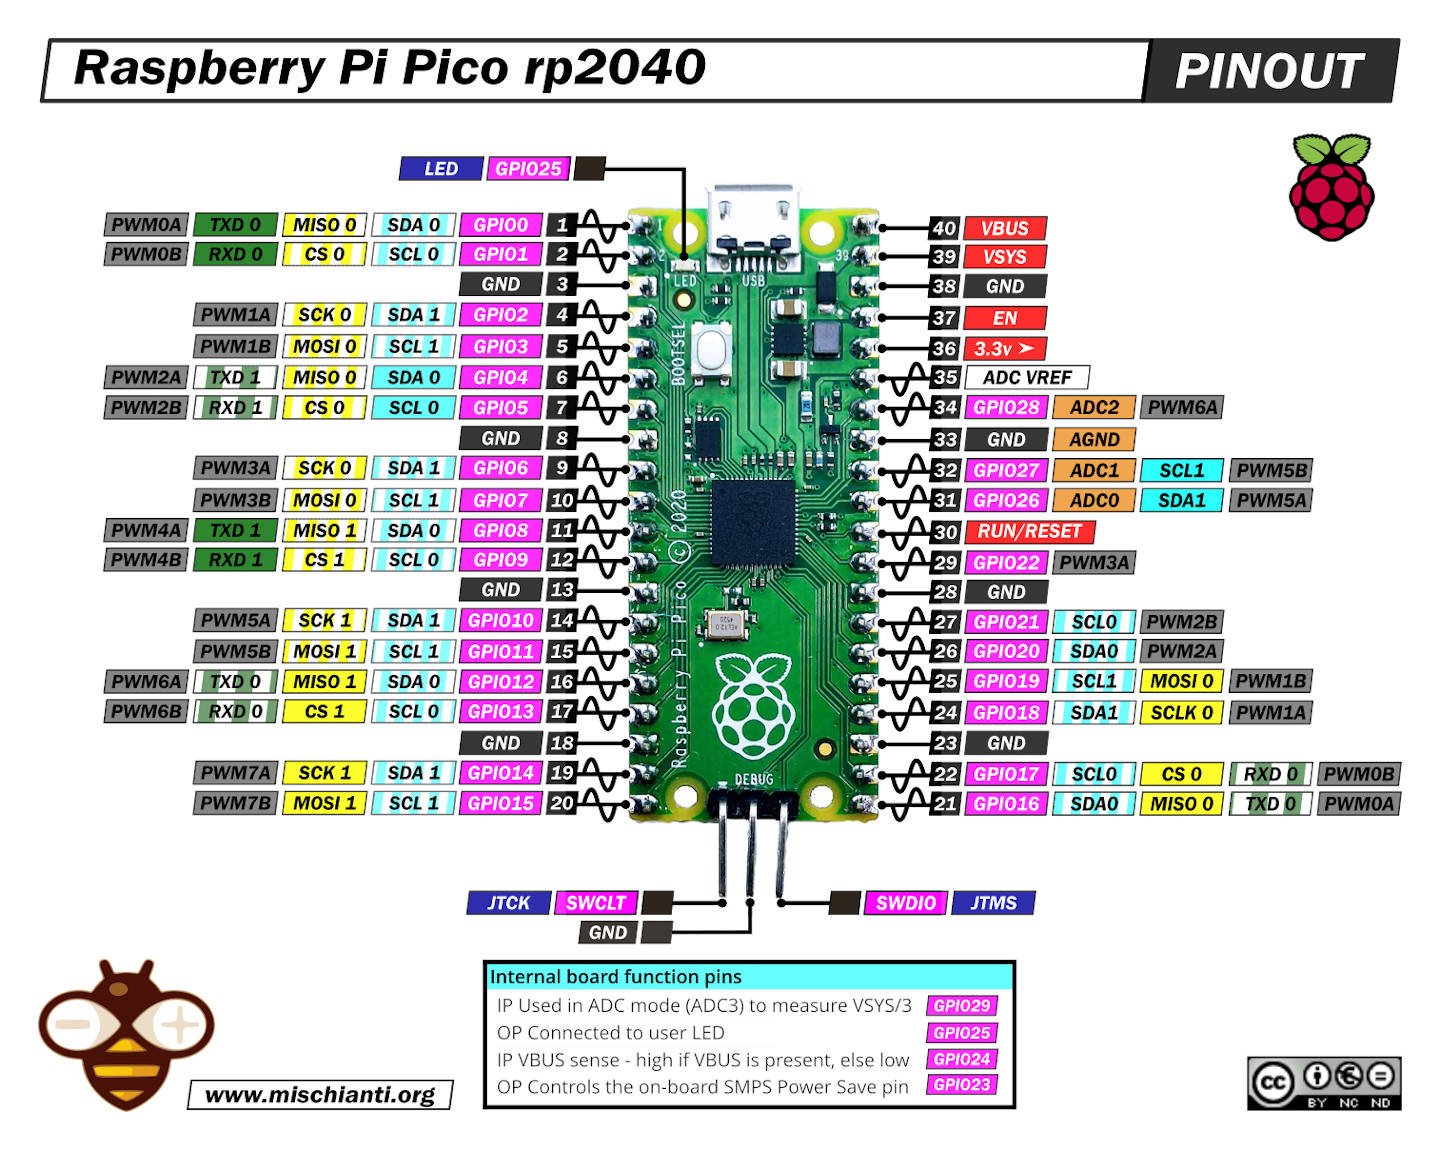
Raspberry Pi Pico
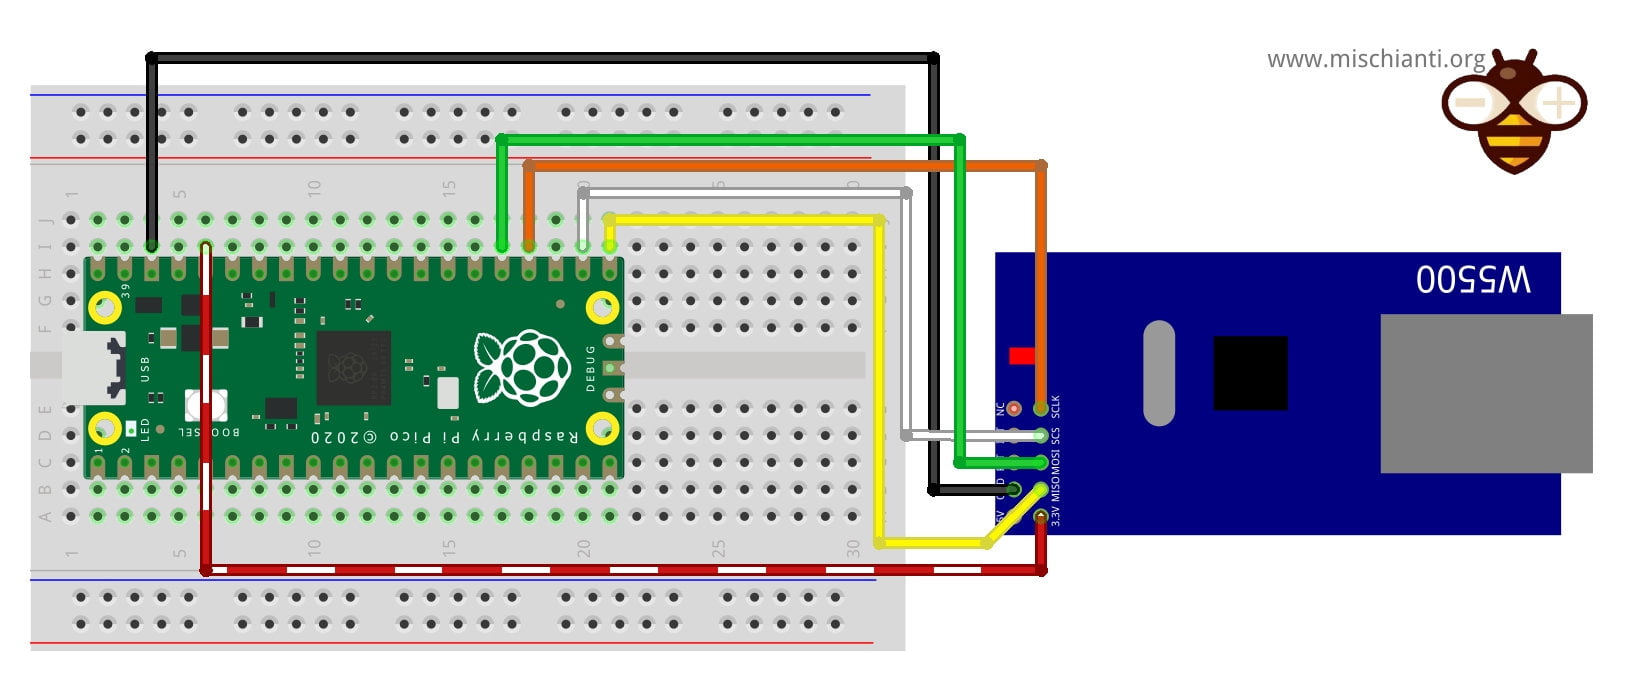
| Pico | w5500 |
|---|---|
| 17 | CS |
| 18 | SCK |
| 16 | MISO |
| 19 | MOSI |
| 3.3v (need >150mha) | VCC |
| GND | GND |
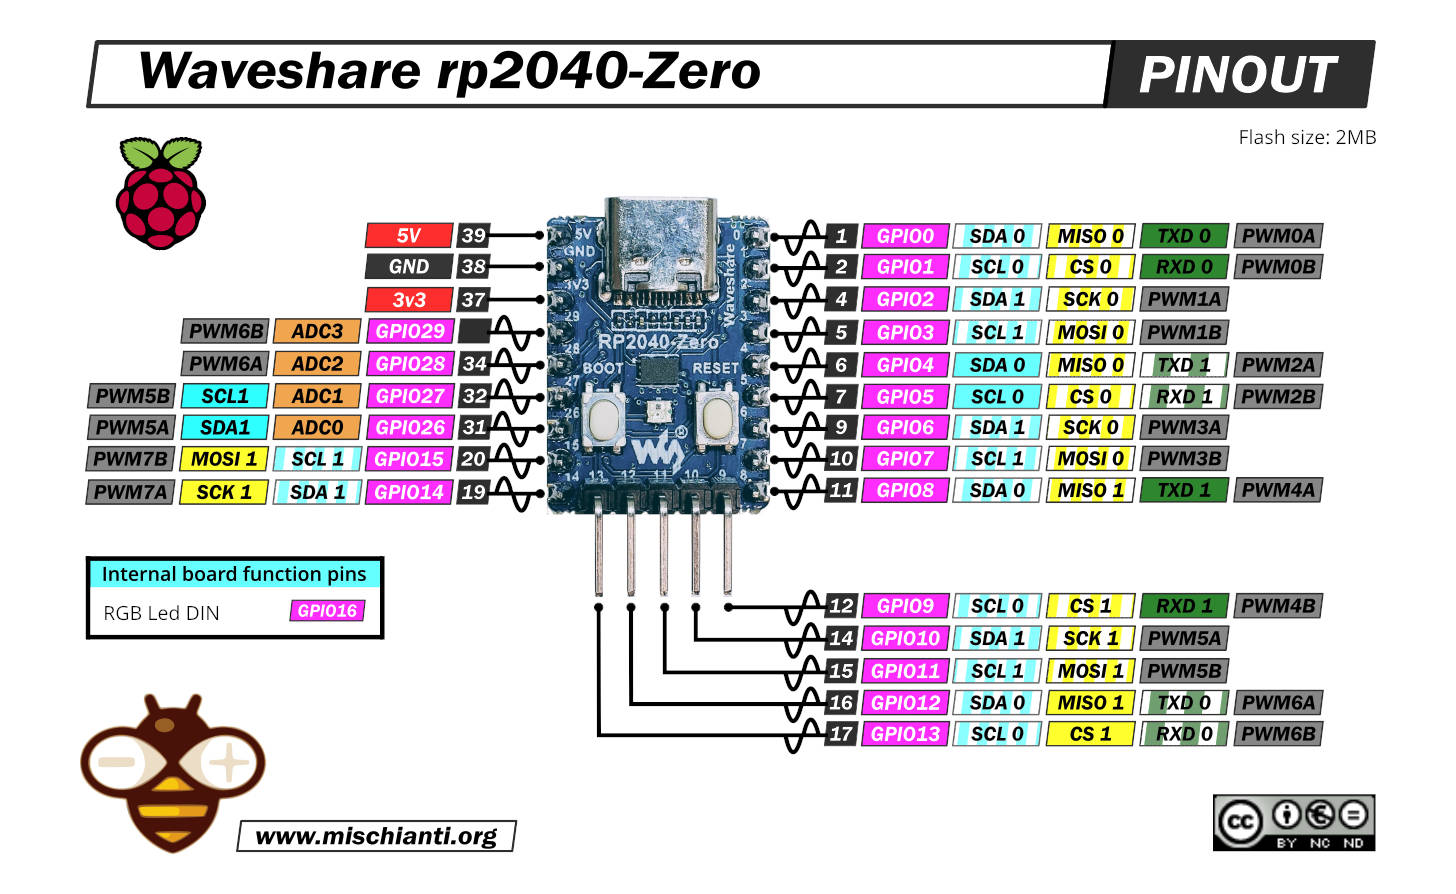
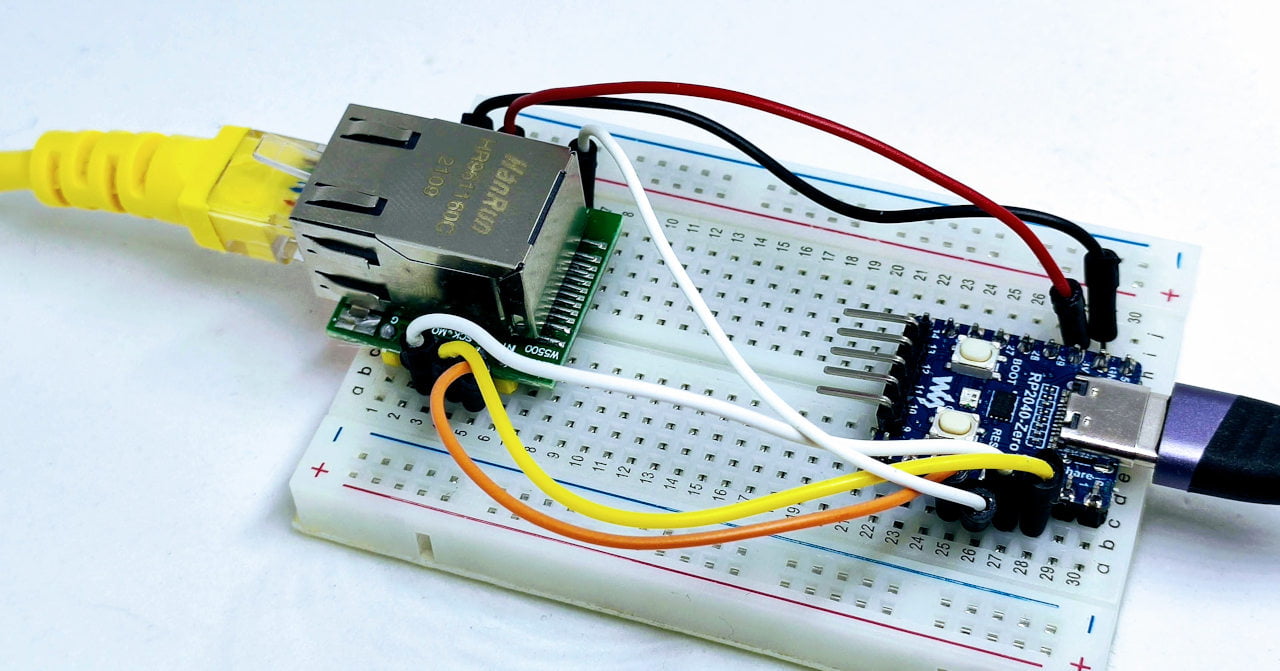
Waveshare rp2040-zero
Remember that the wiring for this device is based on a tutorial that you can find here.
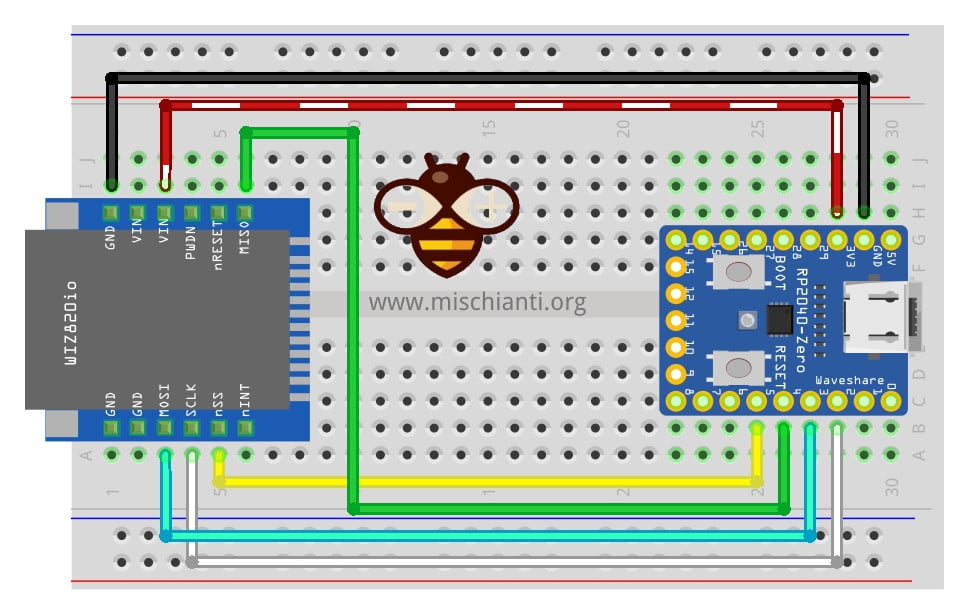
| rp2040-zero | w5500 |
|---|---|
| 5 | CS |
| 2 | SCK |
| 4 | MISO |
| 3 | MOSI |
| 3.3v (need >150mha) | VCC |
| GND | GND |
Library
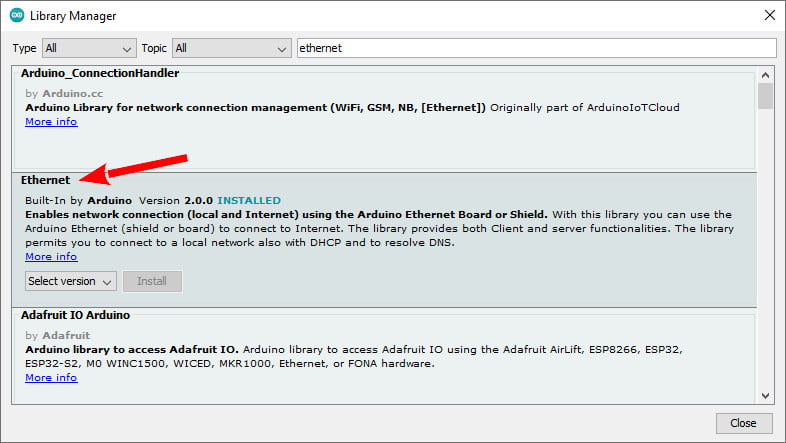
A wide selection of libraries exists, but the standard one Is the best choice. You can find It in the standard Arduino library manager.
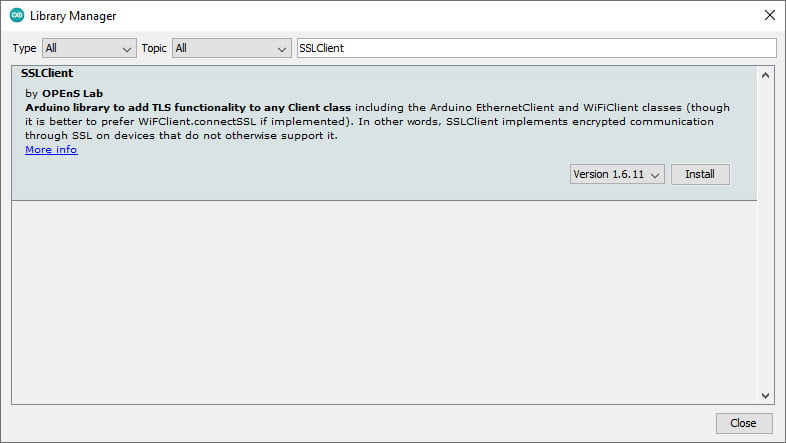
SSLClient
This library and device do not support SSL, so to add these features exists an alternate library named SSLClient that needs a little patch of Ethernet.
SSLClient adds TLS 1.2 functionality to any network library implementing the Arduino Client interface, including the Arduino EthernetClient and WiFiClient classes. SSLClient was created to integrate TLS seamlessly with the Arduino infrastructure using BearSSL as an underlying TLS engine. Unlike ArduinoBearSSL, SSLClient is entirely self-contained and does not require any additional hardware (other than a network connection). (cit.)
SSLClient with Ethernet
If you are using the Arduino Ethernet library, you will need to modify the library to support the large buffer sizes required by SSL (detailed in resources). You can either modify the library yourself or use this fork of the Ethernet library with the modification. To use the fork: download a zipped copy of the fork through GitHub, use the “add a .zip library” button in Arduino to install the library, and replace #include "Ethernet.h" it with #include "EthernetLarge.h" in your sketch. Alternatively, if, for some reason, this solution does not work, you can apply the modification manually using the instructions below.
Buffer extension
I also notice that you probably must change something to get good stability.
In SSLClient.h you must change this line.
unsigned char m_iobuf[2048];
to
unsigned char m_iobuf[BR_SSL_BUFSIZE_BIDI];
Manual Modification
First, find the location of the library in the directory where Arduino is installed (C:\Program Files (x86)\Arduino on Windows). Inside this directory, navigate to libraries\Ethernet\src (C:\Program Files (x86)\Arduino\libraries\Ethernet\src on Windows). Modify Ethernet.h to replace these lines:
...
// Configure the maximum number of sockets to support.  W5100 chips can have
// up to 4 sockets.  W5200 & W5500 can have up to 8 sockets.  Several bytes
// of RAM are used for each socket.  Reducing the maximum can save RAM, but
// you are limited to fewer simultaneous connections.
#if defined(RAMEND) && defined(RAMSTART) && ((RAMEND - RAMSTART) <= 2048)
#define MAX_SOCK_NUM 4
#else
#define MAX_SOCK_NUM 8
#endif

// By default, each socket uses 2K buffers inside the Wiznet chip.  If
// MAX_SOCK_NUM is set to fewer than the chip's maximum, uncommenting
// this will use larger buffers within the Wiznet chip.  Large buffers
// can really help with UDP protocols like Artnet.  In theory larger
// buffers should allow faster TCP over high-latency links, but this
// does not always seem to work in practice (maybe Wiznet bugs?)
//#define ETHERNET_LARGE_BUFFERS
...
With this:
...
// Configure the maximum number of sockets to support.  W5100 chips can have
// up to 4 sockets.  W5200 & W5500 can have up to 8 sockets.  Several bytes
// of RAM are used for each socket.  Reducing the maximum can save RAM, but
// you are limited to fewer simultaneous connections.
#define MAX_SOCK_NUM 2

// By default, each socket uses 2K buffers inside the Wiznet chip.  If
// MAX_SOCK_NUM is set to fewer than the chip's maximum, uncommenting
// this will use larger buffers within the Wiznet chip.  Large buffers
// can really help with UDP protocols like Artnet.  In theory larger
// buffers should allow faster TCP over high-latency links, but this
// does not always seem to work in practice (maybe Wiznet bugs?)
#define ETHERNET_LARGE_BUFFERS
...
You may need to use sudo or administrator permissions to make this modification. We change MAX_SOCK_NUM and ETHERNET_LARGE_BUFFERS so the Ethernet hardware can allocate a larger space for SSLClient. However, a downside of this modification is that we can only have two sockets concurrently. As most microprocessors barely have enough memory for one SSL connection, this limitation will rarely be encountered in practice.
Code
Now we try to do a simple WebRequest with a native client.
But first, we write the code needed for the connection, we try to ask the IP to the DHCP server, and if It fails, we start a connection with a static IP.
Initialize device
Ethernet uses the default SPI interface default, so first, we must set the correct SS pin (probably not needed).
    // You can use Ethernet.init(pin) to configure the CS pin
    //Ethernet.init(10);  // Most Arduino shields
    // Ethernet.init(5);   // MKR ETH Shield
    //Ethernet.init(0);   // Teensy 2.0
    //Ethernet.init(20);  // Teensy++ 2.0
    //Ethernet.init(15);  // ESP8266 with Adafruit FeatherWing Ethernet
    //Ethernet.init(33);  // ESP32 with Adafruit FeatherWing Ethernet
    // Ethernet.init(PA4); // STM32 with w5500
    Ethernet.init(5); // Raspberry Pi Pico with w5500
You must specify a MAC address also.
// Enter a MAC address for your controller below.
// Newer Ethernet shields have a MAC address printed on a sticker on the shield
byte mac[] = { 0xDE, 0xAD, 0xBE, 0xEF, 0xFE, 0xED };
Then we try to make a DHCP request.
    if (Ethernet.begin(mac)) { // Dynamic IP setup
        Serial.println("DHCP OK!");
    }
But If it fails, we try to make a static IP connection with these parameters
// Set the static IP address to use if the DHCP fails to assign
#define MYIPADDR 192,168,1,28
#define MYIPMASK 255,255,255,0
#define MYDNS 192,168,1,1
#define MYGW 192,168,1,1
and here is the connection code
		Serial.println("Failed to configure Ethernet using DHCP");
		// Check for Ethernet hardware present
		if (Ethernet.hardwareStatus() == EthernetNoHardware) {
			Serial.println(
					"Ethernet shield was not found.  Sorry, can't run without hardware. :(");
			while (true) {
				delay(1); // do nothing, no point running without Ethernet hardware
			}
		}
		if (Ethernet.linkStatus() == LinkOFF) {
			Serial.println("Ethernet cable is not connected.");
		}

		IPAddress ip(MYIPADDR);
		IPAddress dns(MYDNS);
		IPAddress gw(MYGW);
		IPAddress sn(MYIPMASK);
		Ethernet.begin(mac, ip, dns, gw, sn);
		Serial.println("STATIC OK!");
Simple HTTP request
First of all, we’ll try to make a simple HTTP request. I chose an online service created to test this kind of request.
I’m going to use a simple service given from httpbin.org, and you can use the same REST API in HTTP and HTTPS.
Remember that HTTP work on port 80 and HTTPS on 443, so you must validate a certificate to query the endpoint on the 443 port.
To make our connection, we use the basic EthernetClient.
// Initialize the Ethernet client library
// with the IP address and port of the server
// that you want to connect to (port 80 is default for HTTP):
EthernetClient client;
And then, we try to connect and ask for a GET endpoint.
  // if you get a connection, report back via serial:
  if (client.connect(server, 80)) {
    Serial.println("Connected!");
    // Make a HTTP request:
    client.println("GET /get HTTP/1.1");
    client.println("Host: httpbin.org");
    client.println("Connection: close");
    client.println();
  } else {
    // if you didn't get a connection to the server:
    Serial.println("connection failed");
  }
In the loop, wait for a response from the server.
  // if there are incoming bytes available
  // from the server, read them and print them:
  int len = client.available();
And then read the response and send it to the serial.
  if (len > 0) {
    byte buffer[80];
    if (len > 80) len = 80;
    client.read(buffer, len);
    if (printWebData) {
      Serial.write(buffer, len); // show in the serial monitor (slows some boards)
    }
    byteCount = byteCount + len;
  }

  // if the server's disconnected, stop the client:
  if (!client.connected()) {
    endMicros = micros();
    Serial.println();
    Serial.println("disconnecting.");
    client.stop();
    Serial.print("Received ");
    Serial.print(byteCount);
    Serial.print(" bytes in ");
    float seconds = (float)(endMicros - beginMicros) / 1000000.0;
    Serial.print(seconds, 4);
    float rate = (float)byteCount / seconds / 1000.0;
    Serial.print(", rate = ");
    Serial.print(rate);
    Serial.print(" kbytes/second");
    Serial.println();

    // do nothing forevermore:
    while (true) {
      delay(1);
    }
  }
And finally, the complete sketch.
/*
 Web client Raspberry Pi Pico (or other rp2040 boards)
 and Arduino Ethernet library

 This sketch connects to a test website (httpbin.org)
 and try to do a GET request, the output is printed
 on Serial

 by Renzo Mischianti <www.mischianti.org>

 https://www.mischianti.org

 */

#include <SPI.h>
#include <Ethernet.h>

// if you don't want to use DNS (and reduce your sketch size)
// use the numeric IP instead of the name for the server:
//IPAddress server(74,125,232,128);  // numeric IP for Google (no DNS)
//char server[] = "www.google.com";    // name address for Google (using DNS)
char server[] = "httpbin.org";    // name address for Google (using DNS)

// Enter a MAC address for your controller below.
// Newer Ethernet shields have a MAC address printed on a sticker on the shield
byte mac[] = { 0xDE, 0xAD, 0xBE, 0xEF, 0xFE, 0xED };

// Set the static IP address to use if the DHCP fails to assign
#define MYIPADDR 192,168,1,28
#define MYIPMASK 255,255,255,0
#define MYDNS 192,168,1,1
#define MYGW 192,168,1,1

// Initialize the Ethernet client library
// with the IP address and port of the server
// that you want to connect to (port 80 is default for HTTP):
EthernetClient client;

// Variables to measure the speed
unsigned long beginMicros, endMicros;
unsigned long byteCount = 0;
bool printWebData = true;  // set to false for better speed measurement

void setup() {
    Serial.begin(115200);

    while (!Serial) {delay(100);};

    Serial.println("Begin Ethernet");

    // You can use Ethernet.init(pin) to configure the CS pin
    //Ethernet.init(10);  // Most Arduino shields
    // Ethernet.init(5);   // MKR ETH Shield
    //Ethernet.init(0);   // Teensy 2.0
    //Ethernet.init(20);  // Teensy++ 2.0
    //Ethernet.init(15);  // ESP8266 with Adafruit FeatherWing Ethernet
    //Ethernet.init(33);  // ESP32 with Adafruit FeatherWing Ethernet
    // Ethernet.init(PA4); // STM32 with w5500
    Ethernet.init(17); // Raspberry Pi Pico with w5500

    if (Ethernet.begin(mac)) { // Dynamic IP setup
        Serial.println("DHCP OK!");
    }else{
        Serial.println("Failed to configure Ethernet using DHCP");
        // Check for Ethernet hardware present
        if (Ethernet.hardwareStatus() == EthernetNoHardware) {
          Serial.println("Ethernet shield was not found.  Sorry, can't run without hardware. :(");
          while (true) {
            delay(1); // do nothing, no point running without Ethernet hardware
          }
        }
        if (Ethernet.linkStatus() == LinkOFF) {
          Serial.println("Ethernet cable is not connected.");
        }

          IPAddress ip(MYIPADDR);
          IPAddress dns(MYDNS);
          IPAddress gw(MYGW);
          IPAddress sn(MYIPMASK);
          Ethernet.begin(mac, ip, dns, gw, sn);
          Serial.println("STATIC OK!");
    }
    delay(5000);


    Serial.print("Local IP : ");
    Serial.println(Ethernet.localIP());
    Serial.print("Subnet Mask : ");
    Serial.println(Ethernet.subnetMask());
    Serial.print("Gateway IP : ");
    Serial.println(Ethernet.gatewayIP());
    Serial.print("DNS Server : ");
    Serial.println(Ethernet.dnsServerIP());

   Serial.println("Ethernet Successfully Initialized");
  // if you get a connection, report back via serial:
  if (client.connect(server, 80)) {
    Serial.println("Connected!");
    // Make a HTTP request:
    client.println("GET /get HTTP/1.1");
    client.println("Host: httpbin.org");
    client.println("Connection: close");
    client.println();
  } else {
    // if you didn't get a connection to the server:
    Serial.println("connection failed");
  }
  beginMicros = micros();
}

void loop() {
  // if there are incoming bytes available
  // from the server, read them and print them:
  int len = client.available();
  if (len > 0) {
    byte buffer[80];
    if (len > 80) len = 80;
    client.read(buffer, len);
    if (printWebData) {
      Serial.write(buffer, len); // show in the serial monitor (slows some boards)
    }
    byteCount = byteCount + len;
  }

  // if the server's disconnected, stop the client:
  if (!client.connected()) {
    endMicros = micros();
    Serial.println();
    Serial.println("disconnecting.");
    client.stop();
    Serial.print("Received ");
    Serial.print(byteCount);
    Serial.print(" bytes in ");
    float seconds = (float)(endMicros - beginMicros) / 1000000.0;
    Serial.print(seconds, 4);
    float rate = (float)byteCount / seconds / 1000.0;
    Serial.print(", rate = ");
    Serial.print(rate);
    Serial.print(" kbytes/second");
    Serial.println();

    // do nothing forevermore:
    while (true) {
      delay(1);
    }
  }
}
The result is this.
Begin Ethernet
DHCP OK!
Local IP : 192.168.1.135
Subnet Mask : 255.255.255.0
Gateway IP : 192.168.1.1
DNS Server : 192.168.1.1
Ethernet Successfully Initialized
Connected!
HTTP/1.1 200 OK
Date: Fri, 16 Sep 2022 07:55:39 GMT
Content-Type: application/json
Content-Length: 198
Connection: close
Server: gunicorn/19.9.0
Access-Control-Allow-Origin: *
Access-Control-Allow-Credentials: true

{
  "args": {},
  "headers": {
    "Host": "httpbin.org",
    "X-Amzn-Trace-Id": "Root=1-63242bfb-38329e827b4986891d437152"
  },
  "origin": "82.53.128.115",
  "url": "http://httpbin.org/get"
}

disconnecting.
Received 423 bytes in 0.1096, rate = 3.86 kbytes/second
HTTPS request
Now, if we change the endpoint to port 443, the request will be to a secure server with SSL encryption.
  if (client.connect(server, 443)) {
    Serial.println("Connected!");
    // Make a HTTP request:
    client.println("GET /get HTTP/1.1");
    client.println("Host: httpbin.org");
    client.println("Connection: close");
    client.println();
  } else {
    // if you didn't get a connection to the server:
    Serial.println("connection failed");
  }
And we obtain this response.
Begin Ethernet
DHCP OK!
Local IP : 192.168.1.135
Subnet Mask : 255.255.255.0
Gateway IP : 192.168.1.1
DNS Server : 192.168.1.1
Ethernet Successfully Initialized
Connected!
HTTP/1.1 400 Bad Request
Server: awselb/2.0
Date: Fri, 16 Sep 2022 10:39:46 GMT
Content-Type: text/html
Content-Length: 220
Connection: close

<html>
<head><title>400 The plain HTTP request was sent to HTTPS port</title></head>
<body>
<center><h1>400 Bad Request</h1></center>
<center>The plain HTTP request was sent to HTTPS port</center>
</body>
</html>

disconnecting.
Received 370 bytes in 0.1078, rate = 3.43 kbytes/second
So the problem is that request and response messages aren’t transmitted using SSL (Secure Sockets Layer) or its successor TLS (Transport Layer Security). To add this feature, we are going to use SSLClient.
Retrieve certificate
To use an SSL connection, we need the server certificate, but in this case, SSLClient uses a trick given by BearSSL implementation. A minimal x509 verification engine that allows using of Trust Anchors.
I add a simple online generator that you can find here.
You must only write the site’s address (httpbin.org) in the first input box, click Generate code, copy the code, and put it inside a file called trust_anchors.h and put it inside the sketch folder.
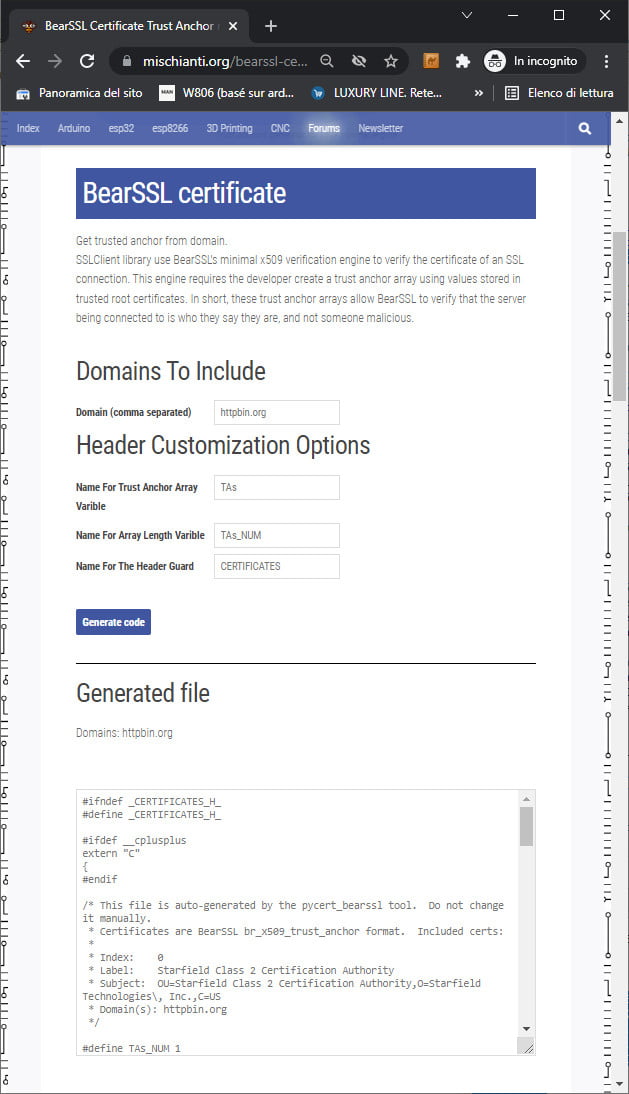
Here is the content of trust_anchors.h.
#ifndef _CERTIFICATES_H_
#define _CERTIFICATES_H_

#ifdef __cplusplus
extern "C"
{
#endif

/* This file is auto-generated by the pycert_bearssl tool.  Do not change it manually.
 * Certificates are BearSSL br_x509_trust_anchor format.  Included certs:
 *
 * Index:    0
 * Label:    Starfield Class 2 Certification Authority
 * Subject:  OU=Starfield Class 2 Certification Authority,O=Starfield Technologies\, Inc.,C=US
 * Domain(s): httpbin.org
 */

#define TAs_NUM 1

static const unsigned char TA_DN0[] = {
    0x30, 0x68, 0x31, 0x0b, 0x30, 0x09, 0x06, 0x03, 0x55, 0x04, 0x06, 0x13,
    0x02, 0x55, 0x53, 0x31, 0x25, 0x30, 0x23, 0x06, 0x03, 0x55, 0x04, 0x0a,
    0x13, 0x1c, 0x53, 0x74, 0x61, 0x72, 0x66, 0x69, 0x65, 0x6c, 0x64, 0x20,
    0x54, 0x65, 0x63, 0x68, 0x6e, 0x6f, 0x6c, 0x6f, 0x67, 0x69, 0x65, 0x73,
    0x2c, 0x20, 0x49, 0x6e, 0x63, 0x2e, 0x31, 0x32, 0x30, 0x30, 0x06, 0x03,
    0x55, 0x04, 0x0b, 0x13, 0x29, 0x53, 0x74, 0x61, 0x72, 0x66, 0x69, 0x65,
    0x6c, 0x64, 0x20, 0x43, 0x6c, 0x61, 0x73, 0x73, 0x20, 0x32, 0x20, 0x43,
    0x65, 0x72, 0x74, 0x69, 0x66, 0x69, 0x63, 0x61, 0x74, 0x69, 0x6f, 0x6e,
    0x20, 0x41, 0x75, 0x74, 0x68, 0x6f, 0x72, 0x69, 0x74, 0x79,
};

static const unsigned char TA_RSA_N0[] = {
    0xb7, 0x32, 0xc8, 0xfe, 0xe9, 0x71, 0xa6, 0x04, 0x85, 0xad, 0x0c, 0x11,
    0x64, 0xdf, 0xce, 0x4d, 0xef, 0xc8, 0x03, 0x18, 0x87, 0x3f, 0xa1, 0xab,
    0xfb, 0x3c, 0xa6, 0x9f, 0xf0, 0xc3, 0xa1, 0xda, 0xd4, 0xd8, 0x6e, 0x2b,
    0x53, 0x90, 0xfb, 0x24, 0xa4, 0x3e, 0x84, 0xf0, 0x9e, 0xe8, 0x5f, 0xec,
    0xe5, 0x27, 0x44, 0xf5, 0x28, 0xa6, 0x3f, 0x7b, 0xde, 0xe0, 0x2a, 0xf0,
    0xc8, 0xaf, 0x53, 0x2f, 0x9e, 0xca, 0x05, 0x01, 0x93, 0x1e, 0x8f, 0x66,
    0x1c, 0x39, 0xa7, 0x4d, 0xfa, 0x5a, 0xb6, 0x73, 0x04, 0x25, 0x66, 0xeb,
    0x77, 0x7f, 0xe7, 0x59, 0xc6, 0x4a, 0x99, 0x25, 0x14, 0x54, 0xeb, 0x26,
    0xc7, 0xf3, 0x7f, 0x19, 0xd5, 0x30, 0x70, 0x8f, 0xaf, 0xb0, 0x46, 0x2a,
    0xff, 0xad, 0xeb, 0x29, 0xed, 0xd7, 0x9f, 0xaa, 0x04, 0x87, 0xa3, 0xd4,
    0xf9, 0x89, 0xa5, 0x34, 0x5f, 0xdb, 0x43, 0x91, 0x82, 0x36, 0xd9, 0x66,
    0x3c, 0xb1, 0xb8, 0xb9, 0x82, 0xfd, 0x9c, 0x3a, 0x3e, 0x10, 0xc8, 0x3b,
    0xef, 0x06, 0x65, 0x66, 0x7a, 0x9b, 0x19, 0x18, 0x3d, 0xff, 0x71, 0x51,
    0x3c, 0x30, 0x2e, 0x5f, 0xbe, 0x3d, 0x77, 0x73, 0xb2, 0x5d, 0x06, 0x6c,
    0xc3, 0x23, 0x56, 0x9a, 0x2b, 0x85, 0x26, 0x92, 0x1c, 0xa7, 0x02, 0xb3,
    0xe4, 0x3f, 0x0d, 0xaf, 0x08, 0x79, 0x82, 0xb8, 0x36, 0x3d, 0xea, 0x9c,
    0xd3, 0x35, 0xb3, 0xbc, 0x69, 0xca, 0xf5, 0xcc, 0x9d, 0xe8, 0xfd, 0x64,
    0x8d, 0x17, 0x80, 0x33, 0x6e, 0x5e, 0x4a, 0x5d, 0x99, 0xc9, 0x1e, 0x87,
    0xb4, 0x9d, 0x1a, 0xc0, 0xd5, 0x6e, 0x13, 0x35, 0x23, 0x5e, 0xdf, 0x9b,
    0x5f, 0x3d, 0xef, 0xd6, 0xf7, 0x76, 0xc2, 0xea, 0x3e, 0xbb, 0x78, 0x0d,
    0x1c, 0x42, 0x67, 0x6b, 0x04, 0xd8, 0xf8, 0xd6, 0xda, 0x6f, 0x8b, 0xf2,
    0x44, 0xa0, 0x01, 0xab,
};

static const unsigned char TA_RSA_E0[] = {
    0x03,
};

static const br_x509_trust_anchor TAs[] = {
    {
        { (unsigned char *)TA_DN0, sizeof TA_DN0 },
        BR_X509_TA_CA,
        {
            BR_KEYTYPE_RSA,
            { .rsa = {
                (unsigned char *)TA_RSA_N0, sizeof TA_RSA_N0,
                (unsigned char *)TA_RSA_E0, sizeof TA_RSA_E0,
            } }
        }
    },
};

#ifdef __cplusplus
} /* extern "C" */
#endif

#endif /* ifndef _CERTIFICATES_H_ */
Add SSLClient wrapper
Code
Now we are going to add the SSLClient library and the trust_anchors.h file.
#include <SPI.h>
#include <EthernetLarge.h>
#include <SSLClient.h>
#include "trust_anchors.h"
I also changed the Ethernet library with EthernetLarge instead of the change described in the upper section.
Then apply the wrapper EthernetClient with all the references of Trust Anchors. The file contains generated trust anchor array names TAs with length. TAs_NUM.
// Choose the analog pin to get semi-random data from for SSL
// Pick a pin that's not connected or attached to a randomish voltage source
const int rand_pin = A5;

// Initialize the SSL client library
// We input an EthernetClient, our trust anchors, and the analog pin
EthernetClient base_client;
SSLClient client(base_client, TAs, (size_t)TAs_NUM, rand_pin);
And we change the port to 443 (HTTPS).
  // if you get a connection, report back via serial:
  if (client.connect(server, 443)) {
    Serial.print("connected to ");
    // Make a HTTP request:
    client.println("GET /get HTTP/1.1");
    client.println("Host: httpbin.org");
    client.println("Connection: close");
    client.println();
  } else {
    // if you didn't get a connection to the server:
    Serial.println("connection failed");
  }
Here is the complete sketch.
/*
  Web SSL client Raspberry Pi Pico and rp2040 boards
   and Arduino EthernetLarge library

 This sketch connects to a test website (httpbin.org)
 and try to do a secure GET request on port 443,
 to do the SSL request we use SSLClient with the
 site Trust Anchor
 the output is printed on Serial

 by Renzo Mischianti <www.mischianti.org>

 https://www.mischianti.org

 */

#include <SPI.h>
#include <EthernetLarge.h>
#include <SSLClient.h>
#include "trust_anchors.h"

// Enter a MAC address for your controller below.
// Newer Ethernet shields have a MAC address printed on a sticker on the shield
byte mac[] = { 0xDE, 0xAD, 0xBE, 0xEF, 0xFE, 0xED };

// if you don't want to use DNS (and reduce your sketch size)
// use the numeric IP instead of the name for the server:
//IPAddress server(74,125,232,128);  // numeric IP for Google (no DNS)
//char server[] = "www.google.com";    // name address for Google (using DNS)
char server[] = "httpbin.org";    // name address for Google (using DNS)

// Set the static IP address to use if the DHCP fails to assign
#define MYIPADDR 192,168,1,28
#define MYIPMASK 255,255,255,0
#define MYDNS 192,168,1,1
#define MYGW 192,168,1,1

// Choose the analog pin to get semi-random data from for SSL
// Pick a pin that's not connected or attached to a randomish voltage source
const int rand_pin = A0;

// Initialize the SSL client library
// We input an EthernetClient, our trust anchors, and the analog pin
EthernetClient base_client;
SSLClient client(base_client, TAs, (size_t)TAs_NUM, rand_pin);

// Variables to measure the speed
unsigned long beginMicros, endMicros;
unsigned long byteCount = 0;
bool printWebData = true;  // set to false for better speed measurement

void setup() {
    Serial.begin(115200);

    while (!Serial) {delay(100);};

    Serial.println("Begin Ethernet");

    // You can use Ethernet.init(pin) to configure the CS pin
    //Ethernet.init(10);  // Most Arduino shields
    // Ethernet.init(5);   // MKR ETH Shield
    //Ethernet.init(0);   // Teensy 2.0
    //Ethernet.init(20);  // Teensy++ 2.0
    //Ethernet.init(15);  // ESP8266 with Adafruit FeatherWing Ethernet
    //Ethernet.init(33);  // ESP32 with Adafruit FeatherWing Ethernet
    // Ethernet.init(PA4); // STM32 with w5500
    Ethernet.init(17); // Raspberry Pi Pico with w5500

    if (Ethernet.begin(mac)) { // Dynamic IP setup
        Serial.println("DHCP OK!");
    }else{
        Serial.println("Failed to configure Ethernet using DHCP");
        // Check for Ethernet hardware present
        if (Ethernet.hardwareStatus() == EthernetNoHardware) {
          Serial.println("Ethernet shield was not found.  Sorry, can't run without hardware. :(");
          while (true) {
            delay(1); // do nothing, no point running without Ethernet hardware
          }
        }
        if (Ethernet.linkStatus() == LinkOFF) {
          Serial.println("Ethernet cable is not connected.");
        }

    	  IPAddress ip(MYIPADDR);
    	  IPAddress dns(MYDNS);
    	  IPAddress gw(MYGW);
    	  IPAddress sn(MYIPMASK);
    	  Ethernet.begin(mac, ip, dns, gw, sn);
		  Serial.println("STATIC OK!");
    }
    delay(5000);


    Serial.print("Local IP : ");
    Serial.println(Ethernet.localIP());
    Serial.print("Subnet Mask : ");
    Serial.println(Ethernet.subnetMask());
    Serial.print("Gateway IP : ");
    Serial.println(Ethernet.gatewayIP());
    Serial.print("DNS Server : ");
    Serial.println(Ethernet.dnsServerIP());

   Serial.println("Ethernet Successfully Initialized");
  // if you get a connection, report back via serial:
  if (client.connect(server, 443)) {
    Serial.print("connected to ");
    // Make a HTTP request:
    client.println("GET /get HTTP/1.1");
    client.println("Host: httpbin.org");
    client.println("Connection: close");
    client.println();
  } else {
    // if you didn't get a connection to the server:
    Serial.println("connection failed");
  }
  beginMicros = micros();
}

void loop() {
  // if there are incoming bytes available
  // from the server, read them and print them:
  int len = client.available();
  if (len > 0) {
    byte buffer[80];
    if (len > 80) len = 80;
    client.read(buffer, len);
    if (printWebData) {
      Serial.write(buffer, len); // show in the serial monitor (slows some boards)
    }
    byteCount = byteCount + len;
  }

  // if the server's disconnected, stop the client:
  if (!client.connected()) {
    endMicros = micros();
    Serial.println();
    Serial.println("disconnecting.");
    client.stop();
    Serial.print("Received ");
    Serial.print(byteCount);
    Serial.print(" bytes in ");
    float seconds = (float)(endMicros - beginMicros) / 1000000.0;
    Serial.print(seconds, 4);
    float rate = (float)byteCount / seconds / 1000.0;
    Serial.print(", rate = ");
    Serial.print(rate);
    Serial.print(" kbytes/second");
    Serial.println();

    // do nothing forevermore:
    while (true) {
      delay(1);
    }
  }
}
Now when we execute the sketch, we obtain this output.
Begin Ethernet
DHCP OK!
Local IP : 192.168.1.135
Subnet Mask : 255.255.255.0
Gateway IP : 192.168.1.1
DNS Server : 192.168.1.1
Ethernet Successfully Initialized
connected to HTTP/1.1 200 OK
Date: Fri, 16 Sep 2022 10:57:24 GMT
Content-Type: application/json
Content-Length: 199
Connection: close
Server: gunicorn/19.9.0
Access-Control-Allow-Origin: *
Access-Control-Allow-Credentials: true

{
  "args": {},
  "headers": {
    "Host": "httpbin.org",
    "X-Amzn-Trace-Id": "Root=1-63245694-23b9f2546222ba04034ff19e"
  },
  "origin": "82.53.128.115",
  "url": "https://httpbin.org/get"
}

disconnecting.
Received 424 bytes in 0.2244, rate = 1.89 kbytes/second
Thanks
I use this SSLClient library in my EMailSender library to use Gmail SMTP server (SSL) with Ethernet. Unfortunately, SSL connections need a lot of resources, but Arduino SAMD, STM32, rp2040, and ESP32 have them.
- Raspberry Pi Pico and rp2040 boards: pinout, specs, and Arduino IDE configuration
- Raspberry Pi Pico and rp2040 boards: integrated LittleFS filesystem
- Raspberry Pi Pico and rp2040 board: ethernet w5500 with plain (HTTP) and SSL (HTTPS) requests
- Raspberry Pi Pico and rp2040 boards: WiFiNINA with ESP32 WiFi Co-Processor
- Raspberry Pi Pico and rp2040 boards: how to use SD card
- Dallas ds18b20
- Connecting the EByte E70 to Raspberry Pi Pico (rp2040) devices and a simple sketch example


WoW~!
I think will be your fan.
How can you create a lot of high-quality content in a short amount of time?
Thanks Irina,
I like these arguments, and when you like something, It’s more simple.
Bye Renzo
I have this problem every second connection and few others and then again connection works.
I do query every 15 seconds:
(SSLClient)(SSL_WARN)(m_run_until): Terminating because the ssl engine closed
(SSLClient)(SSL_ERROR)(m_start_ssl): Failed to initlalize the SSL layer
(SSLClient)(SSL_ERROR)(m_print_br_error): Decryption found an invalid padding, or the record MAC is not correct.
Hi KanG,
The Raspberry Pi Pico environment is very unstable; it’s possible that it does not clean the session correctly. To work at a higher scope, try to isolate every request in an atomic function.
Bye Renzo