Accelerometro GY-291 ADXL345 i2c spi con interrupt per esp32, esp8266, stm32 e Arduino
Un accelerometro è uno strumento che misura la corretta accelerazione. L’accelerazione corretta è l’accelerazione (la velocità di variazione della velocità) di un corpo nel proprio quadro di riposo istantaneo; questo è diverso dall’accelerazione delle coordinate, che è l’accelerazione in un sistema di coordinate fisso.
L’ADXL345 è un accelerometro a 3 assi piccolo, sottile e a bassissima potenza con misurazione ad alta risoluzione (13 bit) fino a ±16g. I dati dell’uscita digitale sono formattati come complemento a due a 16 bit e sono accessibili tramite un’interfaccia digitale SPI (3 o 4 fili) o I2C.

L’ADXL345 è adatto per applicazioni su dispositivi mobili. Misura l’accelerazione statica di gravità nelle applicazioni di rilevamento dell’inclinazione, nonché l’accelerazione dinamica risultante da movimento o shock. La sua alta risoluzione (3,9 mg/LSB) consente di misurare variazioni di inclinazione inferiori ad 1,0°.
Questo modulo supporta alimentazione 3.3v e 5v, ma non ha un convertitore di livello logico e necessita di una connessione 3.3v per comunicazioni a lungo termine.
Come funziona un accelerometro
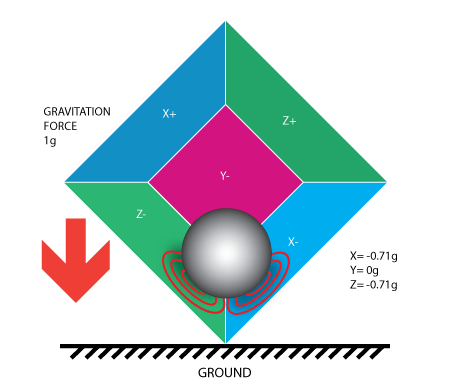
Un accelerometro funziona secondo il principio dell’effetto piezoelettrico. Immaginate una scatola cubica, con dentro una pallina, come nell’immagine qui sotto:
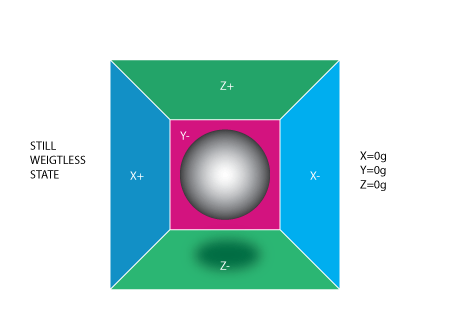
Le pareti di questa scatola sono realizzate con cristalli piezoelettrici. Ogni volta che si inclina la scatola, la palla è costretta a muoversi nella direzione dell’inclinazione,
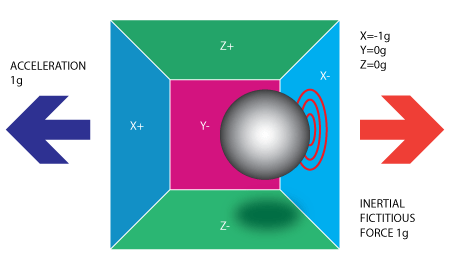
per gravità. Il muro con cui la palla si scontra crea minuscole correnti piezoelettriche. Ci sono in totale, tre coppie di pareti opposte in un cuboide. Ogni coppia corrisponde a un asse nello spazio 3D: assi X, Y e Z.
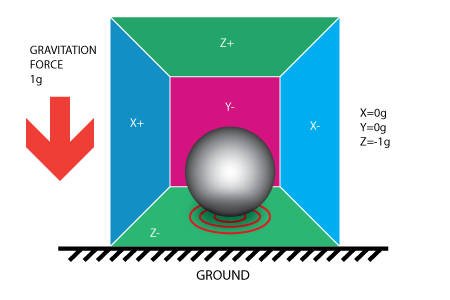
A seconda della corrente prodotta dalle pareti piezoelettriche, possiamo determinare la direzione dell’inclinazione e la sua intensità.
Ogni accelerometro ha un livello di tensione pari a zero g, puoi trovarlo nelle specifiche dell’accelerometro, hanno anche una sensibilità, solitamente espressa in mV/g, dividi la lettura corretta del livello zero-g per la sensibilità per produrre la lettura finale. La deflessione della massa di prova viene misurata come una variazione di capacità tra la massa di prova e le piastre di rilevamento La circuiteria interna converte la minuscola capacità in un segnale di tensione che viene digitalizzato ed emesso.
Con questa caratteristica, l’accelerometro può essere utilizzato anche per correggere gli errori del magnetometro.
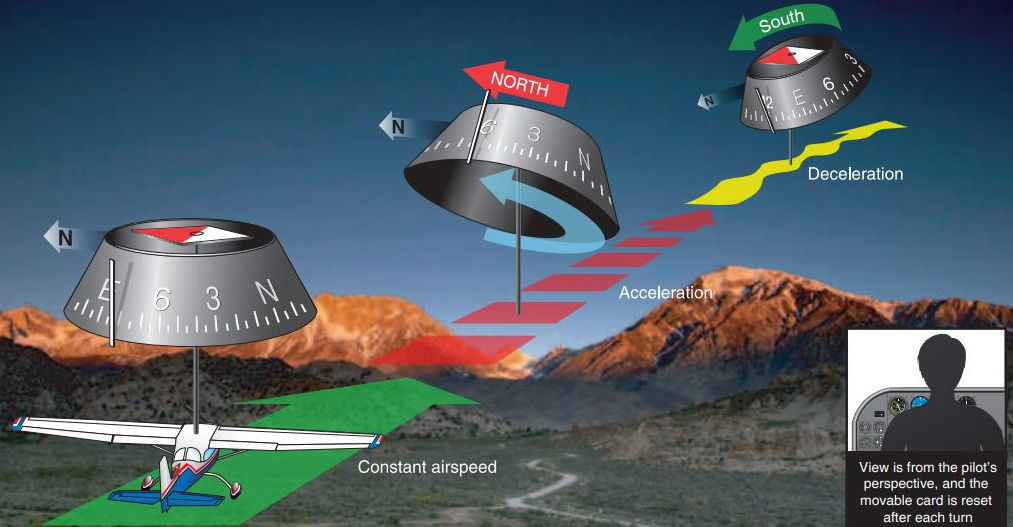
Puoi ottenere maggiori informazioni nel manuale di volo.
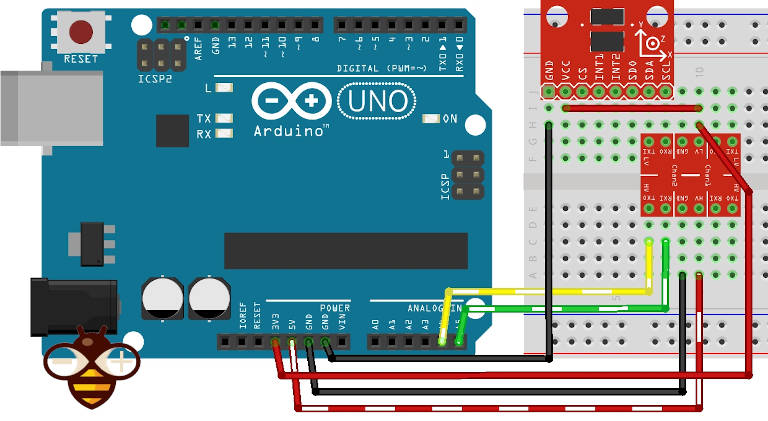
Cablaggio
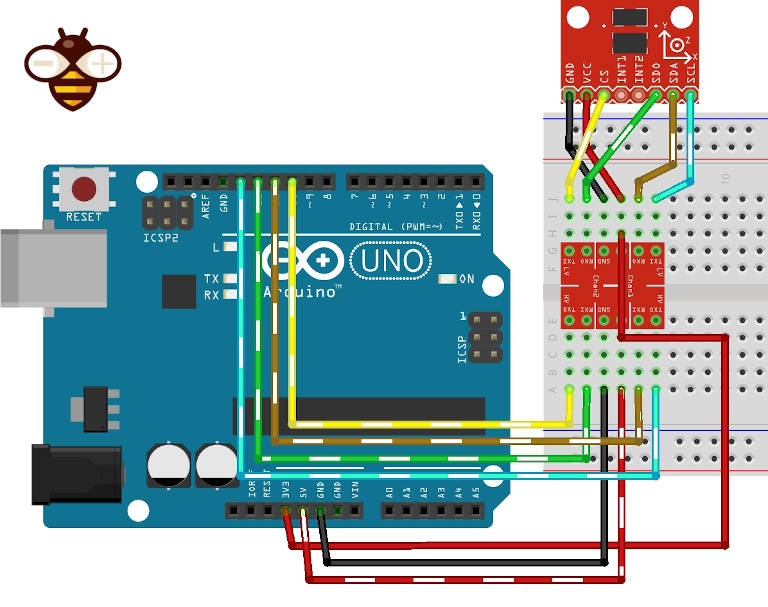
Connessione Arduino i2c
Per Arduino UNO, è meglio se non ti colleghi direttamente ai pin A4 e A5 perché la tensione logica è 5v e il modulo supporta solo 3,3v (limite 3,6v), funziona bene anche senza ma rischi di bruciarlo.
Connessione Arduino SPI
SPI è più difficile da collegare, ma garantisce più velocità.
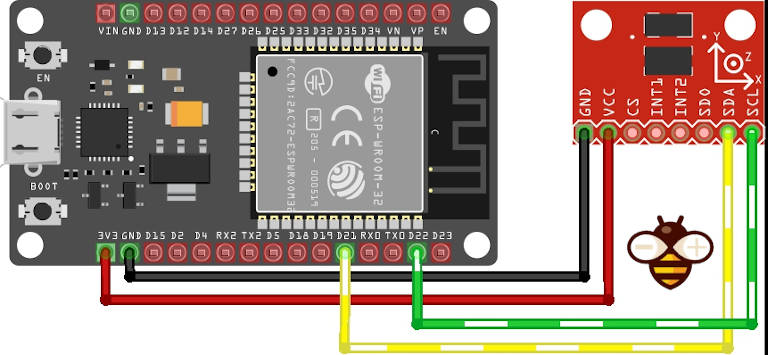
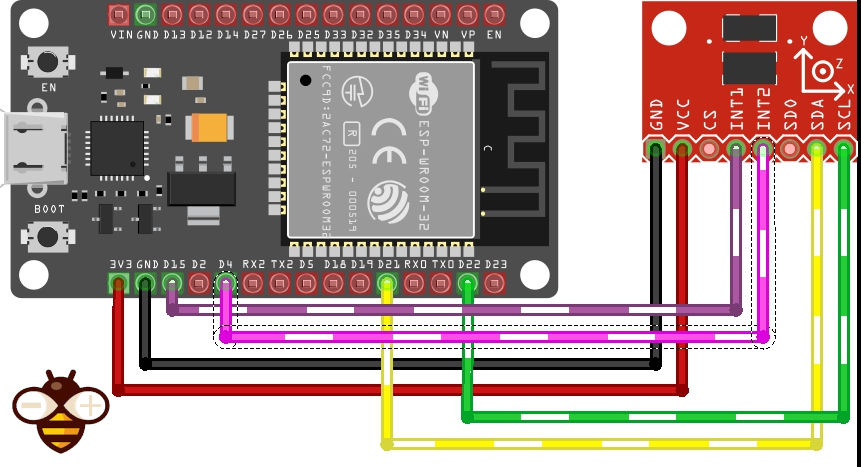
esp32 connessione i2c
L’esp8266 e l’esp32 hanno una logica a 3.3v, quindi funzionano senza problemi.
L’esp32 con connessione i2c su pin standard SDA e SCL GPIO21 e GPIO22.
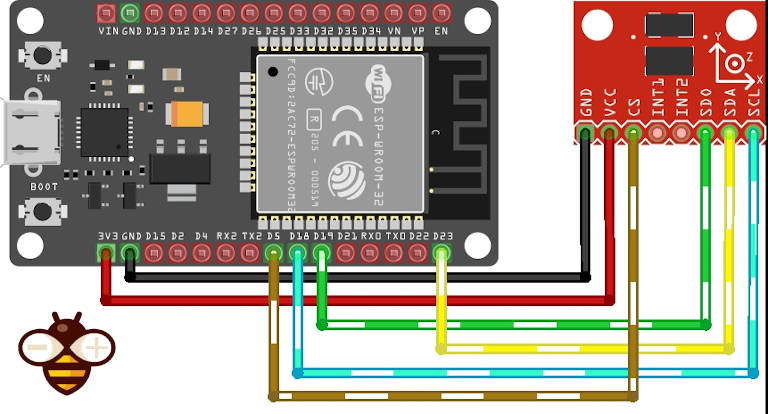
esp32 Connessione SPI
Connessione SPI su SS (GPIO05), MOSI (GPIO23), MISO (GPIO19) e SCK (GPIO18) che corrispondono ai pin CS, SDA, SDO e SCL.
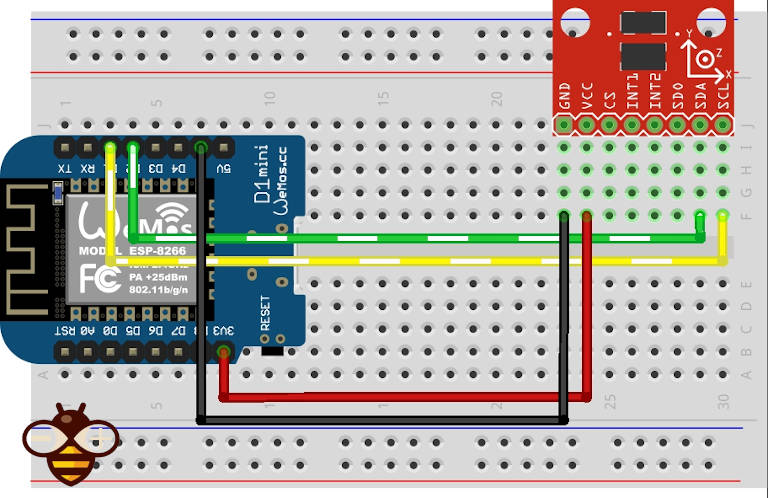
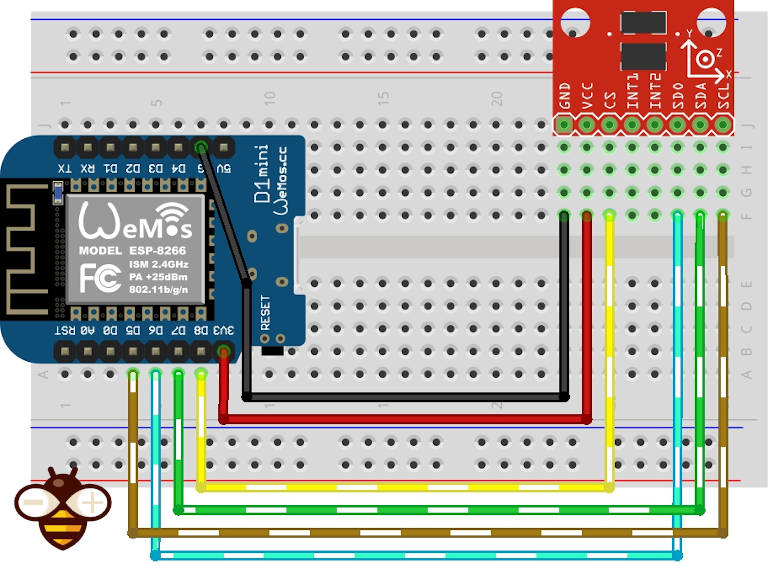
esp8266 connessione i2c
Su esp8266 D4 su SDA e D5 su SCL.
esp8266 Connessione SPI
esp8266 con SPI SS (D8) su CS, D7 (MOSI) su SDA, D6 (MISO) su SDO e D5 (SCK) su SCL.
Libreria Adafruit senza interruzioni
Esistono molte librerie, ma una delle più semplici è quella di Adafruit. Puoi ottenerlo da GitHub con le relative dipendenze Adafruit Unified Sensor Driver, oppure direttamente da Arduino IDE library manager.

Sketch di base
Ecco un semplice sketch (da un esempio di libreria) con una connessione i2c che acquisisce i dati dall’accelerometro.
#include <Wire.h>
#include <Adafruit_Sensor.h>
#include <Adafruit_ADXL345_U.h>

/* Assign a unique ID to this sensor at the same time */
Adafruit_ADXL345_Unified accel = Adafruit_ADXL345_Unified(12345);

void displaySensorDetails(void)
{
  sensor_t sensor;
  accel.getSensor(&sensor);
  Serial.println("------------------------------------");
  Serial.print  ("Sensor:       "); Serial.println(sensor.name);
  Serial.print  ("Driver Ver:   "); Serial.println(sensor.version);
  Serial.print  ("Unique ID:    "); Serial.println(sensor.sensor_id);
  Serial.print  ("Max Value:    "); Serial.print(sensor.max_value); Serial.println(" m/s^2");
  Serial.print  ("Min Value:    "); Serial.print(sensor.min_value); Serial.println(" m/s^2");
  Serial.print  ("Resolution:   "); Serial.print(sensor.resolution); Serial.println(" m/s^2");
  Serial.println("------------------------------------");
  Serial.println("");
  delay(500);
}

void displayDataRate(void)
{
  Serial.print  ("Data Rate:    ");

  switch(accel.getDataRate())
  {
    case ADXL345_DATARATE_3200_HZ:
      Serial.print  ("3200 ");
      break;
    case ADXL345_DATARATE_1600_HZ:
      Serial.print  ("1600 ");
      break;
    case ADXL345_DATARATE_800_HZ:
      Serial.print  ("800 ");
      break;
    case ADXL345_DATARATE_400_HZ:
      Serial.print  ("400 ");
      break;
    case ADXL345_DATARATE_200_HZ:
      Serial.print  ("200 ");
      break;
    case ADXL345_DATARATE_100_HZ:
      Serial.print  ("100 ");
      break;
    case ADXL345_DATARATE_50_HZ:
      Serial.print  ("50 ");
      break;
    case ADXL345_DATARATE_25_HZ:
      Serial.print  ("25 ");
      break;
    case ADXL345_DATARATE_12_5_HZ:
      Serial.print  ("12.5 ");
      break;
    case ADXL345_DATARATE_6_25HZ:
      Serial.print  ("6.25 ");
      break;
    case ADXL345_DATARATE_3_13_HZ:
      Serial.print  ("3.13 ");
      break;
    case ADXL345_DATARATE_1_56_HZ:
      Serial.print  ("1.56 ");
      break;
    case ADXL345_DATARATE_0_78_HZ:
      Serial.print  ("0.78 ");
      break;
    case ADXL345_DATARATE_0_39_HZ:
      Serial.print  ("0.39 ");
      break;
    case ADXL345_DATARATE_0_20_HZ:
      Serial.print  ("0.20 ");
      break;
    case ADXL345_DATARATE_0_10_HZ:
      Serial.print  ("0.10 ");
      break;
    default:
      Serial.print  ("???? ");
      break;
  }
  Serial.println(" Hz");
}

void displayRange(void)
{
  Serial.print  ("Range:         +/- ");

  switch(accel.getRange())
  {
    case ADXL345_RANGE_16_G:
      Serial.print  ("16 ");
      break;
    case ADXL345_RANGE_8_G:
      Serial.print  ("8 ");
      break;
    case ADXL345_RANGE_4_G:
      Serial.print  ("4 ");
      break;
    case ADXL345_RANGE_2_G:
      Serial.print  ("2 ");
      break;
    default:
      Serial.print  ("?? ");
      break;
  }
  Serial.println(" g");
}

void setup(void)
{
#ifndef ESP8266
  while (!Serial); // for Leonardo/Micro/Zero
#endif
  Serial.begin(9600);
  Serial.println("Accelerometer Test"); Serial.println("");

  /* Initialise the sensor */
  if(!accel.begin())
  {
    /* There was a problem detecting the ADXL345 ... check your connections */
    Serial.println("Ooops, no ADXL345 detected ... Check your wiring!");
    while(1);
  }

  /* Set the range to whatever is appropriate for your project */
  accel.setRange(ADXL345_RANGE_16_G);
  // accel.setRange(ADXL345_RANGE_8_G);
  // accel.setRange(ADXL345_RANGE_4_G);
  // accel.setRange(ADXL345_RANGE_2_G);

  /* Display some basic information on this sensor */
  displaySensorDetails();

  /* Display additional settings (outside the scope of sensor_t) */
  displayDataRate();
  displayRange();
  Serial.println("");
}

void loop(void)
{
  /* Get a new sensor event */
  sensors_event_t event;
  accel.getEvent(&event);

  /* Display the results (acceleration is measured in m/s^2) */
  Serial.print("X: "); Serial.print(event.acceleration.x); Serial.print("  ");
  Serial.print("Y: "); Serial.print(event.acceleration.y); Serial.print("  ");
  Serial.print("Z: "); Serial.print(event.acceleration.z); Serial.print("  ");Serial.println("m/s^2 ");
  delay(500);
}
Per connetterti con SPI, devi cambiare il costruttore
//Adafruit_ADXL345_Unified accel = Adafruit_ADXL345_Unified(18, 19, 23, 5, 12345); ESP32 equivalent constructor
Adafruit_ADXL345_Unified accel = Adafruit_ADXL345_Unified(SCK, MISO, MOSI, SS, 12345);
Ecco l’output seriale dello script
------------------------------------
Sensor:       ADXL345
Driver Ver:   1
Unique ID:    12345
Max Value:    -156.91 m/s^2
Min Value:    156.91 m/s^2
Resolution:   0.04 m/s^2
------------------------------------

Data Rate:    100  Hz
Range:         +/- 16  g

X: -4.08  Y: -0.78  Z: 8.98  m/s^2
X: -4.04  Y: -0.78  Z: 8.94  m/s^2
X: -4.08  Y: -0.78  Z: 8.83  m/s^2
X: -4.08  Y: -0.75  Z: 8.90  m/s^2
X: -4.04  Y: -0.78  Z: 8.94  m/s^2
X: -4.08  Y: -0.78  Z: 8.98  m/s^2
X: -4.08  Y: -0.75  Z: 8.90  m/s^2
X: -4.00  Y: -0.78  Z: 8.90  m/s^2
X: -4.08  Y: -0.75  Z: 8.90  m/s^2
X: -4.08  Y: -0.75  Z: 8.94  m/s^2
X: -4.04  Y: -0.78  Z: 8.90  m/s^2
X: -4.04  Y: -0.78  Z: 8.94  m/s^2
X: -4.04  Y: -0.78  Z: 8.94  m/s^2
Libreria SeeedStudio con interrupt
Questo dispositivo offre una buona serie di modalità di interrupt, molto utili nella registrazione intelligente/biometrica. Ecco le informazioni dalla scheda tecnica.
DATA_READY
Il bit DATA_READY viene impostato quando sono disponibili nuovi dati e viene cancellato quando non sono più disponibili.
SINGLE_TAP
Il bit SINGLE_TAP viene impostato quando un singolo evento di accelerazione che è maggiore del valore nel registro THRESH_TAP (indirizzo 0x1D) si verifica per un tempo inferiore a quello specificato nel registro DUR (indirizzo 0x21).
DOUBLE_TAP
Il bit DOUBLE_TAP viene impostato quando due eventi di accelerazione maggiori del valore nel registro THRESH_TAP (indirizzo 0x1D) si verificano per un tempo inferiore a quello specificato nel registro DUR (indirizzo 0x21), con il secondo tap che inizia dopo il tempo specificato da il registro latente (Indirizzo 0x22) ma entro il tempo specificato nel registro della finestra (Indirizzo 0x23).
Attività
Il bit di attività viene impostato quando viene rilevata un’accelerazione maggiore del valore memorizzato nel registro THRESH_ACT (indirizzo 0x24) su qualsiasi asse partecipante, impostato dal registro ACT_INACT_CTL.
(Indirizzo 0x27).
Inattività
Il bit di inattività viene impostato quando l’accelerazione inferiore al valore memorizzato nel registro THRESH_INACT (Indirizzo 0x25) viene sperimentata per un tempo superiore a quello specificato nel
registro TIME_INACT (Indirizzo 0x26) su tutti gli assi partecipanti, come impostato dal registro ACT_INACT_CTL (Indirizzo 0x27). Il valore massimo per TIME_INACT è 255 sec.
FREE_FALL
Il bit FREE_FALL viene impostato quando l’accelerazione inferiore al valore memorizzato nel registro THRESH_FF (Indirizzo 0x28) viene sperimentata per un tempo superiore a quello specificato nel registro TIME_FF (Indirizzo 0x29) su tutti gli assi (AND logico). L’interrupt FREE_FALL differisce dall’interrupt di inattività come segue: tutti gli assi partecipano sempre e sono logicamente AND, il periodo del timer è molto più piccolo (1,28 sec massimo) e la modalità di funzionamento è sempre accoppiata in cc.
Filigrana
Il bit filigrana viene impostato quando il numero di campioni in FIFO è uguale al valore memorizzato nei bit campione (Registro FIFO_CTL, Indirizzo 0x38). Il bit della filigrana viene cancellato automaticamente quando
viene letto FIFO e il contenuto torna a un valore inferiore al valore memorizzato nei bit di esempio.
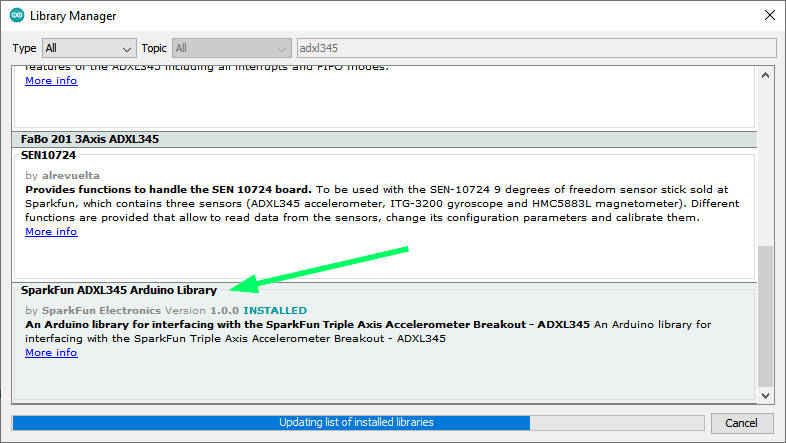
Scaricare la libreria
La libreria SparkFun È una libreria piuttosto complessa ma offre supporto a i2c e SPI e ci dà la possibilità di gestire tutti gli interrupt descritti. Puoi ottenerlo da GitHub o direttamente dal gestore della libreria IDE di Arduino.
Il codice offre un esempio completo di utilizzo degli interrupt.
/*  *********************************************
 *  SparkFun_ADXL345_Example
 *  Triple Axis Accelerometer Breakout - ADXL345
 *  Hook Up Guide Example
 *
 *  Utilizing Sparkfun's ADXL345 Library
 *  Bildr ADXL345 source file modified to support
 *  both I2C and SPI Communication
 *
 *  E.Robert @ SparkFun Electronics
 *  Created: Jul 13, 2016
 *  Updated: Sep 06, 2016
 *
 *  Development Environment Specifics:
 *  Arduino 1.6.11
 *
 *  Hardware Specifications:
 *  SparkFun ADXL345
 *  Arduino Uno
 *  *********************************************/

#include <SparkFun_ADXL345.h>         // SparkFun ADXL345 Library

/*********** COMMUNICATION SELECTION ***********/
/*    Comment Out The One You Are Not Using    */
ADXL345 adxl = ADXL345(10);           // USE FOR SPI COMMUNICATION, ADXL345(CS_PIN);
//ADXL345 adxl = ADXL345();             // USE FOR I2C COMMUNICATION

/****************** INTERRUPT ******************/
/*      Uncomment If Attaching Interrupt       */
//int interruptPin = 2;                 // Setup pin 2 to be the interrupt pin (for most Arduino Boards)

void ADXL_ISR();
/******************** SETUP ********************/
/*          Configure ADXL345 Settings         */
void setup(){

  Serial.begin(9600);                 // Start the serial terminal
  Serial.println("SparkFun ADXL345 Accelerometer Hook Up Guide Example");
  Serial.println();

  adxl.powerOn();                     // Power on the ADXL345

  adxl.setRangeSetting(16);           // Give the range settings
                                      // Accepted values are 2g, 4g, 8g or 16g
                                      // Higher Values = Wider Measurement Range
                                      // Lower Values = Greater Sensitivity

  adxl.setSpiBit(0);                  // Configure the device to be in 4 wire SPI mode when set to '0' or 3 wire SPI mode when set to 1
                                      // Default: Set to 1
                                      // SPI pins on the ATMega328: 11, 12 and 13 as reference in SPI Library

  adxl.setActivityXYZ(1, 0, 0);       // Set to activate movement detection in the axes "adxl.setActivityXYZ(X, Y, Z);" (1 == ON, 0 == OFF)
  adxl.setActivityThreshold(75);      // 62.5mg per increment   // Set activity   // Inactivity thresholds (0-255)

  adxl.setInactivityXYZ(1, 0, 0);     // Set to detect inactivity in all the axes "adxl.setInactivityXYZ(X, Y, Z);" (1 == ON, 0 == OFF)
  adxl.setInactivityThreshold(75);    // 62.5mg per increment   // Set inactivity // Inactivity thresholds (0-255)
  adxl.setTimeInactivity(10);         // How many seconds of no activity is inactive?

  adxl.setTapDetectionOnXYZ(0, 0, 1); // Detect taps in the directions turned ON "adxl.setTapDetectionOnX(X, Y, Z);" (1 == ON, 0 == OFF)

  // Set values for what is considered a TAP and what is a DOUBLE TAP (0-255)
  adxl.setTapThreshold(50);           // 62.5 mg per increment
  adxl.setTapDuration(15);            // 625 μs per increment
  adxl.setDoubleTapLatency(80);       // 1.25 ms per increment
  adxl.setDoubleTapWindow(200);       // 1.25 ms per increment

  // Set values for what is considered FREE FALL (0-255)
  adxl.setFreeFallThreshold(7);       // (5 - 9) recommended - 62.5mg per increment
  adxl.setFreeFallDuration(30);       // (20 - 70) recommended - 5ms per increment

  // Setting all interupts to take place on INT1 pin
  //adxl.setImportantInterruptMapping(1, 1, 1, 1, 1);     // Sets "adxl.setEveryInterruptMapping(single tap, double tap, free fall, activity, inactivity);"
                                                        // Accepts only 1 or 2 values for pins INT1 and INT2. This chooses the pin on the ADXL345 to use for Interrupts.
                                                        // This library may have a problem using INT2 pin. Default to INT1 pin.

  // Turn on Interrupts for each mode (1 == ON, 0 == OFF)
  adxl.InactivityINT(1);
  adxl.ActivityINT(1);
  adxl.FreeFallINT(1);
  adxl.doubleTapINT(1);
  adxl.singleTapINT(1);

//attachInterrupt(digitalPinToInterrupt(interruptPin), ADXL_ISR, RISING);   // Attach Interrupt

}

/****************** MAIN CODE ******************/
/*     Accelerometer Readings and Interrupt    */
void loop(){

  // Accelerometer Readings
  int x,y,z;
  adxl.readAccel(&x, &y, &z);         // Read the accelerometer values and store them in variables declared above x,y,z

  // Output Results to Serial
  /* UNCOMMENT TO VIEW X Y Z ACCELEROMETER VALUES */
  //Serial.print(x);
  //Serial.print(", ");
  //Serial.print(y);
  //Serial.print(", ");
  //Serial.println(z);

  ADXL_ISR();
  // You may also choose to avoid using interrupts and simply run the functions within ADXL_ISR();
  //  and place it within the loop instead.
  // This may come in handy when it doesn't matter when the action occurs.

}

/********************* ISR *********************/
/* Look for Interrupts and Triggered Action    */
void ADXL_ISR() {

  // getInterruptSource clears all triggered actions after returning value
  // Do not call again until you need to recheck for triggered actions
  byte interrupts = adxl.getInterruptSource();

  // Free Fall Detection
  if(adxl.triggered(interrupts, ADXL345_FREE_FALL)){
    Serial.println("*** FREE FALL ***");
    //add code here to do when free fall is sensed
  }

  // Inactivity
  if(adxl.triggered(interrupts, ADXL345_INACTIVITY)){
    Serial.println("*** INACTIVITY ***");
     //add code here to do when inactivity is sensed
  }

  // Activity
  if(adxl.triggered(interrupts, ADXL345_ACTIVITY)){
    Serial.println("*** ACTIVITY ***");
     //add code here to do when activity is sensed
  }

  // Double Tap Detection
  if(adxl.triggered(interrupts, ADXL345_DOUBLE_TAP)){
    Serial.println("*** DOUBLE TAP ***");
     //add code here to do when a 2X tap is sensed
  }

  // Tap Detection
  if(adxl.triggered(interrupts, ADXL345_SINGLE_TAP)){
    Serial.println("*** TAP ***");
     //add code here to do when a tap is sensed
  }
}
Come puoi vedere, la libreria supporta i2c e SPI e puoi impostare molti dati per specificare la sensibilità del dispositivo e i parametri di interrupt.
Cambio l’esempio per utilizzare il pin GPIO15 dell’esp32 come interrupt per alcune attività come TAP o DOUBLE TAP e GPIO4 per intercettare 5 secondi di inattività.
/*  *********************************************
 *  ADXL345
 *  Triple Axis Accelerometer Breakout - ADXL345
 *  Utilizing Sparkfun's ADXL345 Library
 *  both I2C and SPI Communication with esp32
 *
 *
 *
 *  *********************************************/

#include <SparkFun_ADXL345.h>         // SparkFun ADXL345 Library

/*********** COMMUNICATION SELECTION ***********/
/*    Comment Out The One You Are Not Using    */
//ADXL345 adxl = ADXL345(10);           // USE FOR SPI COMMUNICATION, ADXL345(CS_PIN);
ADXL345 adxl = ADXL345();             // USE FOR I2C COMMUNICATION

/****************** INTERRUPT ******************/
/*      Uncomment If Attaching Interrupt       */
//int interruptPin = 2;                 // Setup pin 2 to be the interrupt pin (for most Arduino Boards)
volatile bool somethingAppend = false;
volatile bool nothingAppend = false;

void IRAM_ATTR pin1Interrupt() {
	somethingAppend = true;
}
void IRAM_ATTR pin2Interrupt() {
	nothingAppend = true;
}

/******************** SETUP ********************/
/*          Configure ADXL345 Settings         */
void setup(){

  Serial.begin(9600);                 // Start the serial terminal
  Serial.println("SparkFun ADXL345 Accelerometer Hook Up Guide Example");
  Serial.println();

  adxl.powerOn();                     // Power on the ADXL345

  adxl.setRangeSetting(16);           // Give the range settings
                                      // Accepted values are 2g, 4g, 8g or 16g
                                      // Higher Values = Wider Measurement Range
                                      // Lower Values = Greater Sensitivity

  adxl.setSpiBit(0);                  // Configure the device to be in 4 wire SPI mode when set to '0' or 3 wire SPI mode when set to 1
                                      // Default: Set to 1
                                      // SPI pins on the ATMega328: 11, 12 and 13 as reference in SPI Library

  adxl.setActivityXYZ(1, 0, 0);       // Set to activate movement detection in the axes "adxl.setActivityXYZ(X, Y, Z);" (1 == ON, 0 == OFF)
  adxl.setActivityThreshold(75);      // 62.5mg per increment   // Set activity   // Inactivity thresholds (0-255)

  adxl.setInactivityXYZ(1, 0, 0);     // Set to detect inactivity in all the axes "adxl.setInactivityXYZ(X, Y, Z);" (1 == ON, 0 == OFF)
  adxl.setInactivityThreshold(75);    // 62.5mg per increment   // Set inactivity // Inactivity thresholds (0-255)
  adxl.setTimeInactivity(5);         // How many seconds of no activity is inactive?

  adxl.setTapDetectionOnXYZ(0, 0, 1); // Detect taps in the directions turned ON "adxl.setTapDetectionOnX(X, Y, Z);" (1 == ON, 0 == OFF)

  // Set values for what is considered a TAP and what is a DOUBLE TAP (0-255)
  adxl.setTapThreshold(50);           // 62.5 mg per increment
  adxl.setTapDuration(15);            // 625 μs per increment
  adxl.setDoubleTapLatency(80);       // 1.25 ms per increment
  adxl.setDoubleTapWindow(200);       // 1.25 ms per increment

  // Set values for what is considered FREE FALL (0-255)
  adxl.setFreeFallThreshold(7);       // (5 - 9) recommended - 62.5mg per increment
  adxl.setFreeFallDuration(30);       // (20 - 70) recommended - 5ms per increment

  // Setting all interupts to take place on INT1 pin except inactivity on INT2
  adxl.setImportantInterruptMapping(1, 1, 1, 1, 2);     // Sets "adxl.setEveryInterruptMapping(single tap, double tap, free fall, activity, inactivity);"
                                                        // Accepts only 1 or 2 values for pins INT1 and INT2. This chooses the pin on the ADXL345 to use for Interrupts.
                                                        // This library may have a problem using INT2 pin. Default to INT1 pin.

  // Turn on Interrupts for each mode (1 == ON, 0 == OFF)
  adxl.InactivityINT(1);
  adxl.ActivityINT(1);
  adxl.FreeFallINT(1);
  adxl.doubleTapINT(1);
  adxl.singleTapINT(1);

//attachInterrupt(digitalPinToInterrupt(interruptPin), ADXL_ISR, RISING);   // Attach Interrupt
  pinMode(GPIO_NUM_4, INPUT);
  pinMode(GPIO_NUM_15, INPUT);

  attachInterrupt(digitalPinToInterrupt(GPIO_NUM_4), pin1Interrupt, RISING);
  attachInterrupt(digitalPinToInterrupt(GPIO_NUM_15), pin2Interrupt, RISING);

}

void ADXL_ISR();

#define INTERVAL 1000
unsigned long startTime = millis();

/****************** MAIN CODE ******************/
/*     Accelerometer Readings and Interrupt    */
void loop(){

  // Accelerometer Readings
  int x,y,z;
  adxl.readAccel(&x, &y, &z);         // Read the accelerometer values and store them in variables declared above x,y,z

  if (startTime + INTERVAL < millis()){
	  // Output Results to Serial
	  /* X Y Z ACCELEROMETER VALUES */
		Serial.print("values of X , Y , Z: ");
		Serial.print(x);
		Serial.print(" , ");
		Serial.print(y);
		Serial.print(" , ");
		Serial.println(z);

		double xyzG[3];
		double ax,ay,az;
		adxl.get_Gxyz(xyzG);
		ax = xyzG[0];
		ay = xyzG[1];
		az = xyzG[2];
		Serial.print("X=");
		Serial.print(ax);
	    Serial.print(" g");
		Serial.print(" Y=");
		Serial.print(ay);
	    Serial.print(" g");
		Serial.print(" Z=");
		Serial.print(az);
	    Serial.println(" g");
		Serial.println("**********************");

		  if (somethingAppend) {
		  	Serial.println(" ------> Something append!!");
		  	ADXL_ISR();
		  	somethingAppend = false;
		  }
		  if (nothingAppend) {
		      	Serial.println(" ------> Nothing append in the last 5 secs.!!");
		      	ADXL_ISR();
		      	nothingAppend = false;
			}

	  startTime = millis();
  }
}

/********************* ISR *********************/
/* Look for Interrupts and Triggered Action    */
void ADXL_ISR() {

  // getInterruptSource clears all triggered actions after returning value
  // Do not call again until you need to recheck for triggered actions
  byte interrupts = adxl.getInterruptSource();

  // Free Fall Detection
  if(adxl.triggered(interrupts, ADXL345_FREE_FALL)){
    Serial.println("*** FREE FALL ***");
    //add code here to do when free fall is sensed
  }

  // Inactivity
  if(adxl.triggered(interrupts, ADXL345_INACTIVITY)){
    Serial.println("*** INACTIVITY ***");
     //add code here to do when inactivity is sensed
  }

  // Activity
//  if(adxl.triggered(interrupts, ADXL345_ACTIVITY)){
//    Serial.println("*** ACTIVITY ***");
//     //add code here to do when activity is sensed
//  }

  // Double Tap Detection
  if(adxl.triggered(interrupts, ADXL345_DOUBLE_TAP)){
    Serial.println("*** DOUBLE TAP ***");
     //add code here to do when a 2X tap is sensed
  }

  // Tap Detection
  if(adxl.triggered(interrupts, ADXL345_SINGLE_TAP)){
    Serial.println("*** TAP ***");
     //add code here to do when a tap is sensed
  }
}
Ecco l’output della console del mio test.
values of X , Y , Z: -3 , 16 , 27
X=-0.01 g Y=0.06 g Z=0.09 g
**********************
values of X , Y , Z: -3 , 16 , 27
X=-0.01 g Y=0.06 g Z=0.09 g
**********************
 ------> Nothing append in the last 5 secs.!!
*** INACTIVITY ***
values of X , Y , Z: -3 , 16 , 27
X=-0.01 g Y=0.06 g Z=0.09 g
**********************
values of X , Y , Z: -3 , 16 , 27
X=-0.01 g Y=0.06 g Z=0.09 g
**********************
values of X , Y , Z: -3 , 16 , 27
X=-0.01 g Y=0.06 g Z=0.09 g
**********************
values of X , Y , Z: 1 , -2 , 66
X=0.00 g Y=-0.01 g Z=0.23 g
**********************
values of X , Y , Z: -3 , 16 , 27
X=-0.01 g Y=0.06 g Z=0.09 g
**********************
 ------> Something append!!
*** DOUBLE TAP ***
*** TAP ***
values of X , Y , Z: -3 , 16 , 27
X=-0.01 g Y=0.06 g Z=0.09 g
**********************
values of X , Y , Z: -3 , 16 , 27
X=-0.01 g Y=0.06 g Z=0.09 g
**********************
values of X , Y , Z: -3 , 16 , 27
X=-0.01 g Y=0.06 g Z=0.09 g
**********************
values of X , Y , Z: -3 , 16 , 27
X=-0.01 g Y=0.06 g Z=0.09 g
**********************
values of X , Y , Z: -3 , 16 , 27
X=-0.01 g Y=0.06 g Z=0.09 g
**********************
 ------> Nothing append in the last 5 secs.!!
*** INACTIVITY ***
values of X , Y , Z: -3 , 16 , 27
X=-0.01 g Y=0.06 g Z=0.09 g
**********************
Stima dell’angolo di inclinazione con un accelerometro
Come scritto possiamo ottenere una buona misura dell’angolo di inclinazione attuale per, ad esempio, poter controllare i movimenti di un robot. Esaminiamo prima come utilizzare un accelerometro da solo per misurare l’angolo di inclinazione.
Supponiamo che il robot sia in una posizione stazionaria illustrata di seguito (visto di lato, l’accelerometro è posizionato sulla parte superiore del robot, perpendicolare al corpo):
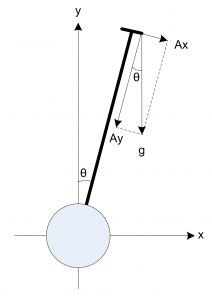
L’angolo di inclinazione può essere calcolato come:
cos(Axr) = Rx / R
cos(Ayr) = Ry / R
cos(Azr) = Rz / R
R = SQRT( Rx^2 + Ry^2 + Rz^2)
Trova gli angoli usando la funzione arccos() (la funzione inversa di cos()):
Axr = arccos(Rx/R)
Ayr = arccos(Ry/R)
Azr = arccos(Rz/R)
Quindi la funzione per calcolare l’angolo dalla posizione 0 diventa
float inclination=180.0*acos(az/sqrt(ax*ax+ay*ay+az*az))/M_PI;
se si vuole “reimpostare” la posizione iniziale, è possibile utilizzare questa funzione che compensa i valori iniziali ax0 ay0 e az0.
float inclinationFromInitialValue = 180.0*acos( (ax0*ax + ay0*ay + az0*az)/sqrt( (ax*ax + ay*ay + az*az)*(ax0*ax0 + ay0*ay0 + az0*az0)))/M_PI;
Il codice risultante è questo
/*
 * GY-291 ADXL345 accelerometer test
 * Retrieve data and calculate angle of rotation with gravitational force
 * Angle from 0 of device and angle from initial position of device
 *
 *  by Mischianti Renzo <https://mischianti.org>
 *
 *  https://mischianti.org
 *
 */
#include <Wire.h>
#include <Adafruit_Sensor.h>
#include <Adafruit_ADXL345_U.h>

/* Assign a unique ID to this sensor at the same time */
//Adafruit_ADXL345_Unified accel = Adafruit_ADXL345_Unified(12345); // i2c connection
//Adafruit_ADXL345_Unified(uint8_t clock, uint8_t miso, uint8_t mosi, uint8_t cs, int32_t sensorID = -1);
//Adafruit_ADXL345_Unified accel = Adafruit_ADXL345_Unified(18, 19, 23, 5, 12345);
Adafruit_ADXL345_Unified accel = Adafruit_ADXL345_Unified(SCK, MISO, MOSI, SS, 12345); // SPI connection

void displaySensorDetails(void)
{
  sensor_t sensor;
  accel.getSensor(&sensor);
  Serial.println("------------------------------------");
  Serial.print  ("Sensor:       "); Serial.println(sensor.name);
  Serial.print  ("Driver Ver:   "); Serial.println(sensor.version);
  Serial.print  ("Unique ID:    "); Serial.println(sensor.sensor_id);
  Serial.print  ("Max Value:    "); Serial.print(sensor.max_value); Serial.println(" m/s^2");
  Serial.print  ("Min Value:    "); Serial.print(sensor.min_value); Serial.println(" m/s^2");
  Serial.print  ("Resolution:   "); Serial.print(sensor.resolution); Serial.println(" m/s^2");
  Serial.println("------------------------------------");
  Serial.println("");
  delay(500);
}

void displayDataRate(void)
{
  Serial.print  ("Data Rate:    ");

  switch(accel.getDataRate())
  {
    case ADXL345_DATARATE_3200_HZ:
      Serial.print  ("3200 ");
      break;
    case ADXL345_DATARATE_1600_HZ:
      Serial.print  ("1600 ");
      break;
    case ADXL345_DATARATE_800_HZ:
      Serial.print  ("800 ");
      break;
    case ADXL345_DATARATE_400_HZ:
      Serial.print  ("400 ");
      break;
    case ADXL345_DATARATE_200_HZ:
      Serial.print  ("200 ");
      break;
    case ADXL345_DATARATE_100_HZ:
      Serial.print  ("100 ");
      break;
    case ADXL345_DATARATE_50_HZ:
      Serial.print  ("50 ");
      break;
    case ADXL345_DATARATE_25_HZ:
      Serial.print  ("25 ");
      break;
    case ADXL345_DATARATE_12_5_HZ:
      Serial.print  ("12.5 ");
      break;
    case ADXL345_DATARATE_6_25HZ:
      Serial.print  ("6.25 ");
      break;
    case ADXL345_DATARATE_3_13_HZ:
      Serial.print  ("3.13 ");
      break;
    case ADXL345_DATARATE_1_56_HZ:
      Serial.print  ("1.56 ");
      break;
    case ADXL345_DATARATE_0_78_HZ:
      Serial.print  ("0.78 ");
      break;
    case ADXL345_DATARATE_0_39_HZ:
      Serial.print  ("0.39 ");
      break;
    case ADXL345_DATARATE_0_20_HZ:
      Serial.print  ("0.20 ");
      break;
    case ADXL345_DATARATE_0_10_HZ:
      Serial.print  ("0.10 ");
      break;
    default:
      Serial.print  ("???? ");
      break;
  }
  Serial.println(" Hz");
}

void displayRange(void)
{
  Serial.print  ("Range:         +/- ");

  switch(accel.getRange())
  {
    case ADXL345_RANGE_16_G:
      Serial.print  ("16 ");
      break;
    case ADXL345_RANGE_8_G:
      Serial.print  ("8 ");
      break;
    case ADXL345_RANGE_4_G:
      Serial.print  ("4 ");
      break;
    case ADXL345_RANGE_2_G:
      Serial.print  ("2 ");
      break;
    default:
      Serial.print  ("?? ");
      break;
  }
  Serial.println(" g");
}

void setup(void)
{
#ifndef ESP8266
  while (!Serial); // for Leonardo/Micro/Zero
#endif
  Serial.begin(9600);
  Serial.println("Accelerometer Test"); Serial.println("");

  /* Initialise the sensor */
  if(!accel.begin())
  {
    /* There was a problem detecting the ADXL345 ... check your connections */
    Serial.println("Ooops, no ADXL345 detected ... Check your wiring!");
    while(1);
  }

  /* Set the range to whatever is appropriate for your project */
  accel.setRange(ADXL345_RANGE_16_G);
  // accel.setRange(ADXL345_RANGE_8_G);
  // accel.setRange(ADXL345_RANGE_4_G);
  // accel.setRange(ADXL345_RANGE_2_G);

  /* Display some basic information on this sensor */
  displaySensorDetails();

  /* Display additional settings (outside the scope of sensor_t) */
  displayDataRate();
  displayRange();
  Serial.println("");
}

bool initialValue = true;

double az0 = 0;
double ax0 = 0;
double ay0 = 0;

void loop(void)
{
  /* Get a new sensor event */
  sensors_event_t event;
  accel.getEvent(&event);

  double az = event.acceleration.z;
  double ax = event.acceleration.x;
  double ay = event.acceleration.y;

  if (initialValue) {
	  az0 = event.acceleration.z;
	  ax0 = event.acceleration.x;
	  ay0 = event.acceleration.y;

	  initialValue = false;
  }

  float inclination=180.0*acos(az/sqrt(ax*ax+ay*ay+az*az))/M_PI;
  Serial.print("Inclination: from 0 -> ");
  Serial.print(inclination);

  float inclinationFromInitialValue = 180.0*acos( (ax0*ax + ay0*ay + az0*az)/sqrt( (ax*ax + ay*ay + az*az)*(ax0*ax0 + ay0*ay0 + az0*az0)))/M_PI;
  Serial.print("° - from initial value -> ");
  Serial.print(inclinationFromInitialValue);

  /* Display the results (acceleration is measured in m/s^2) */
  Serial.print("° - X: "); Serial.print(ax); Serial.print("  ");
  Serial.print("Y: "); Serial.print(ay); Serial.print("  ");
  Serial.print("Z: "); Serial.print(az); Serial.print("  ");Serial.println("m/s^2 ");

  delay(500);
}
L’uscita seriale diventa
Accelerometer Test

------------------------------------
Sensor:       ADXL345
Driver Ver:   1
Unique ID:    12345
Max Value:    -156.91 m/s^2
Min Value:    156.91 m/s^2
Resolution:   0.04 m/s^2
------------------------------------

Data Rate:    100  Hz
Range:         +/- 16  g

Inclination: from 0 -> 25.15° - from initial value -> 0.00° - X: -4.16  Y: -0.43  Z: 8.90  m/s^2
Inclination: from 0 -> 24.46° - from initial value -> 0.76° - X: -4.04  Y: -0.47  Z: 8.94  m/s^2
Inclination: from 0 -> 24.76° - from initial value -> 0.48° - X: -4.08  Y: -0.47  Z: 8.90  m/s^2
Inclination: from 0 -> 24.39° - from initial value -> 0.77° - X: -4.00  Y: -0.39  Z: 8.87  m/s^2
Inclination: from 0 -> 24.78° - from initial value -> 0.62° - X: -4.08  Y: -0.51  Z: 8.90  m/s^2
Inclination: from 0 -> 24.88° - from initial value -> 0.57° - X: -4.08  Y: -0.51  Z: 8.87  m/s^2
Inclination: from 0 -> 20.58° - from initial value -> 5.11° - X: -3.26  Y: 0.00  Z: 8.67  m/s^2
Inclination: from 0 -> 52.23° - from initial value -> 28.91° - X: -7.10  Y: 1.41  Z: 5.61  m/s^2
Inclination: from 0 -> 70.47° - from initial value -> 49.04° - X: -8.90  Y: 3.65  Z: 3.41  m/s^2
Inclination: from 0 -> 77.11° - from initial value -> 56.65° - X: -8.71  Y: 4.43  Z: 2.24  m/s^2
Inclination: from 0 -> 87.06° - from initial value -> 68.87° - X: -8.00  Y: 5.88  Z: 0.51  m/s^2
Inclination: from 0 -> 94.68° - from initial value -> 76.98° - X: -7.81  Y: 6.35  Z: -0.82  m/s^2
Inclination: from 0 -> 102.48° - from initial value -> 84.43° - X: -7.69  Y: 6.28  Z: -2.20  m/s^2
Inclination: from 0 -> 102.26° - from initial value -> 84.13° - X: -7.73  Y: 6.24  Z: -2.16  m/s^2
Inclination: from 0 -> 103.35° - from initial value -> 85.46° - X: -7.61  Y: 6.35  Z: -2.35  m/s^2
Inclination: from 0 -> 105.40° - from initial value -> 87.56° - X: -7.37  Y: 6.28  Z: -2.67  m/s^2
Inclination: from 0 -> 97.58° - from initial value -> 78.79° - X: -8.12  Y: 5.88  Z: -1.33  m/s^2
Inclination: from 0 -> 106.23° - from initial value -> 84.68° - X: -8.71  Y: 4.28  Z: -2.82  m/s^2
Inclination: from 0 -> 106.06° - from initial value -> 83.50° - X: -9.02  Y: 3.49  Z: -2.79  m/s^2
Inclination: from 0 -> 112.29° - from initial value -> 89.72° - X: -8.36  Y: 3.33  Z: -3.69  m/s^2
Inclination: from 0 -> 52.47° - from initial value -> 28.98° - X: -9.14  Y: 1.69  Z: 7.14  m/s^2
Inclination: from 0 -> 30.41° - from initial value -> 8.93° - X: -5.06  Y: 0.86  Z: 8.75  m/s^2
Inclination: from 0 -> 24.27° - from initial value -> 17.12° - X: -2.94  Y: 2.12  Z: 8.04  m/s^2