Ebyte LoRa E22 per Arduino, esp32 o esp8266: risparmio energetico ed invio di dati strutturati – 5
Ora andremo a vedere il Wake On Radio (WOR) e il risparmio energetico, una delle caratteristiche essenziali del nostro dispositivo E22 UART LoRa basato sui popolari chip RF SX1262, SX1268 di Semtech.
Poi capiremo come gestire strutture complesse che sono meglio ottimizzate rispetto ai dati in formato stringa.
Ecco una selezione dei dispositivi LoRa AliExpress (433MHz 5.5Km) - AliExpress (433MHz 10Km) - AliExpress (868MHz 915Mhz 5.5Km) - AliExpress (868MHz 915Mhz 10Km)
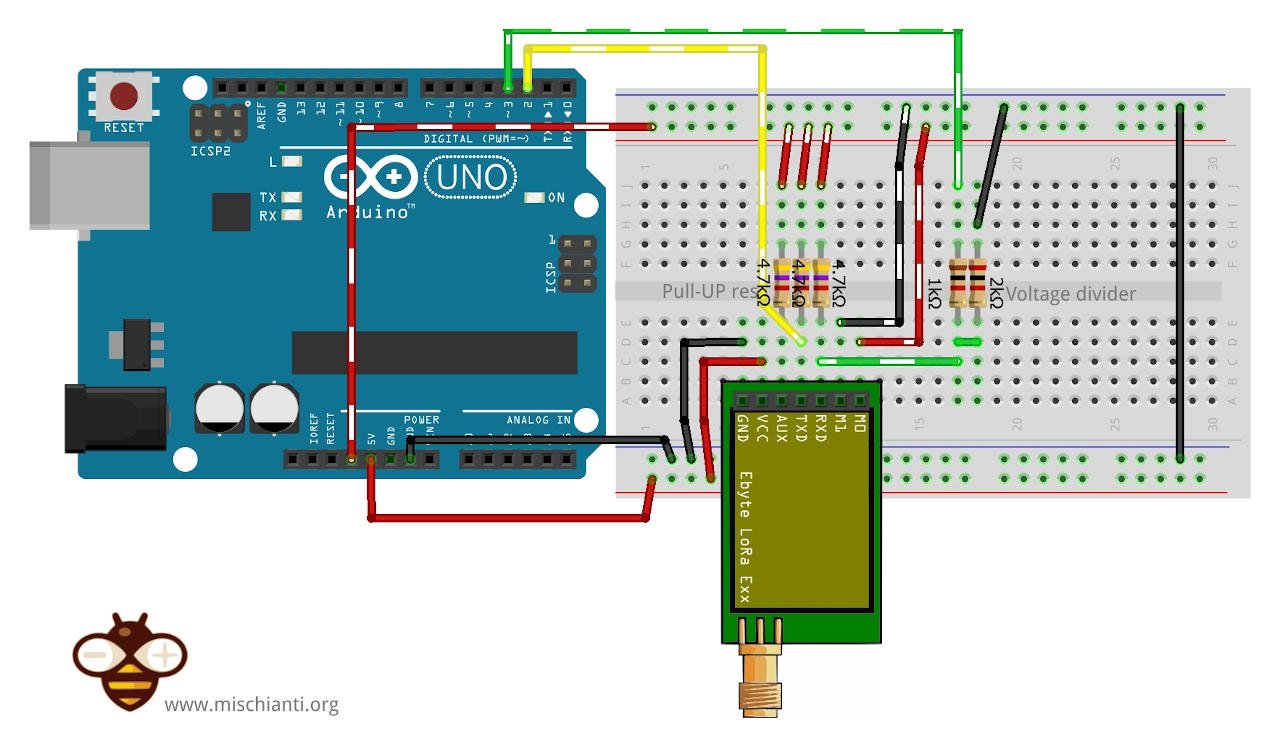
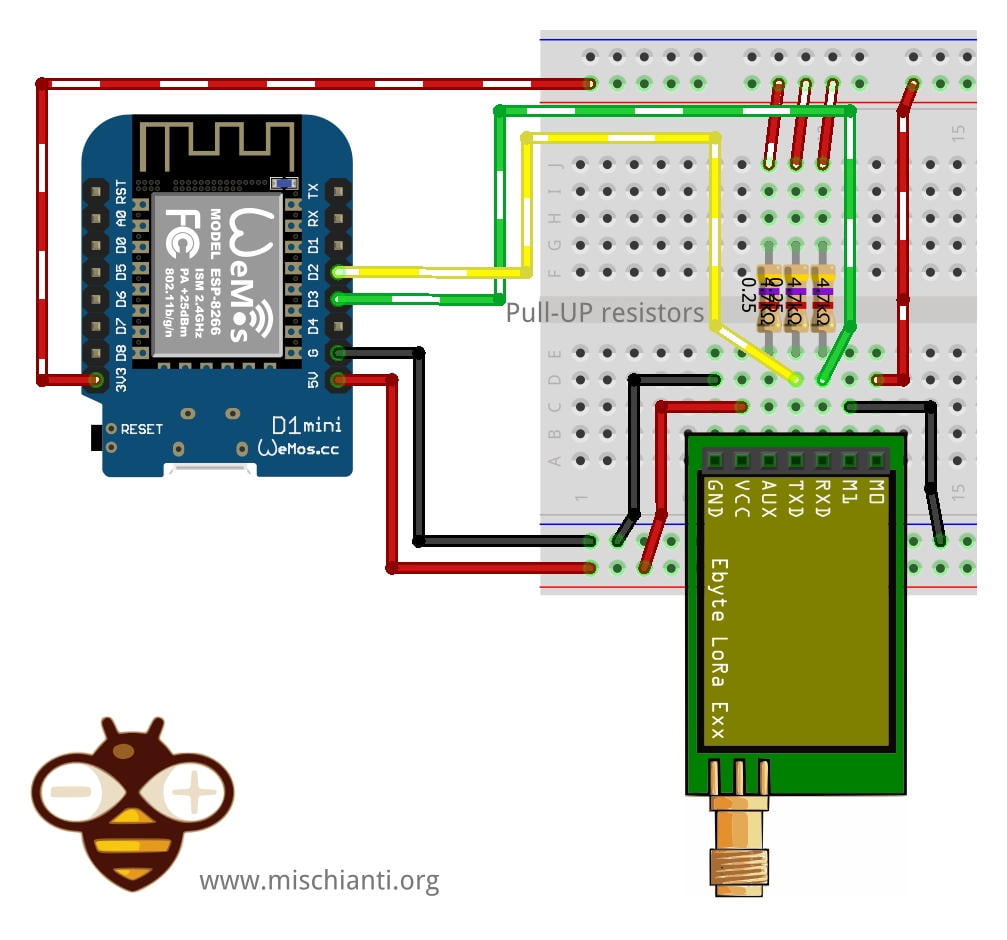
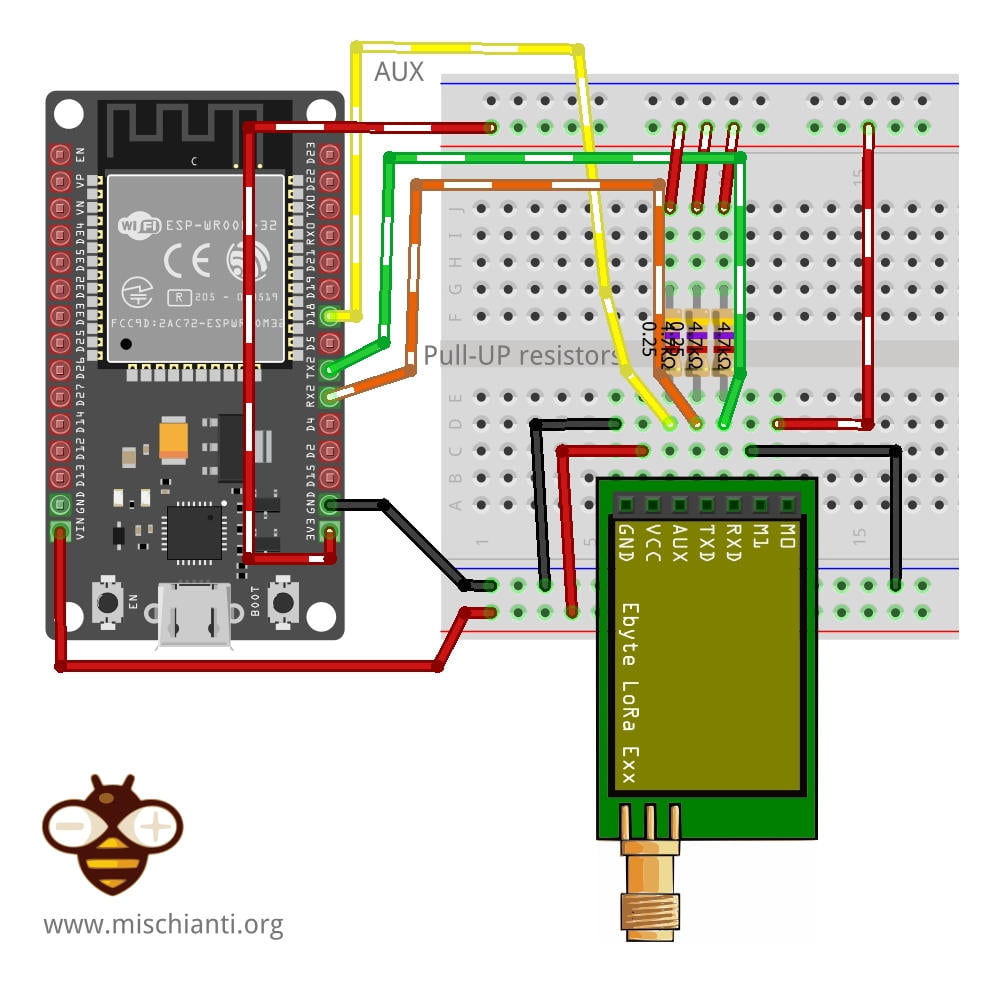
Se hai problemi con il freeze del dispositivo , devi mettere una resistenza di pull-up da 4,7k o meglio collegare il pin AUX del dispositivo.

Questi dispositivi, rispetto a E32 ed E220, hanno una gestione diversa di WOR e sleep, è necessario impostare M0 e M1 per ricevitore e mittente allo stesso modo.
| Modalità | M1 | M0 | Spiegazione |
|---|---|---|---|
| Normale | 0 | 0 | UART e il canale wireless sono aperti, la trasmissione trasparente è attiva (supporta la configurazione via etere tramite comando speciale) |
| Modalità WOR | 0 | 1 | Può essere impostato come trasmettitore WOR e ricevitore WOR |
| Modalità configurazione | 1 | 0 | Gli utenti possono accedere al registro tramite la porta seriale per controllare lo stato di funzionamento del modulo |
| Modalità Deep sleep | 1 | 1 | Sleep mode |
Quindi dobbiamo collegare il dispositivo di invio in modalità WOR.
Ciclo WOR
Un parametro di configurazione critico è WOR Cycle, per il mittente è essenziale perché aggiunge un lungo preambolo al messaggio (lungo come il tempo di attivazione), il ricevitore utilizza il wake time come tempo di intervallo di pull.
Quindi, se il destinatario controlla ogni 2000 ms (tempo di polling) se c’è un messaggio, il mittente aggiunge un preambolo di 2000 ms. Il ricevitore intercetta il preambolo del messaggio, attende che il messaggio effettivo, lo legge e torna alla modalità di risparmio energetico.
Quindi, se vuoi massimizzare il risparmio energetico, devi mettere un ciclo WOR minimo. Se vuoi una maggiore efficienza, devi fare il contrario.
Il mittente e il destinatario in questo dispositivo devono avere lo stesso ciclo WOR.
Ecco la configurazione per il trasmettitore WOR:
			configuration.ADDL = 0x02;
			configuration.ADDH = 0x00;
			configuration.NETID = 0x00;

			configuration.CHAN = 23;

			configuration.SPED.uartBaudRate = UART_BPS_9600;
			configuration.SPED.airDataRate = AIR_DATA_RATE_010_24;
			configuration.SPED.uartParity = MODE_00_8N1;

			configuration.OPTION.subPacketSetting = SPS_240_00;
			configuration.OPTION.RSSIAmbientNoise = RSSI_AMBIENT_NOISE_DISABLED;
			configuration.OPTION.transmissionPower = POWER_22;

			configuration.TRANSMISSION_MODE.enableRSSI = RSSI_DISABLED;
			configuration.TRANSMISSION_MODE.fixedTransmission = FT_FIXED_TRANSMISSION;
			configuration.TRANSMISSION_MODE.enableRepeater = REPEATER_DISABLED;
			configuration.TRANSMISSION_MODE.enableLBT = LBT_DISABLED;
			configuration.TRANSMISSION_MODE.WORTransceiverControl = WOR_TRANSMITTER;
			configuration.TRANSMISSION_MODE.WORPeriod = WOR_2000_011;
Sketch di invio:
/*
* EBYTE LoRa E22
* Send a string message to a fixed point ADDH ADDL CHAN 0 3 23 with WOR preamble
* Write a string on serial monitor or reset to resend default value.
*
* You must set WOR SENDER configuration
*
* Send a fixed point message, you must check that the transmitter and receiver have different
* CHANNEL ADDL or ADDH, check down the correct configuration
*
* Pai attention e22 support RSSI, if you want use that functionality you must enable RSSI on configuration
* configuration.TRANSMISSION_MODE.enableRSSI = RSSI_ENABLED;
*
* and uncomment #define ENABLE_RSSI true in this sketch
*
* Renzo Mischianti <https://mischianti.org>
* https://mischianti.org/category/my-libraries/ebyte-lora-e22-devices/
*
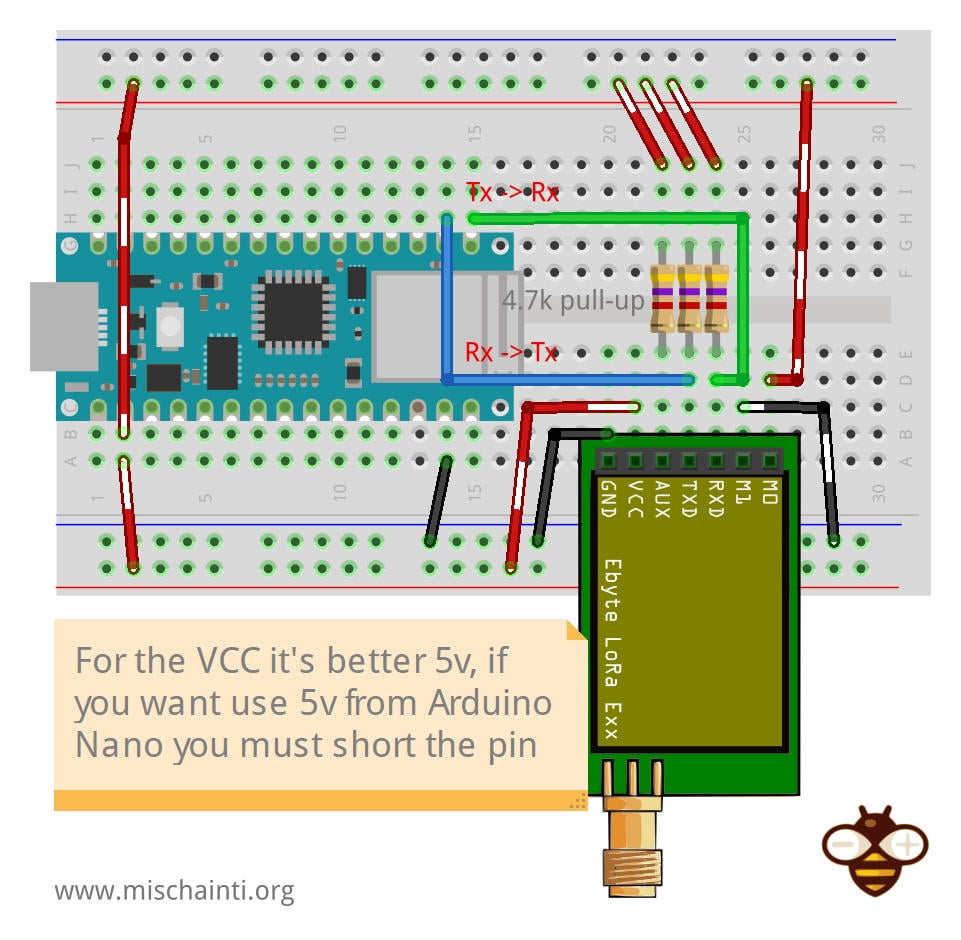
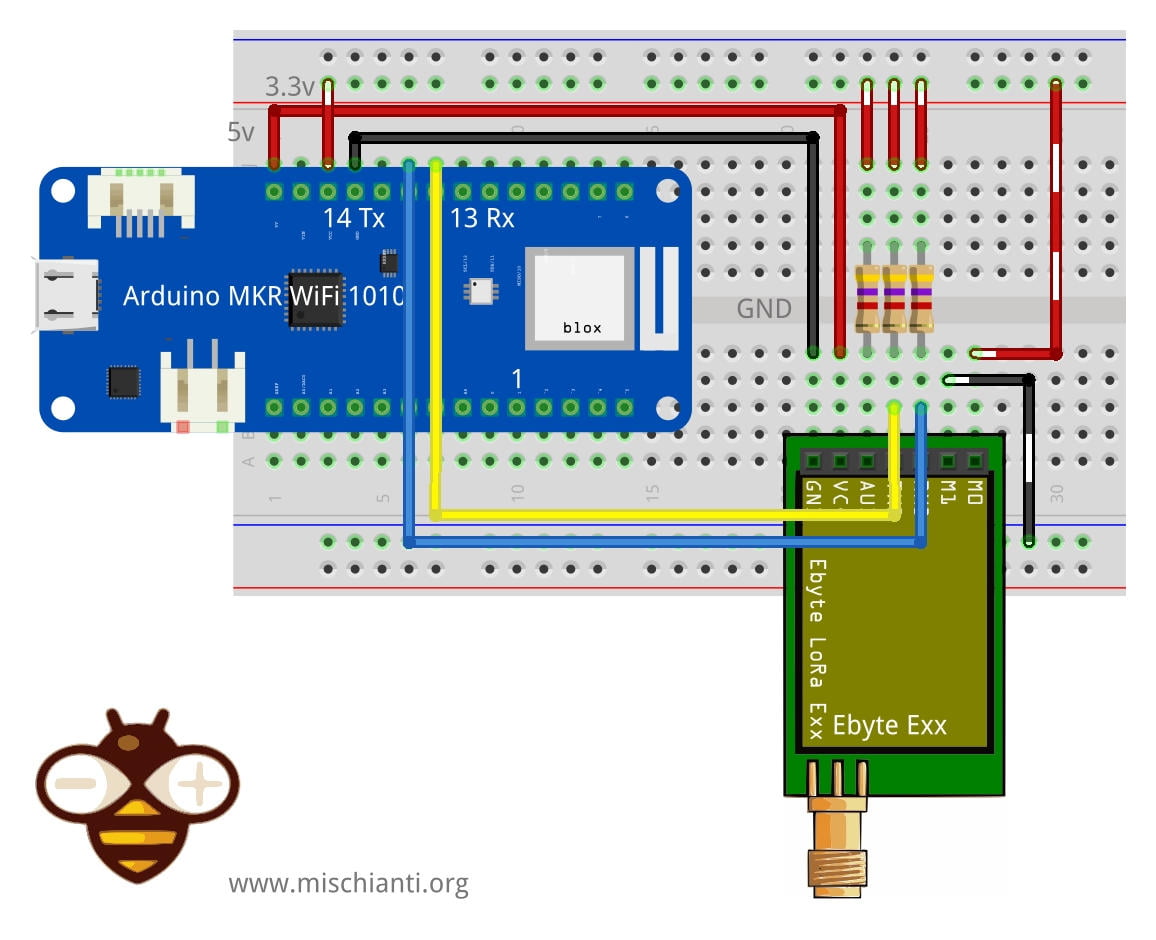
* E22 ----- WeMos D1 mini ----- esp32 ----- Arduino Nano 33 IoT ----- Arduino MKR ----- ArduinoUNO
* M0 ----- D7 (or 3.3v) ----- 19 (or 3.3v) ----- 4 (or 3.3v) ----- 2 (or 3.3v) ----- 7 Volt div (or 3.3v)
* M1 ----- D6 (or GND) ----- 21 (or GND) ----- 6 (or GND) ----- 4 (or GND) ----- 6 Volt div (or GND)
* TX ----- D3 (PullUP) ----- TX2 (PullUP) ----- TX1 (PullUP) ----- 14 (PullUP) ----- 4 (PullUP)
* RX ----- D4 (PullUP) ----- RX2 (PullUP) ----- RX1 (PullUP) ----- 13 (PullUP) ----- 5 Volt div (PullUP)
* AUX ----- D5 (PullUP) ----- 15 (PullUP) ----- 2 (PullUP) ----- 0 (PullUP) ----- 3 (PullUP)
* VCC ----- 3.3v/5v ----- 3.3v/5v ----- 3.3v/5v ----- 3.3v/5v ----- 3.3v/5v
* GND ----- GND ----- GND ----- GND ----- GND ----- GND
*
*/
// WOR SENDER configuration
#define DESTINATION_ADDL 3
// If you want use RSSI uncomment //#define ENABLE_RSSI true
// and use relative configuration with RSSI enabled
// #define ENABLE_RSSI true
#include "Arduino.h"
#include "LoRa_E22.h"
// ---------- esp8266 pins --------------
//LoRa_E22 e22ttl(RX, TX, AUX, M0, M1); // Arduino RX <-- e220 TX, Arduino TX --> e220 RX
//LoRa_E22 e22ttl(D3, D4, D5, D7, D6); // Arduino RX <-- e220 TX, Arduino TX --> e220 RX AUX M0 M1
//LoRa_E22 e22ttl(D2, D3); // Config without connect AUX and M0 M1
//#include <SoftwareSerial.h>
//SoftwareSerial mySerial(D2, D3); // Arduino RX <-- e220 TX, Arduino TX --> e220 RX
//LoRa_E22 e22ttl(&mySerial, D5, D7, D6); // AUX M0 M1
// -------------------------------------
// ---------- Arduino pins --------------
//LoRa_E22 e22ttl(4, 5, 3, 7, 6); // Arduino RX <-- e220 TX, Arduino TX --> e220 RX AUX M0 M1
//LoRa_E22 e22ttl(4, 5); // Config without connect AUX and M0 M1
//#include <SoftwareSerial.h>
//SoftwareSerial mySerial(4, 5); // Arduino RX <-- e220 TX, Arduino TX --> e220 RX
//LoRa_E22 e22ttl(&mySerial, 3, 7, 6); // AUX M0 M1
// -------------------------------------
// ------------- Arduino Nano 33 IoT -------------
LoRa_E22 e22ttl(&Serial1, 2, 4, 6); // RX AUX M0 M1
// -------------------------------------------------
// ------------- Arduino MKR WiFi 1010 -------------
// LoRa_E22 e22ttl(&Serial1, 0, 2, 4); // RX AUX M0 M1
// -------------------------------------------------
// ---------- esp32 pins --------------
// LoRa_E22 e22ttl(&Serial2, 15, 21, 19); // RX AUX M0 M1
//LoRa_E22 e22ttl(&Serial2, 22, 4, 18, 21, 19, UART_BPS_RATE_9600); // esp32 RX <-- e220 TX, esp32 TX --> e220 RX AUX M0 M1
// -------------------------------------
void setup() {
Serial.begin(9600);
delay(500);
// Startup all pins and UART
e22ttl.begin();
e22ttl.setMode(MODE_1_WOR);
Serial.println("Hi, I'm going to send message!");
// Send message
ResponseStatus rs = e22ttl.sendFixedMessage(0, DESTINATION_ADDL, 23, "Hello, world?");
// Check If there is some problem of succesfully send
Serial.println(rs.getResponseDescription());
e22ttl.setMode(MODE_0_NORMAL);
}
void loop() {
// If something available
if (e22ttl.available()>1) {
// read the String message
#ifdef ENABLE_RSSI
ResponseContainer rc = e22ttl.receiveMessageRSSI();
#else
ResponseContainer rc = e22ttl.receiveMessage();
#endif
// Is something goes wrong print error
if (rc.status.code!=1){
Serial.println(rc.status.getResponseDescription());
}else{
// Print the data received
Serial.println(rc.status.getResponseDescription());
Serial.println(rc.data);
#ifdef ENABLE_RSSI
Serial.print("RSSI: "); Serial.println(rc.rssi, DEC);
#endif
}
}
if (Serial.available()) {
String input = Serial.readString();
ResponseStatus rsSend = e22ttl.sendFixedMessage(0, DESTINATION_ADDL, 23, "We have received the message!");
// Check If there is some problem of succesfully send
Serial.println(rsSend.getResponseDescription());
}
}
Ora la configurazione del ricevitore:
			configuration.ADDL = 0x03;
			configuration.ADDH = 0x00;
			configuration.NETID = 0x00;

			configuration.CHAN = 23;

			configuration.SPED.uartBaudRate = UART_BPS_9600;
			configuration.SPED.airDataRate = AIR_DATA_RATE_010_24;
			configuration.SPED.uartParity = MODE_00_8N1;

			configuration.OPTION.subPacketSetting = SPS_240_00;
			configuration.OPTION.RSSIAmbientNoise = RSSI_AMBIENT_NOISE_DISABLED;
			configuration.OPTION.transmissionPower = POWER_22;

			configuration.TRANSMISSION_MODE.enableRSSI = RSSI_DISABLED;
			configuration.TRANSMISSION_MODE.fixedTransmission = FT_FIXED_TRANSMISSION;
			configuration.TRANSMISSION_MODE.enableRepeater = REPEATER_DISABLED;
			configuration.TRANSMISSION_MODE.enableLBT = LBT_DISABLED;
			configuration.TRANSMISSION_MODE.WORTransceiverControl = WOR_RECEIVER;
			configuration.TRANSMISSION_MODE.WORPeriod = WOR_2000_011;
E lo sketch del ricevitore con la sveglia per l’ESP32:
/*
 * EBYTE LoRa E22
 * Stay in sleep mode and wait a wake up WOR message
 * You must set WOR RECEIVER configuration
 *
 * You must configure the address with 0 3 23 with WOR receiver enable
 * and pay attention that WOR period must be the same of sender
 *
 * Pai attention e22 support RSSI, if you want use that functionality you must enable RSSI on configuration
 * configuration.TRANSMISSION_MODE.enableRSSI = RSSI_ENABLED;
 *
 * and uncomment #define ENABLE_RSSI true in this sketch
 *
 * https://mischianti.org
 *
 * E22		  ----- WeMos D1 mini	----- esp32			----- Arduino Nano 33 IoT	----- Arduino MKR	----- ArduinoUNO
 * M0         ----- D7 (or 3.3v)	----- 19 (or 3.3v)	----- 4 (or 3.3v)			----- 2 (or 3.3v)	----- 7 Volt div (or 3.3v)
 * M1         ----- D6 (or GND)		----- 21 (or GND)	----- 6 (or GND)			----- 4 (or GND)	----- 6 Volt div (or GND)
 * TX         ----- D3 (PullUP)		----- TX2 (PullUP)	----- TX1 (PullUP)			----- 14 (PullUP)	----- 4 (PullUP)
 * RX         ----- D4 (PullUP)		----- RX2 (PullUP)	----- RX1 (PullUP)			----- 13 (PullUP)	----- 5 Volt div (PullUP)
 * AUX        ----- D5 (PullUP)		----- 15  (PullUP)	----- 2  (PullUP)			----- 0  (PullUP)	----- 3 (PullUP)
 * VCC        ----- 3.3v/5v			----- 3.3v/5v		----- 3.3v/5v				----- 3.3v/5v		----- 3.3v/5v
 * GND        ----- GND				----- GND			----- GND					----- GND			----- GND
 *
 */

// with this DESTINATION_ADDL 2 you must set
// WOR SENDER configuration to the other device and
// WOR RECEIVER to this device
#define DESTINATION_ADDL 2

// If you want use RSSI uncomment //#define ENABLE_RSSI true
// and use relative configuration with RSSI enabled
//#define ENABLE_RSSI true

#include "Arduino.h"
#include "LoRa_E22.h"
#include <WiFi.h>

#include "soc/rtc_cntl_reg.h"
#include "soc/rtc.h"
#include "driver/rtc_io.h"

#define FPM_SLEEP_MAX_TIME           0xFFFFFFF
void callback() {
  Serial.println("Callback");
  Serial.flush();
}

// ---------- esp8266 pins --------------
//LoRa_E22 e22ttl(RX, TX, AUX, M0, M1);  // Arduino RX <-- e220 TX, Arduino TX --> e220 RX
//LoRa_E22 e22ttl(D3, D4, D5, D7, D6); // Arduino RX <-- e220 TX, Arduino TX --> e220 RX AUX M0 M1
//LoRa_E22 e22ttl(D2, D3); // Config without connect AUX and M0 M1

//#include <SoftwareSerial.h>
//SoftwareSerial mySerial(D2, D3); // Arduino RX <-- e220 TX, Arduino TX --> e220 RX
//LoRa_E22 e22ttl(&mySerial, D5, D7, D6); // AUX M0 M1
// -------------------------------------

// ---------- Arduino pins --------------
//LoRa_E22 e22ttl(4, 5, 3, 7, 6); // Arduino RX <-- e220 TX, Arduino TX --> e220 RX AUX M0 M1
//LoRa_E22 e22ttl(4, 5); // Config without connect AUX and M0 M1

//#include <SoftwareSerial.h>
//SoftwareSerial mySerial(4, 5); // Arduino RX <-- e220 TX, Arduino TX --> e220 RX
//LoRa_E22 e22ttl(&mySerial, 3, 7, 6); // AUX M0 M1
// -------------------------------------

// ------------- Arduino Nano 33 IoT -------------
// LoRa_E22 e22ttl(&Serial1, 2, 4, 6); //  RX AUX M0 M1
// -------------------------------------------------

// ------------- Arduino MKR WiFi 1010 -------------
// LoRa_E22 e22ttl(&Serial1, 0, 2, 4); //  RX AUX M0 M1
// -------------------------------------------------

// ---------- esp32 pins --------------
 LoRa_E22 e22ttl(&Serial2, 15, 21, 19); //  RX AUX M0 M1

//LoRa_E22 e22ttl(&Serial2, 22, 4, 18, 21, 19, UART_BPS_RATE_9600); //  esp32 RX <-- e220 TX, esp32 TX --> e220 RX AUX M0 M1
// -------------------------------------

//The setup function is called once at startup of the sketch
void setup()
{
    Serial.begin(9600);
    while (!Serial) {
        ; // wait for serial port to connect. Needed for native USB
    }
    delay(100);

    e22ttl.begin();

		e22ttl.setMode(MODE_1_WOR);

		delay(1000);
		Serial.println();
		Serial.println("Start sleep!");
		delay(100);

//		if (ESP_OK == gpio_hold_en(GPIO_NUM_21)){
//			Serial.println("HOLD 21");
//		}else{
//			Serial.println("NO HOLD 21");
//		}
//		if (ESP_OK == gpio_hold_en(GPIO_NUM_19)){
//				Serial.println("HOLD 19");
//			}else{
//				Serial.println("NO HOLD 19");
//			}

		esp_sleep_enable_ext0_wakeup(GPIO_NUM_15,LOW);

//		gpio_deep_sleep_hold_en();
		//Go to sleep now
		Serial.println("Going to sleep now");
		delay(100);

		esp_light_sleep_start();

		delay(1);

//	e22ttl.setMode(MODE_0_NORMAL);
//	delay(1000);
    Serial.println();
    Serial.println("Wake and start listening!");

}

// The loop function is called in an endless loop
void loop()
{
    if (e22ttl.available()  > 1){
    	Serial.println("Message arrived!");
#ifdef ENABLE_RSSI
        ResponseContainer rs = e22ttl.receiveMessageRSSI();
#else
        ResponseContainer rs = e22ttl.receiveMessage();
#endif
        // First of all get the data
        String message = rs.data;

        Serial.println(rs.status.getResponseDescription());
        Serial.println(message);

        e22ttl.setMode(MODE_0_NORMAL);

    	delay(1000);

        e22ttl.sendFixedMessage(0, DESTINATION_ADDL, 23, "We have received the message!");
    }
}
Fai attenzione in questo sketch solo il LoRa E220 va in modalità sleep, quindi in un esempio reale, devi gestire lo sleep del microcontrollore. Nei seguenti articoli, verificheremo il sonno profondo di ogni microcontrollore con esempi dettagliati.
Invia una struttura complessa
Per inviare e ricevere, è necessario impostare la modalità normale; se si effettua una connessione completa, la libreria esegue automaticamente l’impostazione corretta.
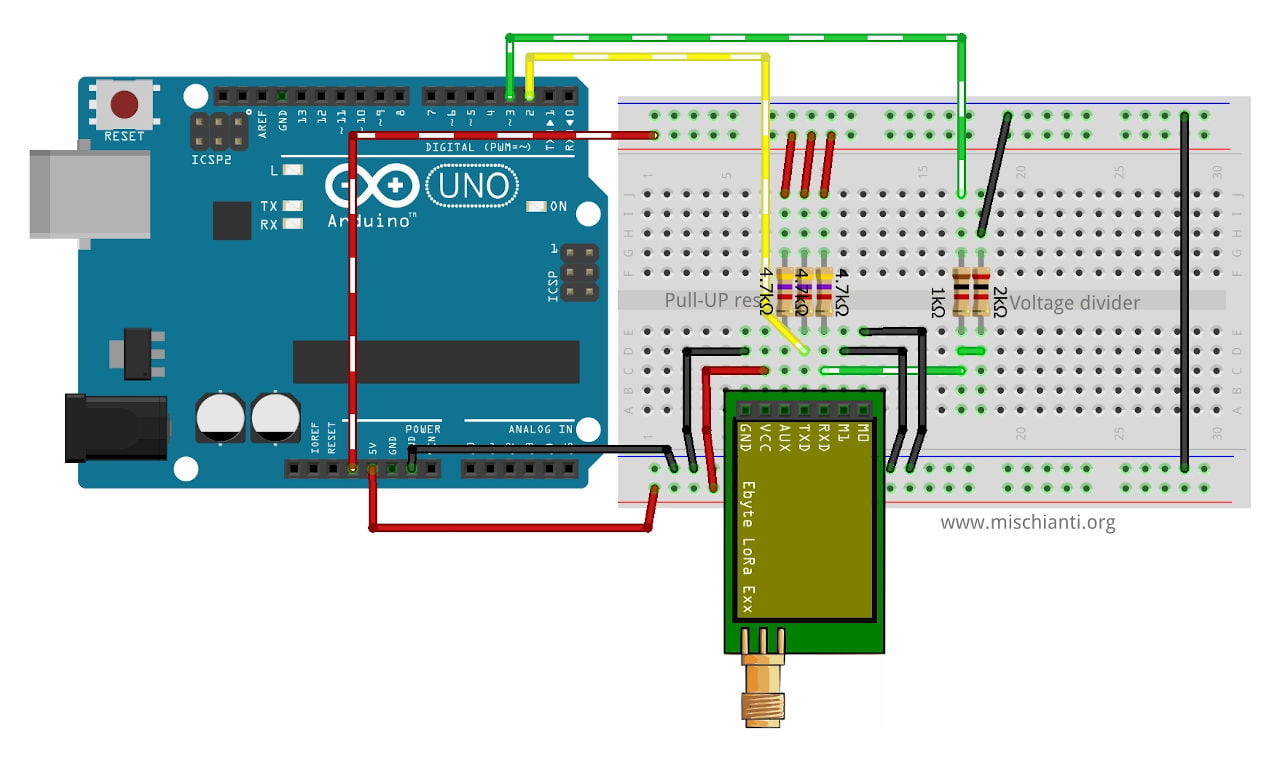
| M0 | GND (Imposta il normal mode) |
| M1 | GND (Imposta il normal mode) |
| TX | PIN 2 (PullUP 4,7KΩ) |
| RX | PIN 3 (PullUP 4,7KΩ & partitore di tensione) |
| AUX | Non connesso (PullUP 4,7KΩ) |
| VCC | 5v |
| GND | GND |
e questa configurazione per Wemos D1 mini:
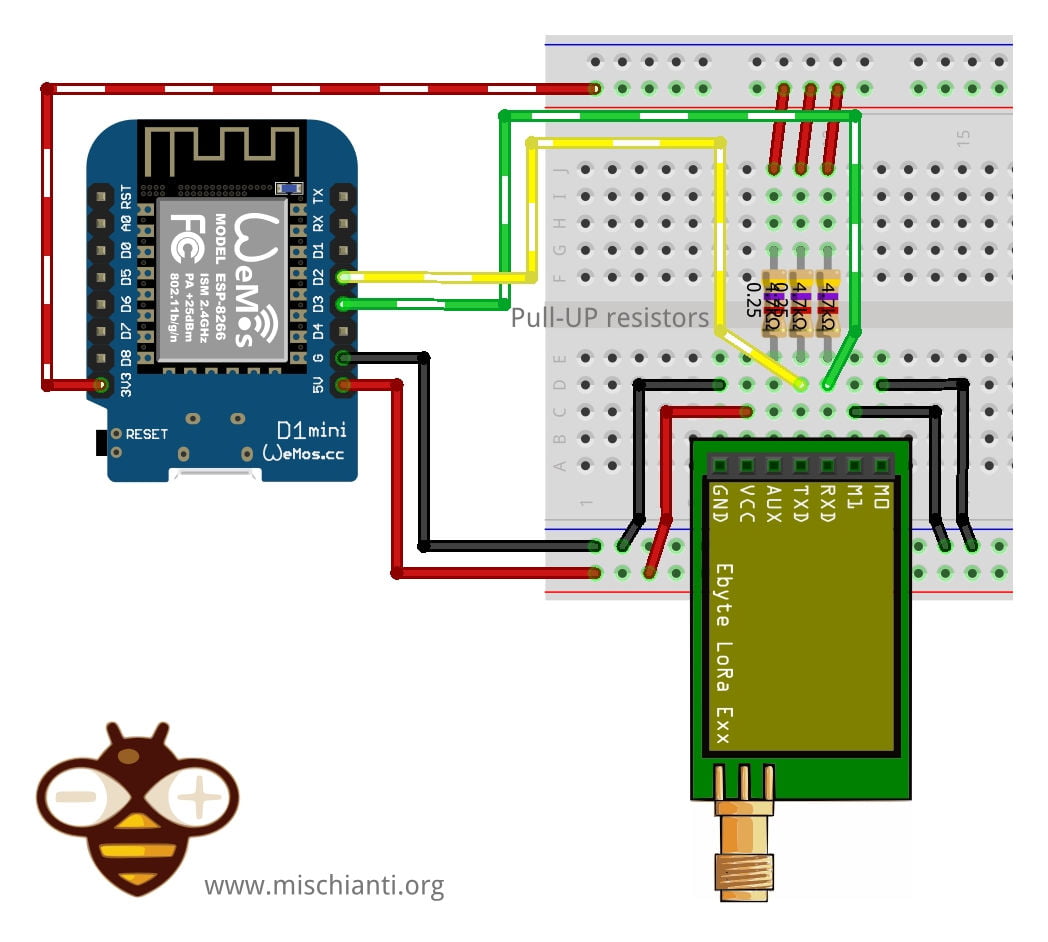
| M0 | GND (Imposta il normal mode) |
| M1 | GND (Imposta il normal mode) |
| TX | PIN D2 (PullUP 4,7KΩ) |
| RX | PIN D3 (PullUP 4,7KΩ) |
| AUX | Non connesso (PullUP 4,7KΩ) |
| VCC | 3.3v/5v |
| GND | GND |
ESP-32:
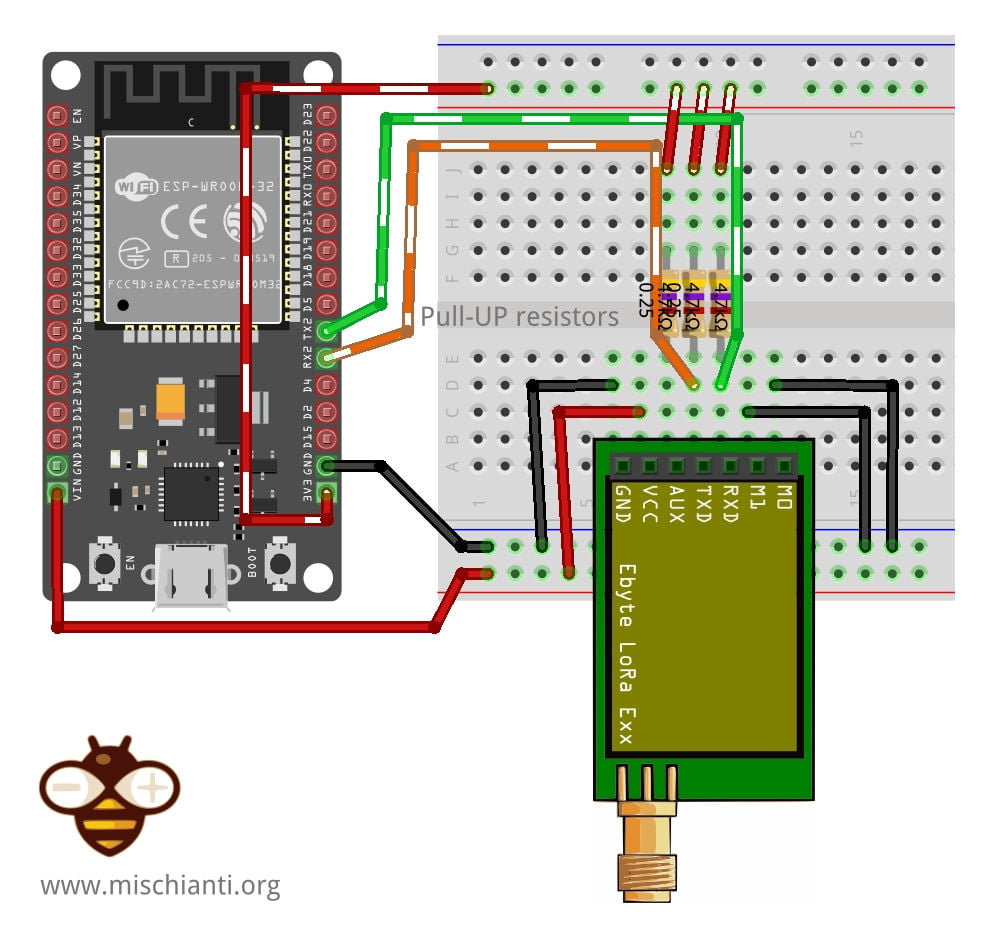
| M0 | GND (Imposta il normal mode) |
| M1 | GND (Imposta il normal mode) |
| RX | TX2 (PullUP 4,7KΩ) |
| TX | RX2 (PullUP 4,7KΩ) |
| AUX | Non connesso (PullUP 4,7KΩ) |
| VCC | 3.3v/5v |
| GND | GND |
Arduino MKR WiFi 1010:
Possiamo usare la stringa come vogliamo, usarla come formato JSON e così via, ma se utilizzerai messaggi strutturati in modalità nativa (array di byte) è più efficiente.
Il codice di esempio per il mittente può essere:
struct Message {
	char type[5];
	char message[8];
	float temperature;
};

  struct	Message message = {"TEMP", ROOM, 19.2};

  // Send message
  ResponseStatus rs = e22ttl.sendFixedMessage(0, DESTINATION_ADDL, 23, &message, sizeof(Message));
  // Check If there is some problem of succesfully send
  Serial.println(rs.getResponseDescription());
e per ricevere:
	// If something available
  if (e22ttl.available()>1) {
	  // read the String message
#ifdef ENABLE_RSSI
		ResponseStructContainer rsc = e22ttl.receiveMessageRSSI(sizeof(Message));
#else
		ResponseStructContainer rsc = e22ttl.receiveMessage(sizeof(Message));
#endif

	// Is something goes wrong print error
	if (rsc.status.code!=1){
		Serial.println(rsc.status.getResponseDescription());
	}else{
		// Print the data received
		Serial.println(rsc.status.getResponseDescription());
		struct Message message = *(Message*) rsc.data;
		Serial.println(message.type);
		Serial.println(message.message);
		Serial.println(message.temperature);

#ifdef ENABLE_RSSI
		Serial.print("RSSI: "); Serial.println(rsc.rssi, DEC);
#endif
	}
  }
Per gestire Mittente e Ricevente è possibile utilizzare la configurazione FIXED SENDER e FIXED RECEIVER:
Mittente:
	//	----------------------- FIXED SENDER -----------------------
			configuration.ADDL = 0x02;
			configuration.ADDH = 0x00;
			configuration.NETID = 0x00;

			configuration.CHAN = 23;

			configuration.SPED.uartBaudRate = UART_BPS_9600;
			configuration.SPED.airDataRate = AIR_DATA_RATE_010_24;
			configuration.SPED.uartParity = MODE_00_8N1;

			configuration.OPTION.subPacketSetting = SPS_240_00;
			configuration.OPTION.RSSIAmbientNoise = RSSI_AMBIENT_NOISE_DISABLED;
			configuration.OPTION.transmissionPower = POWER_22;

			configuration.TRANSMISSION_MODE.enableRSSI = RSSI_DISABLED;
			configuration.TRANSMISSION_MODE.fixedTransmission = FT_FIXED_TRANSMISSION;
			configuration.TRANSMISSION_MODE.enableRepeater = REPEATER_DISABLED;
			configuration.TRANSMISSION_MODE.enableLBT = LBT_DISABLED;
			configuration.TRANSMISSION_MODE.WORTransceiverControl = WOR_TRANSMITTER;
			configuration.TRANSMISSION_MODE.WORPeriod = WOR_2000_011;
E devi decommentare la relativa definizione nello sketch:
// With FIXED SENDER configuration
#define DESTINATION_ADDL 3
#define ROOM "Kitchen"
Ricevitore:
	//	----------------------- FIXED RECEIVER -----------------------
			configuration.ADDL = 0x03;
			configuration.ADDH = 0x00;
			configuration.NETID = 0x00;

			configuration.CHAN = 23;

			configuration.SPED.uartBaudRate = UART_BPS_9600;
			configuration.SPED.airDataRate = AIR_DATA_RATE_010_24;
			configuration.SPED.uartParity = MODE_00_8N1;

			configuration.OPTION.subPacketSetting = SPS_240_00;
			configuration.OPTION.RSSIAmbientNoise = RSSI_AMBIENT_NOISE_ENABLED;
			configuration.OPTION.transmissionPower = POWER_22;

			configuration.TRANSMISSION_MODE.enableRSSI = RSSI_DISABLED;
			configuration.TRANSMISSION_MODE.fixedTransmission = FT_FIXED_TRANSMISSION;
			configuration.TRANSMISSION_MODE.enableRepeater = REPEATER_DISABLED;
			configuration.TRANSMISSION_MODE.enableLBT = LBT_DISABLED;
			configuration.TRANSMISSION_MODE.WORTransceiverControl = WOR_RECEIVER;
			configuration.TRANSMISSION_MODE.WORPeriod = WOR_2000_011;
E devi decommentare la relativa definizione nello schizzo
// With FIXED RECEIVER configuration
#define DESTINATION_ADDL 2
#define ROOM "Bathroo"
Schizzo completo di mittente e destinatario:
/*
 * EBYTE LoRa E22
 * Send a structured message to a fixed point ADDH ADDL CHAN 0 3 23
 *
 * Write the float temperature value on serial (or reset device that send default message)
 *
 * Send a transparent message, you must check that the transmitter and receiver have the same
 * CHANNEL ADDL and ADDH
 *
 * Pai attention e22 support RSSI, if you want use that functionality you must enable RSSI on configuration
 * configuration.TRANSMISSION_MODE.enableRSSI = RSSI_ENABLED;
 *
 * and uncomment #define ENABLE_RSSI true in this sketch
 *
 * https://mischianti.org
 *
 * E22		  ----- WeMos D1 mini	----- esp32			----- Arduino Nano 33 IoT	----- Arduino MKR	----- ArduinoUNO
 * M0         ----- D7 (or GND)		----- 19 (or GND)	----- 4 (or GND)			----- 2 (or GND)	----- 7 Volt div (or GND)
 * M1         ----- D6 (or GND)		----- 21 (or GND)	----- 6 (or GND)			----- 4 (or GND)	----- 6 Volt div (or GND)
 * TX         ----- D3 (PullUP)		----- TX2 (PullUP)	----- TX1 (PullUP)			----- 14 (PullUP)	----- 4 (PullUP)
 * RX         ----- D4 (PullUP)		----- RX2 (PullUP)	----- RX1 (PullUP)			----- 13 (PullUP)	----- 5 Volt div (PullUP)
 * AUX        ----- D5 (PullUP)		----- 18  (PullUP)	----- 2  (PullUP)			----- 0  (PullUP)	----- 3 (PullUP)
 * VCC        ----- 3.3v/5v			----- 3.3v/5v		----- 3.3v/5v				----- 3.3v/5v		----- 3.3v/5v
 * GND        ----- GND				----- GND			----- GND					----- GND			----- GND
 *
 */

// with this RECEIVER_ADDL 3 you must set
// FIXED RECEIVER configuration to the other device and
// FIXED SENDER to this device
#define DESTINATION_ADDL 3

// If you want use RSSI uncomment //#define ENABLE_RSSI true
// and use relative configuration with RSSI enabled
#define ENABLE_RSSI true

#include "Arduino.h"
#include "LoRa_E22.h"

// ---------- esp8266 pins --------------
//LoRa_E22 e22ttl(RX, TX, AUX, M0, M1);  // Arduino RX <-- e220 TX, Arduino TX --> e220 RX
//LoRa_E22 e22ttl(D3, D4, D5, D7, D6); // Arduino RX <-- e220 TX, Arduino TX --> e220 RX AUX M0 M1
//LoRa_E22 e22ttl(D2, D3); // Config without connect AUX and M0 M1

//#include <SoftwareSerial.h>
//SoftwareSerial mySerial(D2, D3); // Arduino RX <-- e220 TX, Arduino TX --> e220 RX
//LoRa_E22 e22ttl(&mySerial, D5, D7, D6); // AUX M0 M1
// -------------------------------------

// ---------- Arduino pins --------------
//LoRa_E22 e22ttl(4, 5, 3, 7, 6); // Arduino RX <-- e220 TX, Arduino TX --> e220 RX AUX M0 M1
//LoRa_E22 e22ttl(4, 5); // Config without connect AUX and M0 M1

//#include <SoftwareSerial.h>
//SoftwareSerial mySerial(4, 5); // Arduino RX <-- e220 TX, Arduino TX --> e220 RX
//LoRa_E22 e22ttl(&mySerial, 3, 7, 6); // AUX M0 M1
// -------------------------------------

// ------------- Arduino Nano 33 IoT -------------
// LoRa_E22 e22ttl(&Serial1, 2, 4, 6); //  RX AUX M0 M1
// -------------------------------------------------

// ------------- Arduino MKR WiFi 1010 -------------
// LoRa_E22 e22ttl(&Serial1, 0, 2, 4); //  RX AUX M0 M1
// -------------------------------------------------

// ---------- esp32 pins --------------
 LoRa_E22 e22ttl(&Serial2, 15, 21, 19); //  RX AUX M0 M1

//LoRa_E22 e22ttl(&Serial2, 22, 4, 18, 21, 19, UART_BPS_RATE_9600); //  esp32 RX <-- e220 TX, esp32 TX --> e220 RX AUX M0 M1
// -------------------------------------

struct Message {
    char type[5];
    char message[8];
	byte temperature[4];
} message;

void setup() {
  Serial.begin(9600);
  delay(500);

  // Startup all pins and UART
  e22ttl100.begin();

  Serial.println("Hi, I'm going to send message!");

	struct Message {
		char type[5] = "TEMP";
		char message[8] = "Kitchen";
		byte temperature[4];
	} message;

	*(float*)(message.temperature) = 19.2;

  // Send message
  ResponseStatus rs = e22ttl100.sendFixedMessage(0, DESTINATION_ADDL, 23, &message, sizeof(Message));
  // Check If there is some problem of succesfully send
  Serial.println(rs.getResponseDescription());
}

void loop() {
	// If something available
  if (e22ttl100.available()>1) {
	  // read the String message
#ifdef ENABLE_RSSI
		ResponseStructContainer rsc = e22ttl100.receiveMessageRSSI(sizeof(Message));
#else
		ResponseStructContainer rsc = e22ttl100.receiveMessage(sizeof(Message));
#endif

	// Is something goes wrong print error
	if (rsc.status.code!=1){
		Serial.println(rsc.status.getResponseDescription());
	}else{
		// Print the data received
		Serial.println(rsc.status.getResponseDescription());
		struct Message message = *(Message*) rsc.data;
		Serial.println(message.type);
		Serial.println(message.message);
		Serial.println(*(float*)(message.temperature));

#ifdef ENABLE_RSSI
		Serial.print("RSSI: "); Serial.println(rsc.rssi, DEC);
#endif
	}
  }
  if (Serial.available()) {
		struct Message {
			char type[5] = "TEMP";
			char message[8] = "Kitchen";
			byte temperature[4];
		} message;
		*(float*)(message.temperature) = Serial.parseFloat();

	  // Send message
	  ResponseStatus rs = e22ttl100.sendFixedMessage(0, DESTINATION_ADDL, 23, &message, sizeof(Message));
	  // Check If there is some problem of succesfully send
	  Serial.println(rs.getResponseDescription());
  }
}
Ma la vita reale non è così semplice e probabilmente hai più sensori con strutture diverse nella tua casa, quindi devi ricevere varie strutture. Una possibile soluzione è leggere la prima parte della struttura e istanziare il resto come si vuole.
Leggi un pezzo di struttura
Quindi se desideri il TIPO di struttura leggerai:
		// read the String message
		char type[5]; // first part of structure
		ResponseContainer rs = e22ttl.receiveInitialMessage(sizeof(type));
		String typeStr = rs.data;
Con queste informazioni, possiamo creare strutture specifiche da diversi dispositivi, ad esempio:
struct MessageTemperature {
	char type[5];
	char message[8];
	byte temperature[4];
};

[...]

	struct MessageTemperature messageT = { "TEMP", ROOM, 0 };
	*(float*)(messageT.temperature) = 19.2;

	// Send message
	ResponseStatus rsT = e22ttl.sendFixedMessage(0, DESTINATION_ADDL, 23, &messageT, sizeof(MessageTemperature));
	// Check If there is some problem of succesfully send
	Serial.println(rsT.getResponseDescription());
o
struct MessageHumidity {
	char type[5];
	char message[8];
	byte humidity;
};

[...]

	struct MessageHumidity message = { "HUMI", ROOM, 80 };
	// Send message
	ResponseStatus rs = e22ttl.sendFixedMessage(0, DESTINATION_ADDL, 23, &message, sizeof(MessageHumidity));
	// Check If there is some problem of succesfully send
	Serial.println(rs.getResponseDescription());
E così puoi caricare la struttura specificata dal ricevitore:
	// If something available
	if (e22ttl.available() > 1) {
		// read the String message
		char type[5]; // first part of structure
		ResponseContainer rs = e220ttl.receiveInitialMessage(sizeof(type));
		String typeStr = rs.data;

		// Is something goes wrong print error
		if (rs.status.code != 1) {
			Serial.println(rs.status.getResponseDescription());
		} else {
			Serial.println(typeStr);
			if (typeStr == "TEMP") {
				struct MessageTemperaturePartial {
					char message[8];
					byte temperature[4];
				};

				ResponseStructContainer rsc = e22ttl.receiveMessage( sizeof(MessageTemperaturePartial));
				struct MessageTemperaturePartial message = *(MessageTemperaturePartial*) rsc.data;

				Serial.println(*(float*)(message.temperature));
				Serial.println(message.message);
				rsc.close();
			} else if (typeStr == "HUMI") {
				struct MessageHumidityPartial {
					char message[8];
					byte humidity;
				};

				ResponseStructContainer rsc = e22ttl.receiveMessage(sizeof(MessageHumidityPartial));
				struct MessageHumidityPartial message = *(MessageHumidityPartial*) rsc.data;

				Serial.println(message.humidity);
				Serial.println(message.message);
				rsc.close();
			} else {
				Serial.println("Something goes wrong!!");
			}
		}
	}
Quindi con uno sketch mittente che invia umidità e temperatura, possiamo leggere la prima parte, il tipo, ed eseguiamo il codice corretto per recuperare il resto dei dati:
/*
 * EBYTE LoRa E22
 * send a structured message to the device that have ADDH ADDL CHAN -> 0 DESTINATION_ADDL 23
 *
 * The receiver read the first part of the packet and undestand the type.
 * If the type is HUMI read the message and the humidity as int
 * else read the temperature as float.
 * I use byte array because some microcontroller can have different size for float
 *
 * You must configure 2 device: one as SENDER (with FIXED SENDER config) and uncomment the relative
 * define with the correct DESTINATION_ADDL, and one as RECEIVER (with FIXED RECEIVER config)
 * and uncomment the relative define with the correct DESTINATION_ADDL.
 *
 * Write a string on serial monitor or reset to resend default value.
 *
 * You must uncommend the correct constructor and set the correct AUX_PIN define.
 *
 * by Renzo Mischianti <https://mischianti.org>
 *
 * https://mischianti.org
 *
 * E22		  ----- WeMos D1 mini	----- esp32			----- Arduino Nano 33 IoT	----- Arduino MKR	----- ArduinoUNO
 * M0         ----- D7 (or GND)		----- 19 (or GND)	----- 4 (or GND)			----- 2 (or GND)	----- 7 Volt div (or GND)
 * M1         ----- D6 (or GND)		----- 21 (or GND)	----- 6 (or GND)			----- 4 (or GND)	----- 6 Volt div (or GND)
 * TX         ----- D3 (PullUP)		----- TX2 (PullUP)	----- TX1 (PullUP)			----- 14 (PullUP)	----- 4 (PullUP)
 * RX         ----- D4 (PullUP)		----- RX2 (PullUP)	----- RX1 (PullUP)			----- 13 (PullUP)	----- 5 Volt div (PullUP)
 * AUX        ----- D5 (PullUP)		----- 15  (PullUP)	----- 2  (PullUP)			----- 0  (PullUP)	----- 3 (PullUP)
 * VCC        ----- 3.3v/5v			----- 3.3v/5v		----- 3.3v/5v				----- 3.3v/5v		----- 3.3v/5v
 * GND        ----- GND				----- GND			----- GND					----- GND			----- GND
 *
 */

#define MESSAGE_TYPE "HUMI"

// With FIXED SENDER configuration
#define DESTINATION_ADDL 3
#define ROOM "Kitchen"

// With FIXED RECEIVER configuration
//#define DESTINATION_ADDL 2
//#define ROOM "Bathroo"

// If you want use RSSI uncomment //#define ENABLE_RSSI true
// and use relative configuration with RSSI enabled
// #define ENABLE_RSSI true

#include "Arduino.h"
#include "LoRa_E22.h"

// ---------- esp8266 pins --------------
//LoRa_E22 e22ttl(RX, TX, AUX, M0, M1);  // Arduino RX <-- e22 TX, Arduino TX --> e22 RX
//LoRa_E22 e22ttl(D3, D4, D5, D7, D6); // Arduino RX <-- e22 TX, Arduino TX --> e22 RX AUX M0 M1
//LoRa_E22 e22ttl(D2, D3); // Config without connect AUX and M0 M1

//#include <SoftwareSerial.h>
//SoftwareSerial mySerial(D2, D3); // Arduino RX <-- e22 TX, Arduino TX --> e22 RX
//LoRa_E22 e22ttl(&mySerial, D5, D7, D6); // AUX M0 M1
// -------------------------------------

// ---------- Arduino pins --------------
//LoRa_E22 e22ttl(4, 5, 3, 7, 6); // Arduino RX <-- e22 TX, Arduino TX --> e22 RX AUX M0 M1
//LoRa_E22 e22ttl(4, 5); // Config without connect AUX and M0 M1

//#include <SoftwareSerial.h>
//SoftwareSerial mySerial(4, 5); // Arduino RX <-- e22 TX, Arduino TX --> e22 RX
//LoRa_E22 e22ttl(&mySerial, 3, 7, 6); // AUX M0 M1
// -------------------------------------

// ------------- Arduino Nano 33 IoT -------------
 LoRa_E22 e22ttl(&Serial1, 2, 4, 6); //  RX AUX M0 M1
// -------------------------------------------------

// ------------- Arduino MKR WiFi 1010 -------------
// LoRa_E22 e22ttl(&Serial1, 0, 2, 4); //  RX AUX M0 M1
// -------------------------------------------------

// ---------- esp32 pins --------------
// LoRa_E22 e22ttl(&Serial2, 15, 21, 19); //  RX AUX M0 M1

//LoRa_E22 e22ttl(&Serial2, 22, 4, 18, 21, 19, UART_BPS_RATE_9600); //  esp32 RX <-- e22 TX, esp32 TX --> e22 RX AUX M0 M1
// -------------------------------------

struct MessageTemperature {
	char type[5];
	char message[8];
	byte temperature[4];
};

struct MessageHumidity {
	char type[5];
	char message[8];
	byte humidity;
};

void setup() {
	Serial.begin(9600);
	while(!Serial);
	delay(500);

	// Startup all pins and UART
	e22ttl.begin();

	Serial.println("Hi, I'm going to send message!");

	struct MessageHumidity message = { "HUMI", ROOM, 80 };
	// Send message
	ResponseStatus rs = e22ttl.sendFixedMessage(0, DESTINATION_ADDL, 23, &message, sizeof(MessageHumidity));
	// Check If there is some problem of succesfully send
	Serial.println(rs.getResponseDescription());

	delay(1000);

	struct MessageTemperature messageT = { "TEMP", ROOM, 0 };
	*(float*)(messageT.temperature) = 19.2;

	// Send message
	ResponseStatus rsT = e22ttl.sendFixedMessage(0, DESTINATION_ADDL, 23, &messageT, sizeof(MessageTemperature));
	// Check If there is some problem of succesfully send
	Serial.println(rsT.getResponseDescription());
}

void loop() {
	// If something available
	if (e22ttl.available() > 1) {
		// read the String message
		char type[5]; // first part of structure
		ResponseContainer rs = e22ttl.receiveInitialMessage(sizeof(type));
		String typeStr = rs.data;

		// Is something goes wrong print error
		if (rs.status.code != 1) {
			Serial.println(rs.status.getResponseDescription());
		} else {
			Serial.println(typeStr);
			if (typeStr == "TEMP") {
				struct MessageTemperaturePartial {
					char message[8];
					byte temperature[4];
				};

				ResponseStructContainer rsc = e22ttl.receiveMessage( sizeof(MessageTemperaturePartial));
				struct MessageTemperaturePartial message = *(MessageTemperaturePartial*) rsc.data;

				Serial.println(*(float*)(message.temperature));
				Serial.println(message.message);
				rsc.close();
			} else if (typeStr == "HUMI") {
				struct MessageHumidityPartial {
					char message[8];
					byte humidity;
				};

				ResponseStructContainer rsc = e22ttl.receiveMessage(sizeof(MessageHumidityPartial));
				struct MessageHumidityPartial message = *(MessageHumidityPartial*) rsc.data;

				Serial.println(message.humidity);
				Serial.println(message.message);
				rsc.close();
			} else {
				Serial.println("Something goes wrong!!");
			}
		}
	}
 	if (Serial.available()) {
 		if (MESSAGE_TYPE == "HUMI") {
 			struct MessageHumidity message = { "HUMI", ROOM, 0 };
 			message.humidity = Serial.parseInt();

 	 		// Send message
 	 		ResponseStatus rs = e22ttl.sendFixedMessage(0, DESTINATION_ADDL, 23, &message, sizeof(MessageHumidity));
 	 		// Check If there is some problem of succesfully send
 	 		Serial.println(rs.getResponseDescription());
 		} else {
 			struct MessageTemperature message = { "TEMP", ROOM, 0 };
 			*(float*)(message.temperature) = Serial.parseFloat();

 	 		// Send message
 	 		ResponseStatus rs = e22ttl.sendFixedMessage(0, DESTINATION_ADDL, 23, &message, sizeof(MessageTemperature));
 	 		// Check If there is some problem of succesfully send
 	 		Serial.println(rs.getResponseDescription());
 		}
 	}
}
Grazie
E questa è stata l’ultima parte del mio piccolo tutorial. Successivamente, esamineremo in dettaglio il risparmio energetico dei vari microcontrollori, non solo del dispositivo LoRa.
- Ebyte LoRa E22 per Arduino, esp32 o esp8266: specifiche ed utilizzo base
- Ebyte LoRa E22 per Arduino, esp32 o esp8266: libreria
- Ebyte LoRa E22 per Arduino, esp32 o esp8266: configurazione
- Ebyte LoRa E22 per Arduino, esp32 o esp8266: trasmissione fissa, broadcast, monitor e RSSI
- Ebyte LoRa E22 per Arduino, esp32 o esp8266: risparmio energetico ed invio di dati strutturati
- Ebyte LoRa E22 per Arduino, esp32 o esp8266: ripetitore e configurazione remota
- Ebyte LoRa E22 per Arduino, esp32 o esp8266: WOR il microcontrollore e lo shield per Arduino
- Ebyte LoRa E22 per Arduino, esp32 o esp8266: WOR il microcontrollore e lo shield per il WeMos D1 mini
- Ebyte LoRa E22 per Arduino, esp32 o esp8266: WOR il microcontrollore e lo shield per l’esp32 dev v1
Shield e PCB