Centralina Web per inverter ABB (Power One) Aurora: WebSocket e Web Server – 7
Un’interfaccia web senza un server web non può esistere, quindi prima ho implementato il server poi ho creato una semplice applicazione web React/Redux per gestire e mostrare i dati.
La struttura web è servita interamente tramite l’esp8266, puoi fare riferimento al tutorial su “Come costruire un Web Server con esp8266 e esp32” per avere molte informazioni e idee.
Non aggiungo l’autenticazione perché lo uso solo all’interno della mia rete LAN, ma il tutorial ti spiega come aggiungere un livello di sicurezza.
Tutto il sito è multilingua (inglese/italiano per ora).
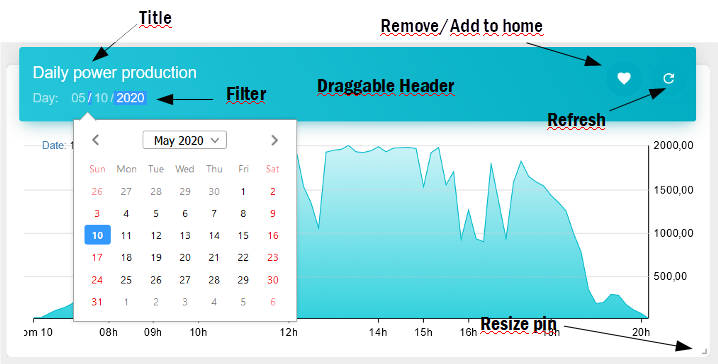
L’interfaccia ha una gestione a widget, puoi selezionare un singolo widget da mettere nella tua home page, e puoi spostare e ridimensionare tutti gli elementi.
Ecco un esempio della home page.
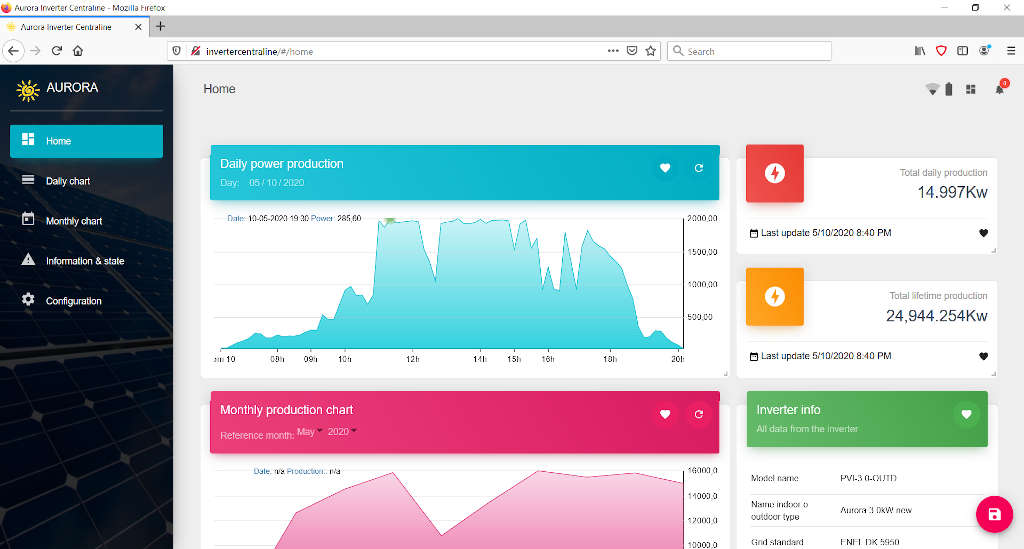
Per mettere il widget nella home page è necessario fare clic sul cuore, dopodiché è possibile trovarlo nella home page.
Gestione del contenuto statico
Per gestire il contenuto statico creo un altro server sulla porta 80, e tutto il contenuto è gestito da 3 semplici funzioni, la prima controlla il tipo di file, se non viene passato nulla viene impostata la paingina index.html come default, e per tutti gli elementi verifica se esiste una versione gzip del file.
bool handleFileRead(String path){  // send the right file to the client (if it exists)
  DEBUG_PRINT(F("handleFileRead: "));
  DEBUG_PRINTLN(path);

  if(path.endsWith("/")) path += F("index.html");           // If a folder is requested, send the index file
  String contentType = getContentType(path);             // Get the MIME type
  String pathWithGz = path + F(".gz");
  if(SPIFFS.exists(pathWithGz) || SPIFFS.exists(path)){  // If the file exists, either as a compressed archive, or normal
    if(SPIFFS.exists(pathWithGz))                          // If there's a compressed version available
      path += F(".gz");                                         // Use the compressed version
    fs::File file = SPIFFS.open(path, "r");                    // Open the file
    size_t sent = httpServer.streamFile(file, contentType);    // Send it to the client
    file.close();                                          // Close the file again
    DEBUG_PRINTLN(String(F("\tSent file: ")) + path + String(F(" of size ")) + sent);
    return true;
  }
  DEBUG_PRINTLN(String(F("\tFile Not Found: ")) + path);
  return false;                                          // If the file doesn't exist, return false
}
se il file viene trovato, riproduce il contenuto
void streamFile(const String filename){
	if (SPIFFS.exists(filename)){
		fs::File fileToStream = SPIFFS.open(filename, "r");
		if (fileToStream){
			if (fileToStream.available()){
				DEBUG_PRINT(F("Stream file..."));
				const String appContext = getContentType(filename);
				httpRestServer.streamFile(fileToStream, appContext);
				DEBUG_PRINTLN(F("done."));
			}else{
				DEBUG_PRINTLN(F("Data not available!"));
				httpRestServer.send(204, F("text/html"), F("Data not available!"));
			}
			fileToStream.close();
		}else{
			DEBUG_PRINTLN(F("File not found!"));
			httpRestServer.send(204, "text/html", "No content found!");
		}
	}else{
		DEBUG_PRINTLN(F("File not found!"));
		httpRestServer.send(204, "text/html", "File not exist!");
	}
}
e imposta il tipo MIME corretto
String getContentType(String filename){
  if(filename.endsWith(F(".htm"))) 		return F("text/html");
  else if(filename.endsWith(F(".html"))) 	return F("text/html");
  else if(filename.endsWith(F(".css"))) 	return F("text/css");
  else if(filename.endsWith(F(".js"))) 	return F("application/javascript");
  else if(filename.endsWith(F(".json"))) 	return F("application/json");
  else if(filename.endsWith(F(".png"))) 	return F("image/png");
  else if(filename.endsWith(F(".gif"))) 	return F("image/gif");
  else if(filename.endsWith(F(".jpg"))) 	return F("image/jpeg");
  else if(filename.endsWith(F(".ico"))) 	return F("image/x-icon");
  else if(filename.endsWith(F(".xml"))) 	return F("text/xml");
  else if(filename.endsWith(F(".pdf"))) 	return F("application/x-pdf");
  else if(filename.endsWith(F(".zip"))) 	return F("application/x-zip");
  else if(filename.endsWith(F(".gz"))) 	return F("application/x-gzip");
  return F("text/plain");
}
È abbastanza semplice ma se vuoi approfondire ti ricordo che puoi fare riferimento alla serie di articoli “Come costruire un Web Server con esp8266 e esp32“.
Carica il sito
Puoi fare riferimento all’articolo “WeMos D1 mini (esp8266): SPIFFS FileSystem integrato” per avere maggiori informazioni su come caricare il sito, ma puoi abilitare il server FTP su WIC e caricare il sito tramite FTP come descritto su “Server FTP su esp8266 ed esp32“.
Widgets
Ho creato 5 sezioni (per ora),
- Homepage : dove puoi aggiungere tutti i singoli widget e creare una visualizzazione personalizzata
- Grafico giornaliero : con
- grafico dell’andamento della potenza
- grafico dell’andamento della corrente
- grafico dell’andamento della della tensione
- produzione giornaliera totale
- produzione in tempo reale
- Grafico mensile : con
- grafico della produzione mensile, per il mese è possibile visualizzare ogni giorno il totale della produzione e il picco della produzione
- Produzione totale
- Produzione annua totale
- Produzione mensile totale
- Produzione settimanale totale
- Informazioni e stato : con
- Grafico della tensione della batteria
- Informazioni sull’inverter
- Stato dell’inverter
- Configurazione : che già vediamo.
Disposizione
Tutto il sito è stato creato con React e Material UI, quindi è responsive
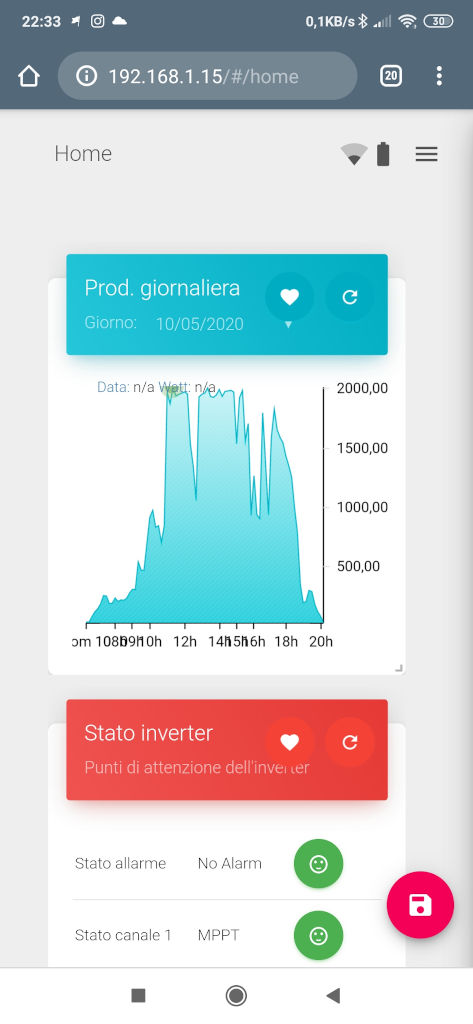
Puoi spostare con il drag and drop tutti i widgets, e puoi ridimensionare i grafici, tutte le operazioni vengono salvate sul dispositivo, quindi se ti sposti e salvi nel telefono questo layout rimane nel telefono.
Puoi creare un layout perfetto per ogni risoluzione, hai un cambiamento della disposizione degli spazi della pagina in funzione della risoluzione, e quando sposti e ridimensioni i widgets si agganciano alle colonne specifiche della risoluzione.
Hai un numero specificato di colonne per varie risoluzioni
>1800: 5 colonne
>1400: 4 colonne
>1100: 3 colonne
>720: 2 colonne
>0: 1 colonna
Uso questo approccio in molti progetti e risulta bello e versatile.
Tempo reale
Vorrei spendere una nota per “il widget dati in tempo reale”, a differenza degli altri widget che funzionano con il sistema REST questo widget viene aggiornato (come notifica) con il WebSocket, in modo da poter avere dati in tempo reale sulla produzione di energia.
Come al solito scrivo un tutorial sull’argomento, e lo trovate su “WebSocket su Arduino, esp8266 ed esp32”.
La parte centrale è la funzione onEvent, che ha il classico set di eventi del ws
void webSocketEvent(uint8_t num, WStype_t type, uint8_t * payload, size_t length) {

    switch(type) {
        case WStype_DISCONNECTED:
			webSocket.sendTXT(num, "{\"connection\": false}");

            DEBUG_PRINT(F(" Disconnected "));
            DEBUG_PRINTLN(num, DEC);

//            DEBUG_PRINTF_AI(F("[%u] Disconnected!\n"), num);
            break;
        case WStype_CONNECTED:
            {
                IPAddress ip = webSocket.remoteIP(num);
//                DEBUG_PRINTF_AI(F("[%u] Connected from %d.%d.%d.%d url: %s\n"), num, ip[0], ip[1], ip[2], ip[3], payload);

                DEBUG_PRINT(num);
                DEBUG_PRINT(F("Connected from: "));
                DEBUG_PRINT(ip.toString());
                DEBUG_PRINT(F(" "));
                DEBUG_PRINTLN((char*)payload);

				// send message to client
				webSocket.sendTXT(num, "{\"connection\": true}");
            }
            break;
        case WStype_TEXT:
//        	DEBUG_PRINTF_AI(F("[%u] get Text: %s\n"), num, payload);

            // send message to client
            // webSocket.sendTXT(num, "message here");

            // send data to all connected clients
            // webSocket.broadcastTXT("message here");
            break;
        case WStype_BIN:
//        	DEBUG_PRINTF_AI(F("[%u] get binary length: %u\n"), num, length);
            hexdump(payload, length);

            // send message to client
            // webSocket.sendBIN(num, payload, length);
            break;
        case WStype_ERROR:
        case WStype_FRAGMENT_TEXT_START:
        case WStype_FRAGMENT_BIN_START:
        case WStype_FRAGMENT:
        case WStype_FRAGMENT_FIN:
        case WStype_PING:
        case WStype_PONG:

//        	DEBUG_PRINTF_AI(F("[%u] get binary length: %u\n"), num, length);
        	DEBUG_PRINT(F("WS : "))
        	DEBUG_PRINT(type)
        	DEBUG_PRINT(F(" - "))
			DEBUG_PRINTLN((char*)payload);

            // send message to client
            // webSocket.sendBIN(num, payload, length);
            break;
    }

}
Invio messaggi in boradcast
webSocket.broadcastTXT(buf);
così tutti i client iscritti ricevono il messaggio, e il widget di che mostra la produzione in realtime viene aggiornato continuamente.
Grazie
- Centralina Web per inverter ABB (ex Power One) Aurora (WIM): intro al progetto
- Centralina Web per inverter ABB Aurora (WIM): connessione Arduino all’RS-485
- Centralina Web per inverter ABB Aurora (WIM): dispositivi di archiviazione
- Centralina Web per inverter ABB Aurora (WIM): debug e notifica
- Centralina Web per inverter ABB Aurora (WIM): impostare l’ora e UPS
- Centralina Web per inverter ABB Aurora (WIM): configurazione WIFI e server REST
- Centralina Web per inverter ABB Aurora (WIM): WebSocket e Web Server
- Centralina Web per inverter ABB Aurora (WIM): cablaggio e PCB
- Centralina Web per inverter ABB Aurora (WIM): caricare il programma ed il front end
- Centralina Web per inverter ABB Aurora (WIM): scatola stampata in 3D e completamento
- Centralina Web per inverter ABB Aurora (WIM): riparare l’errore E013
GitHub repository con tutto il codice FE (transpilato) e BE