esp8266 auto aggiornamenti OTA del firmware da server remoto – 1
L’aggiornamento OTA (Over the Air) è il processo di caricamento del firmware su un modulo ESP utilizzando una connessione Wi-Fi anziché una porta seriale. Tale funzionalità diventa estremamente utile in caso di accesso fisico limitato o nullo al modulo.

Gli aggiornamenti OTA possono essere effettuati utilizzando:
- Arduino IDE
- Web Browser
- Server HTTP
Prima di tutto leggi il tutorial “esp8266: flash del firmware binario(.bin) compilato e firmato”.
In questo articolo spiegheremo come fare un aggiornamento automatico da un server HTTP.
Aggiornamento automatico OTA ad ogni avvio dell’applicazione
La classe ESPhttpUpdate può controllare gli aggiornamenti e scaricare un file binario dal server web HTTP. È possibile scaricare gli aggiornamenti da ogni indirizzo IP o dominio sulla rete o su Internet.
Nota che per impostazione predefinita questa classe chiude tutte le altre connessioni tranne quella utilizzata dall’update, questo perché il metodo update è bloccante. Ciò significa che se c’è un’altra applicazione che riceve dati, i pacchetti TCP si accumuleranno nel buffer portando a errori di memoria insufficiente che causano il fallimento dell’aggiornamento OTA. C’è anche un numero limitato di buffer di ricezione disponibili e tutti possono essere utilizzati da altre applicazioni.
Ci sono alcuni casi in cui sai che non riceverai alcun dato ma desideri comunque inviare aggiornamenti sui progressi. È possibile disabilitare il comportamento predefinito (e mantenere le connessioni aperte) chiamando closeConnectionsOnUpdate(false). (cit.)
Creare un server web di base
Ora andremo a creare un server veloce per scaricare il firmware, poi per gestire REST.
Preparare l’ambiente
- Usiamo NodeJS, puoi scaricarlo da qui .
- Dopo l’installazione creare una nuova directory
OTAServer. cdall’interno dellaOTAServercartella.
Inizializza l’applicazione
- All’interno della cartella di avvio
npm init.
D:\Projects\IdeaProjects\OTAWebPages\OTAServer>npm init
This utility will walk you through creating a package.json file.
It only covers the most common items, and tries to guess sensible defaults.

See `npm help init` for definitive documentation on these fields
and exactly what they do.

Use `npm install <pkg>` afterwards to install a package and
save it as a dependency in the package.json file.

Press ^C at any time to quit.
package name: (otaserver)
version: (1.0.0)
description: Server to test HTTP server OTA update
entry point: (index.js)
test command:
git repository:
keywords: OTA esp8266 esp32 Server
author: Renzo Mischianti
license: (ISC)
About to write to D:\Projects\IdeaProjects\OTAWebPages\OTAServer\package.json:

{
  "name": "otaserver",
  "version": "1.0.0",
  "description": "Server to test HTTP server OTA update",
  "main": "index.js",
  "scripts": {
    "test": "echo \"Error: no test specified\" && exit 1"
  },
  "keywords": [
    "OTA",
    "esp8266",
    "esp32",
    "Server"
  ],
  "author": "Renzo Mischianti",
  "license": "ISC"
}


Is this OK? (yes) yes
- Installa express il server di base in NodeJS
npm install express --save-dev
Codice server web di base
- Crea
index.js. - Aggiungi questo contenuto su
index.js.
const express = require('express');
const { networkInterfaces } = require('os');

const app = express();
const nets = networkInterfaces();

// Server port
const PORT = 3000;

app.get('/', (request, response) => response.send('Hello from www.mischianti.org!'));

app.listen(PORT, () => {
    const results = {}; // Or just '{}', an empty object

    for (const name of Object.keys(nets)) {
        for (const net of nets[name]) {
            // Skip over non-IPv4 and internal (i.e. 127.0.0.1) addresses
            if (net.family === 'IPv4' && !net.internal) {
                if (!results[name]) {
                    results[name] = [];
                }
                results[name].push(net.address);
            }
        }
    }

    console.log('Listening on port '+PORT+'\n', results)
});
- Avvia l’applicazione con
node index.js.
D:\Projects\IdeaProjects\OTAWebPages\OTAServer>node index.js
Listening on port 3000
 {
  'VirtualBox Host-Only Network': [ '192.168.56.1' ],
  'VMware Network Adapter VMnet1': [ '192.168.113.1' ],
  'VMware Network Adapter VMnet8': [ '192.168.116.1' ],
  Ethernet: [ '192.168.1.70' ]
}
- Prendi l’IP corretto dalla console, non possiamo usare
localhosto127.0.0.1per il nostro test, quindi stampo all’avvio tutte le interfacce e nel mio caso l’IP dell’applicazione corrente èEthernet: [ '192.168.1.70' ] - Metti sul browser l’url http://192.168.1.70:3000/.
- Controlla nella pagina del browser la frase “Hello from www.mischianti.org!”.
Crea lo schizzo iniziale
Possiamo usare l’esempio di base che puoi trovare su File -> Examples -> ESP8266httpUpdate -> httpUpdate.
Lo cambiamo in modo che punti al nostro nuovo server.
/*
 * Basic Sketch for automatic update of firmware at start
 *
 * Renzo Mischianti <www.mischianti.org>
 *
 * https://mischianti.org
*/

#include <Arduino.h>

#include <ESP8266WiFi.h>
#include <ESP8266WiFiMulti.h>

#include <ESP8266HTTPClient.h>
#include <ESP8266httpUpdate.h>

#ifndef APSSID
#define APSSID "<YOUR-SSID>"
#define APPSK  "<YOUR-PASSWD>"
#endif

ESP8266WiFiMulti WiFiMulti;

#define FIRMWARE_VERSION "0.2"

void update_started() {
  Serial.println("CALLBACK:  HTTP update process started");
}

void update_finished() {
  Serial.println("CALLBACK:  HTTP update process finished");
}

void update_progress(int cur, int total) {
  Serial.printf("CALLBACK:  HTTP update process at %d of %d bytes...\n", cur, total);
}

void update_error(int err) {
  Serial.printf("CALLBACK:  HTTP update fatal error code %d\n", err);
}

void setup() {

  Serial.begin(115200);
//   Serial.setDebugOutput(true);

  Serial.println();
  Serial.println();
  Serial.println();

  for (uint8_t t = 4; t > 0; t--) {
    Serial.printf("[SETUP] WAIT %d...\n", t);
    Serial.flush();
    delay(1000);
  }

  WiFi.mode(WIFI_STA);
  WiFiMulti.addAP(APSSID, APPSK);

  Serial.print(F("Firmware version "));
  Serial.println(FIRMWARE_VERSION);
  delay(2000);
}


void loop() {
    // wait for WiFi connection
  if ((WiFiMulti.run() == WL_CONNECTED)) {

    WiFiClient client;

    // The line below is optional. It can be used to blink the LED on the board during flashing
    // The LED will be on during download of one buffer of data from the network. The LED will
    // be off during writing that buffer to flash
    // On a good connection the LED should flash regularly. On a bad connection the LED will be
    // on much longer than it will be off. Other pins than LED_BUILTIN may be used. The second
    // value is used to put the LED on. If the LED is on with HIGH, that value should be passed
    ESPhttpUpdate.setLedPin(LED_BUILTIN, LOW);

    // Add optional callback notifiers
    ESPhttpUpdate.onStart(update_started);
    ESPhttpUpdate.onEnd(update_finished);
    ESPhttpUpdate.onProgress(update_progress);
    ESPhttpUpdate.onError(update_error);

    ESPhttpUpdate.rebootOnUpdate(false); // remove automatic update

    Serial.println(F("Update start now!"));

    // t_httpUpdate_return ret = ESPhttpUpdate.update(client, "http://192.168.1.70:3000/firmware/httpUpdateNew.bin");
    // Or:
    t_httpUpdate_return ret = ESPhttpUpdate.update(client, "192.168.1.70", 3000, "/firmware/httpUpdateNew.bin");

    switch (ret) {
      case HTTP_UPDATE_FAILED:
        Serial.printf("HTTP_UPDATE_FAILD Error (%d): %s\n", ESPhttpUpdate.getLastError(), ESPhttpUpdate.getLastErrorString().c_str());
        Serial.println(F("Retry in 10secs!"));
        delay(10000); // Wait 10secs
        break;

      case HTTP_UPDATE_NO_UPDATES:
        Serial.println("HTTP_UPDATE_NO_UPDATES");
        break;

      case HTTP_UPDATE_OK:
        Serial.println("HTTP_UPDATE_OK");
        delay(1000); // Wait a second and restart
        ESP.restart();
        break;
    }
  }
}
Ricordati di aggiungere il tuo SSID e PASSWD
Se carichi lo schizzo ora riceverai questo errore sull’output seriale.
[SETUP] WAIT 4...
[SETUP] WAIT 3...
[SETUP] WAIT 2...
[SETUP] WAIT 1...
CALLBACK:  HTTP update fatal error code -104
HTTP_UPDATE_FAILD Error (-104): Wrong HTTP Code
Questo perché non riesce a trovare il firmware nel percorso http://192.168.1.70:3000/firmware/httpUpdateNew.bin e il server restituisce un codice HTTP 404 Not found.
Se interrompi il server ricevi
[SETUP] WAIT 4...
[SETUP] WAIT 3...
[SETUP] WAIT 2...
[SETUP] WAIT 1...
Firmware version 0.1
Update start now!
CALLBACK:  HTTP update fatal error code -1
HTTP_UPDATE_FAILD Error (-1): HTTP error: connection failed
Retry in 10secs!
Generate binary file
Genera file binario
Fare riferimento all’articolo esp8266: flash del firmware binario(.bin) compilato e firmato” per comprendere tutti i tipi di file binari compilati.
Segui questi passaggi per generare un file binario:
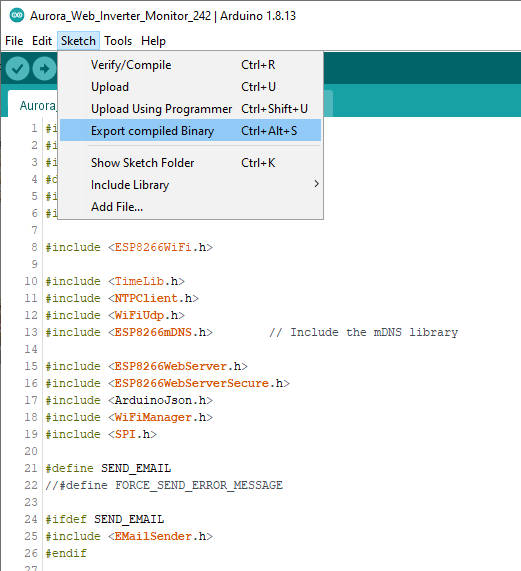
- Fare clic su
Sketch -> Export Compiled Binary;
- Fare clic su
Sketch -> Open Sketch Folder; - Rinominare il file .bin in
httpUpdateNew.bin.
Creare un’URL di download
Ora torna alla cartella OTAServer e:
- Crea la cartella
firmware. - Metti un file
httpUpdateNew.binnella cartella del firmware. - Aggiungi al tuo index.js l’URL di download in GET
const express = require('express');
const { networkInterfaces } = require('os');
const path = require('path');

const app = express();
const nets = networkInterfaces();

// Server port
const PORT = 3000;

app.get('/', (request, response) => response.send('Hello from www.mischianti.org!'));

let downloadCounter = 1;
app.get('/firmware/httpUpdateNew.bin', (request, response) => {
    response.download(path.join(__dirname, 'firmware/httpUpdateNew.bin'), 'httpUpdateNew.bin', (err)=>{
        if (err) {
            console.error("Problem on download firmware: ", err)
        }else{
            downloadCounter++;
        }
    });
    console.log('Your file has been downloaded '+downloadCounter+' times!')
})

app.listen(PORT, () => {
    const results = {}; // Or just '{}', an empty object

    for (const name of Object.keys(nets)) {
        for (const net of nets[name]) {
            // Skip over non-IPv4 and internal (i.e. 127.0.0.1) addresses
            if (net.family === 'IPv4' && !net.internal) {
                if (!results[name]) {
                    results[name] = [];
                }
                results[name].push(net.address);
            }
        }
    }

    console.log('Listening on port '+PORT+'\n', results)
});
- Riavvia l’applicazione con
Ctrl+Cenode index.js. - Prova l’URL scrivendo nell’URL del browser
http://192.168.1.70:3000/firmware/httpUpdateNew.bin
Se tutto è ok, il download inizia e puoi trovare nella console queste righe
D:\Projects\IdeaProjects\OTAWebPages\OTAServer>node index.js
Listening on port 3000
 {
  'VirtualBox Host-Only Network': [ '192.168.56.1' ],
  'VMware Network Adapter VMnet1': [ '192.168.113.1' ],
  'VMware Network Adapter VMnet8': [ '192.168.116.1' ],
  Ethernet: [ '192.168.1.70' ]
}
Your file has been downloaded 1 times!
Your file has been downloaded 2 times!
Test finale
Ora se cambiamo FIRMWARE_VERISON in 0.2 e riproviamo il risultato diventa così:
[SETUP] WAIT 4...
[SETUP] WAIT 3...
[SETUP] WAIT 2...
[SETUP] WAIT 1...
Firmware version 0.1
Update start now!
CALLBACK:  HTTP update process started
CALLBACK:  HTTP update process at 0 of 307872 bytes...
CALLBACK:  HTTP update process at 0 of 307872 bytes...
CALLBACK:  HTTP update process at 4096 of 307872 bytes...
CALLBACK:  HTTP update process at 8192 of 307872 bytes...
CALLBACK:  HTTP update process at 12288 of 307872 bytes...
CALLBACK:  HTTP update process at 16384 of 307872 bytes...
CALLBACK:  HTTP update process at 20480 of 307872 bytes...
CALLBACK:  HTTP update process at 24576 of 307872 bytes...
CALLBACK:  HTTP update process at 28672 of 307872 bytes...
CALLBACK:  HTTP update process at 32768 of 307872 bytes...
CALLBACK:  HTTP update process at 36864 of 307872 bytes...
CALLBACK:  HTTP update process at 40960 of 307872 bytes...
CALLBACK:  HTTP update process at 45056 of 307872 bytes...
CALLBACK:  HTTP update process at 49152 of 307872 bytes...
CALLBACK:  HTTP update process at 53248 of 307872 bytes...
CALLBACK:  HTTP update process at 57344 of 307872 bytes...
CALLBACK:  HTTP update process at 61440 of 307872 bytes...
CALLBACK:  HTTP update process at 65536 of 307872 bytes...
CALLBACK:  HTTP update process at 69632 of 307872 bytes...
CALLBACK:  HTTP update process at 73728 of 307872 bytes...
CALLBACK:  HTTP update process at 77824 of 307872 bytes...
CALLBACK:  HTTP update process at 81920 of 307872 bytes...
CALLBACK:  HTTP update process at 86016 of 307872 bytes...
CALLBACK:  HTTP update process at 90112 of 307872 bytes...
CALLBACK:  HTTP update process at 94208 of 307872 bytes...
CALLBACK:  HTTP update process at 98304 of 307872 bytes...
CALLBACK:  HTTP update process at 102400 of 307872 bytes...
CALLBACK:  HTTP update process at 106496 of 307872 bytes...
CALLBACK:  HTTP update process at 110592 of 307872 bytes...
CALLBACK:  HTTP update process at 114688 of 307872 bytes...
CALLBACK:  HTTP update process at 118784 of 307872 bytes...
CALLBACK:  HTTP update process at 122880 of 307872 bytes...
CALLBACK:  HTTP update process at 126976 of 307872 bytes...
CALLBACK:  HTTP update process at 131072 of 307872 bytes...
CALLBACK:  HTTP update process at 135168 of 307872 bytes...
CALLBACK:  HTTP update process at 139264 of 307872 bytes...
CALLBACK:  HTTP update process at 143360 of 307872 bytes...
CALLBACK:  HTTP update process at 147456 of 307872 bytes...
CALLBACK:  HTTP update process at 151552 of 307872 bytes...
CALLBACK:  HTTP update process at 155648 of 307872 bytes...
CALLBACK:  HTTP update process at 159744 of 307872 bytes...
CALLBACK:  HTTP update process at 163840 of 307872 bytes...
CALLBACK:  HTTP update process at 167936 of 307872 bytes...
CALLBACK:  HTTP update process at 172032 of 307872 bytes...
CALLBACK:  HTTP update process at 176128 of 307872 bytes...
CALLBACK:  HTTP update process at 180224 of 307872 bytes...
CALLBACK:  HTTP update process at 184320 of 307872 bytes...
CALLBACK:  HTTP update process at 188416 of 307872 bytes...
CALLBACK:  HTTP update process at 192512 of 307872 bytes...
CALLBACK:  HTTP update process at 196608 of 307872 bytes...
CALLBACK:  HTTP update process at 200704 of 307872 bytes...
CALLBACK:  HTTP update process at 204800 of 307872 bytes...
CALLBACK:  HTTP update process at 208896 of 307872 bytes...
CALLBACK:  HTTP update process at 212992 of 307872 bytes...
CALLBACK:  HTTP update process at 217088 of 307872 bytes...
CALLBACK:  HTTP update process at 221184 of 307872 bytes...
CALLBACK:  HTTP update process at 225280 of 307872 bytes...
CALLBACK:  HTTP update process at 229376 of 307872 bytes...
CALLBACK:  HTTP update process at 233472 of 307872 bytes...
CALLBACK:  HTTP update process at 237568 of 307872 bytes...
CALLBACK:  HTTP update process at 241664 of 307872 bytes...
CALLBACK:  HTTP update process at 245760 of 307872 bytes...
CALLBACK:  HTTP update process at 249856 of 307872 bytes...
CALLBACK:  HTTP update process at 253952 of 307872 bytes...
CALLBACK:  HTTP update process at 258048 of 307872 bytes...
CALLBACK:  HTTP update process at 262144 of 307872 bytes...
CALLBACK:  HTTP update process at 266240 of 307872 bytes...
CALLBACK:  HTTP update process at 270336 of 307872 bytes...
CALLBACK:  HTTP update process at 274432 of 307872 bytes...
CALLBACK:  HTTP update process at 278528 of 307872 bytes...
CALLBACK:  HTTP update process at 282624 of 307872 bytes...
CALLBACK:  HTTP update process at 286720 of 307872 bytes...
CALLBACK:  HTTP update process at 290816 of 307872 bytes...
CALLBACK:  HTTP update process at 294912 of 307872 bytes...
CALLBACK:  HTTP update process at 299008 of 307872 bytes...
CALLBACK:  HTTP update process at 303104 of 307872 bytes...
CALLBACK:  HTTP update process at 307200 of 307872 bytes...
CALLBACK:  HTTP update process at 307872 of 307872 bytes...
CALLBACK:  HTTP update process at 307872 of 307872 bytes...
CALLBACK:  HTTP update process at 307872 of 307872 bytes...
CALLBACK:  HTTP update process finished
HTTP_UPDATE_OK

 ets Jan  8 2013,rst cause:2, boot mode:(3,7)

load 0x4010f000, len 3460, room 16
tail 4
chksum 0xcc
load 0x3fff20b8, len 40, room 4
tail 4
chksum 0xc9
csum 0xc9
v0005cd10
@cp:B0
ld


[SETUP] WAIT 4...
[SETUP] WAIT 3...
[SETUP] WAIT 2...
[SETUP] WAIT 1...
Firmware version 0.2
Per impedire l’aggiornamento continuo è necessario utilizzare un timer o un’azione che faccia questo lavoro.
Aggiornamento automatico del filesystem OTA ad ogni avvio dell’applicazione
Allo stesso modo possiamo gestire l’aggiornamento del filesystem. Andiamo veloci ora, perché è la stessa logica dell’aggiornamento del firmware.
Genera file binario FileSystem
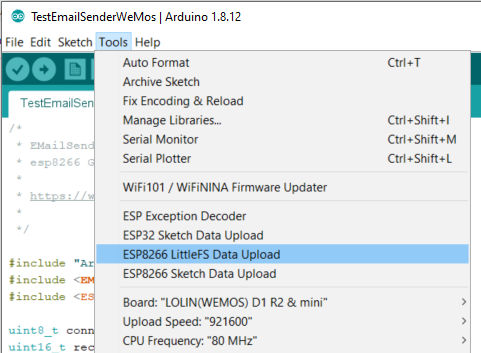
Per caricare un contenuto nel filesystem devi installare il relativo plugin, selezionane uno
WeMos D1 mini (esp8266), filesystem SPIFFS integrato (deprecato)
WeMos D1 mini (esp8266), LittleFS Filesystem integrato (consigliato)
Ora aggiungeremo la directory data alla cartella degli sketch e creeremo un file version.txt con questo contenuto
0.2
e usa il plugin per caricare.
Nella console troviamo il comando giusto per generare questo file.
[LittleFS] data    : D:\Projects\Arduino\sloeber-workspace-OTA\ArduinoOTAesp8266_basic_fs_http_update\data
[LittleFS] size    : 2024
[LittleFS] page    : 256
[LittleFS] block   : 8192
/version.txt
[LittleFS] upload  : C:\Users\renzo\AppData\Local\Temp\arduino_build_649994/ArduinoOTAesp8266_basic_fs_http_update.mklittlefs.bin
[LittleFS] address : 0x200000
[LittleFS] reset   : --before default_reset --after hard_reset
[LittleFS] port    : COM17
[LittleFS] speed   : 921600
[LittleFS] python   : C:\Users\renzo\AppData\Local\Arduino15\packages\esp8266\tools\python3\3.7.2-post1\python3.exe
[LittleFS] uploader : C:\Users\renzo\AppData\Local\Arduino15\packages\esp8266\hardware\esp8266\3.0.2\tools\upload.py

esptool.py v3.0
Serial port COM17
Connecting....
Chip is ESP8266EX
Features: WiFi
Crystal is 26MHz
MAC: 68:c6:3a:a6:32:e5
Uploading stub...
Running stub...
Stub running...
Changing baud rate to 460800
Changed.
Configuring flash size...
Auto-detected Flash size: 4MB
Compressed 2072576 bytes to 2279...
Writing at 0x00200000... (100 %)
Wrote 2072576 bytes (2279 compressed) at 0x00200000 in 0.1 seconds (effective 312864.3 kbit/s)...
Hash of data verified.

Leaving...
Hard resetting via RTS pin...
[LittleFS] data    : D:\Projects\Arduino\sloeber-workspace-OTA\ArduinoOTAesp8266_basic_fs_http_update\data
[LittleFS] size    : 2024
[LittleFS] page    : 256
[LittleFS] block   : 8192
/version.txt
[LittleFS] upload  : C:\Users\renzo\AppData\Local\Temp\arduino_build_649994/ArduinoOTAesp8266_basic_fs_http_update.mklittlefs.bin
[LittleFS] address : 0x200000
[LittleFS] reset   : --before default_reset --after hard_reset
[LittleFS] port    : COM17
[LittleFS] speed   : 921600
[LittleFS] python   : C:\Users\renzo\AppData\Local\Arduino15\packages\esp8266\tools\python3\3.7.2-post1\python3.exe
[LittleFS] uploader : C:\Users\renzo\AppData\Local\Arduino15\packages\esp8266\hardware\esp8266\3.0.2\tools\upload.py

esptool.py v3.0
Serial port COM17
Ora possiamo prendere molte informazioni, come il file
[LittleFS] upload : C:\Users\renzo\AppData\Local\Temp\arduino_build_649994/ArduinoOTAesp8266_basic_fs_http_update.mklittlefs.bin
Crea lo sketch
Ora andremo a modificare lo sketch già utilizzato per il firmware.
/*
 * Basic Sketch for automatic update of filesystem at start
 *
 * Renzo Mischianti <www.mischianti.org>
 *
 * https://mischianti.org
*/

#include <Arduino.h>
#include "LittleFS.h"

#include <ESP8266WiFi.h>
#include <ESP8266WiFiMulti.h>

#include <ESP8266HTTPClient.h>
#include <ESP8266httpUpdate.h>

#ifndef APSSID
#define APSSID "<YOUR-SSID>"
#define APPSK  "<YOUR-PASSWD>"
#endif

ESP8266WiFiMulti WiFiMulti;

#define FIRMWARE_VERSION "0.1"

void update_started() {
  Serial.println("CALLBACK:  HTTP update process started");
}

void update_finished() {
  Serial.println("CALLBACK:  HTTP update process finished");
}

void update_progress(int cur, int total) {
  Serial.printf("CALLBACK:  HTTP update process at %d of %d bytes...\n", cur, total);
}

void update_error(int err) {
  Serial.printf("CALLBACK:  HTTP update fatal error code %d\n", err);
}

void setup() {

  Serial.begin(115200);
//   Serial.setDebugOutput(true);

  Serial.println();
  Serial.println();
  Serial.println();

  for (uint8_t t = 4; t > 0; t--) {
    Serial.printf("[SETUP] WAIT %d...\n", t);
    Serial.flush();
    delay(1000);
  }

  WiFi.mode(WIFI_STA);
  WiFiMulti.addAP(APSSID, APPSK);

  Serial.print(F("Firmware version "));
  Serial.println(FIRMWARE_VERSION);

  Serial.print(F("Inizializing FS..."));
  if (LittleFS.begin()){
      Serial.println(F("done."));
  }else{
      Serial.println(F("fail."));
  }

  String fileSystemVersion = "Not set!";
  Serial.print(F("FileSystem version "));
  File versionFile = LittleFS.open(F("/version.txt"), "r");
  if (versionFile) {
	  fileSystemVersion = versionFile.readString();
	  versionFile.close();
  }
  Serial.println(fileSystemVersion);
  delay(2000);
}


void loop() {
    // wait for WiFi connection
  if ((WiFiMulti.run() == WL_CONNECTED)) {

    WiFiClient client;

    // The line below is optional. It can be used to blink the LED on the board during flashing
    // The LED will be on during download of one buffer of data from the network. The LED will
    // be off during writing that buffer to flash
    // On a good connection the LED should flash regularly. On a bad connection the LED will be
    // on much longer than it will be off. Other pins than LED_BUILTIN may be used. The second
    // value is used to put the LED on. If the LED is on with HIGH, that value should be passed
    ESPhttpUpdate.setLedPin(LED_BUILTIN, LOW);

    // Add optional callback notifiers
    ESPhttpUpdate.onStart(update_started);
    ESPhttpUpdate.onEnd(update_finished);
    ESPhttpUpdate.onProgress(update_progress);
    ESPhttpUpdate.onError(update_error);

    ESPhttpUpdate.rebootOnUpdate(false); // remove automatic update

    Serial.println(F("Update start now!"));

    t_httpUpdate_return ret = ESPhttpUpdate.updateFS(client, "http://192.168.1.70:3000/filesystem/httpUpdateNewFS.bin");

    switch (ret) {
      case HTTP_UPDATE_FAILED:
        Serial.printf("HTTP_UPDATE_FAILD Error (%d): %s\n", ESPhttpUpdate.getLastError(), ESPhttpUpdate.getLastErrorString().c_str());
        Serial.println(F("Retry in 10secs!"));
        delay(10000); // Wait 10secs
        break;

      case HTTP_UPDATE_NO_UPDATES:
        Serial.println("HTTP_UPDATE_NO_UPDATES");
        break;

      case HTTP_UPDATE_OK:
        Serial.println("HTTP_UPDATE_OK");
        delay(1000); // Wait a second and restart
        ESP.restart();
        break;
    }
  }
}
All’inizio ottieni in uscita seriale questo risultato
[SETUP] WAIT 4...
[SETUP] WAIT 3...
[SETUP] WAIT 2...
[SETUP] WAIT 1...
Firmware version 0.1
Inizializing FS...done.
FileSystem version 0.2
Update start now!
CALLBACK:  HTTP update fatal error code -102
HTTP_UPDATE_FAILD Error (-102): File Not Found (404)
Retry in 10secs!
La versione del filesystem è presa dal file version.txt e mostrata con questo codice
  String fileSystemVersion = "Not set!";
  Serial.print(F("FileSystem version "));
  File versionFile = LittleFS.open(F("/version.txt"), "r");
  if (versionFile) {
	  fileSystemVersion = versionFile.readString();
	  versionFile.close();
  }
  Serial.println(fileSystemVersion);
e il codice della linea principale è
t_httpUpdate_return ret = ESPhttpUpdate.updateFS(client, "http://192.168.1.70:3000/filesystem/httpUpdateNewFS.bin");
che gestiscono il download e l’aggiornamento.
Create FileSystem download end-point
Ora aggiungiamo l’end-point del download all’implementazione del server.
- In OTAServer crea la cartella filesystem,
- Cambia la versione in
0.3inversion.txt, rigenera senza caricare e copia il fileArduinoOTAesp8266_basic_fs_http_update.mklittlefs.binnella cartella - Rinomina in
httpUpdateNewFS.bin.
Ora modifica l’originale aggiungendo il codice evidenziato.
const express = require('express');
const { networkInterfaces } = require('os');
const path = require('path');

const app = express();
const nets = networkInterfaces();

// Server port
const PORT = 3000;

app.get('/', (request, response) => response.send('Hello from www.mischianti.org!'));

let downloadCounter = 1;
app.get('/firmware/httpUpdateNew.bin', (request, response) => {
    response.download(path.join(__dirname, 'firmware/httpUpdateNew.bin'), 'httpUpdateNew.bin', (err)=>{
        if (err) {
            console.error("Problem on download firmware: ", err)
        }else{
            downloadCounter++;
        }
    });
    console.log('Your file has been downloaded '+downloadCounter+' times!')
})

let downloadFSCounter = 1;
app.get('/filesystem/httpUpdateNewFS.bin', (request, response) => {
    response.download(path.join(__dirname, 'filesystem/httpUpdateNewFS.bin'), 'httpUpdateNewFS.bin', (err)=>{
        if (err) {
            console.error("Problem on download filesystem: ", err)
        }else{
            downloadFSCounter++;
        }
    });
    console.log('Your file FS has been downloaded '+downloadFSCounter+' times!')
})

app.listen(PORT, () => {
    const results = {}; // Or just '{}', an empty object

    for (const name of Object.keys(nets)) {
        for (const net of nets[name]) {
            // Skip over non-IPv4 and internal (i.e. 127.0.0.1) addresses
            if (net.family === 'IPv4' && !net.internal) {
                if (!results[name]) {
                    results[name] = [];
                }
                results[name].push(net.address);
            }
        }
    }

    console.log('Listening on port '+PORT+'\n', results)
});
Test finale
[SETUP] WAIT 4...
[SETUP] WAIT 3...
[SETUP] WAIT 2...
[SETUP] WAIT 1...
Firmware version 0.1
Inizializing FS...done.
FileSystem version 0.2
Update start now!
CALLBACK:  HTTP update process started
CALLBACK:  HTTP update process at 0 of 2072576 bytes...
CALLBACK:  HTTP update process at 0 of 2072576 bytes...
CALLBACK:  HTTP update process at 4096 of 2072576 bytes...
CALLBACK:  HTTP update process at 8192 of 2072576 bytes...
CALLBACK:  HTTP update process at 12288 of 2072576 bytes...
CALLBACK:  HTTP update process at 16384 of 2072576 bytes...
CALLBACK:  HTTP update process at 20480 of 2072576 bytes...
CALLBACK:  HTTP update process at 24576 of 2072576 bytes...
CALLBACK:  HTTP update process at 28672 of 2072576 bytes...
CALLBACK:  HTTP update process at 32768 of 2072576 bytes...
CALLBACK:  HTTP update process at 36864 of 2072576 bytes...
CALLBACK:  HTTP update process at 40960 of 2072576 bytes...
CALLBACK:  HTTP update process at 45056 of 2072576 bytes...
CALLBACK:  HTTP update process at 49152 of 2072576 bytes...
CALLBACK:  HTTP update process at 53248 of 2072576 bytes...

[...]

CALLBACK:  HTTP update process at 1994752 of 2072576 bytes...
CALLBACK:  HTTP update process at 1998848 of 2072576 bytes...
CALLBACK:  HTTP update process at 2002944 of 2072576 bytes...
CALLBACK:  HTTP update process at 2007040 of 2072576 bytes...
CALLBACK:  HTTP update process at 2011136 of 2072576 bytes...
CALLBACK:  HTTP update process at 2015232 of 2072576 bytes...
CALLBACK:  HTTP update process at 2019328 of 2072576 bytes...
CALLBACK:  HTTP update process at 2023424 of 2072576 bytes...
CALLBACK:  HTTP update process at 2027520 of 2072576 bytes...
CALLBACK:  HTTP update process at 2031616 of 2072576 bytes...
CALLBACK:  HTTP update process at 2035712 of 2072576 bytes...
CALLBACK:  HTTP update process at 2039808 of 2072576 bytes...
CALLBACK:  HTTP update process at 2043904 of 2072576 bytes...
CALLBACK:  HTTP update process at 2048000 of 2072576 bytes...
CALLBACK:  HTTP update process at 2052096 of 2072576 bytes...
CALLBACK:  HTTP update process at 2056192 of 2072576 bytes...
CALLBACK:  HTTP update process at 2060288 of 2072576 bytes...
CALLBACK:  HTTP update process at 2064384 of 2072576 bytes...
CALLBACK:  HTTP update process at 2068480 of 2072576 bytes...
CALLBACK:  HTTP update process at 2072576 of 2072576 bytes...
CALLBACK:  HTTP update process at 2072576 of 2072576 bytes...
CALLBACK:  HTTP update process at 2072576 of 2072576 bytes...
CALLBACK:  HTTP update process finished
HTTP_UPDATE_OK

 ets Jan  8 2013,rst cause:2, boot mode:(3,7)

load 0x4010f000, len 3460, room 16
tail 4
chksum 0xcc
load 0x3fff20b8, len 40, room 4
tail 4
chksum 0xc9
csum 0xc9
v00065100
~ld


[SETUP] WAIT 4...
[SETUP] WAIT 3...
[SETUP] WAIT 2...
[SETUP] WAIT 1...
Firmware version 0.1
Inizializing FS...done.
FileSystem version 0.3
Grazie
- Firmware and OTA update
- Gestione del firmware
- Aggiornamenti OTA con Arduino IDE
- Aggiornamenti OTA con Web Browser
- Aggiornamenti OTA automatico da server HTTP
- Aggiornamenti firmware non standard


