esp8266 Aggiornamenti OTA da Browser Web: firmware, filesystem e autenticazione – 1
L’aggiornamento OTA (Over the Air) è il processo di caricamento del firmware su un modulo ESP utilizzando una connessione Wi-Fi anziché una porta seriale. Tale funzionalità diventa estremamente utile in caso di accesso fisico limitato o nullo al modulo.
Gli aggiornamenti OTA possono essere effettuati utilizzando:
- Arduino IDE
- Web Browser
- Server HTTP
Prima di tutto leggi il tutorial “esp8266: flash del firmware binario(.bin) compilato e firmato”.
In questo articolo spiegheremo come effettuare gli aggiornamenti OTA tramite Web Browser, con e senza autenticazione di base.
Introduzione
Per prima cosa osserviamo che il componente principale del core esp8266 necessita dell’installazione di python e durante l’installazione ricorda di aggiungere i binari alla PATH (per Windows)

Il caricamento OTA utilizza il protocollo UDP, quindi può funzionare (con ArduinoIDE) solo nella rete locale perché usa il broadcast per scoprire i dispositivi ed è limitato alla LAN.
Protocollo UDP è molto vecchio, semplice e potente, lo uso in altri progetti per scovare tutti i dispositivi nella mia rete con una semplice applicazione Android.
Esempio di base
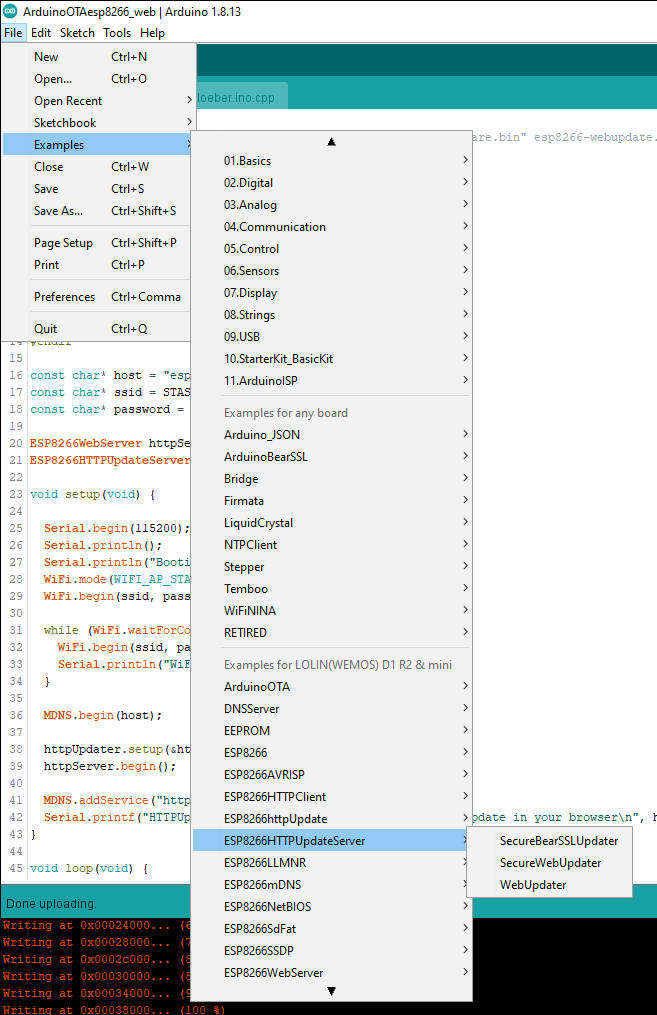
Hai bisogno dell’esempio ESP8266HTTPUpdateServer e lo puoi trovare sotto File -> Examples -> ESP8266HTTPUpdateServer -> WebUpdater.
Devi solo aggiungere il tuo SSID WiFi e la password.
/*
  To upload through terminal you can use: curl -F "image=@firmware.bin" esp8266-webupdate.local/update
*/

#include <ESP8266WiFi.h>
#include <WiFiClient.h>
#include <ESP8266WebServer.h>
#include <ESP8266mDNS.h>
#include <ESP8266HTTPUpdateServer.h>

#ifndef STASSID
#define STASSID "<YOUR-SSID>"
#define STAPSK  "<YOUR-PASSWD>"
#endif

const char* host = "esp8266-webupdate";
const char* ssid = STASSID;
const char* password = STAPSK;

ESP8266WebServer httpServer(80);
ESP8266HTTPUpdateServer httpUpdater;

void setup(void) {

  Serial.begin(115200);
  Serial.println();
  Serial.println("Booting Sketch...");
  WiFi.mode(WIFI_AP_STA);
  WiFi.begin(ssid, password);

  while (WiFi.waitForConnectResult() != WL_CONNECTED) {
    WiFi.begin(ssid, password);
    Serial.println("WiFi failed, retrying.");
  }

  MDNS.begin(host);

  httpUpdater.setup(&httpServer);
  httpServer.begin();

  MDNS.addService("http", "tcp", 80);
  Serial.printf("HTTPUpdateServer ready! Open http://%s.local/update in your browser\n", host);
}

void loop(void) {
  httpServer.handleClient();
  MDNS.update();
}
Il nome host funziona grazie al servizio mDNS
- Avahi https://avahi.org/ per Linux;
- Bonjour https://www.apple.com/support/bonjour/ per Windows;
- Mac OSX e iOS: il supporto è già integrato e non è richiesto alcun software aggiuntivo.
Sul monitor dell’ArduinoIDE troverai questo output:
Booting Sketch...
HTTPUpdateServer ready! Open http://esp8266-webupdate.local/update in your browser
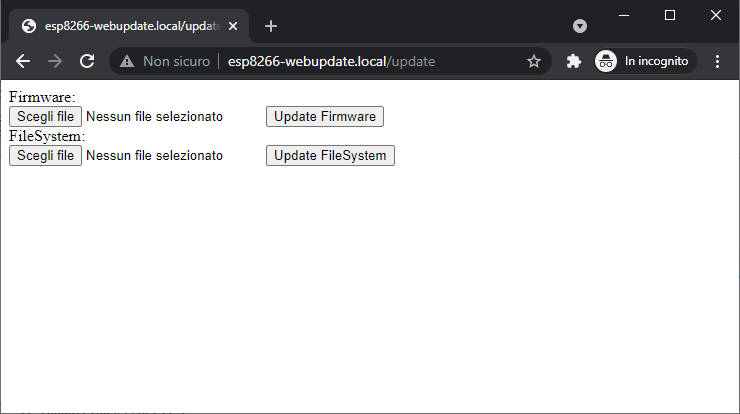
E quando scrivi sul browser l’URL, appare questa pagina web.
Ora cambieremo qualcosa nello sketch in questo modo:
Serial.printf("HTTPUpdateServer modified ready! Open http://%s.local/update in your browser\n", host);
ed eseguiremo Sketch -> Export compiled binary, quando fatto clic su Sketch -> Show sketch folder, qui troviamo un file aggiuntivo chiamato WebUpdate.ino.d1_mini.bin.
Poi faremo clic sulla pagina: Firmware -> Scegli file, selezioniamo il file e avviamo l’aggiornamento del firmware, attendere che la pagina mostri Update Success! Rebooting…, dopo il riavvio è possibile vedere nell’output seriale il messaggio aggiornato:
Booting Sketch...
HTTPUpdateServer modified ready! Open http://esp8266-webupdate.local/update in your browser
Ora capiamo come funziona tecnicamente.
L’ESP8266HTTPUpdateServer fa il wrap dell’ESP8266WebServer e aggiunge un endpoint che in GET risposta con una semplice pagina
static const char serverIndex[] PROGMEM =
  R"(<!DOCTYPE html>
     <html lang='en'>
     <head>
         <meta charset='utf-8'>
         <meta name='viewport' content='width=device-width,initial-scale=1'/>
     </head>
     <body>
     <form method='POST' action='' enctype='multipart/form-data'>
         Firmware:<br>
         <input type='file' accept='.bin,.bin.gz' name='firmware'>
         <input type='submit' value='Update Firmware'>
     </form>
     <form method='POST' action='' enctype='multipart/form-data'>
         FileSystem:<br>
         <input type='file' accept='.bin,.bin.gz' name='filesystem'>
         <input type='submit' value='Update FileSystem'>
     </form>
     </body>
     </html>)";
static const char successResponse[] PROGMEM =
  "<META http-equiv=\"refresh\" content=\"15;URL=/\">Update Success! Rebooting...";
Here is the method in GET for the page
    // handler for the /update form page
    _server->on(path.c_str(), HTTP_GET, [&](){
      if(_username != emptyString && _password != emptyString && !_server->authenticate(_username.c_str(), _password.c_str()))
        return _server->requestAuthentication();
      _server->send_P(200, PSTR("text/html"), serverIndex);
    });
in POST controlla il nome dell’input (firmware o filesystem) per capire se il file è per FLASH o FileSystem, quindi carica il file e il servizio di aggiornamento fa il resto, qui il codice della POST.
    // handler for the /update form POST (once file upload finishes)
    _server->on(path.c_str(), HTTP_POST, [&](){
      if(!_authenticated)
        return _server->requestAuthentication();
      if (Update.hasError()) {
        _server->send(200, F("text/html"), String(F("Update error: ")) + _updaterError);
      } else {
        _server->client().setNoDelay(true);
        _server->send_P(200, PSTR("text/html"), successResponse);
        delay(100);
        _server->client().stop();
        ESP.restart();
      }
    },[&](){
      // handler for the file upload, gets the sketch bytes, and writes
      // them through the Update object
      HTTPUpload& upload = _server->upload();

      if(upload.status == UPLOAD_FILE_START){
        _updaterError.clear();
        if (_serial_output)
          Serial.setDebugOutput(true);

        _authenticated = (_username == emptyString || _password == emptyString || _server->authenticate(_username.c_str(), _password.c_str()));
        if(!_authenticated){
          if (_serial_output)
            Serial.printf("Unauthenticated Update\n");
          return;
        }

        WiFiUDP::stopAll();
        if (_serial_output)
          Serial.printf("Update: %s\n", upload.filename.c_str());
        if (upload.name == "filesystem") {
          size_t fsSize = ((size_t) &_FS_end - (size_t) &_FS_start);
          close_all_fs();
          if (!Update.begin(fsSize, U_FS)){//start with max available size
            if (_serial_output) Update.printError(Serial);
          }
        } else {
          uint32_t maxSketchSpace = (ESP.getFreeSketchSpace() - 0x1000) & 0xFFFFF000;
          if (!Update.begin(maxSketchSpace, U_FLASH)){//start with max available size
            _setUpdaterError();
          }
        }
      } else if(_authenticated && upload.status == UPLOAD_FILE_WRITE && !_updaterError.length()){
        if (_serial_output) Serial.printf(".");
        if(Update.write(upload.buf, upload.currentSize) != upload.currentSize){
          _setUpdaterError();
        }
      } else if(_authenticated && upload.status == UPLOAD_FILE_END && !_updaterError.length()){
        if(Update.end(true)){ //true to set the size to the current progress
          if (_serial_output) Serial.printf("Update Success: %u\nRebooting...\n", upload.totalSize);
        } else {
          _setUpdaterError();
        }
        if (_serial_output) Serial.setDebugOutput(false);
      } else if(_authenticated && upload.status == UPLOAD_FILE_ABORTED){
        Update.end();
        if (_serial_output) Serial.println("Update was aborted");
      }
      delay(0);
    });
Per capire meglio consiglio di leggere “Come creare un Web Server con esp8266 ed esp32” e “Come creare un server REST su esp8266 o esp32”.
Puoi vedere che il codice è banale e possiamo manipolarlo per renderlo più bello, ma lo faremo dopo.
Caricare il filesystem (SPIFFS o LittleFS)
Una feature interessante è la gestione del File System come un firmware compilato.
Abilita l’output dettagliato all’IDE di Arduino
Per comprendere meglio tutto il processo, abiliteremo l’output dettagliato sul nostro IDE Arduino. Puoi trovare queste opzioni su File -> Preferences e controllare Show verbose output.
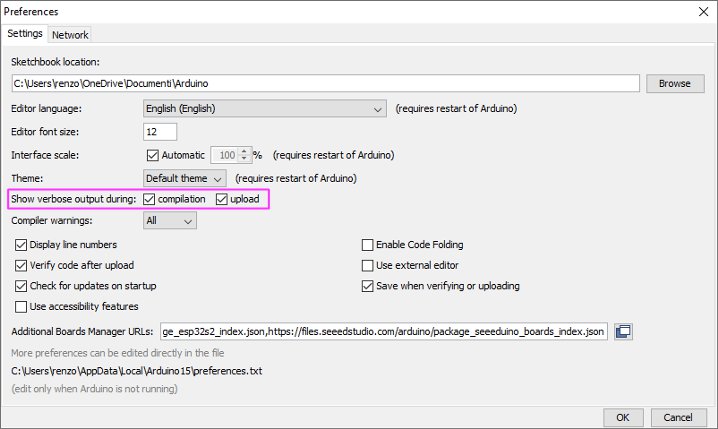
Questo ci permette di prendere e riutilizzare i comandi della console.
Caricare il FileSystem (SPIFFS o LittleFS)
Puoi caricare i dati del filesystem anche con il metodo classico tramite plugin, per installare il plugin SPIFFS o LittleFS fai riferimento al relativo tutorial:
WeMos D1 mini (esp8266): SPIFFS FileSystem integrato (deprecato)
WeMos D1 mini (esp8266): FileSystem integrato LittleFS (raccomandato)
Ora aggiungeremo la cartella data alla cartella degli sketch (con alcuni file) e utilizzeremo il plug-in per caricare.

Puoi controllare l’output della console dell’IDE per verificare cosa è successo.
[LittleFS] data    : D:\tmp\testBlink\Blink\data
[LittleFS] size    : 2024
[LittleFS] page    : 256
[LittleFS] block   : 8192
/bombo.png
[LittleFS] upload  : C:\Users\renzo\AppData\Local\Temp\arduino_build_49036/Blink.mklittlefs.bin
[LittleFS] address : 0x200000
[LittleFS] reset   : --before default_reset --after hard_reset
[LittleFS] port    : COM17
[LittleFS] speed   : 921600
[LittleFS] python   : C:\Users\renzo\AppData\Local\Arduino15\packages\esp8266\tools\python3\3.7.2-post1\python3.exe
[LittleFS] uploader : C:\Users\renzo\AppData\Local\Arduino15\packages\esp8266\hardware\esp8266\2.7.4\tools\upload.py

esptool.py v2.8
Serial port COM17
Connecting....
Chip is ESP8266EX
Features: WiFi
Crystal is 26MHz
MAC: 50:02:91:74:fe:11
Uploading stub...
Running stub...
Stub running...
Changing baud rate to 460800
Changed.
Configuring flash size...
Auto-detected Flash size: 4MB
Compressed 2072576 bytes to 48389...
Wrote 2072576 bytes (48389 compressed) at 0x00200000 in 4.9 seconds (effective 3416.7 kbit/s)...
Hash of data verified.

Leaving...
Hard resetting via RTS pin...
Ora possiamo recuperare le informazioni a noi necessarie, come la posizione del file
[LittleFS] upload : C:\Users\renzo\AppData\Local\Temp\arduino_build_49036/Blink.mklittlefs.bin
Aggiungere l’autenticazione di base
L’ESP8266HTTPUpdateServer implementa l’autenticazione di base (già spiegata in questa sezione dell’esercitazione sui WebServer). È molto semplice, cambieremo questa riga di codice
httpUpdater.setup(&httpServer, "/update", "mischianti", "passwd");
Nella riga di codice puoi vedere 3 parametri,
"/update": è il percorso dell’aggiornamento OTA, se cambi questo percorso l’end point e la pagina cambiano;"mischianti": è il login da inserire;"passwd": è la password.
Quando si tenta di accedere all’URL /update, viene visualizzato un popup di accesso

Se inserisci un login o una passwd errati ricevi lo stato HTTP standard per i non autorizzati 401.
Grazie
- Firmware and OTA update
- Gestione del firmware
- Aggiornamenti OTA con Arduino IDE
- Aggiornamenti OTA con Web Browser
- Aggiornamenti OTA automatico da server HTTP
- Aggiornamenti firmware non standard