
esp8266 OTA update with Web Browser: firmware, filesystem and authentication – 1
OTA (Over the Air) update is the process of uploading firmware to an ESP module using a Wi-Fi connection rather than a serial port. Such functionality becomes extremely useful in case of limited or no physical access to the module.
The OTA updates may be done using:
- Arduino IDE
- Web Browser
- HTTP Server
First of all read the tutorial “esp8266: flash firmware binary (.bin) compiled and signed“.
In this article we will explain how to make OTA updates via Web Browser, with and without basic authentication.
Introduction
First we look that the core component of esp8266 core need python installed, and when install It remember to add to path (for windows)

OTA upload use UDP protocol, so It can work (with ArduinoIDE) only in the local network because use broadcast to discover the devices, and It’s limited to the LAN.
UDP protocol It’s very old, simple and powerful, I use It in other project to discover all devices in my network with a simple Android application.
Basic example
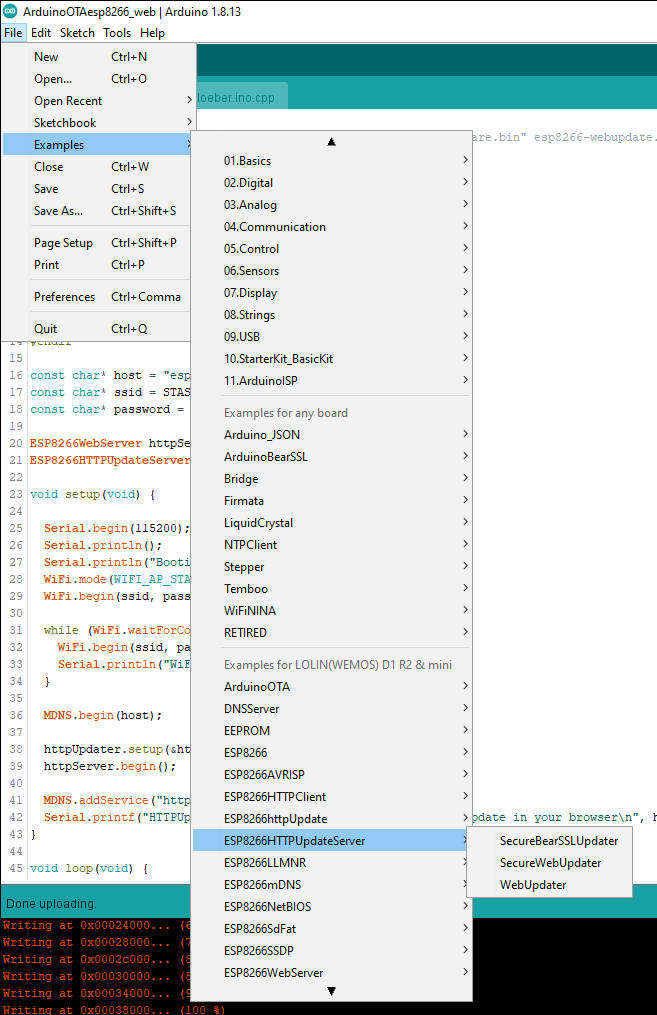
You need ESP8266HTTPUpdateServer example and you can find it under File -> Examples -> ESP8266HTTPUpdateServer -> WebUpdater.
You need only to add your WiFi SSID and Password.
/*
  To upload through terminal you can use: curl -F "image=@firmware.bin" esp8266-webupdate.local/update
*/

#include <ESP8266WiFi.h>
#include <WiFiClient.h>
#include <ESP8266WebServer.h>
#include <ESP8266mDNS.h>
#include <ESP8266HTTPUpdateServer.h>

#ifndef STASSID
#define STASSID "<YOUR-SSID>"
#define STAPSK  "<YOUR-PASSWD>"
#endif

const char* host = "esp8266-webupdate";
const char* ssid = STASSID;
const char* password = STAPSK;

ESP8266WebServer httpServer(80);
ESP8266HTTPUpdateServer httpUpdater;

void setup(void) {

  Serial.begin(115200);
  Serial.println();
  Serial.println("Booting Sketch...");
  WiFi.mode(WIFI_AP_STA);
  WiFi.begin(ssid, password);

  while (WiFi.waitForConnectResult() != WL_CONNECTED) {
    WiFi.begin(ssid, password);
    Serial.println("WiFi failed, retrying.");
  }

  MDNS.begin(host);

  httpUpdater.setup(&httpServer);
  httpServer.begin();

  MDNS.addService("http", "tcp", 80);
  Serial.printf("HTTPUpdateServer ready! Open http://%s.local/update in your browser\n", host);
}

void loop(void) {
  httpServer.handleClient();
  MDNS.update();
}
The host name works thanks to the mDNS service:
- Avahi https://avahi.org/ for Linux
- Bonjour https://www.apple.com/support/bonjour/ for Windows
- Mac OSX and iOS – support is already built in and no any extra s/w is required
On ArduinoIDE monitor you are going to find this output:
Booting Sketch...
HTTPUpdateServer ready! Open http://esp8266-webupdate.local/update in your browser
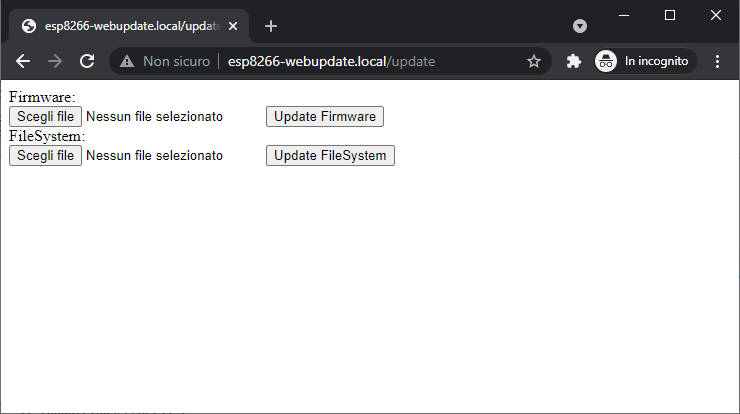
And when you write to the browser the url, this web page appear.
Now we are going to change something in the sketch like so:
Serial.printf("HTTPUpdateServer modified ready! Open http://%s.local/update in your browser\n", host);
and execute Sketch -> Export compiled binary, when done click on Sketch -> Show sketch folder, here we find an additional file named WebUpdate.ino.d1_mini.bin.
Then click on page: Firmware -> Select file, select the file, and start the update of the firmware, wait until the page show Update Success! Rebooting…, after reboot you can see in serial output the modified message:
Booting Sketch...
HTTPUpdateServer modified ready! Open http://esp8266-webupdate.local/update in your browser
Now let’s understand how it works technically.
The ESP8266HTTPUpdateServer wrap ESP8266WebServer and ad an endpoint that in GET response with a simple page
static const char serverIndex[] PROGMEM =
  R"(<!DOCTYPE html>
     <html lang='en'>
     <head>
         <meta charset='utf-8'>
         <meta name='viewport' content='width=device-width,initial-scale=1'/>
     </head>
     <body>
     <form method='POST' action='' enctype='multipart/form-data'>
         Firmware:<br>
         <input type='file' accept='.bin,.bin.gz' name='firmware'>
         <input type='submit' value='Update Firmware'>
     </form>
     <form method='POST' action='' enctype='multipart/form-data'>
         FileSystem:<br>
         <input type='file' accept='.bin,.bin.gz' name='filesystem'>
         <input type='submit' value='Update FileSystem'>
     </form>
     </body>
     </html>)";
static const char successResponse[] PROGMEM =
  "<META http-equiv=\"refresh\" content=\"15;URL=/\">Update Success! Rebooting...";
Here the handle
    // handler for the /update form page
    _server->on(path.c_str(), HTTP_GET, [&](){
      if(_username != emptyString && _password != emptyString && !_server->authenticate(_username.c_str(), _password.c_str()))
        return _server->requestAuthentication();
      _server->send_P(200, PSTR("text/html"), serverIndex);
    });
in POST check the name of input (firmware or filesystem) to understand if the file is for FLASH or FileSystem, then upload the file and Update service do the work, here the POST code.
    // handler for the /update form POST (once file upload finishes)
    _server->on(path.c_str(), HTTP_POST, [&](){
      if(!_authenticated)
        return _server->requestAuthentication();
      if (Update.hasError()) {
        _server->send(200, F("text/html"), String(F("Update error: ")) + _updaterError);
      } else {
        _server->client().setNoDelay(true);
        _server->send_P(200, PSTR("text/html"), successResponse);
        delay(100);
        _server->client().stop();
        ESP.restart();
      }
    },[&](){
      // handler for the file upload, gets the sketch bytes, and writes
      // them through the Update object
      HTTPUpload& upload = _server->upload();

      if(upload.status == UPLOAD_FILE_START){
        _updaterError.clear();
        if (_serial_output)
          Serial.setDebugOutput(true);

        _authenticated = (_username == emptyString || _password == emptyString || _server->authenticate(_username.c_str(), _password.c_str()));
        if(!_authenticated){
          if (_serial_output)
            Serial.printf("Unauthenticated Update\n");
          return;
        }

        WiFiUDP::stopAll();
        if (_serial_output)
          Serial.printf("Update: %s\n", upload.filename.c_str());
        if (upload.name == "filesystem") {
          size_t fsSize = ((size_t) &_FS_end - (size_t) &_FS_start);
          close_all_fs();
          if (!Update.begin(fsSize, U_FS)){//start with max available size
            if (_serial_output) Update.printError(Serial);
          }
        } else {
          uint32_t maxSketchSpace = (ESP.getFreeSketchSpace() - 0x1000) & 0xFFFFF000;
          if (!Update.begin(maxSketchSpace, U_FLASH)){//start with max available size
            _setUpdaterError();
          }
        }
      } else if(_authenticated && upload.status == UPLOAD_FILE_WRITE && !_updaterError.length()){
        if (_serial_output) Serial.printf(".");
        if(Update.write(upload.buf, upload.currentSize) != upload.currentSize){
          _setUpdaterError();
        }
      } else if(_authenticated && upload.status == UPLOAD_FILE_END && !_updaterError.length()){
        if(Update.end(true)){ //true to set the size to the current progress
          if (_serial_output) Serial.printf("Update Success: %u\nRebooting...\n", upload.totalSize);
        } else {
          _setUpdaterError();
        }
        if (_serial_output) Serial.setDebugOutput(false);
      } else if(_authenticated && upload.status == UPLOAD_FILE_ABORTED){
        Update.end();
        if (_serial_output) Serial.println("Update was aborted");
      }
      delay(0);
    });
To better understand I advise to read “How to create a Web Server with esp8266 and esp32” and “How to create a REST server on esp8266 or esp32“.
You can see that the code is trivial, and we can manipulate It to do more beautiful, but we are going to do next.
Generate FileSystem (SPIFFS or LittleFS)
An interesting feature is the management of File System like a compiled firmware.
Add verbose output to Arduino IDE
To better understand all process we are going to enable verbose output on our Arduino IDE. You can find this options on File -> Preferences and check Show verbose output checks.
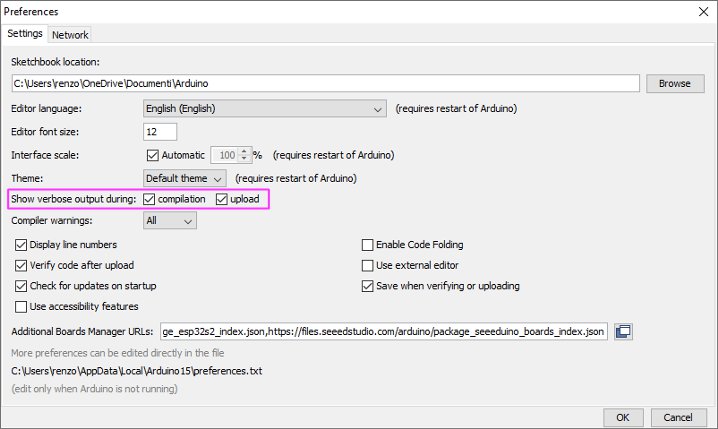
This allows us to take and reuse console commands.
Generate filesystem binary
You can also upload filesystem data with the classic method via plugin, to install SPIFFS or LittleFS plugin refer to the relative tutorial:
WeMos D1 mini (esp8266), integrated SPIFFS Filesystem (deprecated)
WeMos D1 mini (esp8266), integrated LittleFS Filesystem (reccomended)
Now we are going to add data directory to the sketch folder (with some files), and use the plugin to upload.

You can check the IDE console output to check what happened.
[LittleFS] data    : D:\tmp\testBlink\Blink\data
[LittleFS] size    : 2024
[LittleFS] page    : 256
[LittleFS] block   : 8192
/bombo.png
[LittleFS] upload  : C:\Users\renzo\AppData\Local\Temp\arduino_build_49036/Blink.mklittlefs.bin
[LittleFS] address : 0x200000
[LittleFS] reset   : --before default_reset --after hard_reset
[LittleFS] port    : COM17
[LittleFS] speed   : 921600
[LittleFS] python   : C:\Users\renzo\AppData\Local\Arduino15\packages\esp8266\tools\python3\3.7.2-post1\python3.exe
[LittleFS] uploader : C:\Users\renzo\AppData\Local\Arduino15\packages\esp8266\hardware\esp8266\2.7.4\tools\upload.py

esptool.py v2.8
Serial port COM17
Connecting....
Chip is ESP8266EX
Features: WiFi
Crystal is 26MHz
MAC: 50:02:91:74:fe:11
Uploading stub...
Running stub...
Stub running...
Changing baud rate to 460800
Changed.
Configuring flash size...
Auto-detected Flash size: 4MB
Compressed 2072576 bytes to 48389...
Wrote 2072576 bytes (48389 compressed) at 0x00200000 in 4.9 seconds (effective 3416.7 kbit/s)...
Hash of data verified.

Leaving...
Hard resetting via RTS pin...
Now we can retrieve the information we need, such as the location of the file
[LittleFS] upload : C:\Users\renzo\AppData\Local\Temp\arduino_build_49036/Blink.mklittlefs.bin
Add basic authentication
The ESP8266HTTPUpdateServer implement the Basic Authentication (already explained in this section of WebServer tutorial). It’s very simple, we are going to change this line of code
httpUpdater.setup(&httpServer, "/update", "mischianti", "passwd");
In the code line you can see 3 new parameter,
"/update": is the path of the OTA update, if you change this path the end point and the page change;"mischianti": is the login you must insert;"passwd": is the password.
When you try to enter on /update url, a login popup appear

If you insert a wrong login or passwd you receive standard HTTP status for the unauthorized 401.
Thanks
- Firmware management
- OTA update with Arduino IDE
- OTA update with Web Browser
- Self OTA uptate from HTTP server
- Non standard Firmware update


