
Ebyte LoRa E32 with STM32: WOR (wake on radio) and new STM32 shield – 9
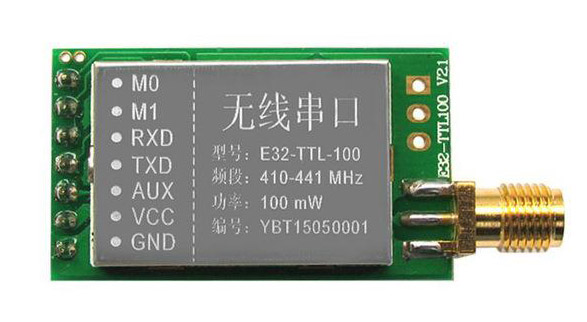
We have seen how this device (E32 UART LoRa based on popular SX1276/SX1278 Wireless Modules ) manages power saving, but If we use power saving only for the e32, the microcontroller continues to rest active, but we can use the AUX pin to resolve this problem.
Here my selection of LoRa E32 AliExpress (433MHz 5Km) - AliExpress (433MHz 8Km) - AliExpress (433MHz 16Km) - AliExpress (868MHz 915MHz 5.5Km) - AliExpress (868MHz 915MHz 8Km)
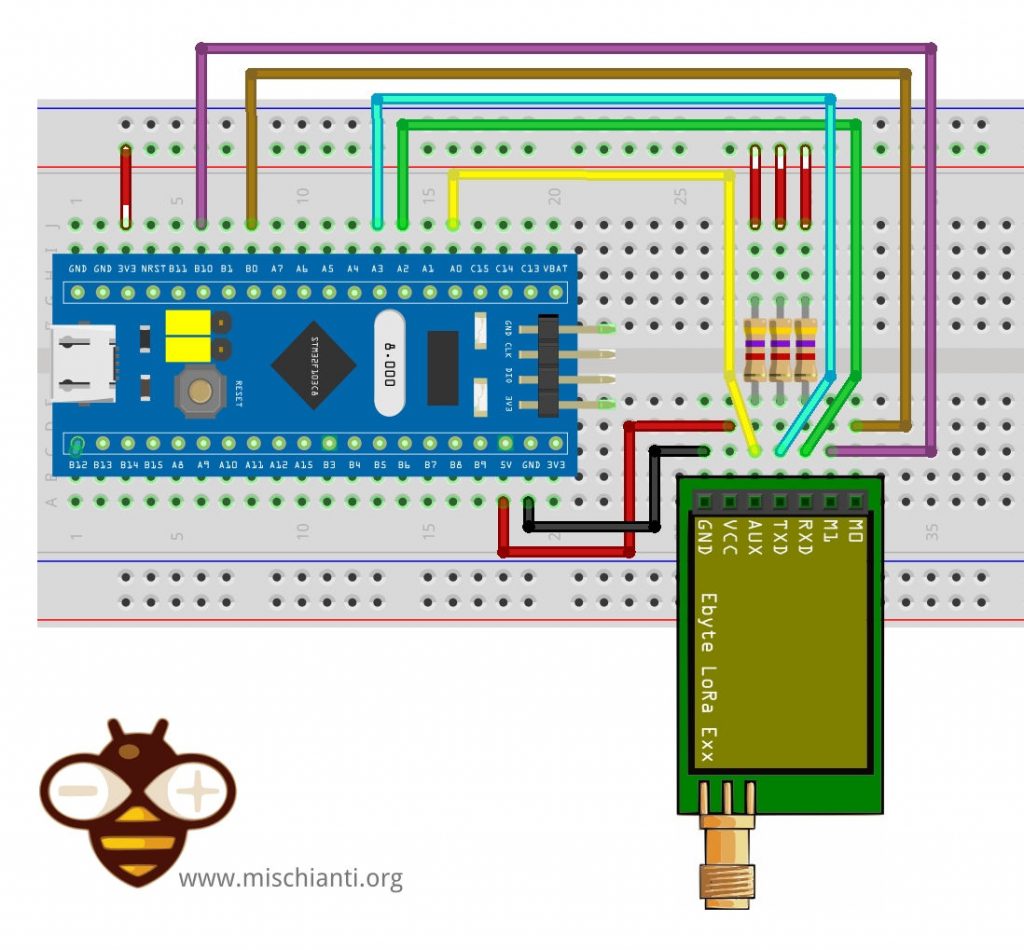
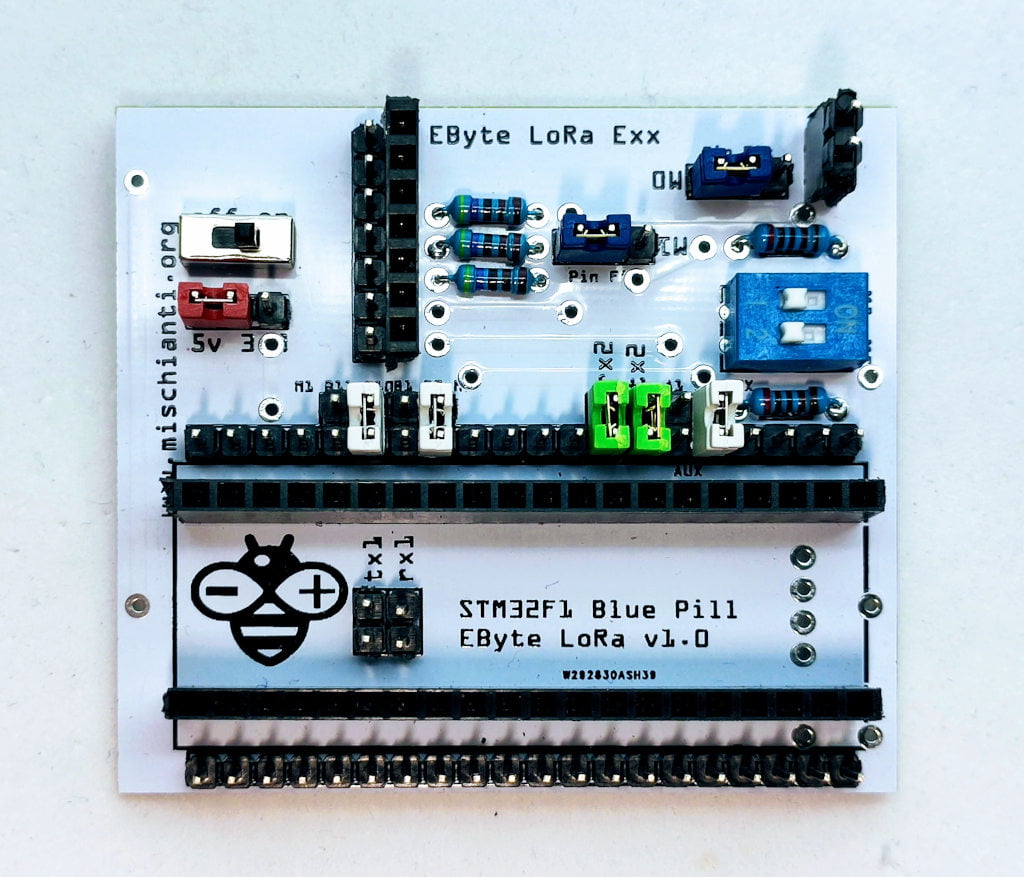
STM32F1 Blue pill wiring
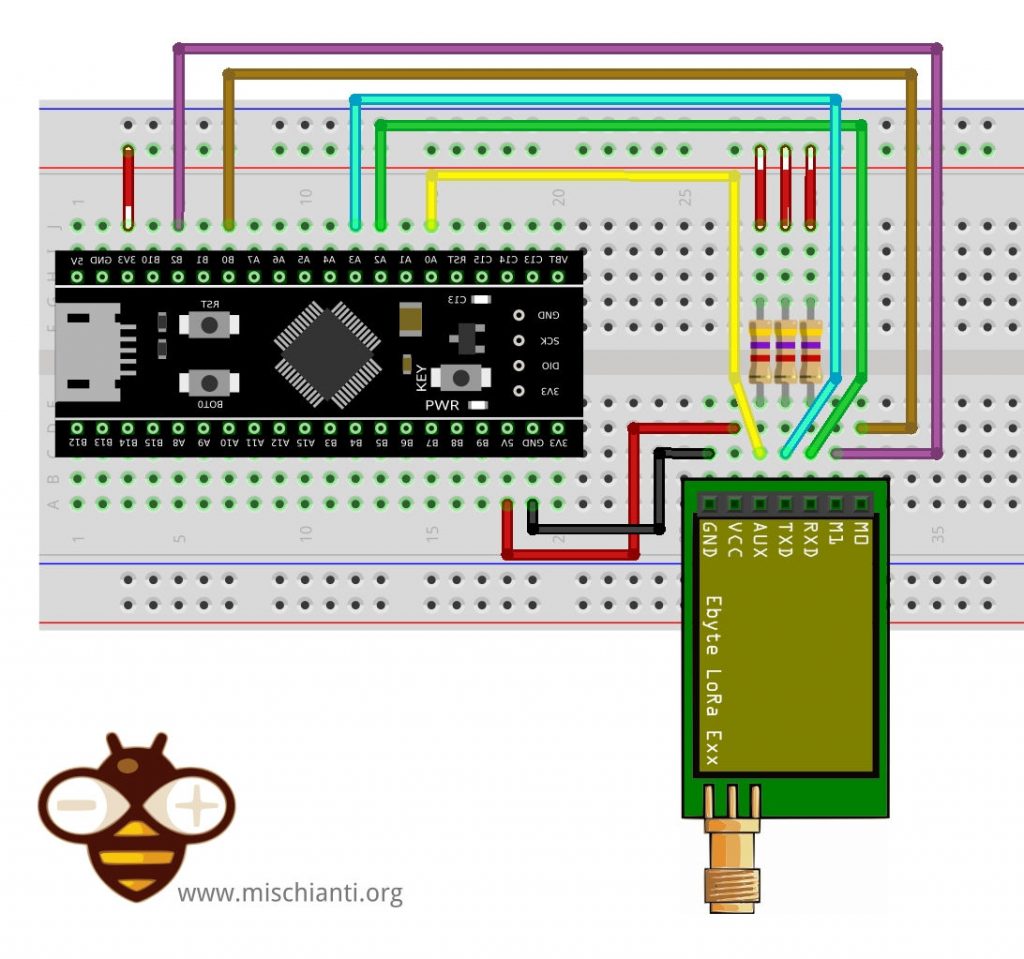
We are going to make this connection to support wake on radio, we use Serial2 for communication, PB0 for M0 and PB10 for M1, and A0, the wake pin, for AUX so we can wake our device without a problem.
I advise you to read the tutorial on energy saving with STM32 “STM32 power saving”.
So the new connection schema becomes like so:
STM32F4 Black pill wiring
We are going to make this connection to support wake on radio, we use Serial2 for communication, PB0 for M0 and PB2 for M1, and A0, the wake pin, for AUX so we can wake our device without a problem.
I advise you to read the tutorial on energy saving with STM32 “STM32 power saving”.
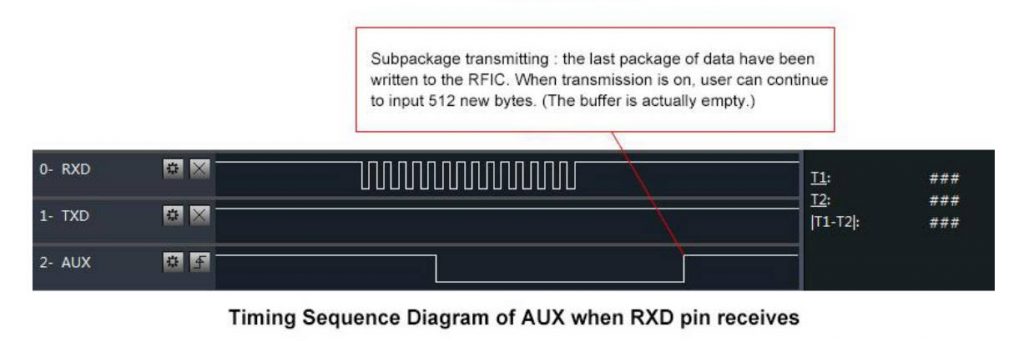
AUX pin behavior
When you are in Sleep mode, the e32 puts on the buffer the data received and go immediately LOW. When data is ready, return HIGHT, LOW It’s perfect to wake the microcontroller.
STM32 wake up
As the e32 device, the stm32 has some sleep type, but for this test, we are going to use Light sleep with GPIO wake up.
Refer to “STM32 power saving” for a detailed description of sleep mode.
How to put in light sleep STM32
The command to put on power down the microcontroller is this
	Serial.println("Start SLEEP mode in ");
	for (int i = 10;i>0;i--) { Serial.print(i); Serial.print(" "); } Serial.println( "OK!" );
	delay(1000);

	LowPower.sleep();

	delay(1000);
But we must specify that the device must wake when the AUX pin goes LOW
	// Configure low power
	LowPower.begin();
	// Attach a wakeup interrupt on pin, calling repetitionsIncrease when the device is woken up
	// Last parameter (LowPowerMode) should match with the low power state used: in this example LowPower.sleep()
	LowPower.attachInterruptWakeup(pin, wakedUp, LOW, SLEEP_MODE);
So the code to receive the alarm from a data transmission becomes like this:
/*
 * EBYTE LoRa E32
 * Stay in sleep mode and wait a wake up WOR message
 *
 * You must configure the address with 0 3 23 with WOR receiver enable
 * and pay attention that WOR period must be the same of sender
 *
 *
 * https://mischianti.org
 *
 * E32		  ----- stm32
 * M0         ----- PB0 (or 3.3v)
 * M1         ----- PB10 (or GND)
 * RX         ----- PA2 TX2 (PullUP)
 * TX         ----- PA3 RX2 (PullUP)
 * AUX        ----- PA0  (PullUP)
 * VCC        ----- 3.3v/5v
 * GND        ----- GND
 *
 */

// with this DESTINATION_ADDL 2 you must set
// WOR SENDER configuration to the other device and
// WOR RECEIVER to this device
#define DESTINATION_ADDL 2

#include "Arduino.h"
#include "LoRa_E32.h"
#include "STM32LowPower.h"

void wakedUp() {
	// randomly you can read this, but normally reset block every time the execution
	Serial.println("Wake-Up callback!");
}

void printParameters(struct Configuration configuration);

// ---------- esp8266 pins --------------
//LoRa_E32 e32ttl(RX, TX, AUX, M0, M1);  // Arduino RX <-- e22 TX, Arduino TX --> e22 RX
//LoRa_E32 e32ttl(D3, D4, D5, D7, D6); // Arduino RX <-- e22 TX, Arduino TX --> e22 RX AUX M0 M1
//LoRa_E32 e32ttl(D2, D3); // Config without connect AUX and M0 M1

//#include <SoftwareSerial.h>
//SoftwareSerial mySerial(D2, D3); // Arduino RX <-- e22 TX, Arduino TX --> e22 RX
//LoRa_E32 e32ttl(&mySerial, D5, D7, D6); // AUX M0 M1
// -------------------------------------

// ---------- Arduino pins --------------
//LoRa_E32 e32ttl(4, 5, 3, 7, 6); // Arduino RX <-- e22 TX, Arduino TX --> e22 RX AUX M0 M1
//LoRa_E32 e32ttl(4, 5); // Config without connect AUX and M0 M1

//#include <SoftwareSerial.h>
//SoftwareSerial mySerial(4, 5); // Arduino RX <-- e22 TX, Arduino TX --> e22 RX
//LoRa_E32 e32ttl(&mySerial, 3, 7, 6); // AUX M0 M1
// -------------------------------------

// ---------- esp32 pins --------------
//LoRa_E32 e32ttl(&Serial2, 15, 21, 19); //  RX AUX M0 M1

//LoRa_E32 e32ttl(&Serial2, 22, 4, 18, 21, 19, UART_BPS_RATE_9600); //  esp32 RX <-- e22 TX, esp32 TX --> e22 RX AUX M0 M1
// -------------------------------------

// ---------------- STM32 --------------------
HardwareSerial Serial2(USART2);   // PA3  (RX)  PA2  (TX)

LoRa_E32 e32ttl(&Serial2, PA0, PB0, PB10); //  RX AUX M0 M1
// -------------------------------------------------

const int pin = SYS_WKUP1;

//The setup function is called once at startup of the sketch
void setup()
{
    Serial.begin(9600);
    while (!Serial) {
        ; // wait for serial port to connect. Needed for native USB
    }
    delay(100);

    e32ttl.begin();

	// After set configuration comment set M0 and M1 to low
	// and reboot if you directly set HIGH M0 and M1 to program
//	ResponseStructContainer c;
//	c = e32ttl.getConfiguration();
//	Configuration configuration = *(Configuration*) c.data;
//	configuration.ADDL = 0x03;
//	configuration.ADDH = 0x00;
//	configuration.CHAN = 0x04;
//	configuration.OPTION.fixedTransmission = FT_FIXED_TRANSMISSION;
//	configuration.OPTION.wirelessWakeupTime = WAKE_UP_2000;
//	e32ttl.setConfiguration(configuration, WRITE_CFG_PWR_DWN_SAVE);
//	printParameters(configuration);
//	c.close();
	// ---------------------------
	e32ttl.setMode(MODE_2_POWER_SAVING);
	// Configure low power
	LowPower.begin();
	// Attach a wakeup interrupt on pin, calling repetitionsIncrease when the device is woken up
	// Last parameter (LowPowerMode) should match with the low power state used: in this example LowPower.sleep()
	LowPower.attachInterruptWakeup(pin, wakedUp, LOW, SLEEP_MODE);

	Serial.println("Start SLEEP mode in ");
	for (int i = 10;i>0;i--) { Serial.print(i); Serial.print(" "); } Serial.println( "OK!" );
	delay(1000);

	LowPower.sleep();

	delay(1000);

	//	e32ttl.setMode(MODE_0_NORMAL);
//	delay(1000);
    Serial.println();
    Serial.println("Wake and start listening!");
}

// The loop function is called in an endless loop
void loop()
{
    if (e32ttl.available()  > 1){
    	Serial.println("Message arrived!");
        ResponseContainer rs = e32ttl.receiveMessage();
        // First of all get the data
        String message = rs.data;

        Serial.println(rs.status.getResponseDescription());
        Serial.println(message);

        e32ttl.setMode(MODE_0_NORMAL);

    	delay(1000);

        e32ttl.sendFixedMessage(0, DESTINATION_ADDL, 23, "We have received the message!");
    }
}

void printParameters(struct Configuration configuration) {
    Serial.println("----------------------------------------");

    Serial.print(F("HEAD : "));  Serial.print(configuration.HEAD, BIN);Serial.print(" ");Serial.print(configuration.HEAD, DEC);Serial.print(" ");Serial.println(configuration.HEAD, HEX);
    Serial.println(F(" "));
    Serial.print(F("AddH : "));  Serial.println(configuration.ADDH, DEC);
    Serial.print(F("AddL : "));  Serial.println(configuration.ADDL, DEC);
    Serial.print(F("Chan : "));  Serial.print(configuration.CHAN, DEC); Serial.print(" -> "); Serial.println(configuration.getChannelDescription());
    Serial.println(F(" "));
    Serial.print(F("SpeedParityBit     : "));  Serial.print(configuration.SPED.uartParity, BIN);Serial.print(" -> "); Serial.println(configuration.SPED.getUARTParityDescription());
    Serial.print(F("SpeedUARTDatte  : "));  Serial.print(configuration.SPED.uartBaudRate, BIN);Serial.print(" -> "); Serial.println(configuration.SPED.getUARTBaudRate());
    Serial.print(F("SpeedAirDataRate   : "));  Serial.print(configuration.SPED.airDataRate, BIN);Serial.print(" -> "); Serial.println(configuration.SPED.getAirDataRate());

    Serial.print(F("OptionTrans        : "));  Serial.print(configuration.OPTION.fixedTransmission, BIN);Serial.print(" -> "); Serial.println(configuration.OPTION.getFixedTransmissionDescription());
    Serial.print(F("OptionPullup       : "));  Serial.print(configuration.OPTION.ioDriveMode, BIN);Serial.print(" -> "); Serial.println(configuration.OPTION.getIODroveModeDescription());
    Serial.print(F("OptionWakeup       : "));  Serial.print(configuration.OPTION.wirelessWakeupTime, BIN);Serial.print(" -> "); Serial.println(configuration.OPTION.getWirelessWakeUPTimeDescription());
    Serial.print(F("OptionFEC          : "));  Serial.print(configuration.OPTION.fec, BIN);Serial.print(" -> "); Serial.println(configuration.OPTION.getFECDescription());
    Serial.print(F("OptionPower        : "));  Serial.print(configuration.OPTION.transmissionPower, BIN);Serial.print(" -> "); Serial.println(configuration.OPTION.getTransmissionPowerDescription());

    Serial.println("----------------------------------------");

}
The result is that the Serial stop on line 98. When we receive the message, the e32 wake itself and puts AUX LOW, so esp32 wake with interrupt on AUX pin.
Here is the sending sketch:
/*
 * LoRa E32
 * Send fixed broadcast transmission message to a specified channel.
 * https://mischianti.org/lora-e32-device-for-arduino-esp32-or-esp8266-fixed-transmission-part-4/
 *
 * E32		  ----- stm32
 * M0         ----- PB0 (or GND)
 * M1         ----- PB10 (or GND)
 * RX         ----- PA2 TX2 (PullUP)
 * TX         ----- PA3 RX2 (PullUP)
 * AUX        ----- PA0  (PullUP)
 * VCC        ----- 3.3v/5v
 * GND        ----- GND
 *
 */
#include "Arduino.h"
#include "LoRa_E32.h"

// ---------- esp8266 pins --------------
//LoRa_E32 e32ttl(RX, TX, AUX, M0, M1);  // Arduino RX <-- e220 TX, Arduino TX --> e220 RX
//LoRa_E32 e32ttl(D3, D4, D5, D7, D6); // Arduino RX <-- e220 TX, Arduino TX --> e220 RX AUX M0 M1
//LoRa_E32 e32ttl(D2, D3); // Config without connect AUX and M0 M1

//#include <SoftwareSerial.h>
//SoftwareSerial mySerial(D2, D3); // Arduino RX <-- e220 TX, Arduino TX --> e220 RX
//LoRa_E32 e32ttl(&mySerial, D5, D7, D6); // AUX M0 M1
// -------------------------------------

// ---------- Arduino pins --------------
// LoRa_E32 e32ttl(4, 5, 3, 7, 6); // Arduino RX <-- e220 TX, Arduino TX --> e220 RX AUX M0 M1
//LoRa_E32 e32ttl(4, 5); // Config without connect AUX and M0 M1

//#include <SoftwareSerial.h>
//SoftwareSerial mySerial(4, 5); // Arduino RX <-- e220 TX, Arduino TX --> e220 RX
//LoRa_E32 e32ttl(&mySerial, 3, 7, 6); // AUX M0 M1
// -------------------------------------

// ------------- Arduino Nano 33 IoT -------------
// LoRa_E32 e32ttl(&Serial1, 2, 4, 6); //  RX AUX M0 M1
// -------------------------------------------------

// ------------- Arduino MKR WiFi 1010 -------------
// LoRa_E32 e32ttl(&Serial1, 0, 2, 4); //  RX AUX M0 M1
// -------------------------------------------------

// ---------- esp32 pins --------------
// LoRa_E32 e32ttl(&Serial2, 15, 21, 19); //  RX AUX M0 M1

//LoRa_E32 e32ttl(&Serial2, 22, 4, 18, 21, 19, UART_BPS_RATE_9600); //  esp32 RX <-- e220 TX, esp32 TX --> e220 RX AUX M0 M1
// -------------------------------------
// ---------------- STM32 --------------------
HardwareSerial Serial2(USART2);   // PA3  (RX)  PA2  (TX)

LoRa_E32 e32ttl(&Serial2, PA0, PB0, PB10); //  RX AUX M0 M1
// -------------------------------------------------

void printParameters(struct Configuration configuration);
void printModuleInformation(struct ModuleInformation moduleInformation);
//The setup function is called once at startup of the sketch
void setup()
{
	Serial.begin(9600);
	while (!Serial) {
	    ; // wait for serial port to connect. Needed for native USB
    }
	delay(100);

	e32ttl.begin();

	// After set configuration comment set M0 and M1 to low
	// and reboot if you directly set HIGH M0 and M1 to program
//	ResponseStructContainer c;
//	c = e32ttl.getConfiguration();
//	Configuration configuration = *(Configuration*) c.data;
//	configuration.ADDL = 0x03;
//	configuration.ADDH = 0x00;
//	configuration.CHAN = 0x05;
//	configuration.OPTION.fixedTransmission = FT_FIXED_TRANSMISSION;
//	e32ttl.setConfiguration(configuration, WRITE_CFG_PWR_DWN_SAVE);
//	c.close();
//
//
//	ResponseStructContainer c1;
//	c1 = e32ttl.getConfiguration();
//	Configuration configuration1 = *(Configuration*) c1.data;
//	printParameters(configuration1);
//	c1.close();
	// ---------------------------
}

// The loop function is called in an endless loop
void loop()
{
	delay(2000);

	Serial.println("Send message to 00 03 04");
	ResponseStatus rs = e32ttl.sendFixedMessage(0, 3, 0x04, "Message to 00 03 04 device");
	Serial.println(rs.getResponseDescription());
}

void printParameters(struct Configuration configuration) {
	Serial.println("----------------------------------------");

	Serial.print(F("HEAD : "));  Serial.print(configuration.HEAD, BIN);Serial.print(" ");Serial.print(configuration.HEAD, DEC);Serial.print(" ");Serial.println(configuration.HEAD, HEX);
	Serial.println(F(" "));
	Serial.print(F("AddH : "));  Serial.println(configuration.ADDH, BIN);
	Serial.print(F("AddL : "));  Serial.println(configuration.ADDL, BIN);
	Serial.print(F("Chan : "));  Serial.print(configuration.CHAN, DEC); Serial.print(" -> "); Serial.println(configuration.getChannelDescription());
	Serial.println(F(" "));
	Serial.print(F("SpeedParityBit     : "));  Serial.print(configuration.SPED.uartParity, BIN);Serial.print(" -> "); Serial.println(configuration.SPED.getUARTParityDescription());
	Serial.print(F("SpeedUARTDatte  : "));  Serial.print(configuration.SPED.uartBaudRate, BIN);Serial.print(" -> "); Serial.println(configuration.SPED.getUARTBaudRate());
	Serial.print(F("SpeedAirDataRate   : "));  Serial.print(configuration.SPED.airDataRate, BIN);Serial.print(" -> "); Serial.println(configuration.SPED.getAirDataRate());

	Serial.print(F("OptionTrans        : "));  Serial.print(configuration.OPTION.fixedTransmission, BIN);Serial.print(" -> "); Serial.println(configuration.OPTION.getFixedTransmissionDescription());
	Serial.print(F("OptionPullup       : "));  Serial.print(configuration.OPTION.ioDriveMode, BIN);Serial.print(" -> "); Serial.println(configuration.OPTION.getIODroveModeDescription());
	Serial.print(F("OptionWakeup       : "));  Serial.print(configuration.OPTION.wirelessWakeupTime, BIN);Serial.print(" -> "); Serial.println(configuration.OPTION.getWirelessWakeUPTimeDescription());
	Serial.print(F("OptionFEC          : "));  Serial.print(configuration.OPTION.fec, BIN);Serial.print(" -> "); Serial.println(configuration.OPTION.getFECDescription());
	Serial.print(F("OptionPower        : "));  Serial.print(configuration.OPTION.transmissionPower, BIN);Serial.print(" -> "); Serial.println(configuration.OPTION.getTransmissionPowerDescription());

	Serial.println("----------------------------------------");

}
void printModuleInformation(struct ModuleInformation moduleInformation) {
	Serial.println("----------------------------------------");
	Serial.print(F("HEAD BIN: "));  Serial.print(moduleInformation.HEAD, BIN);Serial.print(" ");Serial.print(moduleInformation.HEAD, DEC);Serial.print(" ");Serial.println(moduleInformation.HEAD, HEX);

	Serial.print(F("Freq.: "));  Serial.println(moduleInformation.frequency, HEX);
	Serial.print(F("Version  : "));  Serial.println(moduleInformation.version, HEX);
	Serial.print(F("Features : "));  Serial.println(moduleInformation.features, HEX);
	Serial.println("----------------------------------------");

}
Here the Serial output of the 2 devices mixed
Start SLEEP mode in
10 9 8 7 6 5 4 3 2 1 OK!
Send message to 00 03 04
Success
Wake and start listening!
Message arrived!
Success
Message to 00 03 04 deviceMessage to 00 03 04 device
Configuration for STM32 LoRa Shield
I release a new shield for STM32F1 blue pill and
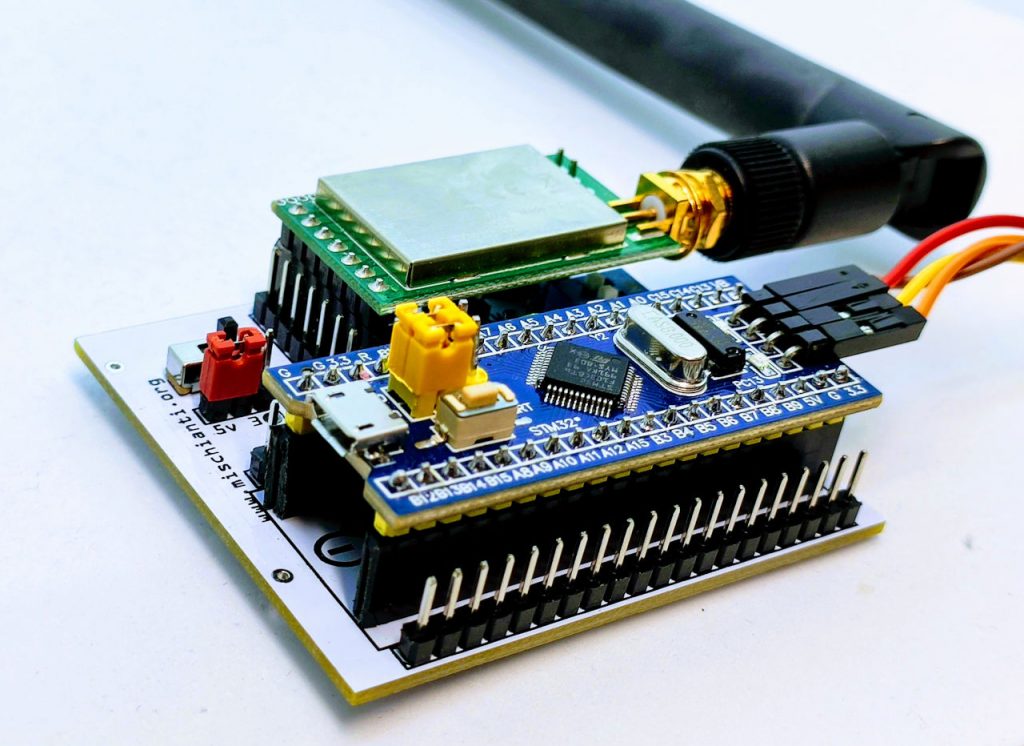
Unleashing IoT Potential: Integrating STM32F1 Blue-Pill with EByte LoRa E32, E22, and E220 Shields
STM32F4 black pill, and I think It’s very useful for prototyping and more.
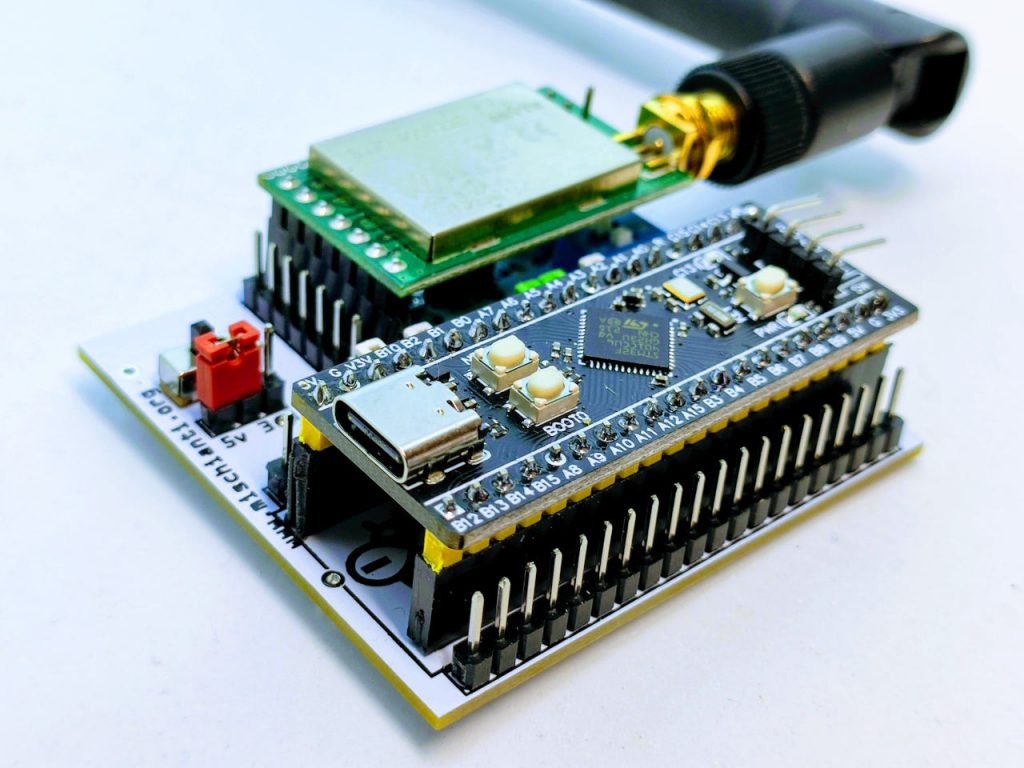
Unleashing IoT Potential: Integrating STM32F4 Black-Pill with EByte LoRa E32, E22, and E220 Shield
The configuration is this:
// -------------------- STM32 ----------------------
HardwareSerial Serial2(USART2);   // PA3  (RX)  PA2  (TX)
LoRa_E32 e32ttl(&Serial2, PA0, PB0, PB10); //  RX AUX M0 M1
// -------------------------------------------------
for this jumper configuration
Thanks
- LoRa E32 device for Arduino, esp32 or esp8266: settings and basic usage
- LoRa E32 device for Arduino, esp32 or esp8266: library
- LoRa E32 device for Arduino, esp32 or esp8266: configuration
- LoRa E32 device for Arduino, esp32 or esp8266: fixed transmission
- LoRa E32 device for Arduino, esp32 or esp8266: power saving and sending structured data
- LoRa E32 device for Arduino, esp32 or esp8266: WOR (wake on radio) microcontroller and Arduino shield
- LoRa E32 device for Arduino, esp32 or esp8266: WOR (wake on radio) microcontroller and WeMos D1 shield
- EByte LoRa E32 device for Arduino, esp32 or esp8266: WOR (wake on radio) and new ESP32 shield
- Ebyte LoRa E32 with STM32: WOR (wake on radio) and new STM32 shield
- Mischianti Arduino LoRa shield (Open source)
- Mischianti WeMos LoRa shield (Open source)
- Mischianti ESP32 DOIT DEV KIT v1 shield (Open source)
- STM32F1 Blue-Pill EByte LoRa E32, E22, and E220 Shield
- STM32F4 Black-Pill EByte LoRa E32, E22, and E220 Shield


I trust this message finds you well. I wanted to extend my heartfelt gratitude for featuring ebyte products in your recent article. Your insights and positive mention have certainly caught our attention, and we are genuinely appreciative of your support.
Considering the shared interest in advancing technology and innovation, I am writing to inquire about the possibility of including a reference to our official website, (www.cdebyte.com) in your article. This would provide your readers with a direct link to explore the diverse range of cutting-edge modules and solutions offered by ebyte.
On a related note, I wanted to bring to your attention that ebyte is currently running a Christmas promotion where we are offering module samples. We would be delighted if you could follow our subsequent exciting activities, including this Christmas promotion, and share this information with your audience.
Thank you once again for your time and consideration. We look forward to the potential collaboration and to hearing from you soon
Thank you for your kind words and for reaching out. I am glad that my article has garnered ebyte’s interest again.
In response to your request, I contact you directly to discuss and refine the details. Looking forward to our conversation and exploring the possibilities of our collaboration.
Bye Renzo