WebSocket su Arduino, esp8266 e esp32: client – 1
Definizione
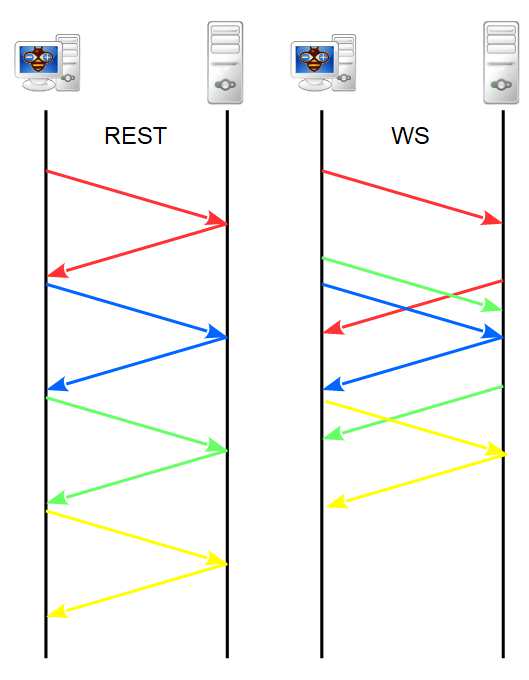
WebSocket è un protocollo di comunicazione che fornisce canali di comunicazione full-duplex su una singola connessione TCP.
A differenza dell’HTTP, il WebSocket fornisce una comunicazione full-duplex. Inoltre, il WebSocket consente flussi di messaggi su TCP. Il TCP da solo si occupa di flussi di byte senza alcun concetto intrinseco di messaggio. (Ct. Wiki)
Quindi con il WebSocket puoi fare una comunicazione full-duplex e, sottoscrivendo un canale, puoi evitare il polling. Ho usato questo protocollo in molte applicazioni e penso che diventerà il futuro delle applicazioni moderne.
Architettura
Fondamentalmente hai un server che condivide il servizio e un insieme di client che possono connettersi al server.
La connessione apre un canale dai dispositivi, ma per ottenere informazioni è necessario sottoscriversi ad un topic (a volte l’iscrizione è implicita con la connect).
La grande differenza dai REST è che in una richiesta http si invia una richiesta e si deve attendere la risposta per avere i dati e avviare una nuova richiesta sulla stessa connessione, con il WS è possibile trasmettere in streaming richieste e risposte e operare su di esse quando lo si desidera.
Ma come possiamo utilizzare il WebSocket per i nostri progetti?
Un classico esempio è una tabella con molte righe, prima facciamo una chiamata REST e otteniamo tutti i dati della tabella, ma per aggiornare la singola cella possiamo usare la sottoscrizione WebSocket, e tramite JavaScript andare ad aggiornare la singola cella magari con un bell’effetto grafico.
Client WebSocket
Ora vedremo un semplice client WebSocket, che si connetterà a un server echo WebSocket. Il suo comportamento è piuttosto semplice, invii un messaggio e il server ti risponde con il medesimo messaggio, così puoi testare l’invio e la ricezione del tuo client.
Aggiungo questo semplice client di test WebSocket in js, qui, puoi testare il comportamento.
WebSocket Test Client
Il mio sito è in https quindi il client incorporato funziona solo su wss non ws (usiamo ws senza secure layer), quindi creo un collegamento a una semplice versione http del client qui.
Client WebSocket in JavaScript
Qui una versione semplificata del client WebSocket di test
<!--
js simple WebSocket client
https://www.mischainti.org

I use the ws://echo.websocket.org/ echo server
When you send a message to this server you receive
a response with the same message
-->

<!DOCTYPE html>
<html>
<head>
    <meta charset="utf-8"/>
    <title>WebSocket Test</title>
    <style>
        #output {
            border: solid 1px #999999;
            border-top-color: #CCCCCC;
            border-left-color: #CCCCCC;
            padding: 5px;
            width: 300px;
            height: 172px;
            overflow-y: scroll;

            font-family: "Open Sans";
            font-size: 13px;
        }
    </style>
    <script language="javascript" type="text/javascript">

        var wsUri = "wss://echo.websocket.org/";
        var output;

        function init() {
            output = document.getElementById("output");
            testWebSocket();
        }

        function testWebSocket() {
            websocket = new WebSocket(wsUri);
            websocket.onopen = function (evt) {
                onOpen(evt)
            };
            websocket.onclose = function (evt) {
                onClose(evt)
            };
            websocket.onmessage = function (evt) {
                onMessage(evt)
            };
            websocket.onerror = function (evt) {
                onError(evt)
            };
        }

        function onOpen(evt) {
            writeToScreen("CONNECTED");
            // doSend("Hi, I'm simple JS client!!");
        }

        function onClose(evt) {
            writeToScreen("DISCONNECTED");
        }

        function onMessage(evt) {
            writeToScreen('<span style="color: blue;">RESPONSE: ' + evt.data + '</span>');
            // websocket.close();
        }

        function onError(evt) {
            writeToScreen('<span style="color: red;">ERROR:</span> ' + evt.data);
        }

        function doSend(message) {
            writeToScreen("SENT: " + message);
            websocket.send(message);
        }

        function writeToScreen(message) {
            var pre = document.createElement("p");
            pre.style.wordWrap = "break-word";
            pre.innerHTML = message;
            output.appendChild(pre);

            output.scrollTop = output.scrollHeight;
        }

        window.addEventListener("load", init, false);

    </script>
</head>
<body>

<h2>WebSocket Test</h2>


<div id="output"></div>
<br/>
<input type="button" value="Send message!" onclick="doSend('Simple js client message!!')"/></div>
<input type="button" value="Close connection!" onclick="websocket.close()"/></div>

</body>
</html>
La parte core del codice è
        function testWebSocket() {
            websocket = new WebSocket(wsUri);
            websocket.onopen = function (evt) {
                onOpen(evt)
            };
            websocket.onclose = function (evt) {
                onClose(evt)
            };
            websocket.onmessage = function (evt) {
                onMessage(evt)
            };
            websocket.onerror = function (evt) {
                onError(evt)
            };
        }
Questo semplice codice esegue una connessione e imposta una serie di funzioni di callback a eventi specificati:
- onopen : viene chiamato quando viene stabilita la connessione;
- onclose : quando il client è disconnesso;
- onmessage : qui quando arriva un messaggio;
- onerror : quando viene generato un errore.
Come puoi vedere per inviare un messaggio devi semplicemente chiamare websocket.send dopo la connessione.
Libreria
Puoi trovare la libreria direttamente nel repository delle librerie Arduino ( Tools --> Manage libraries..).
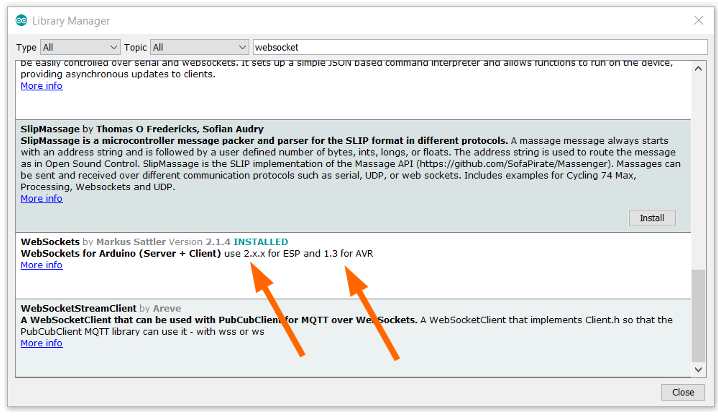
Fai attenzione per l’esp8266 e l’esp32 devi usare la versione 2.xx per AVR (Arduino) devi usare la versione 1.3.
Client WebSocket esp8266
Per connetterti con il tuo esp8266 il codice è abbastanza semplice
/*
 * esp8266 simple WebSocket client
 * https://www.mischainti.org
 *
 * I use the ws://echo.websocket.org/ echo server
 * When you send a message to this server you receive
 * a response with the same message
 *
 */

#include <Arduino.h>

#include <ESP8266WiFi.h>
#include <WebSocketsClient.h>

WebSocketsClient webSocket;

const char *ssid     = "<YOUR-SSID>";
const char *password = "<YOUR-PASSWD>";

unsigned long messageInterval = 5000;
bool connected = false;

#define DEBUG_SERIAL Serial

void webSocketEvent(WStype_t type, uint8_t * payload, size_t length) {
	switch(type) {
		case WStype_DISCONNECTED:
			DEBUG_SERIAL.printf("[WSc] Disconnected!\n");
			connected = false;
			break;
		case WStype_CONNECTED: {
			DEBUG_SERIAL.printf("[WSc] Connected to url: %s\n", payload);
			connected = true;

			// send message to server when Connected
			DEBUG_SERIAL.println("[WSc] SENT: Connected");
			webSocket.sendTXT("Connected");
		}
			break;
		case WStype_TEXT:
			DEBUG_SERIAL.printf("[WSc] RESPONSE: %s\n", payload);
			break;
		case WStype_BIN:
			DEBUG_SERIAL.printf("[WSc] get binary length: %u\n", length);
			hexdump(payload, length);
			break;
                case WStype_PING:
                        // pong will be send automatically
                        DEBUG_SERIAL.printf("[WSc] get ping\n");
                        break;
                case WStype_PONG:
                        // answer to a ping we send
                        DEBUG_SERIAL.printf("[WSc] get pong\n");
                        break;
    }

}

void setup() {
	DEBUG_SERIAL.begin(115200);

//	DEBUG_SERIAL.setDebugOutput(true);

	DEBUG_SERIAL.println();
	DEBUG_SERIAL.println();
	DEBUG_SERIAL.println();

	for(uint8_t t = 4; t > 0; t--) {
		DEBUG_SERIAL.printf("[SETUP] BOOT WAIT %d...\n", t);
		DEBUG_SERIAL.flush();
		delay(1000);
	}

    WiFi.begin(ssid, password);

    while ( WiFi.status() != WL_CONNECTED ) {
      delay ( 500 );
      Serial.print ( "." );
    }
    DEBUG_SERIAL.print("Local IP: "); DEBUG_SERIAL.println(WiFi.localIP());
	// server address, port and URL
	webSocket.begin("echo.websocket.org", 80, "/");

	// event handler
	webSocket.onEvent(webSocketEvent);
}

unsigned long lastUpdate = millis();


void loop() {
	webSocket.loop();
	if (connected && lastUpdate+messageInterval<millis()){
		DEBUG_SERIAL.println("[WSc] SENT: Simple js client message!!");
		webSocket.sendTXT("Simple js client message!!");
		lastUpdate = millis();
	}
}
La parte core è:
	switch(type) {
		case WStype_DISCONNECTED:
			DEBUG_SERIAL.printf("[WSc] Disconnected!\n");
			connected = false;
			break;
		case WStype_CONNECTED: {
			DEBUG_SERIAL.printf("[WSc] Connected to url: %s\n", payload);
			connected = true;

			// send message to server when Connected
			DEBUG_SERIAL.println("[WSc] SENT: Connected");
			webSocket.sendTXT("Connected");
		}
			break;
		case WStype_TEXT:
			DEBUG_SERIAL.printf("[WSc] RESPONSE: %s\n", payload);
			break;
		case WStype_BIN:
			DEBUG_SERIAL.printf("[WSc] get binary length: %u\n", length);
			hexdump(payload, length);
			break;
                case WStype_PING:
                        // pong will be send automatically
                        DEBUG_SERIAL.printf("[WSc] get ping\n");
                        break;
                case WStype_PONG:
                        // answer to a ping we send
                        DEBUG_SERIAL.printf("[WSc] get pong\n");
                        break;
    }
e puoi controllare vari eventi:
- WStype_CONNECTED : quando viene stabilita la connessione;
- WStype_DISCONNECTED : quando il client è disconnesso;
- WStype_TEXT : quando arriva un messaggio di testo;
- WStype_BIN : quando arriva un messaggio binario;
- WStype_PING e WStype_PONG: qui il messaggio di keep alive.
Per connetterti con il client devi usare questo comando
// server address, port and URL
webSocket.begin("echo.websocket.org", 80, "/");
e webSocket.onEvent assegna le callback agli eventi.
Con il client per inviare un semplice messaggio è possibile utilizzare webSocket.sendTXT.
Come puoi vedere la gestione dei WS è abbastanza semplice e simile con tutti i linguaggi.
Client WebSocket esp32
La versione esp32 è abbastanza simile all’esp8266
/*
 * esp32 simple WebSocket client
 * https://www.mischainti.org
 *
 * I use the ws://echo.websocket.org/ echo server
 * When you send a message to this server you receive
 * a response with the same message
 *
 */

#include <Arduino.h>
#include <WiFi.h>
#include <WebSocketsClient.h>

WebSocketsClient webSocket;

const char *ssid     = "<YOUR-SSID>";
const char *password = "<YOUR-PASSWD>";

unsigned long messageInterval = 5000;
bool connected = false;

#define DEBUG_SERIAL Serial

void hexdump(const void *mem, uint32_t len, uint8_t cols = 16) {
	const uint8_t* src = (const uint8_t*) mem;
	DEBUG_SERIAL.printf("\n[HEXDUMP] Address: 0x%08X len: 0x%X (%d)", (ptrdiff_t)src, len, len);
	for(uint32_t i = 0; i < len; i++) {
		if(i % cols == 0) {
			DEBUG_SERIAL.printf("\n[0x%08X] 0x%08X: ", (ptrdiff_t)src, i);
		}
		DEBUG_SERIAL.printf("%02X ", *src);
		src++;
	}
	DEBUG_SERIAL.printf("\n");
}

void webSocketEvent(WStype_t type, uint8_t * payload, size_t length) {

	switch(type) {
		case WStype_DISCONNECTED:
			DEBUG_SERIAL.printf("[WSc] Disconnected!\n");
			connected = false;
			break;
		case WStype_CONNECTED: {
			DEBUG_SERIAL.printf("[WSc] Connected to url: %s\n", payload);
			connected = true;

			// send message to server when Connected
			DEBUG_SERIAL.println("[WSc] SENT: Connected");
			webSocket.sendTXT("Connected");
		}
			break;
		case WStype_TEXT:
			DEBUG_SERIAL.printf("[WSc] RESPONSE: %s\n", payload);
			break;
		case WStype_BIN:
			DEBUG_SERIAL.printf("[WSc] get binary length: %u\n", length);
			hexdump(payload, length);
			break;
        case WStype_PING:
            // pong will be send automatically
            DEBUG_SERIAL.printf("[WSc] get ping\n");
            break;
        case WStype_PONG:
            // answer to a ping we send
            DEBUG_SERIAL.printf("[WSc] get pong\n");
            break;
	case WStype_ERROR:
	case WStype_FRAGMENT_TEXT_START:
	case WStype_FRAGMENT_BIN_START:
	case WStype_FRAGMENT:
	case WStype_FRAGMENT_FIN:
	    break;
    }
}

void setup() {
	DEBUG_SERIAL.begin(115200);

//	DEBUG_SERIAL.setDebugOutput(true);

	DEBUG_SERIAL.println();
	DEBUG_SERIAL.println();
	DEBUG_SERIAL.println();

	for(uint8_t t = 4; t > 0; t--) {
		DEBUG_SERIAL.printf("[SETUP] BOOT WAIT %d...\n", t);
		DEBUG_SERIAL.flush();
		delay(1000);
	}

    WiFi.begin(ssid, password);

    while ( WiFi.status() != WL_CONNECTED ) {
      delay ( 500 );
      DEBUG_SERIAL.print ( "." );
    }
    DEBUG_SERIAL.print("Local IP: "); DEBUG_SERIAL.println(WiFi.localIP());
	// server address, port and URL
	webSocket.begin("echo.websocket.org", 80, "/");

	// event handler
	webSocket.onEvent(webSocketEvent);
}

unsigned long lastUpdate = millis();


void loop() {
	webSocket.loop();
	if (connected && lastUpdate+messageInterval<millis()){
		DEBUG_SERIAL.println("[WSc] SENT: Simple js client message!!");
		webSocket.sendTXT("Simple js client message!!");
		lastUpdate = millis();
	}
}
Ma puoi subito trovare qualche differenza, nella webSocketEvent devi prestare attenzione al metodo hexdump per decodificare il messaggio binario e ci sono un set di case switch che vanno obbligatoriamente implementati (li ho aggiunti alla fine).
Client Arduino Mega WebSocket con enc28j60
Libreria e schema di connessione
Con Arduino devi scaricare un’altra versione della libreria, devi selezionare la versione 1.3 dal gestore librerie o se vuoi esiste un branch specificato per i dispositivi AVR.
Puoi trovare la libreria qui.
Per scaricare.
Fare clic sul pulsante DOWNLOAD nell’angolo in alto a destra, e rinominare la cartella non compressa WebSocket-ATMega.
Verifica che la cartella WebSocket-ATMega contenga WebSocket.cpp e WebSocket.h.
Posiziona la cartella della libreria WebSocket-ATMega nella tua cartella /libraries/.
Potrebbe essere necessario creare la sottocartella delle librerie se è la tua prima libreria.
Riavvia l’IDE.
Uso un adattatore enc28j60 con UIPEthernet ( Tools --> Manage libraries..), e devi fare una modifica nella libreria WebSocket, devi cambiare
// select Network type based
#ifdef ESP8266
#define WEBSOCKETS_NETWORK_TYPE NETWORK_ESP8266
#else
#define WEBSOCKETS_NETWORK_TYPE NETWORK_W5100
#endif
in
// select Network type based
#ifdef ESP8266
#define WEBSOCKETS_NETWORK_TYPE NETWORK_ESP8266
#else
#define WEBSOCKETS_NETWORK_TYPE NETWORK_ENC28J60
#endif
Ora lo schema di connessione
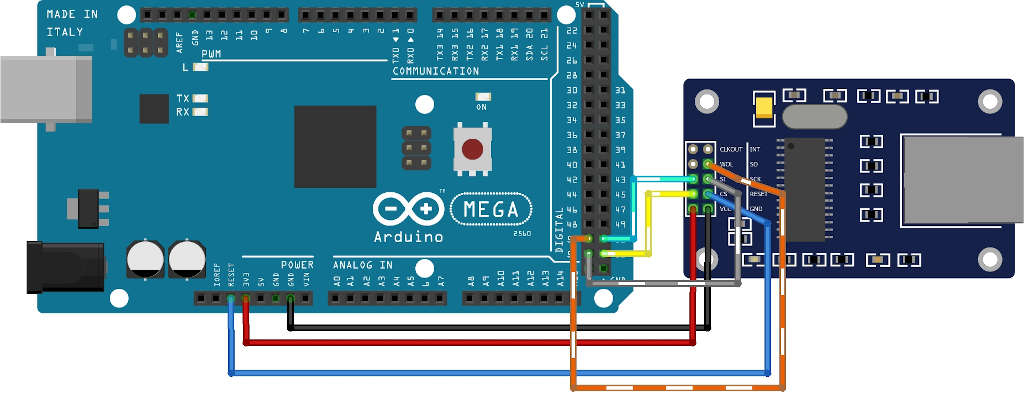
Scelgo un Arduino Mega perché UIPEthernet ha bisogno di più memoria per funzionare.
Client WebSocket
Ora lo sketch
/*
 * Arduino Mega 2560 and enc28j60
 * Simple WebSocket client
 * https://www.mischainti.org
 *
 * I use the ws://echo.websocket.org/ echo server
 * When you send a message to this server you receive
 * a response with the same message
 *
 */


#include <Arduino.h>

#include <SPI.h>
#include <UIPEthernet.h>

#include <WebSocketsClient.h>

#define DEBUG_SERIAL Serial

// Enter a MAC address for your controller below.
// Newer Ethernet shields have a MAC address printed on a sticker on the shield
byte mac[] = { 0xDE, 0xAD, 0xBE, 0xEF, 0xFE, 0xED };

// Set the static IP address to use if the DHCP fails to assign
IPAddress ip(192, 168, 0, 177);

WebSocketsClient webSocket;

unsigned long messageInterval = 5000;
bool connected = false;

void webSocketEvent(WStype_t type, uint8_t * payload, size_t length) {


    switch(type) {
        case WStype_DISCONNECTED:
            DEBUG_SERIAL.println("[WSc] Disconnected!\n");
            connected = false;
            break;
        case WStype_CONNECTED:
            {
    			// send message to server when Connected
    			DEBUG_SERIAL.println("[WSc] SENT: Connected");
                DEBUG_SERIAL.println((char *)payload);
    			webSocket.sendTXT("Connected");

                connected = true;
            }
            break;
        case WStype_TEXT:
			DEBUG_SERIAL.print("[WSc] RESPONSE: ");
			DEBUG_SERIAL.println((char *)payload);
			break;
        case WStype_BIN:
            DEBUG_SERIAL.print("[WSc] get binary length: ");
            DEBUG_SERIAL.println(length);
           // hexdump(payload, length);

            // send data to server
            // webSocket.sendBIN(payload, length);
            break;
		case WStype_ERROR:
			break;
    }

}

void setup()
{
    // Open serial communications and wait for port to open:
    DEBUG_SERIAL.begin(115200);
    while (!Serial) {}

    // start the Ethernet connection:
    if (Ethernet.begin(mac) == 0) {
      DEBUG_SERIAL.println("Failed to configure Ethernet using DHCP");
      Ethernet.begin(mac, ip);
    }
    DEBUG_SERIAL.print("IP address ");
    DEBUG_SERIAL.println(Ethernet.localIP());

    webSocket.begin("echo.websocket.org", 80, "/");
    webSocket.onEvent(webSocketEvent);

}

unsigned long lastUpdate = millis();
void loop() {
	webSocket.loop();
	if (connected && lastUpdate+messageInterval<millis()){
		DEBUG_SERIAL.println("[WSc] SENT: Simple js client message!!");
		webSocket.sendTXT("Simple js client message!!");
		lastUpdate = millis();
	}
}
Lo sketch è simile, puoi però notare che ci sono meno eventi gestiti (nessun ping pong), ma tutti gli eventi principali sono gestiti correttamente.
Opzioni aggiuntive
SSL
Nell’esempio precedente usiamo una semplice connessione al protocollo WS perché ci colleghiamo a questo uri:
ma il server echo supporta anche SSL e puoi connetterti con il protocollo wss
per fare questo devi usare
webSocket.beginSSL("echo.websocket.org", 80);
Riconnessione automatica
A volte la connessione può fallire, ma puoi impostare un tempo di riconnessione automatica
	// try ever 5000 again if connection has failed
	webSocket.setReconnectInterval(5000);
Credenziale di autorizzazione
È inoltre possibile impostare le credenziali di autorizzazione tramite questo comando
	// use HTTP Basic Authorization this is optional remove if not needed
	webSocket.setAuthorization("user", "Password");
Grazie
- WebSocket su Arduino, esp8266 ed esp32: client
- WebSocket su Arduino, esp8266 ed esp32: server e autenticazione
- WebSocket su Arduino, esp8266 ed esp32: aggiornamento temperatura e umidità realtime
Codice completo su GitHub