WebSocket su Arduino, esp8266 e esp32: server e autenticazione – 1
WebSocket è un protocollo di comunicazione, che fornisce canali di comunicazione full-duplex su una singola connessione TCP.
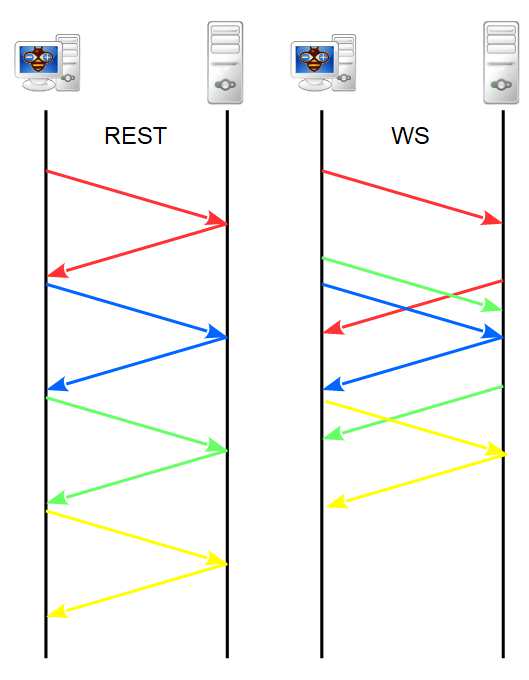
Fai riferimento alla parte precedente per ulteriori informazioni, ma ricordiamo la differenza con il protocollo REST: con un server REST si invia la richiesta e si deve attendere la risposta per avere i dati o avviare una nuova richiesta sulla stessa connessione, in WS è possibile trasmettere in le richieste e le risposte in streaming e puoi operare sulle stesse quando vuoi.
Puoi comprendere questo concetto con questo semplice schema di comunicazione.
Client di test WebSocket
Per semplificare i tests aggiungerò un semplice client WebSocket.
Scarica la pagina html e aprila in un browser locale
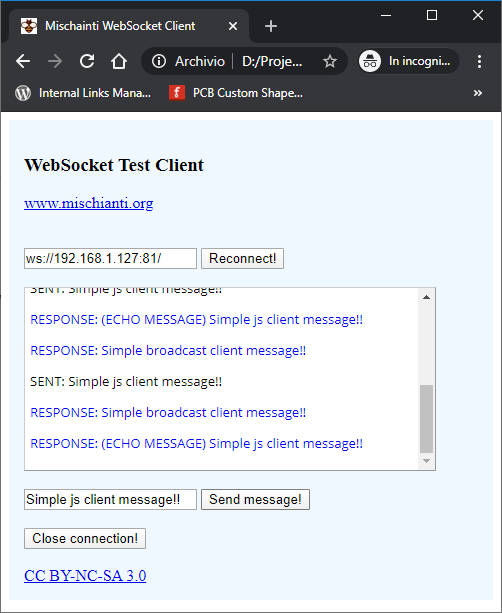
Oppure utilizza la versione on line del client WebSocket .
Imposta l’indirizzo IP corretto del tuo dispositivo con cui potrai inviare il messaggio.
esp8266 WebSocket server
Il server WebSocket è similare al client, hai una serie di eventi per gestire i messaggi e lo stato della connessione, qui un esempio
/*
 * esp8266 simple WebSocket server
 * https://www.mischainti.org
 *
 * The server response with the
 * echo of the message you send
 * and send a broadcast every 5secs
 *
 */

#include <Arduino.h>

#include <ESP8266WiFi.h>
#include <WebSocketsServer.h>

const char *ssid     = "<YOUR-SSID>";
const char *password = "<YOUR-PASSWD>";
const uint8_t wsPort = 81;

unsigned long messageInterval = 5000;
bool connected = false;

#define DEBUG_SERIAL Serial

WebSocketsServer webSocket = WebSocketsServer(wsPort);

void webSocketEvent(uint8_t num, WStype_t type, uint8_t * payload, size_t length) {

    switch(type) {
        case WStype_DISCONNECTED:
            DEBUG_SERIAL.printf("[%u] Disconnected!\n", num);
            break;
        case WStype_CONNECTED:
            {
                IPAddress ip = webSocket.remoteIP(num);
                DEBUG_SERIAL.printf("[%u] Connected from %d.%d.%d.%d url: %s\n", num, ip[0], ip[1], ip[2], ip[3], payload);

				// send message to client
		webSocket.sendTXT(num, "Connected");
            }
            break;
        case WStype_TEXT:
            DEBUG_SERIAL.printf("[%u] RECEIVE TXT: %s\n", num, payload);

            // send message to client
             webSocket.sendTXT(num, "(ECHO MESSAGE) "+String((char *)payload));

            // send data to all connected clients
            // webSocket.broadcastTXT("message here");
            break;
        case WStype_BIN:
            DEBUG_SERIAL.printf("[%u] get binary length: %u\n", num, length);
            hexdump(payload, length);

            // send message to client
            // webSocket.sendBIN(num, payload, length);
            break;
    }
}

void setup() {
	DEBUG_SERIAL.begin(115200);

//	DEBUG_SERIAL.setDebugOutput(true);

	DEBUG_SERIAL.println();
	DEBUG_SERIAL.println();
	DEBUG_SERIAL.println();

	for(uint8_t t = 4; t > 0; t--) {
		DEBUG_SERIAL.printf("[SETUP] BOOT WAIT %d...\n", t);
		DEBUG_SERIAL.flush();
		delay(1000);
	}

    WiFi.begin(ssid, password);

    while ( WiFi.status() != WL_CONNECTED ) {
      delay ( 500 );
      Serial.print ( "." );
    }

    DEBUG_SERIAL.println("WebSocket complete uri is: ");
    DEBUG_SERIAL.print("ws://");
    DEBUG_SERIAL.print(WiFi.localIP());
    DEBUG_SERIAL.print(":");
    DEBUG_SERIAL.print(wsPort);
    DEBUG_SERIAL.println("/");

    webSocket.begin();
    webSocket.onEvent(webSocketEvent);
}

unsigned long lastUpdate = millis();

void loop() {
    webSocket.loop();
	if (lastUpdate+messageInterval<millis()){
		DEBUG_SERIAL.println("[WSc] SENT: Simple broadcast client message!!");
		webSocket.broadcastTXT("Simple broadcast client message!!");
		lastUpdate = millis();
	}
}
Puoi prendere l’uri ws da mettere sul client dall’output seriale:
[SETUP] BOOT WAIT 4...
[SETUP] BOOT WAIT 3...
[SETUP] BOOT WAIT 2...
[SETUP] BOOT WAIT 1...
.....
WebSocket complete uri is:
ws://192.168.1.127:81/
La struttura è simile a quella del client, ma bisogna prestare attenzione a:
Quando un client è connesso gli viene associato un Id ed è possibile utilizzarlo per inviare un messaggio ad un client specifico, un esempio è il messaggio di eco
// send message to client
webSocket.sendTXT(num, "(ECHO MESSAGE) "+String((char *)payload));
Per inviare un messaggio a tutti i clienti puoi utilizzare broadcastTXT:
webSocket.broadcastTXT("Simple broadcast client message!!");
esp32 WebSocket server
/*
 * esp32 simple WebSocket server
 * https://www.mischainti.org
 *
 * The server response with the
 * echo of the message you send
 * and send a broadcast every 5secs
 *
 */

#include <Arduino.h>

#include <WiFi.h>
#include <WebSocketsServer.h>

const char *ssid     = "<YOUR-SSID>";
const char *password = "<YOUR-PASSWD>";
const uint8_t wsPort = 81;

unsigned long messageInterval = 5000;
bool connected = false;

#define DEBUG_SERIAL Serial

WebSocketsServer webSocket = WebSocketsServer(wsPort);

void hexdump(const void *mem, uint32_t len, uint8_t cols = 16) {
	const uint8_t* src = (const uint8_t*) mem;
	DEBUG_SERIAL.printf("\n[HEXDUMP] Address: 0x%08X len: 0x%X (%d)", (ptrdiff_t)src, len, len);
	for(uint32_t i = 0; i < len; i++) {
		if(i % cols == 0) {
			DEBUG_SERIAL.printf("\n[0x%08X] 0x%08X: ", (ptrdiff_t)src, i);
		}
		DEBUG_SERIAL.printf("%02X ", *src);
		src++;
	}
	DEBUG_SERIAL.printf("\n");
}

void webSocketEvent(uint8_t num, WStype_t type, uint8_t * payload, size_t length) {

    switch(type) {
        case WStype_DISCONNECTED:
            DEBUG_SERIAL.printf("[%u] Disconnected!\n", num);
            break;
        case WStype_CONNECTED:
            {
                IPAddress ip = webSocket.remoteIP(num);
                DEBUG_SERIAL.printf("[%u] Connected from %d.%d.%d.%d url: %s\n", num, ip[0], ip[1], ip[2], ip[3], payload);

				// send message to client
				webSocket.sendTXT(num, "Connected");
            }
            break;
        case WStype_TEXT:
            DEBUG_SERIAL.printf("[%u] RECEIVE TXT: %s\n", num, payload);

            // send message to client
             webSocket.sendTXT(num, "(ECHO MESSAGE) "+String((char *)payload));

            // send data to all connected clients
            // webSocket.broadcastTXT("message here");
            break;
        case WStype_BIN:
            DEBUG_SERIAL.printf("[%u] get binary length: %u\n", num, length);
            hexdump(payload, length);

            // send message to client
            // webSocket.sendBIN(num, payload, length);
            break;
		case WStype_ERROR:
		case WStype_FRAGMENT_TEXT_START:
		case WStype_FRAGMENT_BIN_START:
		case WStype_FRAGMENT:
		case WStype_FRAGMENT_FIN:
		case WStype_PING:
		case WStype_PONG:
			break;
    }
}

void setup() {
	DEBUG_SERIAL.begin(115200);

//	DEBUG_SERIAL.setDebugOutput(true);

	DEBUG_SERIAL.println();
	DEBUG_SERIAL.println();
	DEBUG_SERIAL.println();

	for(uint8_t t = 4; t > 0; t--) {
		DEBUG_SERIAL.printf("[SETUP] BOOT WAIT %d...\n", t);
		DEBUG_SERIAL.flush();
		delay(1000);
	}

    WiFi.begin(ssid, password);

    while ( WiFi.status() != WL_CONNECTED ) {
      delay ( 500 );
      DEBUG_SERIAL.print ( "." );
    }

    DEBUG_SERIAL.println();DEBUG_SERIAL.println("WebSocket complete uri is: ");
    DEBUG_SERIAL.print("ws://");
    DEBUG_SERIAL.print(WiFi.localIP());
    DEBUG_SERIAL.print(":");
    DEBUG_SERIAL.print(wsPort);
    DEBUG_SERIAL.println("/");

    webSocket.begin();
    webSocket.onEvent(webSocketEvent);
}

unsigned long lastUpdate = millis()+messageInterval;

void loop() {
    webSocket.loop();
	if (lastUpdate+messageInterval<millis()){
		DEBUG_SERIAL.println("[WSc] SENT: Simple broadcast client message!!");
		webSocket.broadcastTXT("Simple broadcast client message!!");
		lastUpdate = millis();
	}
}
Ci sono solo poche differenze, l’importazione WiFi, l’hexdump non implementato in modo nativo ed alcune opzioni che cono obbligatorie sul switch case della gestione eventi.
Server WebSocket AVR
Questa funzionalità non è implementata per AVR.
Autenticazione
Basic
Puoi aggiungere credenziali con questo semplice comando:
webSocket.setAuthorization("mischianti", "mischianti");
ora hai un sistema di sicurezza nel tuo server WebSocket, funziona in modo semplice, prendi login e password quindi genera una chiave base64 e verifica l’autorizzazione nell’header della connessione.
Esiste un modo deprecato per connettersi con le credenziali in un server WebSocket, è necessario aggiungere il login e passwd all’URL di connessione in questo modo:
ws://mischianti:mischianti@192.168.1.136:81/
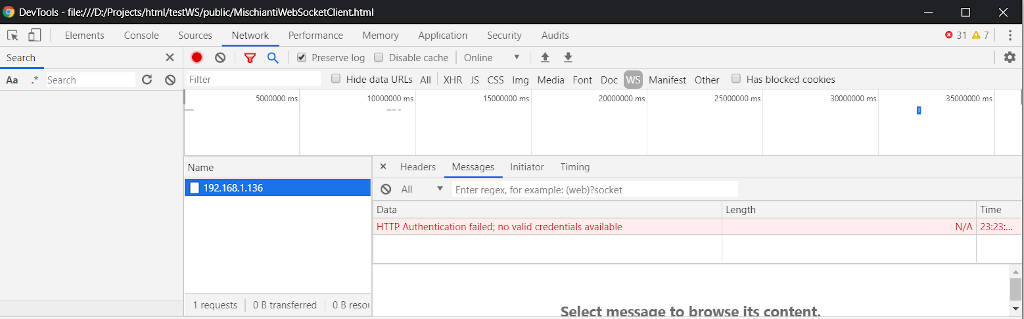
Se vuoi controllare se le credenziali funzionano puoi controllarlo dalla console di Chrome in Strumenti per sviluppatori -> Rete -> WS
Vai a controllare le intestazioni delle richieste, puoi trovare una nuova intestazione dove il valore è login:password in base64.Authorization: Basic OTM3Yzc0NzhhYWEzODBiODcyNDJkZDdhYmE4ZmY5MzA0ZTVjZjA4OQ==
Questo modo di passare le credenziali presenta dei problemi, innanzitutto stai passando utente e password nell’URL ed è troppo semplice da intercettare, secondo tutto l’handshake non è dietro wss (connessione criptata).
La libreria non implementa il protocollo wss, ma la soluzione a ciò è abbastanza semplice, è necessario aggiungere un proxy per eseguire il tunneling del flusso wss in uno ws, normalmente è possibile utilizzare uno nginx o un apache per fare un proxy inverso.
Semplice workarount
Un modo migliore per passare le credenziali sfruttando l’URL di connessione, è usare un token.
websocket = new WebSocket('ws://'+authToken+'@192.168.1.136:81/','arduino');
#include <base64.h>
[...]
String ws_auth_code = "<TOKEN>"+String(":");
webSocket.setAuthorization(base64::encode(ws_auth_code).c_str());
Questa è una soluzione alternativa e devi fare attenzione ai : aggiunti al token perché l’URL di connessione WebSocket richiede una login i : e una password.
Qui metto una versione aggiornata del client per effettuare i test.
Oppure utilizzare la versione on line del WebSocket client.
Una semplice implementazione di un rest di login può essere
//	ws_auth_code = sha1(String(www_username) + ":" + String(www_password) + ":" + String(random(1000)))+":";
	ws_auth_code = sha1(String(www_username) + ":" + String(www_password))+":";

	Serial.println(base64::encode(ws_auth_code).c_str());
in pratica generi un token sha1 e lo restituisci nella risposta o nel cookie, quindi aggiungere un : quando effettui la connessione al WebSocket, se vuoi puoi generare un seed casuale per invalidare ogni volta il token di accesso, ma poi dovrai reinserire le credenziali ad ogni accesso.
Quindi il codice JS diventa
var uri = 'ws://'+token+'@'+location.hostname+':81/';
websocket = new WebSocket(uri,'arduino');
Una soluzione migliore può essere quella di eseguire un handskake di autenticazione completo, ma penso che sia pure troppo per un sito non esposto all’esterno.
La corretta implementazione
Una buona soluzione è gestire una convalida dell’intestazione personalizzata, il WebSocket ha un interceptor per implementare la convalida personalizzata
void WebSocketsServer::onValidateHttpHeader(
            WebSocketServerHttpHeaderValFunc validationFunc,
            const char * mandatoryHttpHeaders[],
            size_t mandatoryHttpHeaderCount);
Here you can implement your custom solution, for example if you want to check a token stored in the cookie you can implement such a function.
bool isCookieValid(String rawCookieHeaderValue) {
	Serial.print("Cookie validation ");
	Serial.println(rawCookieHeaderValue);
	String clientIP = "";
	if (rawCookieHeaderValue.indexOf("CLIENTIP") != -1) {
			clientIP = rawCookieHeaderValue.substring(rawCookieHeaderValue.indexOf("CLIENTIP=") + 9, rawCookieHeaderValue.indexOf("|"));
			Serial.print("clientIP ");
			Serial.println(clientIP);
	}

	if (rawCookieHeaderValue.indexOf("ESPSESSIONID") != -1) {
		String tokenStr = rawCookieHeaderValue.substring(rawCookieHeaderValue.indexOf("ESPSESSIONID=") + 13, rawCookieHeaderValue.indexOf(";"));

		Serial.print("ESPSESSIONID ");
		Serial.println(tokenStr);

		String token = sha1(String(www_username) + ":" + String(www_password) + ":" + clientIP);
		Serial.print("token ");
		Serial.println(token);

		return tokenStr == token;
	}
	return false;
}

/*
 * The WebSocketServerHttpHeaderValFunc delegate passed to webSocket.onValidateHttpHeader
 */
bool validateHttpHeader(String headerName, String headerValue) {

	//assume a true response for any headers not handled by this validator
	bool valid = true;

	if(headerName.equalsIgnoreCase("Cookie")) {
		//if the header passed is the Cookie header, validate it according to the rules in 'isCookieValid' function
		valid = isCookieValid(headerValue);
	}

	return valid;
}
Se ricordi il tutorial sul Web Server, io genero un token sha1 con login + passwd + clientIP, poi lo metto nel cookie, ora con lo stesso token posso controllare se l’utente che si connettere al mio WebSocket è un utente fidato.
const char * headerkeys[] = { "Cookie" };
size_t headerKeyCount = sizeof(headerkeys) / sizeof(char*);
webSocket.onValidateHttpHeader(validateHttpHeader, headerkeys, headerKeyCount);
Quindi inserirò il codice sopra prima che il WebSocket venga inizializzato. Ma vedremo questa soluzione nel prossimo articolo in un esempio reale.
Grazie
- WebSocket su Arduino, esp8266 ed esp32: client
- WebSocket su Arduino, esp8266 ed esp32: server e autenticazione
- WebSocket su Arduino, esp8266 ed esp32: aggiornamento temperatura e umidità realtime
Codice completo su GitHub