
WebSocket on Arduino, esp8266 and esp32: server and authentication – 2
WebSocket is a computer communications protocol, providing full-duplex communication channels over a single TCP connection.
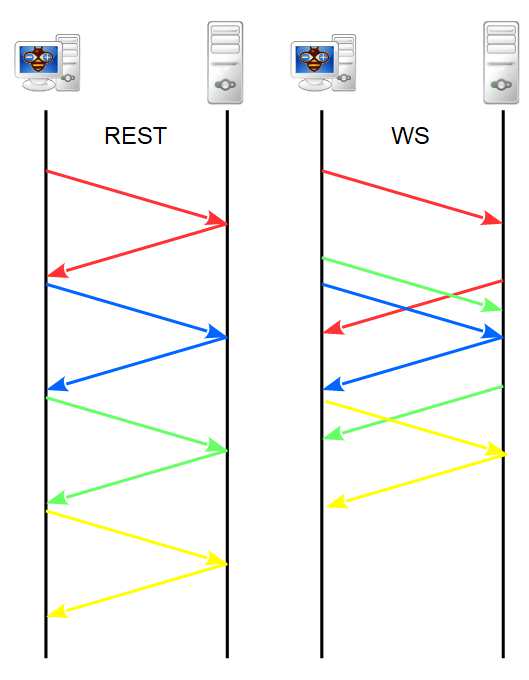
Refer to the previous part for more information, but remember the difference with the REST protocol: with a REST server you send the request and you have to wait for the response to get the data or start a new request on the same connection, in WS it is possible to transmit in streaming requests and responses and you can operate on them whenever you want.
You can understand this concept with this simple communication schema.
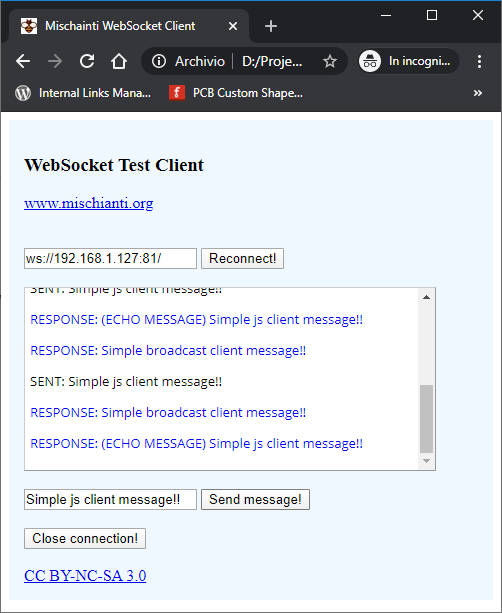
WebSocket test client
To simplify the tests I’m going to add a simple WebSocket client (you can’t use the integrated websocket client because local ws over https is not possible).
Download the html page and open in a local browser
Or use the online version of WebSocket http client.
Set the correct IP address of your device than you can send message.
esp8266 WebSocket server
WebSocket server It’s quite similar to the client, you have a series of event to manage the messages and connection status, here an example
/*
 * esp8266 simple WebSocket server
 * https://www.mischainti.org
 *
 * The server response with the
 * echo of the message you send
 * and send a broadcast every 5secs
 *
 */

#include <Arduino.h>

#include <ESP8266WiFi.h>
#include <WebSocketsServer.h>

const char *ssid     = "<YOUR-SSID>";
const char *password = "<YOUR-PASSWD>";
const uint8_t wsPort = 81;

unsigned long messageInterval = 5000;
bool connected = false;

#define DEBUG_SERIAL Serial

WebSocketsServer webSocket = WebSocketsServer(wsPort);

void webSocketEvent(uint8_t num, WStype_t type, uint8_t * payload, size_t length) {

    switch(type) {
        case WStype_DISCONNECTED:
            DEBUG_SERIAL.printf("[%u] Disconnected!\n", num);
            break;
        case WStype_CONNECTED:
            {
                IPAddress ip = webSocket.remoteIP(num);
                DEBUG_SERIAL.printf("[%u] Connected from %d.%d.%d.%d url: %s\n", num, ip[0], ip[1], ip[2], ip[3], payload);

				// send message to client
		webSocket.sendTXT(num, "Connected");
            }
            break;
        case WStype_TEXT:
            DEBUG_SERIAL.printf("[%u] RECEIVE TXT: %s\n", num, payload);

            // send message to client
             webSocket.sendTXT(num, "(ECHO MESSAGE) "+String((char *)payload));

            // send data to all connected clients
            // webSocket.broadcastTXT("message here");
            break;
        case WStype_BIN:
            DEBUG_SERIAL.printf("[%u] get binary length: %u\n", num, length);
            hexdump(payload, length);

            // send message to client
            // webSocket.sendBIN(num, payload, length);
            break;
    }
}

void setup() {
	DEBUG_SERIAL.begin(115200);

//	DEBUG_SERIAL.setDebugOutput(true);

	DEBUG_SERIAL.println();
	DEBUG_SERIAL.println();
	DEBUG_SERIAL.println();

	for(uint8_t t = 4; t > 0; t--) {
		DEBUG_SERIAL.printf("[SETUP] BOOT WAIT %d...\n", t);
		DEBUG_SERIAL.flush();
		delay(1000);
	}

    WiFi.begin(ssid, password);

    while ( WiFi.status() != WL_CONNECTED ) {
      delay ( 500 );
      Serial.print ( "." );
    }

    DEBUG_SERIAL.println("WebSocket complete uri is: ");
    DEBUG_SERIAL.print("ws://");
    DEBUG_SERIAL.print(WiFi.localIP());
    DEBUG_SERIAL.print(":");
    DEBUG_SERIAL.print(wsPort);
    DEBUG_SERIAL.println("/");

    webSocket.begin();
    webSocket.onEvent(webSocketEvent);
}

unsigned long lastUpdate = millis();

void loop() {
    webSocket.loop();
	if (lastUpdate+messageInterval<millis()){
		DEBUG_SERIAL.println("[WSc] SENT: Simple broadcast client message!!");
		webSocket.broadcastTXT("Simple broadcast client message!!");
		lastUpdate = millis();
	}
}
You can grab the ws uri to put on client from Serial output:
[SETUP] BOOT WAIT 4...
[SETUP] BOOT WAIT 3...
[SETUP] BOOT WAIT 2...
[SETUP] BOOT WAIT 1...
.....
WebSocket complete uri is:
ws://192.168.1.127:81/
The structure is similar to the client, but you must pay attention to:
When a client is connected it is associated with an Id and it is possible to use it to send a message to a specific client, an example is the echo message
// send message to client
webSocket.sendTXT(num, "(ECHO MESSAGE) "+String((char *)payload));
To send a message to all the client you can use broadcastTXT:
webSocket.broadcastTXT("Simple broadcast client message!!");
esp32 WebSocket server
/*
 * esp32 simple WebSocket server
 * https://www.mischainti.org
 *
 * The server response with the
 * echo of the message you send
 * and send a broadcast every 5secs
 *
 */

#include <Arduino.h>

#include <WiFi.h>
#include <WebSocketsServer.h>

const char *ssid     = "<YOUR-SSID>";
const char *password = "<YOUR-PASSWD>";
const uint8_t wsPort = 81;

unsigned long messageInterval = 5000;
bool connected = false;

#define DEBUG_SERIAL Serial

WebSocketsServer webSocket = WebSocketsServer(wsPort);

void hexdump(const void *mem, uint32_t len, uint8_t cols = 16) {
	const uint8_t* src = (const uint8_t*) mem;
	DEBUG_SERIAL.printf("\n[HEXDUMP] Address: 0x%08X len: 0x%X (%d)", (ptrdiff_t)src, len, len);
	for(uint32_t i = 0; i < len; i++) {
		if(i % cols == 0) {
			DEBUG_SERIAL.printf("\n[0x%08X] 0x%08X: ", (ptrdiff_t)src, i);
		}
		DEBUG_SERIAL.printf("%02X ", *src);
		src++;
	}
	DEBUG_SERIAL.printf("\n");
}

void webSocketEvent(uint8_t num, WStype_t type, uint8_t * payload, size_t length) {

    switch(type) {
        case WStype_DISCONNECTED:
            DEBUG_SERIAL.printf("[%u] Disconnected!\n", num);
            break;
        case WStype_CONNECTED:
            {
                IPAddress ip = webSocket.remoteIP(num);
                DEBUG_SERIAL.printf("[%u] Connected from %d.%d.%d.%d url: %s\n", num, ip[0], ip[1], ip[2], ip[3], payload);

				// send message to client
				webSocket.sendTXT(num, "Connected");
            }
            break;
        case WStype_TEXT:
            DEBUG_SERIAL.printf("[%u] RECEIVE TXT: %s\n", num, payload);

            // send message to client
             webSocket.sendTXT(num, "(ECHO MESSAGE) "+String((char *)payload));

            // send data to all connected clients
            // webSocket.broadcastTXT("message here");
            break;
        case WStype_BIN:
            DEBUG_SERIAL.printf("[%u] get binary length: %u\n", num, length);
            hexdump(payload, length);

            // send message to client
            // webSocket.sendBIN(num, payload, length);
            break;
		case WStype_ERROR:
		case WStype_FRAGMENT_TEXT_START:
		case WStype_FRAGMENT_BIN_START:
		case WStype_FRAGMENT:
		case WStype_FRAGMENT_FIN:
		case WStype_PING:
		case WStype_PONG:
			break;
    }
}

void setup() {
	DEBUG_SERIAL.begin(115200);

//	DEBUG_SERIAL.setDebugOutput(true);

	DEBUG_SERIAL.println();
	DEBUG_SERIAL.println();
	DEBUG_SERIAL.println();

	for(uint8_t t = 4; t > 0; t--) {
		DEBUG_SERIAL.printf("[SETUP] BOOT WAIT %d...\n", t);
		DEBUG_SERIAL.flush();
		delay(1000);
	}

    WiFi.begin(ssid, password);

    while ( WiFi.status() != WL_CONNECTED ) {
      delay ( 500 );
      DEBUG_SERIAL.print ( "." );
    }

    DEBUG_SERIAL.println();DEBUG_SERIAL.println("WebSocket complete uri is: ");
    DEBUG_SERIAL.print("ws://");
    DEBUG_SERIAL.print(WiFi.localIP());
    DEBUG_SERIAL.print(":");
    DEBUG_SERIAL.print(wsPort);
    DEBUG_SERIAL.println("/");

    webSocket.begin();
    webSocket.onEvent(webSocketEvent);
}

unsigned long lastUpdate = millis()+messageInterval;

void loop() {
    webSocket.loop();
	if (lastUpdate+messageInterval<millis()){
		DEBUG_SERIAL.println("[WSc] SENT: Simple broadcast client message!!");
		webSocket.broadcastTXT("Simple broadcast client message!!");
		lastUpdate = millis();
	}
}
There are only a few differences, the WiFi import, the hexdump not implemented natively and some options that are mandatory on the event management switch case.
AVR WebSocket server
This features is not implemented for AVR.
Authentication
Basic
You can add credential with this simple command:
webSocket.setAuthorization("mischianti", "mischianti");
now you have a security system in your WebSocket server, It’s work in a simple way, take the login and password than generate a base64 key and It verify the authorization in the header of the connection.
Exist a deprecated way to connect with credential in a WebSocket server, you must add the login and passwd to the connection url like this:
ws://mischianti:mischianti@192.168.1.136:81/
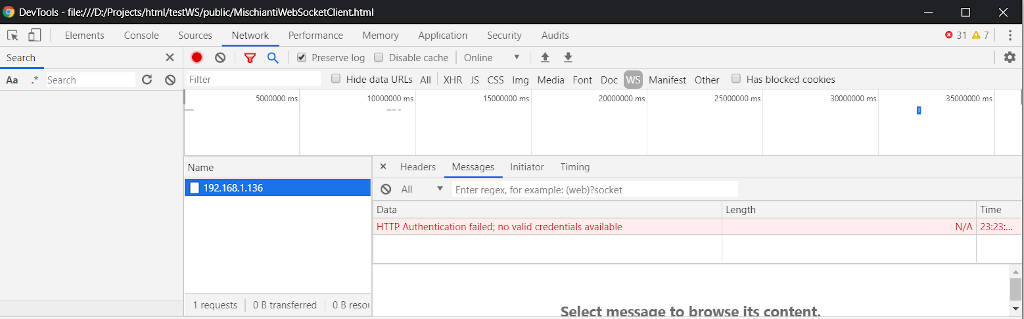
If you want check if the credential work you can check It in Chrome console to the Developer tools --> Network --> WS
Go check the request headers, you can find a new header where the value is login:password in base64.Authorization: Basic OTM3Yzc0NzhhYWEzODBiODcyNDJkZDdhYmE4ZmY5MzA0ZTVjZjA4OQ==
This way of passing credentials presents problems, first you are passing user and password in the URL and it is too easy to intercept, according to all the handshake is not behind wss (encrypted connection).
The library not implement the wss protocol, but the solution is quite simple, you must add a proxy to tunneling the wss stream to a ws one, normally you can use a nginx or apache to do a reverse proxy.
Simple workarount
A better way to pass credentials using the connection URL is to use a token.
websocket = new WebSocket('ws://'+authToken+'@192.168.1.136:81/','arduino');
#include <base64.h>
[...]
String ws_auth_code = "<TOKEN>"+String(":");
webSocket.setAuthorization(base64::encode(ws_auth_code).c_str());
This is a workaround and you need to watch out for the: added to the token because the WebSocket connection URL requires an i: login and password.
Here I put an updated version of the client for testing.
Or use the online version of WebSocket http client.
A simple implementation of a login rest can be
//	ws_auth_code = sha1(String(www_username) + ":" + String(www_password) + ":" + String(random(1000)))+":";
	ws_auth_code = sha1(String(www_username) + ":" + String(www_password))+":";

	Serial.println(base64::encode(ws_auth_code).c_str());
in practice you generate a sha1 token and return it in the response or in the cookie, then add a : when you connect to the WebSocket, if you want you can generate a random seed to invalidate the access token each time, but then you will have to re-enter the credentials at each access.
Then the JS code become
var uri = 'ws://'+token+'@'+location.hostname+':81/';
websocket = new WebSocket(uri,'arduino');
A better solution may be to do a full authentication handskake, but I think that’s too much for a site that’s not exposed to the outside world.
The correct implementation
A good solution is to manage a custom header validation, WebSocket have an interceptor to implement custom validation
void WebSocketsServer::onValidateHttpHeader(
            WebSocketServerHttpHeaderValFunc validationFunc,
            const char * mandatoryHttpHeaders[],
            size_t mandatoryHttpHeaderCount);
Here you can specify a perfect solution for your site, for example if you want check a token stored in the cookie you can implement a function like so.
bool isCookieValid(String rawCookieHeaderValue) {
	Serial.print("Cookie validation ");
	Serial.println(rawCookieHeaderValue);
	String clientIP = "";
	if (rawCookieHeaderValue.indexOf("CLIENTIP") != -1) {
			clientIP = rawCookieHeaderValue.substring(rawCookieHeaderValue.indexOf("CLIENTIP=") + 9, rawCookieHeaderValue.indexOf("|"));
			Serial.print("clientIP ");
			Serial.println(clientIP);
	}

	if (rawCookieHeaderValue.indexOf("ESPSESSIONID") != -1) {
		String tokenStr = rawCookieHeaderValue.substring(rawCookieHeaderValue.indexOf("ESPSESSIONID=") + 13, rawCookieHeaderValue.indexOf(";"));

		Serial.print("ESPSESSIONID ");
		Serial.println(tokenStr);

		String token = sha1(String(www_username) + ":" + String(www_password) + ":" + clientIP);
		Serial.print("token ");
		Serial.println(token);

		return tokenStr == token;
	}
	return false;
}

/*
 * The WebSocketServerHttpHeaderValFunc delegate passed to webSocket.onValidateHttpHeader
 */
bool validateHttpHeader(String headerName, String headerValue) {

	//assume a true response for any headers not handled by this validator
	bool valid = true;

	if(headerName.equalsIgnoreCase("Cookie")) {
		//if the header passed is the Cookie header, validate it according to the rules in 'isCookieValid' function
		valid = isCookieValid(headerValue);
	}

	return valid;
}
If you remember the tutorial on the Web Server, I generate a sha1 token with login + passwd + clientIP, then I put it in the cookie, now with the same token I can check if the user who connects to my WebSocket is a trusted user.
const char * headerkeys[] = { "Cookie" };
size_t headerKeyCount = sizeof(headerkeys) / sizeof(char*);
webSocket.onValidateHttpHeader(validateHttpHeader, headerkeys, headerKeyCount);
So I’ll insert the code above before the WebSocket is initialized. But we will see this solution in the next article in a real example.
Thanks
- WebSocket on Arduino, esp8266 and esp32: client
- WebSocket on Arduino, esp8266 and esp32: server and authentication
- WebSocket on Arduino, esp8266 and esp32: temperature and humidity realtime update
Complete code on GitHub


