LineaMeteoStazione: Guida Tecnica Display – 2
Guest post created with ♥ by Eugenio 🙂|
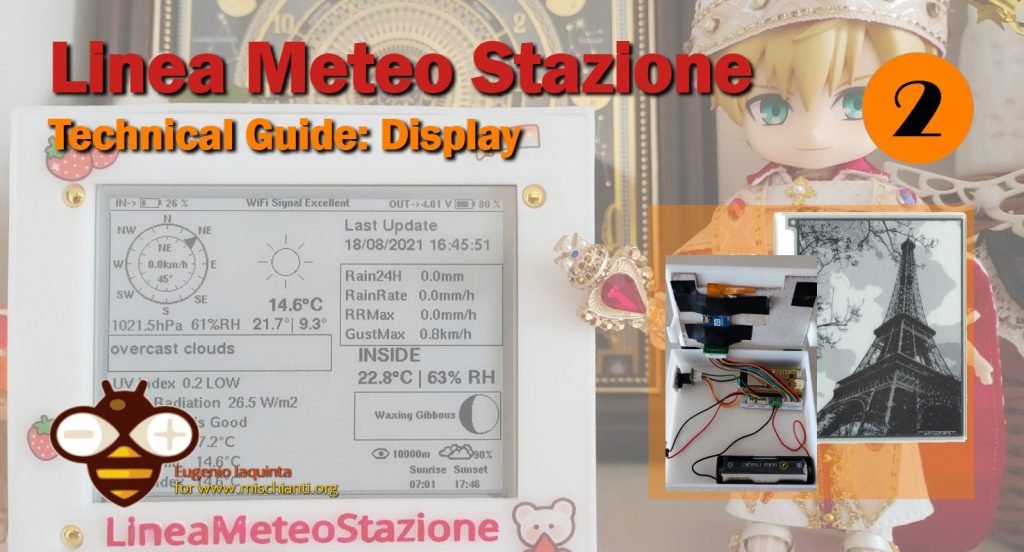
Display a inchiostro con ESP32
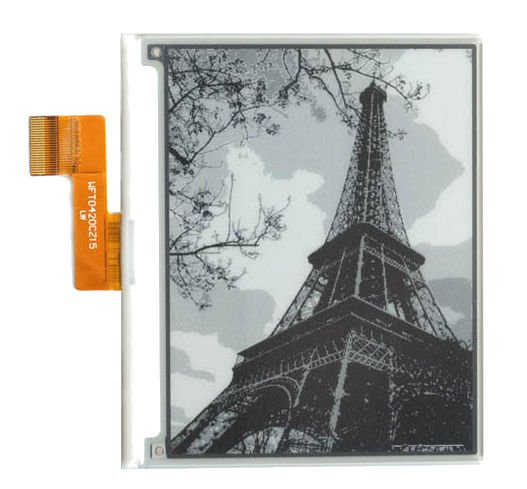
Per avere un’opzione di visualizzazione dei dati e non solo la visualizzazione con i siti Web online, volevo qualcosa che fosse durata a lungo a batterie, ecco perché ho scelto un Display a inchiostro da 4,3 pollici (Display Ink di Good Display, ma può essere utilizzato anche Waveshare)
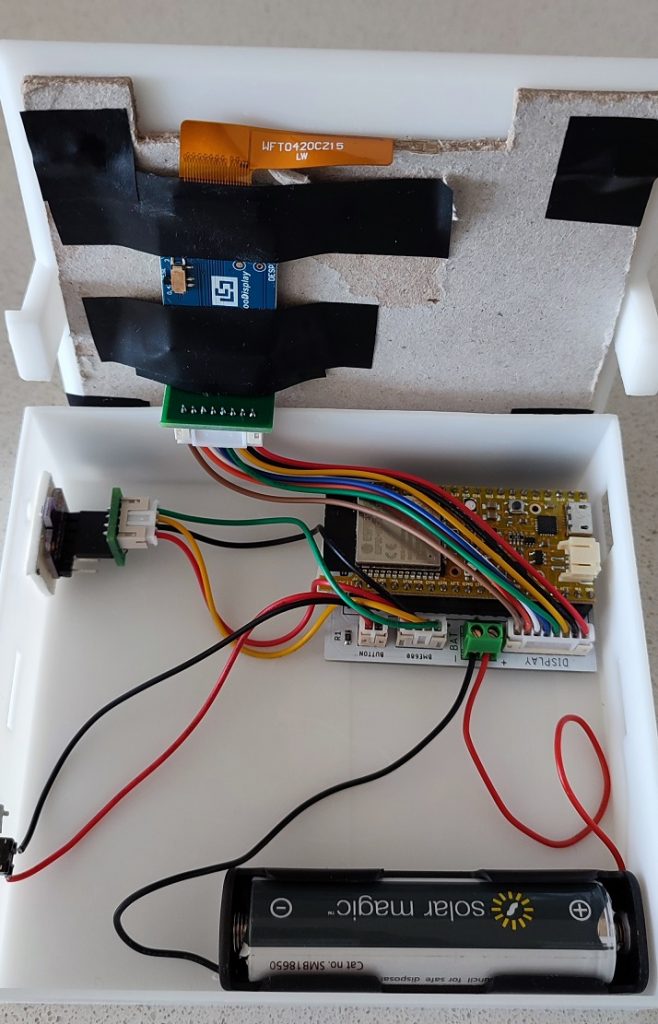
Ho anche usato la stessa scheda di sviluppo del dispositivo esterno perché ha un caricabatterie incluso per le batterie al litio. Ha anche un sensore BME680, che uso per monitorare la temperatura interna e l’umidità, nonché la qualità dell’aria.
La scatola per il display e’ stampata in 3D e usa una board che puoi trovare nei file di Eagle in Github.
Il display, come mostrato nella foto sotto, è incollato su un cartoncino che a sua volte è retto da delle punte color oro alla scatola. Ci sono anche le altre schede per il sensore e l’ESP32 e anche il pulsante, che serve per aggiornare manualmente il display se necessario e per resettare la scheda:
Programmare il Display per visualizzare i dati
Per raccogliere i dati ora esamineremo il codice utilizzato e come funziona il codice. Prima di tutto, devi avere l’ IDE Arduino installato almeno la versione 1.8.13 e dovrai installare dal gestore della scheda di Arduino l’ESP32 seguendo questi passaggi:
Per installare la scheda ESP32 nel tuo IDE Arduino, segui queste istruzioni seguenti:
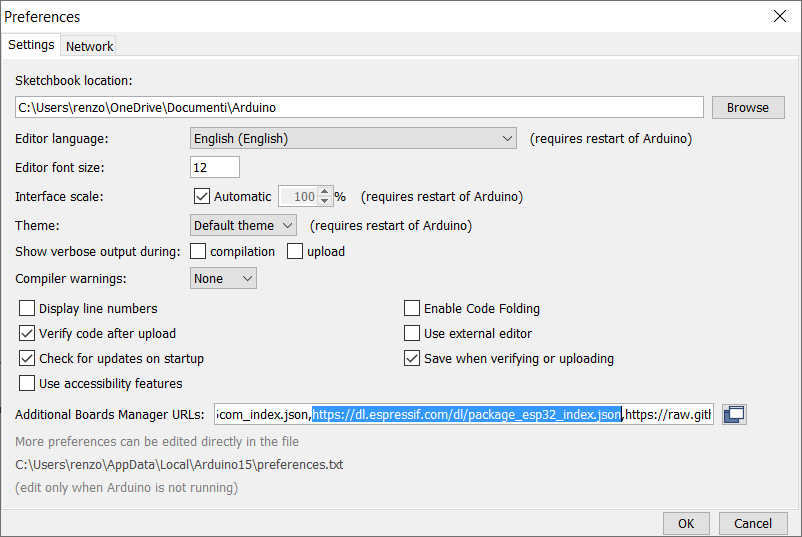
- Nel tuo IDE Arduino, vai su File > Preferenze
- Immettere https://dl.espressif.com/dl/package_esp32_index.json nel campo “Ulteriori URL di gestione schede”. Quindi, fare clic sul pulsante “OK”:
Nota: se si dispone già dell’URL delle schede ESP8266, è possibile separare gli URL con una virgola come segue: https://dl.espressif.com/dl/package_esp32_index.json, http:/ /arduino.esp8266.com/stable/package_esp8266com_index.json - Apri Gestione schede. Vai su Strumenti > Bacheca > Gestore bacheche…
- Cerca ESP32 e premi il pulsante di installazione per “ESP32 di Espressif Systems” e attendi il completamento dell’installazione.
Puoi trovare maggiori informazioni su questo articolo “Esp32: piedinatura, specifiche e configurazione dell’Arduino IDE”.
Una volta installato, puoi programmare ESP32 con questo codice .
Per prima cosa includiamo la libreria. Queste librerie possono essere trovate nel gestore delle librerie dell’IDE di Arduino cercandole o seguendo i link sul codice, ma alcune di esse sono già preinstallate se hai installato il modulo ESP.
///////////////////////////////LIBRARY DECLARATION////////////////////////////////////////
#include <Arduino.h>
#include <HTTPUpdate.h>
#include <ArduinoJson.h>       // https://github.com/bblanchon/ArduinoJson
#include <WiFi.h>              // Built-in
#include "time.h"              // Built-in
#include <SPI.h>               // Built-in
#include <JSON_Decoder.h>      //https://github.com/Bodmer/JSON_Decoder
#include <OpenWeather.h>       //https://github.com/Bodmer/OpenWeather
#include <WiFiManager.h>       // https://github.com/tzapu/WiFiManager
#include <math.h>
#include <String.h>
WiFiManager wifiManager;
#include "NTPClient.h"       //https://github.com/floatAsNeeded/LineaMeteoStazione-Personalised-Weather-Station/blob/main/NTPClient.zip
#include <WiFiUDP.h>
#include <FirebaseESP32.h>     //https://github.com/mobizt/Firebase-ESP32
#include <GxEPD2_BW.h>         //https://github.com/ZinggJM/GxEPD2
#include <GxEPD2_3C.h>         //https://github.com/ZinggJM/GxEPD2
#include <U8g2_for_Adafruit_GFX.h>   //https://github.com/olikraus/U8g2_for_Adafruit_GFX
#include "epaper_fonts.h"       //https://github.com/G6EJD/ESP32-e-Paper-Weather-Display
#include "lang.h"
#include "common_functions.h"
#include <Adafruit_Sensor.h>    //https://github.com/adafruit/Adafruit_Sensor
#include "Adafruit_BME680.h"    //https://github.com/adafruit/Adafruit_BME680
#include "LC709203F.h"          //https://github.com/EzSBC/ESP32_Bat_Pro/blob/main/LC709203F.zip
#include <WebServer.h>
#include <ESPmDNS.h>
#include <HTTPUpdateServer.h>
#include <WiFiClient.h>
#include <RTClib.h>   //https://www.arduino.cc/reference/en/libraries/rtclib/
Creiamo tutte le dichiarazioni e le variabili che ci servono per far funzionare il codice e dobbiamo anche inserire i dettagli di Firebase che sono quelli che hai ricavato dall’articolo che parla della Stazione Meteo. Puoi anche inserire i dettagli riguardo all’Ota da remoto se desideri utilizzare questa funzione che è ampiamente spiegata QUI. Avrai bisogno dell’API. Quando è richiesto un aggiornamento e desideri farlo manualmente, dovrai modificare il numero di versione nel codice che stai caricando.
LC709203F gg;  // create a gas gauge object.
uint8_t percentage;
float voltage;
float VOLTAGEOUT;
byte PERCENTAGEOUT;

//OTA REMOTE//
// To inject firmware info into binary file, You have to use following macro according to let
// OTAdrive to detect binary info automatically
#define ProductKey "" // Replace with your own APIkey
#define Version "1.0.0.4"
#define MakeFirmwareInfo(k, v) "&_FirmwareInfo&k=" k "&v=" v "&FirmwareInfo_&"
void update();


//OTA LOCAL//
WebServer httpServer(80);
HTTPUpdateServer httpUpdater;
const char* host = "esp32-webupdate";
String DEVICE3OTA;
byte WiFiReset = 0;
unsigned long TIMEROTA;
////////////////////*********FIREBASE DETAILS************///////////////////////////////////
#define FIREBASE_HOST ""                 // the project name address from firebase id
#define FIREBASE_AUTH ""            // the secret key generated from firebase
FirebaseData Weather;
FirebaseConfig config;


//////////////////////*********NTP SERVER************//////////////////////////////////////
#define NTP_OFFSET   60 * 60      // In seconds
#define NTP_INTERVAL 60 * 1000    // In miliseconds
#define NTP_ADDRESS "pool.ntp.org" // "ca.pool.ntp.org"  // change this to whatever pool is closest (see ntp.org)
// Set up the NTP UDP client
WiFiUDP ntpUDP;
NTPClient timeClient(ntpUDP, NTP_ADDRESS , NTP_OFFSET, NTP_INTERVAL);


////////////////////*********OPENWEATHER DETAILS************////////////////////////////////
byte SunriseHour;
byte SunsetHour;
byte SunriseMinute;
byte SunsetMinute;
String DescriptionDisplay;
int CloudsDisplay;
String VisibilityDisplay;
String api_key;
String latitude; // 90.0000 to -90.0000 negative for Southern hemisphere
String longitude; // 180.000 to -180.000 negative for West
String units = "metric";
String unitsPressure;
String unitsTemperature;
String unitsRain;
String unitsWind;
String language;   // See notes tab
String Hemisphere;
//CONVERSION TO IMPERIAL//
float constantF = 1;
byte constantF32 = 0;
float constantpressure = 1;
float constantrain = 1;
float constantwind = 1;
String SymbolTemperature = "°C";
String MeasurementUnitPressure = "hPa";
String MeasurementUnitRain = "mm";
String MeasurementUnitWind = "km/h";
boolean justrestart = true;
unsigned long checkopenweather = 0;

OW_Weather ow; // Weather forecast library instance


////////////////////*********DISPLAY DEFINITION************///////////////////////////////////
#define SCREEN_WIDTH  400.0    // Set for landscape mode, don't remove the decimal place!
#define SCREEN_HEIGHT 300.0
#define  ENABLE_GxEPD2_display 0

enum alignment {LEFT, RIGHT, CENTER};

// Connections for e.g. LOLIN D32
static const uint8_t EPD_BUSY = 4;  // to EPD BUSY
static const uint8_t EPD_CS   = 5;  // to EPD CS
static const uint8_t EPD_RST  = 16; // to EPD RST
static const uint8_t EPD_DC   = 17; // to EPD DC
static const uint8_t EPD_SCK  = 18; // to EPD CLK
static const uint8_t EPD_MISO = 19; // Master-In Slave-Out not used, as no data from display
static const uint8_t EPD_MOSI = 23; // to EPD DIN

// Connections for e.g. Waveshare ESP32 e-Paper Driver Board
//static const uint8_t EPD_BUSY = 25;
//static const uint8_t EPD_CS   = 15;
//static const uint8_t EPD_RST  = 26;
//static const uint8_t EPD_DC   = 27;
//static const uint8_t EPD_SCK  = 13;
//static const uint8_t EPD_MISO = 12; // Master-In Slave-Out not used, as no data from display
//static const uint8_t EPD_MOSI = 14;

GxEPD2_BW<GxEPD2_420, GxEPD2_420::HEIGHT> display(GxEPD2_420(/*CS=D8*/ EPD_CS, /*DC=D3*/ EPD_DC, /*RST=D4*/ EPD_RST, /*BUSY=D2*/ EPD_BUSY));

U8G2_FOR_ADAFRUIT_GFX u8g2Fonts;  // Select u8g2 font from here: https://github.com/olikraus/u8g2/wiki/fntlistall

// Using fonts:
// u8g2_font_helvB08_tf
// u8g2_font_helvB10_tf
// u8g2_font_helvB12_tf
// u8g2_font_helvB14_tf
// u8g2_font_helvB18_tf
// u8g2_font_helvB24_tf

boolean LargeIcon = true, SmallIcon = false;
#define Large  9           // For icon drawing, needs to be odd number for best effect
#define Small  9            // For icon drawing, needs to be odd number for best effect
#define VerySmall 7
#define moon 13

//LANGUAGE//
String WIFI;
String DEWPOINT = "Dew Point    ";
String UVINDEX = "UV Index  ";
String SOLARRADIATION = "Solar Radiation  ";
String HEATINDEX = "Heat Index   ";
String UPDATE = "Last Update";
String INSIDE = "INSIDE";
String RAIN = "Rain24H     ";
String RAINRATE = "RainRate   ";
String RAINRATEMAX = "RRMax       ";
String GUST = "GustMax    ";
String SUNSET = "Sunset";
String SUNRISE = "Sunrise";


//////////DEFINE PRESSURE SENSOR AND DATA////////////////
Adafruit_BME680 bme; // I2C
float hum_weighting = 0.25; // so hum effect is 25% of the total air quality score
float gas_weighting = 0.75; // so gas effect is 75% of the total air quality score
float hum_score, gas_score;
float gas_reference = 250000;
float hum_reference = 40;
int   getgasreference_count = 0;
int AQIndex;
String AQI;
//int CALIBRATION;
//float pressure;
float pressurehpa;
//PRESSURE EXTREMES//
//float pressureMax;
//float pressureMin;


//######################## PROGRAM VARIABLES AND OBJECTS ##################################//


//DEWPOINT CALCULATION CONSTANTS//
#define c1 -8.78469475556
#define c2 1.61139411
#define c3 2.33854883889
#define c4 -0.14611605
#define c5 -0.012308094
#define c6 -0.0164248277778
#define c7 0.002211732
#define c8 0.00072546
#define c9 -0.000003582


//////////TEMPERATURE///////////
float temp;
float temperatureIN;
float maxTemp;
float minTemp;
float OffsetTemp;


////////////HUMIDITY////////////
int humidity;
int humidityIN;
//int maxHumidity;
//int minHumidity;
float dewPoint; // variabile del punto di rugiada
float heatIndex; // variabile dell'indice di calore


////////////////LIGHT//////////////
float CalibrationUV;
float UVindex;
float SolarRadiation;

//////////////WIND//////////////
float WindSpeed;
float windchill; // variabile del raffreddamento causato dal vento
float CalDirection;
float Gust;
unsigned int Offset;

//////////////RAIN//////////////
float rainrate;
float mmPioggia;
float rainrateMax;

/////TIMING VARIALABLES//////
unsigned long timeout;
bool res;
int TIMEZONE;
long TIMEZONEINSECONDS;


//////SLEEP DEFINITIONS///////
int SleepDuration;
String FASTREFRESH;
unsigned long refreshcount = 0;
unsigned int refreshtime = 0;
Codice di Setup
Le prime operazioni che andremo a fare sono le seguenti:
inizializziamo il display chiamando InitialiseDisplay();
Questo avvierà la comunicazione SPI e avvierà i caratteri, la direzione della scrittura sul display se verticale o orizzontale e il colore di sfondo.
void InitialiseDisplay() {
  display.init(0);
  SPI.end();
  SPI.begin(EPD_SCK, EPD_MISO, EPD_MOSI, EPD_CS);
  u8g2Fonts.begin(display); // connect u8g2 procedures to Adafruit GFX
  u8g2Fonts.setFontMode(1);                  // use u8g2 transparent mode (this is default)
  u8g2Fonts.setFontDirection(0);             // left to right (this is default)
  u8g2Fonts.setForegroundColor(GxEPD_BLACK); // apply Adafruit GFX color
  u8g2Fonts.setBackgroundColor(GxEPD_WHITE); // apply Adafruit GFX color
  u8g2Fonts.setFont(u8g2_font_helvB10_tf);   // select u8g2 font from here: https://github.com/olikraus/u8g2/wiki/fntlistall
  display.fillScreen(GxEPD_WHITE);
  display.setFullWindow();
  u8g2Fonts.setFont(u8g2_font_helvB24_tf);
  drawString(105, 90, "Please wait.", LEFT);
  drawString(65, 180, "Retrieving Data...", LEFT);
  display.display(false); // Full screen update mode
}
Quindi inizializziamo l’IC di monitoraggio della batteria,lo impostiamo sulla capacità della batteria di 3000 mAh (se si utilizza tale batteria) per avere una stima migliore della durata e della durata della batteria. Dopodiché, se la batteria è troppo scarica, interrompiamo tutte le operazioni andando subito in sleepmode e dando un avviso sul display con la scritta “WARNING! RACHARGE BATTERY”
if (!gg.begin()) {
    while (1) delay(10);
  }
  gg.setCellCapacity(LC709203F_APA_3000MAH);
  //gg.setAlarmVoltage(3.4);
  gg.setCellProfile( LC709203_NOM3p7_Charge4p2 ) ;
  voltage = gg.cellVoltage_mV() / 1000.0;
  if (voltage <= 3.45)
  {
    display.fillScreen(GxEPD_WHITE);
    u8g2Fonts.setFont(u8g2_font_helvB24_tf);
    drawString(100, 75, "WARNING!", LEFT);
    drawString(30, 175, "RECHARGE BATTERY", LEFT);
    display.display(false); // Full screen update mode
    display.powerOff();
    esp_sleep_enable_ext0_wakeup(GPIO_NUM_15, 1); //1 = High, 0 = Low
    esp_deep_sleep_start();
  }
Se non vengono rilevati problemi con la batteria avviamo la connessione WiFi
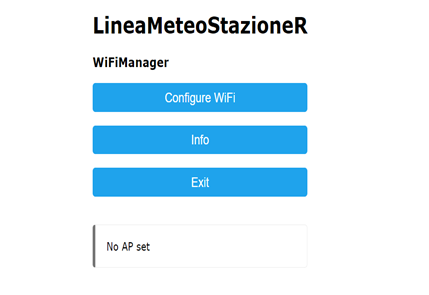
con la libreria WiFi Manager:
  WiFi.mode(WIFI_STA);
  //wifiManager.resetSettings();
  wifiManager.setConfigPortalTimeout(300);
  WiFi.begin();
  timeout = millis();
  while (WiFi.status() != WL_CONNECTED) {
    delay(250);
    //Serial.print(".");
    if (millis() - timeout > 25000)
    {
      display.fillScreen(GxEPD_WHITE);
      u8g2Fonts.setFont(u8g2_font_helvB24_tf);
      drawString(85, 110, "Please Set WiFi", LEFT);
      u8g2Fonts.setFont(u8g2_font_helvB18_tf);
      drawString(35, 180, "LineaMeteoStazioneVisual", LEFT);
      display.display(false); // Full screen update mode
      res = wifiManager.autoConnect("LineaMeteoStazioneVisual", "LaMeteo2005");
      if (!res) {
        //Serial.println("Failed to connect");
        display.fillScreen(GxEPD_WHITE);
        u8g2Fonts.setFont(u8g2_font_helvB24_tf);
        drawString(85, 110, "Failed to connect", LEFT);
        u8g2Fonts.setFont(u8g2_font_helvB18_tf);
        drawString(35, 180, "Reset or wait 1 minute", LEFT);
        esp_sleep_enable_timer_wakeup(60 * 1000000LL);
        esp_deep_sleep_start();
      }
    }
  }
Quando viene stabilita la connessione, ci colleghiamo a Firebase con le nostre credenziali di Firebase come spiegato nell’articolo che parla della stazione metereologica.
Firebase.begin(FIREBASE_HOST, FIREBASE_AUTH);   // connect to firebase
  //Serial.println(Weather.errorReason());
  Firebase.reconnectWiFi(true);
  Firebase.setMaxRetry(Weather, 2);
Quindi controlliamo se è necessario un reset per il WiFi, controllando Firebase per qualsiasi input e se è uguale a 1, farà un reset delle impostazioni WiFi e proverà a riconnettersi nuovamente e entrerà in modalità AP:
  if (Firebase.getInt(Weather, "/Connection/DEVICE3/ResetWiFi"))
  {
    WiFiReset = Weather.to<int>();
  }
  if (WiFiReset == 1)
  {
    WiFiReset = 0;
    Firebase.setInt(Weather, "/Connection/DEVICE3/ResetWiFi", 0);
    wifiManager.resetSettings();
    WiFi.mode(WIFI_STA);
    wifiManager.setConfigPortalTimeout(300);
    WiFi.begin();
    timeout = millis();
    while (WiFi.status() != WL_CONNECTED) {
      delay(250);
      //Serial.print(".");
      if (millis() - timeout > 10000)
      {
        display.fillScreen(GxEPD_WHITE);
        u8g2Fonts.setFont(u8g2_font_helvB24_tf);
        drawString(85, 110, "Please Set WiFi", LEFT);
        u8g2Fonts.setFont(u8g2_font_helvB18_tf);
        drawString(35, 180, "LineaMeteoStazioneVisual", LEFT);
        display.display(false); // Full screen update mode
        res = wifiManager.autoConnect("LineaMeteoStazioneVisual", "LaMeteo2005");

        if (!res) {
          //Serial.println("Failed to connect");
          display.fillScreen(GxEPD_WHITE);
          u8g2Fonts.setFont(u8g2_font_helvB24_tf);
          drawString(85, 110, "Failed to connect", LEFT);
          u8g2Fonts.setFont(u8g2_font_helvB18_tf);
          drawString(35, 180, "Reset or wait 1 minute", LEFT);
          esp_sleep_enable_timer_wakeup(60 * 1000000LL);
          esp_deep_sleep_start();
        }
      }
    }
    InitialiseDisplay();
  }
Quindi controlliamo se sono necessari alcuni aggiornamenti per il nostro display. (Quando “enable” è scritto in “update” in Firebase, consultare la guida generale per maggiori informazioni)
  if (Firebase.getString(Weather, "/Connection/DEVICE3/Update"))
  {
    DEVICE3OTA = Weather.to<const char *>();
  }

  if (DEVICE3OTA == "enable")
  {
    Firebase.setString(Weather, "/Connection/DEVICE3/Update", "disable");
    display.fillScreen(GxEPD_WHITE);
    u8g2Fonts.setFont(u8g2_font_helvB18_tf);
    drawString(75, 110, "Checking for Updates...", LEFT);
    display.display(false); // Full screen update mode
    delay(4000);
    update();
    u8g2Fonts.setFont(u8g2_font_helvB18_tf);
    drawString(75, 180, "No Remote Updates", LEFT);
    display.display(false); // Full screen update mode
    delay(2000);
  }

  if (DEVICE3OTA == "enable")
  {
    MDNS.begin(host);
    if (MDNS.begin("esp32")) {
      Serial.println("mDNS responder started");
    }
    httpUpdater.setup(&httpServer);
    httpServer.begin();

    MDNS.addService("http", "tcp", 80);
    Serial.printf("HTTPUpdateServer ready! Open http://%s.local/update in your browser\n", host);
    Firebase.setString(Weather, "/Connection/DEVICE3/Update", "disable");
    display.fillScreen(GxEPD_WHITE);
    u8g2Fonts.setFont(u8g2_font_helvB24_tf);
    drawString(25, 110, "Update Local Firmware", LEFT);
    u8g2Fonts.setFont(u8g2_font_helvB18_tf);
    drawString(85, 180, "Go to  " + WiFi.localIP().toString() + "/update", LEFT);
    u8g2Fonts.setFont(u8g2_font_helvB14_tf);
    drawString(85, 250, "Press Button to Cancel", LEFT);
    display.display(false); // Full screen update mode
    delay(50);
    Firebase.setString(Weather, "/Connection/DEVICE3/UpdateHere", String(WiFi.localIP().toString() + "/update"));
    delay(50);
    TIMEROTA = millis();
  }
Quindi avviamo la connessione NTP per l’ora con timeClient.begin(); e poi otteniamo alcuni parametri utili come il fuso orario e le unità di misura dei dati meteorologici visualizzati.
void getDataTime()
{
  if (Firebase.getInt(Weather, "/Time/TIMEZONE"))
  {
    TIMEZONE = Weather.to<int>();
  }
  else
  {
    //Serial.println(Weather.errorReason());
  }
  /*if (Firebase.getInt(Weather, "/Pressure/Calibration"))
    {
    CALIBRATION = Weather.to<int>();
    }*/
  if (Firebase.getString(Weather, "/Services/OpenWeather/API"))
  {
    api_key = Weather.to<const char *>();
  }
  if (Firebase.getString(Weather, "/Display/Language"))
  {
    language = Weather.to<const char *>();
  }
  if (Firebase.getString(Weather, "/Services/OpenWeather/Latitude"))
  {
    latitude = Weather.to<const char *>();
  }
  if (Firebase.getString(Weather, "/Services/OpenWeather/Longitude"))
  {
    longitude = Weather.to<const char *>();
  }
  if (Firebase.getString(Weather, "/Services/OpenWeather/Hemisphere"))
  {
    Hemisphere = Weather.to<const char *>();
  }
  if (Firebase.getString(Weather, "/Display/Units/Temperature"))
  {
    unitsTemperature = Weather.to<const char *>();
  }
  if (Firebase.getString(Weather, "/Display/Units/Wind"))
  {
    unitsWind = Weather.to<const char *>();
  }
  if (Firebase.getString(Weather, "/Display/Units/Rain"))
  {
    unitsRain = Weather.to<const char *>();
  }
  if (Firebase.getString(Weather, "/Display/Units/Pressure"))
  {
    unitsPressure = Weather.to<const char *>();
  }
}
E alla fine del setup, iniziamo la comunicazione con il BME680 e impostiamo il pin 15 in input per il nostro pulsante.
  Wire.begin();
  bme.begin();
  bme.setTemperatureOversampling(BME680_OS_8X);
  bme.setHumidityOversampling(BME680_OS_2X);
  //bme.setPressureOversampling(BME680_OS_4X);
  bme.setIIRFilterSize(BME680_FILTER_SIZE_3);
  bme.setGasHeater(320, 150); // 320*C for 150 ms
  pinMode(15, INPUT);
Codice di Loop
Entriamo quindi nel loop e se è stato rilevato un aggiornamento in modalità locale nel setup entriamo in un loop che gestisce il server dove possiamo caricare il file per l’aggiornamento del firmware. Rimarrà in questa modalità per 5 minuti, dopodiché si riavvierà se non viene rilevato nulla.
Se nessun aggiornamento OTA è abilitato, inizierà in normale operazione. Otteniamo prima i dati meteo dal database e li visualizziamo sul display.
getValues(); e DisplayWeather(); sono le funzioni create nel codice che gestiscono questo. In sintesi, getValues(); controlla eventuali impostazioni da applicare sul display, come le unità di temperatura, pressione, vento e pioggia. Riceve anche tutti i valori attuali, massimi e minimi dalla stazione metereologica esterna, inoltre legge il sensore BME680 e calcola la qualità dell’aria. DisplayWeather(); poi utilizza la libreria grafica per visualizzare i dati sul display.
Dopo che i dati sono stati scritti sullo schermo, usiamo display.display(false); display.powerOff(); per aggiornare completamente il display e spegnere il display per un migliore consumo energetico. Se si utilizza la modalità Fast refresh, invece di attivare la modalità sleep, torniamo invece in lettura e scrittura dei dati sul display ogni 50 secondi. Leggiamo anche se il pulsante è stato premuto con:
    if (digitalRead(15) == HIGH)
    {
      Firebase.setString(Weather, "/Connection/DEVICE3/Update", "enable");
      ESP.restart();
    }
In caso affermativo, riavviamo l’ESP e verifichiamo la presenza di un aggiornamento. Se la batteria è scarica, interrompiamo comunque ogni operazione e entriamo in modalità di sospensione con il segnale di avviso sul display come spiegato in precedenza.
void loop() {
  if (DEVICE3OTA == "enable")
  {
    httpServer.handleClient();

    if (digitalRead(15) == HIGH)
    {
      ESP.restart();
    }
    if (millis() - TIMEROTA > 300000)
    {
      ESP.restart();
    }
  }
  else
  {
    if (digitalRead(15) == HIGH)
    {
      Firebase.setString(Weather, "/Connection/DEVICE3/Update", "enable");
      ESP.restart();
    }
    if (millis() - refreshcount >= refreshtime)
    {
      refreshtime = 50000;
      refreshcount = millis();
      percentage = gg.cellRemainingPercent10() / 10;
      voltage = gg.cellVoltage_mV() / 1000.0;
      getValues();
      DisplayWeather();
      display.display(false); // Full screen update mode
      display.powerOff();

      if (FASTREFRESH == "NO")
      {
        BeginSleep();
      }
      if (voltage <= 3.45)
      {
        display.fillScreen(GxEPD_WHITE);
        u8g2Fonts.setFont(u8g2_font_helvB24_tf);
        drawString(100, 75, "WARNING!", LEFT);
        drawString(30, 175, "RECHARGE BATTERY", LEFT);
        //display.display(false); // Full screen update mode
        display.powerOff();
        esp_sleep_enable_ext0_wakeup(GPIO_NUM_15, 1); //1 = High, 0 = Low
        esp_deep_sleep_start();
      }
    }
  }
}
Links
- LineaMeteoStazione: Guida Tecnica Dispositivo Master, Invio e Raccolta Dati
- LineaMeteoStazione: Guida Tecnica Display
- LineaMeteoStazione: Guida Tecnica Ricevitore, rete e dispositivo di gestione
- LineaMeteoStazione: La Stazione Meteo Personalizzabile con ESP32, ESP8266, Attiny85 e aggiornamenti OTA
Per la stazione metereologica pre-assemblata o l’origine dei materiale per favore scrivimi Eugenio
eugenioiaquinta@outlook.it