
LineaMeteoStazione: Technical Guide Display – 2
Guest post created with ♥ by Eugenio 🙂|
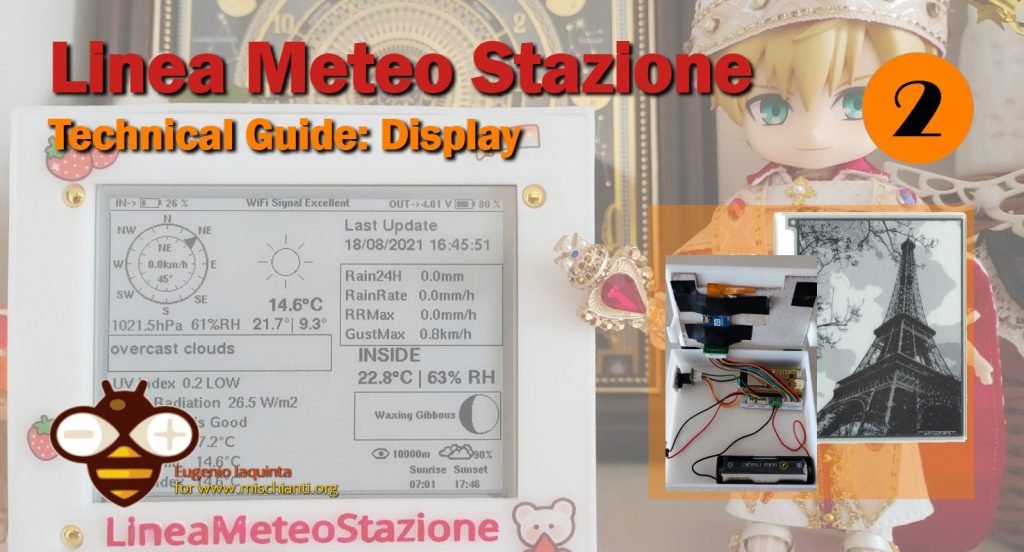
Display Ink and ESP32
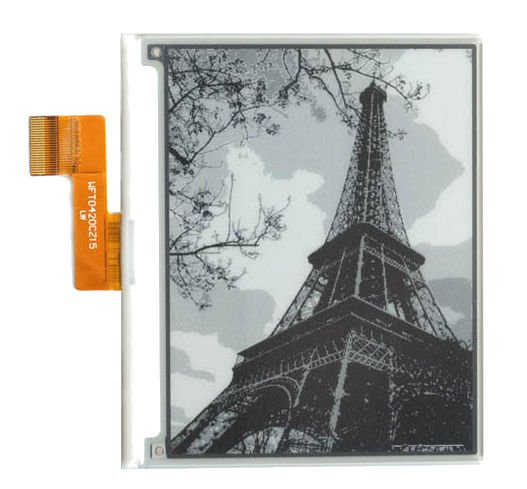
To have an option of data displayed and not just through online websites, I wanted something that could last long on battery, that’s why I choose the Display ink of 4.3inch (Display Ink from Good Display, but can be used also Waveshare)
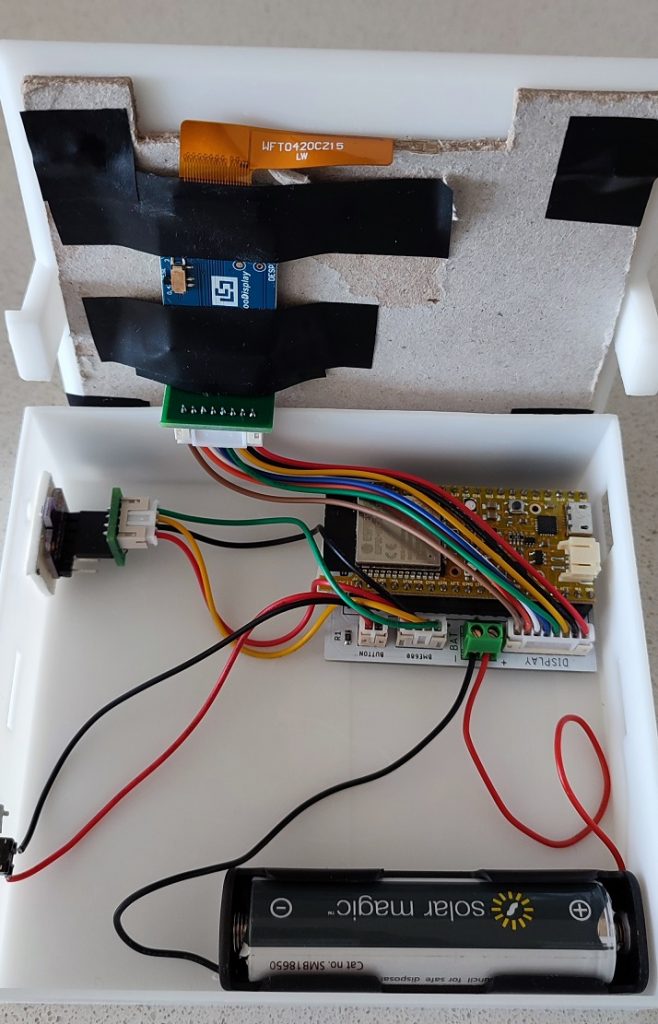
I also used the same development board of the device outside because it has a charger included for lithium batteries. It also has a BME680 sensor, which I use to monitor the temperature inside and humidity, as well as air quality.
The display case is printed in 3D and I use a PCB board that you can find in Eagle files on Github
The display is fitted as shown in the photo below, with a paper board where it’s glued on and with the other adapter boards where the sensor goes and a button that is used to refresh the display manually if needed and to reset the board:
Program the Display to show the data
First of all, you need to have the Arduino IDE installed at least version 1.8.13 and you will need to install from the board manager of Arduino the ESP32 following those steps:
To install the ESP32 board in your Arduino IDE, follow these next instructions:
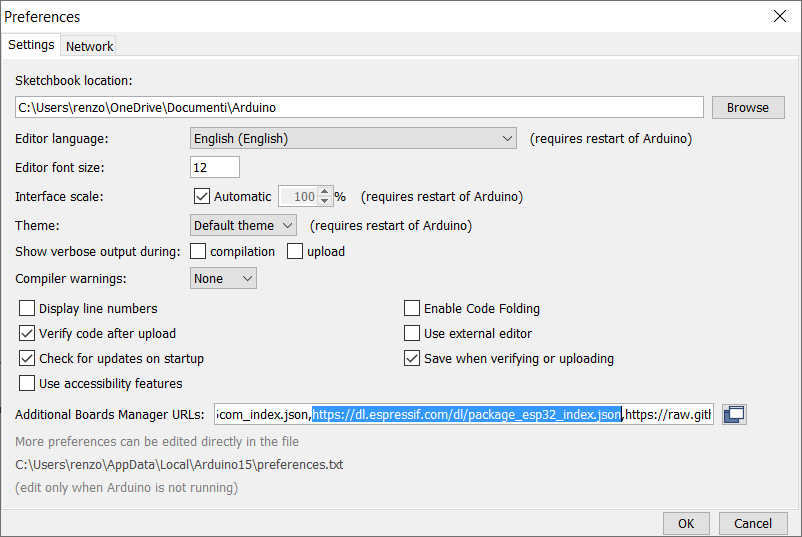
- In your Arduino IDE, go to File> Preferences
- Enter https://dl.espressif.com/dl/package_esp32_index.json into the “Additional Board Manager URLs” field. Then, click the “OK” button:
Note: if you already have the ESP8266 boards URL, you can separate the URLs with a comma as follows:https://dl.espressif.com/dl/package_esp32_index.json, http://arduino.esp8266.com/stable/package_esp8266com_index.json - Open the Boards Manager. Go to Tools > Board > Boards Manager…
- Search for ESP32 and press install button for the “ESP32 by Espressif Systems“ and wait for installation to finish.
You can find more information on this article “ESP32: pinout, specs and Arduino IDE configuration“.
Once installed, then you can program the ESP32 with this code.
We first include the library. These all libraries can be found in the library manager of the Arduino IDE by searching them or following the link on the code, but some of them are already preinstalled if you installed the ESP module.
///////////////////////////////LIBRARY DECLARATION////////////////////////////////////////
#include <Arduino.h>
#include <HTTPUpdate.h>
#include <ArduinoJson.h>       // https://github.com/bblanchon/ArduinoJson
#include <WiFi.h>              // Built-in
#include "time.h"              // Built-in
#include <SPI.h>               // Built-in
#include <JSON_Decoder.h>      //https://github.com/Bodmer/JSON_Decoder
#include <OpenWeather.h>       //https://github.com/Bodmer/OpenWeather
#include <WiFiManager.h>       // https://github.com/tzapu/WiFiManager
#include <math.h>
#include <String.h>
WiFiManager wifiManager;
#include "NTPClient.h"       //https://github.com/floatAsNeeded/LineaMeteoStazione-Personalised-Weather-Station/blob/main/NTPClient.zip
#include <WiFiUDP.h>
#include <FirebaseESP32.h>     //https://github.com/mobizt/Firebase-ESP32
#include <GxEPD2_BW.h>         //https://github.com/ZinggJM/GxEPD2
#include <GxEPD2_3C.h>         //https://github.com/ZinggJM/GxEPD2
#include <U8g2_for_Adafruit_GFX.h>   //https://github.com/olikraus/U8g2_for_Adafruit_GFX
#include "epaper_fonts.h"       //https://github.com/G6EJD/ESP32-e-Paper-Weather-Display
#include "lang.h"
#include "common_functions.h"
#include <Adafruit_Sensor.h>    //https://github.com/adafruit/Adafruit_Sensor
#include "Adafruit_BME680.h"    //https://github.com/adafruit/Adafruit_BME680
#include "LC709203F.h"          //https://github.com/EzSBC/ESP32_Bat_Pro/blob/main/LC709203F.zip
#include <WebServer.h>
#include <ESPmDNS.h>
#include <HTTPUpdateServer.h>
#include <WiFiClient.h>
#include <RTClib.h>   //https://www.arduino.cc/reference/en/libraries/rtclib/
We create all the declarations and variables that we need to make the code works and we also need to insert the Firebase details which are the ones that you got from the article talking about the Weather Station. You can also insert your Ota drive details if you wish to use the Ota drive remote function that is explained widely HERE. You will need the API. When an update is required and you wish to do it manually, you will need to change the Version number in the code you’re uploading.
LC709203F gg;  // create a gas gauge object.
uint8_t percentage;
float voltage;
float VOLTAGEOUT;
byte PERCENTAGEOUT;

//OTA REMOTE//
// To inject firmware info into binary file, You have to use following macro according to let
// OTAdrive to detect binary info automatically
#define ProductKey "" // Replace with your own APIkey
#define Version "1.0.0.4"
#define MakeFirmwareInfo(k, v) "&_FirmwareInfo&k=" k "&v=" v "&FirmwareInfo_&"
void update();


//OTA LOCAL//
WebServer httpServer(80);
HTTPUpdateServer httpUpdater;
const char* host = "esp32-webupdate";
String DEVICE3OTA;
byte WiFiReset = 0;
unsigned long TIMEROTA;
////////////////////*********FIREBASE DETAILS************///////////////////////////////////
#define FIREBASE_HOST ""                 // the project name address from firebase id
#define FIREBASE_AUTH ""            // the secret key generated from firebase
FirebaseData Weather;
FirebaseConfig config;


//////////////////////*********NTP SERVER************//////////////////////////////////////
#define NTP_OFFSET   60 * 60      // In seconds
#define NTP_INTERVAL 60 * 1000    // In miliseconds
#define NTP_ADDRESS "pool.ntp.org" // "ca.pool.ntp.org"  // change this to whatever pool is closest (see ntp.org)
// Set up the NTP UDP client
WiFiUDP ntpUDP;
NTPClient timeClient(ntpUDP, NTP_ADDRESS , NTP_OFFSET, NTP_INTERVAL);


////////////////////*********OPENWEATHER DETAILS************////////////////////////////////
byte SunriseHour;
byte SunsetHour;
byte SunriseMinute;
byte SunsetMinute;
String DescriptionDisplay;
int CloudsDisplay;
String VisibilityDisplay;
String api_key;
String latitude; // 90.0000 to -90.0000 negative for Southern hemisphere
String longitude; // 180.000 to -180.000 negative for West
String units = "metric";
String unitsPressure;
String unitsTemperature;
String unitsRain;
String unitsWind;
String language;   // See notes tab
String Hemisphere;
//CONVERSION TO IMPERIAL//
float constantF = 1;
byte constantF32 = 0;
float constantpressure = 1;
float constantrain = 1;
float constantwind = 1;
String SymbolTemperature = "°C";
String MeasurementUnitPressure = "hPa";
String MeasurementUnitRain = "mm";
String MeasurementUnitWind = "km/h";
boolean justrestart = true;
unsigned long checkopenweather = 0;

OW_Weather ow; // Weather forecast library instance


////////////////////*********DISPLAY DEFINITION************///////////////////////////////////
#define SCREEN_WIDTH  400.0    // Set for landscape mode, don't remove the decimal place!
#define SCREEN_HEIGHT 300.0
#define  ENABLE_GxEPD2_display 0

enum alignment {LEFT, RIGHT, CENTER};

// Connections for e.g. LOLIN D32
static const uint8_t EPD_BUSY = 4;  // to EPD BUSY
static const uint8_t EPD_CS   = 5;  // to EPD CS
static const uint8_t EPD_RST  = 16; // to EPD RST
static const uint8_t EPD_DC   = 17; // to EPD DC
static const uint8_t EPD_SCK  = 18; // to EPD CLK
static const uint8_t EPD_MISO = 19; // Master-In Slave-Out not used, as no data from display
static const uint8_t EPD_MOSI = 23; // to EPD DIN

// Connections for e.g. Waveshare ESP32 e-Paper Driver Board
//static const uint8_t EPD_BUSY = 25;
//static const uint8_t EPD_CS   = 15;
//static const uint8_t EPD_RST  = 26;
//static const uint8_t EPD_DC   = 27;
//static const uint8_t EPD_SCK  = 13;
//static const uint8_t EPD_MISO = 12; // Master-In Slave-Out not used, as no data from display
//static const uint8_t EPD_MOSI = 14;

GxEPD2_BW<GxEPD2_420, GxEPD2_420::HEIGHT> display(GxEPD2_420(/*CS=D8*/ EPD_CS, /*DC=D3*/ EPD_DC, /*RST=D4*/ EPD_RST, /*BUSY=D2*/ EPD_BUSY));

U8G2_FOR_ADAFRUIT_GFX u8g2Fonts;  // Select u8g2 font from here: https://github.com/olikraus/u8g2/wiki/fntlistall

// Using fonts:
// u8g2_font_helvB08_tf
// u8g2_font_helvB10_tf
// u8g2_font_helvB12_tf
// u8g2_font_helvB14_tf
// u8g2_font_helvB18_tf
// u8g2_font_helvB24_tf

boolean LargeIcon = true, SmallIcon = false;
#define Large  9           // For icon drawing, needs to be odd number for best effect
#define Small  9            // For icon drawing, needs to be odd number for best effect
#define VerySmall 7
#define moon 13

//LANGUAGE//
String WIFI;
String DEWPOINT = "Dew Point    ";
String UVINDEX = "UV Index  ";
String SOLARRADIATION = "Solar Radiation  ";
String HEATINDEX = "Heat Index   ";
String UPDATE = "Last Update";
String INSIDE = "INSIDE";
String RAIN = "Rain24H     ";
String RAINRATE = "RainRate   ";
String RAINRATEMAX = "RRMax       ";
String GUST = "GustMax    ";
String SUNSET = "Sunset";
String SUNRISE = "Sunrise";


//////////DEFINE PRESSURE SENSOR AND DATA////////////////
Adafruit_BME680 bme; // I2C
float hum_weighting = 0.25; // so hum effect is 25% of the total air quality score
float gas_weighting = 0.75; // so gas effect is 75% of the total air quality score
float hum_score, gas_score;
float gas_reference = 250000;
float hum_reference = 40;
int   getgasreference_count = 0;
int AQIndex;
String AQI;
//int CALIBRATION;
//float pressure;
float pressurehpa;
//PRESSURE EXTREMES//
//float pressureMax;
//float pressureMin;


//######################## PROGRAM VARIABLES AND OBJECTS ##################################//


//DEWPOINT CALCULATION CONSTANTS//
#define c1 -8.78469475556
#define c2 1.61139411
#define c3 2.33854883889
#define c4 -0.14611605
#define c5 -0.012308094
#define c6 -0.0164248277778
#define c7 0.002211732
#define c8 0.00072546
#define c9 -0.000003582


//////////TEMPERATURE///////////
float temp;
float temperatureIN;
float maxTemp;
float minTemp;
float OffsetTemp;


////////////HUMIDITY////////////
int humidity;
int humidityIN;
//int maxHumidity;
//int minHumidity;
float dewPoint; // variabile del punto di rugiada
float heatIndex; // variabile dell'indice di calore


////////////////LIGHT//////////////
float CalibrationUV;
float UVindex;
float SolarRadiation;

//////////////WIND//////////////
float WindSpeed;
float windchill; // variabile del raffreddamento causato dal vento
float CalDirection;
float Gust;
unsigned int Offset;

//////////////RAIN//////////////
float rainrate;
float mmPioggia;
float rainrateMax;

/////TIMING VARIALABLES//////
unsigned long timeout;
bool res;
int TIMEZONE;
long TIMEZONEINSECONDS;


//////SLEEP DEFINITIONS///////
int SleepDuration;
String FASTREFRESH;
unsigned long refreshcount = 0;
unsigned int refreshtime = 0;
Setup Code
The first operations we are going to do are the following:
We initialize the display by calling InitialiseDisplay();
This will start the SPI communication and will init the fonts that we are going to use and the direction of writing and background colour.
void InitialiseDisplay() {
  display.init(0);
  SPI.end();
  SPI.begin(EPD_SCK, EPD_MISO, EPD_MOSI, EPD_CS);
  u8g2Fonts.begin(display); // connect u8g2 procedures to Adafruit GFX
  u8g2Fonts.setFontMode(1);                  // use u8g2 transparent mode (this is default)
  u8g2Fonts.setFontDirection(0);             // left to right (this is default)
  u8g2Fonts.setForegroundColor(GxEPD_BLACK); // apply Adafruit GFX color
  u8g2Fonts.setBackgroundColor(GxEPD_WHITE); // apply Adafruit GFX color
  u8g2Fonts.setFont(u8g2_font_helvB10_tf);   // select u8g2 font from here: https://github.com/olikraus/u8g2/wiki/fntlistall
  display.fillScreen(GxEPD_WHITE);
  display.setFullWindow();
  u8g2Fonts.setFont(u8g2_font_helvB24_tf);
  drawString(105, 90, "Please wait.", LEFT);
  drawString(65, 180, "Retrieving Data...", LEFT);
  display.display(false); // Full screen update mode
}
We then initialize the battery monitoring IC and we set it to the 3000mAh battery capacity in order to have a better estimate of battery life and duration. After that, if the battery is too low, we stop all operations by going to sleep immediately and giving a sign on display saying “WARNING! RECHARGE BATTERY”
if (!gg.begin()) {
    while (1) delay(10);
  }
  gg.setCellCapacity(LC709203F_APA_3000MAH);
  //gg.setAlarmVoltage(3.4);
  gg.setCellProfile( LC709203_NOM3p7_Charge4p2 ) ;
  voltage = gg.cellVoltage_mV() / 1000.0;
  if (voltage <= 3.45)
  {
    display.fillScreen(GxEPD_WHITE);
    u8g2Fonts.setFont(u8g2_font_helvB24_tf);
    drawString(100, 75, "WARNING!", LEFT);
    drawString(30, 175, "RECHARGE BATTERY", LEFT);
    display.display(false); // Full screen update mode
    display.powerOff();
    esp_sleep_enable_ext0_wakeup(GPIO_NUM_15, 1); //1 = High, 0 = Low
    esp_deep_sleep_start();
  }
If no problems are detected with the battery we start the WiFi connection
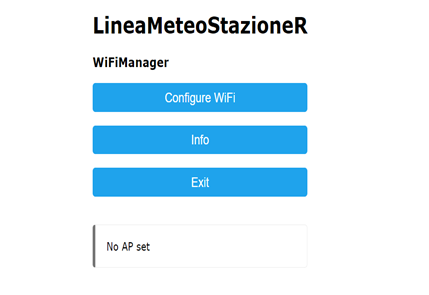
with the WiFi Manager library:
  WiFi.mode(WIFI_STA);
  //wifiManager.resetSettings();
  wifiManager.setConfigPortalTimeout(300);
  WiFi.begin();
  timeout = millis();
  while (WiFi.status() != WL_CONNECTED) {
    delay(250);
    //Serial.print(".");
    if (millis() - timeout > 25000)
    {
      display.fillScreen(GxEPD_WHITE);
      u8g2Fonts.setFont(u8g2_font_helvB24_tf);
      drawString(85, 110, "Please Set WiFi", LEFT);
      u8g2Fonts.setFont(u8g2_font_helvB18_tf);
      drawString(35, 180, "LineaMeteoStazioneVisual", LEFT);
      display.display(false); // Full screen update mode
      res = wifiManager.autoConnect("LineaMeteoStazioneVisual", "LaMeteo2005");
      if (!res) {
        //Serial.println("Failed to connect");
        display.fillScreen(GxEPD_WHITE);
        u8g2Fonts.setFont(u8g2_font_helvB24_tf);
        drawString(85, 110, "Failed to connect", LEFT);
        u8g2Fonts.setFont(u8g2_font_helvB18_tf);
        drawString(35, 180, "Reset or wait 1 minute", LEFT);
        esp_sleep_enable_timer_wakeup(60 * 1000000LL);
        esp_deep_sleep_start();
      }
    }
  }
When the connection is established we connect to Firebase with the details of our Firebase details as explained in the article talking about the Weather Station.
Firebase.begin(FIREBASE_HOST, FIREBASE_AUTH);   // connect to firebase
  //Serial.println(Weather.errorReason());
  Firebase.reconnectWiFi(true);
  Firebase.setMaxRetry(Weather, 2);
We then check if some reset for the WiFi is needed, by checking the Firebase for any input and if is equal to 1 it will reset the WiFi settings and it will try to reconnect again and it will enter in AP mode:
 if (Firebase.getInt(Weather, "/Connection/DEVICE3/ResetWiFi"))
  {
    WiFiReset = Weather.to<int>();
  }
  if (WiFiReset == 1)
  {
    WiFiReset = 0;
    Firebase.setInt(Weather, "/Connection/DEVICE3/ResetWiFi", 0);
    wifiManager.resetSettings();
    WiFi.mode(WIFI_STA);
    wifiManager.setConfigPortalTimeout(300);
    WiFi.begin();
    timeout = millis();
    while (WiFi.status() != WL_CONNECTED) {
      delay(250);
      //Serial.print(".");
      if (millis() - timeout > 10000)
      {
        display.fillScreen(GxEPD_WHITE);
        u8g2Fonts.setFont(u8g2_font_helvB24_tf);
        drawString(85, 110, "Please Set WiFi", LEFT);
        u8g2Fonts.setFont(u8g2_font_helvB18_tf);
        drawString(35, 180, "LineaMeteoStazioneVisual", LEFT);
        display.display(false); // Full screen update mode
        res = wifiManager.autoConnect("LineaMeteoStazioneVisual", "LaMeteo2005");

        if (!res) {
          //Serial.println("Failed to connect");
          display.fillScreen(GxEPD_WHITE);
          u8g2Fonts.setFont(u8g2_font_helvB24_tf);
          drawString(85, 110, "Failed to connect", LEFT);
          u8g2Fonts.setFont(u8g2_font_helvB18_tf);
          drawString(35, 180, "Reset or wait 1 minute", LEFT);
          esp_sleep_enable_timer_wakeup(60 * 1000000LL);
          esp_deep_sleep_start();
        }
      }
    }
    InitialiseDisplay();
  }
We then check if some updates are needed for our display. (When “enable” is written in ‘update’ in Firebase)
if (Firebase.getString(Weather, "/Connection/DEVICE3/Update"))
  {
    DEVICE3OTA = Weather.to<const char *>();
  }

  if (DEVICE3OTA == "enable")
  {
    Firebase.setString(Weather, "/Connection/DEVICE3/Update", "disable");
    display.fillScreen(GxEPD_WHITE);
    u8g2Fonts.setFont(u8g2_font_helvB18_tf);
    drawString(75, 110, "Checking for Updates...", LEFT);
    display.display(false); // Full screen update mode
    delay(4000);
    update();
    u8g2Fonts.setFont(u8g2_font_helvB18_tf);
    drawString(75, 180, "No Remote Updates", LEFT);
    display.display(false); // Full screen update mode
    delay(2000);
  }

  if (DEVICE3OTA == "enable")
  {
    MDNS.begin(host);
    if (MDNS.begin("esp32")) {
      Serial.println("mDNS responder started");
    }
    httpUpdater.setup(&httpServer);
    httpServer.begin();

    MDNS.addService("http", "tcp", 80);
    Serial.printf("HTTPUpdateServer ready! Open http://%s.local/update in your browser\n", host);
    Firebase.setString(Weather, "/Connection/DEVICE3/Update", "disable");
    display.fillScreen(GxEPD_WHITE);
    u8g2Fonts.setFont(u8g2_font_helvB24_tf);
    drawString(25, 110, "Update Local Firmware", LEFT);
    u8g2Fonts.setFont(u8g2_font_helvB18_tf);
    drawString(85, 180, "Go to  " + WiFi.localIP().toString() + "/update", LEFT);
    u8g2Fonts.setFont(u8g2_font_helvB14_tf);
    drawString(85, 250, "Press Button to Cancel", LEFT);
    display.display(false); // Full screen update mode
    delay(50);
    Firebase.setString(Weather, "/Connection/DEVICE3/UpdateHere", String(WiFi.localIP().toString() + "/update"));
    delay(50);
    TIMEROTA = millis();
  }
We then start the NTP connection for the time with timeClient.begin(), and then we get some useful parameters such as Timezone, and the units for the weather data displayed.
void getDataTime()
{
  if (Firebase.getInt(Weather, "/Time/TIMEZONE"))
  {
    TIMEZONE = Weather.to<int>();
  }
  else
  {
    //Serial.println(Weather.errorReason());
  }
  /*if (Firebase.getInt(Weather, "/Pressure/Calibration"))
    {
    CALIBRATION = Weather.to<int>();
    }*/
  if (Firebase.getString(Weather, "/Services/OpenWeather/API"))
  {
    api_key = Weather.to<const char *>();
  }
  if (Firebase.getString(Weather, "/Display/Language"))
  {
    language = Weather.to<const char *>();
  }
  if (Firebase.getString(Weather, "/Services/OpenWeather/Latitude"))
  {
    latitude = Weather.to<const char *>();
  }
  if (Firebase.getString(Weather, "/Services/OpenWeather/Longitude"))
  {
    longitude = Weather.to<const char *>();
  }
  if (Firebase.getString(Weather, "/Services/OpenWeather/Hemisphere"))
  {
    Hemisphere = Weather.to<const char *>();
  }
  if (Firebase.getString(Weather, "/Display/Units/Temperature"))
  {
    unitsTemperature = Weather.to<const char *>();
  }
  if (Firebase.getString(Weather, "/Display/Units/Wind"))
  {
    unitsWind = Weather.to<const char *>();
  }
  if (Firebase.getString(Weather, "/Display/Units/Rain"))
  {
    unitsRain = Weather.to<const char *>();
  }
  if (Firebase.getString(Weather, "/Display/Units/Pressure"))
  {
    unitsPressure = Weather.to<const char *>();
  }
}
And at the end of the setup, we init the communication with the BME680 and we set pin 15 in input for our button.
  Wire.begin();
  bme.begin();
  bme.setTemperatureOversampling(BME680_OS_8X);
  bme.setHumidityOversampling(BME680_OS_2X);
  //bme.setPressureOversampling(BME680_OS_4X);
  bme.setIIRFilterSize(BME680_FILTER_SIZE_3);
  bme.setGasHeater(320, 150); // 320*C for 150 ms
  pinMode(15, INPUT);
Loop Code
We then enter in the loop and if a local mode update in setup was detected we enter in a loop that handles the server where we can drop the file for the update on the firmware. It will stay in this mode for 5 minutes, after that it will restart if nothing was detected.
If no OTA updates are enabled it will start to operate in normal operation. We first get the weather data from the database and we display it on the display.
getValues(); and DisplayWeather(); are the functions created in the code, where this is done, where you can check in the full code for details.
In summaries, getValues(); checks for any settings that need to be applied on the display, like the units for temperature, pressure, wind and rain. It also gets all the current and maximum and minimum values from the weather station outside and it also read the BME680 sensor and calculates the air quality.
DisplayWeather(); then uses the graphic library to display the data on the display.
After the data has been drawn we use display.display(false); display.powerOff(); to completely update the display and we power off the display for better power consumption. If the Fast refresh mode is used we then don’t activate the sleep mode, but instead, we go back into reading and writing data on the display every 50 seconds. We also read if the button has been pressed with:
    if (digitalRead(15) == HIGH)
    {
      Firebase.setString(Weather, "/Connection/DEVICE3/Update", "enable");
      ESP.restart();
    }
If yes, we restart the ESP and we check for an update. If the battery is low we still stop every operation and go into sleep mode with a Warning sign on the display.
void loop() {
  if (DEVICE3OTA == "enable")
  {
    httpServer.handleClient();

    if (digitalRead(15) == HIGH)
    {
      ESP.restart();
    }
    if (millis() - TIMEROTA > 300000)
    {
      ESP.restart();
    }
  }
  else
  {
    if (digitalRead(15) == HIGH)
    {
      Firebase.setString(Weather, "/Connection/DEVICE3/Update", "enable");
      ESP.restart();
    }
    if (millis() - refreshcount >= refreshtime)
    {
      refreshtime = 50000;
      refreshcount = millis();
      percentage = gg.cellRemainingPercent10() / 10;
      voltage = gg.cellVoltage_mV() / 1000.0;
      getValues();
      DisplayWeather();
      display.display(false); // Full screen update mode
      display.powerOff();

      if (FASTREFRESH == "NO")
      {
        BeginSleep();
      }
      if (voltage <= 3.45)
      {
        display.fillScreen(GxEPD_WHITE);
        u8g2Fonts.setFont(u8g2_font_helvB24_tf);
        drawString(100, 75, "WARNING!", LEFT);
        drawString(30, 175, "RECHARGE BATTERY", LEFT);
        //display.display(false); // Full screen update mode
        display.powerOff();
        esp_sleep_enable_ext0_wakeup(GPIO_NUM_15, 1); //1 = High, 0 = Low
        esp_deep_sleep_start();
      }
    }
  }
}
Links
- LineaMeteoStazione: Technical Guide Master Device, Sending and Collecting Data
- LineaMeteoStazione: Technical Guide Display
- LineaMeteoStazione: Technical Guide Receiver, Network and Manager Device
- LineaMeteoStazione: The Personalized WiFi Weather Station using ESP32, ESP8266 and Attiny85 with OTA
For the pre-assembled weather station or source of the material please email me Eugenio
eugenioiaquinta@outlook.it


