
Arduino: fast external SPI Flash memory
And here we are to talk again about storage systems, we already explained SD management (you can take a look at SD management on “How to use SD card with esp8266 and Arduino“), now we’re going to take a look to an alternative storage like external SPI Flash, similar to the EEPROM but with biggest size. SD certainly remains the best choice for size and compatibility, but we pay for these features with a good quantity of energy; the SPI Flash has a smaller capacity but is small, fast, and has very low power consumption.
For devices like Arduino UNO, we can use use the SPI Flash with a basic and very light library, but you can manage a good quantity of memory (from 256Kb to 64Mb), and it’s enough for a lot of projects, It’s possible to use a complete filesystem, but I don’t recommend it with low-resource devices, we are going to see how to use a filesystem with devices like Arduino SAMD or esp devices.
Today we are going to see the SPI Flash memory (NOR Flash). They are a single chip that can be managed via SPI and have high-speed access and low power consumption.
Flash memory is an electronic non-volatile computer memory storage medium that can be electrically erased and reprogrammed. The two main types of flash memory, NOR flash and NAND flash, are named for the NOR and NAND logic gates. NAND flash and NOR flash use the same cell design, consisting of floating gate MOSFETs. They differ at the circuit level: in NAND flash, the relationship between the bit line and the word lines resembles a NAND gate; in NOR flash, it resembles a NOR gate; this depends on whether the state of the bit line or word lines is pulled high or low.
Wikipedia
Flash memory, a type of floating-gate memory, was invented at Toshiba in 1980 and is based on EEPROM technology. Toshiba began marketing flash memory in 1987. EPROMs had to be erased completely before they could be rewritten. NAND flash memory, however, may be erased, written, and read in blocks (or pages), which generally are much smaller than the entire device. NOR flash memory allows a single machine word to be written – to an erased location – or read independently. A flash memory device typically consists of one or more flash memory chips (each holding many flash memory cells), along with a separate flash memory controller chip.
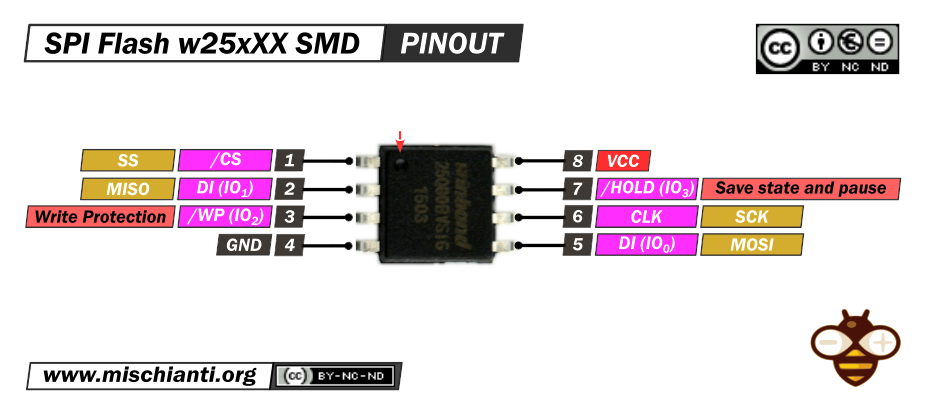
SPI Flash memories pinout
There are SMD, and Discrete IC managed by SPI protocol.
The pinout is equal for the majority of SPI Flash (Winbond, Fujitsu etc. etc.), and It’s also the same for SMD and discrete components.
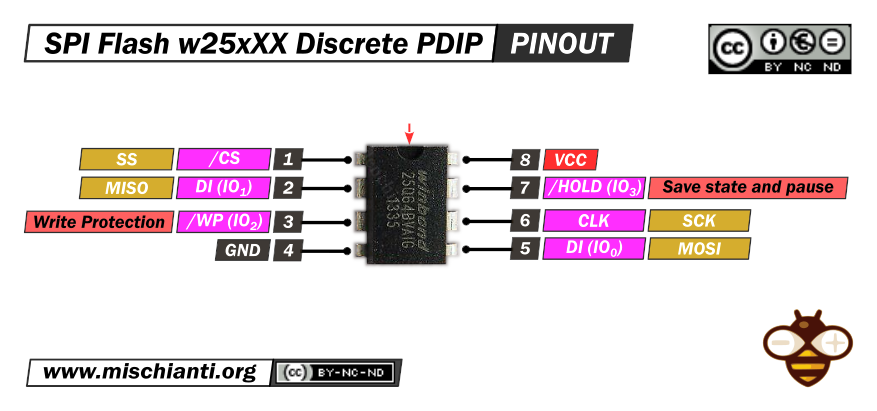
Here a set of SPI flash with different size w25q16 SMD 2Mb - w25q16 Discrete 2Mb - w25q32 SMD 4Mb - w25q32 Discrete 4Mb - w25q64 SMD 8Mb - w25q64 Discrete 8Mb - w25q128 SMD 16Mb - w25q128 Discrete 16Mb W25Q32 W25Q64 w25q128 module 4Mb 8Mb 16Mb
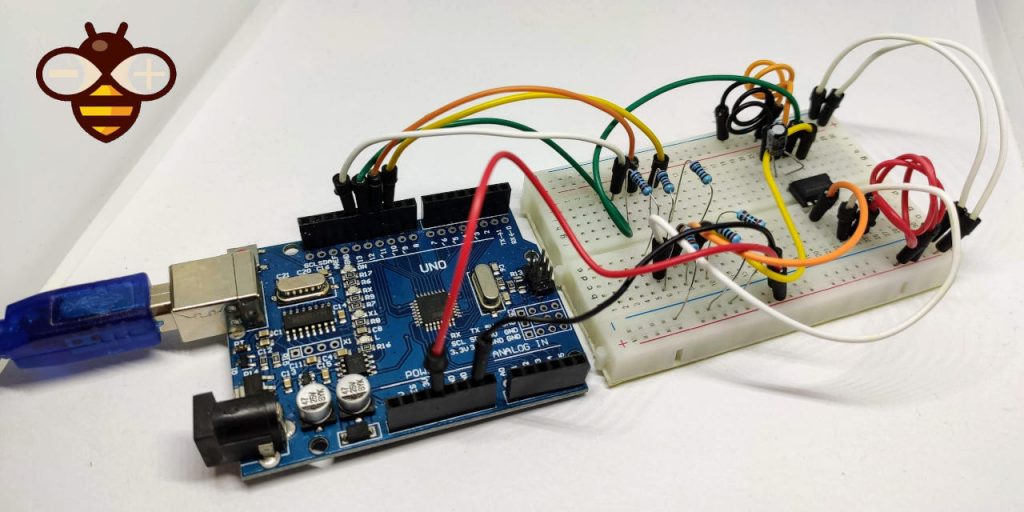
Arduino wiring diagram
The first problem with the connection is that Arduino UNO has 5v logic, but the SPI Flash has 3.3v logic, so the fastest way to connect (but not the best) is to use a voltage divider, refer to this article “Voltage divider: calculator and application“, another solution is to use a logic level converter, a simple device that converts logic from a voltage to another and vice versa.
Here the logic level converter Aliexpress
The connection schema becomes like so:
| Arduino | SPI Flash | |
|---|---|---|
| 10 | /CS | Pulled UP if not standard CS; Voltage divider. |
| 11 | DI (IO1) | Voltage divider |
| 12 | DI (IO0) | |
| 13 | CLK | Voltage divider |
| 3.3v | /WP | |
| 3.3v | /Hold | |
| GND | GND | |
| 3.3v | VCC |
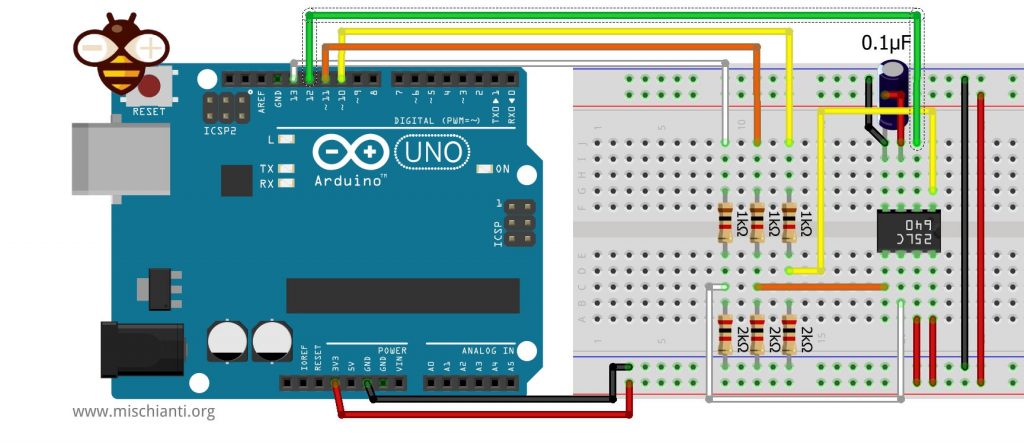
I add a 0.1μF capacitor and It’s work good, but the standard value in this situation is 0.01μF
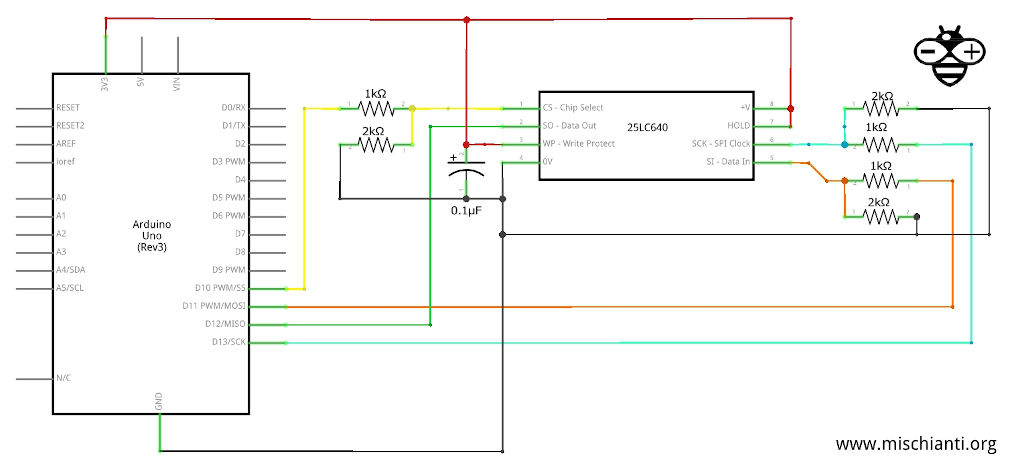
It works well, but if you want to use Dual SPI mode, you need to use MISO also to read data, and this connection isn’t bidirectional, so you need a bidirectional logic level converter.
Library
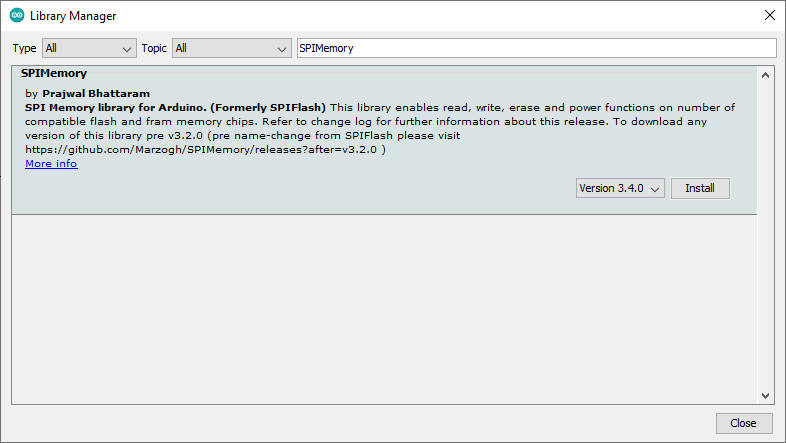
The library selected for these tests is the SPIMemory. It works well and with a low resources.
You can download It also directly in the Arduino IDE.
Troubleshooting
It is unlikely that your memory will not be recognized, but if this happens, it is probably an SPI channel configuration problem. The set of memory types that are supported It’s very wide:
  const uint8_t _capID[18]   =
  {0x10, 0x11, 0x12, 0x13, 0x14, 0x15, 0x16, 0x17, 0x18, 0x19, 0x41, 0x42, 0x43, 0x4B, 0x00, 0x01, 0x13, 0x37};

  const uint32_t _memSize[18]  =
  {KB(64), KB(128), KB(256), KB(512), MB(1), MB(2), MB(4), MB(8), MB(16), MB(32), MB(2), MB(4), MB(8), MB(8), KB(256), KB(512), MB(4), KB(512)};
  // To understand the _memSize definitions check defines.h

  const uint8_t _supportedManID[9] = {WINBOND_MANID, MICROCHIP_MANID, CYPRESS_MANID, ADESTO_MANID, MICRON_MANID, ON_MANID, GIGA_MANID, AMIC_MANID, MACRONIX_MANID};

  const uint8_t _altChipEraseReq[3] = {A25L512, M25P40, SST26};
And if you have some problem with your flash, probably It’s an SPI configuration problem.
For example, though you use a standard SPI channel and you are going to use the standard constructor of SPIMemory too like so:
SPIFlash flash;
it’s better if you specify the configuration like so, where SS is the CS selector and SPI It’s the SPI channel:
SPIFlash flash(SS, &SPI);
if you have already problems, try to configure the speed of SPI channel because all the libraries try to find the best performance for SPI using the CPU frequencies, but in some cases it may not work, so reduce the SPI clock with this command.
flash.setClock(12000000); // uncomment here for Arduino SAMD boards
Commands
The commands are very simple and can be used to manage a lot of situations. Naturally, the ram usage is very low, and if you pay attention can be simple to manage It on devices like Arduino UNO with very low memory.
  bool     sfdpPresent(void);
  uint8_t  error(bool verbosity = false);
  uint16_t getManID(void);
  uint32_t getJEDECID(void);
  uint64_t getUniqueID(void);
  uint32_t getAddress(uint16_t size);
  uint16_t sizeofStr(String &inputStr);
  uint32_t getCapacity(void);
  uint32_t getMaxPage(void);
  float    functionRunTime(void);
  //-------------------------------- Write / Read Bytes ---------------------------------//
  bool     writeByte(uint32_t _addr, uint8_t data, bool errorCheck = true);
  uint8_t  readByte(uint32_t _addr, bool fastRead = false);
  //----------------------------- Write / Read Byte Arrays ------------------------------//
  bool     writeByteArray(uint32_t _addr, uint8_t *data_buffer, size_t bufferSize, bool errorCheck = true);
  bool     readByteArray(uint32_t _addr, uint8_t *data_buffer, size_t bufferSize, bool fastRead = false);
  //-------------------------------- Write / Read Chars ---------------------------------//
  bool     writeChar(uint32_t _addr, int8_t data, bool errorCheck = true);
  int8_t   readChar(uint32_t _addr, bool fastRead = false);
  //------------------------------ Write / Read Char Arrays -----------------------------//
  bool     writeCharArray(uint32_t _addr, char *data_buffer, size_t bufferSize, bool errorCheck = true);
  bool     readCharArray(uint32_t _addr, char *data_buffer, size_t buffer_size, bool fastRead = false);
  //-------------------------------- Write / Read Shorts --------------------------------//
  bool     writeShort(uint32_t _addr, int16_t data, bool errorCheck = true);
  int16_t  readShort(uint32_t _addr, bool fastRead = false);
  //-------------------------------- Write / Read Words ---------------------------------//
  bool     writeWord(uint32_t _addr, uint16_t data, bool errorCheck = true);
  uint16_t readWord(uint32_t _addr, bool fastRead = false);
  //-------------------------------- Write / Read Longs ---------------------------------//
  bool     writeLong(uint32_t _addr, int32_t data, bool errorCheck = true);
  int32_t  readLong(uint32_t _addr, bool fastRead = false);
  //--------------------------- Write / Read Unsigned Longs -----------------------------//
  bool     writeULong(uint32_t _addr, uint32_t data, bool errorCheck = true);
  uint32_t readULong(uint32_t _addr, bool fastRead = false);
  //-------------------------------- Write / Read Floats --------------------------------//
  bool     writeFloat(uint32_t _addr, float data, bool errorCheck = true);
  float    readFloat(uint32_t _addr, bool fastRead = false);
  //-------------------------------- Write / Read Strings -------------------------------//
  bool     writeStr(uint32_t _addr, String &data, bool errorCheck = true);
  bool     readStr(uint32_t _addr, String &data, bool fastRead = false);
  //------------------------------- Write / Read Anything -------------------------------//

  template <class T> bool writeAnything(uint32_t _addr, const T& data, bool errorCheck = true);
  template <class T> bool readAnything(uint32_t _addr, T& data, bool fastRead = false);
  //-------------------------------- Erase functions ------------------------------------//
  bool     eraseSection(uint32_t _addr, uint32_t _sz);
  bool     eraseSector(uint32_t _addr);
  bool     eraseBlock32K(uint32_t _addr);
  bool     eraseBlock64K(uint32_t _addr);
  bool     eraseChip(void);
  //-------------------------------- Power functions ------------------------------------//
  bool     suspendProg(void);
  bool     resumeProg(void);
  bool     powerDown(void);
  bool     powerUp(void);
You must pay attention to these commands:
uint32_t getCapacity(void): get the capacity of the Chip, this library offers support for a lot of IC, and probably when you try It, find for you all specs, If not, you can pass the size of the device to the begin(capacity) command.
uint32_t getAddress(uint16_t size): with this command, you can get a free address that can store a uint16_t size of data.
write commands: there is a lot of command for various type of data, It’s quite intuitive, and in all, you must specify a start address that will be used as an initial point to write the data.
read command: as write commands, there are read commands that can be used to re-read the contiguous data.
template bool writeAnything(uint32_t _addr, const T& data, bool errorCheck = true): more interesting is the writeAnithing command that is used to store a complex structure, remember, the structure must be created with static size value, no data like String or similar.
template bool readAnything(uint32_t _addr, T& data, bool fastRead = false): when you write a structure, you must re-read It, and this command does It, for all read commands, you can set fastRead to true, but not all SPI Flash support It, check the datasheet.
erase commands: you can erase various sizes and portions of the chip, you can see the list of commands.
bool eraseChip(void): there is also a special erase command that format all the chip to the initial state.
bool suspendProg(void), bool resumeProg(void): you can suspend the erase commands, and you start to read immediately.
bool powerDown(void), bool powerUp(void): Puts device in low power state. Good when using battery power. In powerDown() the chip will only respond to powerUp().
Examples
The library offers a huge set of examples here, I’m going to show you basic usage.
Here is a simple example store the first string in the initial address 0, and I re-read It than I ask the method getAddress for the first available contiguous position where I can store another string, and I save It and re-read.
For Arduino MKR, you must set the constructor like so:
SPIFlash flash(SS, &SPI);
Get SPI Flash information
/*
 *  Manage external SPI Flash with Arduino
 *  Write and read a string,
 *  find first address available
 *  and write and read another string
 *
 *  with library SPIMemory
 *
 *  by Mischianti Renzo <https://mischianti.org>
 *
 *  https://mischianti.org/
 *
 *	SPIFlash connected via SPI standard
 *
 */

#include<SPIMemory.h>

//SPIFlash flash; // If you don't specify the library use standard SPI connection
SPIFlash flash;
void setup() {
  Serial.begin(115200);

  while (!Serial) ; // Wait for Serial monitor to open
  delay(100);

//  flash.setClock(12000000); // uncomment here for Arduino SAMD boards

  flash.begin(); // If SPIMemory isn't recognized you can specify the size of memory

//  flash.eraseChip();

  Serial.print(F("Flash size: "));
  Serial.print((long)(flash.getCapacity()/1000));
  Serial.println(F("Kb"));

  unsigned long strAddr = 0;
  unsigned long strAddrSecondString = 0;

  Serial.println();
  String inputString = "I'm going to write this string on IC";
  flash.writeStr(strAddr, inputString);
  Serial.print(F("Written string: "));
  Serial.println(inputString);
  Serial.print(F("To address: "));
  Serial.println(strAddr);
  String outputString = "";
  if (flash.readStr(strAddr, outputString)) {
    Serial.print(F("Read string: "));
    Serial.println(outputString);
    Serial.print(F("From address: "));
    Serial.println(strAddr);
  }

  Serial.println();
  String secondInputString = "I'm going to write this second string on IC";
  Serial.print(F("Check first free sector: "));
  strAddrSecondString = flash.getAddress(secondInputString.length());
  Serial.println(strAddrSecondString);
  Serial.println();

  flash.writeStr(strAddrSecondString, secondInputString);
  Serial.print(F("Written string: "));
  Serial.println(secondInputString);
  Serial.print(F("To address: "));
  Serial.println(strAddrSecondString);
  outputString = "";
  if (flash.readStr(strAddrSecondString, outputString)) {
    Serial.print(F("Read string: "));
    Serial.println(outputString);
    Serial.print(F("From address: "));
    Serial.println(strAddrSecondString);
  }

  while (!flash.eraseSector(strAddr));
  while (!flash.eraseSector(strAddrSecondString));

}

void loop() {

}
Here the serial result:
Flash size: 8388Kb

Written string: I'm going to write this string on IC
To address: 0
Read string: I'm going to write this string on IC
From address: 0

Check first free sector: 43

Written string: I'm going to write this second string on IC
To address: 43
Read string: I'm going to write this second string on IC
From address: 43
Save and read a JSON structure
Here is a more realistic example, instead of saving a text like a String, we are going to save a JSON structure like a String.
/*
 *  Manage external SPI Flash with Arduino
 *  Write and read a JSON structure like a String,
 *  find first address available
 *  and write and read another JSON structure
 *
 *  with library SPIMemory
 *
 *  by Mischianti Renzo <https://mischianti.org>
 *
 *  https://mischianti.org/
 *
 *	SPIFlash connected via SPI standard
 *
 */

#include <SPIMemory.h>
#include <ArduinoJson.h>

//SPIFlash flash; // If you don't specify the library use standard SPI connection
SPIFlash flash;
void setup() {
  Serial.begin(115200);

  while (!Serial) ; // Wait for Serial monitor to open
  delay(100);

  // flash.setClock(12000000); // uncomment here for Arduino SAMD boards

  flash.begin(); // If SPIMemory isn't recognized you can specify the size of memory

  // flash.eraseChip();

  Serial.print(F("Flash size: "));
  Serial.print((long)(flash.getCapacity()/1000));
  Serial.println(F("Kb"));

  unsigned long strAddr = 0;
  unsigned long strAddrSecondString = 0;

  Serial.println();

  // Allocate a temporary JsonDocument
  // Don't forget to change the capacity to match your requirements.
  // Use arduinojson.org/v6/assistant to compute the capacity.
  //  StaticJsonDocument<512> doc;
  // You can use DynamicJsonDocument as well
  Serial.println(F("Generate JSON file!"));
  DynamicJsonDocument doc(512);

  // Set the values in the document
  doc["energyLifetime"] = 21698620;
  doc["energyYearly"] = 1363005;

  Serial.print(F("Put data in a buffer.. "));
  // Serialize JSON to file
  String buf;
  if (serializeJson(doc, buf) == 0) {
	  Serial.println(F("failed to write buffer"));
  }

  if (flash.writeStr(strAddr, buf)){
	  Serial.print(F("OK, writed on address "));
	  Serial.println(strAddr);
  }else{
	  Serial.println(F("KO"));
  }

  String outputString = "";
  if (flash.readStr(strAddr, outputString)) {
    Serial.print(F("Read json: "));
    Serial.println(outputString);
    Serial.print(F("From address: "));
    Serial.println(strAddr);
  }


  Serial.println(F("Generate JSON file!"));
  DynamicJsonDocument doc2(512);

  // Set the values in the document
  doc2["energyLifetime"] = 222;
  doc2["energyYearly"] = 333;


  Serial.println();
  Serial.print(F("Check first free sector: "));
  strAddrSecondString = flash.getAddress(doc2.size());
  Serial.println(strAddrSecondString);
  Serial.println();

  Serial.print(F("Stream data in flash memory!"));

  Serial.print(F("Put data in a buffer.."));
  // Serialize JSON to file
  String buf2;
  if (serializeJson(doc2, buf2) == 0) {
	  Serial.println(F("failed to write buffer"));
  }
    // Print test file

  if (flash.writeStr(strAddrSecondString, buf2)){
	  Serial.print(F("OK, writed on address "));
	  Serial.println(strAddrSecondString);
  }else{
	  Serial.println(F("KO"));
  }

  String outputString2 = "";
  if (flash.readStr(strAddrSecondString, outputString2)) {
    Serial.print(F("Read data: "));
    Serial.println(outputString2);
    Serial.print(F("From address: "));
    Serial.println(strAddrSecondString);
  }

  while (!flash.eraseSector(strAddr));
  while (!flash.eraseSector(strAddrSecondString));

}

void loop() {

}
Here is the console result.
Flash size: 8388Kb

Generate JSON file!
Put data in a buffer.. OK, writed on address 0
Read json: {"energyLifetime":21698620,"energyYearly":1363005}
From address: 0
Generate JSON file!

Check first free sector: 56

Stream data in flash memory!Put data in a buffer..OK, writed on address 56
Read data: {"energyLifetime":222,"energyYearly":333}
From address: 56
Save and read structure
Naturally, you can use a JSON structure to save complex data, but if you want to get the best performance and better space usage you must use a structure like so.
/*
 *  Manage external SPI Flash with Arduino
 *  Write and read a structure
 *
 *  with library SPIMemory
 *
 *  by Mischianti Renzo <https://mischianti.org>
 *
 *  https://mischianti.org/
 *
 *	SPIFlash connected via SPI standard
 *
 */

#include<SPIMemory.h>

// I'm going to use the structure use in standard example
struct ConfigurationIn {
  float lux = 3.24;
  float vOut = 4.45;                    // Voltage ouput from potential divider to Analog input
  float RLDR = 1.234;                   // Resistance calculation of potential divider with LDR
  bool light = true;
  uint8_t adc = 45;
  uint8_t arr[8] = {0, 1, 2, 3, 4, 5, 6, 7};
  struct MISC {
    byte tempHigh = 30;
    byte tempLow = 20;
    bool parkingMode = false;
    bool allowDataToBeSent = false;
  } misc;
  struct NETWORK {
    char ssid[5] = "ssid";
    char pwd[4] = "pwd";
    char userid[7] = "userid";
  } network;
  struct CHARGING_INFO {
    byte interval = 5;
    byte highChargingDefault = 80;
  } charging;
};
ConfigurationIn configurationIn;

struct ConfigurationOut {
  float lux;
  float vOut;                   // Voltage ouput from potential divider to Analog input
  float RLDR;                   // Resistance calculation of potential divider with LDR
  bool light;
  uint8_t adc;
  uint8_t arr[8];
  struct MISC {
    byte tempHigh;
    byte tempLow;
    bool parkingMode;
    bool allowDataToBeSent;
  } misc;
  struct NETWORK {
    char ssid[5];
    char pwd[4];
    char userid[7];
  } network;
  struct CHARGING_INFO {
    byte interval;
    byte highChargingDefault;
  } charging;
};
ConfigurationOut configurationOut;


//SPIFlash flash; // If you don't specify the library use standard SPI connection
SPIFlash flash;
void setup() {
  Serial.begin(115200);

  while (!Serial) ; // Wait for Serial monitor to open
  delay(100);

  // flash.setClock(12000000); // uncomment here for Arduino SAMD boards

  flash.begin(); // If SPIMemory isn't recognized you can specify the size of memory

//  flash.eraseChip();

  Serial.print(F("Flash size: "));
  Serial.print((long)(flash.getCapacity()/1000));
  Serial.println(F("Kb"));

  unsigned long strAddr = 0;

  Serial.println();
  Serial.print(F("Start writing structure "));
  if (flash.writeAnything(strAddr, configurationIn, true)){
	  Serial.println("OK");
  }else{
	  Serial.println("KO");
  }
  Serial.println();

  if (flash.readAnything(strAddr, configurationOut)) {
	  Serial.print(F("Read lux on configuration loaded from Flash: "));
	  Serial.println(configurationOut.lux);
  }else{
	  Serial.println(F("Read not work!"));
  }

  Serial.println();

  while (!flash.eraseSector(strAddr));
}

void loop() {

}
Here is the serial result (with diagnostic active).
Chip Diagnostics initiated.

No Chip size defined by user. Checking library support.
Chip identified. This chip is fully supported by the library.
Flash size: 8388Kb

Start writing structure OK

Read lux on configuration loaded from Flash: 3.24
The fat filesystem on SPI Flash
It’s possible to use a Fat filesystem also, but I discourage this approach because the resource of Arduino UNO and Mega are too low for use those resources, but If you want try, you can read the article about SPI Flash for Arduino SAMD or esp8266 and esp32.
Thanks
- Arduino: fast external SPI Flash memory
- Arduino MKR SAMD: FAT filesystem on external SPI flash memory
- esp32 and esp8266: FAT filesystem on external SPI flash memory
- STM32: SPI flash memory FAT FS


Hello, Is it possible to stotre A text image into a winbond chip?
Hi Joseph,
You can store an image as byte array without problem.
Bye Renzo
gostaria de saber se e possivel armazenar uma imagem em bmp, para exibir num lcd tft
Hi Felipe,
sure, you can save a byte array on the Flash.
Bye Renzo
Can you share the schematic of this project.
Ahhh! sorry there was a not closed tag in the article, I fixed It.
Thank for the alert Renzo
Thanks Renzo! This looks very complete library.
I want to store strings to Flash, each string is a set of measurements.
If I want to read back lets say last 100 strings, how do I find the memory location where I start reading?
Do I have to store strings with “string number” like **1, **2, **3, **4 and so on, and the search the flash byte by byte to find the “string number”?
Cheers,
Ari
Hi Ari,
to do something similar, you must store the address in a fixed point of Flash or (if you know the max length) assign a fixed position to all String. list and store It.
Bye Renzo
Of course….that’t the simple way.
Thanks, Ari