
ESP32-CAM: control CameraWebServer from your own web page – 3
I’m going to write this article because I started using this device as an “external IP cam” for my web project, and I’d like to share my experiences. To control an external (from domain origin) URL, you probably must enable the CORS, and you can find more detail in the article “How to create a REST server on esp8266 or esp32: CORS request, OPTION and GET“.
You can find ESP32-CAM on ESP32 Dev Kit v1 - TTGO T-Display 1.14 ESP32 - NodeMCU V3 V2 ESP8266 Lolin32 - NodeMCU ESP-32S - WeMos Lolin32 - WeMos Lolin32 mini - ESP32-CAM programmer - ESP32-CAM bundle - ESP32-WROOM-32 - ESP32-S
You can find ESP32-CAM programmer or bundle on AliExpress ESP32-CAM programmer - AliExpress ESP32-CAM bundle
CameraWebServer structure
You probably already read the article “ESP32-CAM: upgrade CameraWebServer with flash feature” but I’d like to insert the steps to retrieve the primary example again.
Retrieve the sketch for editing
The sketch uses the 1.0.6 framework, not the 2.x.x where changes have been made.
First, download the CameraWebServer from here or by opening the example in Arduino or directly from your esp32 core installation with these steps:
Retrieve the preferences path from your Arduino IDEFile --> Preferences
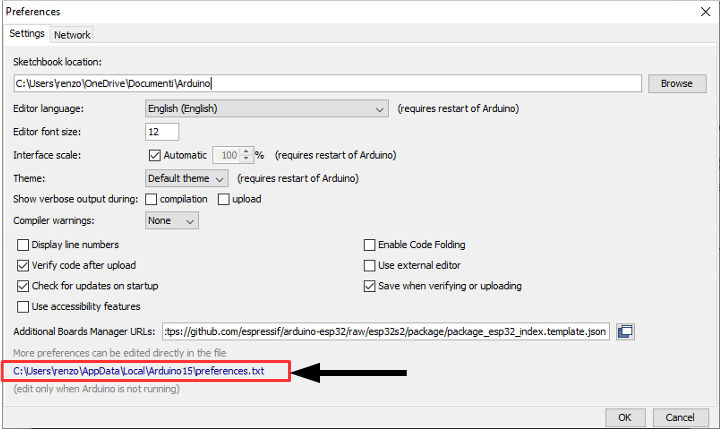
from here, go to
<arduino-preferences-path>\packages\esp32\hardware\esp32\1.0.6\libraries\ESP32\examples\Camera\CameraWebServer
You can find in that folder four file
CameraWebServer.ino: the main sketch;app_httpd.cpp: practically is the back end of the application;camera_pins.h: contains the pins schema for all variants;camera_index.h: contains the web page in base64 gzipped version.
Web/REST server
All the Web/REST Server logic is in the file app_httpd.cpp, but use a native esp32 library (similar to the ESP-IDF one) with basic command, but not so difficult.
You can find the entry point in this function
void startCameraServer(){
    httpd_config_t config = HTTPD_DEFAULT_CONFIG();

    httpd_uri_t index_uri = {
        .uri       = "/",
        .method    = HTTP_GET,
        .handler   = index_handler,
        .user_ctx  = NULL
    };

    httpd_uri_t status_uri = {
        .uri       = "/status",
        .method    = HTTP_GET,
        .handler   = status_handler,
        .user_ctx  = NULL
    };

    httpd_uri_t cmd_uri = {
        .uri       = "/control",
        .method    = HTTP_GET,
        .handler   = cmd_handler,
        .user_ctx  = NULL
    };

    httpd_uri_t capture_uri = {
        .uri       = "/capture",
        .method    = HTTP_GET,
        .handler   = capture_handler,
        .user_ctx  = NULL
    };

   httpd_uri_t stream_uri = {
        .uri       = "/stream",
        .method    = HTTP_GET,
        .handler   = stream_handler,
        .user_ctx  = NULL
    };


    ra_filter_init(&ra_filter, 20);

    mtmn_config.type = FAST;
    mtmn_config.min_face = 80;
    mtmn_config.pyramid = 0.707;
    mtmn_config.pyramid_times = 4;
    mtmn_config.p_threshold.score = 0.6;
    mtmn_config.p_threshold.nms = 0.7;
    mtmn_config.p_threshold.candidate_number = 20;
    mtmn_config.r_threshold.score = 0.7;
    mtmn_config.r_threshold.nms = 0.7;
    mtmn_config.r_threshold.candidate_number = 10;
    mtmn_config.o_threshold.score = 0.7;
    mtmn_config.o_threshold.nms = 0.7;
    mtmn_config.o_threshold.candidate_number = 1;

    face_id_init(&id_list, FACE_ID_SAVE_NUMBER, ENROLL_CONFIRM_TIMES);

    Serial.printf("Starting web server on port: '%d'\n", config.server_port);
    if (httpd_start(&camera_httpd, &config) == ESP_OK) {
        httpd_register_uri_handler(camera_httpd, &index_uri);
        httpd_register_uri_handler(camera_httpd, &cmd_uri);
        httpd_register_uri_handler(camera_httpd, &status_uri);
        httpd_register_uri_handler(camera_httpd, &capture_uri);
    }

    config.server_port += 1;
    config.ctrl_port += 1;
    Serial.printf("Starting stream server on port: '%d'\n", config.server_port);
    if (httpd_start(&stream_httpd, &config) == ESP_OK) {
        httpd_register_uri_handler(stream_httpd, &stream_uri);
    }
}
But we put our attention to /status and /control the endpoint that helps us to change the parameter from the remote request.
This end-point is in GET so that you can test it directly from a web browser, and you need the domain of the request.
Status end-point
First, we are going to call the /status endpoint. My esp32-cam has this IP 192.168.1.41, so the request becomes:
http://192.168.1.41/status
and the result is
{
  "framesize": 5,
  "quality": 10,
  "brightness": 0,
  "contrast": 0,
  "saturation": 0,
  "sharpness": 0,
  "special_effect": 0,
  "wb_mode": 0,
  "awb": 1,
  "awb_gain": 1,
  "aec": 1,
  "aec2": 0,
  "ae_level": 0,
  "aec_value": 168,
  "agc": 1,
  "agc_gain": 0,
  "gainceiling": 0,
  "bpc": 0,
  "wpc": 1,
  "raw_gma": 1,
  "lenc": 1,
  "vflip": 0,
  "hmirror": 0,
  "dcw": 1,
  "colorbar": 0,
  "face_detect": 0,
  "face_enroll": 0,
  "face_recognize": 0,
  "flash": 0
}
The domain of most part of the properties is 0-1 (false – true), but some are more complex
- quality: 0 – 63
- brightness: -2 – 2
- contrast: -2 – 2
- saturation: -2 – 2
- sharpness: -2 – 2
- special_effect: 0 – 6
- wb_mode: 0 – 4
- ae_level: -2 – 2
- aec_value: 0 – 1200
- agc_gain: 0 – 30
- gainceiling: 0 – 6
- framesize: 0 – 10
Control and stream endpoint
We can use the /control end-point to change some of these values.
It takes two variables in the query string:
var: the element to changeval: the value to assign
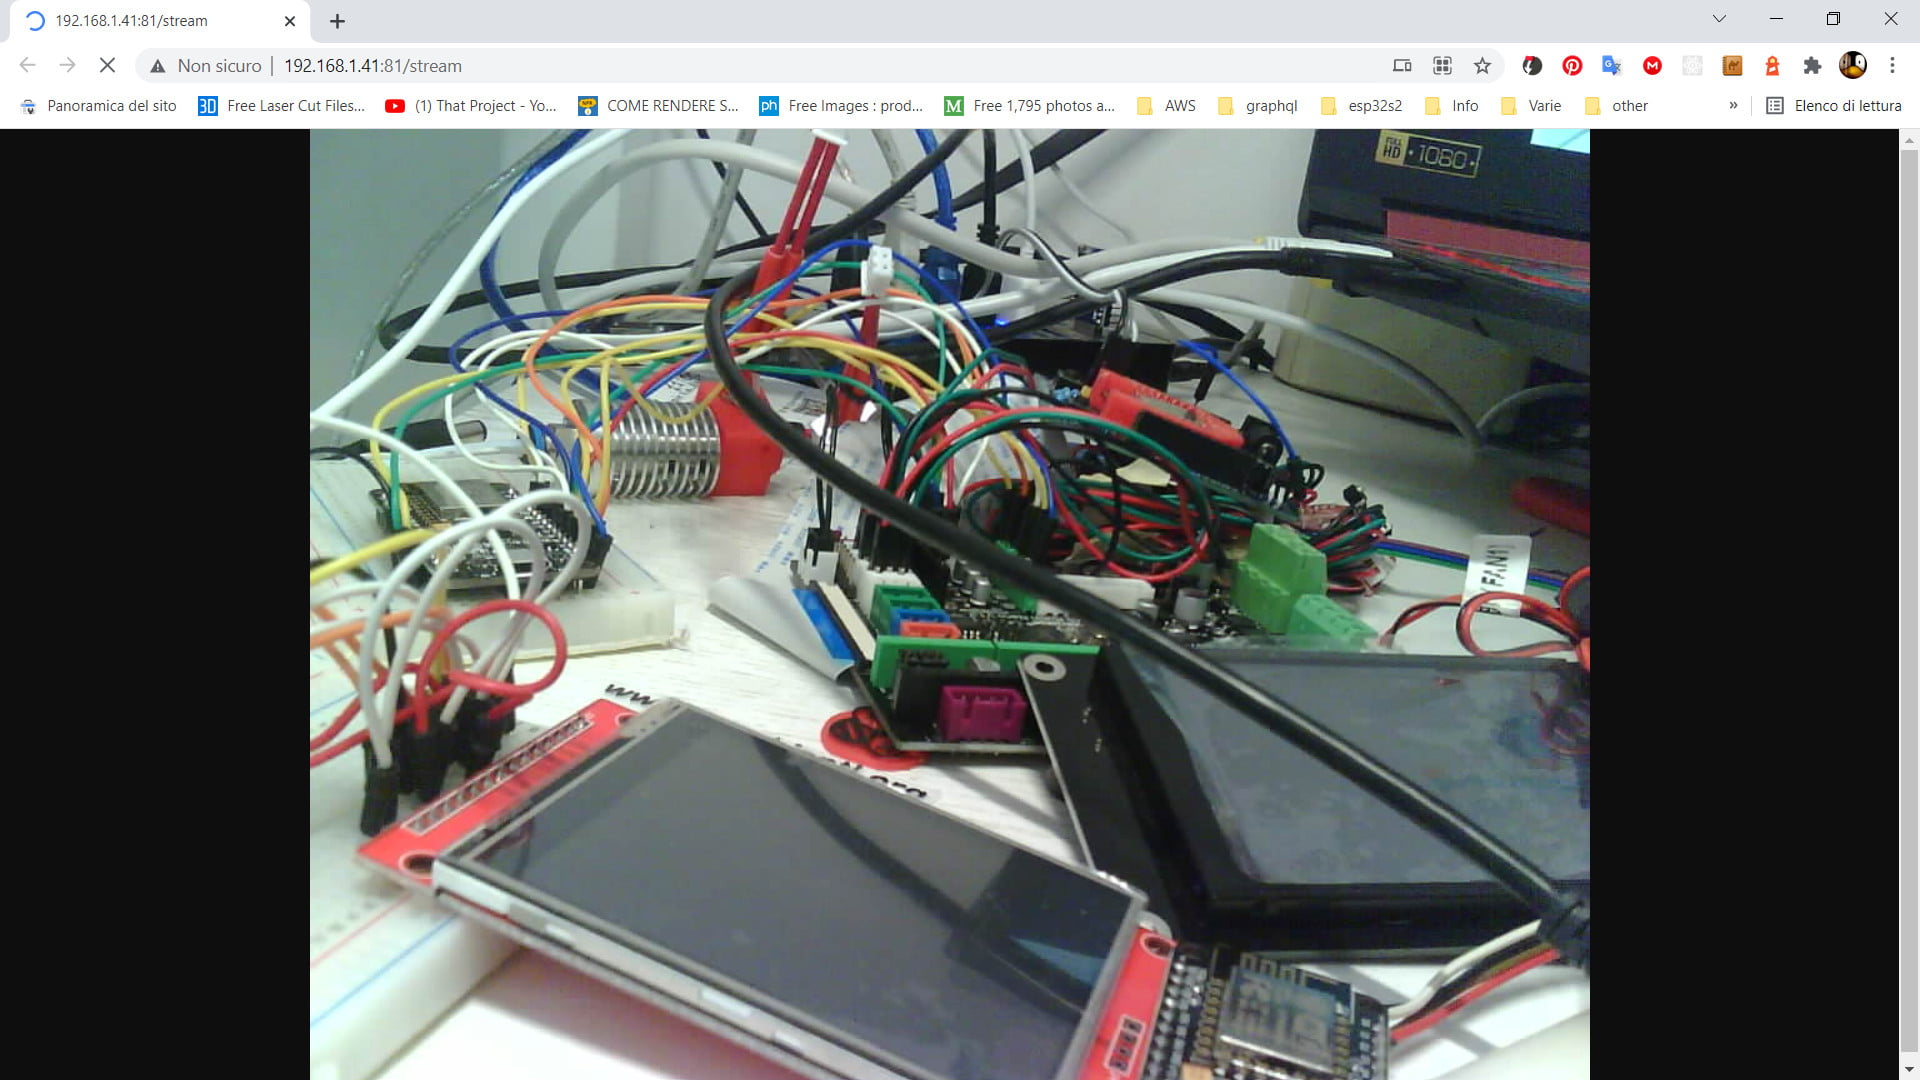
Now start the stream and close all pages to your esp32-cam, and open a new one with only the stream; in my case the URL is:
http://192.168.1.41:81/stream
you get a page like this:
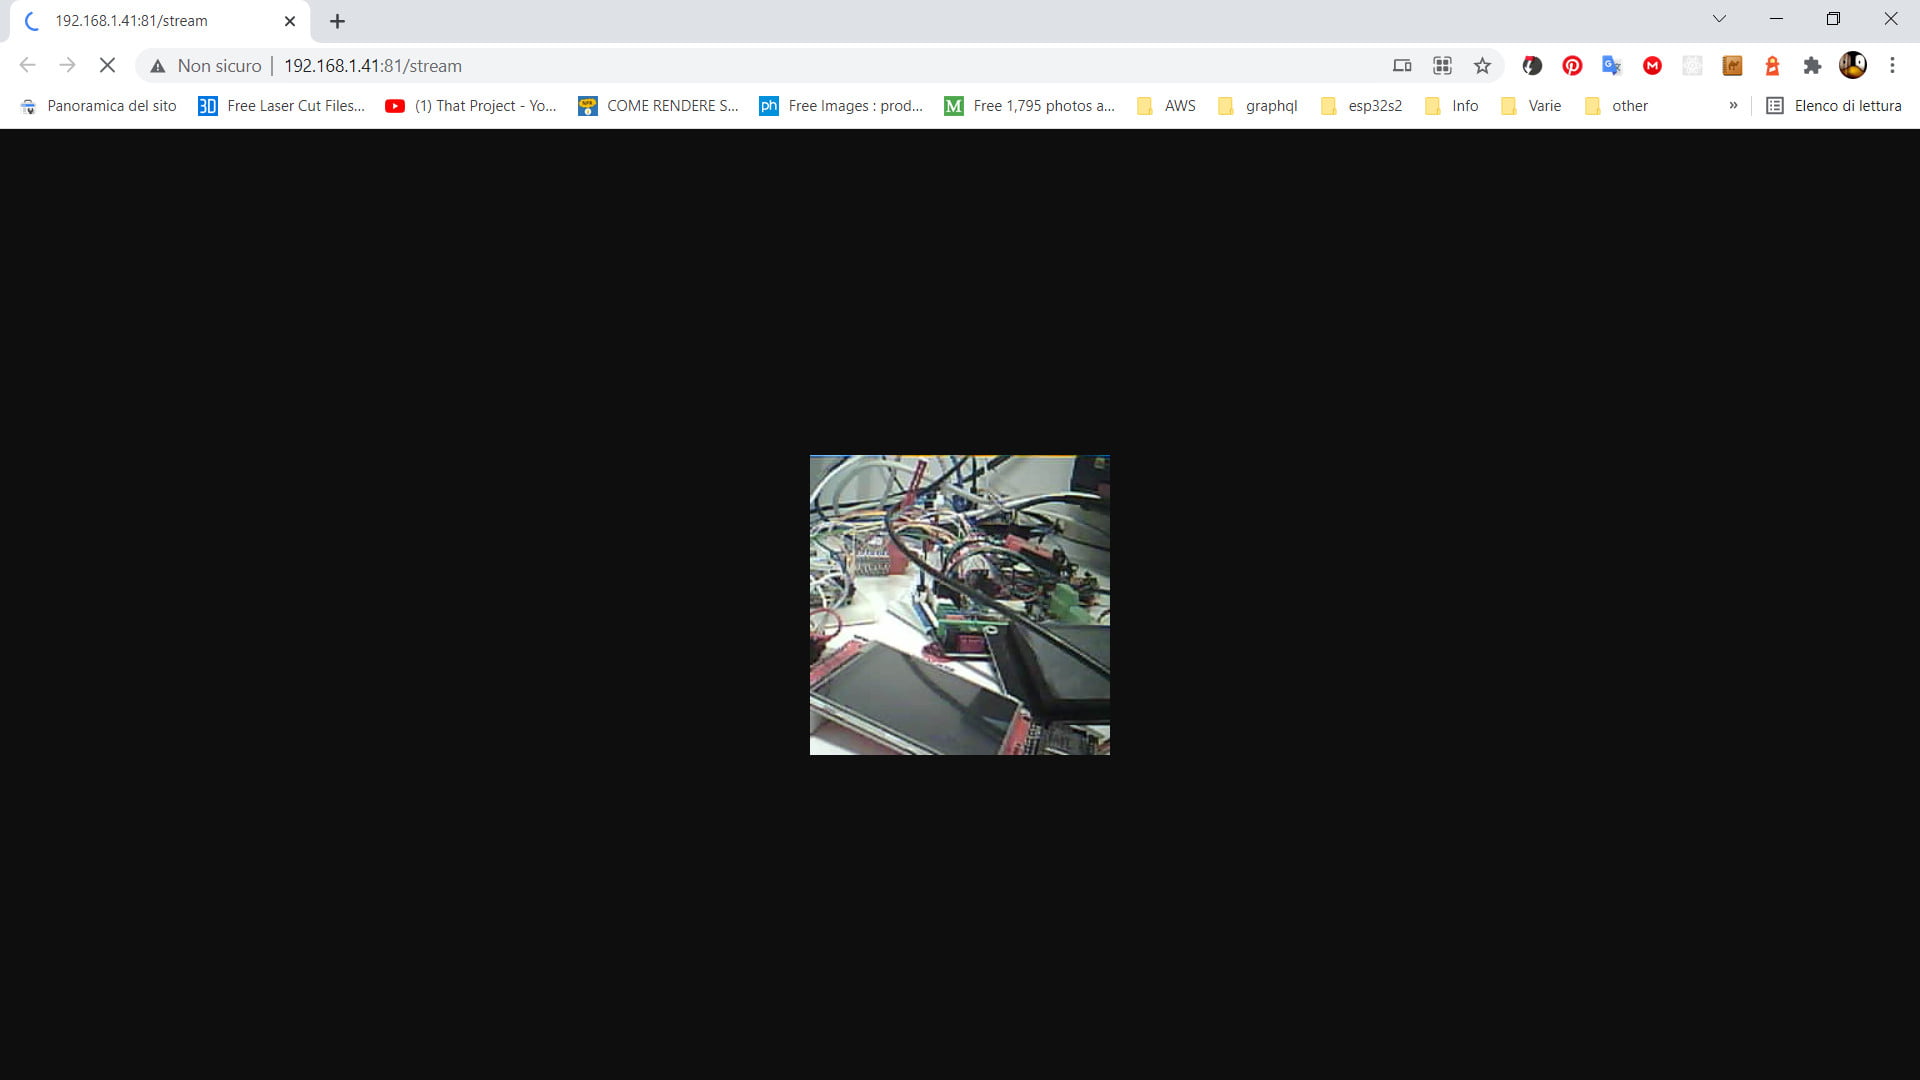
Now, if you open another tab or another browser page and paste this URL:
http://192.168.1.41/control?var=framesize&val=10
The result on the stream page is:
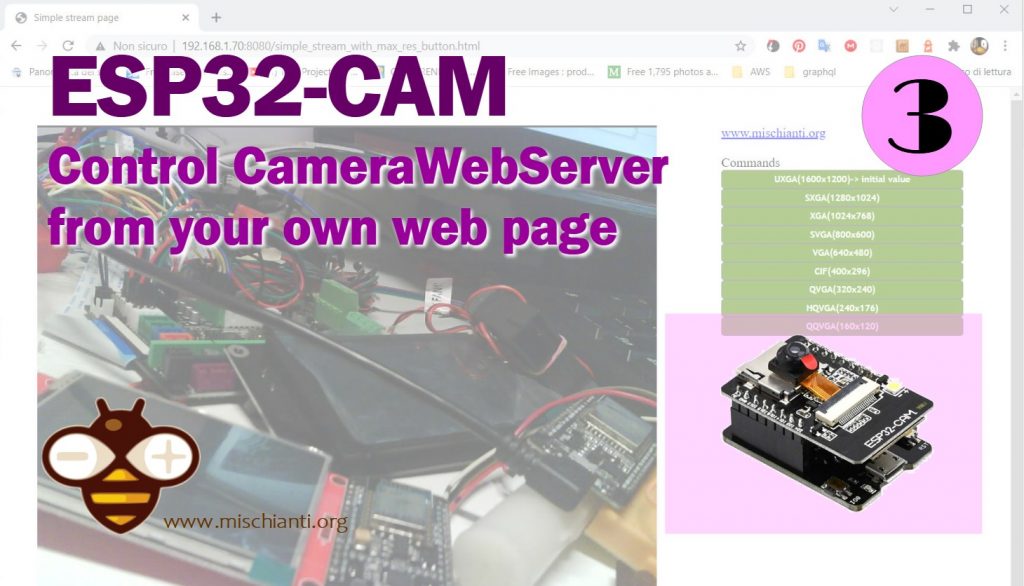
Create a simple HTML page showing the video stream
Now we are going to create a simple HTML page that streams the esp32-cam content.
<!DOCTYPE html><!-- Simple stream and control page for esp32-cam Renzo Mischianti <www.mischianti.org> -->
<html lang="en">
<head>
    <meta charset="UTF-8">
    <title>Simple stream page</title>
</head>
<style>
    .main-container {
        display: flex;
        flex-wrap: wrap
    }
    .main-container .video-block {
        padding: 40px;
        width: 100%;
        max-width: 768px;
        min-width: 300px
    }
    .main-container .cmd-block {
        padding: 40px;
        min-width: 300px
    }
</style>
<body>

<div class="main-container">
    <div class="video-block">
        <img alt="Video stream"
             src='http://192.168.1.41:81/stream' style="object-fit: contain; height: 100%; width: 100%; background-color: #353535"/>
    </div>
    <div class="cmd-block">
        <a href="mischianti.org">www.mischianti.org</a>
        <br>
        Commands
    </div>
</div>
</body>
</html>
And here is the result.
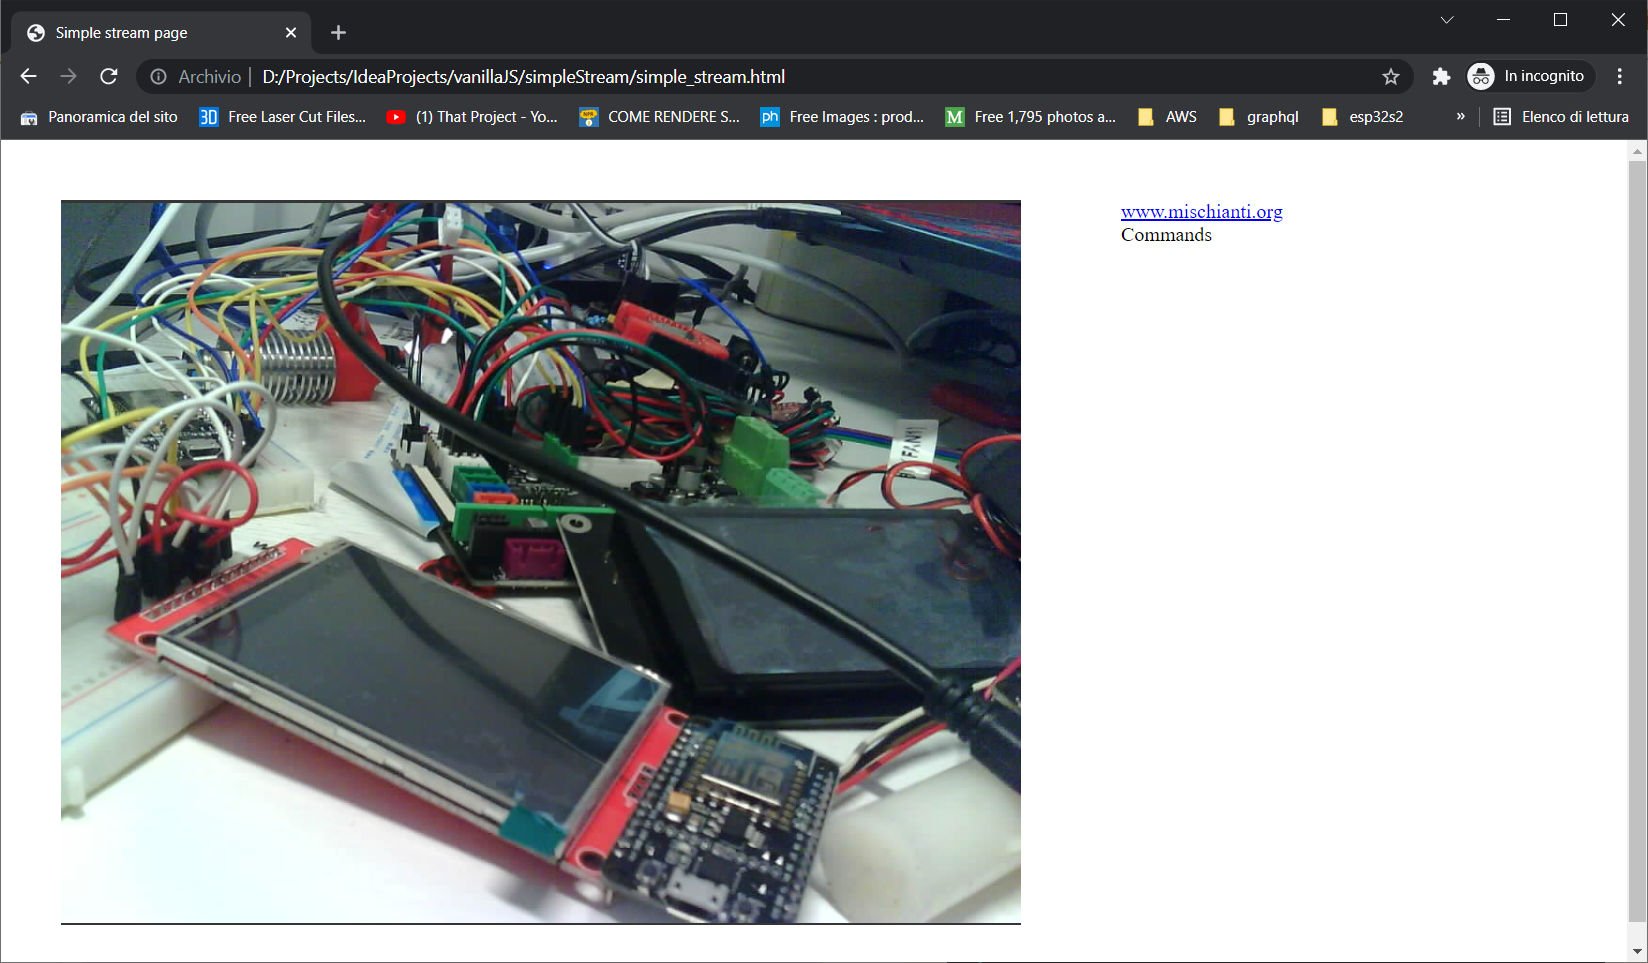
You can check that to show a simple stream; you can use a simple IMG tag and nothing more.
<img alt="Video stream"
             src='http://192.168.1.41:81/stream' style="object-fit: contain; height: 100%; width: 100%; background-color: #353535"/>
We want to add some buttons to manage resolution with a simple JS call.
<!DOCTYPE html><!-- Simple stream and control page for esp32-cam Renzo Mischianti <www.mischianti.org> -->
<html lang="en">
<head>
    <meta charset="UTF-8">
    <title>Simple stream page</title>
</head>
<style>
    .main-container {
        display: flex;
        flex-wrap: wrap
    }
    .main-container .video-block {
        padding: 40px;
        width: 100%;
        max-width: 768px;
        min-width: 300px
    }
    .main-container .cmd-block {
        padding: 40px;
        min-width: 300px
    }

    .btn {
        border: 1px solid #777;
        background: #6e9e2d;
        color: #fff;
        font: bold 11px 'Trebuchet MS';
        padding: 4px;
        cursor: pointer;
        -moz-border-radius: 4px;
        -webkit-border-radius: 4px;
    }
</style>
<body>
<script type="application/javascript">
    var cameraIP = '192.168.1.41';
    function changeFramesize(framesize) {
        var oReq = new XMLHttpRequest();
        oReq.onreadystatechange = function()
        {
                console.log(oReq.responseText);
        }
        oReq.onerror = function (err){
            alert(err);
        }
        oReq.open("GET", "http://" + cameraIP + "/control?var=framesize&val="+framesize+"");
        oReq.send();
    }
</script>
<div class="main-container">
    <div class="video-block">
        <img alt="Video stream"
             src='http://192.168.1.41:81/stream' style="object-fit: contain; height: 100%; width: 100%; background-color: #353535"/>
    </div>
    <div class="cmd-block">
        <a href="mischianti.org">www.mischianti.org</a>
        <br>
        <br>
        Commands
        <br>
        <div style="display: grid">
        <button id="fs10" class="btn" onclick="changeFramesize(10);">UXGA(1600x1200)</button>
        <button id="fs9" class="btn" onclick="changeFramesize(9);">SXGA(1280x1024)</button>
        <button id="fs8" class="btn" onclick="changeFramesize(8);">XGA(1024x768)</button>
        <button id="fs7" class="btn" onclick="changeFramesize(7);">SVGA(800x600)</button>
        <button id="fs6" class="btn" onclick="changeFramesize(6);">VGA(640x480)</button>
        <button id="fs5" class="btn" onclick="changeFramesize(5);">CIF(400x296)</button>
        <button id="fs4" class="btn" onclick="changeFramesize(4);">QVGA(320x240)</button>
        <button id="fs3" class="btn" onclick="changeFramesize(3);">HQVGA(240x176)</button>
        <button id="fs0" class="btn" onclick="changeFramesize(0);">QQVGA(160x120)</button>
        </div>
    </div>
</div>
</body>
</html>
The function is elementary.
    var cameraIP = '192.168.1.41';
    function changeFramesize(framesize) {
        var oReq = new XMLHttpRequest();
        oReq.onreadystatechange = function()
        {
                console.log(oReq.responseText);
        }
        oReq.onerror = function (err){
            alert(err);
        }
        oReq.open("GET", "http://" + cameraIP + "/control?var=framesize&val="+framesize+"");
        oReq.send();
    }
It’s an XHR request in GET versus the camera, but It’s bizarre that CORS does not block this call; if we are going to check the code, we can find the header that allows the origin.
static esp_err_t cmd_handler(httpd_req_t *req){
    char*  buf;
    size_t buf_len;
    char variable[32] = {0,};
    char value[32] = {0,};

    buf_len = httpd_req_get_url_query_len(req) + 1;
    if (buf_len > 1) {
        buf = (char*)malloc(buf_len);
        if(!buf){
            httpd_resp_send_500(req);
            return ESP_FAIL;
        }
        if (httpd_req_get_url_query_str(req, buf, buf_len) == ESP_OK) {
            if (httpd_query_key_value(buf, "var", variable, sizeof(variable)) == ESP_OK &&
                httpd_query_key_value(buf, "val", value, sizeof(value)) == ESP_OK) {
            } else {
                free(buf);
                httpd_resp_send_404(req);
                return ESP_FAIL;
            }
        } else {
            free(buf);
            httpd_resp_send_404(req);
            return ESP_FAIL;
        }
        free(buf);
    } else {
        httpd_resp_send_404(req);
        return ESP_FAIL;
    }

    int val = atoi(value);
    sensor_t * s = esp_camera_sensor_get();
    int res = 0;

    if(!strcmp(variable, "framesize")) {
        if(s->pixformat == PIXFORMAT_JPEG) res = s->set_framesize(s, (framesize_t)val);
    }
    else if(!strcmp(variable, "quality")) res = s->set_quality(s, val);
    else if(!strcmp(variable, "contrast")) res = s->set_contrast(s, val);
    else if(!strcmp(variable, "brightness")) res = s->set_brightness(s, val);
    else if(!strcmp(variable, "saturation")) res = s->set_saturation(s, val);
    else if(!strcmp(variable, "gainceiling")) res = s->set_gainceiling(s, (gainceiling_t)val);
    else if(!strcmp(variable, "colorbar")) res = s->set_colorbar(s, val);
    else if(!strcmp(variable, "awb")) res = s->set_whitebal(s, val);
    else if(!strcmp(variable, "agc")) res = s->set_gain_ctrl(s, val);
    else if(!strcmp(variable, "aec")) res = s->set_exposure_ctrl(s, val);
    else if(!strcmp(variable, "hmirror")) res = s->set_hmirror(s, val);
    else if(!strcmp(variable, "vflip")) res = s->set_vflip(s, val);
    else if(!strcmp(variable, "awb_gain")) res = s->set_awb_gain(s, val);
    else if(!strcmp(variable, "agc_gain")) res = s->set_agc_gain(s, val);
    else if(!strcmp(variable, "aec_value")) res = s->set_aec_value(s, val);
    else if(!strcmp(variable, "aec2")) res = s->set_aec2(s, val);
    else if(!strcmp(variable, "dcw")) res = s->set_dcw(s, val);
    else if(!strcmp(variable, "bpc")) res = s->set_bpc(s, val);
    else if(!strcmp(variable, "wpc")) res = s->set_wpc(s, val);
    else if(!strcmp(variable, "raw_gma")) res = s->set_raw_gma(s, val);
    else if(!strcmp(variable, "lenc")) res = s->set_lenc(s, val);
    else if(!strcmp(variable, "special_effect")) res = s->set_special_effect(s, val);
    else if(!strcmp(variable, "wb_mode")) res = s->set_wb_mode(s, val);
    else if(!strcmp(variable, "ae_level")) res = s->set_ae_level(s, val);
    else if(!strcmp(variable, "face_detect")) {
        detection_enabled = val;
        if(!detection_enabled) {
            recognition_enabled = 0;
        }
    }
    else if(!strcmp(variable, "face_enroll")) is_enrolling = val;
    else if(!strcmp(variable, "face_recognize")) {
        recognition_enabled = val;
        if(recognition_enabled){
            detection_enabled = val;
        }
    }
    else {
        res = -1;
    }

    if(res){
        return httpd_resp_send_500(req);
    }

    httpd_resp_set_hdr(req, "Access-Control-Allow-Origin", "*");
    return httpd_resp_send(req, NULL, 0);
}
In detail, the line
httpd_resp_set_hdr(req, "Access-Control-Allow-Origin", "*");
This header is sufficient because this is a simple GET request, for a POST is more complex, and we must add OPTION.
We will add a call to the /status end-point and add a string to the correct frame size at the page open.
<!DOCTYPE html><!-- Simple stream and control page for esp32-cam Renzo Mischianti <www.mischianti.org> -->
<html lang="en">
<head>
    <meta charset="UTF-8">
    <title>Simple stream page</title>
</head>
<style>
    .main-container {
        display: flex;
        flex-wrap: wrap
    }
    .main-container .video-block {
        padding: 40px;
        width: 100%;
        max-width: 768px;
        min-width: 300px
    }
    .main-container .cmd-block {
        padding: 40px;
        min-width: 300px
    }

    .btn {
        border: 1px solid #777;
        background: #6e9e2d;
        color: #fff;
        font: bold 11px 'Trebuchet MS';
        padding: 4px;
        cursor: pointer;
        -moz-border-radius: 4px;
        -webkit-border-radius: 4px;
    }
</style>
<body>
<script type="application/javascript">
    var cameraIP = '192.168.1.41';
    function changeFramesize(framesize) {
        var oReq = new XMLHttpRequest();
        oReq.onreadystatechange = function()
        {
                console.log(oReq.responseText);
        }
        oReq.onerror = function (err){
            alert(err);
        }
        oReq.open("GET", "http://" + cameraIP + "/control?var=framesize&val="+framesize+"");
        oReq.send();
    }
</script>
<div class="main-container">
    <div class="video-block">
        <img alt="Video stream"
             src='http://192.168.1.41:81/stream' style="object-fit: contain; height: 100%; width: 100%; background-color: #353535"/>
    </div>
    <div class="cmd-block">
        <a href="mischianti.org">www.mischianti.org</a>
        <br>
        <br>
        Commands
        <br>
        <div style="display: grid">
        <button id="fs10" class="btn" onclick="changeFramesize(10);">UXGA(1600x1200)</button>
        <button id="fs9" class="btn" onclick="changeFramesize(9);">SXGA(1280x1024)</button>
        <button id="fs8" class="btn" onclick="changeFramesize(8);">XGA(1024x768)</button>
        <button id="fs7" class="btn" onclick="changeFramesize(7);">SVGA(800x600)</button>
        <button id="fs6" class="btn" onclick="changeFramesize(6);">VGA(640x480)</button>
        <button id="fs5" class="btn" onclick="changeFramesize(5);">CIF(400x296)</button>
        <button id="fs4" class="btn" onclick="changeFramesize(4);">QVGA(320x240)</button>
        <button id="fs3" class="btn" onclick="changeFramesize(3);">HQVGA(240x176)</button>
        <button id="fs0" class="btn" onclick="changeFramesize(0);">QQVGA(160x120)</button>
        </div>
    </div>
</div>
<script type="application/javascript">
    var oReq = new XMLHttpRequest();
    oReq.onloadend = function()
    {
        console.log(oReq.responseText);
        debugger
        if (oReq.response) {
            var fsB = document.getElementById("fs" + JSON.parse(oReq.response).framesize);
            if (fsB) {
                fsB.innerText = fsB.innerText + "-> initial value";
            }
        }
    }
    oReq.onerror = function (err){
        alert(err);
    }
    oReq.open("GET", "http://" + cameraIP + "/status");
    oReq.send();

</script>
</body>
</html>
The code to do that It’s simple too.
    var oReq = new XMLHttpRequest();
    oReq.onloadend = function()
    {
        console.log(oReq.responseText);
        debugger
        if (oReq.response) {
            var fsB = document.getElementById("fs" + JSON.parse(oReq.response).framesize);
            if (fsB) {
                fsB.innerText = fsB.innerText + "-> initial value";
            }
        }
    }
    oReq.onerror = function (err){
        alert(err);
    }
    oReq.open("GET", "http://" + cameraIP + "/status");
    oReq.send();
The result in this screenshot:

Similarly, the status end-point also has the header to bypass CORS.
static esp_err_t status_handler(httpd_req_t *req){
    static char json_response[1024];

    sensor_t * s = esp_camera_sensor_get();
    char * p = json_response;
    *p++ = '{';

    p+=sprintf(p, "\"framesize\":%u,", s->status.framesize);
    p+=sprintf(p, "\"quality\":%u,", s->status.quality);
    p+=sprintf(p, "\"brightness\":%d,", s->status.brightness);
    p+=sprintf(p, "\"contrast\":%d,", s->status.contrast);
    p+=sprintf(p, "\"saturation\":%d,", s->status.saturation);
    p+=sprintf(p, "\"sharpness\":%d,", s->status.sharpness);
    p+=sprintf(p, "\"special_effect\":%u,", s->status.special_effect);
    p+=sprintf(p, "\"wb_mode\":%u,", s->status.wb_mode);
    p+=sprintf(p, "\"awb\":%u,", s->status.awb);
    p+=sprintf(p, "\"awb_gain\":%u,", s->status.awb_gain);
    p+=sprintf(p, "\"aec\":%u,", s->status.aec);
    p+=sprintf(p, "\"aec2\":%u,", s->status.aec2);
    p+=sprintf(p, "\"ae_level\":%d,", s->status.ae_level);
    p+=sprintf(p, "\"aec_value\":%u,", s->status.aec_value);
    p+=sprintf(p, "\"agc\":%u,", s->status.agc);
    p+=sprintf(p, "\"agc_gain\":%u,", s->status.agc_gain);
    p+=sprintf(p, "\"gainceiling\":%u,", s->status.gainceiling);
    p+=sprintf(p, "\"bpc\":%u,", s->status.bpc);
    p+=sprintf(p, "\"wpc\":%u,", s->status.wpc);
    p+=sprintf(p, "\"raw_gma\":%u,", s->status.raw_gma);
    p+=sprintf(p, "\"lenc\":%u,", s->status.lenc);
    p+=sprintf(p, "\"vflip\":%u,", s->status.vflip);
    p+=sprintf(p, "\"hmirror\":%u,", s->status.hmirror);
    p+=sprintf(p, "\"dcw\":%u,", s->status.dcw);
    p+=sprintf(p, "\"colorbar\":%u,", s->status.colorbar);
    p+=sprintf(p, "\"face_detect\":%u,", detection_enabled);
    p+=sprintf(p, "\"face_enroll\":%u,", is_enrolling);
    p+=sprintf(p, "\"face_recognize\":%u", recognition_enabled);
    *p++ = '}';
    *p++ = 0;
    httpd_resp_set_type(req, "application/json");
    httpd_resp_set_hdr(req, "Access-Control-Allow-Origin", "*");
    return httpd_resp_send(req, json_response, strlen(json_response));
}
I use these instruments to embed an esp32 camera in my Web solution BeePrint to control my FlyingBear Ghost 5.
I use a convert very useful to power the cam on my 3D printer.
You can find here Converter from 9v-24v to USB 5v quick charging
Thanks
- ESP32-CAM: pinout, specs and Arduino IDE configuration
- ESP32-CAM: upgrade CamerWebServer with flash feature
- ESP32-CAM: control CameraWebServer from your own web page
Firmware with additional features.


Hello !
Really appreciate your hard work and thanks a lot 🙂
could you please tell me is there any way to connect to the camera through internet? 🙂
Akhila
Hi Akhila,
yes It’s possible, but you must do:
Bye Renzo