
ESP32-CAM: upgrade CameraWebServer with flash feature – 2
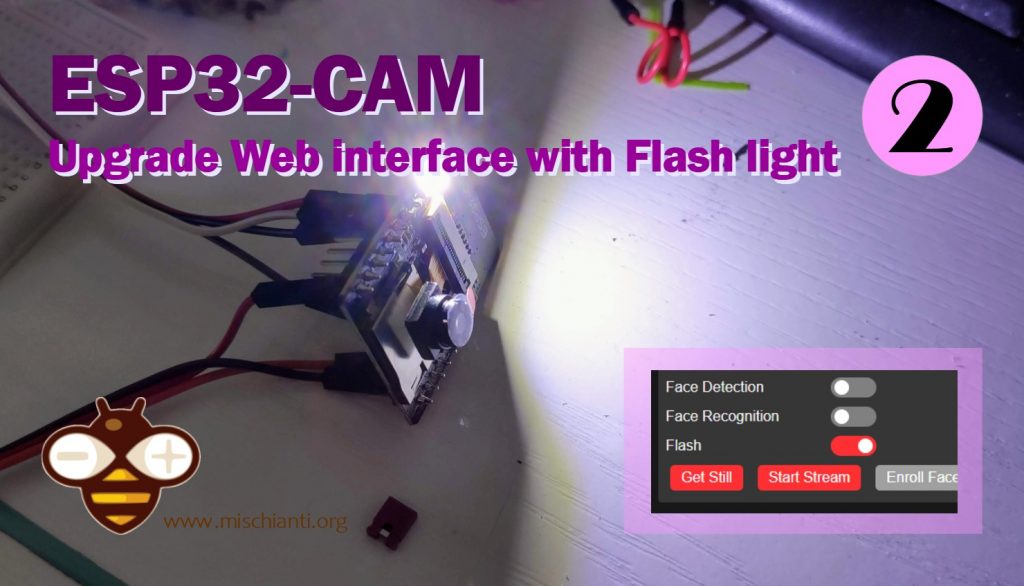
I use this esp32-cam for all my monitoring systems and videos with multiple windows. The integrated led feature in the esp32-cam board can be very useful, so I thought about adding the control on the web interface.
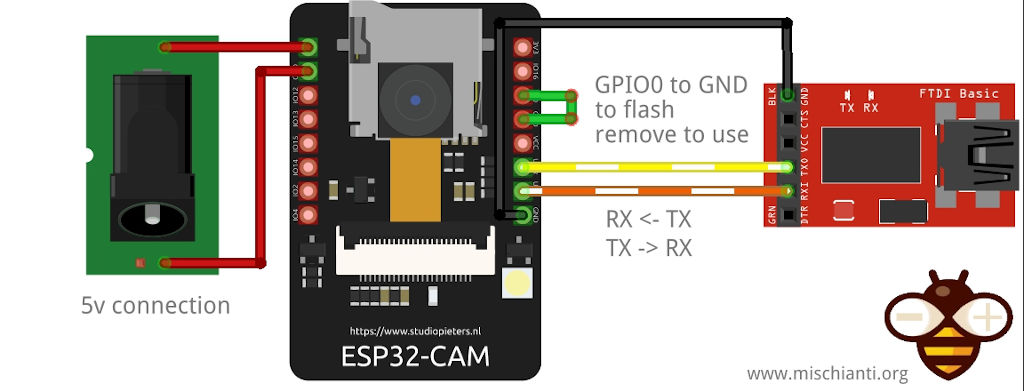
But remember, the flash pin is the same as SD, so you must stop using SD if you want led features.
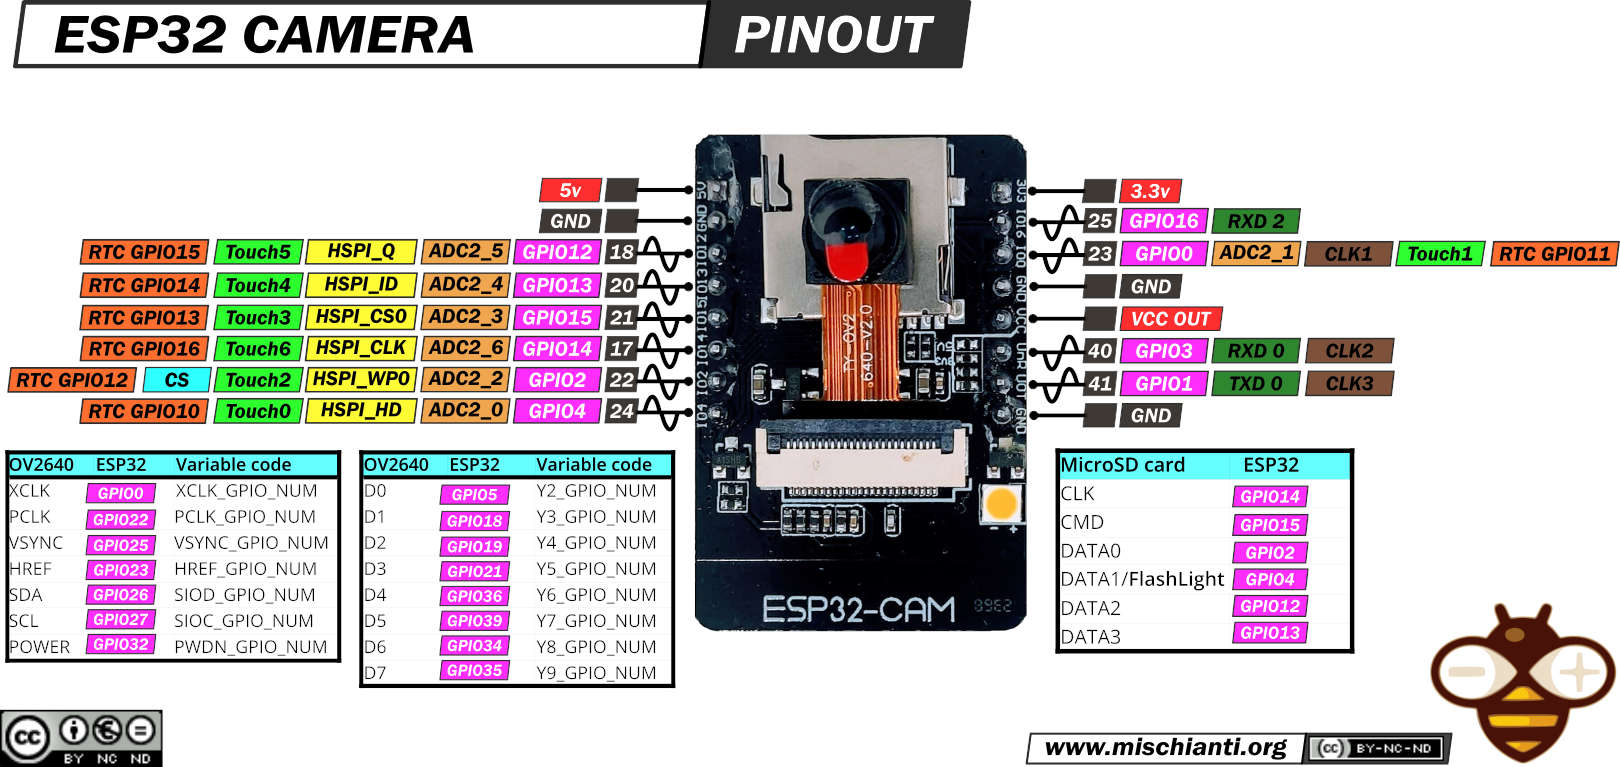
Now you can refer to the article “ESP32-CAM: pinout, specs and Arduino IDE configuration” to have additional information on uploading sketches. In the pinout, you can find Flashlight on GPIO4.
You can find ESP32-CAM on ESP32 Dev Kit v1 - TTGO T-Display 1.14 ESP32 - NodeMCU V3 V2 ESP8266 Lolin32 - NodeMCU ESP-32S - WeMos Lolin32 - WeMos Lolin32 mini - ESP32-CAM programmer - ESP32-CAM bundle - ESP32-WROOM-32 - ESP32-S
Retrieve the sketch for editing
This example work with 1.0.6 version of ESP32 Framework, for the 2.x.x or more go to the relative section.
First, download the CameraWebServer from here or by opening the example in Arduino or directly from your esp32 core installation with these steps:
Retrieve the preferences path from your Arduino IDEFile --> Preferences
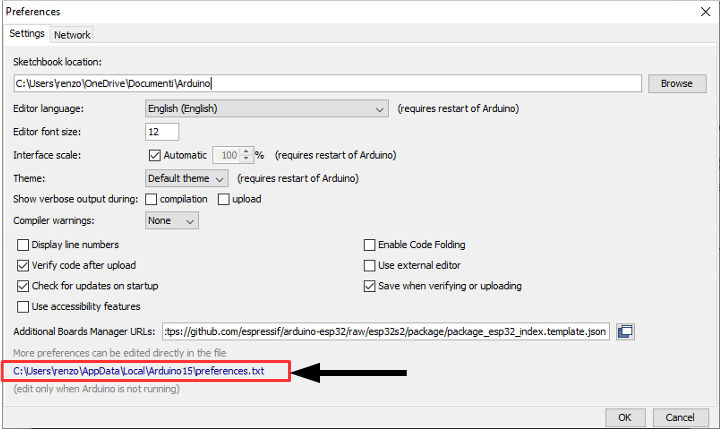
from here, go to
<arduino-preferences-path>\packages\esp32\hardware\esp32\1.0.4\libraries\ESP32\examples\Camera\CameraWebServer
You can find in that folder four file
CameraWebServer.ino: the main sketch;app_httpd.cpp: practically is the back end of the application;camera_pins.h: contains the pins schema for all variants;camera_index.h: contains the web page in base64 gzipped version.
Extract the HTML page
Now, as you can see, we don’t find the HTML page, but you can use this utility to transform the HEX array from camera_index.h into the classic HTML file.
Online converter: HEX Array to file
copy the HEX array values and paste in the text area (from first { to the last } excluded) and insert index_ov2640.html.gz as filename, download the GZip file, extract index_ov2640.html and put it in your folder, open with an editor.
Now we have all material to apply a change to CameraWebServer.
In the HTML page, find the last slider (face_recognize-group), as in the following code
                        <div class="input-group" id="face_recognize-group">
                            <label for="face_recognize">Face Recognition</label>
                            <div class="switch">
                                <input id="face_recognize" type="checkbox" class="default-action">
                                <label class="slider" for="face_recognize"></label>
                            </div>
                        </div>
                        <section id="buttons">
                            <button id="get-still">Get Still</button>
                            <button id="toggle-stream">Start Stream</button>
                            <button id="face_enroll" class="disabled" disabled="disabled">Enroll Face</button>
                        </section>
and add flash-group like this
                        <div class="input-group" id="face_recognize-group">
                            <label for="face_recognize">Face Recognition</label>
                            <div class="switch">
                                <input id="face_recognize" type="checkbox" class="default-action">
                                <label class="slider" for="face_recognize"></label>
                            </div>
                        </div>
                        <div class="input-group" id="flash-group">
                            <label for="flash">Flash</label>
                            <div class="switch">
                                <input id="flash" type="checkbox" class="default-action">
                                <label class="slider" for="flash"></label>
                            </div>
                        </div>
                        <section id="buttons">
                            <button id="get-still">Get Still</button>
                            <button id="toggle-stream">Start Stream</button>
                            <button id="face_enroll" class="disabled" disabled="disabled">Enroll Face</button>
                        </section>
Back-end end-point
All the elements with class default-action had a listener
  // Attach default on change action
  document
    .querySelectorAll('.default-action')
    .forEach(el => {
      el.onchange = () => updateConfig(el)
    })
that on change call a function updateConfig
  function updateConfig (el) {
    let value
    switch (el.type) {
      case 'checkbox':
        value = el.checked ? 1 : 0
        break
      case 'range':
      case 'select-one':
        value = el.value
        break
      case 'button':
      case 'submit':
        value = '1'
        break
      default:
        return
    }

    const query = `${baseHost}/control?var=${el.id}&val=${value}`

    fetch(query)
      .then(response => {
        console.log(`request to ${query} finished, status: ${response.status}`)
      })
  }
this function does a GET (refer to the tutorial “How to create a REST server“) that call a handler specified in the file app_https.cpp
static esp_err_t cmd_handler(httpd_req_t *req){
    char*  buf;
    size_t buf_len;
    char variable[32] = {0,};
    char value[32] = {0,};

    buf_len = httpd_req_get_url_query_len(req) + 1;
    if (buf_len > 1) {
        buf = (char*)malloc(buf_len);
        if(!buf){
            httpd_resp_send_500(req);
            return ESP_FAIL;
        }
        if (httpd_req_get_url_query_str(req, buf, buf_len) == ESP_OK) {
            if (httpd_query_key_value(buf, "var", variable, sizeof(variable)) == ESP_OK &&
                httpd_query_key_value(buf, "val", value, sizeof(value)) == ESP_OK) {
            } else {
                free(buf);
                httpd_resp_send_404(req);
                return ESP_FAIL;
            }
        } else {
            free(buf);
            httpd_resp_send_404(req);
            return ESP_FAIL;
        }
        free(buf);
    } else {
        httpd_resp_send_404(req);
        return ESP_FAIL;
    }

    int val = atoi(value);
    sensor_t * s = esp_camera_sensor_get();
    int res = 0;

    if(!strcmp(variable, "framesize")) {
        if(s->pixformat == PIXFORMAT_JPEG) res = s->set_framesize(s, (framesize_t)val);
    }
    else if(!strcmp(variable, "quality")) res = s->set_quality(s, val);
    else if(!strcmp(variable, "contrast")) res = s->set_contrast(s, val);
    else if(!strcmp(variable, "brightness")) res = s->set_brightness(s, val);
    else if(!strcmp(variable, "saturation")) res = s->set_saturation(s, val);
    else if(!strcmp(variable, "gainceiling")) res = s->set_gainceiling(s, (gainceiling_t)val);
    else if(!strcmp(variable, "colorbar")) res = s->set_colorbar(s, val);
    else if(!strcmp(variable, "awb")) res = s->set_whitebal(s, val);
    else if(!strcmp(variable, "agc")) res = s->set_gain_ctrl(s, val);
    else if(!strcmp(variable, "aec")) res = s->set_exposure_ctrl(s, val);
    else if(!strcmp(variable, "hmirror")) res = s->set_hmirror(s, val);
    else if(!strcmp(variable, "vflip")) res = s->set_vflip(s, val);
    else if(!strcmp(variable, "awb_gain")) res = s->set_awb_gain(s, val);
    else if(!strcmp(variable, "agc_gain")) res = s->set_agc_gain(s, val);
    else if(!strcmp(variable, "aec_value")) res = s->set_aec_value(s, val);
    else if(!strcmp(variable, "aec2")) res = s->set_aec2(s, val);
    else if(!strcmp(variable, "dcw")) res = s->set_dcw(s, val);
    else if(!strcmp(variable, "bpc")) res = s->set_bpc(s, val);
    else if(!strcmp(variable, "wpc")) res = s->set_wpc(s, val);
    else if(!strcmp(variable, "raw_gma")) res = s->set_raw_gma(s, val);
    else if(!strcmp(variable, "lenc")) res = s->set_lenc(s, val);
    else if(!strcmp(variable, "special_effect")) res = s->set_special_effect(s, val);
    else if(!strcmp(variable, "wb_mode")) res = s->set_wb_mode(s, val);
    else if(!strcmp(variable, "ae_level")) res = s->set_ae_level(s, val);
    else if(!strcmp(variable, "face_detect")) {
        detection_enabled = val;
        if(!detection_enabled) {
            recognition_enabled = 0;
        }
    }
    else if(!strcmp(variable, "face_enroll")) is_enrolling = val;
    else if(!strcmp(variable, "face_recognize")) {
        recognition_enabled = val;
        if(recognition_enabled){
            detection_enabled = val;
        }
    }
    else if(!strcmp(variable, "flash") ) {
		 pinMode(4, OUTPUT);
		 digitalWrite(4, atoi(value));
		 flash_enabled = atoi(value);
	 }
    else {
        res = -1;
    }

    if(res){
        return httpd_resp_send_500(req);
    }

    httpd_resp_set_hdr(req, "Access-Control-Allow-Origin", "*");
    return httpd_resp_send(req, NULL, 0);
}
The handler manages all the actions of the web interface. We can also add flash management digitalWrite on pin 4 (builtin led) with the slider’s value.
You can call the end-point directly from the browser with
http://<camera-ip>/control?var=flash&val=1
to activate the flash, and
http://<camera-ip>/control?var=flash&val=0
to deactivate.
Set an initial state
We also set the value on the flash_enabled variable, declared with the other state variable
static mtmn_config_t mtmn_config = {0};
static int8_t detection_enabled = 0;
static int8_t recognition_enabled = 0;
static int8_t flash_enabled = 0;
static int8_t is_enrolling = 0;
static face_id_list id_list = {0};
used to restore the value on the end-point in GET status, and next managed by status_handler
static esp_err_t status_handler(httpd_req_t *req){
    static char json_response[1024];

    sensor_t * s = esp_camera_sensor_get();
    char * p = json_response;
    *p++ = '{';

    p+=sprintf(p, "\"framesize\":%u,", s->status.framesize);
    p+=sprintf(p, "\"quality\":%u,", s->status.quality);
    p+=sprintf(p, "\"brightness\":%d,", s->status.brightness);
    p+=sprintf(p, "\"contrast\":%d,", s->status.contrast);
    p+=sprintf(p, "\"saturation\":%d,", s->status.saturation);
    p+=sprintf(p, "\"sharpness\":%d,", s->status.sharpness);
    p+=sprintf(p, "\"special_effect\":%u,", s->status.special_effect);
    p+=sprintf(p, "\"wb_mode\":%u,", s->status.wb_mode);
    p+=sprintf(p, "\"awb\":%u,", s->status.awb);
    p+=sprintf(p, "\"awb_gain\":%u,", s->status.awb_gain);
    p+=sprintf(p, "\"aec\":%u,", s->status.aec);
    p+=sprintf(p, "\"aec2\":%u,", s->status.aec2);
    p+=sprintf(p, "\"ae_level\":%d,", s->status.ae_level);
    p+=sprintf(p, "\"aec_value\":%u,", s->status.aec_value);
    p+=sprintf(p, "\"agc\":%u,", s->status.agc);
    p+=sprintf(p, "\"agc_gain\":%u,", s->status.agc_gain);
    p+=sprintf(p, "\"gainceiling\":%u,", s->status.gainceiling);
    p+=sprintf(p, "\"bpc\":%u,", s->status.bpc);
    p+=sprintf(p, "\"wpc\":%u,", s->status.wpc);
    p+=sprintf(p, "\"raw_gma\":%u,", s->status.raw_gma);
    p+=sprintf(p, "\"lenc\":%u,", s->status.lenc);
    p+=sprintf(p, "\"vflip\":%u,", s->status.vflip);
    p+=sprintf(p, "\"hmirror\":%u,", s->status.hmirror);
    p+=sprintf(p, "\"dcw\":%u,", s->status.dcw);
    p+=sprintf(p, "\"colorbar\":%u,", s->status.colorbar);
    p+=sprintf(p, "\"face_detect\":%u,", detection_enabled);
    p+=sprintf(p, "\"face_enroll\":%u,", is_enrolling);
    p+=sprintf(p, "\"face_recognize\":%u,", recognition_enabled);
    p+=sprintf(p, "\"flash\":%u", flash_enabled);
    *p++ = '}';
    *p++ = 0;
    httpd_resp_set_type(req, "application/json");
    httpd_resp_set_hdr(req, "Access-Control-Allow-Origin", "*");
    return httpd_resp_send(req, json_response, strlen(json_response));
}
to show the change, you must only put the URL on the browser (It’s GET)
http://<camera-ip>/status
with this result
{
  "framesize": 4,
  "quality": 10,
  "brightness": 0,
  "contrast": 0,
  "saturation": 0,
  "sharpness": 0,
  "special_effect": 0,
  "wb_mode": 0,
  "awb": 1,
  "awb_gain": 1,
  "aec": 1,
  "aec2": 0,
  "ae_level": 0,
  "aec_value": 168,
  "agc": 1,
  "agc_gain": 0,
  "gainceiling": 0,
  "bpc": 0,
  "wpc": 1,
  "raw_gma": 1,
  "lenc": 1,
  "vflip": 0,
  "hmirror": 0,
  "dcw": 1,
  "colorbar": 0,
  "face_detect": 0,
  "face_enroll": 0,
  "face_recognize": 0,
  "flash": 0
}
which is called upon initialization of the web interface
  // read initial values
  fetch(`${baseHost}/status`)
    .then(function (response) {
      return response.json()
    })
    .then(function (state) {
      document
        .querySelectorAll('.default-action')
        .forEach(el => {
          updateValue(el, state[el.id], false)
        })
    })
and set the correct value of the slider at the first load.
Re-Conversion to HEX array
When you change the page, you must regenerate the HEX array from the file in GZipped format. To simplify the operation on my “File to GZipped filearray” I generate the “plain” and gzipped filerray in one step.
Remember that the device wants a quiet amount of power
| Operation mode | Power |
|---|---|
| Stand by | 80mHa |
| In streaming | 100~160mAh |
| In streaming with flash | 270mAh |
So to use It correctly, you must connect the device to an external power source
Very bright the LED, but the amperage is relevant.
Use CameraWebServer of Framework version 2.x.x
In the new version, Espressiff has changed the face recognition image and added the management of flash features in the IDF framework.
To activate that features, the process is quite simple.
You must add these lines after the camera_config_t config; settings in the main CameraWebServer.ino file.
  camera_config_t config;
  config.ledc_channel = LEDC_CHANNEL_0;
  config.ledc_timer = LEDC_TIMER_0;
  config.pin_d0 = Y2_GPIO_NUM;
  config.pin_d1 = Y3_GPIO_NUM;
  config.pin_d2 = Y4_GPIO_NUM;
  config.pin_d3 = Y5_GPIO_NUM;
  config.pin_d4 = Y6_GPIO_NUM;
  config.pin_d5 = Y7_GPIO_NUM;
  config.pin_d6 = Y8_GPIO_NUM;
  config.pin_d7 = Y9_GPIO_NUM;
  config.pin_xclk = XCLK_GPIO_NUM;
  config.pin_pclk = PCLK_GPIO_NUM;
  config.pin_vsync = VSYNC_GPIO_NUM;
  config.pin_href = HREF_GPIO_NUM;
  config.pin_sscb_sda = SIOD_GPIO_NUM;
  config.pin_sscb_scl = SIOC_GPIO_NUM;
  config.pin_pwdn = PWDN_GPIO_NUM;
  config.pin_reset = RESET_GPIO_NUM;
  config.xclk_freq_hz = 20000000;
  config.frame_size = FRAMESIZE_UXGA;
  config.pixel_format = PIXFORMAT_JPEG; // for streaming
  //config.pixel_format = PIXFORMAT_RGB565; // for face detection/recognition
  config.grab_mode = CAMERA_GRAB_WHEN_EMPTY;
  config.fb_location = CAMERA_FB_IN_PSRAM;
  config.jpeg_quality = 12;
  config.fb_count = 1;

  const int pwmfreq = 50000;     // 50K pwm frequency
  const int pwmresolution = 9;   // duty cycle bit range
  ledcSetup(config.ledc_channel, pwmfreq, pwmresolution);  // configure LED PWM channel
  ledcAttachPin(4, config.ledc_channel);            // attach the GPIO pin to the channel
And in the first part of app_attpd.cpp file after the includes these defines.
//
// LED Illuminator
//
#define CONFIG_LED_ILLUMINATOR_ENABLED
#define CONFIG_LED_LEDC_PIN 4
#define CONFIG_LED_MAX_INTENSITY 255
//#define CONFIG_LED_LEDC_LOW_SPEED_MODE
// CONFIG_LED_LEDC_HIGH_SPEED_MODE is not set
#define CONFIG_LED_LEDC_TIMER LEDC_TIMER_0
#define CONFIG_LED_LEDC_CHANNEL LEDC_CHANNEL_0
// end of LED Illuminator
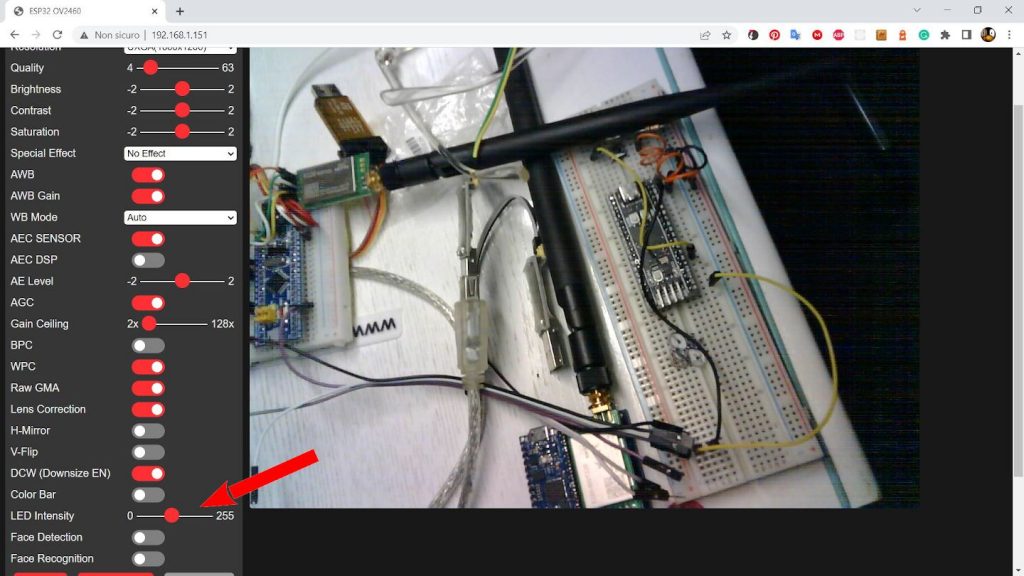
The result is in this screenshot.
Set a static IP
Another very useful thing is to set the static IP. To do this, add this line before WiFi.begin
  IPAddress ip(192,168,1,40);
  IPAddress gateway(192,168,1,1);
  IPAddress subnet(255,255,255,0);
  WiFi.config(ip, gateway, subnet);
Thanks
- ESP32-CAM: pinout, specs and Arduino IDE configuration
- ESP32-CAM: upgrade CamerWebServer with flash feature
- ESP32-CAM: control CameraWebServer from your own web page
Firmware with additional features.


Thanks for your great work. I got mine working too. 🙂 https://m.facebook.com/story.php?story_fbid=pfbid02scLF8n5KME3REUNNSFi2dxRr12WNWQwf2kMnN22uRR3U3QrTSLAYboqobvAymJYgl&id=554017662
Hi Rodney,
good work.
Bye Renzo
Hello Renzo,
Will be looking forward to your latest source codes to migrate and work on ESP32 library version 2.0.4 or latest stable framework soon.
Cheers 😉 Rodney
A little contribution to the author Renzo @ https://github.com/espressif/arduino-esp32/issues/7009
The ESP32-CAM Flight Light LED Illuminator solution which everyone is awaiting is now resolved by the blog author and programmer Bye Renzo
http://mischianti.org/forums/topic/esp32-cam-upgrade-camerawebserver-with-flash-on-esp32-framework-2-0-4/
Thank you 😉
Thanks you for releasing the “Use CameraWebServer of Framework version 2.x.x” 🙂
Thanks to you for the help in finding the solution.
Bye Renzo
Hi, this is a great improvement. I would like to ask you to open a PR into Arduino-ESP32 making this available as a default version for everyone.
In general, Espressif is happy to receive community PRs. On Arduino-ESP32 support, we are just a small team, but the community is large and we don’t refuse good help.
Hi Tomas,
I implement those features in a very fast way, to open a PR I think I must do something more customizable, but, if I find some time I fix It.
Bye Renzo
how I can download, compile and write without manual modification? all the time I have errors (maybe im doing something wrong)
Hi Tomek,
pay attention to the version framework.
Witch framework version do you want to use?
Bye RM
I want to use the newest version. I managed in Arduino IDE version 2.0.6 with newer soft but after compile and burn it does not work (in serial monitor I have only ………………). With 1.0.6 works fine but I cannot use LED control
IDK what Im doing wrong
Thank you a lot for reply
Hi Tomasz,
you can find the complete solution on this forum topic.
Bye Renzo
Hi
I cannot create account on your website because when I try to login I have :
“Too Many Requests
The user has sent too many requests in a given amount of time.”
So I still dont know what is final solution to use esp with 2.0.4 or 2.0.6 🙁
Hi Tomasz,
I have written to my provider, I hope they fix it soon.
Bye Renzo
Hello, I don’t know how much you know about esp32cam. But I still want to ask a question here. Can esp32cam replace the original flash chip? Is the flash chip the one with 8 pins on the back of the memory card slot?
Hi Rorin,
It’s not possible. The 8-pin chip that you indicate is the PSRAM, I think.
ESP32-S integrates the Flash, and here you can find the Schema of the ESP32-CAM.
Bye Renzo
Hi, this whole site is a very nice collection of very useful tutorials, thanks for all of it!
I do however have a question that I can’t seem to figure out, and if you could point me in the right direction I would be very grateful.
I have successfully used the ‘CameraWebServer’ example in the arduino IDE and set it up to deliver streaming and still images that I can access via browser and it’s really great. the one problem, is that when I want to activate the flash via the browser it doesn’t turn on at all. is there something I’m missing?
ok i got it to work by changing the “#define LED_LEDC_GPIO 22” in “app_httpd.cpp”. I switched it from ’22’ to ‘4’ and it worked!
Now i just have to look into making the flash stay on for a bit before the capture so that the brightness balances out.
Hi Methodize,
Good!! If you need further help, open a forum topic so that you can post the code, and we can try to help better.
Bye Renzo