
ESP32 self OTA update in HTTPS (SSL/TLS) with trusted self-signed certificate – 3
In today’s increasingly connected world, ensuring the security and privacy of embedded systems and IoT devices is more critical than ever. This article delves into the realm of secure firmware updates by exploring how to implement self-OTA (Over-The-Air) updates for ESP32 devices using HTTPS (SSL/TLS) with a trusted self-signed certificate. As an essential technique for maintaining the safety and reliability of your projects, self-OTA updates enable remote deployment of firmware updates while ensuring secure communication between devices and update servers.
We will begin by examining the need for secure OTA updates, followed by a step-by-step guide on generating a self-signed SSL/TLS certificate, setting up the ESP32 with the necessary libraries, and configuring the update server. By the end of this article, you will have a comprehensive understanding of how to incorporate HTTPS-based self OTA updates into your ESP32 projects, enhancing the security and efficiency of your IoT devices.
OTA may be done using the following:
- Arduino IDE
- Web Browser
- HTTP Server
First of all, check the tutorial “ESP32: flash compiled firmware (.bin)“.
Here some common devices ESP32 Dev Kit v1 - TTGO T-Display 1.14 ESP32 - NodeMCU V3 V2 ESP8266 Lolin32 - NodeMCU ESP-32S - WeMos Lolin32 - WeMos Lolin32 mini - ESP32-CAM programmer - ESP32-CAM bundle - ESP32-WROOM-32 - ESP32-S
Update endpoint with version control and secure TLS connection
Now we can upgrade our example with SSL/TLS connection.
To generate a good Self-Signed certificate, you need to associate a common name or IP of the machine you want to call.
But ESP32 and esp8266 do not support IP (I lost a day to try It), so the only way to test a real solution is to assign a hostname to the server machine.
If you want to do a fast solution you can use the command
client.setInsecure();
that prevents all server validation check, and allow you to do HTTPs request without a thrust certificate.
But we make It step by step.
Self-signed certificate generation
But if you want to use a self-signed certificate, you can use OpenSSL for the generation of a private key and certificate.
Basic server certificate (you must bypass certificate validation on the client)
You can get OpenSSL by downloading the Linux version from all packet managers, or download it for Windows from here, to use It with more simplicity add It to bin pah.
openssl req -x509 -nodes -days 730 -newkey rsa:2048 -keyout server.key -out server.crt -subj "/CN=192.168.1.70"
and here is the response
Generating a RSA private key
.....+++++
..................................................................................+++++
writing new private key to 'server.key'
-----
Now you have a server.key
-----BEGIN PRIVATE KEY-----
MIIEvgIBADANBgkqhkiG9w0BAQEFAASCBKgwggSkAgEAAoIBAQDPwU8Kbzr4PiKO
k+S4Cwj20tgnxYlesv99Fbmivl7PjwhYaIEX68afazYUoeQa1nNM8GSKRh4gSZnR
Zk61RR5d1U/EtWRVFWhIUB2U4Vy6KQ3vUaVoXRjtHjzlvarulvLvHF3/37rTJMqg
rnP2EbdKUQyxuAW7P3OMfSLEzn1LbuPGtZRHepckXnOpddghBvqIRrvrM8GPo0Ro
AXziXZMQ4hQgSxZopnP62XintfM1f/eZVPws9ww/5DVLFQs0ji2LuCPtxaokNgkq
t0wGHS6QNaWDbB7IBhbeg7oLg0HHz2SMJkYrGkmWhku+BVkWWf9snMK/RjN2NNMA
zMGADoSPAgMBAAECggEBAMQ8NHuHquy2TA/edAi/K51wdInElUekzZyJ+8lUBdwJ
n3laZK2CoB8OtotwizQqYchHvL+7EVOwEaFwAGJKQi+hf/Iu3/FaAiFjwz1QTTTt
+GKX/SQB47x9dkoPCDjKzfa7FbLN0fsEYny5q4C/JSEGQ3ZOeuNuQKdvv3qkDEdF
Z90JBHWzOrfUR2SpHuuk366ixwBjohOwyOHSP8VLXfPYp/RcgU/7/cRBSPN+xxIB
2Ovv/ERnTUbLqYlgU0Ok5KMMc7RmtXO9mwE6wFwNGJImYgn4IcCxAe41h6UTxmaG
gdeS2Ixil20Fi7wuLntOGkaqGewdjmjZN2apJ33gCukCgYEA7zE0hVzgfzLXPRVe
y7ouuLLrhZlkJfFsk75aVv9vfLD4eX6JgN/VU34vqmzqVSdszfum6fWyycSXwc9s
xrCLMYMS9lbz/HuiQn1c+7mZT+3hF4Qazy4ZU1rA4CBgGoyJK4eiO7tC9Vl29PvR
osDTdCOjJbIOCIAKsswrixHfgDsCgYEA3lqWDEuxQTctplL6gtXRUyBAooMLrrGZ
9/5Ut3qLlTWqdKr5+RlJCF4hc/1iYQHxDq+6SV2GpOO/0E7w0GlcoO3ME+AMf4qq
OHMcAGoJXYCEw/0u2MjuEnXlo8L3qp1+LK9rvGUViCx7Fha4OCIRuNWeJ4g8eIAl
qqzUd6fJ+70CgYEAiBDEoMzZxGIGgPAEMf5ij5zwT9qXVuJEcrNJLs41/IergWmT
DOXHs6xHrzov/2rjATYTmGm1YAPelFjLtyc8t1ip08pZFxq5jftEhsnoxcg7UKZM
nejKbVll+NlR8ihZ65JHnpUDHRDck7YgZeYtI5cWOt5UD0/PRjDQ4Fa1fnsCgYAL
+gEfBGy1wI0a6llH9tBhk9knZ7uXW0WZz/8sKtOd49gclKEGQ9BlPPy8TKeh5gLf
8aMtFHaOJx5L0BS0hRhSKrzVTTofHI7yn3CgrRV4DdYY4GhHkPsRz3vhCD1i2TzU
l1ZMPX2dahfvJqYhj+Q4enkcVAA91VkyCkEfeNAuWQKBgH+82agy+jlRyRBvQ6eI
i5n7FbCMJSw/1mfOmxGiEQhshaQkPDx+PfPgy+LOMuXAr1ZBsWMCGERdUsesXjIH
AHcY8Nl0tC5dG8q7B3A11xttwFbhQ4fgq+AUEzSH3ykTvuobGCNtM5AuawNWIjj7
VO0JDqUFQcom1brJIHowKKNU
-----END PRIVATE KEY-----
and server.crt
-----BEGIN CERTIFICATE-----
MIIDGTCCAgGgAwIBAgIULbAi2zs41Rh6AZy08xumoYMIFJQwDQYJKoZIhvcNAQEL
BQAwHDEaMBgGA1UEAwwRMTkyLjE2OC4xLjcwOjM0NDMwHhcNMjEwOTEzMDcwODUw
WhcNMjIwOTEzMDcwODUwWjAcMRowGAYDVQQDDBExOTIuMTY4LjEuNzA6MzQ0MzCC
ASIwDQYJKoZIhvcNAQEBBQADggEPADCCAQoCggEBAM/BTwpvOvg+Io6T5LgLCPbS
2CfFiV6y/30VuaK+Xs+PCFhogRfrxp9rNhSh5BrWc0zwZIpGHiBJmdFmTrVFHl3V
T8S1ZFUVaEhQHZThXLopDe9RpWhdGO0ePOW9qu6W8u8cXf/futMkyqCuc/YRt0pR
DLG4Bbs/c4x9IsTOfUtu48a1lEd6lyRec6l12CEG+ohGu+szwY+jRGgBfOJdkxDi
FCBLFmimc/rZeKe18zV/95lU/Cz3DD/kNUsVCzSOLYu4I+3FqiQ2CSq3TAYdLpA1
pYNsHsgGFt6DuguDQcfPZIwmRisaSZaGS74FWRZZ/2ycwr9GM3Y00wDMwYAOhI8C
AwEAAaNTMFEwHQYDVR0OBBYEFKyvsHqrsHBj+V5H8aDT5qvPOSfdMB8GA1UdIwQY
MBaAFKyvsHqrsHBj+V5H8aDT5qvPOSfdMA8GA1UdEwEB/wQFMAMBAf8wDQYJKoZI
hvcNAQELBQADggEBALwdlitiQayOG2o2y3BAipcdaMxdGbihorheuO17glsZtp2R
H2LUUqnmG8hGH4pHbkd2gozxLt/h7ILrD1xK/EIlXjGueu3MF377GWZpR18OXt+1
cqpxDdAESD3PRbcJnu75uffFYLSKizbuaTbV2D8RY1kcUxRlrFG2bciNP9widbjq
T9B4RhtJb0d+Sk8Z2G2eTlNxESPQ/Oi530rrbZsez0XmdYyogbVHuNdwJvfQdA8U
F1UtWj6vtGAramUn0dS5rJ8REfZ4jdGsXYT2jmCfDTgaE+1sEYm6ry+RInDK5RVi
Kk+bL292uc4d0STCqXciv7YbWDWlZPo9fH0Pxs0=
-----END CERTIFICATE-----
Valid self-signed certificate
If you don’t need to create a real environment, go to the next paragraph, the certificate generated in the previous chapter is sufficient for our test.
First of all, we must assign a name to the server host, there are a lot of alternatives, but I think the fastest way is to use a Dynamic DNS.
Normally Dynamic DNS is used to assign a name dynamically to the IP given to us by ISP, but you can assign a static IP and use It like a normal host. Here is an example with a free service NO-IP.
Configure Dynamic DNS service
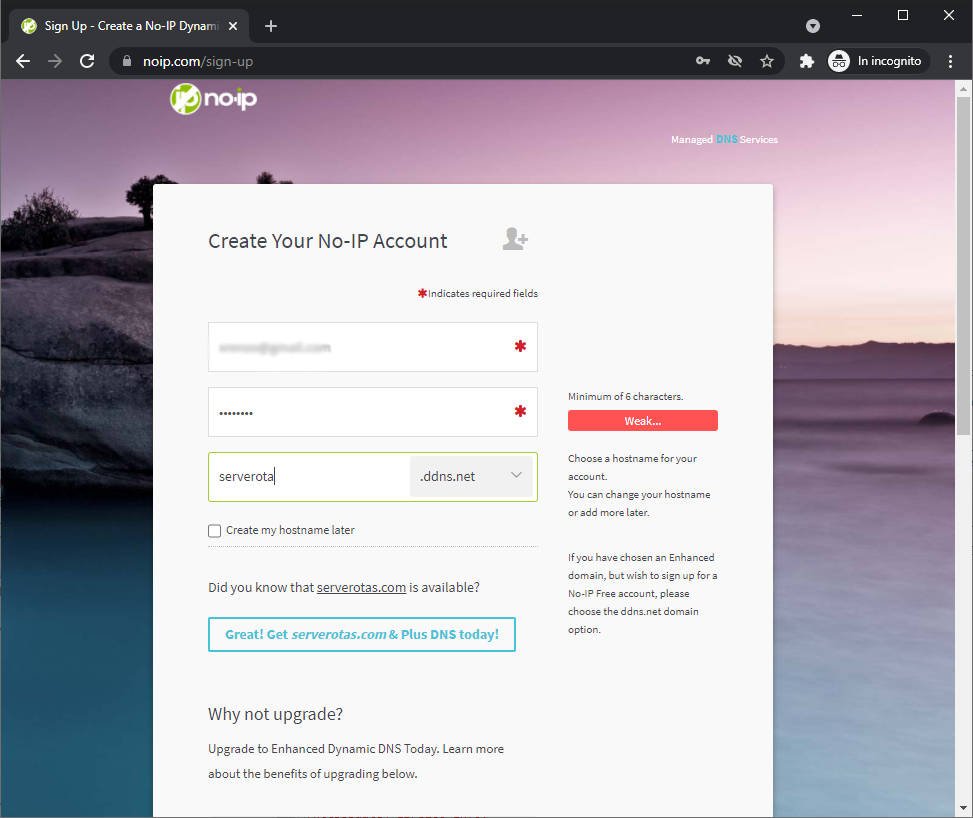
Go to https://www.noip.com/ and Sign Up.
I add my email, insert a password and, create a name like serverota.ddns.net, then click on Free Sign Up.
After the email subscription confirmation go to this link https://my.noip.com/dynamic-dns, and you can see the list of dynamic DNS entries.
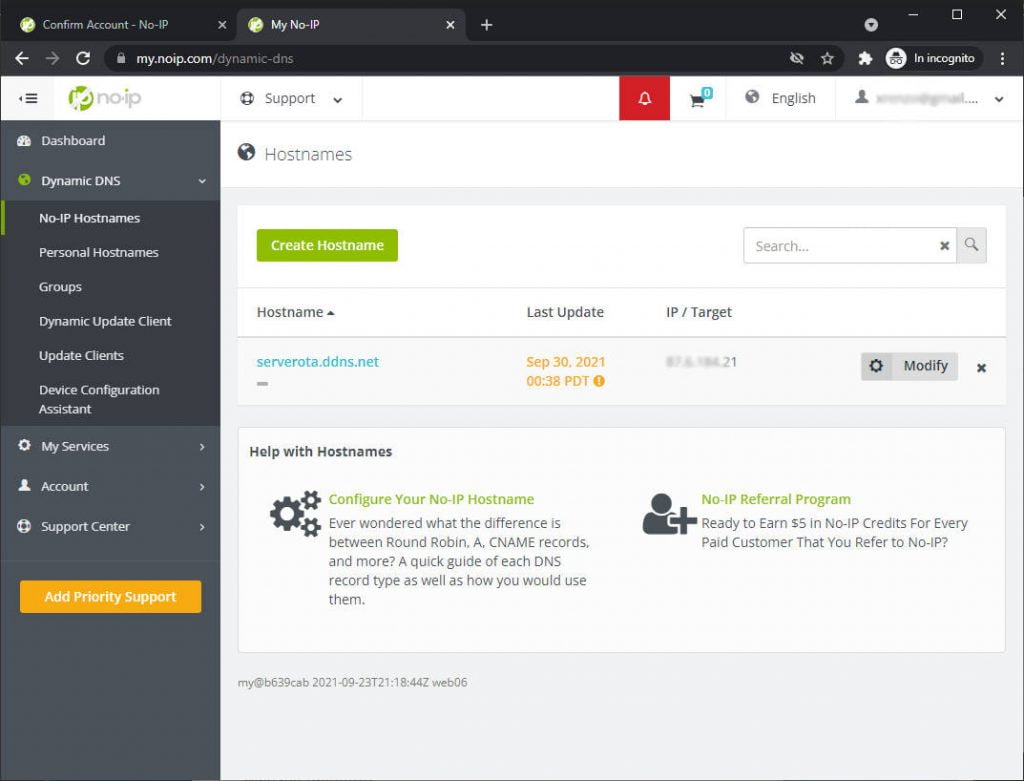
Now click on modify and insert the IP address of your NodeJS server, for me, now is 192.168.1.70.
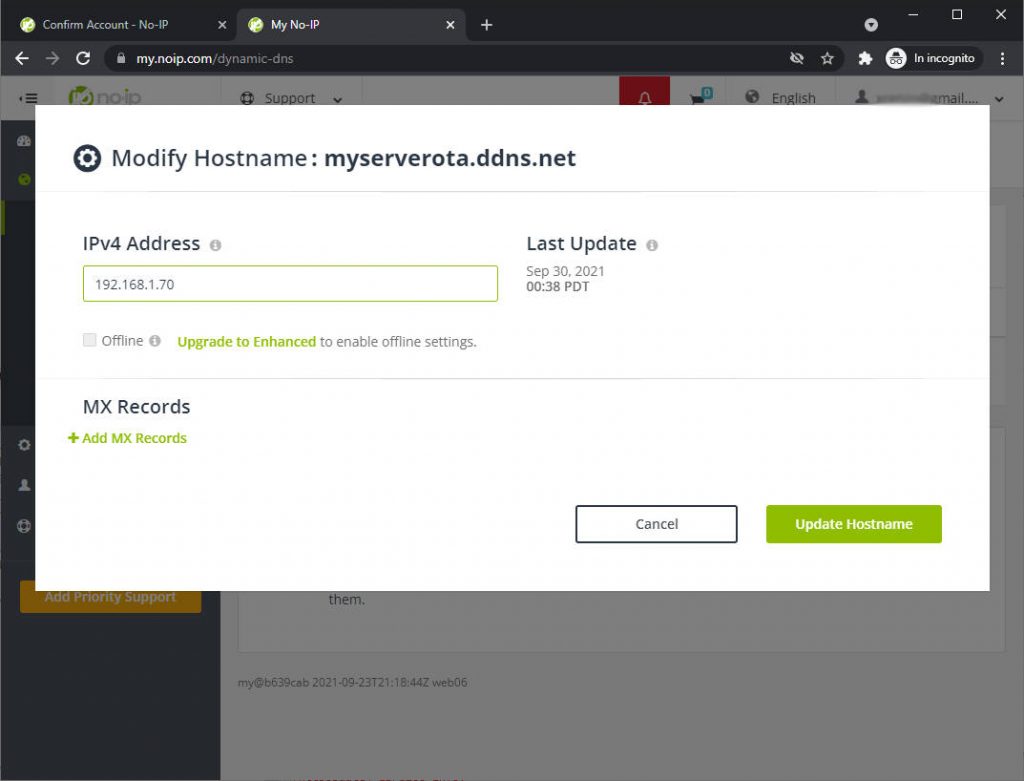
Apply and wait some minutes. After that (on Windows) go con cmd and launch ipconfig /flushdns.
C:\Users\renzo>ipconfig /flushdns

Configurazione IP di Windows

Cache del resolver DNS svuotata.
C:\Users\renzo>ipconfig /flushdns

Windows IP Configuration

Successfully flushed the DNS Resolver Cache
Now you can try ping the domain.
C:\Users\renzo>ping serverota.ddns.net

Esecuzione di Ping serverota.ddns.net [192.168.1.70] con 32 byte di dati:
Risposta da 192.168.1.70: byte=32 durata<1ms TTL=128
Risposta da 192.168.1.70: byte=32 durata<1ms TTL=128
Risposta da 192.168.1.70: byte=32 durata<1ms TTL=128
To test the specified resolve of DNS, you can use this script (Linux).
# Renzo Mischianti <www.mischianti.org>
# Specify DNS server
dnsserver="8.8.8.8"
# function to get IP address
function get_ipaddr {
  ip_address=""
    # A and AAA record for IPv4 and IPv6, respectively
    # $1 stands for first argument
  if [ -n "$1" ]; then
    hostname="${1}"
    if [ -z "query_type" ]; then
      query_type="A"
    fi
    # use host command for DNS lookup operations
    host -t ${query_type}  ${hostname} &>/dev/null ${dnsserver}
    if [ "$?" -eq "0" ]; then
      # get ip address
      ip_address="$(host -t ${query_type} ${hostname} ${dnsserver}| awk '/has.*address/{print $NF; exit}')"
    else
      exit 1
    fi
  else
    exit 2
  fi
# display ip
 echo $ip_address
}
hostname="${1}"
for query in "A-IPv4" "AAAA-IPv6"; do
  query_type="$(printf $query | cut -d- -f 1)"
  ipversion="$(printf $query | cut -d- -f 2)"
  address="$(get_ipaddr ${hostname})"
  if [ "$?" -eq "0" ]; then
    if [ -n "${address}" ]; then
    echo "The ${ipversion} adress of the Hostname ${hostname} is: $address"
    fi
  else
    echo "An error occurred"
  fi
done
And you can run It like so:
$ ./testdns.sh serverota.ddns.net
The IPv4 adress of the Hostname serverota.ddns.net is: 192.168.1.70
Generate self-signed certificate
You can use the base command already used by modifying the common name like so.
openssl req -x509 -nodes -days 730 -newkey rsa:2048 -keyout server.key -out server.crt -subj "/CN=serverota.ddns.net"
and now have server.key
-----BEGIN PRIVATE KEY-----
MIIEvAIBADANBgkqhkiG9w0BAQEFAASCBKYwggSiAgEAAoIBAQDFe10Ysfohkqek
lgLLIj09Y3p1B7jAzQnzmWoX6iaPGYcJjhZB843o/AjGWGcMMYLimP/abbAWQimD
WwPIyZI7DxDRztm7eeoOTmCm0pa2SNB2Y6WxrjyMBfj1/C9voXDKH4fP3iUu4JNC
Ln0sbZJQ+65teHvhy3WkqdzynCC0i4KVJJuBwsIaSECctuNMlp63hR6aBVxRyiuW
arAMpt1VBH7kMvpuJXHL5wslzAqof3fGuP2GHUjiS1ZIGkz/EieUacDUVrSq0asz
qb53e6oT8YvoykzSQi9PLHIVWT4uU+uhBLzM3JFTUoDDnURxPmpyPoWRUxWlKh3I
BGgk/CcHAgMBAAECggEAPUNfByk3arDfVvy+kxvlGaVBuQqTMySooKyIMDEQkzYd
IUa1+vG+pXeClV2ZYjv92aQTQ0Th6pXN4RUcIG7/8VhkJGJiQ3m3tYZ1D2unG5eN
LB0PqwZdfCbiLBV29c+EeP+9FyxYJqm+pTpc1KqNSJg7bXSCIfMHZPTZOV5b+wX9
B8IjzaGa6pG34vdu3rTrZHxPWxNzkdlxOBN5gB+oLkpgNZ8xqgKK9jJCRWt7JTM8
mvV5/USDAmvuq6LDF3hHGA54OGoC0DQ0RNEr/7TBOdsPgEtQ+JUM46erCeggkaxi
NTnId/kWJt5PMiPpIw7OHnaEB9dptd5do/DqzQKLwQKBgQDm1r6nT4CDQ1Mlo8Mu
1TOG3L+RmoPOx8Mgal3m3+0IQKQfy1uCHJ9CeMEwTptDBQgStiR8hmvL/nSUmnSy
wjs2Hy9pdz+JfdqHgczGksd62F+nBN+zdCLg0ljeokD/beeD/Gb/rXvrgXS5F/dK
U+zyTGY3Jlga5eSeP9yGkdx34QKBgQDbAdY2rtKJ1UZXNvYsyj4Vz0RGVEABZAnZ
yAA5iOHE4y/GLz/p7hKx6mh4nhQAOq/R+s7kT+IJoJNDrfTLZ6vvjWjGj8TREUBD
+rmp7Xu5flO2VavaDVJY13QvkNJHuCn5F/fPdYJ+DlnBkgxbG6tiP2XeGKNl3ETc
t+8Vak9b5wKBgCHlEFOS2eTsQs45EJTU218HFN31WTtIm78rvyQCZ1SZ4T+F5abi
OwRQpNVKBYQ+veO5ePwL5NIsR8P2NgJ1gKo+xABxcRPoNelFxuK1dLL2CH2Guq4n
9GMcn8349yBKa/82VY1fVN3MwW3YNghk8FrXmv6oE7HHZd1StTfRPRUhAoGAeGjK
HcaAeseHpOvS7U1EVTlfkEtB5YHa6KHNfdSETHucCJpxyWvbW3ZFegtvc7DQeeIr
XduNqz1duhgqPqsBHPPiZ0kkLM4PR1DSQ1sOay3JWLZBheFNJQtQFdbJxiS67vj+
hlFVLXk2X/asVGsiDyJMH4/sRlSUh8WY7W1FtIECgYAEz/TGAepaPpPXADU/x0Hb
zHvzpdxmFnSKzbfCQIxKvby8UOxdSpTU5JthvA7YhZsCwtjvdc6llzDJ1LQ7vwBB
Y535/X/RlouD68o4a4+zz9k3acD7tcHPOGY7wy9ga+e6AJqDz0g5rj+c1ZMd84U/
5EfWxNSIcFqAtFpbPg3VSA==
-----END PRIVATE KEY-----
and a server.crt
-----BEGIN CERTIFICATE-----
MIIDGzCCAgOgAwIBAgIUWd2CIejZK0uuqLPUDTUkA20SyAAwDQYJKoZIhvcNAQEL
BQAwHTEbMBkGA1UEAwwSc2VydmVyb3RhLmRkbnMubmV0MB4XDTIxMDkzMDEyMjkx
MFoXDTIzMDkzMDEyMjkxMFowHTEbMBkGA1UEAwwSc2VydmVyb3RhLmRkbnMubmV0
MIIBIjANBgkqhkiG9w0BAQEFAAOCAQ8AMIIBCgKCAQEAxXtdGLH6IZKnpJYCyyI9
PWN6dQe4wM0J85lqF+omjxmHCY4WQfON6PwIxlhnDDGC4pj/2m2wFkIpg1sDyMmS
Ow8Q0c7Zu3nqDk5gptKWtkjQdmOlsa48jAX49fwvb6Fwyh+Hz94lLuCTQi59LG2S
UPuubXh74ct1pKnc8pwgtIuClSSbgcLCGkhAnLbjTJaet4UemgVcUcorlmqwDKbd
VQR+5DL6biVxy+cLJcwKqH93xrj9hh1I4ktWSBpM/xInlGnA1Fa0qtGrM6m+d3uq
E/GL6MpM0kIvTyxyFVk+LlProQS8zNyRU1KAw51EcT5qcj6FkVMVpSodyARoJPwn
BwIDAQABo1MwUTAdBgNVHQ4EFgQUY6S5QEqFZe7UTVQLAuet07qsW6MwHwYDVR0j
BBgwFoAUY6S5QEqFZe7UTVQLAuet07qsW6MwDwYDVR0TAQH/BAUwAwEB/zANBgkq
hkiG9w0BAQsFAAOCAQEAmxHExHoWclbgdhsIenSyb2wihbC7+QO69dAfQPwJOEQ9
9Lb4h6nmJzuHD+ohFsnNDm3cnKadG7F7to7/LdeG4g5qBNzdMVolsgMTMQ0wyFBx
iTxKPh2FGsGvzftJoYLNXAYXDKtrwK7cxn+HOQOqCw7Q2clMRljva42GQJytDsOx
7F6pVNDnDzo2H1Sni7WzwzIQGb06dUinPY4AhunYRaasbWAU4a4K35x2c5IqCrMW
5TYYCt2KMOaTNLbd0Lh9/ImeJnImAVGN8DivXbtNfhrj+Pl8McHnUztUMkcyHMNR
dVRh0YwsiXtZcu+RWatZB2eJQZJyZx04pIAwgIdhBA==
-----END CERTIFICATE-----
Generate a certificate from a configuration file
If you want to give more information about the certificate you can use this form of the configuration file, here my local.cnf
[req]
distinguished_name = req_distinguished_name
x509_extensions = v3_req
prompt = no
[req_distinguished_name]
C = IT
ST = Perugia
L = Gubbio
O = www.mischianti.org
OU = dev
CN = 192.168.1.70: Self-signed certificate
[req_ext]
subjectAltName = @alt_names
[v3_req]
subjectAltName = @alt_names
[alt_names]
DNS.1 = serverota.ddns.net
and the command becomes
openssl req -x509 -nodes -days 730 -newkey rsa:2048 -keyout server.key -out server.crt -config local.cnf
The most relevant data is the DNS.1 that identifies the alternate common name, and I use the common name to identify what I want to do.
Certificate configuration for local IP
This type of generation is not supported for ESP32 but can be used for all programmers.
We can generate a Self Signed certificate linked to the IP address, not the hostname, and It’s supported by a lot of devices, but not Espressif one.
Here is an example.
[req]
distinguished_name = req_distinguished_name
x509_extensions = v3_req
prompt = no
[req_distinguished_name]
C = IT
ST = Perugia
L = Gubbio
O = www.mischianti.org
OU = dev
CN = 192.168.1.70: Self-signed certificate
[req_ext]
subjectAltName = @alt_names
[v3_req]
subjectAltName = @alt_names
[alt_names]
IP.1 = 192.168.1.70
Add the certificate to NodeJS server.
First, modify the server to expose the HTTPS endpoint, I select the 3443 port for that purpose, and I add the two certificate to the certificate folder.
var fs = require('fs');

const express = require('express');
var http = require('http');
var https = require('https');
var privateKey  = fs.readFileSync('certificate/server.key', 'utf8');
var certificate = fs.readFileSync('certificate/server.crt', 'utf8');

var credentials = {key: privateKey, cert: certificate};

const { networkInterfaces } = require('os');
const path = require('path');

const app = express();
var httpServer = http.createServer(app);
var httpsServer = https.createServer(credentials, app);

const nets = networkInterfaces();

// Server port
const PORT = 3000;
const PORT_HTTPS = 3443;

app.get('/', (request, response) => response.send('Hello from www.mischianti.org!'));

let downloadCounter = 1;
const LAST_VERSION = 0.3;
app.get('/update', (request, response) => {
    const version = (request.header("x-esp8266-version"))?parseFloat(request.header("x-esp8266-version")):Infinity;

    if (version<LAST_VERSION){
        // If you need an update go here
        response.status(200).download(path.join(__dirname, 'firmware/httpUpdateNew.bin'), 'httpUpdateNew.bin', (err)=>{
            if (err) {
                console.error("Problem on download firmware: ", err)
            }else{
                downloadCounter++;
            }
        });
        console.log('Your file has been downloaded '+downloadCounter+' times!')
    }else{
        response.status(304).send('No update needed!')
    }
});


httpServer.listen(PORT, () => {
    const results = {}; // Or just '{}', an empty object

    for (const name of Object.keys(nets)) {
        for (const net of nets[name]) {
            // Skip over non-IPv4 and internal (i.e. 127.0.0.1) addresses
            if (net.family === 'IPv4' && !net.internal) {
                if (!results[name]) {
                    results[name] = [];
                }
                results[name].push(net.address);
            }
        }
    }

    console.log('HTTP Listening on port '+PORT+'\n', results)
});
httpsServer.listen(PORT_HTTPS, () => console.log('HTTPS Listening on port '+PORT_HTTPS+'\n'));
Now in the command prompt, you have this output.
D:\Projects\IdeaProjects\OTAWebPages\OTAServer>node index.js
HTTP Listening on port 3000
 {
  Ethernet: [ '192.168.1.70' ],
  'VirtualBox Host-Only Network': [ '192.168.56.1' ],
  'VMware Network Adapter VMnet1': [ '192.168.113.1' ],
  'VMware Network Adapter VMnet8': [ '192.168.116.1' ]
}
HTTPS Listening on port 3443
Modify the sketch to do a secure HTTPs call.
There are two ways to execute this example.
Prevent certificate validation
The first is to prevent any certificate validation with this command:
client.setInsecure();
You must use this command without add certificate, but do It if you can’t generate a valid certificate.
Create and add CertStore
The second is to trust the Certificate of the server without using a certification authority, and you can do that by adding to the device a valid certificate of the server.
Practically you are going to add directly to the client the certificate needed.
static const char serverCACert[] PROGMEM = R"EOF(
-----BEGIN CERTIFICATE-----
MIIDGzCCAgOgAwIBAgIUWd2CIejZK0uuqLPUDTUkA20SyAAwDQYJKoZIhvcNAQEL
BQAwHTEbMBkGA1UEAwwSc2VydmVyb3RhLmRkbnMubmV0MB4XDTIxMDkzMDEyMjkx
MFoXDTIzMDkzMDEyMjkxMFowHTEbMBkGA1UEAwwSc2VydmVyb3RhLmRkbnMubmV0
MIIBIjANBgkqhkiG9w0BAQEFAAOCAQ8AMIIBCgKCAQEAxXtdGLH6IZKnpJYCyyI9
PWN6dQe4wM0J85lqF+omjxmHCY4WQfON6PwIxlhnDDGC4pj/2m2wFkIpg1sDyMmS
Ow8Q0c7Zu3nqDk5gptKWtkjQdmOlsa48jAX49fwvb6Fwyh+Hz94lLuCTQi59LG2S
UPuubXh74ct1pKnc8pwgtIuClSSbgcLCGkhAnLbjTJaet4UemgVcUcorlmqwDKbd
VQR+5DL6biVxy+cLJcwKqH93xrj9hh1I4ktWSBpM/xInlGnA1Fa0qtGrM6m+d3uq
E/GL6MpM0kIvTyxyFVk+LlProQS8zNyRU1KAw51EcT5qcj6FkVMVpSodyARoJPwn
BwIDAQABo1MwUTAdBgNVHQ4EFgQUY6S5QEqFZe7UTVQLAuet07qsW6MwHwYDVR0j
BBgwFoAUY6S5QEqFZe7UTVQLAuet07qsW6MwDwYDVR0TAQH/BAUwAwEB/zANBgkq
hkiG9w0BAQsFAAOCAQEAmxHExHoWclbgdhsIenSyb2wihbC7+QO69dAfQPwJOEQ9
9Lb4h6nmJzuHD+ohFsnNDm3cnKadG7F7to7/LdeG4g5qBNzdMVolsgMTMQ0wyFBx
iTxKPh2FGsGvzftJoYLNXAYXDKtrwK7cxn+HOQOqCw7Q2clMRljva42GQJytDsOx
7F6pVNDnDzo2H1Sni7WzwzIQGb06dUinPY4AhunYRaasbWAU4a4K35x2c5IqCrMW
5TYYCt2KMOaTNLbd0Lh9/ImeJnImAVGN8DivXbtNfhrj+Pl8McHnUztUMkcyHMNR
dVRh0YwsiXtZcu+RWatZB2eJQZJyZx04pIAwgIdhBA==
-----END CERTIFICATE-----
)EOF";

[...]

	    WiFiClientSecure client;
//	    client.setInsecure();

	    client.setCACert(serverCACert);

	    // Reading data over SSL may be slow, use an adequate timeout
	    client.setTimeout(12000 / 1000); // timeout argument is defined in seconds for setTimeout
Set the clock for certificate validation.
I speak about NTP service in deep in the article “Network Time Protocol (NTP), Timezone and Daylight saving time (DST) with esp8266, esp32 or Arduino” and we are going to use this function.
// Set time via NTP, as required for x.509 validation
void setClock() {
  configTime(0, 0, "pool.ntp.org", "time.nist.gov");  // UTC

  Serial.print(F("Waiting for NTP time sync: "));
  time_t now = time(nullptr);
  while (now < 8 * 3600 * 2) {
    yield();
    delay(500);
    Serial.print(F("."));
    now = time(nullptr);
  }

  Serial.println(F(""));
  struct tm timeinfo;
  gmtime_r(&now, &timeinfo);
  Serial.print(F("Current time: "));
  Serial.print(asctime(&timeinfo));
}
Complete sketch for secure update
Now we are going to assembly all the part and the result is this.
/*
 * ESP32 Basic Sketch for automatic update of firmware at start
 * connect to an HTTPS server with self signed certificate
 *
 * Renzo Mischianti <www.mischianti.org>
 *
 * https://mischianti.org
*/

#include <Arduino.h>

#include <WiFi.h>
#include <WiFiMulti.h>
#include <WiFiClientSecure.h>

#include <HTTPClient.h>
#include <HTTPUpdate.h>

#include <time.h>

#ifndef APSSID
#define APSSID "<YOUR-SSID>"
#define APPSK  "<YOUR-PASSWD>"
#endif

WiFiMulti WiFiMulti;

#define FIRMWARE_VERSION "0.3"

// Set time via NTP, as required for x.509 validation
void setClock() {
  configTime(0, 0, "pool.ntp.org", "time.nist.gov");  // UTC

  Serial.print(F("Waiting for NTP time sync: "));
  time_t now = time(nullptr);
  while (now < 8 * 3600 * 2) {
    yield();
    delay(500);
    Serial.print(F("."));
    now = time(nullptr);
  }

  Serial.println(F(""));
  struct tm timeinfo;
  gmtime_r(&now, &timeinfo);
  Serial.print(F("Current time: "));
  Serial.print(asctime(&timeinfo));
}

static const char serverCACert[] PROGMEM = R"EOF(
-----BEGIN CERTIFICATE-----
MIIDGzCCAgOgAwIBAgIUWd2CIejZK0uuqLPUDTUkA20SyAAwDQYJKoZIhvcNAQEL
BQAwHTEbMBkGA1UEAwwSc2VydmVyb3RhLmRkbnMubmV0MB4XDTIxMDkzMDEyMjkx
MFoXDTIzMDkzMDEyMjkxMFowHTEbMBkGA1UEAwwSc2VydmVyb3RhLmRkbnMubmV0
MIIBIjANBgkqhkiG9w0BAQEFAAOCAQ8AMIIBCgKCAQEAxXtdGLH6IZKnpJYCyyI9
PWN6dQe4wM0J85lqF+omjxmHCY4WQfON6PwIxlhnDDGC4pj/2m2wFkIpg1sDyMmS
Ow8Q0c7Zu3nqDk5gptKWtkjQdmOlsa48jAX49fwvb6Fwyh+Hz94lLuCTQi59LG2S
UPuubXh74ct1pKnc8pwgtIuClSSbgcLCGkhAnLbjTJaet4UemgVcUcorlmqwDKbd
VQR+5DL6biVxy+cLJcwKqH93xrj9hh1I4ktWSBpM/xInlGnA1Fa0qtGrM6m+d3uq
E/GL6MpM0kIvTyxyFVk+LlProQS8zNyRU1KAw51EcT5qcj6FkVMVpSodyARoJPwn
BwIDAQABo1MwUTAdBgNVHQ4EFgQUY6S5QEqFZe7UTVQLAuet07qsW6MwHwYDVR0j
BBgwFoAUY6S5QEqFZe7UTVQLAuet07qsW6MwDwYDVR0TAQH/BAUwAwEB/zANBgkq
hkiG9w0BAQsFAAOCAQEAmxHExHoWclbgdhsIenSyb2wihbC7+QO69dAfQPwJOEQ9
9Lb4h6nmJzuHD+ohFsnNDm3cnKadG7F7to7/LdeG4g5qBNzdMVolsgMTMQ0wyFBx
iTxKPh2FGsGvzftJoYLNXAYXDKtrwK7cxn+HOQOqCw7Q2clMRljva42GQJytDsOx
7F6pVNDnDzo2H1Sni7WzwzIQGb06dUinPY4AhunYRaasbWAU4a4K35x2c5IqCrMW
5TYYCt2KMOaTNLbd0Lh9/ImeJnImAVGN8DivXbtNfhrj+Pl8McHnUztUMkcyHMNR
dVRh0YwsiXtZcu+RWatZB2eJQZJyZx04pIAwgIdhBA==
-----END CERTIFICATE-----
)EOF";


const char* updateServer = "serverota.ddns.net";
const int updateServerPort = 3443;

void setup() {

  Serial.begin(115200);
  // Serial.setDebugOutput(true);

  Serial.println();
  Serial.println();
  Serial.println();

  for (uint8_t t = 4; t > 0; t--) {
    Serial.printf("[SETUP] WAIT %d...\n", t);
    Serial.flush();
    delay(1000);
  }

  WiFi.mode(WIFI_STA);

  WiFiMulti.addAP(APSSID, APPSK);

  Serial.print(F("Firmware version "));
  Serial.println(FIRMWARE_VERSION);


//  WiFi.setDNS(dns1, dns2);

  delay(2000);

}

void loop() {
  // wait for WiFi connection
  if ((WiFiMulti.run() == WL_CONNECTED)) {
	    setClock();

	    WiFiClientSecure client;
//	    client.setInsecure();

	    client.setCACert(serverCACert);

	    // Reading data over SSL may be slow, use an adequate timeout
	    client.setTimeout(12000 / 1000); // timeout argument is defined in seconds for setTimeout

		// httpUpdate.setLedPin(LED_BUILTIN, LOW);

		httpUpdate.rebootOnUpdate(false); // remove automatic update

		Serial.println(F("Update start now!"));

		t_httpUpdate_return ret = httpUpdate.update(client, "https://"+String(updateServer)+":"+String(updateServerPort)+"/update", FIRMWARE_VERSION);

		switch (ret) {
		  case HTTP_UPDATE_FAILED:
			Serial.printf("HTTP_UPDATE_FAILD Error (%d): %s\n", httpUpdate.getLastError(), httpUpdate.getLastErrorString().c_str());
			Serial.println(F("Retry in 10secs!"));
			delay(10000); // Wait 10secs
			break;

		  case HTTP_UPDATE_NO_UPDATES:
			Serial.println("HTTP_UPDATE_NO_UPDATES");
			break;

		  case HTTP_UPDATE_OK:
			Serial.println("HTTP_UPDATE_OK");
			delay(1000); // Wait a second and restart
			ESP.restart();
			break;
		}
			delay(10000);
	  }
}
The serial output is the same as the HTTP update.
[SETUP] WAIT 4...
[SETUP] WAIT 3...
[SETUP] WAIT 2...
[SETUP] WAIT 1...
Firmware version 0.1
Waiting for NTP time sync: .
Current time: Thu Sep 30 13:16:54 2021
Update start now!
HTTP_UPDATE_OK
ets Jun  8 2016 00:22:57

rst:0xc (SW_CPU_RESET),boot:0x13 (SPI_FAST_FLASH_BOOT)
configsip: 0, SPIWP:0xee
clk_drv:0x00,q_drv:0x00,d_drv:0x00,cs0_drv:0x00,hd_drv:0x00,wp_drv:0x00
mode:DIO, clock div:1
load:0x3fff0018,len:4
load:0x3fff001c,len:1216
ho 0 tail 12 room 4
load:0x40078000,len:10944
load:0x40080400,len:6388
entry 0x400806b4


[SETUP] WAIT 4...
[SETUP] WAIT 3...
[SETUP] WAIT 2...
[SETUP] WAIT 1...
Firmware version 0.2
Thanks
- ESP32: pinout, specs and Arduino IDE configuration
- ESP32: integrated SPIFFS Filesystem
- ESP32: manage multiple Serial and logging
- ESP32 practical power saving
- ESP32 practical power saving: manage WiFi and CPU
- ESP32 practical power saving: modem and light sleep
- ESP32 practical power saving: deep sleep and hibernation
- ESP32 practical power saving: preserve data, timer and touch wake up
- ESP32 practical power saving: external and ULP wake up
- ESP32 practical power saving: UART and GPIO wake up
- ESP32: integrated LittleFS FileSystem
- ESP32: integrated FFat (Fat/exFAT) FileSystem
- ESP32-wroom-32
- ESP32-CAM
- ESP32: use ethernet w5500 with plain (HTTP) and SSL (HTTPS)
- ESP32: use ethernet enc28j60 with plain (HTTP) and SSL (HTTPS)
- How to use SD card with esp32
- esp32 and esp8266: FAT filesystem on external SPI flash memory
- Firmware and OTA update management
- Firmware management
- OTA update with Arduino IDE
- OTA update with Web Browser
- Self OTA uptate from HTTP server
- Non-standard Firmware update
- Integrating LAN8720 with ESP32 for Ethernet Connectivity with plain (HTTP) and SSL (HTTPS)
- Connecting the EByte E70 to ESP32 c3/s3 devices and a simple sketch example
- ESP32-C3: pinout, specs and Arduino IDE configuration
- Integrating W5500 with ESP32 Using Core 3: Native Ethernet Protocol Support with SSL and Other Features
- Integrating LAN8720 with ESP32 Using Core 3: Native Ethernet Protocol Support with SSL and Other Features
- Dallas ds18b20:
- Guide to I2C on ESP32: Communication with Heterogeneous 5V and 3.3V Devices, Additional Interface Management and Scanner
- Display
- Complete Guide: Using an ILI9341 Display with the TFT_eSPI Library
- Integrating Touch Screen Functionality with Your ILI9341 TFT Display
- SSD1683 eInk Display with GxEPD and ESP32 (and CrowPanel 4.2″ HMI): basics and configuration


Hi!
I’ve tested this way to update firmware to my ESP32 using WiFi and it works great, nice job.
I have two questions for you:
1.- Could be possible to do this method using an external Internet link, not only local IPs (like a file .bin in GitHub with raw.githubusercontent.com prefix)?
2.- Which changes should I do to make it work with Ethernet? I’m trying to do OTA updates with HTTPS via Ethernet with an ENC28J60 module.
Thanks!
Hi Ignacio,
1 – sure, in this specified case, you need a nodejs server.
Or another solution is to use your PC and use Dynamic DNS and set the correct port to a you PC.
2 – Yes, you can follow the guide to add SSL to the device
ESP32: ethernet enc28j60 with plain (HTTP) and SSL (HTTPS)
If you need a more specified info you can try also to the forum or here.
Bye Renzo
hi friend
great job
please explain server side ( node.js server )
thanks
Hi Reza,
I created/explained the server side in Nodejs step by step, trying to start from the first article.
If you have some trouble, write without a problem.
Bye Renzo
hello renzo, I have some questions
1. in my serial output I only get this, and no indication of an update. Do you know why that is?
[SETUP] WAIT 4…
[SETUP] WAIT 3…
[SETUP] WAIT 2…
[SETUP] WAIT 1…
Firmware version 0.3
I am not getting anything else
2. if I updated the firmware in this sketch, then I run another camera sketch, will I still have the update stored on my esp32? or will it reset
also, thank you for the great sketch
Hi,
It’s mean that the server not found anything to update.
Bye Renzo
Hi.. Thank you for a wonderful article which briefly explain how to use tls/ssl .
If I am wrong please correct me, at the interval of 90 days ssl expires and new certificate should be updated in device. Can you please let me know any article or way to update the ssl/tls in device?
Hi Nikunj,
you can use a server to stream/download the certificate, but you can specify the days before expiring when you create It:
openssl req -x509 -nodes -days 730 -newkey rsa:2048 -keyout server.key -out server.crt -subj "/CN=192.168.1.70"In this case, to set 730 days, I add the param
-days 730Bye Renzo