
ESP32 self OTA update firmware from server – 1
The ESP32 is a powerful microcontroller that can be used in a wide range of applications, from IoT devices to robotics projects. One of its key features is the ability to perform Over-The-Air (OTA) updates of its firmware from a server. This allows you to remotely update the firmware of an ESP32-based device without having to access the device physically.
OTA (Over the Air) update is the process of uploading firmware to an ESP32 module using a Wi-Fi connection rather than a serial port. Such functionality becomes extremely useful in case of limited or no physical access to the module.
To perform a self-OTA update, you must set up a server that hosts the new firmware image and add OTA support to your ESP32 firmware. You can then configure the ESP32 to check the server for new firmware updates periodically, and when a new update is available, the ESP32 will download it from the server and install it.
By implementing OTA updates on your ESP32-based devices, you can ensure that your devices are always running the latest firmware without having to access each device to perform updates physically. This can save you time and effort, especially if you have a large number of devices deployed in the field.
OTA may be done using the following:
- Arduino IDE
- Web Browser
- HTTP Server
First of all, check the tutorial “ESP32: flash compiled firmware (.bin)“.
In this article, we are going to explain OTA updates with an automatic update from an HTTP server.
Automatic OTA update every application start
ESPhttpUpdate class can check for updates and download a binary file from the HTTP web server. It is possible to download updates from every IP or domain address on the network or Internet.
Note that by default, this class closes all other connections except the one used by the update; this is because the update method blocks. This means that if there’s another application receiving data, then TCP packets will build up in the buffer leading to out-of-memory errors and causing the OTA update to fail. There’s also a limited number of receive buffers available, and other applications may use it all up.
There are some cases where you know that you won’t be receiving any data but would still like to send progress updates. It’s possible to disable the default behavior (and keep connections open) by calling closeConnectionsOnUpdate(false). (Cit.)
Create a basic web server
Now we are going o create a fast server, now to download the firmware next to manage REST.
Prepare environment
- We use NodeJS, and you can download It from here.
- After installation, create a new directory
OTAServer. - CD inside the
OTAServerfolder.
Initialize application
- Inside folder launch
npm init.
D:\Projects\IdeaProjects\OTAWebPages\OTAServer>npm init
This utility will walk you through creating a package.json file.
It only covers the most common items, and tries to guess sensible defaults.

See `npm help init` for definitive documentation on these fields
and exactly what they do.

Use `npm install <pkg>` afterwards to install a package and
save it as a dependency in the package.json file.

Press ^C at any time to quit.
package name: (otaserver)
version: (1.0.0)
description: Server to test HTTP server OTA update
entry point: (index.js)
test command:
git repository:
keywords: OTA esp8266 esp32 Server
author: Renzo Mischianti
license: (ISC)
About to write to D:\Projects\IdeaProjects\OTAWebPages\OTAServer\package.json:

{
  "name": "otaserver",
  "version": "1.0.0",
  "description": "Server to test HTTP server OTA update",
  "main": "index.js",
  "scripts": {
    "test": "echo \"Error: no test specified\" && exit 1"
  },
  "keywords": [
    "OTA",
    "esp8266",
    "esp32",
    "Server"
  ],
  "author": "Renzo Mischianti",
  "license": "ISC"
}


Is this OK? (yes) yes
- Install express the basic server in NodeJS
npm install express --save-dev
Basic web server code
- Create
index.js. - Add this content on
index.js.
const express = require('express');
const { networkInterfaces } = require('os');

const app = express();
const nets = networkInterfaces();

// Server port
const PORT = 3000;

app.get('/', (request, response) => response.send('Hello from www.mischianti.org!'));

app.listen(PORT, () => {
    const results = {}; // Or just '{}', an empty object

    for (const name of Object.keys(nets)) {
        for (const net of nets[name]) {
            // Skip over non-IPv4 and internal (i.e. 127.0.0.1) addresses
            if (net.family === 'IPv4' && !net.internal) {
                if (!results[name]) {
                    results[name] = [];
                }
                results[name].push(net.address);
            }
        }
    }

    console.log('Listening on port '+PORT+'\n', results)
});
- Start the application with
node index.js.
D:\Projects\IdeaProjects\OTAWebPages\OTAServer>node index.js
Listening on port 3000
 {
  'VirtualBox Host-Only Network': [ '192.168.56.1' ],
  'VMware Network Adapter VMnet1': [ '192.168.113.1' ],
  'VMware Network Adapter VMnet8': [ '192.168.116.1' ],
  'Wi-Fi': [ '192.168.1.108' ],
  Ethernet: [ '192.168.1.125' ]
}
- Grab the correct IP from the console, we can’t use localhost or 127.0.0.1 for our test, so I print at the start all the interfaces, and in my case, the IP of the current application is Ethernet: [ ‘192.168.1.125’ ]
- Put on the browser the URL
http://192.168.1.125:3000/. - Check in the browser page the sentence “Hello from www.mischianti.org!”.
Create the initial sketch
We can use the basic example that you can find on File -> Examples -> HTTPUpdate -> httpUpdate.
We change It to point at our new server.
/*
 * ESP32 Basic Sketch for automatic update of firmware at start
 *
 * Renzo Mischianti <www.mischianti.org>
 *
 * https://mischianti.org
*/

#include <Arduino.h>

#include <WiFi.h>
#include <WiFiMulti.h>

#include <HTTPClient.h>
#include <HTTPUpdate.h>

#ifndef APSSID
#define APSSID "<YOUR-SSID>"
#define APPSK  "<YOUR-PASSWD>"
#endif

WiFiMulti WiFiMulti;

#define FIRMWARE_VERSION "0.2"

void setup() {

  Serial.begin(115200);
  // Serial.setDebugOutput(true);

  Serial.println();
  Serial.println();
  Serial.println();

  for (uint8_t t = 4; t > 0; t--) {
    Serial.printf("[SETUP] WAIT %d...\n", t);
    Serial.flush();
    delay(1000);
  }

  WiFi.mode(WIFI_STA);
  WiFiMulti.addAP(APSSID, APPSK);

  Serial.print(F("Firmware version "));
  Serial.println(FIRMWARE_VERSION);
  delay(2000);

}

void loop() {
  // wait for WiFi connection
  if ((WiFiMulti.run() == WL_CONNECTED)) {

    WiFiClient client;

    // The line below is optional. It can be used to blink the LED on the board during flashing
    // The LED will be on during download of one buffer of data from the network. The LED will
    // be off during writing that buffer to flash
    // On a good connection the LED should flash regularly. On a bad connection the LED will be
    // on much longer than it will be off. Other pins than LED_BUILTIN may be used. The second
    // value is used to put the LED on. If the LED is on with HIGH, that value should be passed
    // httpUpdate.setLedPin(LED_BUILTIN, LOW);

    httpUpdate.rebootOnUpdate(false); // remove automatic update

    Serial.println(F("Update start now!"));

    // t_httpUpdate_return ret = ESPhttpUpdate.update(client, "http://192.168.1.125:3000/firmware/httpUpdateNew.bin");
    // Or:
    t_httpUpdate_return ret = httpUpdate.update(client, "192.168.1.125", 3000, "/firmware/httpUpdateNew.bin");

    switch (ret) {
      case HTTP_UPDATE_FAILED:
        Serial.printf("HTTP_UPDATE_FAILD Error (%d): %s\n", httpUpdate.getLastError(), httpUpdate.getLastErrorString().c_str());
        Serial.println(F("Retry in 10secs!"));
        delay(10000); // Wait 10secs
        break;

      case HTTP_UPDATE_NO_UPDATES:
        Serial.println("HTTP_UPDATE_NO_UPDATES");
        break;

      case HTTP_UPDATE_OK:
        Serial.println("HTTP_UPDATE_OK");
        delay(1000); // Wait a second and restart
        ESP.restart();
        break;
    }
  }
}
Remember to add your SSID and PASSWD
If you upload the sketch now, you will receive this error on the Serial output.
[SETUP] WAIT 4...
[SETUP] WAIT 3...
[SETUP] WAIT 2...
[SETUP] WAIT 1...
Firmware version 0.1
Update start now!
HTTP_UPDATE_FAILD Error (-11): HTTP error: read Timeout
Retry in 10secs!
This is because It can’t find the Firmware on path http://192.168.1.125:3000/firmware/httpUpdateNew.bin, and the server returns an HTTP code 404 Not found.
If you stop the server receive
[SETUP] WAIT 4...
[SETUP] WAIT 3...
[SETUP] WAIT 2...
[SETUP] WAIT 1...
Firmware version 0.1
Update start now!
CALLBACK:  HTTP update fatal error code -1
HTTP_UPDATE_FAILD Error (-1): HTTP error: connection failed
Retry in 10secs!
Generate binary file
Refer to the article “ESP32: flash compiled firmware (.bin)” to understand all types of compiled binary files.
Follow these steps to generate a binary file:
- Click on
Sketch -> Export Compiled Binary;
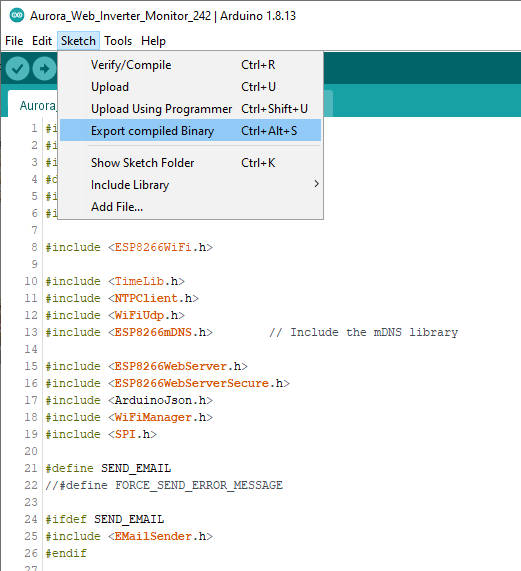
- Click on
Sketch -> Open Sketch Folder; - Rename the .bin file to
httpUpdateNew.bin.
Create download URL
Now return to OTAServer folder and:
- Create
firmwarefolder. - Put a
httpUpdateNew.binthe file inside the firmware folder. - Add to your index.js the download URL in GET
const express = require('express');
const { networkInterfaces } = require('os');
const path = require('path');

const app = express();
const nets = networkInterfaces();

// Server port
const PORT = 3000;

app.get('/', (request, response) => response.send('Hello from www.mischianti.org!'));

let downloadCounter = 1;
app.get('/firmware/httpUpdateNew.bin', (request, response) => {
    response.download(path.join(__dirname, 'firmware/httpUpdateNew.bin'), 'httpUpdateNew.bin', (err)=>{
        if (err) {
            console.error("Problem on download firmware: ", err)
        }else{
            downloadCounter++;
        }
    });
    console.log('Your file has been downloaded '+downloadCounter+' times!')
})

app.listen(PORT, () => {
    const results = {}; // Or just '{}', an empty object

    for (const name of Object.keys(nets)) {
        for (const net of nets[name]) {
            // Skip over non-IPv4 and internal (i.e. 127.0.0.1) addresses
            if (net.family === 'IPv4' && !net.internal) {
                if (!results[name]) {
                    results[name] = [];
                }
                results[name].push(net.address);
            }
        }
    }

    console.log('Listening on port '+PORT+'\n', results)
});
- Restart application with
Ctrl+Candnode index.js. - Test the URL by writing in the Browser URL
http://192.168.1.125:3000/firmware/httpUpdateNew.bin
If all is ok, the download start, and you can find in the console these lines
D:\Projects\IdeaProjects\OTAWebPages\OTAServer>node index.js
Listening on port 3000
 {
  'VirtualBox Host-Only Network': [ '192.168.56.1' ],
  'VMware Network Adapter VMnet1': [ '192.168.113.1' ],
  'VMware Network Adapter VMnet8': [ '192.168.116.1' ],
  'Wi-Fi': [ '192.168.1.108' ],
  Ethernet: [ '192.168.1.125' ]
}
Your file has been downloaded 1 times!
Your file has been downloaded 2 times!
Final test
Now if we change FIRMWARE_VERISON to 0.2 and retry the result becomes like so:
[SETUP] WAIT 4...
[SETUP] WAIT 3...
[SETUP] WAIT 2...
[SETUP] WAIT 1...
Firmware version 0.1
Update start now!
HTTP_UPDATE_OK
ets Jun  8 2016 00:22:57

rst:0xc (SW_CPU_RESET),boot:0x13 (SPI_FAST_FLASH_BOOT)
configsip: 0, SPIWP:0xee
clk_drv:0x00,q_drv:0x00,d_drv:0x00,cs0_drv:0x00,hd_drv:0x00,wp_drv:0x00
mode:DIO, clock div:1
load:0x3fff0018,len:4
load:0x3fff001c,len:1216
ho 0 tail 12 room 4
load:0x40078000,len:10944
load:0x40080400,len:6388
entry 0x400806b4


[SETUP] WAIT 4...
[SETUP] WAIT 3...
[SETUP] WAIT 2...
[SETUP] WAIT 1...
Firmware version 0.2
Update start now!
HTTP_UPDATE_OK
To prevent continuous update, you must use a time or a process that activate the work.
Automatic FileSystem OTA updates every application start
In the same manner, we can manage filesystem updates. We are going fast now because It’s the same logic as a firmware update.
Generate FileSystem binary file
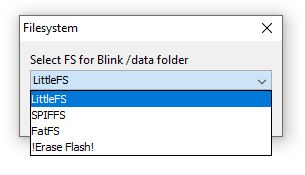
To manage the filesystem, we can use the same way, but first, you must read one of the following guides:
- ESP32: integrated SPIFFS FileSystem
- ESP32: integrated LittleFS FileSystem
- ESP32: integrated FFat (FAT/exFAT) FileSystem
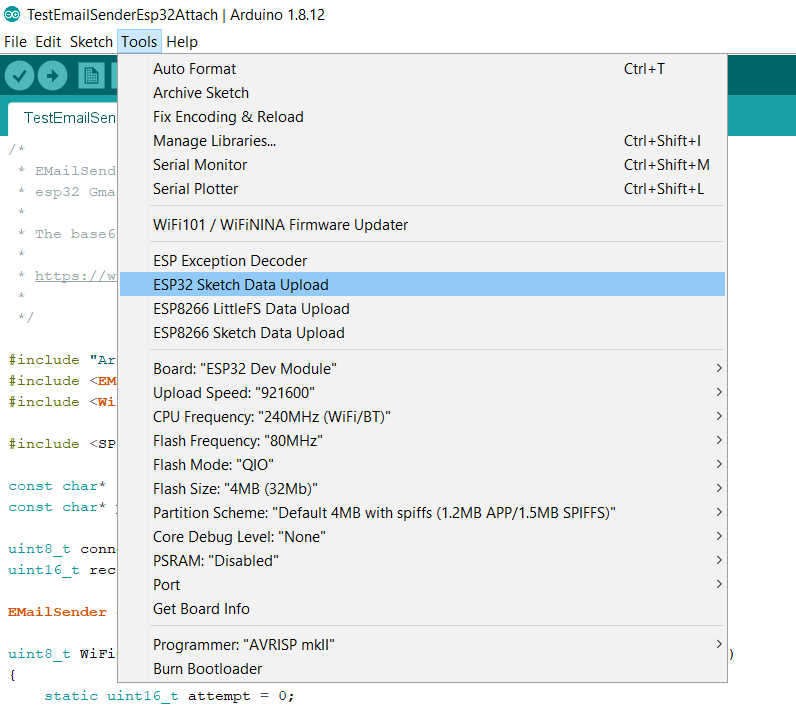
After that operation, you can use the plugin as usual.
Now we are going to add data directory to the sketch folder, and we create a file version.txt with this content
0.2
and use the plugin to upload.
You can check the IDE console output to check what happened.
Chip : esp32
Using partition scheme from Arduino IDE.
Start: 0x290000
Size : 0x170000
mkspiffs : C:\Users\renzo\AppData\Local\Arduino15\packages\esp32\tools\mkspiffs\0.2.3\mkspiffs.exe

espota : C:\Users\renzo\AppData\Local\Arduino15\packages\esp32\hardware\esp32\2.0.0\tools\espota.exe

[SPIFFS] data   : D:\Projects\Arduino\sloeber-workspace-OTA\ArduinoOTAesp32_basic_arduino\data
[SPIFFS] offset : 0
[SPIFFS] start  : 2686976
[SPIFFS] size   : 1472
[SPIFFS] page   : 256
[SPIFFS] block  : 4096
->/version.txt
[SPIFFS] upload : C:\Users\renzo\AppData\Local\Temp\arduino_build_258074/ArduinoOTAesp32_basic_arduino.spiffs.bin
[SPIFFS] IP     : 192.168.1.186
Running: C:\Users\renzo\AppData\Local\Arduino15\packages\esp32\hardware\esp32\2.0.0\tools\espota.exe -i 192.168.1.186 -p 3232 -s -f C:\Users\renzo\AppData\Local\Temp\arduino_build_258074/ArduinoOTAesp32_basic_arduino.spiffs.bin

_>Sending invitation to 192.168.1.186
_>Uploading................................................................................................................................................................................................................................................................................................................................................................................................................................................................................................................................................................................................................................................................................................................................................................................................................................................................................................................................................................................................................................................................................................................................................................................................................................................................................................................................................................................................................................................................................................................................
_>09:21:38 [ERROR]: Error response from device
SPIFFS Upload failed!
The IDE console returns an error, but the upload work; I think there is a little bug now when I write this article.
IDE gives an error but it is a bug, the loading works correctly
You can retrieve the file system bin file from this line
[SPIFFS] upload : C:\Users\renzo\AppData\Local\Temp\arduino_build_258074/ArduinoOTAesp32_basic_arduino.spiffs.bin
Create sketch
Now we are going to modify the sketch already used for firmware.
/*
 * Basic Sketch for ESP32 automatic update of filesystem at start
 *
 * Renzo Mischianti <www.mischianti.org>
 *
 * https://mischianti.org
*/

#include <Arduino.h>

#include <WiFi.h>
#include <WiFiMulti.h>

#include <HTTPClient.h>
#include <HTTPUpdate.h>
#include <SPIFFS.h>

#ifndef APSSID
#define APSSID "<YOUR-SSID>"
#define APPSK  "<YOUR-PASSWD>"
#endif

WiFiMulti WiFiMulti;

#define FIRMWARE_VERSION "0.2"

void setup() {

  Serial.begin(115200);
  // Serial.setDebugOutput(true);

  Serial.println();
  Serial.println();
  Serial.println();

  for (uint8_t t = 4; t > 0; t--) {
    Serial.printf("[SETUP] WAIT %d...\n", t);
    Serial.flush();
    delay(1000);
  }

  WiFi.mode(WIFI_STA);
  WiFiMulti.addAP(APSSID, APPSK);

  Serial.print(F("Firmware version "));
  Serial.println(FIRMWARE_VERSION);

  Serial.print(F("Inizializing FS..."));
  if (SPIFFS.begin()){
      Serial.println(F("done."));
  }else{
      Serial.println(F("fail."));
  }

  String fileSystemVersion = "Not set!";
  Serial.print(F("FileSystem version "));
  File versionFile = SPIFFS.open(F("/version.txt"), "r");
  if (versionFile) {
	  fileSystemVersion = versionFile.readString();
	  versionFile.close();
  }
  Serial.println(fileSystemVersion);
  delay(2000);
}

void loop() {
  // wait for WiFi connection
  if ((WiFiMulti.run() == WL_CONNECTED)) {

    WiFiClient client;

    // The line below is optional. It can be used to blink the LED on the board during flashing
    // The LED will be on during download of one buffer of data from the network. The LED will
    // be off during writing that buffer to flash
    // On a good connection the LED should flash regularly. On a bad connection the LED will be
    // on much longer than it will be off. Other pins than LED_BUILTIN may be used. The second
    // value is used to put the LED on. If the LED is on with HIGH, that value should be passed
    // httpUpdate.setLedPin(LED_BUILTIN, LOW);

    httpUpdate.rebootOnUpdate(false); // remove automatic update

    Serial.println(F("Update start now!"));

    t_httpUpdate_return ret = httpUpdate.updateSpiffs(client, "http://192.168.1.125:3000/filesystem/httpUpdateNewFS.bin");

    switch (ret) {
      case HTTP_UPDATE_FAILED:
        Serial.printf("HTTP_UPDATE_FAILD Error (%d): %s\n", httpUpdate.getLastError(), httpUpdate.getLastErrorString().c_str());
        Serial.println(F("Retry in 10secs!"));
        delay(10000); // Wait 10secs
        break;

      case HTTP_UPDATE_NO_UPDATES:
        Serial.println("HTTP_UPDATE_NO_UPDATES");
        break;

      case HTTP_UPDATE_OK:
        Serial.println("HTTP_UPDATE_OK");
        delay(1000); // Wait a second and restart
        ESP.restart();
        break;
    }
  }
}
At the start, you get on Serial output this result
[SETUP] WAIT 4...
[SETUP] WAIT 3...
[SETUP] WAIT 2...
[SETUP] WAIT 1...
Firmware version 0.2
Inizializing FS...done.
FileSystem version
Update start now!
HTTP_UPDATE_FAILD Error (-102): File Not Found (404)
Retry in 10secs!
The filesystem version is grabbed from the version.txt file and shown with this code
  String fileSystemVersion = "Not set!";
  Serial.print(F("FileSystem version "));
  File versionFile = SPIFFS.open(F("/version.txt"), "r");
  if (versionFile) {
	  fileSystemVersion = versionFile.readString();
	  versionFile.close();
  }
  Serial.println(fileSystemVersion);
and the core line code is
t_httpUpdate_return ret = httpUpdate.updateSpiffs(client, "http://192.168.1.125:3000/filesystem/httpUpdateNewFS.bin");
that manages the download and update.
Create FileSystem download end-point
Now we add the download endpoint to the implementation of the server.
- In OTAServer, create the folder filesystem,
- Change version to
0.3inversion.txt, regenerate without upload, and copy the fileArduinoOTAesp32_basic_fs_http_update.mkspiffs.binto the folder - Rename in
httpUpdateNewFS.bin.
And modify the original by adding the highlighted code.
const express = require('express');
const { networkInterfaces } = require('os');
const path = require('path');

const app = express();
const nets = networkInterfaces();

// Server port
const PORT = 3000;

app.get('/', (request, response) => response.send('Hello from www.mischianti.org!'));

let downloadCounter = 1;
app.get('/firmware/httpUpdateNew.bin', (request, response) => {
    response.download(path.join(__dirname, 'firmware/httpUpdateNew.bin'), 'httpUpdateNew.bin', (err)=>{
        if (err) {
            console.error("Problem on download firmware: ", err)
        }else{
            downloadCounter++;
        }
    });
    console.log('Your file has been downloaded '+downloadCounter+' times!')
})

let downloadFSCounter = 1;
app.get('/filesystem/httpUpdateNewFS.bin', (request, response) => {
    response.download(path.join(__dirname, 'filesystem/httpUpdateNewFS.bin'), 'httpUpdateNewFS.bin', (err)=>{
        if (err) {
            console.error("Problem on download filesystem: ", err)
        }else{
            downloadFSCounter++;
        }
    });
    console.log('Your file FS has been downloaded '+downloadFSCounter+' times!')
})

app.listen(PORT, () => {
    const results = {}; // Or just '{}', an empty object

    for (const name of Object.keys(nets)) {
        for (const net of nets[name]) {
            // Skip over non-IPv4 and internal (i.e. 127.0.0.1) addresses
            if (net.family === 'IPv4' && !net.internal) {
                if (!results[name]) {
                    results[name] = [];
                }
                results[name].push(net.address);
            }
        }
    }

    console.log('Listening on port '+PORT+'\n', results)
});
Final test
[SETUP] WAIT 4...
[SETUP] WAIT 3...
[SETUP] WAIT 2...
[SETUP] WAIT 1...
Firmware version 0.2
Inizializing FS...done.
FileSystem version 0.1
Update start now!
HTTP_UPDATE_OK
ets Jun  8 2016 00:22:57

rst:0xc (SW_CPU_RESET),boot:0x13 (SPI_FAST_FLASH_BOOT)
configsip: 0, SPIWP:0xee
clk_drv:0x00,q_drv:0x00,d_drv:0x00,cs0_drv:0x00,hd_drv:0x00,wp_drv:0x00
mode:DIO, clock div:1
load:0x3fff0018,len:4
load:0x3fff001c,len:1216
ho 0 tail 12 room 4
load:0x40078000,len:10944
load:0x40080400,len:6388
entry 0x400806b4


[SETUP] WAIT 4...
[SETUP] WAIT 3...
[SETUP] WAIT 2...
[SETUP] WAIT 1...
Firmware version 0.2
Inizializing FS...done.
FileSystem version 0.2
Thanks
- ESP32: pinout, specs and Arduino IDE configuration
- ESP32: integrated SPIFFS Filesystem
- ESP32: manage multiple Serial and logging
- ESP32 practical power saving
- ESP32 practical power saving: manage WiFi and CPU
- ESP32 practical power saving: modem and light sleep
- ESP32 practical power saving: deep sleep and hibernation
- ESP32 practical power saving: preserve data, timer and touch wake up
- ESP32 practical power saving: external and ULP wake up
- ESP32 practical power saving: UART and GPIO wake up
- ESP32: integrated LittleFS FileSystem
- ESP32: integrated FFat (Fat/exFAT) FileSystem
- ESP32-wroom-32
- ESP32-CAM
- ESP32: use ethernet w5500 with plain (HTTP) and SSL (HTTPS)
- ESP32: use ethernet enc28j60 with plain (HTTP) and SSL (HTTPS)
- How to use SD card with esp32
- esp32 and esp8266: FAT filesystem on external SPI flash memory
- Firmware and OTA update management
- Firmware management
- OTA update with Arduino IDE
- OTA update with Web Browser
- Self OTA uptate from HTTP server
- Non-standard Firmware update
- Integrating LAN8720 with ESP32 for Ethernet Connectivity with plain (HTTP) and SSL (HTTPS)
- Connecting the EByte E70 to ESP32 c3/s3 devices and a simple sketch example
- ESP32-C3: pinout, specs and Arduino IDE configuration
- Integrating W5500 with ESP32 Using Core 3: Native Ethernet Protocol Support with SSL and Other Features
- Integrating LAN8720 with ESP32 Using Core 3: Native Ethernet Protocol Support with SSL and Other Features


Do you know if your “Firmware and OTA update management” examples still work with Arduino IDE 2.2.1 (current)?
BTW, these are great examples, just a lot of outdated images, possibly code.
Hi Timothy,
sure, the code is independent from the IDE I developed with Eclipse Sloeber.
But pay attention, the Arduino IDE 2 doesn’t have the filesystem plugin and other features like ESP trace visualizer. You also need the old version to work with the filesystem.
Bye Renzo
why we can’t use localhost or 127.0.0.1 for our test? and how about the solution?
Thanks
Hi Jack,
we connect an external device to the server, so you must use the ip of the server.
Localhost, called from esp32, refer to the esp32 itself.
Bye Renzo
I used a Apache server and got this message:
HTTP_UPDATE_FAILD Error (-108): Partition Could Not be Found
Hi Andreas,
It seems that you set the wrong configuration on your IDE about FS.
Bye Renzo
this is a nice application of OTA
unfortunately it doesn’t solve, the same as classic WIFI OTA, that the bin file is open and in case of obtaining it is possible to apply this file on your own hw
I haven’t thought about how to secure the bin file for updates so that it can’t be used elsewhere than where it was intended, or to secure it against reverse inversion ..it’s about distributing updates for devices I’ve developed and need to update from time to time ..I haven’t found any functional and simple way (for example using xor,char13 or similar) and for uploading to ESP realtime unpacking
Martin
Hi Martin,
I don’t understand very well, but I think you need to protect the update link with a certificate and verify the version or the firmware type with a rest call, like this.
Bye Renzo