
ESP32 firmware and filesystem update from SD card – 1
Welcome to another installment in our series on firmware management for the ESP32 microcontroller. In this article, we will explore a non-standard but highly effective method for updating both the firmware and filesystem on your ESP32. This technique utilizes an SD card to store and transfer update files, providing a robust and easily accessible solution for developers and hobbyists alike.
As we dive into this topic, we will build on the knowledge gained from previous articles in the series, which covered various methods for flashing compiled firmware (.bin) files, OTA updates with Arduino IDE, web browser-based updates, and self-OTA updates from HTTP servers. In this article, we will outline the steps necessary to prepare your ESP32 for SD card-based updates, discuss the advantages and disadvantages of this approach, and provide a detailed walkthrough for setting up the required hardware and software.
By the end of this article, you will have a comprehensive understanding of how to perform ESP32 firmware and filesystem updates using an SD card, and you’ll be able to make an informed decision on whether this method is suitable for your specific project requirements.
Here a selection of esp32 ESP32 Dev Kit v1 - TTGO T-Display 1.14 ESP32 - NodeMCU V3 V2 ESP8266 Lolin32 - NodeMCU ESP-32S - WeMos Lolin32 - WeMos Lolin32 mini - ESP32-CAM programmer - ESP32-CAM bundle - ESP32-WROOM-32 - ESP32-S
Update firmware from storage with Update class
Another interesting system to update firmware is to use an SD card or local filesystem, to do that we can use Update class.
A method, in particular, can manage updates via stream
Update.begin(firmwareSizeInBytes);
Update.writeStream(streamVar);
Update.end();
Use SD card for update
A widely used system to update firmware is to add a file inside external storage like removable SD and at the boot of the device, update with It.
In this case, we are going to follow these steps:
- Insert a firmware named
firmware.binin the SD; - At boot check if
firmware.binexist; - If exists, start the stream/update of the file;
- At the end, rename firmware.bin in
firmware.bak, so we stop the loop of updates; - Reset and reboot the microcontroller.
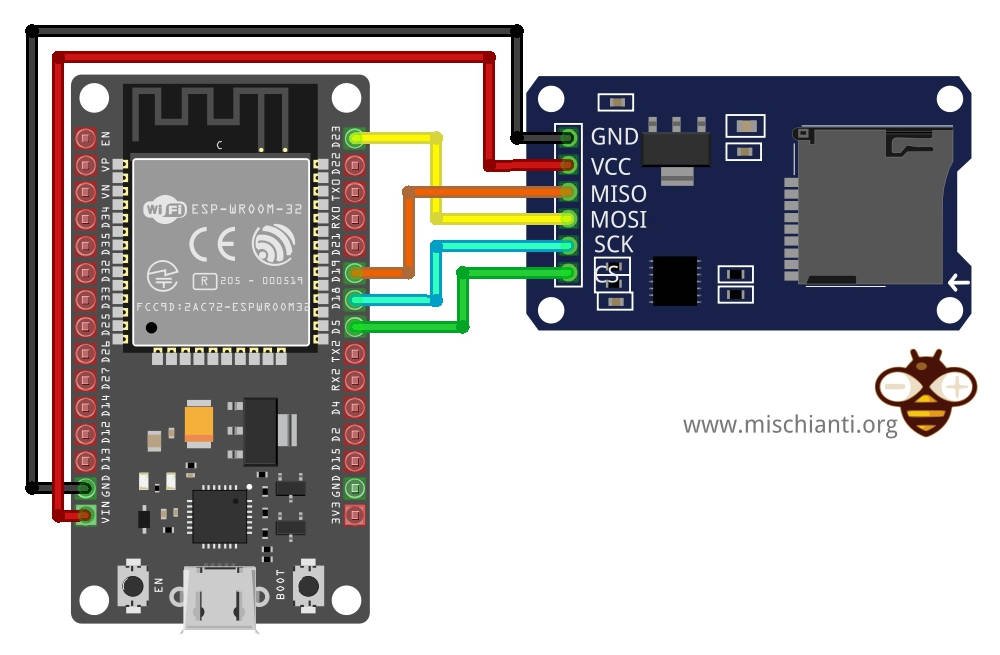
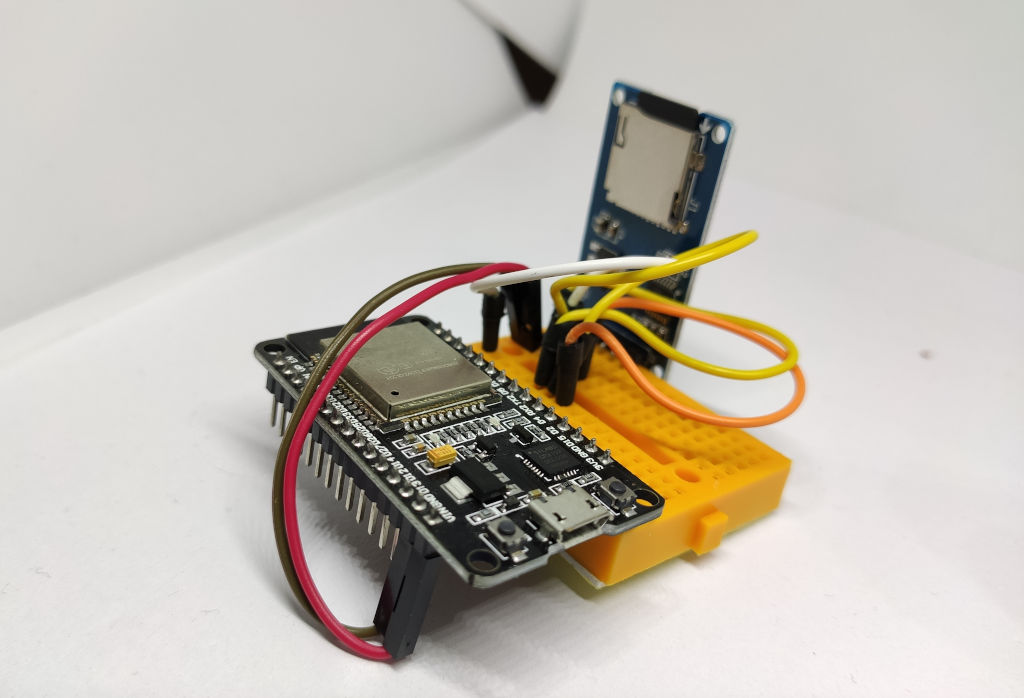
Wiring SD adapter
First, we must wire the SD, and you can follow this tutorial, “How to use SD card with esp32“.
Firmware update sketch via SD card
The sketch is quite simple, and I’m going to explain It in detail.
/*
 * Update ESP32 firmware with external SD
 * Check firmware.bin, if present start update then rename in firmware.bak
 *
 * Renzo Mischianti <www.mischianti.org>
 *
 * https://mischianti.org/
*/

// include the SD library:
#include <SPI.h>
#include <Update.h>
#include <SD.h>

const int chipSelect = SS;

void progressCallBack(size_t currSize, size_t totalSize) {
	  Serial.printf("CALLBACK:  Update process at %d of %d bytes...\n", currSize, totalSize);
}

#define FIRMWARE_VERSION 0.2

void setup() {
  // Open serial communications and wait for port to open:
  Serial.begin(115200);
  while (!Serial) {
    ; // wait for serial port to connect. Needed for native USB port only
  }


  Serial.print("\nInitializing SD card...");

  // we'll use the initialization code from the utility libraries
  // since we're just testing if the card is working!
  if (!SD.begin(SS)) {
    Serial.println("initialization failed. Things to check:");
    Serial.println("* is a card inserted?");
    Serial.println("* is your wiring correct?");
    Serial.println("* did you change the chipSelect pin to match your shield or module?");
    while (1);
  } else {
    Serial.println("Wiring is correct and a card is present.");
  }

  Serial.print("Card size:  ");
  Serial.println((float)SD.cardSize()/1000);

  Serial.print("Total bytes: ");
  Serial.println(SD.totalBytes());

  Serial.print("Used bytes: ");
  Serial.println(SD.usedBytes());

  Serial.print(F("\nCurrent firmware version: "));
  Serial.println(FIRMWARE_VERSION);

  Serial.print(F("\nSearch for firmware.."));
  File firmware =  SD.open("/firmware.bin");
  if (firmware) {
	  Serial.println(F("found!"));
	  Serial.println(F("Try to update!"));

	  Update.onProgress(progressCallBack);

	  Update.begin(firmware.size(), U_FLASH);
	  Update.writeStream(firmware);
	  if (Update.end()){
		  Serial.println(F("Update finished!"));
	  }else{
		  Serial.println(F("Update error!"));
		  Serial.println(Update.getError());
	  }

	  firmware.close();

	  if (SD.rename("/firmware.bin", "/firmware.bak")){
		  Serial.println(F("Firmware rename succesfully!"));
	  }else{
		  Serial.println(F("Firmware rename error!"));
	  }
	  delay(2000);

	  ESP.restart();
  }else{
	  Serial.println(F("not found!"));
  }

  Serial.print(F("Firmware version "));
  Serial.println(FIRMWARE_VERSION);
}

void loop(void) {
}
First, we try to open firmware.bin
  File firmware =  SD.open("/firmware.bin");
  if (firmware) {
If the file exists, start the stream of the file to the OTA partition
	  Update.begin(firmware.size(), U_FLASH);
	  Update.writeStream(firmware);
	  if (Update.end()){
And follow the progress with the relative callback
Update.onProgress(progressCallBack);
In the end, I rename firmware.bin to prevent another update at reboot.
	  if (SD.rename("/firmware.bin", "/firmware.bak")){
		  Serial.println(F("Firmware rename succesfully!"));
	  }else{
		  Serial.println(F("Firmware rename error!"));
	  }
Finally, I restarted the esp to allow the copy of the firmware from the OTA partition to the flash.
Execute the test
For the test, we are going to remove SD and upload the sketch with this version of the firmware.
#define FIRMWARE_VERSION 0.1
Then change the version to 0.2
#define FIRMWARE_VERSION 0.2
And generate compiled binary refers to the article “ESP32: flash compiled firmware (.bin)“
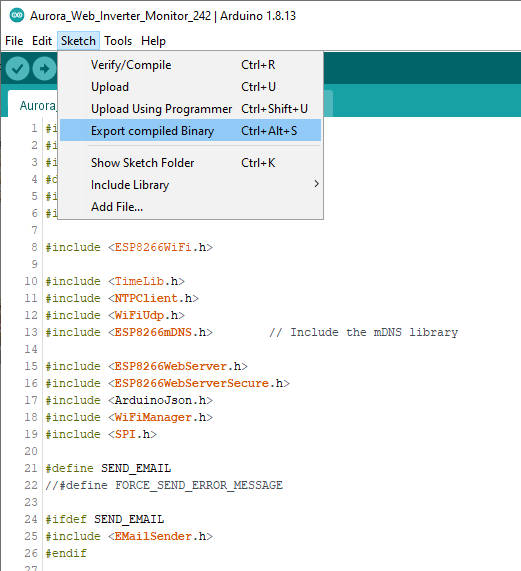
Now you can get the bin file from the sketch folder (Sketch -> Show Sketch Folder), copy it to the SD, and rename it as firmware.bin.
Now when you reinsert the SD and click the reset, you can get this serial output.
Initializing SD card...Wiring is correct and a card is present.
Card size:  3972006.00
Total bytes: 3967680512
Used bytes: 458752

Current firmware version: 0.10

Search for firmware..found!
Try to update!
CALLBACK:  Update process at 0 of 308272 bytes...
CALLBACK:  Update process at 4096 of 308272 bytes...
CALLBACK:  Update process at 8192 of 308272 bytes...
CALLBACK:  Update process at 12288 of 308272 bytes...
CALLBACK:  Update process at 16384 of 308272 bytes...
CALLBACK:  Update process at 20480 of 308272 bytes...

[...]

CALLBACK:  Update process at 294912 of 308272 bytes...
CALLBACK:  Update process at 299008 of 308272 bytes...
CALLBACK:  Update process at 303104 of 308272 bytes...
CALLBACK:  Update process at 307200 of 308272 bytes...
CALLBACK:  Update process at 308272 of 308272 bytes...
Update finished!
Firmware rename succesfully!
ets Jun  8 2016 00:22:57

rst:0xc (SW_CPU_RESET),boot:0x13 (SPI_FAST_FLASH_BOOT)
configsip: 0, SPIWP:0xee
clk_drv:0x00,q_drv:0x00,d_drv:0x00,cs0_drv:0x00,hd_drv:0x00,wp_drv:0x00
mode:DIO, clock div:1
load:0x3fff0018,len:4
load:0x3fff001c,len:1216
ho 0 tail 12 room 4
load:0x40078000,len:10944
load:0x40080400,len:6388
entry 0x400806b4

Initializing SD card...Wiring is correct and a card is present.
Card size:  3972006.00
Total bytes: 3967680512
Used bytes: 458752

Current firmware version: 0.20

Search for firmware..not found!
Firmware version 0.20
Generate FileSystem (SPIFFS, LittleFS, and FFat)
An interesting feature is the management of File Systems like compiled firmware.
Add verbose output to Arduino IDE
To better understand all processes we are going to enable verbose output on our Arduino IDE. You can find these options on File -> Preferences and check Show verbose output checks.
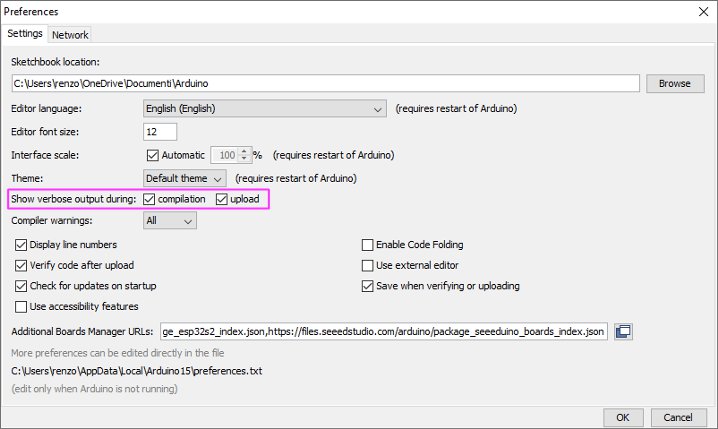
Now we can grab and reuse the console command.
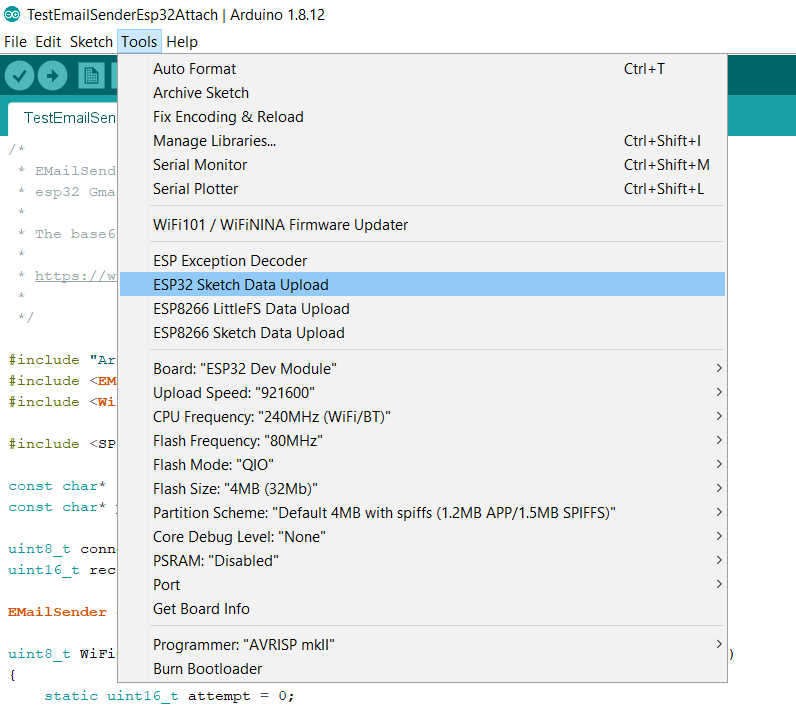
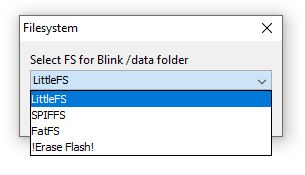
Generate filesystem binary
To manage the filesystem, we can use the same way, but first, you must read one of the following guides:
- ESP32: integrated SPIFFS FileSystem
- ESP32: integrated LittleFS FileSystem
- ESP32: integrated FFat (FAT/exFAT) FileSystem
After that operation, you can use the plugin as usual.
You can check the IDE console output to check what happened.
Chip : esp32
Using partition scheme from Arduino IDE.
Start: 0x290000
Size : 0x170000
mkspiffs : C:\Users\renzo\AppData\Local\Arduino15\packages\esp32\tools\mkspiffs\0.2.3\mkspiffs.exe

espota : C:\Users\renzo\AppData\Local\Arduino15\packages\esp32\hardware\esp32\2.0.0\tools\espota.exe

[SPIFFS] data   : D:\Projects\Arduino\sloeber-workspace-OTA\ArduinoOTAesp32_basic_arduino\data
[SPIFFS] offset : 0
[SPIFFS] start  : 2686976
[SPIFFS] size   : 1472
[SPIFFS] page   : 256
[SPIFFS] block  : 4096
->/version.txt
[SPIFFS] upload : C:\Users\renzo\AppData\Local\Temp\arduino_build_258074/ArduinoOTAesp32_basic_arduino.spiffs.bin
[SPIFFS] IP     : 192.168.1.186
Running: C:\Users\renzo\AppData\Local\Arduino15\packages\esp32\hardware\esp32\2.0.0\tools\espota.exe -i 192.168.1.186 -p 3232 -s -f C:\Users\renzo\AppData\Local\Temp\arduino_build_258074/ArduinoOTAesp32_basic_arduino.spiffs.bin

_>Sending invitation to 192.168.1.186
_>Uploading................................................................................................................................................................................................................................................................................................................................................................................................................................................................................................................................................................................................................................................................................................................................................................................................................................................................................................................................................................................................................................................................................................................................................................................................................................................................................................................................................................................................................................................................................................................................
_>09:21:38 [ERROR]: Error response from device
SPIFFS Upload failed!
The IDE console returns an error, but the upload work. I think there is a little bug now when I write this article.
IDE gives an error but it is a bug, the loading works correctly
You can retrieve the file system bin file from this line
[SPIFFS] upload : C:\Users\renzo\AppData\Local\Temp\arduino_build_258074/ArduinoOTAesp32_basic_arduino.spiffs.bin
Sketch to update the filesystem with a file in the SD card
I reuse the previous sketch, and I’m going to add a section to manage the update of firmware.
/*
 * Update ESP32 firmware with external SD
 * Check firmware.bin, if present start update then rename in firmware.bak
 *
 * Update filesystem with external SD
 * Check filesystem.bin, if present start update then rename in filesystem.bak
 *
 * Renzo Mischianti <www.mischianti.org>
 *
 * https://mischianti.org/
*/

// include the SD library:
#include <SPI.h>
#include <Update.h>
#include <SD.h>
#include <SPIFFS.h>

const int chipSelect = SS;

void progressCallBack(size_t currSize, size_t totalSize) {
	  Serial.printf("CALLBACK:  Update process at %d of %d bytes...\n", currSize, totalSize);
}

#define FIRMWARE_VERSION 0.1
String FILESYSTEM_VERSION = "0.0";

void setup() {
  // Open serial communications and wait for port to open:
  Serial.begin(115200);
  while (!Serial) {
    ; // wait for serial port to connect. Needed for native USB port only
  }


  Serial.print("\nInitializing SD card...");

  // we'll use the initialization code from the utility libraries
  // since we're just testing if the card is working!
  if (!SD.begin(SS)) {
    Serial.println("initialization failed. Things to check:");
    Serial.println("* is a card inserted?");
    Serial.println("* is your wiring correct?");
    Serial.println("* did you change the chipSelect pin to match your shield or module?");
    while (1);
  } else {
    Serial.println("Wiring is correct and a card is present.");
  }

  Serial.print("Card size:  ");
  Serial.println((float)SD.cardSize()/1000);

  Serial.print("Total bytes: ");
  Serial.println(SD.totalBytes());

  Serial.print("Used bytes: ");
  Serial.println(SD.usedBytes());

  Serial.print(F("\nCurrent firmware version: "));
  Serial.println(FIRMWARE_VERSION);

  Serial.print(F("\nSearch for firmware.."));
  File firmware =  SD.open("/firmware.bin");
  if (firmware) {
	  Serial.println(F("found!"));
	  Serial.println(F("Try to update!"));

	  Update.onProgress(progressCallBack);

	  Update.begin(firmware.size(), U_FLASH);
	  Update.writeStream(firmware);
	  if (Update.end()){
		  Serial.println(F("Update finished!"));
	  }else{
		  Serial.println(F("Update error!"));
		  Serial.println(Update.getError());
	  }

	  firmware.close();

	  if (SD.rename("/firmware.bin", "/firmware.bak")){
		  Serial.println(F("Firmware rename succesfully!"));
	  }else{
		  Serial.println(F("Firmware rename error!"));
	  }
	  delay(2000);

	  ESP.restart();
  }else{
	  Serial.println(F("not found!"));
  }

  Serial.print(F("Firmware version "));
  Serial.println(FIRMWARE_VERSION);

  Serial.print(F("Inizializing FS..."));
  if (SPIFFS.begin()){
      Serial.println(F("done."));
  }else{
      Serial.println(F("fail."));
  }

  Serial.print(F("FileSystem version "));
  File versionFile = SPIFFS.open(F("/version.txt"), "r");
  if (versionFile) {
	  FILESYSTEM_VERSION = versionFile.readString();
	  versionFile.close();
  }
  Serial.println(FILESYSTEM_VERSION);

  Serial.print(F("\nSearch for filesystem update.."));
  File filesystem =  SD.open("/filesystem.bin");
  if (filesystem) {
	  Serial.println(F("found!"));
	  Serial.println(F("Try to update!"));

	  Update.onProgress(progressCallBack);

	  Update.begin(filesystem.size(), U_SPIFFS);
	  Update.writeStream(filesystem);
	  if (Update.end()){
		  Serial.println(F("Update finished!"));
	  }else{
		  Serial.println(F("Update error!"));
		  Serial.println(Update.getError());
	  }

	  filesystem.close();

	  if (SD.rename("/filesystem.bin", "/filesystem.bak")){
		  Serial.println(F("Filesystem rename succesfully!"));
	  }else{
		  Serial.println(F("Filesystem rename error!"));
	  }
	  delay(2000);

	  ESP.restart();
  }else{
	  Serial.println(F("not found!"));
  }


}

void loop(void) {
}
You can find relevant informations
Update.begin(filesystem.size(), U_SPIFFS);
I change U_FLASH in U_SPIFFS, this internally sets the correct address of the flash section and starts updating from there.
Test the sketch
We create a version.txt file on the data folder of the sketch, and I write 0.1 inside, and I use that as a version of the FileSystem, then upload the data folder to the filesystem.
Initializing SD card...Wiring is correct and a card is present.
Card size:  3972006.00
Total bytes: 3967680512
Used bytes: 458752

Current firmware version: 0.10

Search for firmware..not found!
Firmware version 0.10
Inizializing FS...done.
FileSystem version 0.1

Search for filesystem update..not found!
Now we are going to modify the file version.txt with version 0.2 then upload to the device, then
Change version to 0.2 in version.txt, regenerate without upload, and copy the file ArduinoOTAesp8266_sd_fs_update.mklittlefs.bin to the SD and rename it to filesystem.bin.
Now insert SD and check the serial output.
Initializing SD card...Wiring is correct and a card is present.
Card size:  3972006.00
Total bytes: 3967680512
Used bytes: 1966080

Current firmware version: 0.10

Search for firmware..not found!
Firmware version 0.10
Inizializing FS...done.
FileSystem version 0.2

Search for filesystem update..found!
Try to update!
CALLBACK:  Update process at 0 of 1507328 bytes...
CALLBACK:  Update process at 4096 of 1507328 bytes...
CALLBACK:  Update process at 8192 of 1507328 bytes...
CALLBACK:  Update process at 12288 of 1507328 bytes...
CALLBACK:  Update process at 16384 of 1507328 bytes...

[...]

CALLBACK:  Update process at 1486848 of 1507328 bytes...
CALLBACK:  Update process at 1490944 of 1507328 bytes...
CALLBACK:  Update process at 1495040 of 1507328 bytes...
CALLBACK:  Update process at 1499136 of 1507328 bytes...
CALLBACK:  Update process at 1503232 of 1507328 bytes...
CALLBACK:  Update process at 1507328 of 1507328 bytes...
Update finished!
Filesystem rename succesfully!
ets Jun  8 2016 00:22:57

rst:0xc (SW_CPU_RESET),boot:0x13 (SPI_FAST_FLASH_BOOT)
configsip: 0, SPIWP:0xee
clk_drv:0x00,q_drv:0x00,d_drv:0x00,cs0_drv:0x00,hd_drv:0x00,wp_drv:0x00
mode:DIO, clock div:1
load:0x3fff0018,len:4
load:0x3fff001c,len:1216
ho 0 tail 12 room 4
load:0x40078000,len:10944
load:0x40080400,len:6388
entry 0x400806b4

Initializing SD card...Wiring is correct and a card is present.
Card size:  3972006.00
Total bytes: 3967680512
Used bytes: 1966080

Current firmware version: 0.10

Search for firmware..not found!
Firmware version 0.10
Inizializing FS...done.
FileSystem version 0.3

Search for filesystem update..not found!
The first time finds the filesystem.bin then change the name, and the next time does nothing.
Thanks
- ESP32: pinout, specs and Arduino IDE configuration
- ESP32: integrated SPIFFS Filesystem
- ESP32: manage multiple Serial and logging
- ESP32 practical power saving
- ESP32 practical power saving: manage WiFi and CPU
- ESP32 practical power saving: modem and light sleep
- ESP32 practical power saving: deep sleep and hibernation
- ESP32 practical power saving: preserve data, timer and touch wake up
- ESP32 practical power saving: external and ULP wake up
- ESP32 practical power saving: UART and GPIO wake up
- ESP32: integrated LittleFS FileSystem
- ESP32: integrated FFat (Fat/exFAT) FileSystem
- ESP32-wroom-32
- ESP32-CAM
- ESP32: use ethernet w5500 with plain (HTTP) and SSL (HTTPS)
- ESP32: use ethernet enc28j60 with plain (HTTP) and SSL (HTTPS)
- How to use SD card with esp32
- esp32 and esp8266: FAT filesystem on external SPI flash memory
- Firmware and OTA update management
- Firmware management
- OTA update with Arduino IDE
- OTA update with Web Browser
- Self OTA uptate from HTTP server
- Non-standard Firmware update
- Integrating LAN8720 with ESP32 for Ethernet Connectivity with plain (HTTP) and SSL (HTTPS)
- Connecting the EByte E70 to ESP32 c3/s3 devices and a simple sketch example
- ESP32-C3: pinout, specs and Arduino IDE configuration
- Integrating W5500 with ESP32 Using Core 3: Native Ethernet Protocol Support with SSL and Other Features
- Integrating LAN8720 with ESP32 Using Core 3: Native Ethernet Protocol Support with SSL and Other Features
- Dallas ds18b20:
- Guide to I2C on ESP32: Communication with Heterogeneous 5V and 3.3V Devices, Additional Interface Management and Scanner
- Display
- Complete Guide: Using an ILI9341 Display with the TFT_eSPI Library
- Integrating Touch Screen Functionality with Your ILI9341 TFT Display
- SSD1683 eInk Display with GxEPD and ESP32 (and CrowPanel 4.2″ HMI): basics and configuration


Great example. Worked on the first test for me.
Hi Dave,
thanks for the feedback.
In what project did you use this kind of update?
Bye Renzo
Hi,
I have been trying the update functions via SD card for a while now. The code is running and the update is found on the SD card. But at the end of the update I always get the error:
CALLBACK: Update process at 372736 of 374880 bytes…
CALLBACK: Update process at 374880 of 374880 bytes…
E (7281) esp_image: invalid segment length 0xffffffff
Update error!
9
Firmware rename succesfully
Do you have any idea why this could be?
I am using an ESP32 S3 (wroom1 N4R8)
Partition Scheme: Default
Arduino: 2.3.3
Hi,
It’s very strange, this error (invalid segment length 0xffffffff) could stem from a mismatch in the partition scheme or an issue with reading the firmware from the SD card.
Make sure the SD card is formatted to FAT32.
Bye Renzo