ESP32 OTA update with Arduino IDE: filesystem, firmware, and password
The ESP32 is a powerful microcontroller that has gained popularity among developers for its versatility and ease of use.
One of the most important features of the ESP32 is the ability to perform over-the-air (OTA) updates, which allows developers to remotely update the firmware of the device without the need for physical access.
In this article, we will explore how to perform an OTA update on an ESP32 using the Arduino IDE. We will cover the entire process, including updating the filesystem and firmware, as well as securing the OTA update with a password.
By the end of this article, you will have a comprehensive understanding of how to perform OTA updates on your ESP32 devices using the Arduino IDE.
OTA (Over the Air) update is the process of uploading firmware to an ESP32 module using a Wi-Fi connection rather than a serial port. Such functionality becomes extremely useful in case of limited or no physical access to the module.
OTA may be done using the following:
- Arduino IDE
- Web Browser
- HTTP Server
First of all, check the tutorial “ESP32: flash compiled firmware (.bin)“.
In this article, we are going to explain the Arduino IDE OTA update of the firmware and filesystem.
Here some common esp32 device I use ESP32 Dev Kit v1 - TTGO T-Display 1.14 ESP32 - NodeMCU V3 V2 ESP8266 Lolin32 - NodeMCU ESP-32S - WeMos Lolin32 - WeMos Lolin32 mini - ESP32-CAM programmer - ESP32-CAM bundle - ESP32-WROOM-32 - ESP32-S
Introduction
First, we look that the core component of ESP32 core needs python installed, and when installing It remember to add to the path (for windows)

OTA upload use UDP protocol, so It can work (with ArduinoIDE) only in the local network because uses broadcast to discover the devices, and It’s limited to the LAN.
The UDP protocol is rather old, simple, and powerful. I use it in other projects to discover all the devices on my network from a simple Android application
Basic example
Now upload BasicOTA.ino, available under File -> Examples -> ArduinoOTA -> BasicOTA.ino
Or copy and paste from here.
#include <WiFi.h>
#include <ESPmDNS.h>
#include <WiFiUdp.h>
#include <ArduinoOTA.h>

const char* ssid = "<YOUR-SSID>";
const char* password = "<YOUR-PASSWD>";

void setup() {
  Serial.begin(115200);
  Serial.println("Booting");
  WiFi.mode(WIFI_STA);
  WiFi.begin(ssid, password);
  while (WiFi.waitForConnectResult() != WL_CONNECTED) {
    Serial.println("Connection Failed! Rebooting...");
    delay(5000);
    ESP.restart();
  }

  // Port defaults to 3232
  // ArduinoOTA.setPort(3232);

  // Hostname defaults to esp3232-[MAC]
  // ArduinoOTA.setHostname("myesp32");

  // No authentication by default
  // ArduinoOTA.setPassword("admin");

  // Password can be set with it's md5 value as well
  // MD5(admin) = 21232f297a57a5a743894a0e4a801fc3
  // ArduinoOTA.setPasswordHash("21232f297a57a5a743894a0e4a801fc3");

  ArduinoOTA
    .onStart([]() {
      String type;
      if (ArduinoOTA.getCommand() == U_FLASH)
        type = "sketch";
      else // U_SPIFFS
        type = "filesystem";

      // NOTE: if updating SPIFFS this would be the place to unmount SPIFFS using SPIFFS.end()
      Serial.println("Start updating " + type);
    })
    .onEnd([]() {
      Serial.println("\nEnd");
    })
    .onProgress([](unsigned int progress, unsigned int total) {
      Serial.printf("Progress: %u%%\r", (progress / (total / 100)));
    })
    .onError([](ota_error_t error) {
      Serial.printf("Error[%u]: ", error);
      if (error == OTA_AUTH_ERROR) Serial.println("Auth Failed");
      else if (error == OTA_BEGIN_ERROR) Serial.println("Begin Failed");
      else if (error == OTA_CONNECT_ERROR) Serial.println("Connect Failed");
      else if (error == OTA_RECEIVE_ERROR) Serial.println("Receive Failed");
      else if (error == OTA_END_ERROR) Serial.println("End Failed");
    });

  ArduinoOTA.begin();

  Serial.println("Ready");
  Serial.print("IP address: ");
  Serial.println(WiFi.localIP());
}

void loop() {
  ArduinoOTA.handle();
}
The code is concise, and the library ArduinoOTA does all for us.
The serial output is:
Booting
Ready
IP address: 192.168.1.200
Remember to set the SSID and PASSWD of your WiFi network.
ArduinoOTA needs to be started ArduinoOTA.begin(); and the relative handle ArduinoOTA.handle();, the full logic is managed by the library, and It offers some listeners to follow the process and apply your additional logic.
void onStart(OTA_CALLBACK(fn));
void onEnd(OTA_CALLBACK(fn));
void onProgress(OTA_CALLBACK_PROGRESS(fn));
void onError(OTA_CALLBACK_ERROR (fn));
The meaning of this method is written in the name, but in the example code, we can find some information that can help you to understand some additional features:
    .onStart([]() {
      String type;
      if (ArduinoOTA.getCommand() == U_FLASH)
        type = "sketch";
      else // U_SPIFFS
        type = "filesystem";

      // NOTE: if updating SPIFFS this would be the place to unmount SPIFFS using SPIFFS.end()
      Serial.println("Start updating " + type);
    })
You can check if It’s an OTA update of the FLASH or of the FS, this means that you can upload the sketch and FileSystem in the same way, but we are going to check it next.
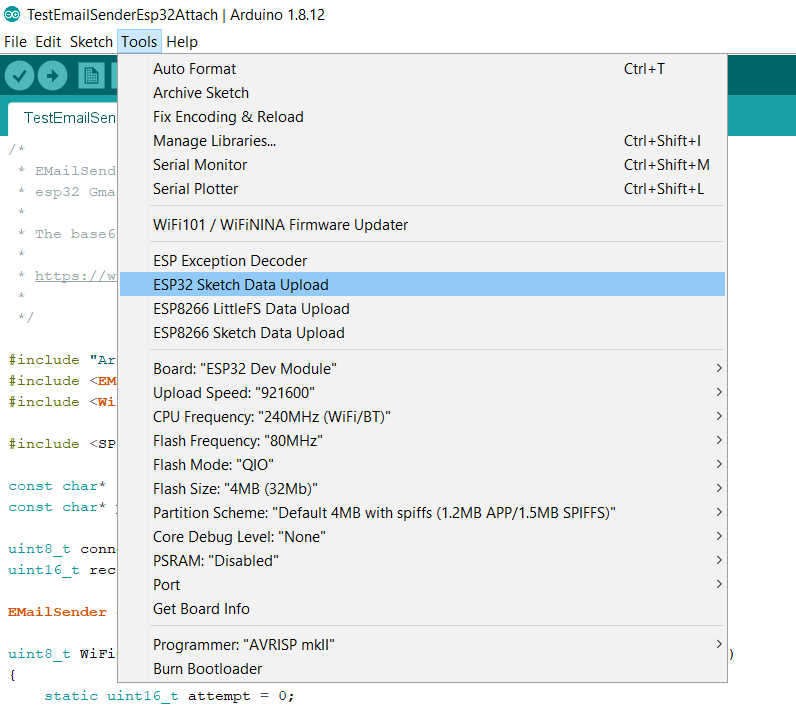
You can upload the Firmware or FileSystem
Caricare lo sketch
Now if we are going to open, Tools -> Port we can find our device listed (discovered by broadcast UDP).
Probably, if you use windows, It asks to allow network access.
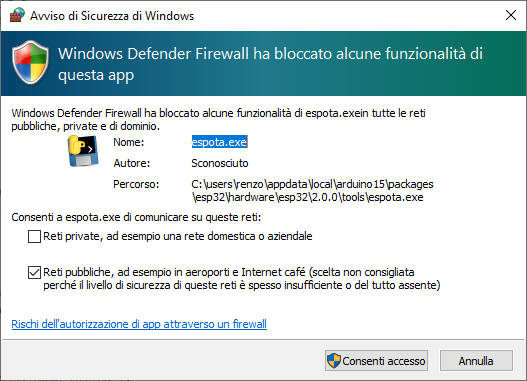
Allow It, and now the menu.
And now, we can disconnect the device from the PC, power it on via an external power supply, and upload the code.
Sketch uses 776093 bytes (59%) of program storage space. Maximum is 1310720 bytes.
Global variables use 36448 bytes (11%) of dynamic memory, leaving 291232 bytes for local variables. Maximum is 327680 bytes.
C:\Users\renzo\AppData\Local\Arduino15\packages\esp32\hardware\esp32\2.0.0/tools/espota.exe -i 192.168.1.200 -p 3232 --auth= -f C:\Users\renzo\AppData\Local\Temp\arduino_build_18433/BasicOTA.ino.bin
Sending invitation to 192.168.1.200
Uploading............................................................................................................................................................................................................................................................................................................................................................................................................................................................................................................................................................................................................................................................................................................................................................................................
And the serial output of the microcontroller is:
Booting
Ready
IP address: 192.168.1.200
Start updating sketch
Progress: 0% Error[2]: Connect Failed
Error[4]: End Failed
Start updating sketch
Progress: 0% Progress: 0% Progress: 0% Progress: 0% Progress: 0% Progress: 0% Progress: 0% Progress: 0% Progress: 0%
Progress: 1% Progress: 1% Progress: 1%
Progress: 1% Progress: 1%
Progress: 1% Progress: 1%
Progress: 1% Progress: 1%
Progress: 1%
Progress: 1% Progress: 1%
Progress: 1% Progress: 2%
Progress: 2% Progress: 2% Progress: 2%
Progress: 2% Progress: 2% Progress: 2%
Progress: 2% Progress: 2% Progress: 2%
Progress: 2% Progress: 3% Progress: 3% Progress: 3% Progress: 3%

[...]

Progress: 97% Progress: 97%
Progress: 97% Progress: 98%
Progress: 98%
Progress: 98%
Progress: 98% Progress: 98%
Progress: 98% Progress: 98% Progress: 98%
Progress: 98%
Progress: 98%
Progress: 98% Progress: 99% Progress: 99% Progress: 99% Progress: 99%
Progress: 99% Progress: 99%
Progress: 99% Progress: 99% Progress: 99%
Progress: 99%
Progress: 99%
Progress: 99% Progress: 100%
End
ets Jun  8 2016 00:22:57

rst:0xc (SW_CPU_RESET),boot:0x13 (SPI_FAST_FLASH_BOOT)
configsip: 0, SPIWP:0xee
clk_drv:0x00,q_drv:0x00,d_drv:0x00,cs0_drv:0x00,hd_drv:0x00,wp_drv:0x00
mode:DIO, clock div:1
load:0x3fff0018,len:4
load:0x3fff001c,len:1216
ho 0 tail 12 room 4
load:0x40078000,len:10944
load:0x40080400,len:6388
entry 0x400806b4
Booting
Ready
IP address: 192.168.1.186
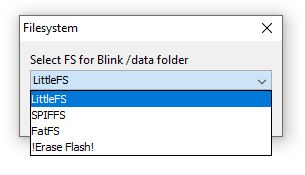
Upload FileSystem (SPIFFS, LittleFS, or FFatFS)
You can also upload filesystem data with the classic method via the plugin, to install SPIFFS, LittleFS, or FFat plugin, refer to the relative tutorial:
- ESP32: integrated SPIFFS FileSystem
- ESP32: integrated LittleFS FileSystem
- ESP32: integrated FFat (FAT/exFAT) FileSystem
After that operation, you can use the plugin like usual.
You can check the IDE console output to check what happened.
Chip : esp32
Using partition scheme from Arduino IDE.
Start: 0x290000
Size : 0x170000
mkspiffs : C:\Users\renzo\AppData\Local\Arduino15\packages\esp32\tools\mkspiffs\0.2.3\mkspiffs.exe

espota : C:\Users\renzo\AppData\Local\Arduino15\packages\esp32\hardware\esp32\2.0.0\tools\espota.exe

[SPIFFS] data   : D:\Projects\Arduino\sloeber-workspace-OTA\ArduinoOTAesp32_basic_arduino\data
[SPIFFS] offset : 0
[SPIFFS] start  : 2686976
[SPIFFS] size   : 1472
[SPIFFS] page   : 256
[SPIFFS] block  : 4096
->/version.txt
[SPIFFS] upload : C:\Users\renzo\AppData\Local\Temp\arduino_build_258074/ArduinoOTAesp32_basic_arduino.spiffs.bin
[SPIFFS] IP     : 192.168.1.186
Running: C:\Users\renzo\AppData\Local\Arduino15\packages\esp32\hardware\esp32\2.0.0\tools\espota.exe -i 192.168.1.186 -p 3232 -s -f C:\Users\renzo\AppData\Local\Temp\arduino_build_258074/ArduinoOTAesp32_basic_arduino.spiffs.bin

_>Sending invitation to 192.168.1.186
_>Uploading................................................................................................................................................................................................................................................................................................................................................................................................................................................................................................................................................................................................................................................................................................................................................................................................................................................................................................................................................................................................................................................................................................................................................................................................................................................................................................................................................................................................................................................................................................................................
_>09:21:38 [ERROR]: Error response from device
SPIFFS Upload failed!
The IDE console returns an error, but the upload work. I think there is a little bug now when I write this article.
IDE gives an error but it is a bug, the loading works correctly
And on the microcontroller
Booting
Ready
IP address: 192.168.1.186
Start updating filesystem
Progress: 0% Progress: 0% Progress: 0% Progress: 0% Progress: 0% Progress: 0% Progress: 0% Progress: 0% Progress: 0% Progress: 0% Progress: 0% Progress: 0% Progress: 0% Progress: 0% Progress: 0% Progress: 0%
Progress: 0%
Progress: 0%
Progress: 1% Progress: 1%
Progress: 1% Progress: 1%
Progress: 1%
Progress: 1%
Progress: 1% Progress: 1%
Progress: 1% Progress: 1%
Progress: 1% Progress: 1%
Progress: 1%

[...]

Progress: 99% Progress: 99%
Progress: 99%
Progress: 99% Progress: 99% Progress: 99%
Progress: 99% Progress: 99%
Progress: 99% Progress: 99%
Progress: 99%
Progress: 99%
Progress: 99%
Progress: 99%
Progress: 99% Progress: 100%
End
ets Jun  8 2016 00:22:57

rst:0xc (SW_CPU_RESET),boot:0x13 (SPI_FAST_FLASH_BOOT)
configsip: 0, SPIWP:0xee
clk_drv:0x00,q_drv:0x00,d_drv:0x00,cs0_drv:0x00,hd_drv:0x00,wp_drv:0x00
mode:DIO, clock div:1
load:0x3fff0018,len:4
load:0x3fff001c,len:1216
ho 0 tail 12 room 4
load:0x40078000,len:10944
load:0x40080400,len:6388
entry 0x400806b4
Booting
Ready
IP address: 192.168.1.186
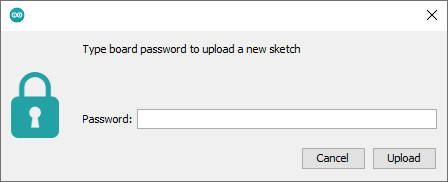
Protect upload with a password
Adding a password is very simple, and you must only uncomment this line
  // No authentication by default
  // ArduinoOTA.setPassword("admin");
Now when you try to upload the code, a popup appears and asks you to add a password
You can also verify the process in the console.
Sketch uses 776309 bytes (59%) of program storage space. Maximum is 1310720 bytes.
Global variables use 36448 bytes (11%) of dynamic memory, leaving 291232 bytes for local variables. Maximum is 327680 bytes.
C:\Users\renzo\AppData\Local\Arduino15\packages\esp32\hardware\esp32\2.0.0/tools/espota.exe -i 192.168.1.186 -p 3232 --auth=admin -f C:\Users\renzo\AppData\Local\Temp\arduino_build_258074/ArduinoOTAesp32_basic_arduino.ino.bin
Sending invitation to 192.168.1.186
Authenticating...OK
Uploading............................................................................................................................................................................................................................................................................................................................................................................................................................................................................................................................................................................................................................................................................................................................................................................................
Thanks
- ESP32: pinout, specs and Arduino IDE configuration
- ESP32: integrated SPIFFS Filesystem
- ESP32: manage multiple Serial and logging
- ESP32 practical power saving
- ESP32 practical power saving: manage WiFi and CPU
- ESP32 practical power saving: modem and light sleep
- ESP32 practical power saving: deep sleep and hibernation
- ESP32 practical power saving: preserve data, timer and touch wake up
- ESP32 practical power saving: external and ULP wake up
- ESP32 practical power saving: UART and GPIO wake up
- ESP32: integrated LittleFS FileSystem
- ESP32: integrated FFat (Fat/exFAT) FileSystem
- ESP32-wroom-32
- ESP32-CAM
- ESP32: use ethernet w5500 with plain (HTTP) and SSL (HTTPS)
- ESP32: use ethernet enc28j60 with plain (HTTP) and SSL (HTTPS)
- How to use SD card with esp32
- esp32 and esp8266: FAT filesystem on external SPI flash memory
- Firmware and OTA update management
- Firmware management
- OTA update with Arduino IDE
- OTA update with Web Browser
- Self OTA uptate from HTTP server
- Non-standard Firmware update
- Integrating LAN8720 with ESP32 for Ethernet Connectivity with plain (HTTP) and SSL (HTTPS)
- Connecting the EByte E70 to ESP32 c3/s3 devices and a simple sketch example
- ESP32-C3: pinout, specs and Arduino IDE configuration
- Integrating W5500 with ESP32 Using Core 3: Native Ethernet Protocol Support with SSL and Other Features
- Integrating LAN8720 with ESP32 Using Core 3: Native Ethernet Protocol Support with SSL and Other Features
- Dallas ds18b20:
- Guide to I2C on ESP32: Communication with Heterogeneous 5V and 3.3V Devices, Additional Interface Management and Scanner
- Display
- Complete Guide: Using an ILI9341 Display with the TFT_eSPI Library
- Integrating Touch Screen Functionality with Your ILI9341 TFT Display
- SSD1683 eInk Display with GxEPD and ESP32 (and CrowPanel 4.2″ HMI): basics and configuration