
ESP32 OTA update with Web Browser: firmware, filesystem and authentication – 1
The ESP32 microcontroller is a popular choice for building IoT projects due to its low cost, low power consumption, and powerful capabilities.
One of the most important features of any IoT device is the ability to update its firmware and filesystem over the air (OTA) without physical access.
In this article series, we will explore how to perform an OTA update on the ESP32 using a web browser, focusing on three key aspects: firmware update, filesystem update, and authentication. We will discuss the various challenges and considerations involved in each step, as well as provide practical examples and code snippets to guide you through the process.
By the end of this series, you should have a good understanding of how to implement OTA updates on your ESP32-based projects, making them more flexible and reliable.
OTA (Over the Air) update is the process of uploading firmware to an ESP32 module using a Wi-Fi connection rather than a serial port. Such functionality becomes extremely useful in case of limited or no physical access to the module.
OTA may be done using the following:
- Arduino IDE
- Web Browser
- HTTP Server
First of all, check the tutorial “ESP32: flash compiled firmware (.bin)“.
In this article, we are going to explain OTA via Web Browser, with and without basic authentication.
Introduction
First, we look that the core component of ESP32 core needs python installed, and when installing, It remembers to add to the path (for windows)

Then go to read how to create a binary file from this article “ESP32: flash compiled firmware (.bin)”.
Basic example with HTTPUpdateServer
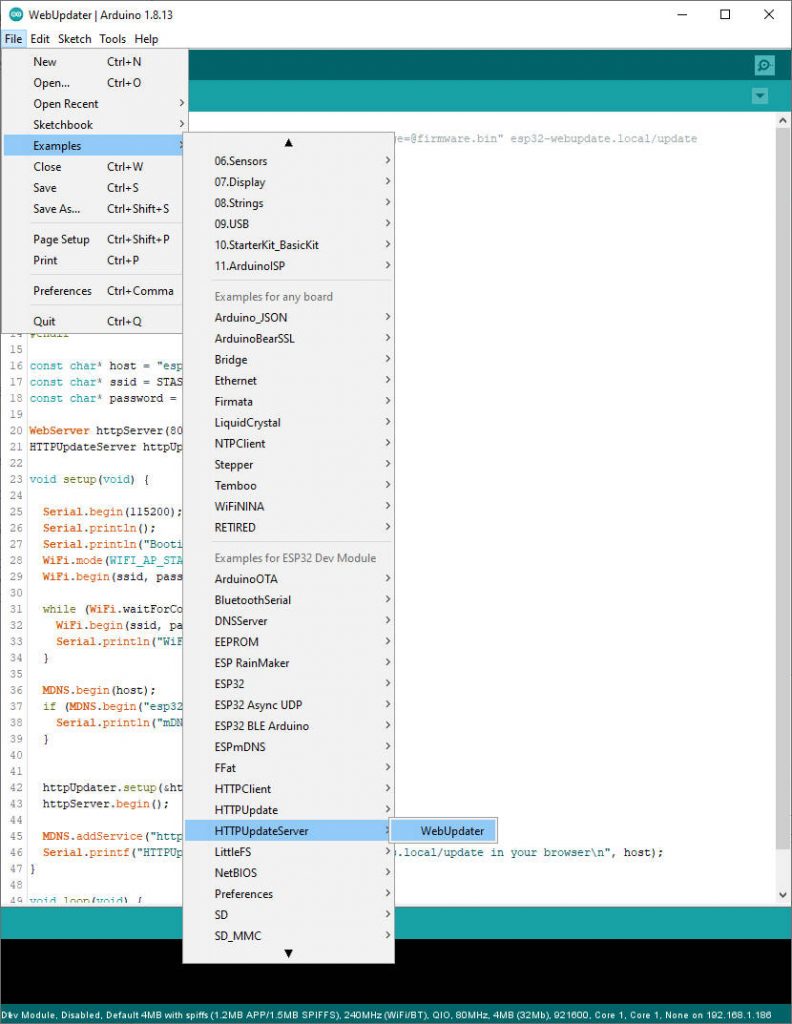
You can use HTTPUpdateServer, and you can find a basic example under File -> Examples -> HTTPUpdateServer -> WebUpdater.
You need only to add your WiFi SSID and Password.
/*
  To upload through terminal you can use: curl -F "image=@firmware.bin" esp32-webupdate.local/update
*/

#include <WiFi.h>
#include <WiFiClient.h>
#include <WebServer.h>
#include <ESPmDNS.h>
#include <HTTPUpdateServer.h>

#ifndef STASSID
#define STASSID "<YOUR-SSID>"
#define STAPSK  "<YOUR-PASSWD>"
#endif

const char* host = "esp32-webupdate";
const char* ssid = STASSID;
const char* password = STAPSK;

WebServer httpServer(80);
HTTPUpdateServer httpUpdater;

void setup(void) {

  Serial.begin(115200);
  Serial.println();
  Serial.println("Booting Sketch...");
  WiFi.mode(WIFI_AP_STA);
  WiFi.begin(ssid, password);

  while (WiFi.waitForConnectResult() != WL_CONNECTED) {
    WiFi.begin(ssid, password);
    Serial.println("WiFi failed, retrying.");
  }

  MDNS.begin(host);
  if (MDNS.begin("esp32")) {
    Serial.println("mDNS responder started");
  }


  httpUpdater.setup(&httpServer);
  httpServer.begin();

  MDNS.addService("http", "tcp", 80);
  Serial.printf("HTTPUpdateServer ready! Open http://%s.local/update in your browser\n", host);
}

void loop(void) {
  httpServer.handleClient();
}
The hostname works tanks to mDNS service
- Avahi https://avahi.org/ for Linux
- Bonjour https://www.apple.com/support/bonjour/ for Windows
- Mac OSX and iOS – support is already built-in / no any extra s/w is required
On the ArduinoIDE monitor you are going to find this output:
Booting Sketch...
mDNS responder started
HTTPUpdateServer ready! Open http://esp32-webupdate.local/update in your browser
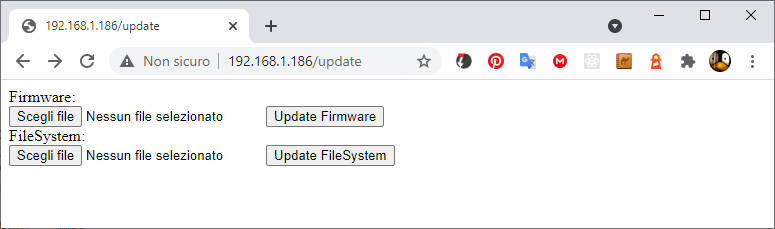
And when you write the to the browser the URL, this web page appears.
Now we are going to change something in the sketch, like the address like so:
Serial.printf("HTTPUpdateServer ready! Open http://%s.local/update in your browser\n", host);
and execute Sketch -> Export compiled binary, when done click on Sketch -> Show sketch folder, here we find an additional file named like WebUpdate.ino.esp32.bin.
Click on Firmware -> Select file, select this file, and start the update of the firmware, wait until the page show Update Success! Rebooting…, after reboot, you can see in the serial output the updated message:
Booting Sketch...
mDNS responder started
HTTPUpdateServer ready! Open http://esp32-webupdate.local/update in your browser
If you receive an asynchronous message like this.
dhcps: send_nak>>udp_sendto result 0
Probably mDNS does not work for you, and to retrieve the IP modify the line like so:
  IPAddress ip = WiFi.localIP();
  Serial.printf("HTTPUpdateServer ready! Open http://%s.local/update in your browser (%u.%u.%u.%u)\n", host, ip & 0xFF, (ip>>8) & 0xFF, (ip>>16) & 0xFF, (ip>>24) & 0xFF);
Now you have something like this:
HTTPUpdateServer ready! Open http://esp32-webupdate.local/update in your browser (192.168.1.119)
Now we are going to explain how It works technically.
The HTTPUpdateServer wraps WebServer and ad an endpoint that in GET response with a simple page
static const char serverIndex[] PROGMEM =
R"(<!DOCTYPE html>
     <html lang='en'>
     <head>
         <meta charset='utf-8'>
         <meta name='viewport' content='width=device-width,initial-scale=1'/>
     </head>
     <body>
     <form method='POST' action='' enctype='multipart/form-data'>
         Firmware:<br>
         <input type='file' accept='.bin,.bin.gz' name='firmware'>
         <input type='submit' value='Update Firmware'>
     </form>
     <form method='POST' action='' enctype='multipart/form-data'>
         FileSystem:<br>
         <input type='file' accept='.bin,.bin.gz,.image' name='filesystem'>
         <input type='submit' value='Update FileSystem'>
     </form>
     </body>
     </html>)";
static const char successResponse[] PROGMEM =
"<META http-equiv=\"refresh\" content=\"15;URL=/\">Update Success! Rebooting...";
Here the handle
        // handler for the /update form page
        _server->on(path.c_str(), HTTP_GET, [&]() {
            if (_username != emptyString && _password != emptyString && !_server->authenticate(_username.c_str(), _password.c_str()))
                return _server->requestAuthentication();
            _server->send_P(200, PSTR("text/html"), serverIndex);
            });
in POST, check the name of input (firmware or filesystem) to understand if the file is for FLASH or FileSystem, then upload the file and Update the service to do the work; here is the POST code.
        // handler for the /update form POST (once file upload finishes)
        _server->on(path.c_str(), HTTP_POST, [&]() {
            if (!_authenticated)
                return _server->requestAuthentication();
            if (Update.hasError()) {
                _server->send(200, F("text/html"), String(F("Update error: ")) + _updaterError);
            }
            else {
                _server->client().setNoDelay(true);
                _server->send_P(200, PSTR("text/html"), successResponse);
                delay(100);
                _server->client().stop();
                ESP.restart();
            }
            }, [&]() {
                // handler for the file upload, get's the sketch bytes, and writes
                // them through the Update object
                HTTPUpload& upload = _server->upload();

                if (upload.status == UPLOAD_FILE_START) {
                    _updaterError.clear();
                    if (_serial_output)
                        Serial.setDebugOutput(true);

                    _authenticated = (_username == emptyString || _password == emptyString || _server->authenticate(_username.c_str(), _password.c_str()));
                    if (!_authenticated) {
                        if (_serial_output)
                            Serial.printf("Unauthenticated Update\n");
                        return;
                    }

                    if (_serial_output)
                        Serial.printf("Update: %s\n", upload.filename.c_str());
                    if (upload.name == "filesystem") {
                        if (!Update.begin(SPIFFS.totalBytes(), U_SPIFFS)) {//start with max available size
                            if (_serial_output) Update.printError(Serial);
                        }
                    }
                    else {
                        uint32_t maxSketchSpace = (ESP.getFreeSketchSpace() - 0x1000) & 0xFFFFF000;
                        if (!Update.begin(maxSketchSpace, U_FLASH)) {//start with max available size
                            _setUpdaterError();
                        }
                    }
                }
                else if (_authenticated && upload.status == UPLOAD_FILE_WRITE && !_updaterError.length()) {
                    if (_serial_output) Serial.printf(".");
                    if (Update.write(upload.buf, upload.currentSize) != upload.currentSize) {
                        _setUpdaterError();
                    }
                }
                else if (_authenticated && upload.status == UPLOAD_FILE_END && !_updaterError.length()) {
                    if (Update.end(true)) { //true to set the size to the current progress
                        if (_serial_output) Serial.printf("Update Success: %u\nRebooting...\n", upload.totalSize);
                    }
                    else {
                        _setUpdaterError();
                    }
                    if (_serial_output) Serial.setDebugOutput(false);
                }
                else if (_authenticated && upload.status == UPLOAD_FILE_ABORTED) {
                    Update.end();
                    if (_serial_output) Serial.println("Update was aborted");
                }
                delay(0);
            });
To better understand, I advise you to read “How to create a Web Server with esp8266 and esp32” and “How to create a REST server on esp8266 or esp32“.
You can see that the code is trivial, and we can manipulate It to do more beautifully, but we are going to do it next.
Basic example with native code
In the ArduinoOTA library, you can get another web update example with native code.
#include <WiFi.h>
#include <WiFiClient.h>
#include <WebServer.h>
#include <ESPmDNS.h>
#include <Update.h>

const char* host = "esp32";
const char* ssid = "<YOUR-SSID>";
const char* password = "<YOUR-PASSWD>";

WebServer server(80);

/*
 * Login page
 */

const char* loginIndex =
 "<form name='loginForm'>"
    "<table width='20%' bgcolor='A09F9F' align='center'>"
        "<tr>"
            "<td colspan=2>"
                "<center><font size=4><b>ESP32 Login Page</b></font></center>"
                "<br>"
            "</td>"
            "<br>"
            "<br>"
        "</tr>"
        "<tr>"
             "<td>Username:</td>"
             "<td><input type='text' size=25 name='userid'><br></td>"
        "</tr>"
        "<br>"
        "<br>"
        "<tr>"
            "<td>Password:</td>"
            "<td><input type='Password' size=25 name='pwd'><br></td>"
            "<br>"
            "<br>"
        "</tr>"
        "<tr>"
            "<td><input type='submit' onclick='check(this.form)' value='Login'></td>"
        "</tr>"
    "</table>"
"</form>"
"<script>"
    "function check(form)"
    "{"
    "if(form.userid.value=='admin' && form.pwd.value=='admin')"
    "{"
    "window.open('/serverIndex')"
    "}"
    "else"
    "{"
    " alert('Error Password or Username')/*displays error message*/"
    "}"
    "}"
"</script>";

/*
 * Server Index Page
 */

const char* serverIndex =
"<script src='https://ajax.googleapis.com/ajax/libs/jquery/3.2.1/jquery.min.js'></script>"
"<form method='POST' action='#' enctype='multipart/form-data' id='upload_form'>"
   "<input type='file' name='update'>"
        "<input type='submit' value='Update'>"
    "</form>"
 "<div id='prg'>progress: 0%</div>"
 "<script>"
  "$('form').submit(function(e){"
  "e.preventDefault();"
  "var form = $('#upload_form')[0];"
  "var data = new FormData(form);"
  " $.ajax({"
  "url: '/update',"
  "type: 'POST',"
  "data: data,"
  "contentType: false,"
  "processData:false,"
  "xhr: function() {"
  "var xhr = new window.XMLHttpRequest();"
  "xhr.upload.addEventListener('progress', function(evt) {"
  "if (evt.lengthComputable) {"
  "var per = evt.loaded / evt.total;"
  "$('#prg').html('progress: ' + Math.round(per*100) + '%');"
  "}"
  "}, false);"
  "return xhr;"
  "},"
  "success:function(d, s) {"
  "console.log('success!')"
 "},"
 "error: function (a, b, c) {"
 "}"
 "});"
 "});"
 "</script>";

/*
 * setup function
 */
void setup(void) {
  Serial.begin(115200);

  // Connect to WiFi network
  WiFi.begin(ssid, password);
  Serial.println("");

  // Wait for connection
  while (WiFi.status() != WL_CONNECTED) {
    delay(500);
    Serial.print(".");
  }
  Serial.println("");
  Serial.print("Connected to ");
  Serial.println(ssid);
  Serial.print("IP address: ");
  Serial.println(WiFi.localIP());

  /*use mdns for host name resolution*/
  if (!MDNS.begin(host)) { //http://esp32.local
    Serial.println("Error setting up MDNS responder!");
    while (1) {
      delay(1000);
    }
  }
  Serial.println("mDNS responder started");
  /*return index page which is stored in serverIndex */
  server.on("/", HTTP_GET, []() {
    server.sendHeader("Connection", "close");
    server.send(200, "text/html", loginIndex);
  });
  server.on("/serverIndex", HTTP_GET, []() {
    server.sendHeader("Connection", "close");
    server.send(200, "text/html", serverIndex);
  });
  /*handling uploading firmware file */
  server.on("/update", HTTP_POST, []() {
    server.sendHeader("Connection", "close");
    server.send(200, "text/plain", (Update.hasError()) ? "FAIL" : "OK");
    ESP.restart();
  }, []() {
    HTTPUpload& upload = server.upload();
    if (upload.status == UPLOAD_FILE_START) {
      Serial.printf("Update: %s\n", upload.filename.c_str());
      if (!Update.begin(UPDATE_SIZE_UNKNOWN)) { //start with max available size
        Update.printError(Serial);
      }
    } else if (upload.status == UPLOAD_FILE_WRITE) {
      /* flashing firmware to ESP*/
      if (Update.write(upload.buf, upload.currentSize) != upload.currentSize) {
        Update.printError(Serial);
      }
    } else if (upload.status == UPLOAD_FILE_END) {
      if (Update.end(true)) { //true to set the size to the current progress
        Serial.printf("Update Success: %u\nRebooting...\n", upload.totalSize);
      } else {
        Update.printError(Serial);
      }
    }
  });
  server.begin();
}

void loop(void) {
  server.handleClient();
  delay(1);
}
It implements a fake login (no security to do front-end login check), a simple web page similar to the update page of HTTPUpdateServer, and the REST endpoint in POST with multipart/form-data management.
The page is given to upload works only if there is an internet connection because I use jQuery to manage progress and POST, next, I publish my page that uses VanillaJS without a library to do all.
The relevant and interesting part of this simple sketch is the Update class. That is the core of the OTA update, and It needs to start the session
if (!Update.begin(UPDATE_SIZE_UNKNOWN)) { //start with max available size
then It can manage a generic stream of data (inherit a basic Stream class)
if (Update.write(upload.buf, upload.currentSize) != upload.currentSize) {
and at the end close the session and reboot the device to do the firmware change.
if (Update.end(true)) { //true to set the size to the current progress
But I discourage the use of the native class to do Web updates if exists a library implementation that is maintained when a core change happens. Somebody updates the code for you.
I discourage the use of native command if exist a library that are maintained for you.
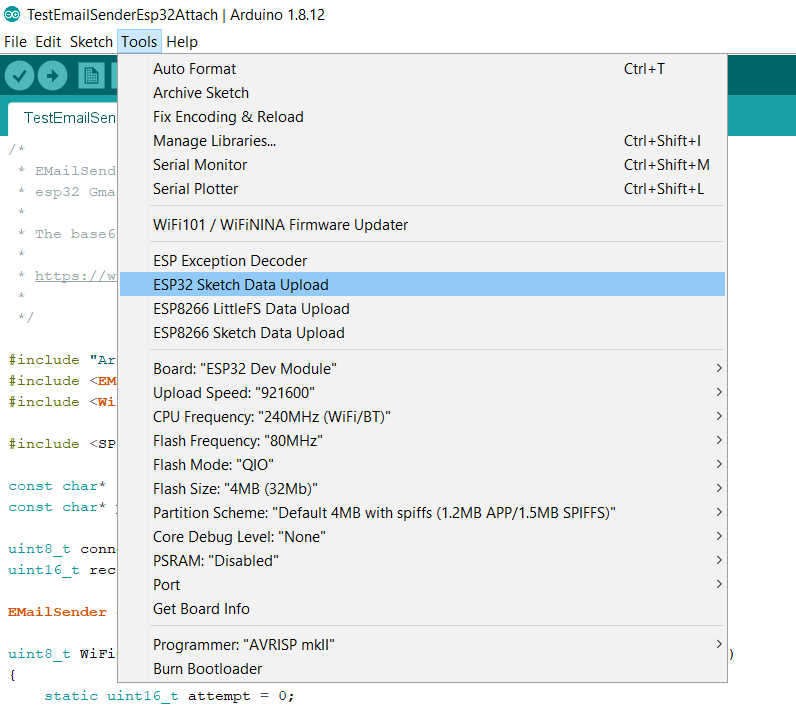
Generate FileSystem (SPIFFS, LittleFS, and FFat)
An interesting feature is the management of File Systems like compiled firmware.
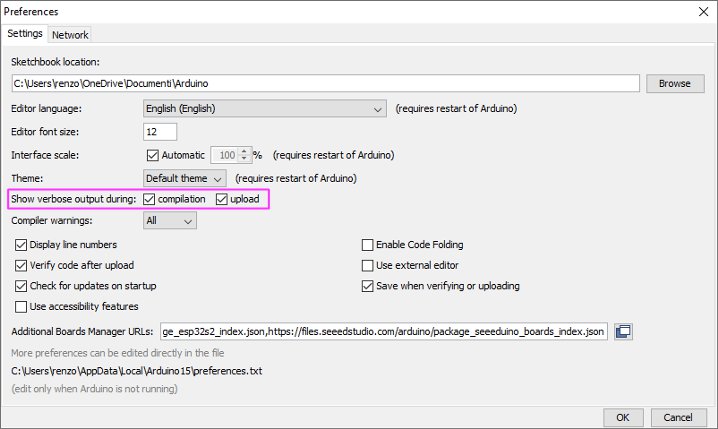
Add verbose output to Arduino IDE
To better understand all processes we are going to enable verbose output on our Arduino IDE. You can find these options on File -> Preferences and check Show verbose output checks.
Now we can grab and reuse the console command.
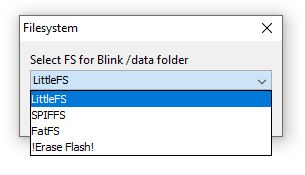
Generate filesystem binary
To manage the filesystem, we can use the same way, but first, you must read one of the following guides:
- ESP32: integrated SPIFFS FileSystem
- ESP32: integrated LittleFS FileSystem
- ESP32: integrated FFat (FAT/exFAT) FileSystem
After that operation, you can use the plugin as usual.
You can check the IDE console output to check what happened.
Chip : esp32
Using partition scheme from Arduino IDE.
Start: 0x290000
Size : 0x170000
mkspiffs : C:\Users\renzo\AppData\Local\Arduino15\packages\esp32\tools\mkspiffs\0.2.3\mkspiffs.exe

espota : C:\Users\renzo\AppData\Local\Arduino15\packages\esp32\hardware\esp32\2.0.0\tools\espota.exe

[SPIFFS] data   : D:\Projects\Arduino\sloeber-workspace-OTA\ArduinoOTAesp32_basic_arduino\data
[SPIFFS] offset : 0
[SPIFFS] start  : 2686976
[SPIFFS] size   : 1472
[SPIFFS] page   : 256
[SPIFFS] block  : 4096
->/version.txt
[SPIFFS] upload : C:\Users\renzo\AppData\Local\Temp\arduino_build_258074/ArduinoOTAesp32_basic_arduino.spiffs.bin
[SPIFFS] IP     : 192.168.1.186
Running: C:\Users\renzo\AppData\Local\Arduino15\packages\esp32\hardware\esp32\2.0.0\tools\espota.exe -i 192.168.1.186 -p 3232 -s -f C:\Users\renzo\AppData\Local\Temp\arduino_build_258074/ArduinoOTAesp32_basic_arduino.spiffs.bin

_>Sending invitation to 192.168.1.186
_>Uploading................................................................................................................................................................................................................................................................................................................................................................................................................................................................................................................................................................................................................................................................................................................................................................................................................................................................................................................................................................................................................................................................................................................................................................................................................................................................................................................................................................................................................................................................................................................................
_>09:21:38 [ERROR]: Error response from device
SPIFFS Upload failed!
The IDE console returns an error but the upload work, I think there is a little bug now when I write this article.
IDE gives an error but it is a bug, the loading works correctly
You can retrieve the file system bin file from this line
[SPIFFS] upload : C:\Users\renzo\AppData\Local\Temp\arduino_build_258074/ArduinoOTAesp32_basic_arduino.spiffs.bin
Add basic authentication
The ESP8266HTTPUpdateServer implements the Basic Authentication (already explained in this section of the WebServer tutorial). It’s elementary, we are going to change this line of code
httpUpdater.setup(&httpServer, "/update", "mischianti", "passwd");
In the code line, you can see 3 new parameters,
"/update": is the path of the OTA update, if you change this path the endpoint and the page change;"mischianti": is the login you must insert;"passwd": is the password.
When you try to enter on /update URL, a login popup appears

If you insert a wrong login or password, you receive standard HTTP status 401.
Thanks
- ESP32: pinout, specs and Arduino IDE configuration
- ESP32: integrated SPIFFS Filesystem
- ESP32: manage multiple Serial and logging
- ESP32 practical power saving
- ESP32 practical power saving: manage WiFi and CPU
- ESP32 practical power saving: modem and light sleep
- ESP32 practical power saving: deep sleep and hibernation
- ESP32 practical power saving: preserve data, timer and touch wake up
- ESP32 practical power saving: external and ULP wake up
- ESP32 practical power saving: UART and GPIO wake up
- ESP32: integrated LittleFS FileSystem
- ESP32: integrated FFat (Fat/exFAT) FileSystem
- ESP32-wroom-32
- ESP32-CAM
- ESP32: use ethernet w5500 with plain (HTTP) and SSL (HTTPS)
- ESP32: use ethernet enc28j60 with plain (HTTP) and SSL (HTTPS)
- How to use SD card with esp32
- esp32 and esp8266: FAT filesystem on external SPI flash memory
- Firmware and OTA update management
- Firmware management
- OTA update with Arduino IDE
- OTA update with Web Browser
- Self OTA uptate from HTTP server
- Non-standard Firmware update
- Integrating LAN8720 with ESP32 for Ethernet Connectivity with plain (HTTP) and SSL (HTTPS)
- Connecting the EByte E70 to ESP32 c3/s3 devices and a simple sketch example
- ESP32-C3: pinout, specs and Arduino IDE configuration
- Integrating W5500 with ESP32 Using Core 3: Native Ethernet Protocol Support with SSL and Other Features
- Integrating LAN8720 with ESP32 Using Core 3: Native Ethernet Protocol Support with SSL and Other Features
- Dallas ds18b20:
- Guide to I2C on ESP32: Communication with Heterogeneous 5V and 3.3V Devices, Additional Interface Management and Scanner
- Display
- Complete Guide: Using an ILI9341 Display with the TFT_eSPI Library
- Integrating Touch Screen Functionality with Your ILI9341 TFT Display
- SSD1683 eInk Display with GxEPD and ESP32 (and CrowPanel 4.2″ HMI): basics and configuration


I wrote an Arduino library to handle this exact thing. You could probably simplify some of your code by using WebOTA: https://github.com/scottchiefbaker/ESP-WebOTA
Hi Scott,
It’s interesting but I think the code It’s very simple with the standard library, but the fastest way you offer It’s appreciated by a lot of people.
Bye Renzo
Hi Renzo I tried your code but I don’t have the exact web page for the firmware and filesystem.
Can you give me the code for this because I didn’t understand anything in the site.
Best regards
Alfredo
Hi Alfredo,
what part don’t you understand?
Bye Renzo
I would like the code only for OTA (Firmware + Filesystem) for the ESP32, I tried to upload the code to your site but with many errors.
So I would like the code for firmware upload and file upload….
I work in Access Point…
Hi Alfredo,
please open a forum topic (here in English or qui in italiano), and explain the code you use and the errors.
The code is quite simple, and you can find the basic sketch in the ESP32 basic examples as described.
Bye Renzo