Aggiornamento automatico Firmware OTA dell’ESP32 dal server – 1
L’ESP32 è un potente microcontrollore che può essere utilizzato in un’ampia gamma di applicazioni, dai dispositivi IoT ai progetti di robotica. Una delle sue caratteristiche principali è la capacità di eseguire aggiornamenti Over-The-Air (OTA) del suo firmware da un server. Ciò consente di aggiornare in remoto il firmware di un dispositivo basato su ESP32 senza dover accedere fisicamente al dispositivo.
L’aggiornamento OTA (Over the Air) è il processo di caricamento del firmware su un modulo ESP32 utilizzando una connessione Wi-Fi anziché una porta seriale. Tale funzionalità diventa estremamente utile in caso di accesso fisico limitato o nullo al modulo.
Per eseguire un aggiornamento self-OTA, è necessario configurare un server che ospiti la nuova immagine del firmware e aggiungere il supporto OTA al firmware ESP32. È quindi possibile configurare ESP32 per controllare periodicamente il server per nuovi aggiornamenti del firmware e, quando è disponibile un nuovo aggiornamento, ESP32 lo scaricherà dal server e lo installerà.
Implementando gli aggiornamenti OTA sui tuoi dispositivi basati su ESP32, puoi assicurarti che i tuoi dispositivi eseguano sempre il firmware più recente senza dover accedere fisicamente a ciascun dispositivo per eseguire gli aggiornamenti. Ciò può farti risparmiare tempo e fatica, soprattutto se hai un gran numero di dispositivi distribuiti sul campo.
L’OTA può essere eseguito utilizzando quanto segue:
- Arduino IDE
- Web Browser
- Server HTTP
First of all, check the tutorial “ESP32: flash compiled firmware (.bin)“.
Aggiornamento automatico OTA a ogni avvio dell’applicazione
ESPhttpUpdate class può controllare gli aggiornamenti e scaricare un file binario dal server Web HTTP. È possibile scaricare gli aggiornamenti da ogni indirizzo IP o dominio sulla rete o su Internet.
Si noti che per impostazione predefinita questa classe chiude tutte le altre connessioni tranne quella utilizzata dall’aggiornamento; questo perché il metodo di aggiornamento si blocca. Ciò significa che se c’è un’altra applicazione che riceve dati, i pacchetti TCP si accumuleranno nel buffer causando errori di memoria insufficiente e causando il fallimento dell’aggiornamento OTA. C’è anche un numero limitato di buffer di ricezione disponibili e altre applicazioni potrebbero esaurirli tutti.
Ci sono alcuni casi in cui sai che non riceverai alcun dato ma vorresti comunque inviare aggiornamenti sui progressi. È possibile disabilitare il comportamento predefinito (e mantenere aperte le connessioni) chiamando closeConnectionsOnUpdate(false). (Cit.)
Crea un server web di base
Ora creeremo un server veloce, ora per scaricare il firmware accanto a gestire REST.
Preparare l’ambiente
- Utilizziamo NodeJS e puoi scaricarlo da qui .
- Dopo l’installazione, crea una nuova directory
OTAServer. - CD all’interno della cartella
OTAServer.
Inizializzare l’applicazione
- Lancio all’interno della cartella
npm init.
D:\Projects\IdeaProjects\OTAWebPages\OTAServer>npm init
This utility will walk you through creating a package.json file.
It only covers the most common items, and tries to guess sensible defaults.

See `npm help init` for definitive documentation on these fields
and exactly what they do.

Use `npm install <pkg>` afterwards to install a package and
save it as a dependency in the package.json file.

Press ^C at any time to quit.
package name: (otaserver)
version: (1.0.0)
description: Server to test HTTP server OTA update
entry point: (index.js)
test command:
git repository:
keywords: OTA esp8266 esp32 Server
author: Renzo Mischianti
license: (ISC)
About to write to D:\Projects\IdeaProjects\OTAWebPages\OTAServer\package.json:

{
  "name": "otaserver",
  "version": "1.0.0",
  "description": "Server to test HTTP server OTA update",
  "main": "index.js",
  "scripts": {
    "test": "echo \"Error: no test specified\" && exit 1"
  },
  "keywords": [
    "OTA",
    "esp8266",
    "esp32",
    "Server"
  ],
  "author": "Renzo Mischianti",
  "license": "ISC"
}


Is this OK? (yes) yes
- Installa express il server di base in NodeJS
npm install express --save-dev
Codice di base del server web
- Crea
index.js. - Aggiungi questo contenuto su
index.js.
const express = require('express');
const { networkInterfaces } = require('os');

const app = express();
const nets = networkInterfaces();

// Server port
const PORT = 3000;

app.get('/', (request, response) => response.send('Hello from www.mischianti.org!'));

app.listen(PORT, () => {
    const results = {}; // Or just '{}', an empty object

    for (const name of Object.keys(nets)) {
        for (const net of nets[name]) {
            // Skip over non-IPv4 and internal (i.e. 127.0.0.1) addresses
            if (net.family === 'IPv4' && !net.internal) {
                if (!results[name]) {
                    results[name] = [];
                }
                results[name].push(net.address);
            }
        }
    }

    console.log('Listening on port '+PORT+'\n', results)
});
- Avviare l’applicazione con
node index.js.
D:\Projects\IdeaProjects\OTAWebPages\OTAServer>node index.js
Listening on port 3000
 {
  'VirtualBox Host-Only Network': [ '192.168.56.1' ],
  'VMware Network Adapter VMnet1': [ '192.168.113.1' ],
  'VMware Network Adapter VMnet8': [ '192.168.116.1' ],
  'Wi-Fi': [ '192.168.1.108' ],
  Ethernet: [ '192.168.1.125' ]
}
- Prendi l’IP corretto dalla console, non possiamo usare localhost o 127.0.0.1 per il nostro test, quindi stampo all’inizio tutte le interfacce e, nel mio caso, l’IP dell’applicazione corrente è Ethernet: [ ‘192.168. 1.125’]
- Metti sul browser l’URL
http://192.168.1.125:3000/. - Controlla nella pagina del browser la frase “Hello from www.mischianti.org!”.
Creare lo sketch iniziale
Possiamo usare l’esempio di base che puoi trovare su File -> Examples -> HTTPUpdate -> httpUpdate.
Lo cambiamo in modo che punti al nostro nuovo server.
/*
 * ESP32 Basic Sketch for automatic update of firmware at start
 *
 * Renzo Mischianti <www.mischianti.org>
 *
 * https://mischianti.org
*/

#include <Arduino.h>

#include <WiFi.h>
#include <WiFiMulti.h>

#include <HTTPClient.h>
#include <HTTPUpdate.h>

#ifndef APSSID
#define APSSID "<YOUR-SSID>"
#define APPSK  "<YOUR-PASSWD>"
#endif

WiFiMulti WiFiMulti;

#define FIRMWARE_VERSION "0.2"

void setup() {

  Serial.begin(115200);
  // Serial.setDebugOutput(true);

  Serial.println();
  Serial.println();
  Serial.println();

  for (uint8_t t = 4; t > 0; t--) {
    Serial.printf("[SETUP] WAIT %d...\n", t);
    Serial.flush();
    delay(1000);
  }

  WiFi.mode(WIFI_STA);
  WiFiMulti.addAP(APSSID, APPSK);

  Serial.print(F("Firmware version "));
  Serial.println(FIRMWARE_VERSION);
  delay(2000);

}

void loop() {
  // wait for WiFi connection
  if ((WiFiMulti.run() == WL_CONNECTED)) {

    WiFiClient client;

    // The line below is optional. It can be used to blink the LED on the board during flashing
    // The LED will be on during download of one buffer of data from the network. The LED will
    // be off during writing that buffer to flash
    // On a good connection the LED should flash regularly. On a bad connection the LED will be
    // on much longer than it will be off. Other pins than LED_BUILTIN may be used. The second
    // value is used to put the LED on. If the LED is on with HIGH, that value should be passed
    // httpUpdate.setLedPin(LED_BUILTIN, LOW);

    httpUpdate.rebootOnUpdate(false); // remove automatic update

    Serial.println(F("Update start now!"));

    // t_httpUpdate_return ret = ESPhttpUpdate.update(client, "http://192.168.1.125:3000/firmware/httpUpdateNew.bin");
    // Or:
    t_httpUpdate_return ret = httpUpdate.update(client, "192.168.1.125", 3000, "/firmware/httpUpdateNew.bin");

    switch (ret) {
      case HTTP_UPDATE_FAILED:
        Serial.printf("HTTP_UPDATE_FAILD Error (%d): %s\n", httpUpdate.getLastError(), httpUpdate.getLastErrorString().c_str());
        Serial.println(F("Retry in 10secs!"));
        delay(10000); // Wait 10secs
        break;

      case HTTP_UPDATE_NO_UPDATES:
        Serial.println("HTTP_UPDATE_NO_UPDATES");
        break;

      case HTTP_UPDATE_OK:
        Serial.println("HTTP_UPDATE_OK");
        delay(1000); // Wait a second and restart
        ESP.restart();
        break;
    }
  }
}
Ricordati di aggiungere il tuo SSID e PASSWD
Se carichi lo sketch ora, riceverai questo errore sull’output seriale.
[SETUP] WAIT 4...
[SETUP] WAIT 3...
[SETUP] WAIT 2...
[SETUP] WAIT 1...
Firmware version 0.1
Update start now!
HTTP_UPDATE_FAILD Error (-11): HTTP error: read Timeout
Retry in 10secs!
Questo perché non riesce a trovare il firmware sul percorso http://192.168.1.125:3000/firmware/httpUpdateNew.bin e il server restituisce un codice HTTP 404 Non trovato.
Se interrompi il server ricevi
[SETUP] WAIT 4...
[SETUP] WAIT 3...
[SETUP] WAIT 2...
[SETUP] WAIT 1...
Firmware version 0.1
Update start now!
CALLBACK:  HTTP update fatal error code -1
HTTP_UPDATE_FAILD Error (-1): HTTP error: connection failed
Retry in 10secs!
Generare il file binario
Fare riferimento all’articolo “ESP32: flash compiled firmware (.bin)” per comprendere tutti i tipi di file binari compilati.
Segui questi passaggi per generare un file binario:
- Fare clic su
Sketch -> Export Compiled Binary;
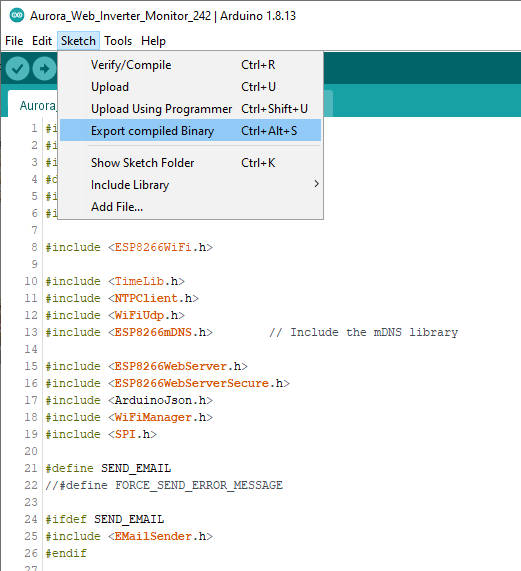
- Fare clic su
Sketch -> Open Sketch Folder; - Rinominare il file .bin in
httpUpdateNew.bin.
Creare un URL di download
Ora torna alla cartella OTAServer e:
- Crea la cartella
firmware. - Metti un file
httpUpdateNew.binall’interno della cartella del firmware. - Aggiungi al tuo index.js l’URL di download in GET
const express = require('express');
const { networkInterfaces } = require('os');
const path = require('path');

const app = express();
const nets = networkInterfaces();

// Server port
const PORT = 3000;

app.get('/', (request, response) => response.send('Hello from www.mischianti.org!'));

let downloadCounter = 1;
app.get('/firmware/httpUpdateNew.bin', (request, response) => {
    response.download(path.join(__dirname, 'firmware/httpUpdateNew.bin'), 'httpUpdateNew.bin', (err)=>{
        if (err) {
            console.error("Problem on download firmware: ", err)
        }else{
            downloadCounter++;
        }
    });
    console.log('Your file has been downloaded '+downloadCounter+' times!')
})

app.listen(PORT, () => {
    const results = {}; // Or just '{}', an empty object

    for (const name of Object.keys(nets)) {
        for (const net of nets[name]) {
            // Skip over non-IPv4 and internal (i.e. 127.0.0.1) addresses
            if (net.family === 'IPv4' && !net.internal) {
                if (!results[name]) {
                    results[name] = [];
                }
                results[name].push(net.address);
            }
        }
    }

    console.log('Listening on port '+PORT+'\n', results)
});
- Riavvia l’applicazione con
Ctrl+Cenode index.js. - Prova l’URL scrivendo nell’URL del browser
http://192.168.1.125:3000/firmware/httpUpdateNew.bin
Se tutto è ok, il download inizia, e puoi trovare nella console queste righe
D:\Projects\IdeaProjects\OTAWebPages\OTAServer>node index.js
Listening on port 3000
 {
  'VirtualBox Host-Only Network': [ '192.168.56.1' ],
  'VMware Network Adapter VMnet1': [ '192.168.113.1' ],
  'VMware Network Adapter VMnet8': [ '192.168.116.1' ],
  'Wi-Fi': [ '192.168.1.108' ],
  Ethernet: [ '192.168.1.125' ]
}
Your file has been downloaded 1 times!
Your file has been downloaded 2 times!
Test finale
Ora se cambiamo FIRMWARE_VERISON a 0.2 e riproviamo il risultato diventa così:
[SETUP] WAIT 4...
[SETUP] WAIT 3...
[SETUP] WAIT 2...
[SETUP] WAIT 1...
Firmware version 0.1
Update start now!
HTTP_UPDATE_OK
ets Jun  8 2016 00:22:57

rst:0xc (SW_CPU_RESET),boot:0x13 (SPI_FAST_FLASH_BOOT)
configsip: 0, SPIWP:0xee
clk_drv:0x00,q_drv:0x00,d_drv:0x00,cs0_drv:0x00,hd_drv:0x00,wp_drv:0x00
mode:DIO, clock div:1
load:0x3fff0018,len:4
load:0x3fff001c,len:1216
ho 0 tail 12 room 4
load:0x40078000,len:10944
load:0x40080400,len:6388
entry 0x400806b4


[SETUP] WAIT 4...
[SETUP] WAIT 3...
[SETUP] WAIT 2...
[SETUP] WAIT 1...
Firmware version 0.2
Update start now!
HTTP_UPDATE_OK
Per impedire l’aggiornamento continuo, è necessario utilizzare un orario o un’azione che attivi il processo.
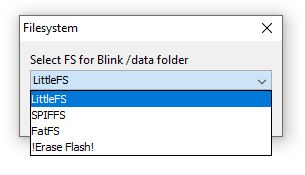
Aggiornamento OTA del FileSystem a ogni avvio dell’applicazione
Allo stesso modo, possiamo gestire gli aggiornamenti del filesystem. Stiamo andando veloci ora perché è la stessa logica di un aggiornamento del firmware.
Genera file binario del FileSystem
Per gestire il filesystem, possiamo utilizzare allo stesso modo, ma prima devi leggere una delle seguenti guide:
- ESP32: fileSystem integrato SPIFFS
- ESP32: filesystem integrato LittleFS
- ESP32: filesystem integrato FFat (FAT/exFAT)
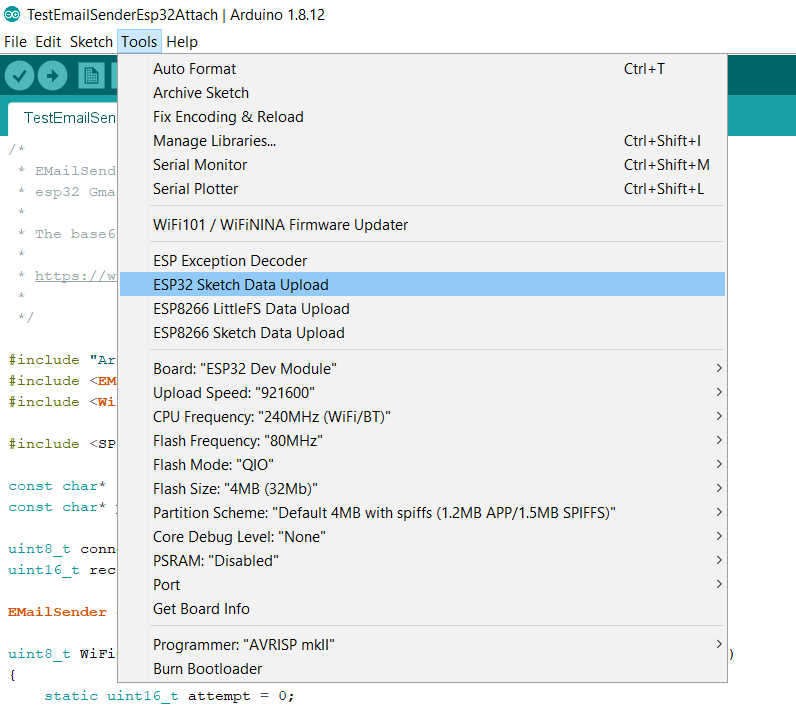
Dopo tale operazione, puoi utilizzare il plug-in come al solito.
Ora aggiungeremo la directory data alla cartella dello sketch e creeremo un file version.txt con questo contenuto
0.2
e usa il plugin per caricare.
Puoi controllare l’output della console per verificare cosa è successo.
Chip : esp32
Using partition scheme from Arduino IDE.
Start: 0x290000
Size : 0x170000
mkspiffs : C:\Users\renzo\AppData\Local\Arduino15\packages\esp32\tools\mkspiffs\0.2.3\mkspiffs.exe

espota : C:\Users\renzo\AppData\Local\Arduino15\packages\esp32\hardware\esp32\2.0.0\tools\espota.exe

[SPIFFS] data   : D:\Projects\Arduino\sloeber-workspace-OTA\ArduinoOTAesp32_basic_arduino\data
[SPIFFS] offset : 0
[SPIFFS] start  : 2686976
[SPIFFS] size   : 1472
[SPIFFS] page   : 256
[SPIFFS] block  : 4096
->/version.txt
[SPIFFS] upload : C:\Users\renzo\AppData\Local\Temp\arduino_build_258074/ArduinoOTAesp32_basic_arduino.spiffs.bin
[SPIFFS] IP     : 192.168.1.186
Running: C:\Users\renzo\AppData\Local\Arduino15\packages\esp32\hardware\esp32\2.0.0\tools\espota.exe -i 192.168.1.186 -p 3232 -s -f C:\Users\renzo\AppData\Local\Temp\arduino_build_258074/ArduinoOTAesp32_basic_arduino.spiffs.bin

_>Sending invitation to 192.168.1.186
_>Uploading................................................................................................................................................................................................................................................................................................................................................................................................................................................................................................................................................................................................................................................................................................................................................................................................................................................................................................................................................................................................................................................................................................................................................................................................................................................................................................................................................................................................................................................................................................................................
_>09:21:38 [ERROR]: Error response from device
SPIFFS Upload failed!
La console IDE restituisce un errore, ma il caricamento funziona; Penso che ora ci sia un piccolo bug quando scrivo questo articolo.
IDE dà un errore ma è un bug, il caricamento funziona correttamente
È possibile recuperare il file bin del file system da questa riga
[SPIFFS] upload : C:\Users\renzo\AppData\Local\Temp\arduino_build_258074/ArduinoOTAesp32_basic_arduino.spiffs.bin
Creare lo sketch
Ora andiamo a modificare lo sketch già utilizzato per il firmware.
/*
 * Basic Sketch for ESP32 automatic update of filesystem at start
 *
 * Renzo Mischianti <www.mischianti.org>
 *
 * https://mischianti.org
*/

#include <Arduino.h>

#include <WiFi.h>
#include <WiFiMulti.h>

#include <HTTPClient.h>
#include <HTTPUpdate.h>
#include <SPIFFS.h>

#ifndef APSSID
#define APSSID "<YOUR-SSID>"
#define APPSK  "<YOUR-PASSWD>"
#endif

WiFiMulti WiFiMulti;

#define FIRMWARE_VERSION "0.2"

void setup() {

  Serial.begin(115200);
  // Serial.setDebugOutput(true);

  Serial.println();
  Serial.println();
  Serial.println();

  for (uint8_t t = 4; t > 0; t--) {
    Serial.printf("[SETUP] WAIT %d...\n", t);
    Serial.flush();
    delay(1000);
  }

  WiFi.mode(WIFI_STA);
  WiFiMulti.addAP(APSSID, APPSK);

  Serial.print(F("Firmware version "));
  Serial.println(FIRMWARE_VERSION);

  Serial.print(F("Inizializing FS..."));
  if (SPIFFS.begin()){
      Serial.println(F("done."));
  }else{
      Serial.println(F("fail."));
  }

  String fileSystemVersion = "Not set!";
  Serial.print(F("FileSystem version "));
  File versionFile = SPIFFS.open(F("/version.txt"), "r");
  if (versionFile) {
	  fileSystemVersion = versionFile.readString();
	  versionFile.close();
  }
  Serial.println(fileSystemVersion);
  delay(2000);
}

void loop() {
  // wait for WiFi connection
  if ((WiFiMulti.run() == WL_CONNECTED)) {

    WiFiClient client;

    // The line below is optional. It can be used to blink the LED on the board during flashing
    // The LED will be on during download of one buffer of data from the network. The LED will
    // be off during writing that buffer to flash
    // On a good connection the LED should flash regularly. On a bad connection the LED will be
    // on much longer than it will be off. Other pins than LED_BUILTIN may be used. The second
    // value is used to put the LED on. If the LED is on with HIGH, that value should be passed
    // httpUpdate.setLedPin(LED_BUILTIN, LOW);

    httpUpdate.rebootOnUpdate(false); // remove automatic update

    Serial.println(F("Update start now!"));

    t_httpUpdate_return ret = httpUpdate.updateSpiffs(client, "http://192.168.1.125:3000/filesystem/httpUpdateNewFS.bin");

    switch (ret) {
      case HTTP_UPDATE_FAILED:
        Serial.printf("HTTP_UPDATE_FAILD Error (%d): %s\n", httpUpdate.getLastError(), httpUpdate.getLastErrorString().c_str());
        Serial.println(F("Retry in 10secs!"));
        delay(10000); // Wait 10secs
        break;

      case HTTP_UPDATE_NO_UPDATES:
        Serial.println("HTTP_UPDATE_NO_UPDATES");
        break;

      case HTTP_UPDATE_OK:
        Serial.println("HTTP_UPDATE_OK");
        delay(1000); // Wait a second and restart
        ESP.restart();
        break;
    }
  }
}
All’inizio, ottieni questo risultato sull’output seriale
[SETUP] WAIT 4...
[SETUP] WAIT 3...
[SETUP] WAIT 2...
[SETUP] WAIT 1...
Firmware version 0.2
Inizializing FS...done.
FileSystem version
Update start now!
HTTP_UPDATE_FAILD Error (-102): File Not Found (404)
Retry in 10secs!
La versione del filesystem è presa dal file version.txt e mostrata con questo codice
  String fileSystemVersion = "Not set!";
  Serial.print(F("FileSystem version "));
  File versionFile = SPIFFS.open(F("/version.txt"), "r");
  if (versionFile) {
	  fileSystemVersion = versionFile.readString();
	  versionFile.close();
  }
  Serial.println(fileSystemVersion);
e il codice della riga principale è
t_httpUpdate_return ret = httpUpdate.updateSpiffs(client, "http://192.168.1.125:3000/filesystem/httpUpdateNewFS.bin");
che gestisce il download e l’aggiornamento.
Creare un end-point di download del FileSystem
Ora aggiungiamo l’endpoint di download all’implementazione del server.
- In OTAServer, crea la cartella filesystem,
- Modificare la versione in
0.3inversion.txt, rigenerare senza caricare e copia il fileArduinoOTAesp32_basic_fs_http_update.mkspiffs.binnella cartella - Rinomina in
httpUpdateNewFS.bin.
E modifica l’originale aggiungendo il codice evidenziato.
const express = require('express');
const { networkInterfaces } = require('os');
const path = require('path');

const app = express();
const nets = networkInterfaces();

// Server port
const PORT = 3000;

app.get('/', (request, response) => response.send('Hello from www.mischianti.org!'));

let downloadCounter = 1;
app.get('/firmware/httpUpdateNew.bin', (request, response) => {
    response.download(path.join(__dirname, 'firmware/httpUpdateNew.bin'), 'httpUpdateNew.bin', (err)=>{
        if (err) {
            console.error("Problem on download firmware: ", err)
        }else{
            downloadCounter++;
        }
    });
    console.log('Your file has been downloaded '+downloadCounter+' times!')
})

let downloadFSCounter = 1;
app.get('/filesystem/httpUpdateNewFS.bin', (request, response) => {
    response.download(path.join(__dirname, 'filesystem/httpUpdateNewFS.bin'), 'httpUpdateNewFS.bin', (err)=>{
        if (err) {
            console.error("Problem on download filesystem: ", err)
        }else{
            downloadFSCounter++;
        }
    });
    console.log('Your file FS has been downloaded '+downloadFSCounter+' times!')
})

app.listen(PORT, () => {
    const results = {}; // Or just '{}', an empty object

    for (const name of Object.keys(nets)) {
        for (const net of nets[name]) {
            // Skip over non-IPv4 and internal (i.e. 127.0.0.1) addresses
            if (net.family === 'IPv4' && !net.internal) {
                if (!results[name]) {
                    results[name] = [];
                }
                results[name].push(net.address);
            }
        }
    }

    console.log('Listening on port '+PORT+'\n', results)
});
Test finale
[SETUP] WAIT 4...
[SETUP] WAIT 3...
[SETUP] WAIT 2...
[SETUP] WAIT 1...
Firmware version 0.2
Inizializing FS...done.
FileSystem version 0.1
Update start now!
HTTP_UPDATE_OK
ets Jun  8 2016 00:22:57

rst:0xc (SW_CPU_RESET),boot:0x13 (SPI_FAST_FLASH_BOOT)
configsip: 0, SPIWP:0xee
clk_drv:0x00,q_drv:0x00,d_drv:0x00,cs0_drv:0x00,hd_drv:0x00,wp_drv:0x00
mode:DIO, clock div:1
load:0x3fff0018,len:4
load:0x3fff001c,len:1216
ho 0 tail 12 room 4
load:0x40078000,len:10944
load:0x40080400,len:6388
entry 0x400806b4


[SETUP] WAIT 4...
[SETUP] WAIT 3...
[SETUP] WAIT 2...
[SETUP] WAIT 1...
Firmware version 0.2
Inizializing FS...done.
FileSystem version 0.2
Grazie
- ESP32: piedinatura, specifiche e configurazione dell’Arduino IDE
- ESP32: fileSystem integrato SPIFFS
- ESP32: gestire più seriali e logging per il debug
- ESP32 risparmio energetico pratico
- ESP32 risparmio energetico pratico: gestire WiFi e CPU
- ESP32 risparmio energetico pratico: modem e light sleep
- ESP32 risparmio energetico pratico: deep sleep e ibernazione
- ESP32 risparmio energetico pratico: preservare dati al riavvio, sveglia a tempo e tramite tocco
- ESP32 risparmio energetico pratico: sveglia esterna e da ULP
- ESP32 risparmio energetico pratico: sveglia da UART e GPIO
- ESP32: filesystem integrato LittleFS
- ESP32: filesystem integrato FFat (Fat/exFAT)
- ESP32-wroom-32
- ESP32-CAM
- ESP32: ethernet w5500 con chiamate standard (HTTP) e SSL (HTTPS)
- ESP32: ethernet enc28j60 con chiamate standard (HTTP) e SSL (HTTPS)
- Come usare la scheda SD con l’esp32
- esp32 e esp8266: file system FAT su memoria SPI flash esterna
- Gestione aggiornamenti firmware e OTA
- Gestione del firmware
- Aggiornamento OTA con Arduino IDE
- Aggiornamento OTA con browser web
- Aggiornamenti automatici OTA da un server HTTP
- Aggiornamento del firmware non standard
- Integrare LAN8720 con ESP32 per la connettività Ethernet con plain (HTTP) e SSL (HTTPS)
- Collegare l’EByte E70 (CC1310) ai dispositivi ESP32 c3/s3 ed un semplice sketch di esempio
- ESP32-C3: piedinatura, specifiche e configurazione dell’IDE Arduino
- i2c esp32: gestione rete a 5v, 3.3v e interfaccia aggiuntiva
- […]