STM32 Risparmio energetico: Sveglia da allarme RTC e Seriale – 6

Come al solito i nostri microcontrollori offrono una vasta gamma di fonti di risveglio, abbiamo già visto un risveglio temporizzato, e ora introduciamo il risveglio tramite allarme RTC e Seriale dei nostri STM32.
Risvegliarsi con l’interrupt interno generata dall’allarme RTC
Per questo test è meglio se leggi prima questo articolo “STM32: RTC interno, sistema orario e backup batteria (VBAT)” per comprendere meglio come funziona l’RTC interno.
Vogliamo provare a impostare un allarme per risvegliare il dispositivo, la libreria RTC ci aiuta a farlo.
In questo caso, utilizziamo l’integrazione perfetta di STM32LowPower e della libreria RTC, e possiamo modificare lo sketch dell’allarme usato nell’articolo collegato per risvegliarsi da una modalità di LowPower.
/**
 * A simple sketch that set the time to
 * 2022-04-20 at 16:00:00
 * and an alarm at
 * 16:00:10
 * the result is the interrupt after 10 secs
 * and wake from deep sleep status.
 *
 * by Renzo Mischianti <www.mischianti.org>
 * en: https://mischianti.org/category/tutorial/stm32-tutorial/
 * it: https://mischianti.org/it/category/guide/guida-alla-linea-di-microcontrollori-stm32/
 */

#include "STM32LowPower.h"
#include <STM32RTC.h>

/* Get the rtc object */
STM32RTC& rtc = STM32RTC::getInstance();

/* Change these values to set the current initial time */
const byte seconds = 0;
const byte minutes = 0;
const byte hours = 16;

/* Change these values to set the current initial date */
const byte day = 20;
const byte month = 4;
const byte year = 22;

void alarmMatch(void *data);

void setup()
{
  Serial.begin(115200);

  // Select RTC clock source: LSI_CLOCK, LSE_CLOCK or HSE_CLOCK.
  // By default the LSI is selected as source.
//  rtc.setClockSource(STM32RTC::LSI_CLOCK);

  rtc.begin(); // initialize RTC 24H format
  // we set the time at 2022-04-20 at 16:00:00
  rtc.setTime(hours, minutes, seconds);
  rtc.setDate(day, month, year);

  delay(1000);


  String someRandomData = "www.mischianti.org";

  // Configure low power
  LowPower.begin();
  LowPower.enableWakeupFrom(&rtc, alarmMatch, &someRandomData);

  // Now we set an alert at 16:00:10
  // pratically 10 secs after the start
  // (check the initialization of clock)
  rtc.setAlarmDay(day);
  rtc.setAlarmTime(16, 0, 10, 0);
  rtc.enableAlarm(rtc.MATCH_DHHMMSS);

  // Print date...
  Serial.printf("Now is %02d/%02d/%02d %02d:%02d:%02d.%03d and we set the wake at 16:10! So wait 10secs! \n",
		  rtc.getDay(), rtc.getMonth(), rtc.getYear(),
		  rtc.getHours(), rtc.getMinutes(), rtc.getSeconds(), rtc.getSubSeconds());
  Serial.println("Deep Sleep!");
  delay(1000);

  LowPower.deepSleep();
}

void loop()
{
  // Print date...
  Serial.printf("%02d/%02d/%02d ", rtc.getDay(), rtc.getMonth(), rtc.getYear());

  // ...and time
  Serial.printf("%02d:%02d:%02d.%03d\n", rtc.getHours(), rtc.getMinutes(), rtc.getSeconds(), rtc.getSubSeconds());
  delay(1000);
}

void alarmMatch(void *data)
{
	String myData = *(String*)data;
	Serial.println("Alarm Match!");
	Serial.println(myData);
}
Evidenzio l’aggiunta che abbiamo bisogno di risvegliarci dal deepSleep (ma funziona con tutte le modalità a basso consumo). Dopo aver importato la libreria, attiveremo la modalità LowPower e agganceremo l’interrupt dell’allarme.
  // Configure low power
  LowPower.begin();
  LowPower.enableWakeupFrom(&rtc, alarmMatch, &someRandomData);
Poi, dopo aver impostato tutti i dati per l’allarme, mettiamo il dispositivo in deepSleep.
LowPower.deepSleep();
Puoi controllare il risultato nell’output seriale.
Now is 20/04/22 16:00:00.944 and we set the wake at 16:10! So wait 10secs!
Deep Sleep!
Alarm Match!
www.mischianti.org
20/04/22 16:00:10.008
20/04/22 16:00:10.952
20/04/22 16:00:11.900
20/04/22 16:00:12.848
20/04/22 16:00:13.792
20/04/22 16:00:14.740
Lo sketch è molto semplice ma offre una funzionalità che può essere molto utile.
Risveglio dalla Seriale
Un’altra caratteristica interessante è il risveglio dal dispositivo Seriale. È interessante soprattutto se si dispone di un dispositivo Seriale autonomo.
Qui lo STM32 e ST-Link V2 utilizzati in questo test STM32F103C8T6 STM32F401 STM32F411 ST-Link v2 ST-Link v2 official
Qui l'FTDI USB to TTL CH340G - USB to TTL FT232RL
Qui il mio multimetro Aneng SZ18
Il risveglio da USB Seriale non è supportato, quindi andremo a migliorare lo schema di cablaggio di base utilizzato per questo test aggiungendo anche il cablaggio da STM32 Rx al pin Tx FTDI.
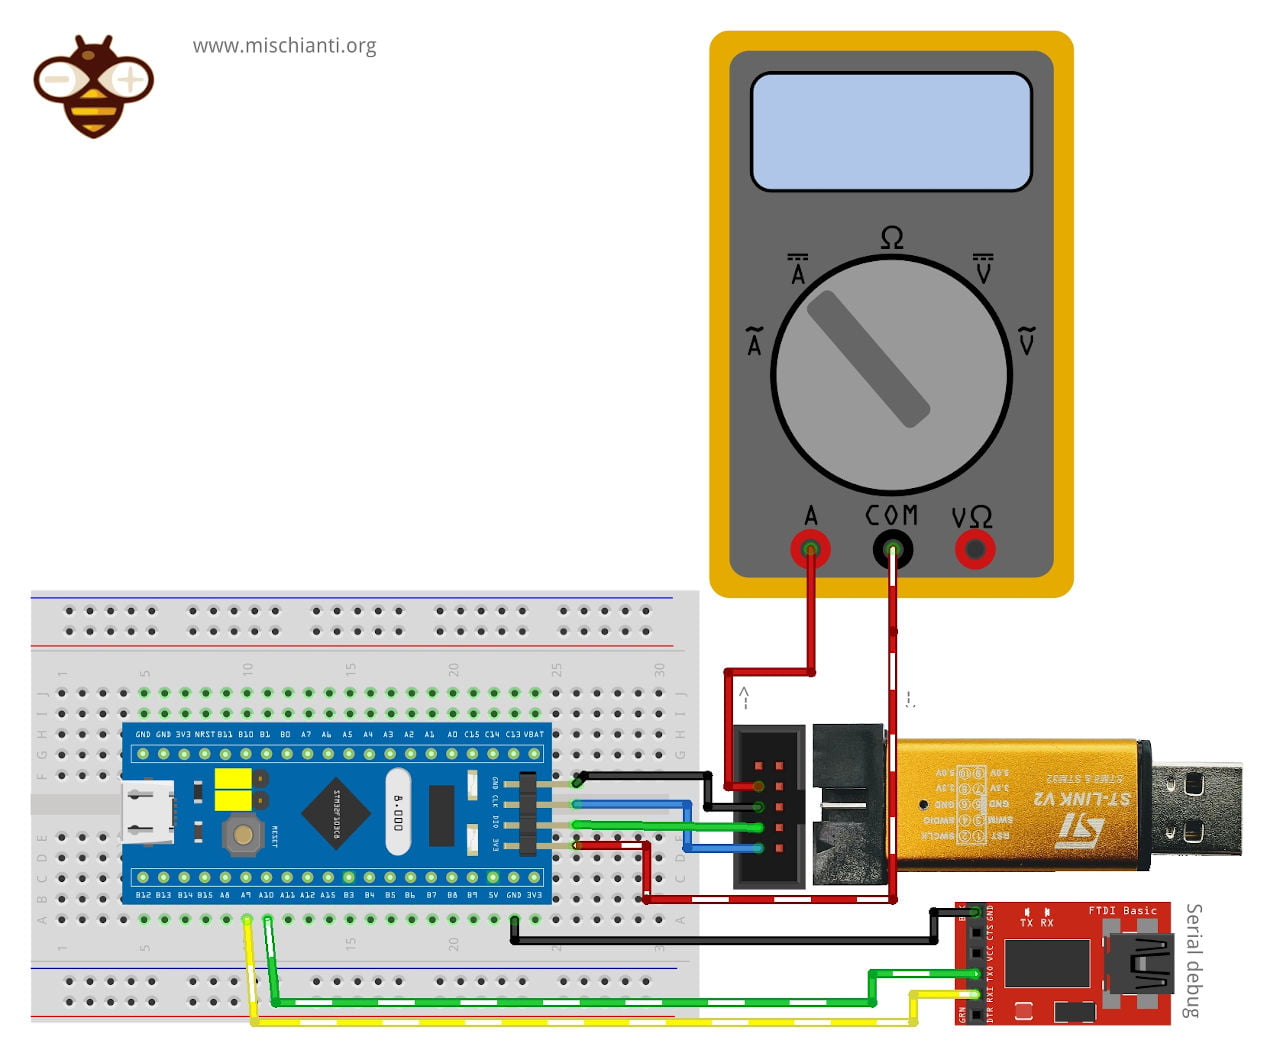
| STM32 | FTDI |
|---|---|
| PA9 | Tx |
| PA10 | Rx |
| GND | GND |
Qui l'FTDI USB to TTL CH340G - USB to TTL FT232RL
Anche lo sketch è molto semplice.
/**
 * STM32 wake up from Serial, you must use and external FTDI connected
 *
 * STM32		FTDI
 * PA9			Tx
 * PA10			Rx
 *
 * then with a serial console try to write some text, the STM32 wake-up
 * read the Serial buffer and return in sleep.
 *
 * by Renzo Mischianti <www.mischianti.org>
 * en: https://mischianti.org/category/tutorial/stm32-tutorial/
 * it: https://mischianti.org/it/category/guide/guida-alla-linea-di-microcontrollori-stm32/
*/

#include "STM32LowPower.h"

// Declare it volatile since it's incremented inside an interrupt
volatile int wakeup_counter = 0;
void serialWakeup();

void setup() {
  Serial.begin(115200);
  delay(1000);

  Serial.println("START PROGRAM!");

  // Configure low power
  LowPower.begin();
  // Enable UART in Low Power mode wakeup source
  LowPower.enableWakeupFrom(&Serial, serialWakeup);
}

void loop() {
  Serial.print("Start Sleep mode in ");
  for (int i = 5;i>0;i--) { Serial.print(i); Serial.print(" "); delay(1000); } Serial.println( "OK!" ); delay(1000);

  // Go to sleep
  LowPower.sleep();

  // Waked
  Serial.print(wakeup_counter);
  Serial.println(" wake up");

  // Give time to Serial bus to be ready
  delay(10);
  // Read all serial buffer
  while(Serial.available()) {
    char c = Serial.read();
    Serial.print(c);
  }
  Serial.println();
}

void serialWakeup() {
  // This function will be called once on device wakeup
  // You can do some little operations here (like changing variables
  // which will be used in the loop)
  // Remember to avoid calling delay() and long running functions
  // since this functions executes in interrupt context
  wakeup_counter++;
}
L’output seriale nel mio caso risulta essere:
START PROGRAM!
Start Sleep mode in 5 4 3 2 1 OK!

>>Send to COM16: "pippo"<<
1 wake up
pippo

Start Sleep mode in 5 4 3 2 1 OK!

>>Send to COM16: "pluto"<<
2 wake up
pluto

Start Sleep mode in 5 4 3 2 1 OK!

>>Send to COM16: "paperino"<<
3 wake up
paperino

Start Sleep mode in 5 4 3 2 1 OK!
Grazie
- STM32F1 Blue Pill: piedinatura, specifiche e configurazione IDE Arduino (STM32duino e STMicroelectronics)
- STM32: programmazione (STM32F1) via USB con bootloader STM32duino
- STM32: programmazione (STM32F1 STM32F4) tramite USB con bootloader HID
- STM32F4 Black Pill: pinout, specifiche e configurazione IDE Arduino
- STM32: ethernet w5500 standard (HTTP) e SSL (HTTPS)
- STM32: ethernet enc28j60 standard (HTTP) e SSL (HTTPS)
- STM32: WiFiNINA con un ESP32 come WiFi Co-Processor
- Come utilizzare la scheda SD con l’stm32 e la libreria SdFat
- STM32: memoria flash SPI FAT FS
- STM32: RTC interno, sistema orario e backup batteria (VBAT)
- STM32 LoRa
- STM32 Risparmio energetico
- STM32F1 Blue-Pill gestione clock e frequenza
- STM32F4 Black-Pill gestione clock e frequenza
- Introduzione e framework Arduino vs STM
- Libreria LowPower, cablaggio e Idle (STM Sleep).
- Sleep, deep sleep, shutdown e consumo energetico
- Sveglia da allarme RTC e Seriale
- Sveglia da sorgente esterna
- Introduzione al dominio di backup e conservazione delle variabili durante il RESET
- Registro di backup RTC e conservazione della SRAM
- STM32 invia email con allegati e SSL (come Gmail): w5500, enc28j60, SD e SPI Flash
- Server FTP su STM32 con W5500, ENC28J60, scheda SD e memoria flash SPI
- Collegamento dell’EByte E70 ai dispositivi STM32 (black/blue pill) e un semplice sketch di esempio