ESP32: ethernet enc28j60 con chiamate standard (HTTP) e SSL (HTTPS)
Innanzitutto, l’ESP32 ha già una periferica MAC, uno stack TCP/IP e la libreria Arduino duplica tutto questo sui dispositivi enc28j60. Ma ho molti dispositivi w5500 ed enc28j60 che funzionano bene.
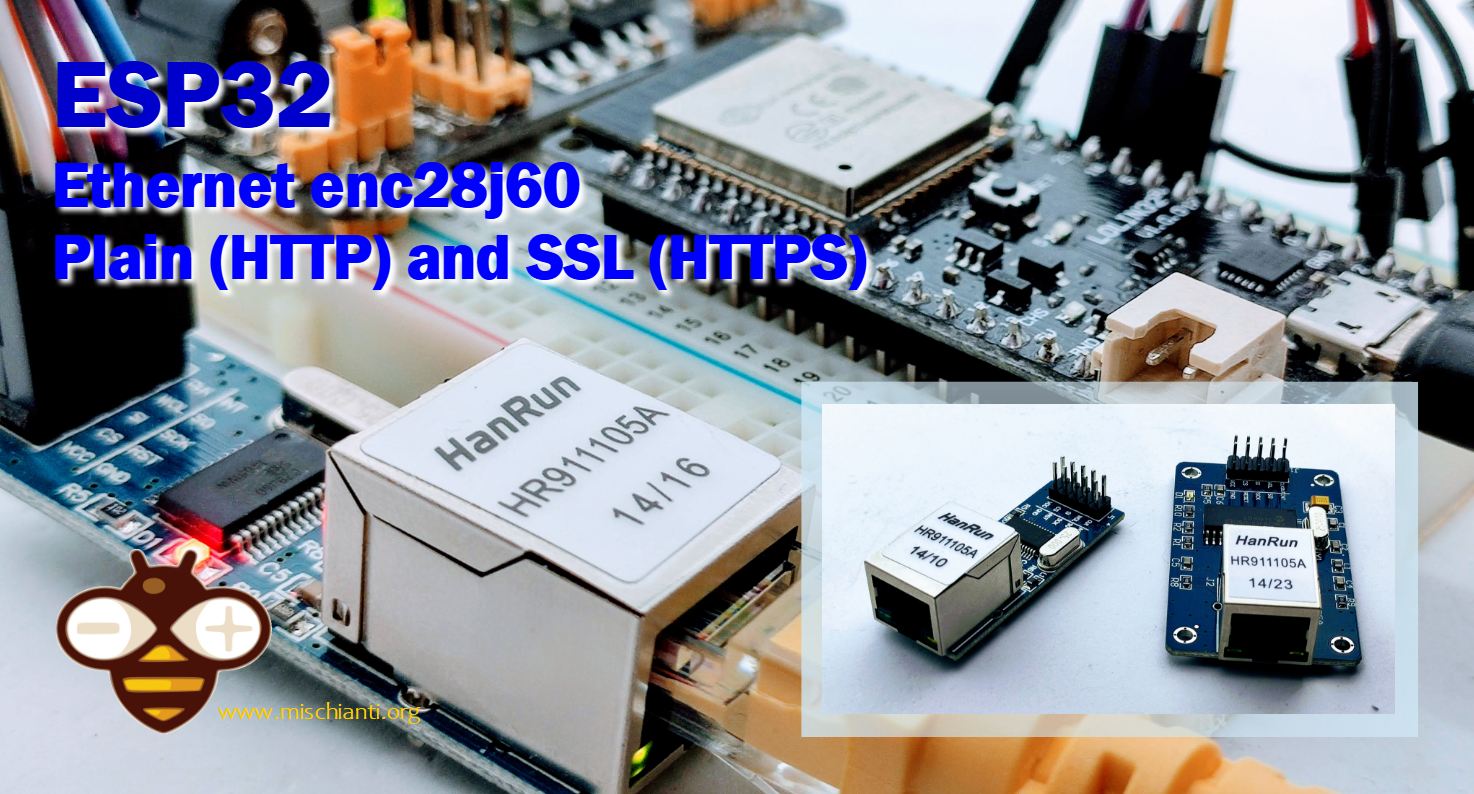
Molte persone mi chiedono alcuni esempi di connessioni cablate; Penso che la scelta migliore sia il dispositivo della serie w5500, ma enc28j60 può essere sufficiente per molti scopi, ed ha diversi fattori di forma e il prezzo è molto basso. Inizieremo a imparare come gestire le richieste semplici e SSL.
Dispositivo
L’ENC28J60-I/SP è un controller Ethernet autonomo con un’interfaccia periferica seriale (SPI) standard del settore. È progettato per fungere da interfaccia di rete Ethernet per qualsiasi controller dotato di SPI. L’ENC28J60 soddisfa tutte le specifiche IEEE 802.3. Incorpora diversi schemi di filtraggio dei pacchetti per limitare i pacchetti in entrata. Fornisce inoltre un modulo DMA interno per un veloce throughput dei dati e il calcolo del checksum assistito da hardware, utilizzato in vari protocolli di rete. La comunicazione con il controller host è implementata tramite un pin di interrupt e SPI, con frequenze di clock fino a 20 MHz. Due pin dedicati vengono utilizzati per il collegamento LED e l’indicazione dell’attività di rete.
- Pienamente compatibile con le reti 10/100/1000Base-T
- MAC integrato e PHY 10Base-T
- Supporta una porta 10Base-T con rilevamento e correzione della polarità
- Supporta le modalità full e half duplex
- Ritrasmissione automatica programmabile in caso di collisione
- Padding programmabile e generazione CRC
- Rifiuto automatico programmabile di pacchetti errati
- Interfaccia SPI con velocità di clock fino a 20MHz
- SRAM a doppia porta di trasmissione/ricezione di pacchetti da 8kB
- Dimensione del buffer di trasmissione/ricezione configurabile
- FIFO di ricezione circolare gestita dall’hardware
- Accesso casuale e sequenziale a livello di byte con incremento automatico
- Medium Access Controller (MAC) supporta pacchetti unicast, multicast e broadcast
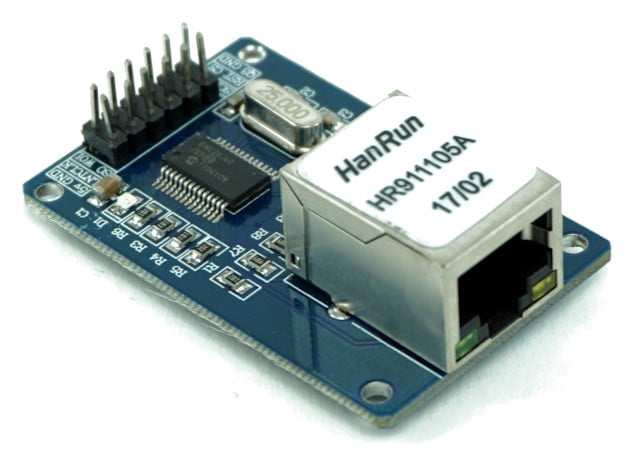
Come ho già detto, questo tipo di dispositivo ha molti fattori di forma e talvolta è stato rilasciato come shield.
Il più comune è quello di taglia media.
Poi un altro molto usato è la versione mini.
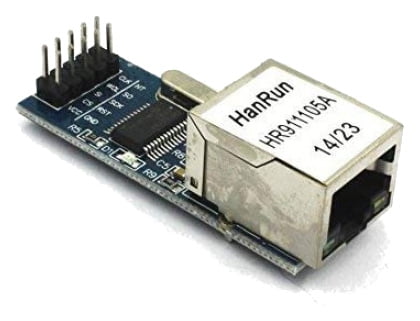
Ecco la mai selezione di enc8266 w5500 lite - w5500 - enc26j60 mini - enc26j60 - lan8720
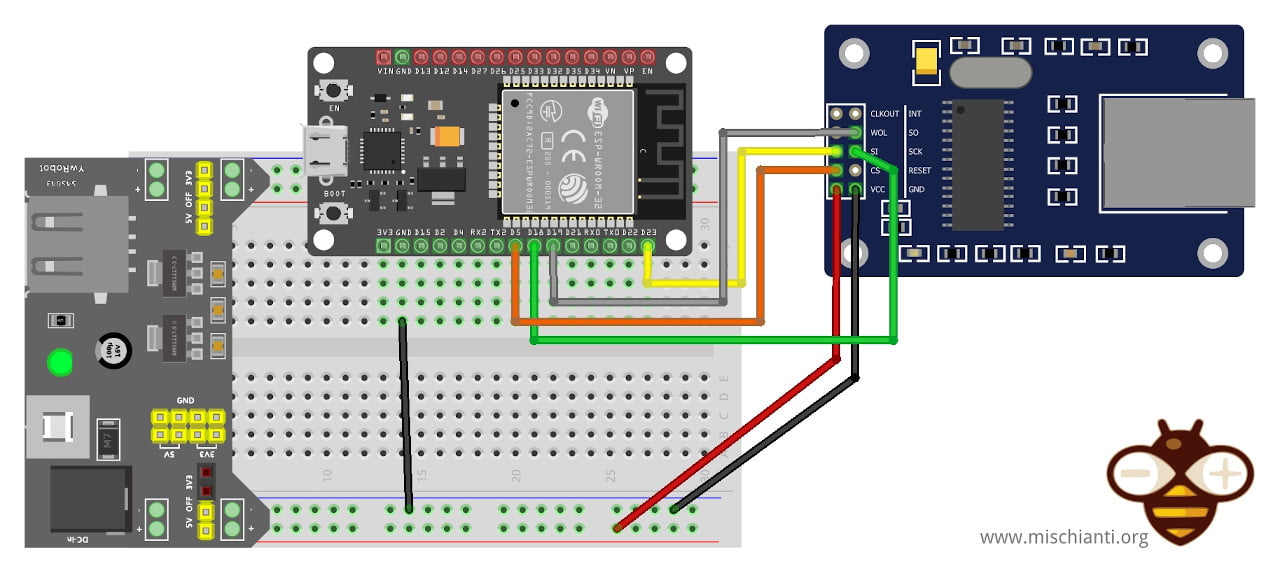
Collegamenti
Qui la mia selezione di dispositivi ESP32 ESP32 Dev Kit v1 - TTGO T-Display 1.14 ESP32 - NodeMCU V3 V2 ESP8266 Lolin32 - NodeMCU ESP-32S - WeMos Lolin32 - WeMos Lolin32 mini - ESP32-CAM programmer - ESP32-CAM bundle - ESP32-WROOM-32 - ESP32-S
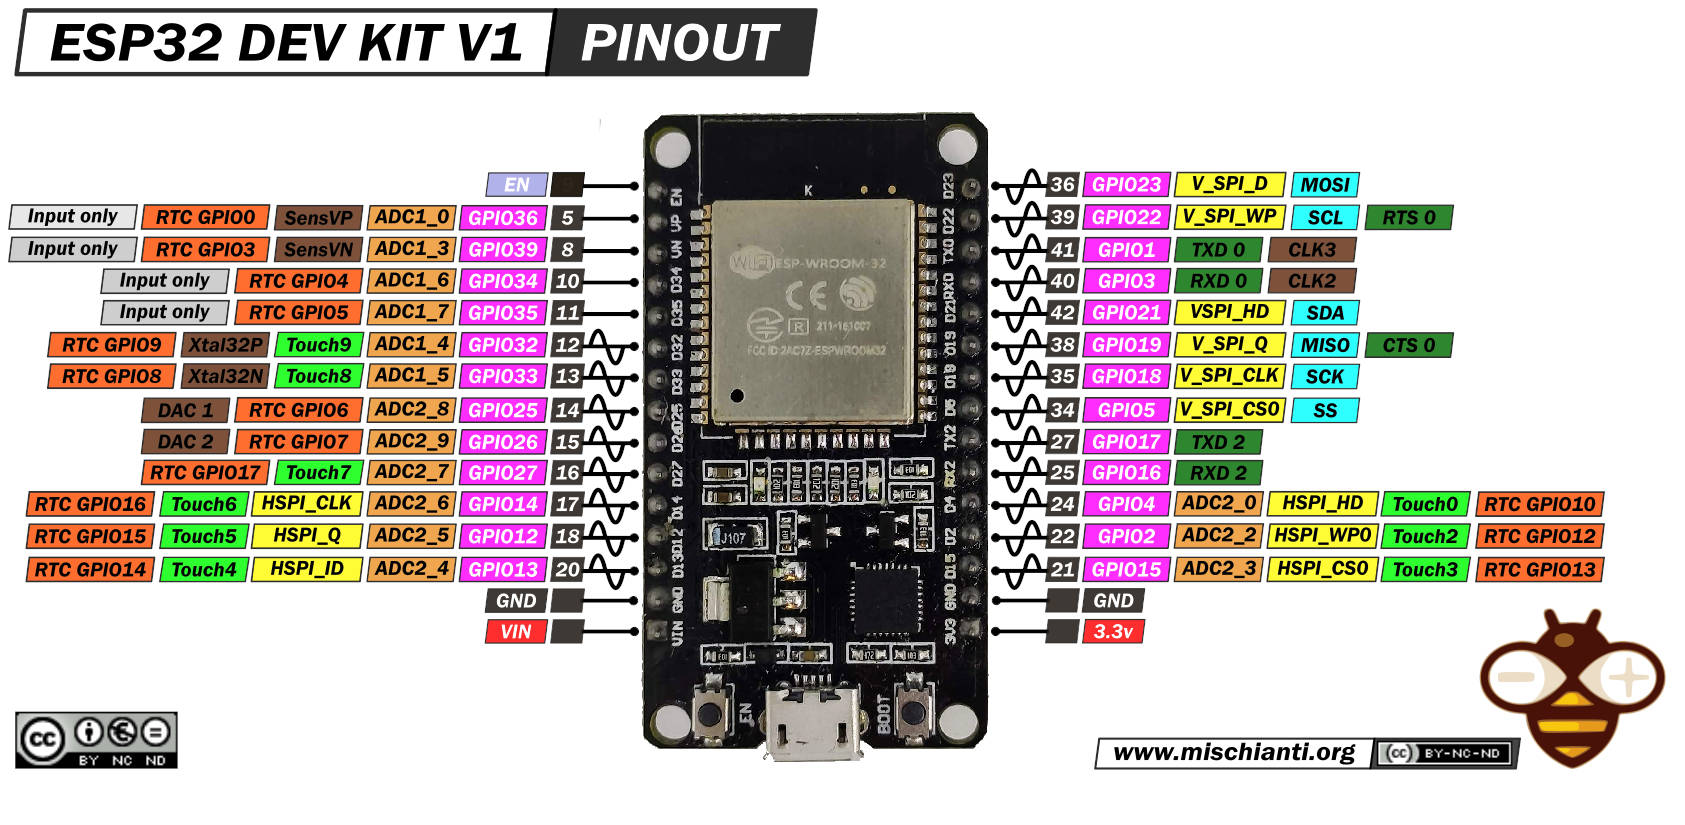
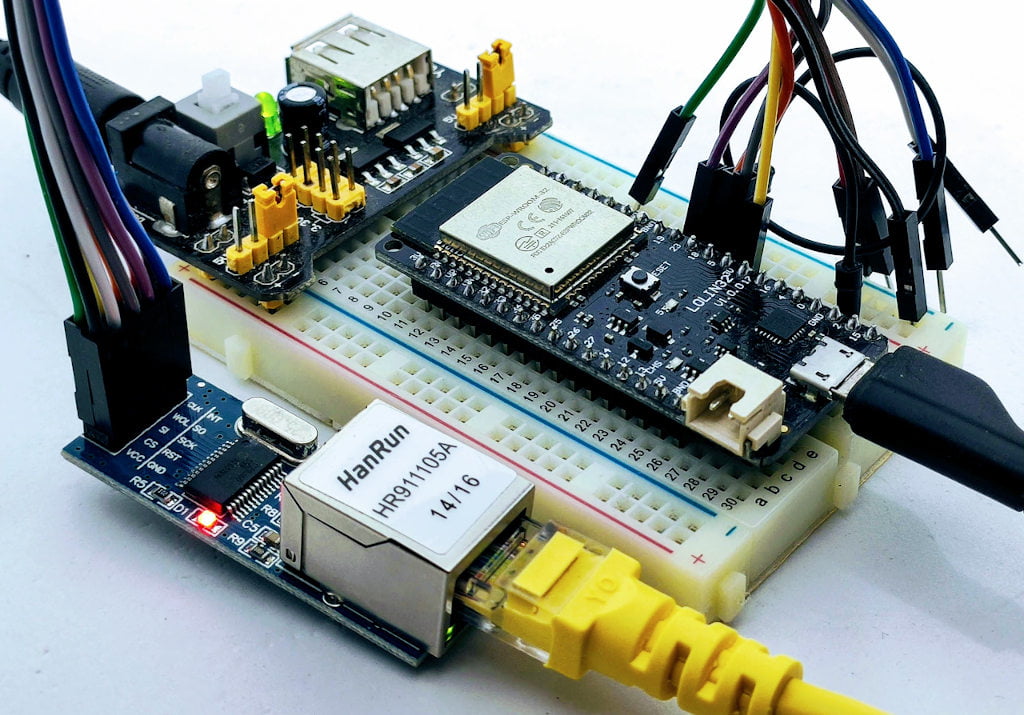
Questo dispositivo utilizza un’interfaccia SPI; per impostazione predefinita, utilizzerò un’interfaccia SPI di base.

| ESP32 | enc28j60 |
|---|---|
| D5 | CS |
| D18 | SCK |
| D19 | MISO |
| D23 | MOSI |
| 3.3v (better with external 200mha) | VCC |
| GND | GND |
Attenzione non tutti i dispositivi hanno così tanti ampere per alimentare il dispositivo, quindi se hai problemi devi aggiungere un alimentatore esterno.
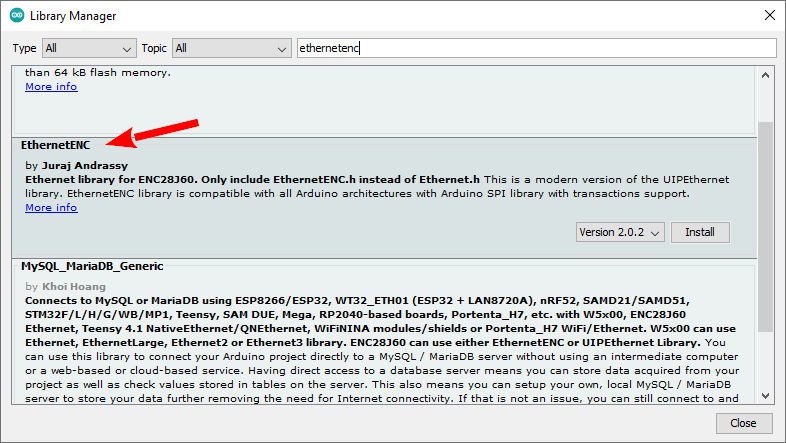
Librerie
Esistono molte librerie anche per questo dispositivo, la più famosa è UIPEthernet, ma ora abbiamo dei piccoli problemi con l’integrazione con programmi più innovativi, quindi utilizzeremo EthernetENC, che è completamente compatibile con Arduino Ethernet ed è una versione moderna di UIP.
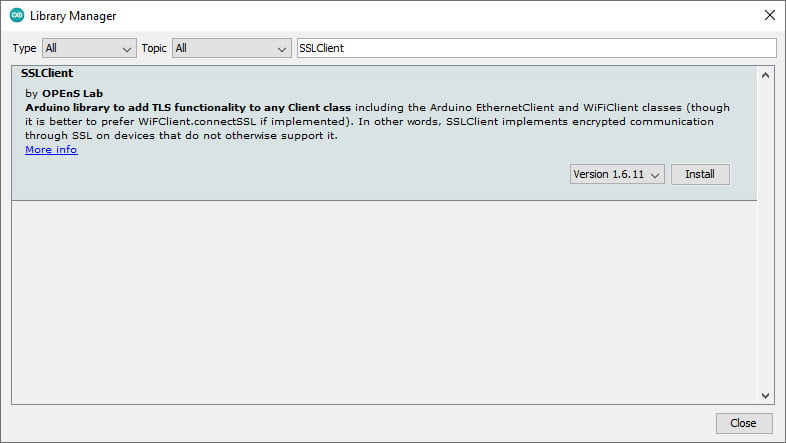
SSLClient
Questa libreria e questo dispositivo non supportano SSL, quindi per queste funzionalità esiste una libreria alternativa denominata SSLClient che necessita di una piccola patch di Ethernet.
SSLClient aggiunge la funzionalità TLS 1.2 a qualsiasi libreria di rete che implementa l’ interfaccia Arduino Client, comprese le classi Arduino EthernetClient e WiFiClient. L’SSLClient è stato creato per integrare TLS con l’infrastruttura Arduino utilizzando BearSSL come motore TLS sottostante. A differenza di ArduinoBearSSL , SSLClient è completamente autonomo e non richiede alcun hardware aggiuntivo (a parte una connessione di rete). (cit.)
SSLClient con EthernetENC
Ho provato questa libreria con alcune altre librerie e ho notato che UIPEthernet non funzionava, ma EthernetENC funziona correttamente senza fare nulla.
Estensione del buffer
Noto anche che per ottenere una buona stabilità probabilmente devi cambiare qualcosa.
In SSLClient.h devi cambiare questa riga.
SSLClient with EthernetENC
unsigned char m_iobuf[2048];
a
unsigned char m_iobuf[BR_SSL_BUFSIZE_BIDI];
Codice
Ora proviamo a fare una semplice WebRequest con un client nativo. Ma prima scriviamo il codice necessario per la connessione, proviamo a chiedere l’IP al server DHCP e, se fallisce, avviamo una connessione con un IP statico.
Inizializza il dispositivo
Ethernet utilizza l’interfaccia SPI predefinita per impostazione predefinita, quindi prima dobbiamo ser il pin SS corretto (probabilmente non necessario).
    // You can use Ethernet.init(pin) to configure the CS pin
    //Ethernet.init(10);  // Most Arduino shields
    Ethernet.init(5);   // MKR ETH Shield
    //Ethernet.init(0);   // Teensy 2.0
    //Ethernet.init(20);  // Teensy++ 2.0
    //Ethernet.init(15);  // ESP8266 with Adafruit FeatherWing Ethernet
    //Ethernet.init(33);  // ESP32 with Adafruit FeatherWing Ethernet
Questa scheda è diversa da LAN8720 (il dispositivo predefinito per esp32) e necessita di un indirizzo MAC.
// Enter a MAC address for your controller below.
// Newer Ethernet shields have a MAC address printed on a sticker on the shield
byte mac[] = { 0xDE, 0xAD, 0xBE, 0xEF, 0xFE, 0xED };
Quindi proviamo a fare una richiesta DHCP.
    if (Ethernet.begin(mac)) { // Dynamic IP setup
        Serial.println("DHCP OK!");
    }
Ma se fallisce, proviamo a stabilire una connessione IP statica con questi parametri
// Set the static IP address to use if the DHCP fails to assign
#define MYIPADDR 192,168,1,28
#define MYIPMASK 255,255,255,0
#define MYDNS 192,168,1,1
#define MYGW 192,168,1,1
ed ecco il codice di connessione
		Serial.println("Failed to configure Ethernet using DHCP");
		// Check for Ethernet hardware present
		if (Ethernet.hardwareStatus() == EthernetNoHardware) {
			Serial.println(
					"Ethernet shield was not found.  Sorry, can't run without hardware. :(");
			while (true) {
				delay(1); // do nothing, no point running without Ethernet hardware
			}
		}
		if (Ethernet.linkStatus() == LinkOFF) {
			Serial.println("Ethernet cable is not connected.");
		}

		IPAddress ip(MYIPADDR);
		IPAddress dns(MYDNS);
		IPAddress gw(MYGW);
		IPAddress sn(MYIPMASK);
		Ethernet.begin(mac, ip, dns, gw, sn);
		Serial.println("STATIC OK!");
Semplice richiesta HTTP
Prima di tutto, proveremo a fare una semplice richiesta HTTP. Ho scelto un servizio online creato per testare questo tipo di richiesta per fare questo test.
Userò un semplice servizio da httpbin.org e puoi usare la stessa API REST in HTTP e HTTPS .
Ricorda che HTTP funziona sulla porta 80 e HTTPS sulla 443, quindi per interrogare l’endpoint sulla porta 443, devi convalidare un certificato.
Per stabilire la nostra connessione, utilizziamo l’EthernetClient di base.
// Initialize the Ethernet client library
// with the IP address and port of the server
// that you want to connect to (port 80 is default for HTTP):
EthernetClient client;
E poi, proviamo a connetterci e chiediamo un endpoint GET.
  // if you get a connection, report back via serial:
  if (client.connect(server, 80)) {
    Serial.println("Connected!");
    // Make a HTTP request:
    client.println("GET /get HTTP/1.1");
    client.println("Host: httpbin.org");
    client.println("Connection: close");
    client.println();
  } else {
    // if you didn't get a connection to the server:
    Serial.println("connection failed");
  }
Nel ciclo, attendi una risposta dal server.
  // if there are incoming bytes available
  // from the server, read them and print them:
  int len = client.available();
E poi leggi la risposta e mettila sulla Serial output.
  if (len > 0) {
    byte buffer[80];
    if (len > 80) len = 80;
    client.read(buffer, len);
    if (printWebData) {
      Serial.write(buffer, len); // show in the serial monitor (slows some boards)
    }
    byteCount = byteCount + len;
  }

  // if the server's disconnected, stop the client:
  if (!client.connected()) {
    endMicros = micros();
    Serial.println();
    Serial.println("disconnecting.");
    client.stop();
    Serial.print("Received ");
    Serial.print(byteCount);
    Serial.print(" bytes in ");
    float seconds = (float)(endMicros - beginMicros) / 1000000.0;
    Serial.print(seconds, 4);
    float rate = (float)byteCount / seconds / 1000.0;
    Serial.print(", rate = ");
    Serial.print(rate);
    Serial.print(" kbytes/second");
    Serial.println();

    // do nothing forevermore:
    while (true) {
      delay(1);
    }
  }
E per finire, lo sketch completo.
/*
 Web client with enc28j60 and EthernetENC

 This sketch connects to a test website (httpbin.org)
 and try to do a GET request, the output is printed
 on Serial

 by Renzo Mischianti <www.mischianti.org>

 https://www.mischianti.org

 */

#include <SPI.h>
#include <EthernetENC.h>

// if you don't want to use DNS (and reduce your sketch size)
// use the numeric IP instead of the name for the server:
//IPAddress server(74,125,232,128);  // numeric IP for Google (no DNS)
//char server[] = "www.google.com";    // name address for Google (using DNS)
char server[] = "httpbin.org";    // name address for Google (using DNS)

// Enter a MAC address for your controller below.
// Newer Ethernet shields have a MAC address printed on a sticker on the shield
byte mac[] = { 0xDE, 0xAD, 0xBE, 0xEF, 0xFE, 0xED };

// Set the static IP address to use if the DHCP fails to assign
#define MYIPADDR 192,168,1,28
#define MYIPMASK 255,255,255,0
#define MYDNS 192,168,1,1
#define MYGW 192,168,1,1

// Initialize the Ethernet client library
// with the IP address and port of the server
// that you want to connect to (port 80 is default for HTTP):
EthernetClient client;

// Variables to measure the speed
unsigned long beginMicros, endMicros;
unsigned long byteCount = 0;
bool printWebData = true;  // set to false for better speed measurement

void setup() {
    Serial.begin(115200);
    delay(1000);
    Serial.println("Begin Ethernet");

    // You can use Ethernet.init(pin) to configure the CS pin
    //Ethernet.init(10);  // Most Arduino shields
    Ethernet.init(5);   // MKR ETH Shield
    //Ethernet.init(0);   // Teensy 2.0
    //Ethernet.init(20);  // Teensy++ 2.0
    //Ethernet.init(15);  // ESP8266 with Adafruit FeatherWing Ethernet
    //Ethernet.init(33);  // ESP32 with Adafruit FeatherWing Ethernet

    if (Ethernet.begin(mac)) { // Dynamic IP setup
        Serial.println("DHCP OK!");
    }else{
        Serial.println("Failed to configure Ethernet using DHCP");
        // Check for Ethernet hardware present
        if (Ethernet.hardwareStatus() == EthernetNoHardware) {
          Serial.println("Ethernet shield was not found.  Sorry, can't run without hardware. :(");
          while (true) {
            delay(1); // do nothing, no point running without Ethernet hardware
          }
        }
        if (Ethernet.linkStatus() == LinkOFF) {
          Serial.println("Ethernet cable is not connected.");
        }

    	  IPAddress ip(MYIPADDR);
    	  IPAddress dns(MYDNS);
    	  IPAddress gw(MYGW);
    	  IPAddress sn(MYIPMASK);
    	  Ethernet.begin(mac, ip, dns, gw, sn);
		  Serial.println("STATIC OK!");
    }
    delay(5000);


    Serial.print("Local IP : ");
    Serial.println(Ethernet.localIP());
    Serial.print("Subnet Mask : ");
    Serial.println(Ethernet.subnetMask());
    Serial.print("Gateway IP : ");
    Serial.println(Ethernet.gatewayIP());
    Serial.print("DNS Server : ");
    Serial.println(Ethernet.dnsServerIP());

   Serial.println("Ethernet Successfully Initialized");
  // if you get a connection, report back via serial:
  if (client.connect(server, 80)) {
    Serial.println("Connected!");
    // Make a HTTP request:
    client.println("GET /get HTTP/1.1");
    client.println("Host: httpbin.org");
    client.println("Connection: close");
    client.println();
  } else {
    // if you didn't get a connection to the server:
    Serial.println("connection failed");
  }
  beginMicros = micros();
}

void loop() {
  // if there are incoming bytes available
  // from the server, read them and print them:
  int len = client.available();
  if (len > 0) {
    byte buffer[80];
    if (len > 80) len = 80;
    client.read(buffer, len);
    if (printWebData) {
      Serial.write(buffer, len); // show in the serial monitor (slows some boards)
    }
    byteCount = byteCount + len;
  }

  // if the server's disconnected, stop the client:
  if (!client.connected()) {
    endMicros = micros();
    Serial.println();
    Serial.println("disconnecting.");
    client.stop();
    Serial.print("Received ");
    Serial.print(byteCount);
    Serial.print(" bytes in ");
    float seconds = (float)(endMicros - beginMicros) / 1000000.0;
    Serial.print(seconds, 4);
    float rate = (float)byteCount / seconds / 1000.0;
    Serial.print(", rate = ");
    Serial.print(rate);
    Serial.print(" kbytes/second");
    Serial.println();

    // do nothing forevermore:
    while (true) {
      delay(1);
    }
  }
}
Il risultato è questo.
Begin Ethernet
DHCP OK!
Local IP : 192.168.1.138
Subnet Mask : 255.255.255.0
Gateway IP : 192.168.1.1
DNS Server : 192.168.1.1
Ethernet Successfully Initialized

Connected!
HTTP/1.1 200 OK
Date: Wed, 09 Mar 2022 11:15:49 GMT
Content-Type: application/json
Content-Length: 197
Connection: close
Server: gunicorn/19.9.0
Access-Control-Allow-Origin: *
Access-Control-Allow-Credentials: true

{
  "args": {},
  "headers": {
    "Host": "httpbin.org",
    "X-Amzn-Trace-Id": "Root=1-62288c65-1fe4f19070d3ab7c773aee09"
  },
  "origin": "82.51.127.46",
  "url": "http://httpbin.org/get"
}

disconnecting.
Received 422 bytes in 0.2663, rate = 1.58 kbytes/second
Richiesta HTTPS
Ora, se cambiamo l’endpoint sulla porta 443, richiederemo un server sicuro con crittografia SSL.
  if (client.connect(server, 443)) {
    Serial.println("Connected!");
    // Make a HTTP request:
    client.println("GET /get HTTP/1.1");
    client.println("Host: httpbin.org");
    client.println("Connection: close");
    client.println();
  } else {
    // if you didn't get a connection to the server:
    Serial.println("connection failed");
  }
E otteniamo questa risposta.
Begin Ethernet
DHCP OK!
Local IP : 192.168.1.138
Subnet Mask : 255.255.255.0
Gateway IP : 192.168.1.1
DNS Server : 192.168.1.1
Ethernet Successfully Initialized

Connected!
HTTP/1.1 400 Bad Request
Server: awselb/2.0
Date: Wed, 09 Mar 2022 11:23:16 GMT
Content-Type: text/html
Content-Length: 220
Connection: close

<html>
<head><title>400 The plain HTTP request was sent to HTTPS port</title></head>
<body>
<center><h1>400 Bad Request</h1></center>
<center>The plain HTTP request was sent to HTTPS port</center>
</body>
</html>

Disconnecting.
Received 370 bytes in 0.4333, rate = 0.85 kbytes/second
Quindi il problema è che i messaggi di request e response non vengono trasmessi utilizzando SSL (Secure Sockets Layer) o il suo successore TLS (Transport Layer Security). Per aggiungere questa funzione, utilizzeremo l’SSLClient.
Recupera il certificato
Per utilizzare un canale SSL, abbiamo bisogno del certificato del server, ma in questo caso SSLClient utilizza un trucco fornito dall’implementazione di BearSSL. Questo motore di verifica x509 minimo consente l’utilizzo di Trust Anchors.
Aggiungo un semplice generatore online che puoi trovare qui.
Devi solo scrivere l’indirizzo del sito (httpbin.org) nella prima casella di input, fare clic su Generate code, copiare il codice e inserirlo in un file chiamato trust_anchors.h e metterlo nella cartella dello sketch.
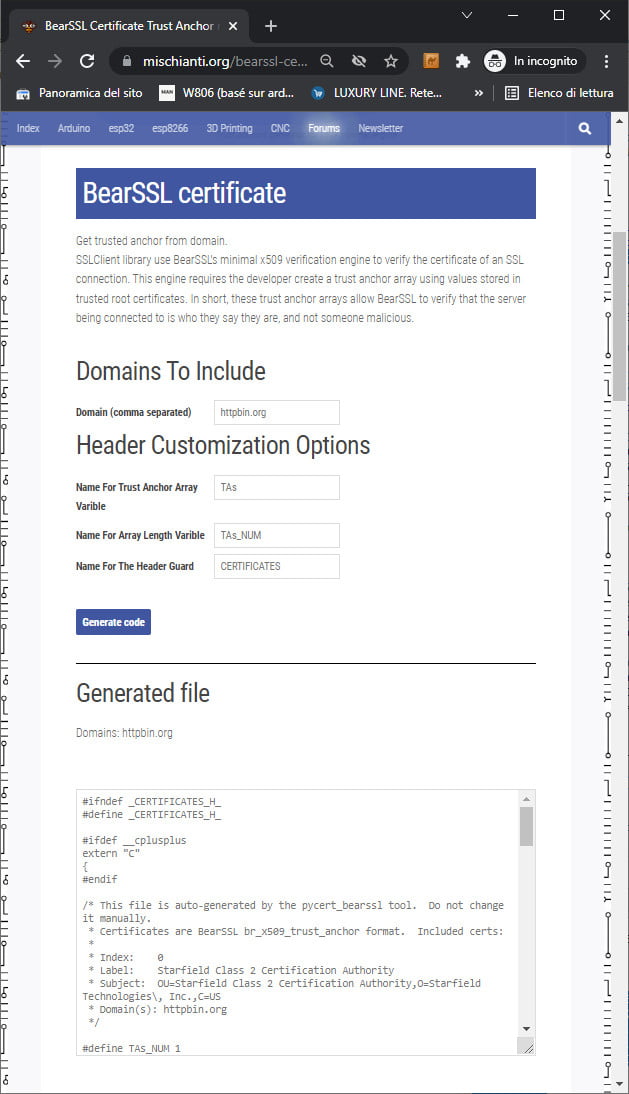
Ecco il contenuto del trust_anchors.h.
#ifndef _CERTIFICATES_H_
#define _CERTIFICATES_H_

#ifdef __cplusplus
extern "C"
{
#endif

/* This file is auto-generated by the pycert_bearssl tool.  Do not change it manually.
 * Certificates are BearSSL br_x509_trust_anchor format.  Included certs:
 *
 * Index:    0
 * Label:    Starfield Class 2 Certification Authority
 * Subject:  OU=Starfield Class 2 Certification Authority,O=Starfield Technologies\, Inc.,C=US
 * Domain(s): httpbin.org
 */

#define TAs_NUM 1

static const unsigned char TA_DN0[] = {
    0x30, 0x68, 0x31, 0x0b, 0x30, 0x09, 0x06, 0x03, 0x55, 0x04, 0x06, 0x13,
    0x02, 0x55, 0x53, 0x31, 0x25, 0x30, 0x23, 0x06, 0x03, 0x55, 0x04, 0x0a,
    0x13, 0x1c, 0x53, 0x74, 0x61, 0x72, 0x66, 0x69, 0x65, 0x6c, 0x64, 0x20,
    0x54, 0x65, 0x63, 0x68, 0x6e, 0x6f, 0x6c, 0x6f, 0x67, 0x69, 0x65, 0x73,
    0x2c, 0x20, 0x49, 0x6e, 0x63, 0x2e, 0x31, 0x32, 0x30, 0x30, 0x06, 0x03,
    0x55, 0x04, 0x0b, 0x13, 0x29, 0x53, 0x74, 0x61, 0x72, 0x66, 0x69, 0x65,
    0x6c, 0x64, 0x20, 0x43, 0x6c, 0x61, 0x73, 0x73, 0x20, 0x32, 0x20, 0x43,
    0x65, 0x72, 0x74, 0x69, 0x66, 0x69, 0x63, 0x61, 0x74, 0x69, 0x6f, 0x6e,
    0x20, 0x41, 0x75, 0x74, 0x68, 0x6f, 0x72, 0x69, 0x74, 0x79,
};

static const unsigned char TA_RSA_N0[] = {
    0xb7, 0x32, 0xc8, 0xfe, 0xe9, 0x71, 0xa6, 0x04, 0x85, 0xad, 0x0c, 0x11,
    0x64, 0xdf, 0xce, 0x4d, 0xef, 0xc8, 0x03, 0x18, 0x87, 0x3f, 0xa1, 0xab,
    0xfb, 0x3c, 0xa6, 0x9f, 0xf0, 0xc3, 0xa1, 0xda, 0xd4, 0xd8, 0x6e, 0x2b,
    0x53, 0x90, 0xfb, 0x24, 0xa4, 0x3e, 0x84, 0xf0, 0x9e, 0xe8, 0x5f, 0xec,
    0xe5, 0x27, 0x44, 0xf5, 0x28, 0xa6, 0x3f, 0x7b, 0xde, 0xe0, 0x2a, 0xf0,
    0xc8, 0xaf, 0x53, 0x2f, 0x9e, 0xca, 0x05, 0x01, 0x93, 0x1e, 0x8f, 0x66,
    0x1c, 0x39, 0xa7, 0x4d, 0xfa, 0x5a, 0xb6, 0x73, 0x04, 0x25, 0x66, 0xeb,
    0x77, 0x7f, 0xe7, 0x59, 0xc6, 0x4a, 0x99, 0x25, 0x14, 0x54, 0xeb, 0x26,
    0xc7, 0xf3, 0x7f, 0x19, 0xd5, 0x30, 0x70, 0x8f, 0xaf, 0xb0, 0x46, 0x2a,
    0xff, 0xad, 0xeb, 0x29, 0xed, 0xd7, 0x9f, 0xaa, 0x04, 0x87, 0xa3, 0xd4,
    0xf9, 0x89, 0xa5, 0x34, 0x5f, 0xdb, 0x43, 0x91, 0x82, 0x36, 0xd9, 0x66,
    0x3c, 0xb1, 0xb8, 0xb9, 0x82, 0xfd, 0x9c, 0x3a, 0x3e, 0x10, 0xc8, 0x3b,
    0xef, 0x06, 0x65, 0x66, 0x7a, 0x9b, 0x19, 0x18, 0x3d, 0xff, 0x71, 0x51,
    0x3c, 0x30, 0x2e, 0x5f, 0xbe, 0x3d, 0x77, 0x73, 0xb2, 0x5d, 0x06, 0x6c,
    0xc3, 0x23, 0x56, 0x9a, 0x2b, 0x85, 0x26, 0x92, 0x1c, 0xa7, 0x02, 0xb3,
    0xe4, 0x3f, 0x0d, 0xaf, 0x08, 0x79, 0x82, 0xb8, 0x36, 0x3d, 0xea, 0x9c,
    0xd3, 0x35, 0xb3, 0xbc, 0x69, 0xca, 0xf5, 0xcc, 0x9d, 0xe8, 0xfd, 0x64,
    0x8d, 0x17, 0x80, 0x33, 0x6e, 0x5e, 0x4a, 0x5d, 0x99, 0xc9, 0x1e, 0x87,
    0xb4, 0x9d, 0x1a, 0xc0, 0xd5, 0x6e, 0x13, 0x35, 0x23, 0x5e, 0xdf, 0x9b,
    0x5f, 0x3d, 0xef, 0xd6, 0xf7, 0x76, 0xc2, 0xea, 0x3e, 0xbb, 0x78, 0x0d,
    0x1c, 0x42, 0x67, 0x6b, 0x04, 0xd8, 0xf8, 0xd6, 0xda, 0x6f, 0x8b, 0xf2,
    0x44, 0xa0, 0x01, 0xab,
};

static const unsigned char TA_RSA_E0[] = {
    0x03,
};

static const br_x509_trust_anchor TAs[] = {
    {
        { (unsigned char *)TA_DN0, sizeof TA_DN0 },
        BR_X509_TA_CA,
        {
            BR_KEYTYPE_RSA,
            { .rsa = {
                (unsigned char *)TA_RSA_N0, sizeof TA_RSA_N0,
                (unsigned char *)TA_RSA_E0, sizeof TA_RSA_E0,
            } }
        }
    },
};

#ifdef __cplusplus
} /* extern "C" */
#endif

#endif /* ifndef _CERTIFICATES_H_ */
Aggiungi il wrapper SSLClient
Ora aggiungeremo la libreria SSLClient e il file trust_anchors.h.
#include <SPI.h>
#include <EthernetENC.h>
#include <SSLClient.h>
#include "trust_anchors.h"
Quindi applica il wrapper EthernetClient con tutti i riferimenti dei Trust Anchors. Il file contiene nomi di array di trust anchor generati TAs con lunghezza TAs_NUM.
// Choose the analog pin to get semi-random data from for SSL
// Pick a pin that's not connected or attached to a randomish voltage source
const int rand_pin = A5;

// Initialize the SSL client library
// We input an EthernetClient, our trust anchors, and the analog pin
EthernetClient base_client;
SSLClient client(base_client, TAs, (size_t)TAs_NUM, rand_pin);
E cambiamo la porta in 443 (HTTPS).
  // if you get a connection, report back via serial:
  if (client.connect(server, 443)) {
    Serial.print("connected to ");
    // Make a HTTP request:
    client.println("GET /get HTTP/1.1");
    client.println("Host: httpbin.org");
    client.println("Connection: close");
    client.println();
  } else {
    // if you didn't get a connection to the server:
    Serial.println("connection failed");
  }
Ecco lo sketch completo.
/*
 Web SSL client  with enc28j60,
 EthernetENC and SSLClient

 This sketch connects to a test website (httpbin.org)
 and try to do a secure GET request on port 443,
 to do the SSL request we use SSLClient with the
 site Trust Anchor
 the output is printed on Serial

 by Renzo Mischianti <www.mischianti.org>

 https://www.mischianti.org

 */

#include <SPI.h>
#include <EthernetENC.h>
#include <SSLClient.h>
#include "trust_anchors.h"

// Enter a MAC address for your controller below.
// Newer Ethernet shields have a MAC address printed on a sticker on the shield
byte mac[] = { 0xDE, 0xAD, 0xBE, 0xEF, 0xFE, 0xED };

// if you don't want to use DNS (and reduce your sketch size)
// use the numeric IP instead of the name for the server:
//IPAddress server(74,125,232,128);  // numeric IP for Google (no DNS)
//char server[] = "www.google.com";    // name address for Google (using DNS)
char server[] = "httpbin.org";    // name address for Google (using DNS)

// Set the static IP address to use if the DHCP fails to assign
#define MYIPADDR 192,168,1,28
#define MYIPMASK 255,255,255,0
#define MYDNS 192,168,1,1
#define MYGW 192,168,1,1

// Choose the analog pin to get semi-random data from for SSL
// Pick a pin that's not connected or attached to a randomish voltage source
const int rand_pin = A5;

// Initialize the SSL client library
// We input an EthernetClient, our trust anchors, and the analog pin
EthernetClient base_client;
SSLClient client(base_client, TAs, (size_t)TAs_NUM, rand_pin);

// Variables to measure the speed
unsigned long beginMicros, endMicros;
unsigned long byteCount = 0;
bool printWebData = true;  // set to false for better speed measurement

void setup() {
    Serial.begin(115200);
    delay(1000);
    Serial.println("Begin Ethernet");

    // You can use Ethernet.init(pin) to configure the CS pin
    //Ethernet.init(10);  // Most Arduino shields
    Ethernet.init(5);   // MKR ETH Shield
    //Ethernet.init(0);   // Teensy 2.0
    //Ethernet.init(20);  // Teensy++ 2.0
    //Ethernet.init(15);  // ESP8266 with Adafruit FeatherWing Ethernet
    //Ethernet.init(33);  // ESP32 with Adafruit FeatherWing Ethernet

    if (Ethernet.begin(mac)) { // Dynamic IP setup
        Serial.println("DHCP OK!");
    }else{
        Serial.println("Failed to configure Ethernet using DHCP");
        // Check for Ethernet hardware present
        if (Ethernet.hardwareStatus() == EthernetNoHardware) {
          Serial.println("Ethernet shield was not found.  Sorry, can't run without hardware. :(");
          while (true) {
            delay(1); // do nothing, no point running without Ethernet hardware
          }
        }
        if (Ethernet.linkStatus() == LinkOFF) {
          Serial.println("Ethernet cable is not connected.");
        }

    	  IPAddress ip(MYIPADDR);
    	  IPAddress dns(MYDNS);
    	  IPAddress gw(MYGW);
    	  IPAddress sn(MYIPMASK);
    	  Ethernet.begin(mac, ip, dns, gw, sn);
		  Serial.println("STATIC OK!");
    }
    delay(5000);


    Serial.print("Local IP : ");
    Serial.println(Ethernet.localIP());
    Serial.print("Subnet Mask : ");
    Serial.println(Ethernet.subnetMask());
    Serial.print("Gateway IP : ");
    Serial.println(Ethernet.gatewayIP());
    Serial.print("DNS Server : ");
    Serial.println(Ethernet.dnsServerIP());

   Serial.println("Ethernet Successfully Initialized");
  // if you get a connection, report back via serial:
  if (client.connect(server, 443)) {
    Serial.print("connected to ");
    // Make a HTTP request:
    client.println("GET /get HTTP/1.1");
    client.println("Host: httpbin.org");
    client.println("Connection: close");
    client.println();
  } else {
    // if you didn't get a connection to the server:
    Serial.println("connection failed");
  }
  beginMicros = micros();
}

void loop() {
  // if there are incoming bytes available
  // from the server, read them and print them:
  int len = client.available();
  if (len > 0) {
    byte buffer[80];
    if (len > 80) len = 80;
    client.read(buffer, len);
    if (printWebData) {
      Serial.write(buffer, len); // show in the serial monitor (slows some boards)
    }
    byteCount = byteCount + len;
  }

  // if the server's disconnected, stop the client:
  if (!client.connected()) {
    endMicros = micros();
    Serial.println();
    Serial.println("disconnecting.");
    client.stop();
    Serial.print("Received ");
    Serial.print(byteCount);
    Serial.print(" bytes in ");
    float seconds = (float)(endMicros - beginMicros) / 1000000.0;
    Serial.print(seconds, 4);
    float rate = (float)byteCount / seconds / 1000.0;
    Serial.print(", rate = ");
    Serial.print(rate);
    Serial.print(" kbytes/second");
    Serial.println();

    // do nothing forevermore:
    while (true) {
      delay(1);
    }
  }
}
Ora, quando eseguiamo lo schizzo, otteniamo questo output.
Begin Ethernet
DHCP OK!
Local IP : 192.168.1.138
Subnet Mask : 255.255.255.0
Gateway IP : 192.168.1.1
DNS Server : 192.168.1.1
Ethernet Successfully Initialized

connected to HTTP/1.1 200 OK
Date: Wed, 09 Mar 2022 11:55:33 GMT
Content-Type: application/json
Content-Length: 198
Connection: close
Server: gunicorn/19.9.0
Access-Control-Allow-Origin: *
Access-Control-Allow-Credentials: true

{
  "args": {},
  "headers": {
    "Host": "httpbin.org",
    "X-Amzn-Trace-Id": "Root=1-622895b5-05f3c1351d694e66175a5335"
  },
  "origin": "82.51.127.46",
  "url": "https://httpbin.org/get"
}

disconnecting.
Received 423 bytes in 0.2611, rate = 1.62 kbytes/second
Grazie
Uso questa libreria SSLClient nella mia libreria EMailSender per utilizzare il server SMTP (SSL) di Gmail con Ethernet. Sfortunatamente, le connessioni SSL richiedono un bel po’ di risorse e solo Arduino SAMD, STM32 ed ESP32 hanno così tante risorse.
- ESP32: piedinatura, specifiche e configurazione dell’Arduino IDE
- ESP32: fileSystem integrato SPIFFS
- ESP32: gestire più seriali e logging per il debug
- ESP32 risparmio energetico pratico
- ESP32 risparmio energetico pratico: gestire WiFi e CPU
- ESP32 risparmio energetico pratico: modem e light sleep
- ESP32 risparmio energetico pratico: deep sleep e ibernazione
- ESP32 risparmio energetico pratico: preservare dati al riavvio, sveglia a tempo e tramite tocco
- ESP32 risparmio energetico pratico: sveglia esterna e da ULP
- ESP32 risparmio energetico pratico: sveglia da UART e GPIO
- ESP32: filesystem integrato LittleFS
- ESP32: filesystem integrato FFat (Fat/exFAT)
- ESP32-wroom-32
- ESP32-CAM
- ESP32: ethernet w5500 con chiamate standard (HTTP) e SSL (HTTPS)
- ESP32: ethernet enc28j60 con chiamate standard (HTTP) e SSL (HTTPS)
- Come usare la scheda SD con l’esp32
- esp32 e esp8266: file system FAT su memoria SPI flash esterna
- Gestione aggiornamenti firmware e OTA
- Gestione del firmware
- Aggiornamento OTA con Arduino IDE
- Aggiornamento OTA con browser web
- Aggiornamenti automatici OTA da un server HTTP
- Aggiornamento del firmware non standard
- Integrare LAN8720 con ESP32 per la connettività Ethernet con plain (HTTP) e SSL (HTTPS)
- Collegare l’EByte E70 (CC1310) ai dispositivi ESP32 c3/s3 ed un semplice sketch di esempio
- ESP32-C3: piedinatura, specifiche e configurazione dell’IDE Arduino
- Integrazione del modulo W5500 su ESP32 con Core 3: supporto nativo ai protocolli Ethernet con SSL e altre funzionalità
- Integrazione del modulo LAN8720 su ESP32 con Core 3: supporto nativo del protocollo Ethernet con SSL e altre funzionalità.
- Dallas DS18B20
- Guida all’I2C su ESP32: comunicazione con dispositivi eterogenei 5v 3.3v, gestione interfacce aggiuntive
- Display
- Guida Completa: Come Usare un Display ILI9341 con la Libreria TFT_eSPI
- Come integrare la funzionalità touch screen nel display TFT ILI9341
- Display eInk SSD1683 con GxEPD e ESP32 (e HMI CrowPanel 4,2″): nozioni di base e configurazione