esp32 e esp8266: file system FAT su memoria SPI flash esterna
Avevamo già spiegato le flash interne con vari filesystem e gestione SD. Il primo integrato a basso consumo energetico, il secondo da piccola a grande capienza ma abbastanza assetato di energia.
Ma perché ora vorrei spiegare il flash SPI esterno se già questi dispositivi ne hanno uno integrato?
La risposta è piuttosto semplice: la flash interna ha vita breve per il ciclo di scrittura, ma esistono memorie flash tipo Winbond (o altro) che invece di avere centomila cicli, hanno milioni di cicli di scrittura e possono essere utilizzate come data logging.

Oggi vedremo la memoria flash SPI (NOR Flash); su un unico chip che può essere gestito tramite SPI e hanno accesso ad alta velocità e basso consumo energetico.
La memoria flash è un supporto di memorizzazione elettronico non volatile della memoria del computer che può essere cancellato e riprogrammato elettricamente. I due tipi principali di memoria flash, flash NOR e flash NAND, prendono il nome dalle porte logiche NOR e NAND. Flash NAND e flash NOR utilizzano lo stesso design della cella, costituito da MOSFET a gate flottante. Differiscono a livello di circuito: nella flash NAND, la relazione tra la linea di bit e le linee di parola assomiglia a una porta NAND; in NOR flash, assomiglia a una porta NOR; questo dipende dal fatto che lo stato della linea di bit o delle linee di parola sia alto o basso.
La memoria flash, un tipo di memoria floating-gate, è stata inventata da Toshiba nel 1980 e si basa sulla tecnologia EEPROM. Toshiba ha iniziato a commercializzare la memoria flash nel 1987. Le EPROM dovevano essere cancellate completamente prima di poter essere riscritte. La memoria flash NAND, tuttavia, può essere cancellata, scritta e letta in blocchi (o pagine), che generalmente sono molto più piccoli dell’intero dispositivo. La memoria flash NOR consente di scrivere una singola parola macchina – in una posizione cancellata – o di leggerla indipendentemente. Un dispositivo di memoria flash è tipicamente costituito da uno o più chip di memoria flash (ciascuno contenente molte celle di memoria flash), insieme a un chip controller di memoria flash separato.
Wikipedia
Piedinatura delle memorie Flash SPI
Ci sono IC SMD e discreti gestiti dal protocollo SPI.
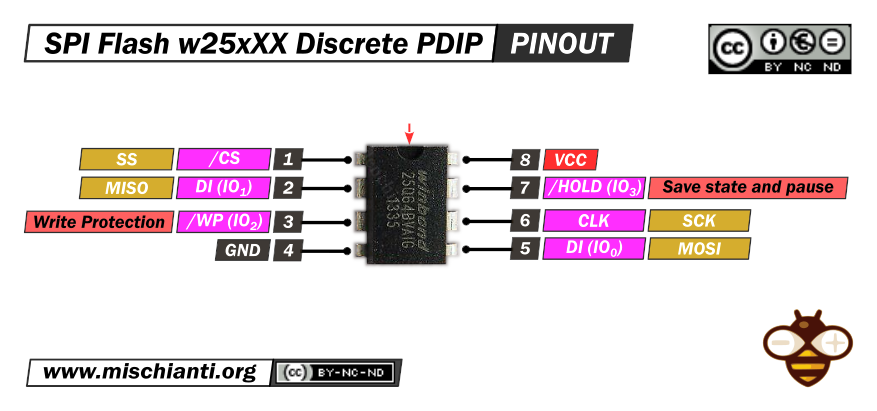
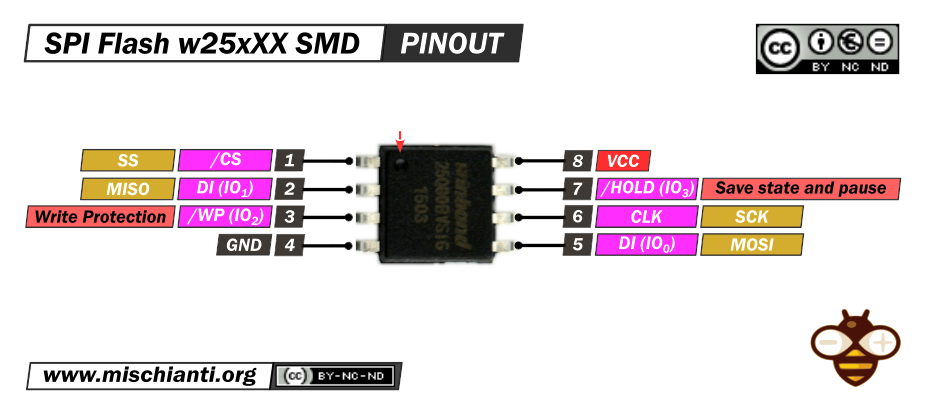
Qui un set di memorie flash di varie dimensioni w25q16 SMD 2Mb - w25q16 Discrete 2Mb - w25q32 SMD 4Mb - w25q32 Discrete 4Mb - w25q64 SMD 8Mb - w25q64 Discrete 8Mb - w25q128 SMD 16Mb - w25q128 Discrete 16Mb W25Q32 W25Q64 w25q128 module 4Mb 8Mb 16Mb
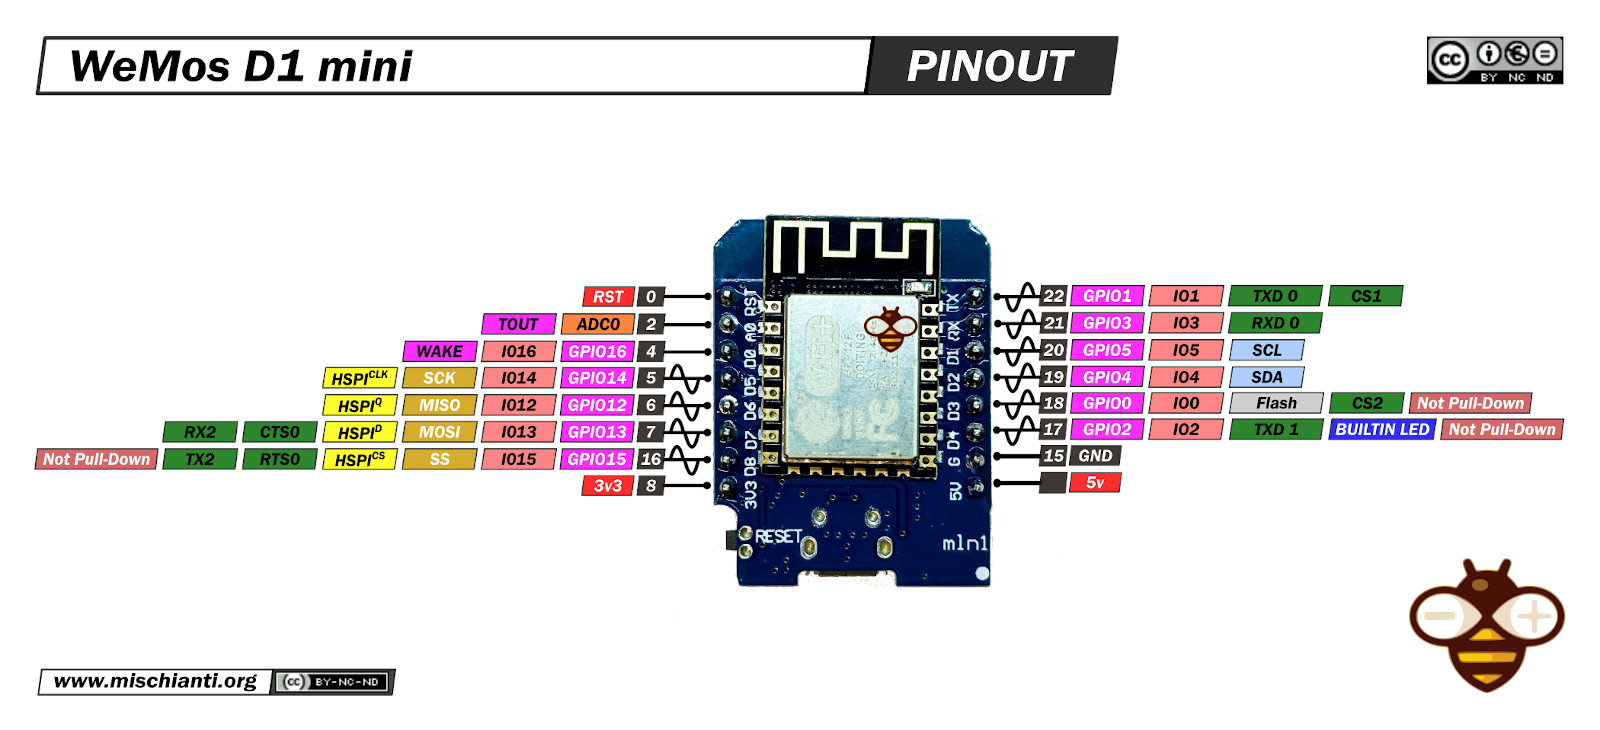
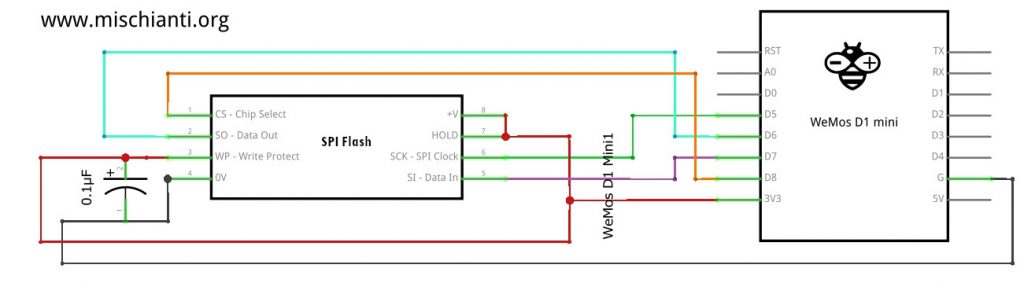
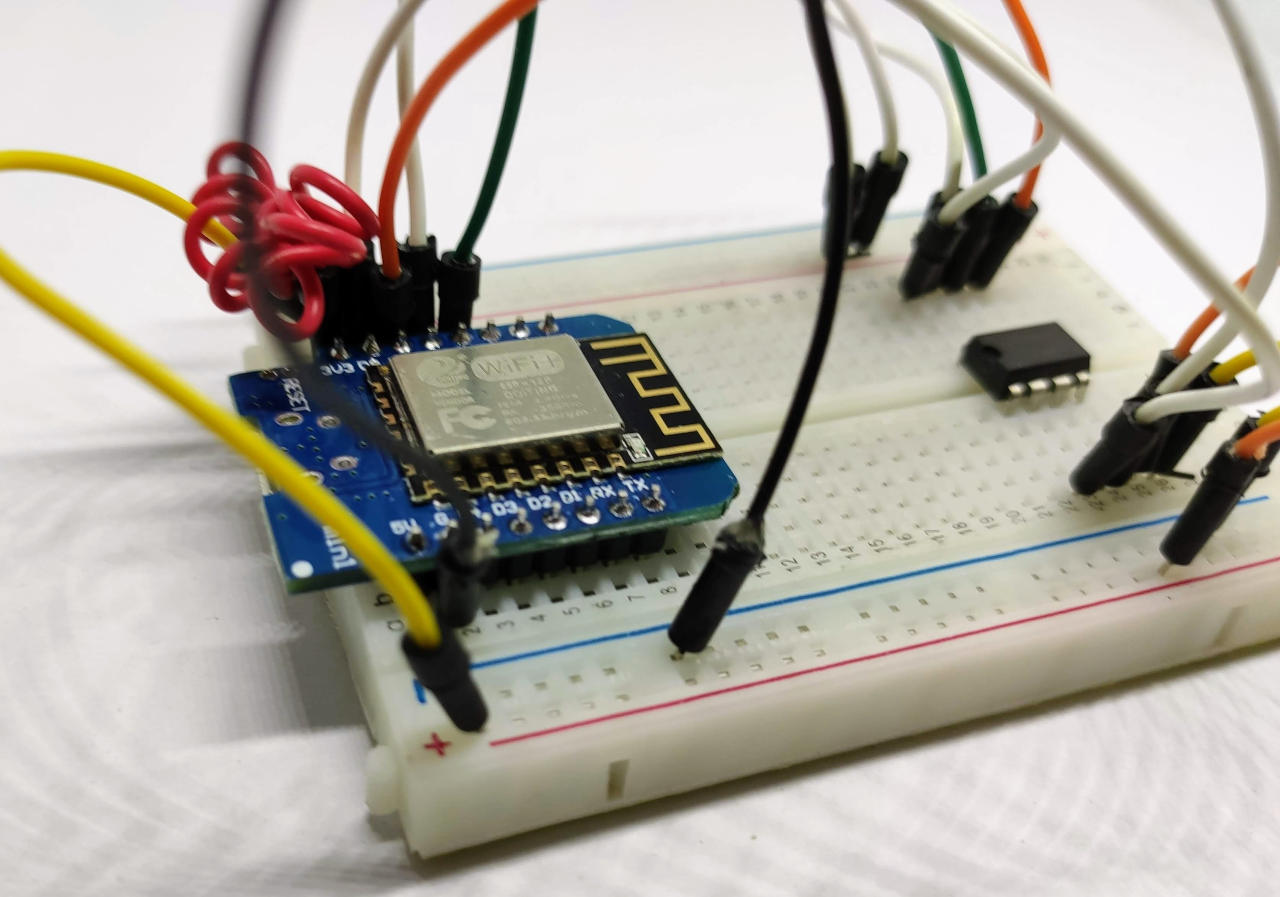
Cablaggio esp8266
Come al solito, per il dispositivo esp8266, utilizzo WeMos D1 mini.
| Arduino | SPI Flash | |
|---|---|---|
| D8 | /CS | Pulled UP if not standard CS |
| D6 | DI (IO1) | |
| D7 | DI (IO0) | |
| D5 | CLK | |
| 3.3v | /WP | |
| 3.3v | /Hold | |
| GND | GND | |
| 3.3v | VCC |
Ecco il risultato sulla breadboard.
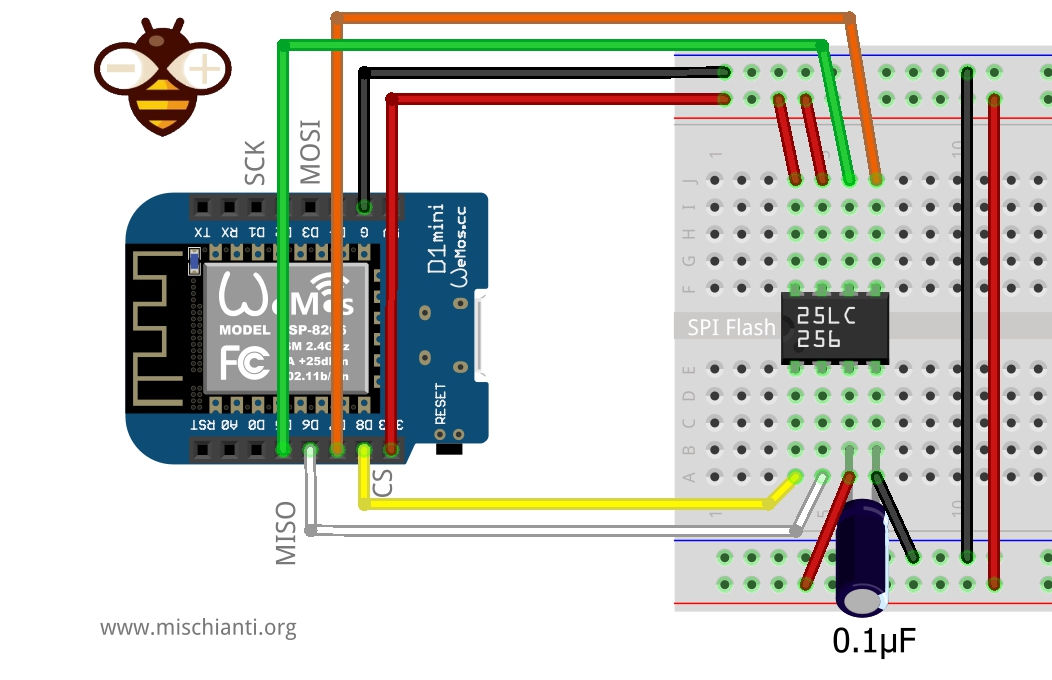
Ed ecco lo schema.
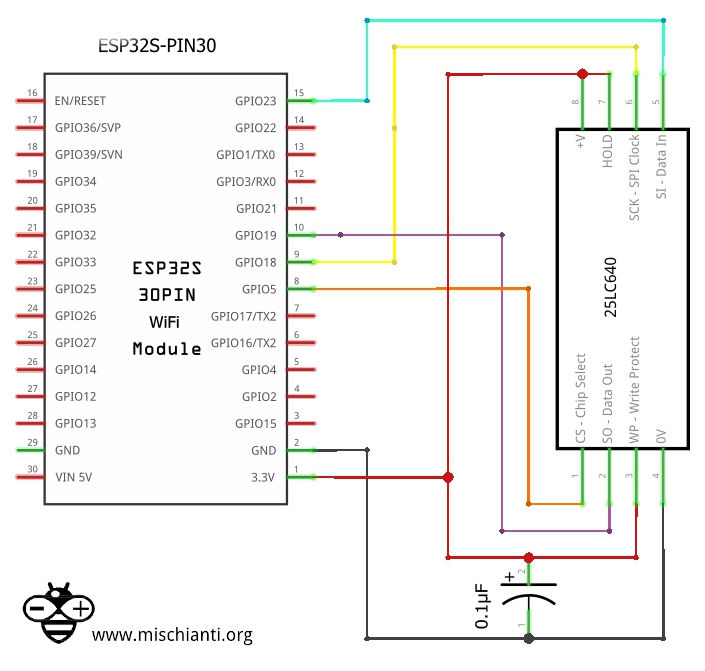
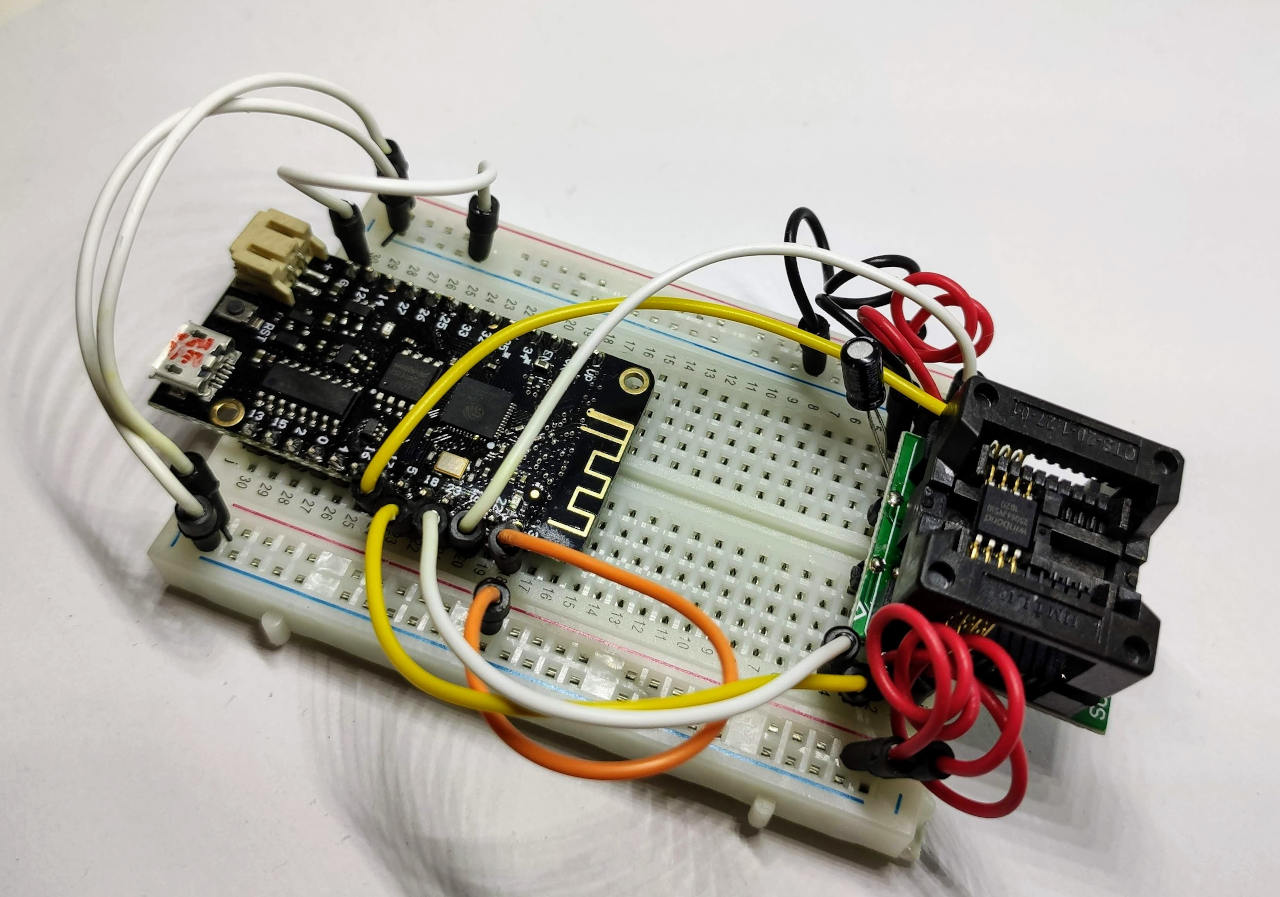
Cablaggio esp32
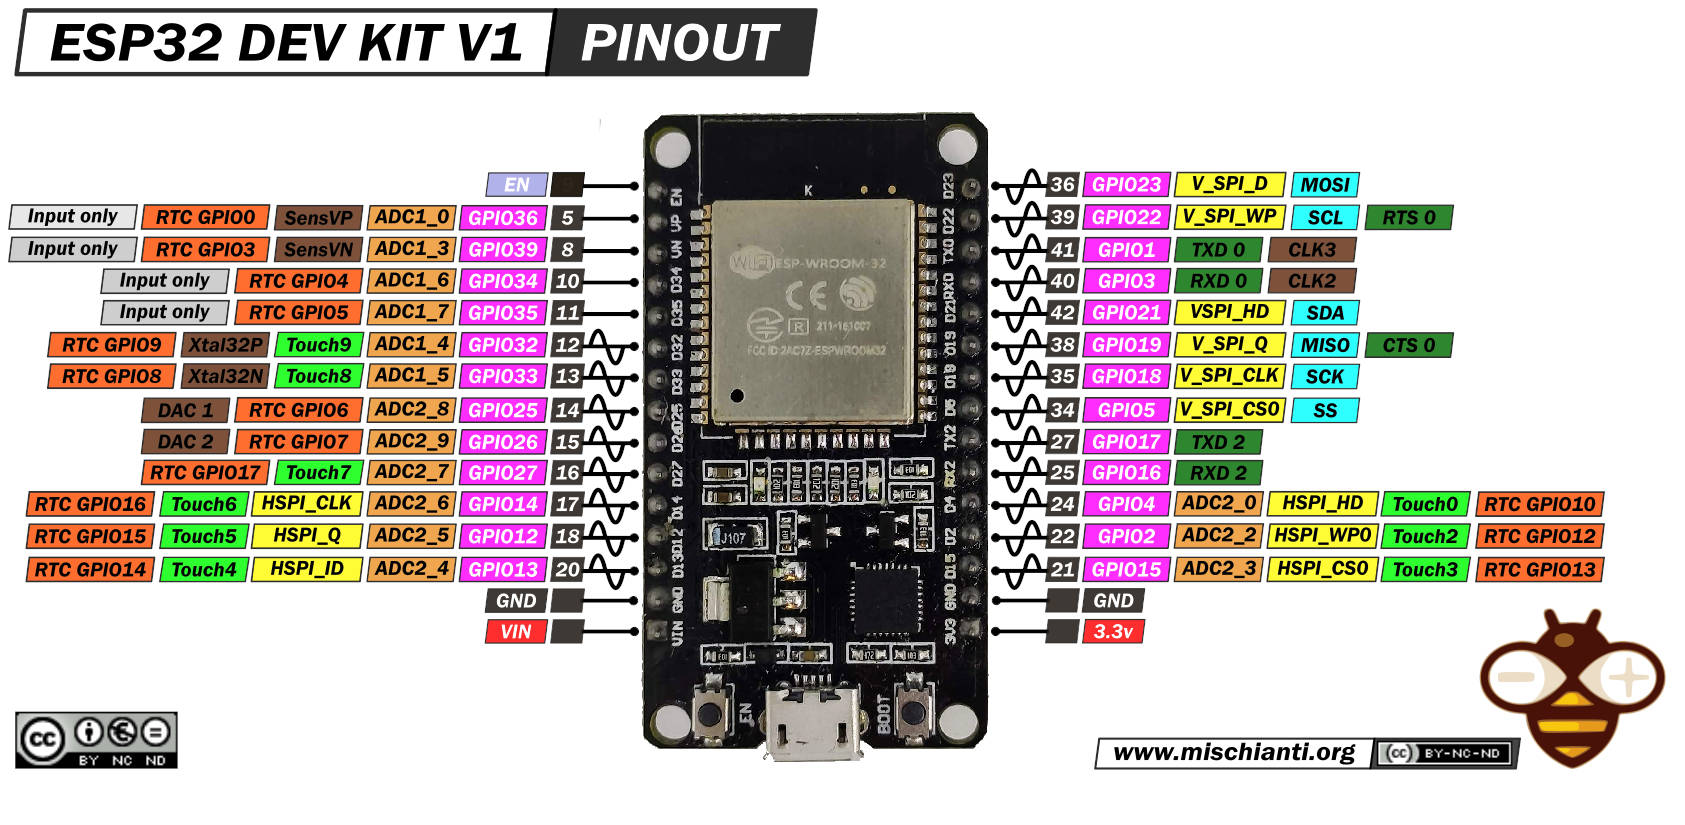
Qui lo schema di connessione

| Arduino | SPI Flash | |
|---|---|---|
| GPIO5 | /CS | Pulled UP if not standard CS |
| GPIO19 | DI (IO1) | |
| GPIO23 | DI (IO0) | |
| GPIO18 | CLK | |
| 3.3v | /WP | |
| 3.3v | /Hold | |
| GND | GND | |
| 3.3v | VCC |
Ecco lo schema.
Utilizzo di base di una flash SPI
Se non hai bisogno di una struttura di dati particolare, puoi fare un utilizzo di base e grezzo della flash SPI.
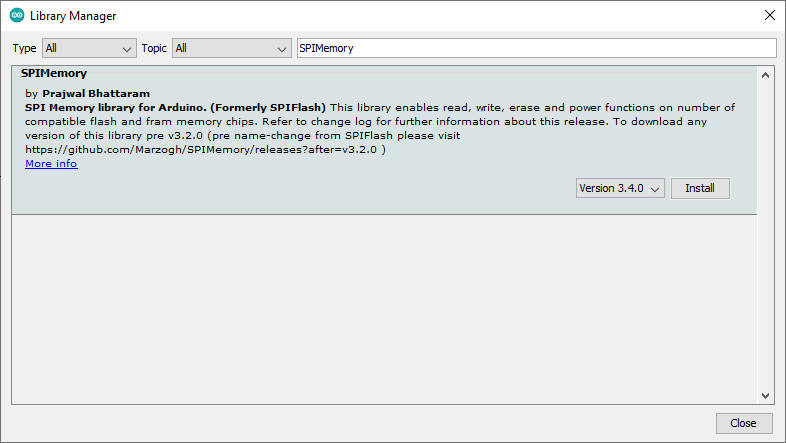
Per un utilizzo di base, consiglio di utilizzare una libreria denominata SPIMemory, abbastanza semplice ma con un buon supporto senza difficoltà. Puoi scaricarla tramite il gestore della libreria da Arduino IDE.
Per ulteriori informazioni su questa libreria, è possibile consultare l’articolo “Arduino: memoria SPI flash esterna veloce”.
Fai attenzione all’esp32. È necessario impostare i limiti delle frequenze SPI a 24 Mhz; l’esp8266 non aveva limitazioni.
Per impostare i limiti di frequenza, usa un comando come questo (leggi l’articolo su Arduino per avere maggiori informazioni):
flash.setClock(24000000);
Ecco un semplice esempio che memorizza una stringa JSON nell’indirizzo iniziale 0 e la rileggo, quindi chiedo al metodo getAddress la prima posizione contigua disponibile in cui posso memorizzare un’altra stringa JSON, la salvo e la rileggo.
/*
 *  Manage external SPI Flash with Arduino
 *  Write and read a JSON structure like a String,
 *  find first address available
 *  and write and read another JSON structure
 *
 *  with library SPIMemory
 *
 *  by Mischianti Renzo <https://mischianti.org>
 *
 *  https://mischianti.org/
 *
 *	SPIFlash connected via SPI standard
 *
 */

#include <SPIMemory.h>
#include <ArduinoJson.h>

//SPIFlash flash; // If you don't specify the library use standard SPI connection
SPIFlash flash(SS, &SPI);
void setup() {
  Serial.begin(115200);

  while (!Serial) ; // Wait for Serial monitor to open
  delay(100);

  // flash.setClock(12000000); // uncomment here for Arduino SAMD boards

  flash.begin(); // If SPIMemory isn't recognized you can specify the size of memory

  // flash.eraseChip();

  Serial.print(F("Flash size: "));
  Serial.print((long)(flash.getCapacity()/1000));
  Serial.println(F("Kb"));

  unsigned long strAddr = 0;
  unsigned long strAddrSecondString = 0;

  Serial.println();

  // Allocate a temporary JsonDocument
  // Don't forget to change the capacity to match your requirements.
  // Use arduinojson.org/v6/assistant to compute the capacity.
  //  StaticJsonDocument<512> doc;
  // You can use DynamicJsonDocument as well
  Serial.println(F("Generate JSON file!"));
  DynamicJsonDocument doc(512);

  // Set the values in the document
  doc["energyLifetime"] = 21698620;
  doc["energyYearly"] = 1363005;

  Serial.print(F("Put data in a buffer.. "));
  // Serialize JSON to file
  String buf;
  if (serializeJson(doc, buf) == 0) {
	  Serial.println(F("failed to write buffer"));
  }

  if (flash.writeStr(strAddr, buf)){
	  Serial.print(F("OK, writed on address "));
	  Serial.println(strAddr);
  }else{
	  Serial.println(F("KO"));
  }

  String outputString = "";
  if (flash.readStr(strAddr, outputString)) {
    Serial.print(F("Read json: "));
    Serial.println(outputString);
    Serial.print(F("From address: "));
    Serial.println(strAddr);
  }


  Serial.println(F("Generate JSON file!"));
  DynamicJsonDocument doc2(512);

  // Set the values in the document
  doc2["energyLifetime"] = 222;
  doc2["energyYearly"] = 333;


  Serial.println();
  Serial.print(F("Check first free sector: "));
  strAddrSecondString = flash.getAddress(doc2.size());
  Serial.println(strAddrSecondString);
  Serial.println();

  Serial.print(F("Stream data in flash memory!"));

  Serial.print(F("Put data in a buffer.."));
  // Serialize JSON to file
  String buf2;
  if (serializeJson(doc2, buf2) == 0) {
	  Serial.println(F("failed to write buffer"));
  }
    // Print test file

  if (flash.writeStr(strAddrSecondString, buf2)){
	  Serial.print(F("OK, writed on address "));
	  Serial.println(strAddrSecondString);
  }else{
	  Serial.println(F("KO"));
  }

  String outputString2 = "";
  if (flash.readStr(strAddrSecondString, outputString2)) {
    Serial.print(F("Read data: "));
    Serial.println(outputString2);
    Serial.print(F("From address: "));
    Serial.println(strAddrSecondString);
  }

  while (!flash.eraseSector(strAddr));
  while (!flash.eraseSector(strAddrSecondString));

}

void loop() {

}
Ecco il risultato della console.
Flash size: 8388Kb

Generate JSON file!
Put data in a buffer.. OK, writed on address 0
Read json: {"energyLifetime":21698620,"energyYearly":1363005}
From address: 0
Generate JSON file!

Check first free sector: 56

Stream data in flash memory!Put data in a buffer..OK, writed on address 56
Read data: {"energyLifetime":222,"energyYearly":333}
From address: 56
SPI Flash uso avanzato con filesystem SdFat
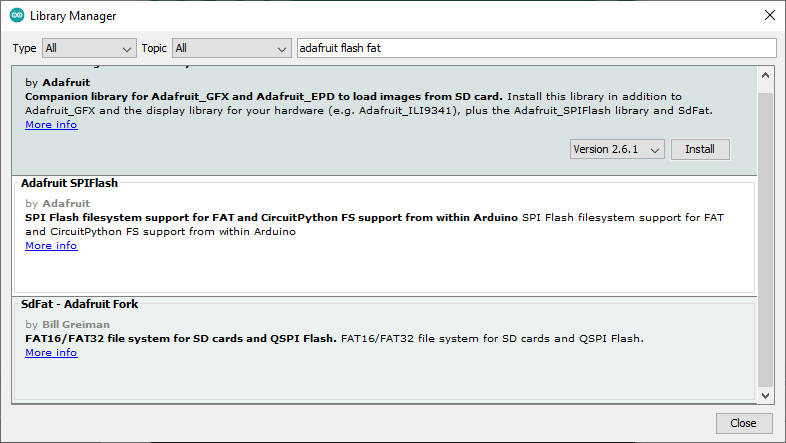
Una libreria più complessa (e più affamata di risorse) è quella di Adafruit, l’Adafruit SPIFlash, che deve essere usata con il fork di SdFat Adafruit.
Questa libreria è sconsigliata su schede Arduino come UNO o Mega perché, solo per il buffer, ha bisogno di 512 byte e ogni file ha qualche byte di preambolo e rischi di sprecare molta RAM.
Per un microcontrollore a bassa potenza, è meglio usare una libreria come SPIMemory.
Puoi trovare queste librerie anche sul gestore delle librerie “Adafruit SPIFlash” e “SdFat – Adafruit Fork”.
Aggiungi un nuovo tipo di Flash SPI
Il set di chip è supportato. È limitato a un elenco specificato ma crea un nuovo dispositivo. È piuttosto semplice. Ad esempio, ho un W25X80AVAIZ (penso clone di Winbond), un componente discreto acquistato a un prezzo molto basso.
Ha queste caratteristiche:
- capacità 1Mb;
- 104 Mhz di velocità;
- clone Winbond;
- SPI singola doppia e quadrupla.
Quindi, scrivo un semplice schizzo per verificare la compatibilità:
/*
 *  Retrieve basic core info of Flash SPI
 *  Add a custom device w25x80
 *  library Adafruit_SPIFlash and SdFat - AdafruitFork
 *
 *  by Mischianti Renzo <https://mischianti.org>
 *
 *  https://mischianti.org/
 *
 *	SPIFlash connected via SPI standard check wiring on the article
 *
 */

#include "SdFat.h"
#include "Adafruit_SPIFlash.h"

Adafruit_FlashTransport_SPI flashTransport(SS, SPI); // Set CS and SPI interface
Adafruit_SPIFlash flash(&flashTransport);

void setup()
{
  Serial.begin(115200);
  while ( !Serial ) delay(100);   // wait for native usb

  if (flash.begin()) {
	  Serial.println(F("Device finded and supported!"));
  } else {
	  Serial.println(F("Problem to discover and configure device, check wiring also!"));
  }
  // Set 4Mhz SPI speed
  flashTransport.setClockSpeed(4000000, 4000000); // added to prevent speed problem

  Serial.println();

  Serial.println("Adafruit Serial Flash get basic info: ");
  Serial.print("JEDEC ID (FFFFFF for unknown): "); Serial.println(flash.getJEDECID(), HEX);
  Serial.print("Flash size: "); Serial.println(flash.size());

  Serial.println();Serial.println();

  uint8_t jedec_ids[4];
  flashTransport.readCommand(SFLASH_CMD_READ_JEDEC_ID, jedec_ids, 4);

  // For simplicity with commonly used device, we only check for continuation
  // code at 2nd byte (e.g Fujitsu FRAM devices)
  if (jedec_ids[1] == 0x7F) {
    // Shift and skip continuation code in 2nd byte
    jedec_ids[1] = jedec_ids[2];
    jedec_ids[2] = jedec_ids[3];
  }

  Serial.println("Retrieve JDEC_ID");

  Serial.print("Manufacturer ID: 0x");
  Serial.println(jedec_ids[0], HEX);

  Serial.print("Memory Type: 0x");
  Serial.println(jedec_ids[1], HEX);

  Serial.print("Capacity: 0x");
  Serial.println(jedec_ids[2], HEX);
  Serial.print("Capacity DEC: ");
  Serial.println(jedec_ids[2], DEC);
}

void loop()
{
  // nothing to do
}
L’output seriale per il mio dispositivo non supportato è:
Unknown flash device 0xEF4014
Problem to discover and configure device, check wiring also!

Adafruit Serial Flash get basic info:
JEDEC ID (FFFFFF for unknown): FFFFFF
Flash size: 0


Retrieve JDEC_ID
Manufacturer ID: 0xEF
Memory Type: 0x40
Capacity: 0x14
Capacity DEC: 20
Quindi ottengo dalla libreria Adafruit_SPIFlash il file flash_devices.h e ottengo il dispositivo più simile nell’elenco.
Allora uso:
Capacity DEC per ottenere la dimensione: .total_size = (1UL << 20), /* 1 MiB */
ID produttore per il produttore: .manufacturer_id = 0xef
Tipo di memoria per memory_type: .memory_type = 0x40
La capacità per la capacità:.capacity = 0x14
Provo a trovare qualche informazione sul datasheet del dispositivo compatibile.
  // Settings for the Winbond W25Q80BV (1 MiB SPI flash.)
  // https://pdf1.alldatasheet.com/datasheet-pdf/view/555565/WINBOND/W25Q80BV.html
  #define W25X80BV                                                            \
    {                                                                            \
      .total_size = (1UL << 20), /* 1 MiB */                                     \
          .start_up_time_us = 5000, .manufacturer_id = 0xef,                     \
      .memory_type = 0x40, .capacity = 0x14, .max_clock_speed_mhz = 104,         \
      .quad_enable_bit_mask = 0x02, .has_sector_protection = false,              \
      .supports_fast_read = true, .supports_qspi = true,                         \
      .supports_qspi_writes = true, .write_status_register_split = false,        \
      .single_status_byte = false, .is_fram = false,                             \
    }


  static const SPIFlash_Device_t possible_devices[] = {
		  W25X80BV,
  };

  // Initialize flash library and check its chip ID.
  if (!flash.begin(possible_devices)) {
    Serial.println("Error, failed to initialize flash chip!");
    while(1) yield();
  }
Ora lo schizzo di prova completo diventa:
/*
 *  Retrieve basic core info of Flash SPI
 *  Add a custom device w25x80
 *  library Adafruit_SPIFlash and SdFat - AdafruitFork
 *
 *  by Mischianti Renzo <https://mischianti.org>
 *
 *  https://mischianti.org/
 *
 *	SPIFlash connected via SPI standard check wiring on the article
 *
 */

#include "SdFat.h"
#include "Adafruit_SPIFlash.h"

Adafruit_FlashTransport_SPI flashTransport(SS, SPI); // Set CS and SPI interface
Adafruit_SPIFlash flash(&flashTransport);

void setup()
{
  Serial.begin(115200);
  while ( !Serial ) delay(100);   // wait for native usb

  // Settings for the Winbond W25Q80BV (1 MiB SPI flash.)
  // https://pdf1.alldatasheet.com/datasheet-pdf/view/555565/WINBOND/W25Q80BV.html
  #define W25X80BV                                                            \
    {                                                                            \
      .total_size = (1UL << 20), /* 1 MiB */                                     \
          .start_up_time_us = 5000, .manufacturer_id = 0xef,                     \
      .memory_type = 0x40, .capacity = 0x14, .max_clock_speed_mhz = 104,         \
      .quad_enable_bit_mask = 0x02, .has_sector_protection = false,              \
      .supports_fast_read = true, .supports_qspi = true,                         \
      .supports_qspi_writes = true, .write_status_register_split = false,        \
      .single_status_byte = false, .is_fram = false,                             \
    }


  static const SPIFlash_Device_t possible_devices[] = {
		  W25X80BV,
  };

  if (flash.begin(possible_devices)) {
	  Serial.println(F("Device finded and supported!"));
  } else {
	  Serial.println(F("Problem to discover and configure device, check wiring also!"));
  }
  // Set 4Mhz SPI speed
  flashTransport.setClockSpeed(4000000, 4000000); // added to prevent speed problem

  Serial.println();

  Serial.println("Adafruit Serial Flash get basic info: ");
  Serial.print("JEDEC ID (FFFFFF for unknown): "); Serial.println(flash.getJEDECID(), HEX);
  Serial.print("Flash size: "); Serial.println(flash.size());

  Serial.println();Serial.println();

  uint8_t jedec_ids[4];
  flashTransport.readCommand(SFLASH_CMD_READ_JEDEC_ID, jedec_ids, 4);

  // For simplicity with commonly used device, we only check for continuation
  // code at 2nd byte (e.g Fujitsu FRAM devices)
  if (jedec_ids[1] == 0x7F) {
    // Shift and skip continuation code in 2nd byte
    jedec_ids[1] = jedec_ids[2];
    jedec_ids[2] = jedec_ids[3];
  }

  Serial.println("Retrieve JDEC_ID");

  Serial.print("Manufacturer ID: 0x");
  Serial.println(jedec_ids[0], HEX);

  Serial.print("Memory Type: 0x");
  Serial.println(jedec_ids[1], HEX);

  Serial.print("Capacity: 0x");
  Serial.println(jedec_ids[2], HEX);
  Serial.print("Capacity DEC: ");
  Serial.println(jedec_ids[2], DEC);


}

void loop()
{
  // nothing to do
}
E ora il risultato è:
Device finded and supported!

Adafruit Serial Flash get basic info:
JEDEC ID (FFFFFF for unknown): EF4014
Flash size: 1048576


Retrieve JDEC_ID
Manufacturer ID: 0xEF
Memory Type: 0x40
Capacity: 0x14
Capacity DEC: 20
Test e risoluzione dei problemi
Per verificare se tutto è a posto, puoi utilizzare il test fornito in libreria. Innanzitutto, devi avviare l’esempio SdFat_speedtest; per Arduino UNO, come la scheda con poca RAM, è necessario ridurre il buffer da
#define BUFSIZE 4096
a
#define BUFSIZE 512
ecco lo sketch completo con IC personalizzato:
// The MIT License (MIT)
// Copyright (c) 2019 Ha Thach for Adafruit Industries

#include "SdFat.h"
#include "Adafruit_SPIFlash.h"

// Uncomment to run example with custom SPI and SS e.g with FRAM breakout
 #define CUSTOM_CS   SS
 #define CUSTOM_SPI  SPI
#define EXTERNAL_FLASH_USE_QSPI

  Adafruit_FlashTransport_SPI flashTransport(CUSTOM_CS, CUSTOM_SPI);

  Adafruit_SPIFlash flash(&flashTransport);

#define BUFSIZE   4096

// 4 byte aligned buffer has best result with nRF QSPI
uint8_t bufwrite[BUFSIZE] __attribute__ ((aligned(4)));
uint8_t bufread[BUFSIZE] __attribute__ ((aligned(4)));

// the setup function runs once when you press reset or power the board
void setup()
{
  Serial.begin(115200);
  while ( !Serial ) delay(100);   // wait for native usb
  SPI.setFrequency(12000000);

  // Settings for the Winbond W25Q80BV (1 MiB SPI flash.)
  // https://pdf1.alldatasheet.com/datasheet-pdf/view/555565/WINBOND/W25Q80BV.html
  #define W25X80BV                                                            \
    {                                                                            \
      .total_size = (1UL << 20), /* 1 MiB */                                     \
          .start_up_time_us = 5000, .manufacturer_id = 0xef,                     \
      .memory_type = 0x40, .capacity = 0x14, .max_clock_speed_mhz = 104,         \
      .quad_enable_bit_mask = 0x02, .has_sector_protection = false,              \
      .supports_fast_read = true, .supports_qspi = true,                         \
      .supports_qspi_writes = true, .write_status_register_split = false,        \
      .single_status_byte = false, .is_fram = false,                             \
    }


  /// List of all possible flash devices used by Adafruit boards
  static const SPIFlash_Device_t possible_devices[] = {
      // Main devices used in current Adafruit products
		  W25X80BV,
  };

//  flash.begin(possible_devices); // custom board
  flash.begin(); // start with standard board

  pinMode(LED_BUILTIN, OUTPUT);
  flash.setIndicator(LED_BUILTIN, true);

  Serial.println("Adafruit Serial Flash Speed Test example");
  Serial.print("JEDEC ID: "); Serial.println(flash.getJEDECID(), HEX);
  Serial.print("Flash size: "); Serial.println(flash.size());
  Serial.flush();

  write_and_compare(0xAA);
  write_and_compare(0x55);

  Serial.println("Speed test is completed.");
  Serial.flush();
}

void print_speed(const char* text, uint32_t count, uint32_t ms)
{
  Serial.print(text);
  Serial.print(count);
  Serial.print(" bytes in ");
  Serial.print(ms / 1000.0F, 2);
  Serial.println(" seconds.");

  Serial.print("Speed : ");
  Serial.print( (count / 1000.0F) / (ms / 1000.0F), 2);
  Serial.println(" KB/s.\r\n");
}

bool write_and_compare(uint8_t pattern)
{
  uint32_t ms;

  Serial.println("Erase chip");
  Serial.flush();

#define TEST_WHOLE_CHIP

#ifdef TEST_WHOLE_CHIP
  uint32_t const flash_sz = flash.size();
  flash.eraseChip();
#else
  uint32_t const flash_sz = 4096;
  flash.eraseSector(0);
#endif

  flash.waitUntilReady();

  // write all
  memset(bufwrite, (int) pattern, sizeof(bufwrite));
  Serial.printf("Write flash with 0x%02X\n", pattern);
  Serial.flush();
  ms = millis();

  for(uint32_t addr = 0; addr < flash_sz; addr += sizeof(bufwrite))
  {
    flash.writeBuffer(addr, bufwrite, sizeof(bufwrite));
  }

  uint32_t ms_write = millis() - ms;
  print_speed("Write ", flash_sz, ms_write);
  Serial.flush();

  // read and compare
  Serial.println("Read flash and compare");
  Serial.flush();
  uint32_t ms_read = 0;
  for(uint32_t addr = 0; addr < flash_sz; addr += sizeof(bufread))
  {
    memset(bufread, 0, sizeof(bufread));

    ms = millis();
    flash.readBuffer(addr, bufread, sizeof(bufread));
    ms_read += millis() - ms;

    if ( memcmp(bufwrite, bufread, BUFSIZE) )
    {
      Serial.printf("Error: flash contents mismatched at address 0x%08X!!!", addr);
      for(uint32_t i=0; i<sizeof(bufread); i++)
      {
        if ( i != 0 ) Serial.print(' ');
        if ( (i%16 == 0) )
        {
          Serial.println();
          Serial.printf("%03X: ", i);
        }

        Serial.printf("%02X", bufread[i]);
      }

      Serial.println();
      return false;
    }
  }

  print_speed("Read  ", flash_sz, ms_read);
  Serial.flush();

  return true;
}

void loop()
{
  // nothing to do
}
Se hai un output seriale come questo (io uso […] per indicare la replica della linea):
Adafruit Serial Flash Speed Test example
JEDEC ID: EF4014
Flash size: 1048576
Erase chip
Write flash with 0xAA
Write 1048576 bytes in 1.03 seconds.
Speed : 1016.06 KB/s.

Read flash and compare
Error: flash contents mismatched at address 0x00000000!!!
000: 00 00 00 00 00 00 00 00 00 00 00 00 00 00 00 00
[...]
FF0: 00 00 00 00 00 00 00 00 00 00 00 00 00 00 00 00
Erase chip
Write flash with 0x55
Write 1048576 bytes in 1.03 seconds.
Speed : 1017.05 KB/s.

Read flash and compare
Error: flash contents mismatched at address 0x00000000!!!
000: 00 00 00 00 00 00 00 00 00 00 00 00 00 00 00 00
[...]
FF0: 00 00 00 00 00 00 00 00 00 00 00 00 00 00 00 00
Speed test is completed.
Le linee (o altri caratteri HEX) con
000: 00 00 00 00 00 00 00 00 00 00 00 00 00 00 00 00
indica che i dati confrontati non corrispondono , quindi (se lo schizzo di prova precedente funziona) probabilmente hai avuto qualche problema.
Nella maggior parte dei casi, la velocità dello SPI è troppo alta; questo non significa che la velocità sia troppo alta per il microcontrollore o IC, ma può essere un problema con un cavo di connessione scadente.
Ma se la soluzione fosse stata ridurre la velocità devi aggiungere una riga come questa dopo flash.begin():
flashTransport.setClockSpeed(24000000, 24000000);
il comando imposta la velocità SPI a 24 Mhz, e ora il risultato diventa così:
Adafruit Serial Flash Speed Test example
JEDEC ID: EF4014
Flash size: 1048576
Erase chip
Write flash with 0xAA
Write 1048576 bytes in 4.07 seconds.
Speed : 257.38 KB/s.

Read flash and compare
Read  1048576 bytes in 0.47 seconds.
Speed : 2226.28 KB/s.

Erase chip
Write flash with 0x55
Write 1048576 bytes in 4.07 seconds.
Speed : 257.38 KB/s.

Read flash and compare
Read  1048576 bytes in 0.47 seconds.
Speed : 2231.01 KB/s.

Speed test is completed.
Se non vengono visualizzati errori di confronto, la flash SPI è stata configurata correttamente.
Limitazioni esp32
Per esp32, la velocità massima stabile che ho raggiunto è di 24 Mhz, quindi devo aggiungere
flashTransport.setClockSpeed(24000000, 24000000);
esp8266 limitations
esp8266 ha una frequenza CPU inferiore ma nessuna limitazione sulle frequenze SPI.
Sketch pratico
Prima di tutto, devi formattare la flash SPI; negli esempi di Adafruit_SPIFlash, puoi trovare l’ esempio SdFat_format, che formatta la flash SPI per te.
Quando avvii lo sketch, ti chiede di inserire, nel monitor Serial, “OK” in maiuscolo, ecco il risultato dell’output seriale.
Adafruit SPI Flash FatFs Format Example
Flash size: 1024 KB
Flash chip JEDEC ID: 0xEF4014
!!!!!!!!!!!!!!!!!!!!!!!!!!!!!!!!!!!!!!!!!!!!!!!!!!!!!!!!!!!!!!!!!!!!!
This sketch will ERASE ALL DATA on the flash chip and format it with a new filesystem!
Type OK (all caps) and press enter to continue.
!!!!!!!!!!!!!!!!!!!!!!!!!!!!!!!!!!!!!!!!!!!!!!!!!!!!!!!!!!!!!!!!!!!!!

>>Send to COM17: "OK"<<
Creating and formatting FAT filesystem (this takes ~60 seconds)...
Setting disk label to: EXT FLASH
Formatted flash!
Flash chip successfully formatted with new empty filesystem!
Ora sei pronto per utilizzare la flash SPI con FAT FS.
Se vuoi usare il file system FAT, ti consiglio di usare una flash SPI con più di 1Mb di spazio.
Ecco un semplice sketch che crea un file test.txt con la stringa <num> -> testing 1, 2, 3. 100 volte.
/*
 *  Add new txt file and add  the string <num> -> testing 1, 2, 3. 100 times
 *  than read the file and put on serial output.
 *  library Adafruit_SPIFlash and SdFat - AdafruitFork
 *
 *  by Mischianti Renzo <https://mischianti.org>
 *
 *  https://mischianti.org/
 *
 *	SPIFlash connected via SPI standard check wiring on the article
 *
 */

#include "SdFat.h"
#include "Adafruit_SPIFlash.h"

Adafruit_FlashTransport_SPI flashTransport(SS, SPI); // Set CS and SPI interface
Adafruit_SPIFlash flash(&flashTransport);

// file system object from SdFat
FatFileSystem fatfs;
File myFile;

void setup()
{
  Serial.begin(115200);
  while ( !Serial ) delay(100);   // wait for native usb

//  // Settings for the Winbond W25Q80BV (1 MiB SPI flash.)
//  // https://pdf1.alldatasheet.com/datasheet-pdf/view/555565/WINBOND/W25Q80BV.html
//  #define W25X80BV                                                            \
//    {                                                                            \
//      .total_size = (1UL << 20), /* 1 MiB */                                     \
//          .start_up_time_us = 5000, .manufacturer_id = 0xef,                     \
//      .memory_type = 0x40, .capacity = 0x14, .max_clock_speed_mhz = 104,         \
//      .quad_enable_bit_mask = 0x02, .has_sector_protection = false,              \
//      .supports_fast_read = true, .supports_qspi = true,                         \
//      .supports_qspi_writes = true, .write_status_register_split = false,        \
//      .single_status_byte = false, .is_fram = false,                             \
//    }
//
//
//  /// List of all possible flash devices used by Adafruit boards
//  static const SPIFlash_Device_t possible_devices[] = {
//      // Main devices used in current Adafruit products
//		  W25X80BV,
//  };

//if (flash.begin(possible_devices)) {
  if (flash.begin()) {
	  Serial.println(F("Device finded and supported!"));
  } else {
	  Serial.println(F("Problem to discover and configure device, check wiring also!"));
  }
  // Set 24Mhz SPI speed
  flashTransport.setClockSpeed(24000000, 24000000); // added to prevent speed problem

  pinMode(LED_BUILTIN, OUTPUT);
  flash.setIndicator(LED_BUILTIN, true);

  Serial.println("Adafruit Serial Flash read write example");
  Serial.print("JEDEC ID: "); Serial.println(flash.getJEDECID(), HEX);
  Serial.print("Flash size: "); Serial.println(flash.size());
  Serial.flush();

  Serial.println();
  // First call begin to mount the filesystem.  Check that it returns true
  // to make sure the filesystem was mounted.
  if (!fatfs.begin(&flash)) {
    Serial.println("Error, failed to mount newly formatted filesystem!");
    Serial.println("Was the flash chip formatted with the SdFat_format example?");
    while(1) yield();
  }
  Serial.println("Mounted filesystem!");
  Serial.println();

  // open the file. note that only one file can be open at a time,
  // so you have to close this one before opening another.
  myFile = fatfs.open("test.txt", FILE_WRITE);

  // if the file opened okay, write to it:
  if (myFile) {
    Serial.print("Writing to test.txt...");
    for (int i=0;i<100;i++){
    	myFile.print(i);
    	myFile.println(" -> testing 1, 2, 3.");
    }
    // close the file:
    myFile.close();
    Serial.println("done.");
  } else {
    // if the file didn't open, print an error:
    Serial.println("error opening test.txt");
  }

  // re-open the file for reading:
  myFile = fatfs.open("test.txt");
  if (myFile) {
    Serial.println("test.txt:");

    // read from the file until there's nothing else in it:
    while (myFile.available()) {
      Serial.write(myFile.read());
    }
    // close the file:
    myFile.close();
  } else {
    // if the file didn't open, print an error:
    Serial.println("error opening test.txt");
  }
}

void loop() {
  // nothing happens after setup
}
Il risultato sarà così:
Device finded and supported!
Adafruit Serial Flash Speed Test example
JEDEC ID: EF4017
Flash size: 8388608

Mounted filesystem!

Writing to test.txt...done.
test.txt:
0 -> testing 1, 2, 3.
[...]
99 -> testing 1, 2, 3.
ets Jun  8 2016 00:22:57
Ora possiamo chiamare alcuni comandi per recuperare le informazioni sul filesystem e quindi ottenere l’elenco dei file con il comando ls.
/*
 *  Retrieve basic core info of Flash SPI
 *  Get size and free size
 *
 *  than call ls command
 *
 *  library Adafruit_SPIFlash and SdFat - AdafruitFork
 *
 *  by Mischianti Renzo <https://mischianti.org>
 *
 *  https://mischianti.org/
 *
 *	SPIFlash connected via SPI standard check wiring on the article
 *
 */

#include "SdFat.h"
#include "Adafruit_SPIFlash.h"

Adafruit_FlashTransport_SPI flashTransport(SS, SPI); // Set CS and SPI interface
Adafruit_SPIFlash flash(&flashTransport);

// file system object from SdFat
FatFileSystem fatfs;

void setup()
{
  Serial.begin(115200);
  while ( !Serial ) delay(100);   // wait for native usb

//  // Settings for the Winbond W25Q80BV (1 MiB SPI flash.)
//  // https://pdf1.alldatasheet.com/datasheet-pdf/view/555565/WINBOND/W25Q80BV.html
//  #define W25X80BV                                                            \
//    {                                                                            \
//      .total_size = (1UL << 20), /* 1 MiB */                                     \
//          .start_up_time_us = 5000, .manufacturer_id = 0xef,                     \
//      .memory_type = 0x40, .capacity = 0x14, .max_clock_speed_mhz = 104,         \
//      .quad_enable_bit_mask = 0x02, .has_sector_protection = false,              \
//      .supports_fast_read = true, .supports_qspi = true,                         \
//      .supports_qspi_writes = true, .write_status_register_split = false,        \
//      .single_status_byte = false, .is_fram = false,                             \
//    }
//
//
//  /// List of all possible flash devices used by Adafruit boards
//  static const SPIFlash_Device_t possible_devices[] = {
//      // Main devices used in current Adafruit products
//		  W25X80BV,
//  };

//if (flash.begin(possible_devices)) {
  if (flash.begin()) {
	  Serial.println(F("Device finded and supported!"));
  } else {
	  Serial.println(F("Problem to discover and configure device, check wiring also!"));
  }
  // Set 24Mhz SPI speed
  flashTransport.setClockSpeed(24000000, 24000000); // added to prevent speed problem

  pinMode(LED_BUILTIN, OUTPUT);
  flash.setIndicator(LED_BUILTIN, true);

  Serial.println("Adafruit Serial Flash Speed Test example");
  Serial.print("JEDEC ID: "); Serial.println(flash.getJEDECID(), HEX);
  Serial.print("Flash size: "); Serial.println(flash.size());
  Serial.flush();

  Serial.println();
  // First call begin to mount the filesystem.  Check that it returns true
  // to make sure the filesystem was mounted.
  if (!fatfs.begin(&flash)) {
    Serial.println("Error, failed to mount newly formatted filesystem!");
    Serial.println("Was the flash chip formatted with the SdFat_format example?");
    while(1) yield();
  }
  Serial.println("Mounted filesystem!");
  Serial.println();

  Serial.print("Clusters:          ");
  Serial.println(fatfs.clusterCount());
  Serial.print("Blocks x Cluster:  ");
  Serial.println(fatfs.blocksPerCluster());

  Serial.print("Total Blocks:      ");
  Serial.println(fatfs.blocksPerCluster() * fatfs.clusterCount());
  Serial.println();

  // print the type and size of the first FAT-type volume
  uint32_t volumesize;
  Serial.print("Volume type is:    FAT");
  Serial.println(fatfs.fatType(), DEC);

  volumesize = fatfs.blocksPerCluster();    // clusters are collections of blocks
  volumesize *= fatfs.clusterCount();       // we'll have a lot of clusters

  volumesize /= 2;                           // SD card blocks are always 512 bytes (2 blocks are 1KB)
  Serial.print("Volume size (Kb):  ");
  Serial.println(volumesize);
  Serial.print("Volume size (Mb):  ");
  volumesize /= 1024;
  Serial.println(volumesize);

  Serial.println();
  // print the type and size of the first FAT-type volume
  volumesize = 0;
  volumesize = fatfs.blocksPerCluster();    // clusters are collections of blocks
  volumesize *= fatfs.freeClusterCount();       // we'll have a lot of clusters

  volumesize /= 2;                           // SD card blocks are always 512 bytes (2 blocks are 1KB)
  Serial.print("Free space size (Kb):  ");
  Serial.println(volumesize);
  Serial.print("Free space size (Mb):  ");
  volumesize /= 1024;
  Serial.println(volumesize);


  Serial.println("\nFiles found on the card (name, date and size in bytes): ");
  fatfs.rootDirStart();

  // list all files in the card with date and size
  fatfs.ls(LS_R | LS_DATE | LS_SIZE);
}

void loop(void) {
}
Il risultato sarà
Device finded and supported!
Adafruit Serial Flash Speed Test example
JEDEC ID: EF4017
Flash size: 8388608

Mounted filesystem!

Clusters:          2043
Blocks x Cluster:  8
Total Blocks:      16344

Volume type is:    FAT12
Volume size (Kb):  8172
Volume size (Mb):  7

Free space size (Kb):  8164
Free space size (Mb):  7

Files found on the card (name, date and size in bytes):
2000-01-01 01:00:00       7170 test.txt
Grazie
- Arduino: memoria SPI flash esterna veloce
- Arduino MKR SAMD: filesystem FAT su memoria SPI flash esterna
- esp32 e esp8266: file system FAT su memoria SPI flash esterna
- STM32: memoria SPI flash FAT FS
- ESP32: piedinatura, specifiche e configurazione dell’Arduino IDE
- ESP32: fileSystem integrato SPIFFS
- ESP32: gestire più seriali e logging per il debug
- ESP32 risparmio energetico pratico
- ESP32 risparmio energetico pratico: gestire WiFi e CPU
- ESP32 risparmio energetico pratico: modem e light sleep
- ESP32 risparmio energetico pratico: deep sleep e ibernazione
- ESP32 risparmio energetico pratico: preservare dati al riavvio, sveglia a tempo e tramite tocco
- ESP32 risparmio energetico pratico: sveglia esterna e da ULP
- ESP32 risparmio energetico pratico: sveglia da UART e GPIO
- ESP32: filesystem integrato LittleFS
- ESP32: filesystem integrato FFat (Fat/exFAT)
- ESP32-wroom-32
- ESP32-CAM
- ESP32: ethernet w5500 con chiamate standard (HTTP) e SSL (HTTPS)
- ESP32: ethernet enc28j60 con chiamate standard (HTTP) e SSL (HTTPS)
- Come usare la scheda SD con l’esp32
- esp32 e esp8266: file system FAT su memoria SPI flash esterna
- Gestione aggiornamenti firmware e OTA
- Gestione del firmware
- Aggiornamento OTA con Arduino IDE
- Aggiornamento OTA con browser web
- Aggiornamenti automatici OTA da un server HTTP
- Aggiornamento del firmware non standard
- Integrare LAN8720 con ESP32 per la connettività Ethernet con plain (HTTP) e SSL (HTTPS)
- Collegare l’EByte E70 (CC1310) ai dispositivi ESP32 c3/s3 ed un semplice sketch di esempio
- ESP32-C3: piedinatura, specifiche e configurazione dell’IDE Arduino
- Integrazione del modulo W5500 su ESP32 con Core 3: supporto nativo ai protocolli Ethernet con SSL e altre funzionalità
- Integrazione del modulo LAN8720 su ESP32 con Core 3: supporto nativo del protocollo Ethernet con SSL e altre funzionalità.
- Dallas DS18B20
- Guida all’I2C su ESP32: comunicazione con dispositivi eterogenei 5v 3.3v, gestione interfacce aggiuntive
- Display
- Guida Completa: Come Usare un Display ILI9341 con la Libreria TFT_eSPI
- Come integrare la funzionalità touch screen nel display TFT ILI9341
- Display eInk SSD1683 con GxEPD e ESP32 (e HMI CrowPanel 4,2″): nozioni di base e configurazione
- WeMos D1 mini (esp8266): caratteristiche e configurazione dell’Arduino IDE
- WeMos D1 mini (esp8266): SPIFFS Filesystem integrato
- WeMos D1 mini (esp8266): debug sulla seriale secondaria
- WeMos D1 mini (esp8266), i tre tipi di modalità di sospensione per gestire il risparmio energetico
- WeMos D1 mini (esp8266): FileSystem integrato LittleFS
- esp12 esp07 (esp8266): flash, piedinatura, spec e config dell’IDE Arduino
- Firmware and OTA update
- Gestione del firmware
- Aggiornamenti OTA con Arduino IDE
- Aggiornamenti OTA con Web Browser
- Aggiornamenti OTA automatico da server HTTP
- Aggiornamenti firmware non standard
- esp32 e esp8266: file system FAT su memoria SPI flash esterna
- i2c esp8266: how to, rete 5V, 3.3V, velocità e pin personalizzati
- …