Integrare LAN8720 con ESP32 per la connettività Ethernet con plain (HTTP) e SSL (HTTPS)
Nel mondo dell’IoT e dei sistemi embedded, l’ESP32 è emerso come un microcontrollore molto popolare grazie alla sua versatilità e alle capacità WiFi. Tuttavia, per progetti che richiedono connessioni di rete stabili e veloci, Ethernet è spesso la scelta preferita.
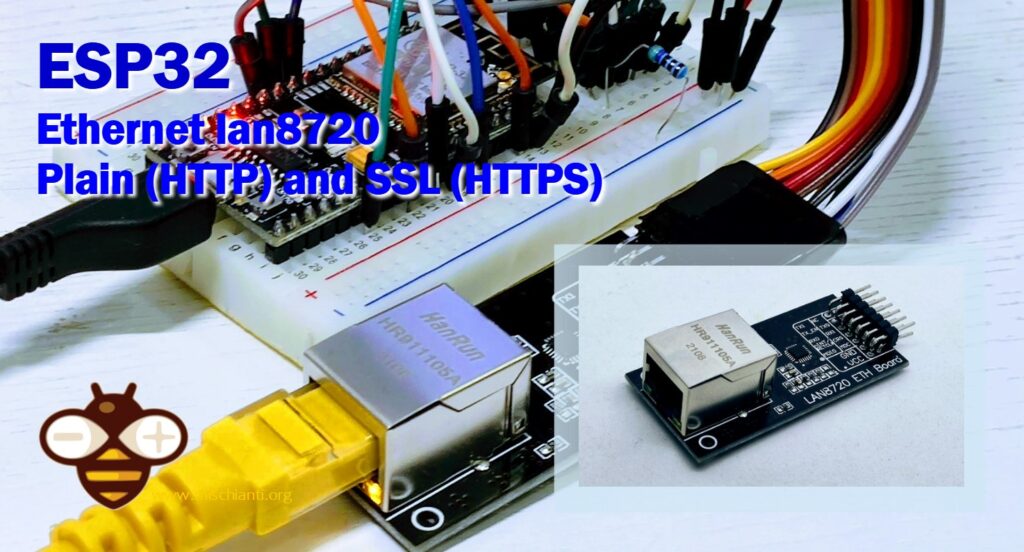
Qui entra in gioco l’Ethernet PHY LAN8720. In questa guida, esploreremo come integrare senza problemi il modulo LAN8720 con un ESP32, fornendo una connessione Ethernet robusta e affidabile per i vostri progetti IoT.
Qui la mia selezione di esp32 ESP32 Dev Kit v1 - TTGO T-Display 1.14 ESP32 - NodeMCU V3 V2 ESP8266 Lolin32 - NodeMCU ESP-32S - WeMos Lolin32 - WeMos Lolin32 mini - ESP32-CAM programmer - ESP32-CAM bundle - ESP32-WROOM-32 - ESP32-S
LAN8720 vs W5500
Il W5500 e il LAN8720 sono entrambi controllori Ethernet, ma svolgono ruoli diversi e hanno caratteristiche distinte:
- W5500:
- Produttore: Wiznet
- Tipo: Controller Ethernet con stack TCP/IP hardware completo.
- Principali caratteristiche:
- Stack protocollo TCP/IP integrato che può gestire protocolli TCP, UDP, IPv4, ICMP, ARP, IGMP e PPPoE.
- Supporta fino a 8 connessioni socket simultanee.
- SPI (Serial Peripheral Interface) per la comunicazione con i controllori host.
- Memoria interna di 32Kbyte per i buffer TX/RX.
- Adatto per applicazioni embedded grazie alla sua facilità di integrazione e al minimo carico sul processore host.
- Utilizzato tipicamente con microcontrollori come Arduino, STM32, ecc.
- LAN8720:
- Produttore: Microchip Technology (precedentemente SMSC)
- Tipo: Trasmettitore di livello fisico (PHY).
- Principali caratteristiche:
- Opera al livello fisico del modello OSI.
- Supporta gli standard Ethernet 10BASE-T e 100BASE-TX.
- Utilizza RMII (Reduced Media Independent Interface) per la comunicazione con i controllori host.
- Consumo energetico ridotto.
- Generalmente utilizzato in applicazioni che richiedono un controller separato per il livello MAC (Media Access Control), spesso presente in sistemi più complessi come quelli con processori ARM.
Qui una selezione dei dispositivi ethernet più diffusi w5500 lite - w5500 - enc26j60 mini - enc26j60 - lan8720
Differenze chiave:
- Funzionalità: Il W5500 è una soluzione più integrata con uno stack TCP/IP incorporato, rendendolo più semplice da gestire per le comunicazioni di rete in progetti basati su microcontrollori semplici. Il LAN8720, essendo un dispositivo di livello PHY, richiede un controller MAC separato ed è più adatto per applicazioni complesse.
- Interfaccia: Il W5500 utilizza SPI, che è più semplice e comunemente trovato nei microcontrollori. Il LAN8720 utilizza RMII, che è più complesso ma offre prestazioni superiori per i sistemi che lo supportano.
- Caso d’uso: Il W5500 è preferito in progetti basati su microcontrollori più semplici dove la facilità d’uso e di integrazione sono chiave. Il LAN8720 è migliore per sistemi più avanzati dove è disponibile un MAC separato e si richiede più controllo sullo stack di rete.
Cablaggio
Per impostazione predefinita, il dispositivo CHIP ha questo cablaggio.
Assegnazioni comuni dei pin dalla documentazione ufficiale
Utilizzo del MAC interno ESP32
- Il cablaggio PHY RMII è fisso e non può essere cambiato tramite IOMUX o GPIO Matrix. Per impostazione predefinita, sono connessi come segue:
| GPIO | Segnale RMII | Note |
|---|---|---|
| GPIO21 | TX_EN | EMAC_TX_EN |
| GPIO19 | TX0 | EMAC_TXD0 |
| GPIO22 | TX1 | EMAC_TXD1 |
| GPIO25 | RX0 | EMAC_RXD0 |
| GPIO26 | RX1 | EMAC_RXD1 |
| GPIO27 | CRS_DV | EMAC_RX_DRV |
- Uno dei seguenti pin GPIO può essere utilizzato come input/output di RMII REF_CLK:
| GPIO | Funzione | Note |
|---|---|---|
| GPIO0 | EMAC_TX_CLK/CLK_OUT1 | input/output |
| GPIO16 | EMAC_CLK_OUT | output |
| GPIO17 | EMAC_CLK_180 | output |
- Il cablaggio dell’interfaccia di gestione seriale (SMI) non è fisso. Potrebbe essere necessario modificarlo in base allo schema del vostro circuito. Per impostazione predefinita, sono connessi come segue:
| GPIO | Segnale SMI | Note |
|---|---|---|
| GPIO23 | MDC | Output verso PHY |
| GPIO18 | MDIO | Bidirezionale |
Cablaggio del prototipo
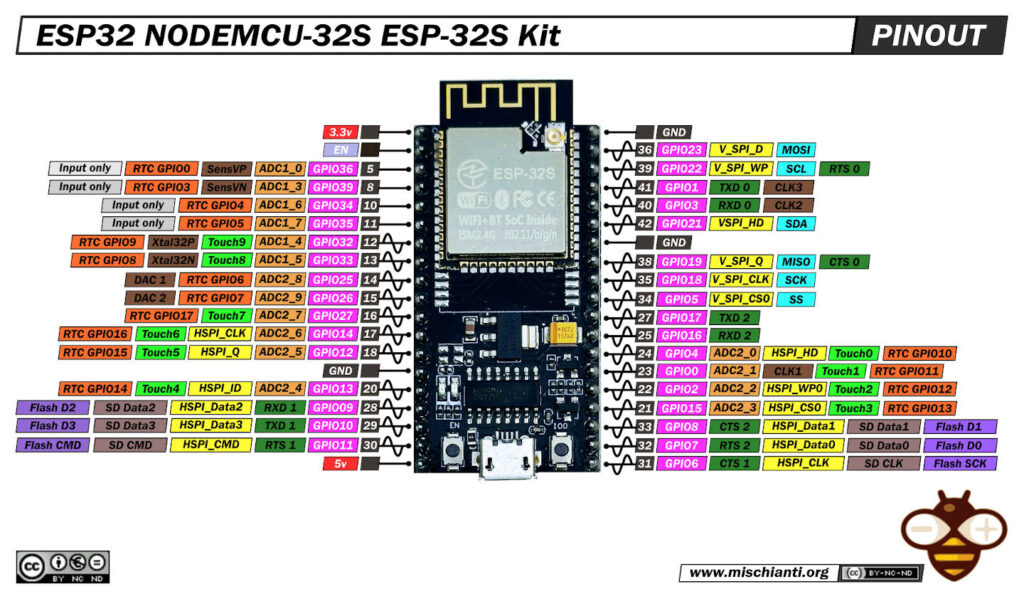
Ecco il cablaggio con un ESP32 a 38 pin.
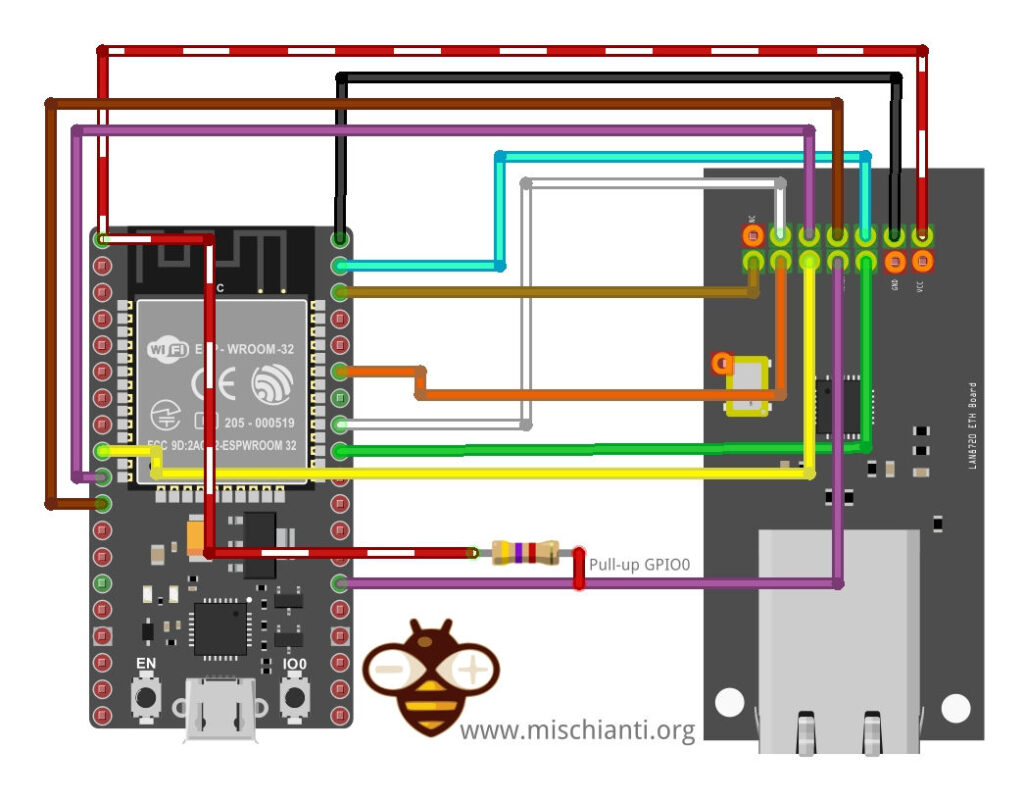
Sul nostro prototipo, iniziamo il cablaggio con questa configurazione (quella standard)
| esp32 | lan8720 |
|---|---|
| 3V3 | Vcc |
| GND | GND |
| GPIO18 | MDIO |
| GPIO19 | TXD0 |
| GPIO21 | TXEN |
| GPIO22 | TXD1 |
| GPIO23 | MDC |
| GPIO25 | RXD0 |
| GPIO26 | RXD1 |
| GPIO27 | CRS_DV |
| GPIO0 | nINT/RETCLM |
Ma con questa versione e la scheda lan8720 cinese si può incontrare un problema, casualmente si riceve un messaggio come questo.
mode:DIO, clock div:1
load:0x3fff0030,len:1184
load:0x40078000,len:13260
load:0x40080400,len:3028
entry 0x400805e4
ets Jul 29 2019 12:21:46

rst:0x1 (POWERON_RESET),boot:0x3 (DOWNLOAD_BOOT(UART0/UART1/SDIO_REI_REO_V2))
waiting for download
ets Jul 29 2019 12:21:46

rst:0x1 (POWERON_RESET),boot:0x3 (DOWNLOAD_BOOT(UART0/UART1/SDIO_REI_REO_V2))
waiting for download
A volte funziona e altre volte no, questo perché si collega GPIO0 all’oscillatore al quarzo, e quando l’oscillatore è ALTO, GPIO0 mette l’ESP32 in modalità di avvio, se si è fortunati e l’oscillatore è BASSO si avvia normalmente.
Per risolvere questo problema è necessario saldare un filo dal pin di abilitazione dell’oscillatore al pin NC (Non collegato), e cablare in questo modo.
| esp32 | lan8720 modificato |
|---|---|
| 3V3 | Vcc |
| GND | GND |
| GPIO18 | MDIO |
| GPIO19 | TXD0 |
| GPIO21 | TXEN |
| GPIO22 | TXD1 |
| GPIO23 | MDC |
| GPIO25 | RXD0 |
| GPIO26 | RXD1 |
| GPIO27 | CRS_DV |
| GPIO0 | nINT/RETCLM |
| GPIO17 | NC |
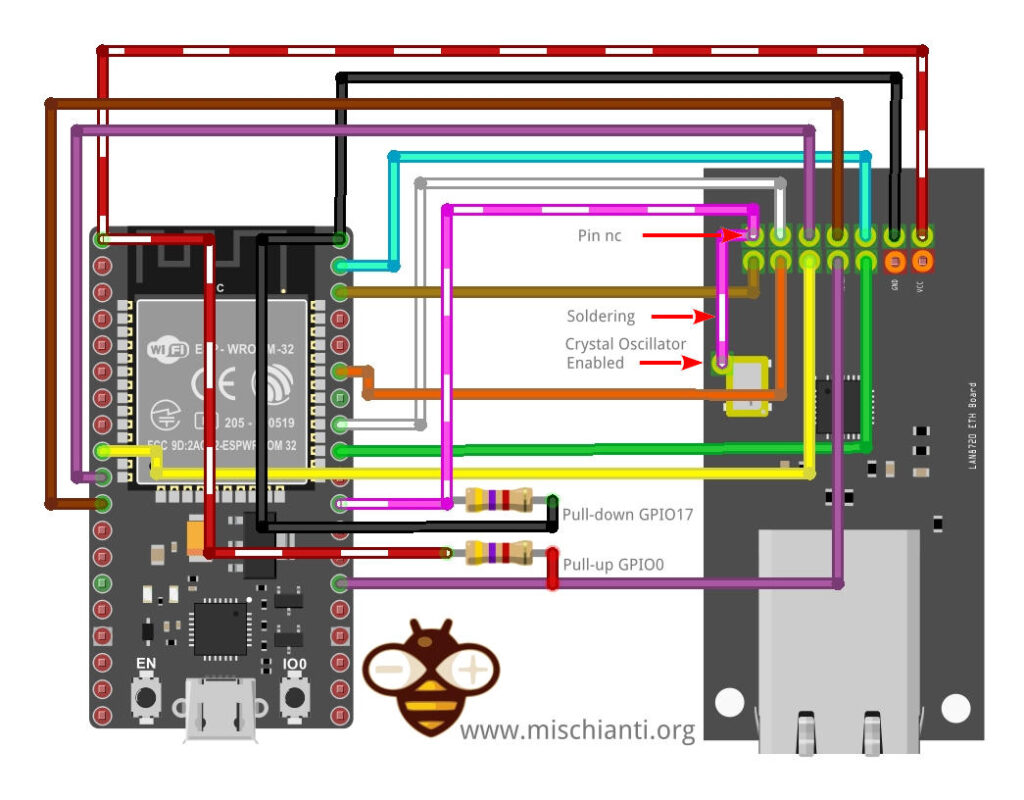
Ecco la modifica sul mio dispositivo.

Test del dispositivo
Connessione standard senza patch
Prima, lo sketch più comune che si può trovare sul web senza utilizzare la patch. Ricorda che probabilmente devi resettare più di una volta per farlo funzionare senza entrare in modalità di download.
/*
 This sketch shows how to use lan8720 with esp32 with minimal/standard configuration

 You can set the parameter in begin function or at start with define before the import
 of ETH.h file, this way is preferible.

 by Renzo Mischianti <mischianti.org>
 */

// I²C-address of Ethernet PHY (0 or 1 for LAN8720, 31 for TLK110)
#define ETH_PHY_ADDR 1 						// DEFAULT VALUE IS 0 YOU CAN OMIT IT
// Type of the Ethernet PHY (LAN8720 or TLK110)
#define ETH_PHY_TYPE ETH_PHY_LAN8720 		// DEFAULT VALUE YOU CAN OMIT IT
// Pin# of the enable signal for the external crystal oscillator (-1 to disable for internal APLL source)
#define ETH_PHY_POWER -1 					// DEFAULT VALUE YOU CAN OMIT IT
// Pin# of the I²C clock signal for the Ethernet PHY
#define ETH_PHY_MDC 23 						// DEFAULT VALUE YOU CAN OMIT IT
// Pin# of the I²C IO signal for the Ethernet PHY
#define ETH_PHY_MDIO 18 					// DEFAULT VALUE YOU CAN OMIT IT
// External clock from crystal oscillator
#define ETH_CLK_MODE ETH_CLOCK_GPIO0_IN 	// DEFAULT VALUE YOU CAN OMIT IT

#include <ETH.h>

static bool eth_connected = false;

void WiFiEvent(WiFiEvent_t event) {
	switch (event) {
	case ARDUINO_EVENT_ETH_START:
		Serial.println("ETH Started");
		ETH.setHostname("esp32-mischianti-eth");
		break;
	case ARDUINO_EVENT_ETH_CONNECTED:
		Serial.println("ETH Connected");
		break;
	case ARDUINO_EVENT_ETH_GOT_IP:
		Serial.print("ETH MAC: ");
		Serial.print(ETH.macAddress());
		Serial.print(", IPv4: ");
		Serial.print(ETH.localIP());
		if (ETH.fullDuplex()) {
			Serial.print(", FULL_DUPLEX");
		}
		Serial.print(", ");
		Serial.print(ETH.linkSpeed());
		Serial.println("Mbps");
		eth_connected = true;
		break;
	case ARDUINO_EVENT_ETH_DISCONNECTED:
		Serial.println("ETH Disconnected");
		eth_connected = false;
		break;
	case ARDUINO_EVENT_ETH_STOP:
		Serial.println("ETH Stopped");
		eth_connected = false;
		break;
	default:
		break;
	}
}

void testClient(const char *host, uint16_t port) {
	Serial.print("\nconnecting to ");
	Serial.println(host);

	WiFiClient client;
	if (!client.connect(host, port)) {
		Serial.println("connection failed");
		return;
	}
	client.printf("GET / HTTP/1.1\r\nHost: %s\r\n\r\n", host);
	while (client.connected() && !client.available())
		;
	while (client.available()) {
		Serial.write(client.read());
	}

	Serial.println("closing connection\n");
	client.stop();
}

void setup() {
	Serial.begin(115200);
	WiFi.onEvent(WiFiEvent);
	ETH.begin();
}

void loop() {
	if (eth_connected) {
		testClient("mischianti.org", 80);
	}
	delay(10000);

}
Puoi passare lo stesso parametro anche nella funzione begin in questo modo (aggiungo solo come esempio in questo caso).
/*
 This sketch shows how to use lan8720 with esp32 with minimal/standard configuration

 Parameter in begin function

 by Renzo Mischianti <mischianti.org>
 */

#include <ETH.h>

#define ETH_PARAM_PHY_ADDR 1
#define ETH_PARAM_PHY_TYPE ETH_PHY_LAN8720
#define ETH_PARAM_PHY_POWER -1
#define ETH_PARAM_PHY_MDC 23
#define ETH_PARAM_PHY_MDIO 18
#define ETH_PARAM_CLK_MODE ETH_CLOCK_GPIO0_IN


static bool eth_connected = false;

void WiFiEvent(WiFiEvent_t event) {
	switch (event) {
	case ARDUINO_EVENT_ETH_START:
		Serial.println("ETH Started");
		ETH.setHostname("esp32-mischianti-eth");
		break;
	case ARDUINO_EVENT_ETH_CONNECTED:
		Serial.println("ETH Connected");
		break;
	case ARDUINO_EVENT_ETH_GOT_IP:
		Serial.print("ETH MAC: ");
		Serial.print(ETH.macAddress());
		Serial.print(", IPv4: ");
		Serial.print(ETH.localIP());
		if (ETH.fullDuplex()) {
			Serial.print(", FULL_DUPLEX");
		}
		Serial.print(", ");
		Serial.print(ETH.linkSpeed());
		Serial.println("Mbps");
		eth_connected = true;
		break;
	case ARDUINO_EVENT_ETH_DISCONNECTED:
		Serial.println("ETH Disconnected");
		eth_connected = false;
		break;
	case ARDUINO_EVENT_ETH_STOP:
		Serial.println("ETH Stopped");
		eth_connected = false;
		break;
	default:
		break;
	}
}

void testClient(const char *host, uint16_t port) {
	Serial.print("\nconnecting to ");
	Serial.println(host);

	WiFiClient client;
	if (!client.connect(host, port)) {
		Serial.println("connection failed");
		return;
	}
	client.printf("GET / HTTP/1.1\r\nHost: %s\r\n\r\n", host);
	while (client.connected() && !client.available())
		;
	while (client.available()) {
		Serial.write(client.read());
	}

	Serial.println("closing connection\n");
	client.stop();
}

void setup() {
	Serial.begin(115200);
	WiFi.onEvent(WiFiEvent);
	ETH.begin(ETH_PARAM_PHY_ADDR, ETH_PARAM_PHY_POWER, ETH_PARAM_PHY_MDC, ETH_PARAM_PHY_MDIO, ETH_PARAM_PHY_TYPE, ETH_PARAM_CLK_MODE);
}

void loop() {
	if (eth_connected) {
		testClient("mischianti.org", 80);
	}
	delay(10000);

}
L’output del codice è qui.
ets Jul 29 2019 12:21:46

rst:0x1 (POWERON_RESET),boot:0x13 (SPI_FAST_FLASH_BOOT)
configsip: 0, SPIWP:0xee
clk_drv:0x00,q_drv:0x00,d_drv:0x00,cs0_drv:0x00,hd_drv:0x00,wp_drv:0x00
mode:DIO, clock div:1
load:0x3fff0030,len:1184
load:0x40078000,len:13260
load:0x40080400,len:3028
entry 0x400805e4
ETH Started
ETH Connected
ETH MAC: B8:D6:1A:68:E5:7F, IPv4: 192.168.1.115, FULL_DUPLEX, 100Mbps

connecting to mischianti.org
HTTP/1.1 301 Moved Permanently
Connection: Keep-Alive
Keep-Alive: timeout=5, max=100
content-type: text/html
content-length: 3145
date: Fri, 02 Feb 2024 10:55:05 GMT
server: LiteSpeed
x-qc-pop: EU-FR-NTE-51
location: https://mischianti.org/

<!DOCTYPE html><html lang="en-US"><head>
<title> 301 Moved Permanently
</title>
<meta charset="utf-8"><meta name="viewport" content="width=device-width, initial-scale=1, shrink-to-fit=no">
<style>
*{box-sizing:border-box}.site-logo{max-width:100%;background-repeat:none;display:inline-block;height:45px;width:75px;margin:5px}body{font-family:-apple-system,system-ui,BlinkMacSystemFont,"Segoe UI",Helvetica,sans-serif,"Apple Color Emoji","Segoe UI Emoji","Segoe UI Symbol";margin:0;line-height:1.3;font-size:.95em}.text-center,h2{text-align:center;margin-top:1.5em;margin-bottom:.5em}h2{font-size:7em;color:#555;margin-top:0}h4{font-size:1.25em;font-weight:400;color:#6d6c64;margin-top:0}a{color:#36f;font-weight:600;word-break:break-word}.text-center{margin-bottom:3em}
</style>
</head>
<body style="background-color:#f7f9fb; display: flex; min-height: 100vh;flex-direction: column;">
<div style="display:flex;background-color:#004262;padding:8px"><a href="https://quic.cloud/" title="QUIC.cloud" rel="home"><div class="site-logo"><svg height="50" viewBox="0 0 75 50" width="75" xmlns="http://www.w3.org/2000/svg"><path d="m71.301 15.049c-2.885-3.792-7.072-6.232-11.791-6.872-3.709-.503-7.415.154-10.721 1.901-.44.232-.873.484-1.289.75l-1.486 1.117 3.835 5.041 1.169-.889c.236-.147.481-.288.73-.421 2.13-1.124 4.518-1.547 6.908-1.224 3.045.413 5.744 1.987 7.604 4.432 1.861 2.445 2.657 5.467 2.244 8.511-.853 6.283-6.663 10.7-12.942 9.849-2.389-.324-4.579-1.37-6.332-3.022-.209-.198-.407-.399-.59-.599l-14.45-18.99-.005.059-1.522-2-.165-.199c-.346-.385-.712-.76-1.086-1.111-2.838-2.677-6.382-4.369-10.249-4.895-10.162-1.38-19.56 5.769-20.939 15.935-1.38 10.164 5.768 19.558 15.934 20.937 3.868.525 7.733-.16 11.186-1.983.14-.074.275-.153.413-.229l-3.895-5.119c-2.14 1.006-4.493 1.377-6.852 1.057-6.706-.912-11.419-7.106-10.51-13.812.91-6.705 7.099-11.418 13.811-10.509 2.549.346 4.885 1.461 6.758 3.228.219.206.432.422.637.644l11.357 14.928.006-.061 4.612 6.062.158.193c.324.361.676.723 1.046 1.072 2.72 2.564 6.117 4.187 9.825 4.689.811.111 1.614.164 2.412.164 8.775-.002 16.444-6.504 17.658-15.438.642-4.718-.594-9.405-3.479-13.196z" fill="#97a3aa"/><path d="m40.375 40.139c-.059-.061-.123-.121-.179-.182l-7.318-9.609c-.318-.356-.665-.711-1.03-1.056-2.72-2.565-6.117-4.186-9.825-4.69-.354-.047-.707-.082-1.061-.108h-.542l2.7 3.533c.058.06.123.121.178.181l7.317 9.61c.319.355.665.711 1.03 1.055 2.72 2.564 6.117 4.188 9.825 4.689.354.049.707.082 1.061.109h.542z" fill="#9ff"/></svg></div></a><div style="margin-top:20px;margin-left:5px"><a href="https://quic.cloud/" title="QUIC.cloud" rel="home" style="color:#fff;font-size:1.25em;text-decoration:none">QUIC<span style="color:#f60">.</span><span style="color:#e4e4f1">cloud</span></a></a></div></div><div style="max-width:1140px;margin:auto;padding:0 1.6em 1.6em; display:flex; align-items: center;flex: 1;"><div style="color:#555"><div class="text-center"><h2>301</h2>
<h4>Moved Permanently
</h4>
<h4>The document has been permanently moved.</h4>
<p>This page is generated by <a href="https://quic.cloud/">QUIC.cloud</a> CDN on the EU-FR-NTE-51 server.</p>
</div></div></div></body></html>
closing connection
Connessione del dispositivo con la patch
Se applichi la patch, devi gestire lo stato di abilitazione dell’oscillatore al quarzo, devi impostare il GPIO17 come pin di alimentazione; questo trucco ti permette di avviare il dispositivo e, dopo l’operazione di boot del MCU, abilitare l’oscillatore al quarzo.
Probabilmente con una scheda di alta qualità, non ne hai bisogno.
/*
 This sketch shows how to use patched lan8720 with esp32

 Remeber you must connect the enable pin of Crystal Oscillator to the NC pin of the board

 by Renzo Mischianti <mischianti.org>
 */

// I²C-address of Ethernet PHY (0 or 1 for LAN8720, 31 for TLK110)
#define ETH_PHY_ADDR 1 						// DEFAULT VALUE IS 0 YOU CAN OMIT IT
// Pin# of the enable signal for the external crystal oscillator (-1 to disable for internal APLL source)
#define ETH_PHY_POWER 17 					// DEFAULT VALUE YOU CAN OMIT IT

#include <ETH.h>

static bool eth_connected = false;

void WiFiEvent(WiFiEvent_t event) {
	switch (event) {
	case ARDUINO_EVENT_ETH_START:
		Serial.println("ETH Started");
		ETH.setHostname("esp32-mischianti-eth");
		break;
	case ARDUINO_EVENT_ETH_CONNECTED:
		Serial.println("ETH Connected");
		break;
	case ARDUINO_EVENT_ETH_GOT_IP:
		Serial.print("ETH MAC: ");
		Serial.print(ETH.macAddress());
		Serial.print(", IPv4: ");
		Serial.print(ETH.localIP());
		if (ETH.fullDuplex()) {
			Serial.print(", FULL_DUPLEX");
		}
		Serial.print(", ");
		Serial.print(ETH.linkSpeed());
		Serial.println("Mbps");
		eth_connected = true;
		break;
	case ARDUINO_EVENT_ETH_DISCONNECTED:
		Serial.println("ETH Disconnected");
		eth_connected = false;
		break;
	case ARDUINO_EVENT_ETH_STOP:
		Serial.println("ETH Stopped");
		eth_connected = false;
		break;
	default:
		break;
	}
}

void testClient(const char *host, uint16_t port) {
	Serial.print("\nconnecting to ");
	Serial.println(host);

	WiFiClient client;
	if (!client.connect(host, port)) {
		Serial.println("connection failed");
		return;
	}
	client.printf("GET / HTTP/1.1\r\nHost: %s\r\n\r\n", host);
	while (client.connected() && !client.available())
		;
	while (client.available()) {
		Serial.write(client.read());
	}

	Serial.println("closing connection\n");
	client.stop();
}

void setup() {
	Serial.begin(115200);
	WiFi.onEvent(WiFiEvent);
	ETH.begin();
}

void loop() {
	if (eth_connected) {
		testClient("mischianti.org", 80);
	}
	delay(10000);

}
Effettuare una richiesta GET semplice
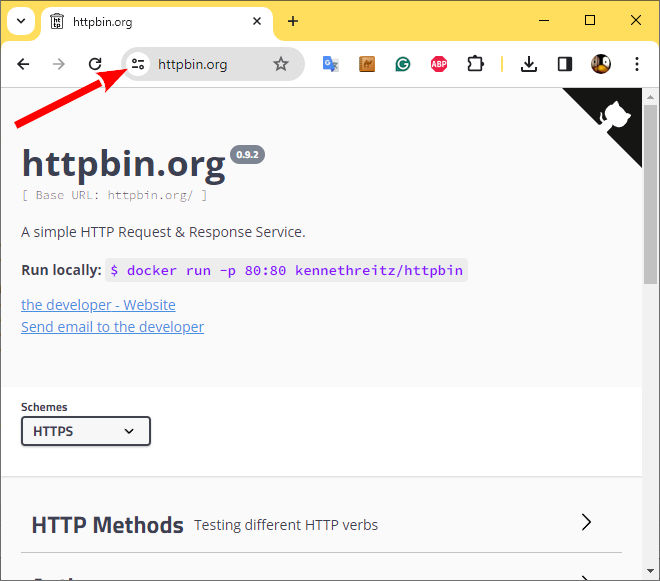
Prima di tutto, cercheremo di effettuare una semplice richiesta HTTP. Ho scelto un servizio online creato per testare questo tipo di richiesta per fare questo test.
Utilizzerò un servizio semplice fornito da httpbin.org, e puoi usare la stessa API REST in HTTP e HTTPS.
Ricorda che HTTP funziona sulla porta 80 e HTTPS sulla 443, quindi devi validare un certificato per interrogare l’endpoint sulla porta 443.
Ecco la semplice richiesta get
/*
 This sketch shows how to use patched lan8720 with esp32

 We are going to do a raw GET request to online service httpbin.org
 http://httpbin.org/get

 by Renzo Mischianti <mischianti.org>
 */


// I²C-address of Ethernet PHY (0 or 1 for LAN8720, 31 for TLK110)
#define ETH_PHY_ADDR 1 						// DEFAULT VALUE IS 0 YOU CAN OMIT IT
// Pin# of the enable signal for the external crystal oscillator (-1 to disable for internal APLL source)
#define ETH_PHY_POWER 17 					// DEFAULT VALUE YOU CAN OMIT IT

#include <ETH.h>

// if you don't want to use DNS (and reduce your sketch size)
// use the numeric IP instead of the name for the server:
//IPAddress server(74,125,232,128);  // numeric IP for Google (no DNS)
//char server[] = "www.google.com";    // name address for Google (using DNS)
char server[] = "httpbin.org";    // name address for Google (using DNS)

// Initialize the Ethernet client library
WiFiClient client;

// Variables to measure the speed
unsigned long beginMicros, endMicros;
unsigned long byteCount = 0;
bool printWebData = true;  // set to false for better speed measurement

static bool eth_connected = false;

void WiFiEvent(WiFiEvent_t event) {
	switch (event) {
	case ARDUINO_EVENT_ETH_START:
		Serial.println("ETH Started");
		ETH.setHostname("esp32-mischianti-eth");
		break;
	case ARDUINO_EVENT_ETH_CONNECTED:
		Serial.println("ETH Connected");
		break;
	case ARDUINO_EVENT_ETH_GOT_IP:
		Serial.println();
		Serial.print("ETH MAC: ");
		Serial.print(ETH.macAddress());
		Serial.print(", IPv4: ");
		Serial.print(ETH.localIP());
		if (ETH.fullDuplex()) {
			Serial.print(", FULL_DUPLEX");
		}
		Serial.print(", ");
		Serial.print(ETH.linkSpeed());
		Serial.println("Mbps");
		eth_connected = true;
		break;
	case ARDUINO_EVENT_ETH_DISCONNECTED:
		Serial.println("ETH Disconnected");
		eth_connected = false;
		break;
	case ARDUINO_EVENT_ETH_STOP:
		Serial.println("ETH Stopped");
		eth_connected = false;
		break;
	default:
		break;
	}
}

void setup() {
	Serial.begin(115200);
	WiFi.onEvent(WiFiEvent);
	ETH.begin();

	while (!eth_connected) {
		Serial.print(".");
		delay(100);
	}

	// if you get a connection, report back via serial:
	if (client.connect(server, 80)) {
		Serial.println("Connected!");
		// Make a HTTP request:
		client.println("GET /get HTTP/1.1");
		client.println("Host: httpbin.org");
		client.println("Connection: close");
		client.println();
	} else {
		// if you didn't get a connection to the server:
		Serial.println("connection failed");
	}
	beginMicros = micros();

}

void loop() {
	  // if there are incoming bytes available
	  // from the server, read them and print them:
	  int len = client.available();
	  if (len > 0) {
	    byte buffer[80];
	    if (len > 80) len = 80;
	    client.read(buffer, len);
	    if (printWebData) {
	      Serial.write(buffer, len); // show in the serial monitor (slows some boards)
	    }
	    byteCount = byteCount + len;
	  }

	  // if the server's disconnected, stop the client:
	  if (len == 0 && !client.connected()) {
	    endMicros = micros();
	    Serial.println();
	    Serial.println("disconnecting.");
	    client.stop();
	    Serial.print("Received ");
	    Serial.print(byteCount);
	    Serial.print(" bytes in ");
	    float seconds = (float)(endMicros - beginMicros) / 1000000.0;
	    Serial.print(seconds, 4);
	    float rate = (float)byteCount / seconds / 1000.0;
	    Serial.print(", rate = ");
	    Serial.print(rate);
	    Serial.print(" kbytes/second");
	    Serial.println();

	    // do nothing forevermore:
	    while (true) {
	      delay(1);
	    }
	  }
}
E questo è il risultato.
ETH Started
ETH Connected
...........
ETH MAC: B8:D6:1A:68:E5:7F, IPv4: 192.168.1.115, FULL_DUPLEX, 100Mbps
Connected!
HTTP/1.1 200 OK
Date: Fri, 02 Feb 2024 15:44:00 GMT
Content-Type: application/json
Content-Length: 199
Connection: close
Server: gunicorn/19.9.0
Access-Control-Allow-Origin: *
Access-Control-Allow-Credentials: true

{
  "args": {},
  "headers": {
    "Host": "httpbin.org",
    "X-Amzn-Trace-Id": "Root=1-65bd0dc0-4ea2c7a33ad187b40ac5cda8"
  },
  "origin": "84.221.199.122",
  "url": "http://httpbin.org/get"
}

disconnecting.
Received 424 bytes in 0.2767, rate = 1.53 kbytes/second
Ora, una richiesta HTTPS.
Se cambiamo solo la porta da
if (client.connect(server, 80)) {
to
if (client.connect(server, 443)) {
riceviamo un errore esplicito come questo.
ETH Started
ETH Connected
.
ETH MAC: B8:D6:1A:68:E5:7F, IPv4: 192.168.1.115, FULL_DUPLEX, 100Mbps
Connected!
HTTP/1.1 400 Bad Request
Server: awselb/2.0
Date: Fri, 02 Feb 2024 16:25:02 GMT
Content-Type: text/html
Content-Length: 220
Connection: close

<html>
<head><title>400 The plain HTTP request was sent to HTTPS port</title></head>
<body>
<center><h1>400 Bad Request</h1></center>
<center>The plain HTTP request was sent to HTTPS port</center>
</body>
</html>

disconnecting.
Received 370 bytes in 0.2764, rate = 1.34 kbytes/second
Prima di tutto, dobbiamo usare il WiFiClientSecure che implementa lo strato SSL. Ma se sostituisci la linea
// Initialize the Ethernet client library
WiFiClient client;
con
// Initialize the Ethernet client library
WiFiClientSecure client;
otteniamo
ETH Started
ETH Connected
.
ETH MAC: B8:D6:1A:68:E5:7F, IPv4: 192.168.1.115, FULL_DUPLEX, 100Mbps
connection failed

disconnecting.
Received 0 bytes in 0.0000, rate = 0.00 kbytes/second
Questo perché lo strato SSL necessita di validare il server remoto tramite l’Autorità di Certificazione, ma se sei una brutta persona, puoi chiedere alla libreria di evitare il controllo del certificato con questo comando.
client.setInsecure();
Lo sketch completo diventa.
/*
 This sketch shows how to use patched lan8720 with esp32

 We are going to do a raw GET request to online service httpbin.org
 http://httpbin.org/get

 by Renzo Mischianti <mischianti.org>
 */


// I²C-address of Ethernet PHY (0 or 1 for LAN8720, 31 for TLK110)
#define ETH_PHY_ADDR 1 						// DEFAULT VALUE IS 0 YOU CAN OMIT IT
// Pin# of the enable signal for the external crystal oscillator (-1 to disable for internal APLL source)
#define ETH_PHY_POWER 17 					// DEFAULT VALUE YOU CAN OMIT IT

#include <ETH.h>
#include <WiFiClientSecure.h>

// if you don't want to use DNS (and reduce your sketch size)
// use the numeric IP instead of the name for the server:
//IPAddress server(74,125,232,128);  // numeric IP for Google (no DNS)
//char server[] = "www.google.com";    // name address for Google (using DNS)
char server[] = "httpbin.org";    // name address for Google (using DNS)

// Initialize the Ethernet client library
WiFiClientSecure client;

// Variables to measure the speed
unsigned long beginMicros, endMicros;
unsigned long byteCount = 0;
bool printWebData = true;  // set to false for better speed measurement

static bool eth_connected = false;

void WiFiEvent(WiFiEvent_t event) {
	switch (event) {
	case ARDUINO_EVENT_ETH_START:
		Serial.println("ETH Started");
		ETH.setHostname("esp32-mischianti-eth");
		break;
	case ARDUINO_EVENT_ETH_CONNECTED:
		Serial.println("ETH Connected");
		break;
	case ARDUINO_EVENT_ETH_GOT_IP:
		Serial.println();
		Serial.print("ETH MAC: ");
		Serial.print(ETH.macAddress());
		Serial.print(", IPv4: ");
		Serial.print(ETH.localIP());
		if (ETH.fullDuplex()) {
			Serial.print(", FULL_DUPLEX");
		}
		Serial.print(", ");
		Serial.print(ETH.linkSpeed());
		Serial.println("Mbps");
		eth_connected = true;
		break;
	case ARDUINO_EVENT_ETH_DISCONNECTED:
		Serial.println("ETH Disconnected");
		eth_connected = false;
		break;
	case ARDUINO_EVENT_ETH_STOP:
		Serial.println("ETH Stopped");
		eth_connected = false;
		break;
	default:
		break;
	}
}

void setup() {
	Serial.begin(115200);
	WiFi.onEvent(WiFiEvent);
	ETH.begin();

	while (!eth_connected) {
		Serial.print(".");
		delay(100);
	}

	client.setInsecure();

	// if you get a connection, report back via serial:
	if (client.connect(server, 443)) {
		Serial.println("Connected!");
		// Make a HTTP request:
		client.println("GET /get HTTP/1.1");
		client.println("Host: httpbin.org");
		client.println("Connection: close");
		client.println();
	} else {
		// if you didn't get a connection to the server:
		Serial.println("connection failed");
	}
	beginMicros = micros();

}

void loop() {
	  // if there are incoming bytes available
	  // from the server, read them and print them:
	  int len = client.available();
	  if (len > 0) {
	    byte buffer[80];
	    if (len > 80) len = 80;
	    client.read(buffer, len);
	    if (printWebData) {
	      Serial.write(buffer, len); // show in the serial monitor (slows some boards)
	    }
	    byteCount = byteCount + len;
	  }

	  // if the server's disconnected, stop the client:
	  if (len == 0 && !client.connected()) {
	    endMicros = micros();
	    Serial.println();
	    Serial.println("disconnecting.");
	    client.stop();
	    Serial.print("Received ");
	    Serial.print(byteCount);
	    Serial.print(" bytes in ");
	    float seconds = (float)(endMicros - beginMicros) / 1000000.0;
	    Serial.print(seconds, 4);
	    float rate = (float)byteCount / seconds / 1000.0;
	    Serial.print(", rate = ");
	    Serial.print(rate);
	    Serial.print(" kbytes/second");
	    Serial.println();

	    // do nothing forevermore:
	    while (true) {
	      delay(1);
	    }
	  }

}
E ora il risultato è questo.
ETH Started
ETH Connected
..........
ETH MAC: B8:D6:1A:68:E5:7F, IPv4: 192.168.1.115, FULL_DUPLEX, 100Mbps
Connected!
HTTP/1.1 200 OK
Date: Fri, 02 Feb 2024 16:36:00 GMT
Content-Type: application/json
Content-Length: 200
Connection: close
Server: gunicorn/19.9.0
Access-Control-Allow-Origin: *
Access-Control-Allow-Credentials: true

{
  "args": {},
  "headers": {
    "Host": "httpbin.org",
    "X-Amzn-Trace-Id": "Root=1-65bd19f0-36775c160826895f26d52da8"
  },
  "origin": "84.221.199.122",
  "url": "https://httpbin.org/get"
}

disconnecting.
Received 425 bytes in 0.1594, rate = 2.67 kbytes/second
Ok, ora proviamo ad essere dalla parte dei buoni; stiamo per scaricare il certificato dell’Autorità di Certificazione per validare l’host.
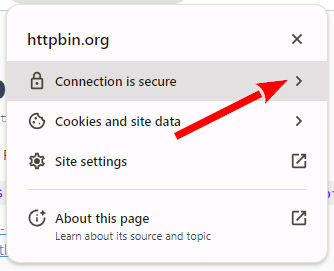
Quindi, nella pagina di httpbin, clicca sulla configurazione del sito.
Poi devi selezionare le informazioni sulla connessione.
Ora clicca su certificato.
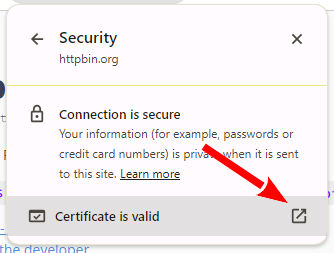
E infine seleziona la linea in cima alla lista (il certificato radice).
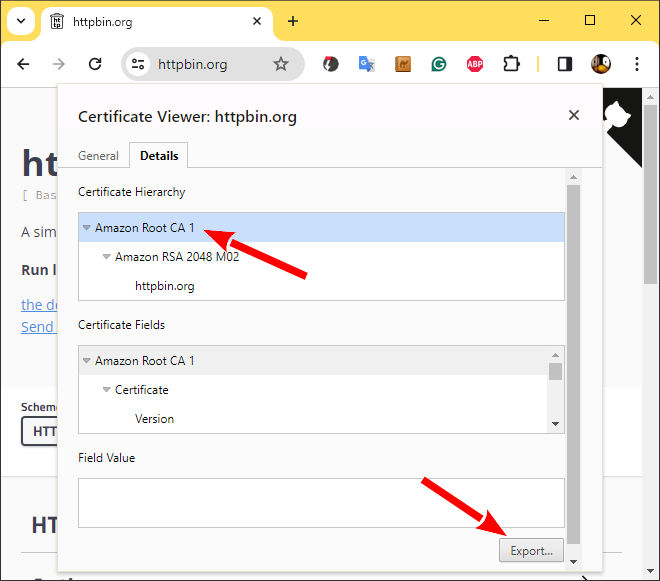
Esporta il certificato e apri il file, copia il contenuto e inseriscilo in una variabile array di char.
const char* rootCA= R""""(-----BEGIN CERTIFICATE-----
MIIDQTCCAimgAwIBAgITBmyfz5m/jAo54vB4ikPmljZbyjANBgkqhkiG9w0BAQsF
ADA5MQswCQYDVQQGEwJVUzEPMA0GA1UEChMGQW1hem9uMRkwFwYDVQQDExBBbWF6
b24gUm9vdCBDQSAxMB4XDTE1MDUyNjAwMDAwMFoXDTM4MDExNzAwMDAwMFowOTEL
MAkGA1UEBhMCVVMxDzANBgNVBAoTBkFtYXpvbjEZMBcGA1UEAxMQQW1hem9uIFJv
b3QgQ0EgMTCCASIwDQYJKoZIhvcNAQEBBQADggEPADCCAQoCggEBALJ4gHHKeNXj
ca9HgFB0fW7Y14h29Jlo91ghYPl0hAEvrAIthtOgQ3pOsqTQNroBvo3bSMgHFzZM
9O6II8c+6zf1tRn4SWiw3te5djgdYZ6k/oI2peVKVuRF4fn9tBb6dNqcmzU5L/qw
IFAGbHrQgLKm+a/sRxmPUDgH3KKHOVj4utWp+UhnMJbulHheb4mjUcAwhmahRWa6
VOujw5H5SNz/0egwLX0tdHA114gk957EWW67c4cX8jJGKLhD+rcdqsq08p8kDi1L
93FcXmn/6pUCyziKrlA4b9v7LWIbxcceVOF34GfID5yHI9Y/QCB/IIDEgEw+OyQm
jgSubJrIqg0CAwEAAaNCMEAwDwYDVR0TAQH/BAUwAwEB/zAOBgNVHQ8BAf8EBAMC
AYYwHQYDVR0OBBYEFIQYzIU07LwMlJQuCFmcx7IQTgoIMA0GCSqGSIb3DQEBCwUA
A4IBAQCY8jdaQZChGsV2USggNiMOruYou6r4lK5IpDB/G/wkjUu0yKGX9rbxenDI
U5PMCCjjmCXPI6T53iHTfIUJrU6adTrCC2qJeHZERxhlbI1Bjjt/msv0tadQ1wUs
N+gDS63pYaACbvXy8MWy7Vu33PqUXHeeE6V/Uq2V8viTO96LXFvKWlJbYK8U90vv
o/ufQJVtMVT8QtPHRh8jrdkPSHCa2XV4cdFyQzR1bldZwgJcJmApzyMZFo6IQ6XU
5MsI+yMRQ+hDKXJioaldXgjUkK642M4UwtBV8ob2xJNDd2ZhwLnoQdeXeGADbkpy
rqXRfboQnoZsG4q5WTP468SQvvG5
-----END CERTIFICATE-----)"""";
Ora possiamo impostare il certificato dell’Autorità di Certificazione, necessario per validare il server httpbin sul WiFiClientSecure per poter effettuare il controllo.
Il codice diventa quindi.
/*
 This sketch shows how to use patched lan8720 with esp32

 We are going to do a raw GET request to online service httpbin.org
 http://httpbin.org/get

 by Renzo Mischianti <mischianti.org>
 */


// I²C-address of Ethernet PHY (0 or 1 for LAN8720, 31 for TLK110)
#define ETH_PHY_ADDR 1 						// DEFAULT VALUE IS 0 YOU CAN OMIT IT
// Pin# of the enable signal for the external crystal oscillator (-1 to disable for internal APLL source)
#define ETH_PHY_POWER 17 					// DEFAULT VALUE YOU CAN OMIT IT

#include <ETH.h>
#include <WiFiClientSecure.h>

// if you don't want to use DNS (and reduce your sketch size)
// use the numeric IP instead of the name for the server:
//IPAddress server(74,125,232,128);  // numeric IP for Google (no DNS)
//char server[] = "www.google.com";    // name address for Google (using DNS)
char server[] = "httpbin.org";    // name address for Google (using DNS)

const char* rootCA= R""""(-----BEGIN CERTIFICATE-----
MIIDQTCCAimgAwIBAgITBmyfz5m/jAo54vB4ikPmljZbyjANBgkqhkiG9w0BAQsF
ADA5MQswCQYDVQQGEwJVUzEPMA0GA1UEChMGQW1hem9uMRkwFwYDVQQDExBBbWF6
b24gUm9vdCBDQSAxMB4XDTE1MDUyNjAwMDAwMFoXDTM4MDExNzAwMDAwMFowOTEL
MAkGA1UEBhMCVVMxDzANBgNVBAoTBkFtYXpvbjEZMBcGA1UEAxMQQW1hem9uIFJv
b3QgQ0EgMTCCASIwDQYJKoZIhvcNAQEBBQADggEPADCCAQoCggEBALJ4gHHKeNXj
ca9HgFB0fW7Y14h29Jlo91ghYPl0hAEvrAIthtOgQ3pOsqTQNroBvo3bSMgHFzZM
9O6II8c+6zf1tRn4SWiw3te5djgdYZ6k/oI2peVKVuRF4fn9tBb6dNqcmzU5L/qw
IFAGbHrQgLKm+a/sRxmPUDgH3KKHOVj4utWp+UhnMJbulHheb4mjUcAwhmahRWa6
VOujw5H5SNz/0egwLX0tdHA114gk957EWW67c4cX8jJGKLhD+rcdqsq08p8kDi1L
93FcXmn/6pUCyziKrlA4b9v7LWIbxcceVOF34GfID5yHI9Y/QCB/IIDEgEw+OyQm
jgSubJrIqg0CAwEAAaNCMEAwDwYDVR0TAQH/BAUwAwEB/zAOBgNVHQ8BAf8EBAMC
AYYwHQYDVR0OBBYEFIQYzIU07LwMlJQuCFmcx7IQTgoIMA0GCSqGSIb3DQEBCwUA
A4IBAQCY8jdaQZChGsV2USggNiMOruYou6r4lK5IpDB/G/wkjUu0yKGX9rbxenDI
U5PMCCjjmCXPI6T53iHTfIUJrU6adTrCC2qJeHZERxhlbI1Bjjt/msv0tadQ1wUs
N+gDS63pYaACbvXy8MWy7Vu33PqUXHeeE6V/Uq2V8viTO96LXFvKWlJbYK8U90vv
o/ufQJVtMVT8QtPHRh8jrdkPSHCa2XV4cdFyQzR1bldZwgJcJmApzyMZFo6IQ6XU
5MsI+yMRQ+hDKXJioaldXgjUkK642M4UwtBV8ob2xJNDd2ZhwLnoQdeXeGADbkpy
rqXRfboQnoZsG4q5WTP468SQvvG5
-----END CERTIFICATE-----)"""";

// Initialize the Ethernet client library
WiFiClientSecure client;

// Variables to measure the speed
unsigned long beginMicros, endMicros;
unsigned long byteCount = 0;
bool printWebData = true;  // set to false for better speed measurement

static bool eth_connected = false;

void WiFiEvent(WiFiEvent_t event) {
	switch (event) {
	case ARDUINO_EVENT_ETH_START:
		Serial.println("ETH Started");
		ETH.setHostname("esp32-mischianti-eth");
		break;
	case ARDUINO_EVENT_ETH_CONNECTED:
		Serial.println("ETH Connected");
		break;
	case ARDUINO_EVENT_ETH_GOT_IP:
		Serial.println();
		Serial.print("ETH MAC: ");
		Serial.print(ETH.macAddress());
		Serial.print(", IPv4: ");
		Serial.print(ETH.localIP());
		if (ETH.fullDuplex()) {
			Serial.print(", FULL_DUPLEX");
		}
		Serial.print(", ");
		Serial.print(ETH.linkSpeed());
		Serial.println("Mbps");
		eth_connected = true;
		break;
	case ARDUINO_EVENT_ETH_DISCONNECTED:
		Serial.println("ETH Disconnected");
		eth_connected = false;
		break;
	case ARDUINO_EVENT_ETH_STOP:
		Serial.println("ETH Stopped");
		eth_connected = false;
		break;
	default:
		break;
	}
}

void setup() {
	Serial.begin(115200);
	WiFi.onEvent(WiFiEvent);
	ETH.begin();

	while (!eth_connected) {
		Serial.print(".");
		delay(100);
	}

	client.setCACert(rootCA);

	// if you get a connection, report back via serial:
	if (client.connect(server, 443)) {
		Serial.println("Connected!");
		// Make a HTTP request:
		client.println("GET /get HTTP/1.1");
		client.println("Host: httpbin.org");
		client.println("Connection: close");
		client.println();
	} else {
		// if you didn't get a connection to the server:
		Serial.println("connection failed");
	}
	beginMicros = micros();

}

void loop() {
	  // if there are incoming bytes available
	  // from the server, read them and print them:
	  int len = client.available();
	  if (len > 0) {
	    byte buffer[80];
	    if (len > 80) len = 80;
	    client.read(buffer, len);
	    if (printWebData) {
	      Serial.write(buffer, len); // show in the serial monitor (slows some boards)
	    }
	    byteCount = byteCount + len;
	  }

	  // if the server's disconnected, stop the client:
	  if (len == 0 && !client.connected()) {
	    endMicros = micros();
	    Serial.println();
	    Serial.println("disconnecting.");
	    client.stop();
	    Serial.print("Received ");
	    Serial.print(byteCount);
	    Serial.print(" bytes in ");
	    float seconds = (float)(endMicros - beginMicros) / 1000000.0;
	    Serial.print(seconds, 4);
	    float rate = (float)byteCount / seconds / 1000.0;
	    Serial.print(", rate = ");
	    Serial.print(rate);
	    Serial.print(" kbytes/second");
	    Serial.println();

	    // do nothing forevermore:
	    while (true) {
	      delay(1);
	    }
	  }
}
Il risultato è lo stesso, ma il mondo ha bisogno di tante persone per bene.
Grazie
- ESP32: piedinatura, specifiche e configurazione dell’Arduino IDE
- ESP32: fileSystem integrato SPIFFS
- ESP32: gestire più seriali e logging per il debug
- ESP32 risparmio energetico pratico
- ESP32 risparmio energetico pratico: gestire WiFi e CPU
- ESP32 risparmio energetico pratico: modem e light sleep
- ESP32 risparmio energetico pratico: deep sleep e ibernazione
- ESP32 risparmio energetico pratico: preservare dati al riavvio, sveglia a tempo e tramite tocco
- ESP32 risparmio energetico pratico: sveglia esterna e da ULP
- ESP32 risparmio energetico pratico: sveglia da UART e GPIO
- ESP32: filesystem integrato LittleFS
- ESP32: filesystem integrato FFat (Fat/exFAT)
- ESP32-wroom-32
- ESP32-CAM
- ESP32: ethernet w5500 con chiamate standard (HTTP) e SSL (HTTPS)
- ESP32: ethernet enc28j60 con chiamate standard (HTTP) e SSL (HTTPS)
- Come usare la scheda SD con l’esp32
- esp32 e esp8266: file system FAT su memoria SPI flash esterna
- Gestione aggiornamenti firmware e OTA
- Gestione del firmware
- Aggiornamento OTA con Arduino IDE
- Aggiornamento OTA con browser web
- Aggiornamenti automatici OTA da un server HTTP
- Aggiornamento del firmware non standard
- Integrare LAN8720 con ESP32 per la connettività Ethernet con plain (HTTP) e SSL (HTTPS)
- Collegare l’EByte E70 (CC1310) ai dispositivi ESP32 c3/s3 ed un semplice sketch di esempio
- ESP32-C3: piedinatura, specifiche e configurazione dell’IDE Arduino
- Integrazione del modulo W5500 su ESP32 con Core 3: supporto nativo ai protocolli Ethernet con SSL e altre funzionalità
- Integrazione del modulo LAN8720 su ESP32 con Core 3: supporto nativo del protocollo Ethernet con SSL e altre funzionalità.
- Dallas DS18B20
- Guida all’I2C su ESP32: comunicazione con dispositivi eterogenei 5v 3.3v, gestione interfacce aggiuntive
- Display
- Guida Completa: Come Usare un Display ILI9341 con la Libreria TFT_eSPI
- Come integrare la funzionalità touch screen nel display TFT ILI9341
- Display eInk SSD1683 con GxEPD e ESP32 (e HMI CrowPanel 4,2″): nozioni di base e configurazione