Aggiornamento automatico Firmware OTA dell’ESP32 dal server con controllo della versione – 2
Nel mondo in rapida evoluzione degli Internet of Things (IoT), mantenere il firmware aggiornato è fondamentale per garantire la sicurezza, la stabilità e la funzionalità dei sistemi connessi.
Un microcontroller potente e versatile che ha guadagnato popolarità nella comunità IoT è l’ESP32, che offre una vasta gamma di funzionalità sia per gli appassionati che per i professionisti.
Un aspetto essenziale della manutenzione di una rete IoT è la capacità di eseguire aggiornamenti firmware Over-the-Air (OTA), che permettono ai dispositivi di ricevere nuovo software senza richiedere interventi fisici.
In questo articolo, esploreremo un metodo robusto ed efficiente per implementare l’aggiornamento firmware self OTA per l’ESP32, completo di un meccanismo di controllo della versione che consentirà ai vostri dispositivi di scaricare e installare automaticamente gli aggiornamenti più recenti da un server designato. Ciò vi farà risparmiare tempo e risorse e contribuirà a un ecosistema IoT più resiliente e adattabile.
Prima di tutto, controlla il tutorial “ESP32: flash del firmware binario compilato (.bin)“.
Ecco una selezione di dispositivi esp32 ESP32 Dev Kit v1 - TTGO T-Display 1.14 ESP32 - NodeMCU V3 V2 ESP8266 Lolin32 - NodeMCU ESP-32S - WeMos Lolin32 - WeMos Lolin32 mini - ESP32-CAM programmer - ESP32-CAM bundle - ESP32-WROOM-32 - ESP32-S
Aggiornamenti condizionali OTA (controllo versione) con REST
Possiamo utilizzare un firmware di aggiornamento più complesso e possiamo passare la versione del firmware da controllare,
t_httpUpdate_return ret = httpUpdate.update(client, "192.168.1.125", 3000, "/update", FIRMWARE_VERSION);
con FIRMWARE_VERSION uguale a 0.2.
Questa chiamata trasporta una serie di informazioni nell’intestazione della chiamata, quindi se controlliamo l’intestazione ricevuta dall’aggiornamento GET
app.get('/update', (request, response) => {
    console.log("List of headers", request.headers);
});
possiamo trovare questi valori
host = "192.168.1.70:3000"
user-agent = "ESP32-http-Update"
connection = "close"
cache-control = "no-cache"
x-esp32-sta-mac = "30:AE:A4:F4:7C:38"
x-esp32-ap-mac = "30:AE:A4:F4:7C:39"
x-esp32-free-space = "1310720"
x-esp32-sketch-size = "731136"
x-esp32-sketch-md5 = "b91170ed29a37d086b1f22e55750af43"
x-esp32-sketch-sha256 = "716398C33FFC451B000B3F4664BD568CCABA49FC36A21CFA426E982305BC2D90"
x-esp32-chip-size = "4194304"
x-esp32-sdk-version = "v3.3.5-1-g85c43024c"
x-esp32-mode = "sketch"
x-esp32-version = "0.2"
In questo caso, controlliamo solo la versione x-esp32, ma alcune informazioni come lo spazio libero e la versione dell’SDK possono essere molto utili.
Endpoint di aggiornamento con il controllo della versione
Ora aggiungiamo un endpoint di aggiornamento
const express = require('express');
const { networkInterfaces } = require('os');
const path = require('path');

const app = express();
const nets = networkInterfaces();

// Server port
const PORT = 3000;

app.get('/', (request, response) => response.send('Hello from www.mischianti.org!'));

let downloadCounter = 1;
const LAST_VERSION = 0.3;
app.get('/update', (request, response) => {
    const version = (request.header("x-esp32-version"))?parseFloat(request.header("x-esp32-version")):Infinity;

    if (version<LAST_VERSION){
        // If you need an update go here
        response.status(200).download(path.join(__dirname, 'firmware/httpUpdateNew.bin'), 'httpUpdateNew.bin', (err)=>{
            if (err) {
                console.error("Problem on download firmware: ", err)
            }else{
                downloadCounter++;
            }
        });
        console.log('Your file has been downloaded '+downloadCounter+' times!')
    }else{
        response.status(304).send('No update needed!')
    }
});


app.listen(PORT, () => {
    const results = {}; // Or just '{}', an empty object

    for (const name of Object.keys(nets)) {
        for (const net of nets[name]) {
            // Skip over non-IPv4 and internal (i.e. 127.0.0.1) addresses
            if (net.family === 'IPv4' && !net.internal) {
                if (!results[name]) {
                    results[name] = [];
                }
                results[name].push(net.address);
            }
        }
    }

    console.log('Listening on port '+PORT+'\n', results)
});
E generiamo un nuovo file binario compilato con la versione 0.3 e lo mettiamo sul server
[SETUP] WAIT 4...
[SETUP] WAIT 3...
[SETUP] WAIT 2...
[SETUP] WAIT 1...
Firmware version 0.2
Update start now!
HTTP_UPDATE_OK
ets Jun  8 2016 00:22:57

rst:0xc (SW_CPU_RESET),boot:0x13 (SPI_FAST_FLASH_BOOT)
configsip: 0, SPIWP:0xee
clk_drv:0x00,q_drv:0x00,d_drv:0x00,cs0_drv:0x00,hd_drv:0x00,wp_drv:0x00
mode:DIO, clock div:1
load:0x3fff0018,len:4
load:0x3fff001c,len:1216
ho 0 tail 12 room 4
load:0x40078000,len:10944
load:0x40080400,len:6388
entry 0x400806b4


[SETUP] WAIT 4...
[SETUP] WAIT 3...
[SETUP] WAIT 2...
[SETUP] WAIT 1...
Firmware version 0.3
Conditionally FileSystem OTA (version control) updates with REST
In the same manner, we can manage filesystem updates. We are going fast now because It’s the same logic of firmware update.
Generare il file binario del FileSystem
Per gestire il filesystem, possiamo utilizzare allo stesso modo, ma prima devi leggere una delle seguenti guide:
- ESP32: fileSystem integrato SPIFFS
- ESP32: filesystem integrato LittleFS
- ESP32: filesystem integrato FFat (FAT/exFAT)
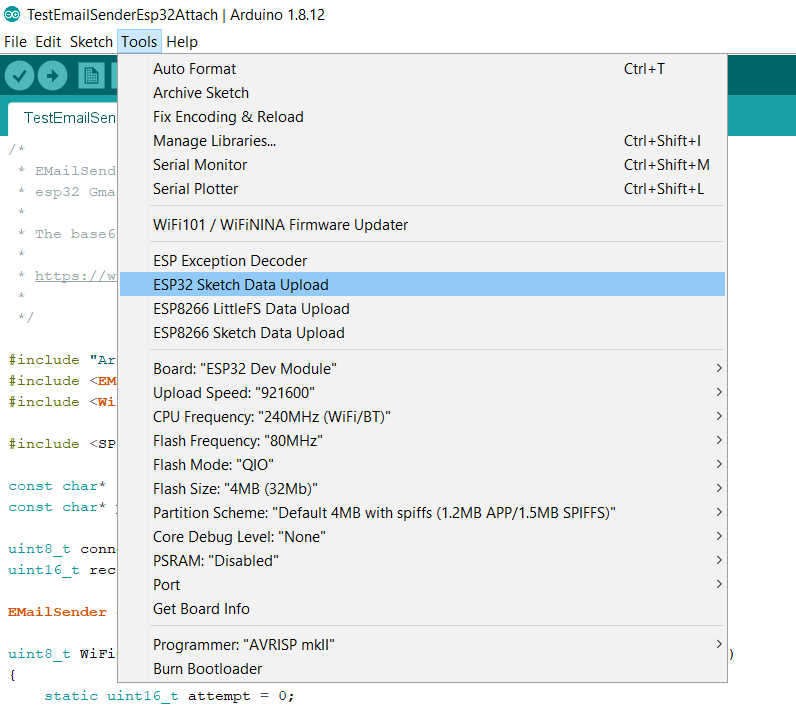
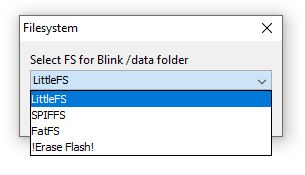
Dopo tale operazione, puoi utilizzare il plug-in come al solito.
Ora aggiungeremo la directory data alla cartella dello sketch e creeremo un file version.txt con questo contenuto
0.2
e usa il plugin per caricare.
Puoi controllare l’output della console per verificare cosa è successo.
Chip : esp32
Using partition scheme from Arduino IDE.
Start: 0x290000
Size : 0x170000
mkspiffs : C:\Users\renzo\AppData\Local\Arduino15\packages\esp32\tools\mkspiffs\0.2.3\mkspiffs.exe

espota : C:\Users\renzo\AppData\Local\Arduino15\packages\esp32\hardware\esp32\2.0.0\tools\espota.exe

[SPIFFS] data   : D:\Projects\Arduino\sloeber-workspace-OTA\ArduinoOTAesp32_basic_arduino\data
[SPIFFS] offset : 0
[SPIFFS] start  : 2686976
[SPIFFS] size   : 1472
[SPIFFS] page   : 256
[SPIFFS] block  : 4096
->/version.txt
[SPIFFS] upload : C:\Users\renzo\AppData\Local\Temp\arduino_build_258074/ArduinoOTAesp32_basic_arduino.spiffs.bin
[SPIFFS] IP     : 192.168.1.186
Running: C:\Users\renzo\AppData\Local\Arduino15\packages\esp32\hardware\esp32\2.0.0\tools\espota.exe -i 192.168.1.186 -p 3232 -s -f C:\Users\renzo\AppData\Local\Temp\arduino_build_258074/ArduinoOTAesp32_basic_arduino.spiffs.bin

_>Sending invitation to 192.168.1.186
_>Uploading................................................................................................................................................................................................................................................................................................................................................................................................................................................................................................................................................................................................................................................................................................................................................................................................................................................................................................................................................................................................................................................................................................................................................................................................................................................................................................................................................................................................................................................................................................................................
_>09:21:38 [ERROR]: Error response from device
SPIFFS Upload failed!
La console IDE restituisce un errore, ma il caricamento funziona, penso che ci sia un piccolo bug ora quando scrivo questo articolo.
IDE gives an error but it is a bug, the loading works correctly
È possibile recuperare il file bin del file system da questa riga
[SPIFFS] upload : C:\Users\renzo\AppData\Local\Temp\arduino_build_258074/ArduinoOTAesp32_basic_arduino.spiffs.bin
Creiamo lo sketch
Ora andiamo a modificare lo sketch già utilizzato per il firmware.
/*
 * ESP32 Sketch for update of filesystem with version control
 *
 * Renzo Mischianti <www.mischianti.org>
 *
 * https://mischianti.org
*/

#include <Arduino.h>

#include <WiFi.h>
#include <WiFiMulti.h>

#include <HTTPClient.h>
#include <HTTPUpdate.h>

#include <SPIFFS.h>

#ifndef APSSID
#define APSSID "<YOUR-SSID>"
#define APPSK  "<YOUR-PASSWD>"
#endif

WiFiMulti WiFiMulti;

#define FIRMWARE_VERSION "0.2"
String FILESYSTEM_VERSION = "0.0";

void setup() {

  Serial.begin(115200);
  // Serial.setDebugOutput(true);

  Serial.println();
  Serial.println();
  Serial.println();

  for (uint8_t t = 4; t > 0; t--) {
    Serial.printf("[SETUP] WAIT %d...\n", t);
    Serial.flush();
    delay(1000);
  }

  WiFi.mode(WIFI_STA);
  WiFiMulti.addAP(APSSID, APPSK);

  Serial.print(F("Firmware version "));
  Serial.println(FIRMWARE_VERSION);
  delay(2000);

  Serial.print(F("Inizializing FS..."));
  if (SPIFFS.begin()){
      Serial.println(F("done."));
  }else{
      Serial.println(F("fail."));
  }

  Serial.print(F("FileSystem version "));
  File versionFile = SPIFFS.open(F("/version.txt"), "r");
  if (versionFile) {
	  FILESYSTEM_VERSION = versionFile.readString();
	  versionFile.close();
  }
  Serial.println(FILESYSTEM_VERSION);
}

void loop() {
  // wait for WiFi connection
  if ((WiFiMulti.run() == WL_CONNECTED)) {

    WiFiClient client;

    // The line below is optional. It can be used to blink the LED on the board during flashing
    // The LED will be on during download of one buffer of data from the network. The LED will
    // be off during writing that buffer to flash
    // On a good connection the LED should flash regularly. On a bad connection the LED will be
    // on much longer than it will be off. Other pins than LED_BUILTIN may be used. The second
    // value is used to put the LED on. If the LED is on with HIGH, that value should be passed
    // httpUpdate.setLedPin(LED_BUILTIN, LOW);

    httpUpdate.rebootOnUpdate(false); // remove automatic update

    Serial.println(F("Update start now!"));

    t_httpUpdate_return ret = httpUpdate.updateSpiffs(client, "http://192.168.1.70:3000/updateFS", FILESYSTEM_VERSION);

    switch (ret) {
      case HTTP_UPDATE_FAILED:
        Serial.printf("HTTP_UPDATE_FAILD Error (%d): %s\n", httpUpdate.getLastError(), httpUpdate.getLastErrorString().c_str());
        Serial.println(F("Retry in 10secs!"));
        delay(10000); // Wait 10secs
        break;

      case HTTP_UPDATE_NO_UPDATES:
        Serial.println("HTTP_UPDATE_NO_UPDATES");
        break;

      case HTTP_UPDATE_OK:
        Serial.println("HTTP_UPDATE_OK");
        delay(1000); // Wait a second and restart
        ESP.restart();
        break;
    }
  }
}
Recupero la versione del filesystem da il file version.txt e inserirlo nella variabile FILESYSTEM_VERSION.
  Serial.print(F("Inizializing FS..."));
  if (SPIFFS.begin()){
      Serial.println(F("done."));
  }else{
      Serial.println(F("fail."));
  }

  Serial.print(F("FileSystem version "));
  File versionFile = SPIFFS.open(F("/version.txt"), "r");
  if (versionFile) {
	  FILESYSTEM_VERSION = versionFile.readString();
	  versionFile.close();
  }
  Serial.println(FILESYSTEM_VERSION);
Creiamo l’end-point sul server
Ora creeremo un nuovo endpoint /updateFS in GET che controlla la versione del filesystem da cui ottenere version.txt con la variabile LAST_FS_VERSION.
const express = require('express');
const { networkInterfaces } = require('os');
const path = require('path');

const app = express();
const nets = networkInterfaces();

// Server port
const PORT = 3000;

app.get('/', (request, response) => response.send('Hello from www.mischianti.org!'));

let downloadCounter = 1;
const LAST_VERSION = 0.3;
app.get('/update', (request, response) => {
    const version = (request.header("x-esp32-version"))?parseFloat(request.header("x-esp32-version")):Infinity;

    if (version<LAST_VERSION){
        // If you need an update go here
        response.status(200).download(path.join(__dirname, 'firmware/httpUpdateNew.bin'), 'httpUpdateNew.bin', (err)=>{
            if (err) {
                console.error("Problem on download firmware: ", err)
            }else{
                downloadCounter++;
            }
        });
        console.log('Your file has been downloaded '+downloadCounter+' times!')
    }else{
        response.status(304).send('No update needed!')
    }
});

let downloadFSCounter = 1;
const LAST_FS_VERSION = 0.3;
app.get('/updateFS', (request, response) => {
    const version = (request.header("x-esp32-version"))?parseFloat(request.header("x-esp32-version")):Infinity;

    if (version<LAST_FS_VERSION){
        // If you need an update go here
        response.status(200).download(path.join(__dirname, 'filesystem/httpUpdateNewFS.bin'), 'httpUpdateNewFS.bin', (err)=>{
            if (err) {
                console.error("Problem on download filesystem: ", err)
            }else{
                downloadFSCounter++;
            }
        });
        console.log('Your file FS has been downloaded '+downloadFSCounter+' times!')
    }else{
        response.status(304).send('No FS update needed!')
    }
});

app.listen(PORT, () => {
    const results = {}; // Or just '{}', an empty object

    for (const name of Object.keys(nets)) {
        for (const net of nets[name]) {
            // Skip over non-IPv4 and internal (i.e. 127.0.0.1) addresses
            if (net.family === 'IPv4' && !net.internal) {
                if (!results[name]) {
                    results[name] = [];
                }
                results[name].push(net.address);
            }
        }
    }

    console.log('Listening on port '+PORT+'\n', results)
});
Ora modificheremo il file version.txt con la versione 0.2 quindi lo caricheremo sul dispositivo:
- In OTAServer creare la cartella filesystem,
- Modificare la versione in
0.3inversion.txt, rigenerare senza caricare e copiare il fileArduinoOTAesp32_fs_update.mkspiffs.binnella cartella - Rinomina in
httpUpdateNewFS.bin.
Il risultato nell’output seriale diventa così.
[SETUP] WAIT 4...
[SETUP] WAIT 3...
[SETUP] WAIT 2...
[SETUP] WAIT 1...
Firmware version 0.3
Inizializing FS...done.
FileSystem version 0.1
Update start now!
HTTP_UPDATE_OK
ets Jun  8 2016 00:22:57

rst:0xc (SW_CPU_RESET),boot:0x13 (SPI_FAST_FLASH_BOOT)
configsip: 0, SPIWP:0xee
clk_drv:0x00,q_drv:0x00,d_drv:0x00,cs0_drv:0x00,hd_drv:0x00,wp_drv:0x00
mode:DIO, clock div:1
load:0x3fff0018,len:4
load:0x3fff001c,len:1216
ho 0 tail 12 room 4
load:0x40078000,len:10944
load:0x40080400,len:6388
entry 0x400806b4


[SETUP] WAIT 4...
[SETUP] WAIT 3...
[SETUP] WAIT 2...
[SETUP] WAIT 1...
Firmware version 0.3
Inizializing FS...done.
FileSystem version 0.2
Update start now!
Aggiorna l’endpoint con il controllo della versione e la connessione TLS sicura
Ora possiamo aggiornare il nostro esempio con la connessione SSL/TLS.
Per generare un buon certificato autofirmato, è necessario associare un nome comune o un IP della macchina che si desidera chiamare.
Ma ESP32 ed esp8266 non supportano l’IP (ho perso un giorno a provarlo), quindi l’unico modo per testare una soluzione reale è assegnare un nome host alla macchina server.
Se vuoi fare una soluzione veloce, puoi usare il comando
client.setInsecure();
che impedisce tutti i controlli di convalida del server e consente di eseguire richieste HTTPS senza un certificato Thrust.
Ma lo facciamo passo dopo passo.
Generazione di certificati autofirmati
Ma se si desidera utilizzare un certificato autofirmato, è possibile utilizzare OpenSSL per la generazione delle chiavi private e del certificato.
Certificato del server base (è necessario ignorare la convalida del certificato sul client)
Puoi ottenere openssl scaricando la versione Linux da tutti i gestori di pacchetti, oppure scaricarlo per Windows da qui , per usarlo con più semplicità aggiungi l’eseguibile alla PATH.
openssl req -new -x509 -sha256 -newkey rsa:2048 -nodes -keyout key.pem -days 365 -out cert.pem -subj "/CN=192.168.1.70"
ed ecco la risposta
Generating a RSA private key
................................+++++
..........................................................+++++
writing new private key to 'key.pem'
-----
Ora puoi prendere i dati da key.pem
-----BEGIN PRIVATE KEY-----
MIIEvgIBADANBgkqhkiG9w0BAQEFAASCBKgwggSkAgEAAoIBAQDPwU8Kbzr4PiKO
k+S4Cwj20tgnxYlesv99Fbmivl7PjwhYaIEX68afazYUoeQa1nNM8GSKRh4gSZnR
Zk61RR5d1U/EtWRVFWhIUB2U4Vy6KQ3vUaVoXRjtHjzlvarulvLvHF3/37rTJMqg
rnP2EbdKUQyxuAW7P3OMfSLEzn1LbuPGtZRHepckXnOpddghBvqIRrvrM8GPo0Ro
AXziXZMQ4hQgSxZopnP62XintfM1f/eZVPws9ww/5DVLFQs0ji2LuCPtxaokNgkq
t0wGHS6QNaWDbB7IBhbeg7oLg0HHz2SMJkYrGkmWhku+BVkWWf9snMK/RjN2NNMA
zMGADoSPAgMBAAECggEBAMQ8NHuHquy2TA/edAi/K51wdInElUekzZyJ+8lUBdwJ
n3laZK2CoB8OtotwizQqYchHvL+7EVOwEaFwAGJKQi+hf/Iu3/FaAiFjwz1QTTTt
+GKX/SQB47x9dkoPCDjKzfa7FbLN0fsEYny5q4C/JSEGQ3ZOeuNuQKdvv3qkDEdF
Z90JBHWzOrfUR2SpHuuk366ixwBjohOwyOHSP8VLXfPYp/RcgU/7/cRBSPN+xxIB
2Ovv/ERnTUbLqYlgU0Ok5KMMc7RmtXO9mwE6wFwNGJImYgn4IcCxAe41h6UTxmaG
gdeS2Ixil20Fi7wuLntOGkaqGewdjmjZN2apJ33gCukCgYEA7zE0hVzgfzLXPRVe
y7ouuLLrhZlkJfFsk75aVv9vfLD4eX6JgN/VU34vqmzqVSdszfum6fWyycSXwc9s
xrCLMYMS9lbz/HuiQn1c+7mZT+3hF4Qazy4ZU1rA4CBgGoyJK4eiO7tC9Vl29PvR
osDTdCOjJbIOCIAKsswrixHfgDsCgYEA3lqWDEuxQTctplL6gtXRUyBAooMLrrGZ
9/5Ut3qLlTWqdKr5+RlJCF4hc/1iYQHxDq+6SV2GpOO/0E7w0GlcoO3ME+AMf4qq
OHMcAGoJXYCEw/0u2MjuEnXlo8L3qp1+LK9rvGUViCx7Fha4OCIRuNWeJ4g8eIAl
qqzUd6fJ+70CgYEAiBDEoMzZxGIGgPAEMf5ij5zwT9qXVuJEcrNJLs41/IergWmT
DOXHs6xHrzov/2rjATYTmGm1YAPelFjLtyc8t1ip08pZFxq5jftEhsnoxcg7UKZM
nejKbVll+NlR8ihZ65JHnpUDHRDck7YgZeYtI5cWOt5UD0/PRjDQ4Fa1fnsCgYAL
+gEfBGy1wI0a6llH9tBhk9knZ7uXW0WZz/8sKtOd49gclKEGQ9BlPPy8TKeh5gLf
8aMtFHaOJx5L0BS0hRhSKrzVTTofHI7yn3CgrRV4DdYY4GhHkPsRz3vhCD1i2TzU
l1ZMPX2dahfvJqYhj+Q4enkcVAA91VkyCkEfeNAuWQKBgH+82agy+jlRyRBvQ6eI
i5n7FbCMJSw/1mfOmxGiEQhshaQkPDx+PfPgy+LOMuXAr1ZBsWMCGERdUsesXjIH
AHcY8Nl0tC5dG8q7B3A11xttwFbhQ4fgq+AUEzSH3ykTvuobGCNtM5AuawNWIjj7
VO0JDqUFQcom1brJIHowKKNU
-----END PRIVATE KEY-----
E cert.pem
-----BEGIN CERTIFICATE-----
MIIDGTCCAgGgAwIBAgIULbAi2zs41Rh6AZy08xumoYMIFJQwDQYJKoZIhvcNAQEL
BQAwHDEaMBgGA1UEAwwRMTkyLjE2OC4xLjcwOjM0NDMwHhcNMjEwOTEzMDcwODUw
WhcNMjIwOTEzMDcwODUwWjAcMRowGAYDVQQDDBExOTIuMTY4LjEuNzA6MzQ0MzCC
ASIwDQYJKoZIhvcNAQEBBQADggEPADCCAQoCggEBAM/BTwpvOvg+Io6T5LgLCPbS
2CfFiV6y/30VuaK+Xs+PCFhogRfrxp9rNhSh5BrWc0zwZIpGHiBJmdFmTrVFHl3V
T8S1ZFUVaEhQHZThXLopDe9RpWhdGO0ePOW9qu6W8u8cXf/futMkyqCuc/YRt0pR
DLG4Bbs/c4x9IsTOfUtu48a1lEd6lyRec6l12CEG+ohGu+szwY+jRGgBfOJdkxDi
FCBLFmimc/rZeKe18zV/95lU/Cz3DD/kNUsVCzSOLYu4I+3FqiQ2CSq3TAYdLpA1
pYNsHsgGFt6DuguDQcfPZIwmRisaSZaGS74FWRZZ/2ycwr9GM3Y00wDMwYAOhI8C
AwEAAaNTMFEwHQYDVR0OBBYEFKyvsHqrsHBj+V5H8aDT5qvPOSfdMB8GA1UdIwQY
MBaAFKyvsHqrsHBj+V5H8aDT5qvPOSfdMA8GA1UdEwEB/wQFMAMBAf8wDQYJKoZI
hvcNAQELBQADggEBALwdlitiQayOG2o2y3BAipcdaMxdGbihorheuO17glsZtp2R
H2LUUqnmG8hGH4pHbkd2gozxLt/h7ILrD1xK/EIlXjGueu3MF377GWZpR18OXt+1
cqpxDdAESD3PRbcJnu75uffFYLSKizbuaTbV2D8RY1kcUxRlrFG2bciNP9widbjq
T9B4RhtJb0d+Sk8Z2G2eTlNxESPQ/Oi530rrbZsez0XmdYyogbVHuNdwJvfQdA8U
F1UtWj6vtGAramUn0dS5rJ8REfZ4jdGsXYT2jmCfDTgaE+1sEYm6ry+RInDK5RVi
Kk+bL292uc4d0STCqXciv7YbWDWlZPo9fH0Pxs0=
-----END CERTIFICATE-----
Certificato autofirmato valido
Se non hai bisogno di creare un ambiente reale, vai al paragrafo successivo, il certificato generato nel capitolo precedente è sufficiente per il nostro test.
Prima di tutto dobbiamo assegnare un nome all’host del server, ci sono molte alternative, ma penso che il modo più veloce sia usare un DNS dinamico.
Normalmente il DNS Dinamico viene utilizzato per assegnare un nome dinamicamente all’IP fornitoci dall’ISP, ma è possibile assegnare un IP statico e utilizzarlo come un normale host, ecco un esempio con un servizio gratuito NO-IP.
Configura il servizio DNS dinamico
Vai su https://www.noip.com/ e registrati .
Aggiungo la mia email, inserisco una password e, creo un nome come serverota.ddns.net, quindi clicco su Free Sign Up .
Aggiungi il certificato al server NodeJS
Innanzitutto, modifico il server per esporre l’endpoint HTTPS, seleziono la porta 3443 a tale scopo e aggiungo i 2 certificati alla cartella certificate.
var fs = require('fs');

const express = require('express');
var http = require('http');
var https = require('https');
var privateKey  = fs.readFileSync('certificate/key.pem', 'utf8');
var certificate = fs.readFileSync('certificate/cert.pem', 'utf8');

var credentials = {key: privateKey, cert: certificate};

const { networkInterfaces } = require('os');
const path = require('path');

const app = express();
var httpServer = http.createServer(app);
var httpsServer = https.createServer(credentials, app);

const nets = networkInterfaces();

// Server port
const PORT = 3000;
const PORT_HTTPS = 3443;

app.get('/', (request, response) => response.send('Hello from www.mischianti.org!'));

let downloadCounter = 1;
const LAST_VERSION = 0.3;
app.get('/update', (request, response) => {
    const version = (request.header("x-esp8266-version"))?parseFloat(request.header("x-esp8266-version")):Infinity;

    if (version<LAST_VERSION){
        // If you need an update go here
        response.status(200).download(path.join(__dirname, 'firmware/httpUpdateNew.bin'), 'httpUpdateNew.bin', (err)=>{
            if (err) {
                console.error("Problem on download firmware: ", err)
            }else{
                downloadCounter++;
            }
        });
        console.log('Your file has been downloaded '+downloadCounter+' times!')
    }else{
        response.status(304).send('No update needed!')
    }
});


httpServer.listen(PORT, () => {
    const results = {}; // Or just '{}', an empty object

    for (const name of Object.keys(nets)) {
        for (const net of nets[name]) {
            // Skip over non-IPv4 and internal (i.e. 127.0.0.1) addresses
            if (net.family === 'IPv4' && !net.internal) {
                if (!results[name]) {
                    results[name] = [];
                }
                results[name].push(net.address);
            }
        }
    }

    console.log('HTTP Listening on port '+PORT+'\n', results)
});
httpsServer.listen(PORT_HTTPS, () => console.log('HTTPS Listening on port '+PORT_HTTPS+'\n'));
Ora nel prompt dei comandi, hai questo output.
D:\Projects\IdeaProjects\OTAWebPages\OTAServer>node index.js
HTTP Listening on port 3000
 {
  Ethernet: [ '192.168.1.70' ],
  'VirtualBox Host-Only Network': [ '192.168.56.1' ],
  'VMware Network Adapter VMnet1': [ '192.168.113.1' ],
  'VMware Network Adapter VMnet8': [ '192.168.116.1' ]
}
HTTPS Listening on port 3443
Modificare lo sketch per eseguire una chiamata HTTP sicura.
Per gestire la connessione HTTPS puoi utilizzare 3 modi.
Impedisci la convalida del certificato
Il primo è impedire qualsiasi convalida del certificato con questo comando:
client.setInsecure();
ma non tutti i server funzionano.
Creare e aggiungere CertStore
Il secondo è aggiungere il certificato e la chiave alla chiamata, e puoi farlo aggiungendo al filesystem e precaricando nell’archivio di certificazione in questo modo:
  LittleFS.begin();

  int numCerts = certStore.initCertStore(LittleFS, PSTR("/certs.idx"), PSTR("/certs.ar"));
Aggiungere il certificato e chiave al client
Praticamente aggiungerai direttamente al client il certificato necessario.
static const char serverCert[] PROGMEM = R"EOF(
-----BEGIN CERTIFICATE-----
MIIDGTCCAgGgAwIBAgIULbAi2zs41Rh6AZy08xumoYMIFJQwDQYJKoZIhvcNAQEL
BQAwHDEaMBgGA1UEAwwRMTkyLjE2OC4xLjcwOjM0NDMwHhcNMjEwOTEzMDcwODUw
WhcNMjIwOTEzMDcwODUwWjAcMRowGAYDVQQDDBExOTIuMTY4LjEuNzA6MzQ0MzCC
ASIwDQYJKoZIhvcNAQEBBQADggEPADCCAQoCggEBAM/BTwpvOvg+Io6T5LgLCPbS
2CfFiV6y/30VuaK+Xs+PCFhogRfrxp9rNhSh5BrWc0zwZIpGHiBJmdFmTrVFHl3V
T8S1ZFUVaEhQHZThXLopDe9RpWhdGO0ePOW9qu6W8u8cXf/futMkyqCuc/YRt0pR
DLG4Bbs/c4x9IsTOfUtu48a1lEd6lyRec6l12CEG+ohGu+szwY+jRGgBfOJdkxDi
FCBLFmimc/rZeKe18zV/95lU/Cz3DD/kNUsVCzSOLYu4I+3FqiQ2CSq3TAYdLpA1
pYNsHsgGFt6DuguDQcfPZIwmRisaSZaGS74FWRZZ/2ycwr9GM3Y00wDMwYAOhI8C
AwEAAaNTMFEwHQYDVR0OBBYEFKyvsHqrsHBj+V5H8aDT5qvPOSfdMB8GA1UdIwQY
MBaAFKyvsHqrsHBj+V5H8aDT5qvPOSfdMA8GA1UdEwEB/wQFMAMBAf8wDQYJKoZI
hvcNAQELBQADggEBALwdlitiQayOG2o2y3BAipcdaMxdGbihorheuO17glsZtp2R
H2LUUqnmG8hGH4pHbkd2gozxLt/h7ILrD1xK/EIlXjGueu3MF377GWZpR18OXt+1
cqpxDdAESD3PRbcJnu75uffFYLSKizbuaTbV2D8RY1kcUxRlrFG2bciNP9widbjq
T9B4RhtJb0d+Sk8Z2G2eTlNxESPQ/Oi530rrbZsez0XmdYyogbVHuNdwJvfQdA8U
F1UtWj6vtGAramUn0dS5rJ8REfZ4jdGsXYT2jmCfDTgaE+1sEYm6ry+RInDK5RVi
Kk+bL292uc4d0STCqXciv7YbWDWlZPo9fH0Pxs0=
-----END CERTIFICATE-----
)EOF";

static const char serverKey[] PROGMEM =  R"EOF(
-----BEGIN RSA PRIVATE KEY-----
MIIEvgIBADANBgkqhkiG9w0BAQEFAASCBKgwggSkAgEAAoIBAQDPwU8Kbzr4PiKO
k+S4Cwj20tgnxYlesv99Fbmivl7PjwhYaIEX68afazYUoeQa1nNM8GSKRh4gSZnR
Zk61RR5d1U/EtWRVFWhIUB2U4Vy6KQ3vUaVoXRjtHjzlvarulvLvHF3/37rTJMqg
rnP2EbdKUQyxuAW7P3OMfSLEzn1LbuPGtZRHepckXnOpddghBvqIRrvrM8GPo0Ro
AXziXZMQ4hQgSxZopnP62XintfM1f/eZVPws9ww/5DVLFQs0ji2LuCPtxaokNgkq
t0wGHS6QNaWDbB7IBhbeg7oLg0HHz2SMJkYrGkmWhku+BVkWWf9snMK/RjN2NNMA
zMGADoSPAgMBAAECggEBAMQ8NHuHquy2TA/edAi/K51wdInElUekzZyJ+8lUBdwJ
n3laZK2CoB8OtotwizQqYchHvL+7EVOwEaFwAGJKQi+hf/Iu3/FaAiFjwz1QTTTt
+GKX/SQB47x9dkoPCDjKzfa7FbLN0fsEYny5q4C/JSEGQ3ZOeuNuQKdvv3qkDEdF
Z90JBHWzOrfUR2SpHuuk366ixwBjohOwyOHSP8VLXfPYp/RcgU/7/cRBSPN+xxIB
2Ovv/ERnTUbLqYlgU0Ok5KMMc7RmtXO9mwE6wFwNGJImYgn4IcCxAe41h6UTxmaG
gdeS2Ixil20Fi7wuLntOGkaqGewdjmjZN2apJ33gCukCgYEA7zE0hVzgfzLXPRVe
y7ouuLLrhZlkJfFsk75aVv9vfLD4eX6JgN/VU34vqmzqVSdszfum6fWyycSXwc9s
xrCLMYMS9lbz/HuiQn1c+7mZT+3hF4Qazy4ZU1rA4CBgGoyJK4eiO7tC9Vl29PvR
osDTdCOjJbIOCIAKsswrixHfgDsCgYEA3lqWDEuxQTctplL6gtXRUyBAooMLrrGZ
9/5Ut3qLlTWqdKr5+RlJCF4hc/1iYQHxDq+6SV2GpOO/0E7w0GlcoO3ME+AMf4qq
OHMcAGoJXYCEw/0u2MjuEnXlo8L3qp1+LK9rvGUViCx7Fha4OCIRuNWeJ4g8eIAl
qqzUd6fJ+70CgYEAiBDEoMzZxGIGgPAEMf5ij5zwT9qXVuJEcrNJLs41/IergWmT
DOXHs6xHrzov/2rjATYTmGm1YAPelFjLtyc8t1ip08pZFxq5jftEhsnoxcg7UKZM
nejKbVll+NlR8ihZ65JHnpUDHRDck7YgZeYtI5cWOt5UD0/PRjDQ4Fa1fnsCgYAL
+gEfBGy1wI0a6llH9tBhk9knZ7uXW0WZz/8sKtOd49gclKEGQ9BlPPy8TKeh5gLf
8aMtFHaOJx5L0BS0hRhSKrzVTTofHI7yn3CgrRV4DdYY4GhHkPsRz3vhCD1i2TzU
l1ZMPX2dahfvJqYhj+Q4enkcVAA91VkyCkEfeNAuWQKBgH+82agy+jlRyRBvQ6eI
i5n7FbCMJSw/1mfOmxGiEQhshaQkPDx+PfPgy+LOMuXAr1ZBsWMCGERdUsesXjIH
AHcY8Nl0tC5dG8q7B3A11xttwFbhQ4fgq+AUEzSH3ykTvuobGCNtM5AuawNWIjj7
VO0JDqUFQcom1brJIHowKKNU
-----END RSA PRIVATE KEY-----
)EOF";

[...]

    client.setClientRSACert(new BearSSL::X509List(serverCert), new BearSSL::PrivateKey(serverKey));
Se utilizzi un certificato autofirmato, devi specificarlo con questo comando.
client.allowSelfSignedCerts();
Devi specificare se si tratta di un certificato autofirmato
Impostare l’orologio per la convalida del certificato
Parlo del servizio NTP in profondità in questo articolo “Protocollo NTP, fuso orario e ora legale (DST) con esp8266, esp32 o Arduino” e useremo questa funzione
// Set time via NTP, as required for x.509 validation
time_t setClock() {
  configTime(3 * 3600, 0, "pool.ntp.org", "time.nist.gov");

  Serial.print("Waiting for NTP time sync: ");
  time_t now = time(nullptr);
  while (now < 8 * 3600 * 2) {
    delay(500);
    Serial.print(".");
    now = time(nullptr);
  }
  Serial.println("");
  struct tm timeinfo;
  gmtime_r(&now, &timeinfo);
  Serial.print("Current time: ");
  Serial.print(asctime(&timeinfo));
  return now;
}
Sketch completo per un aggiornamento sicuro
Ora andiamo ad assemblare tutte le parti e il risultato è questo.
/**
 * Sketch with secure and conditionally firmware update
 *
 * Renzo Mischianti <www.mischianti.org>
 *
 * https://mischianti.org
 */

#include <ESP8266WiFi.h>
#include <ESP8266WiFiMulti.h>

#include <ESP8266HTTPClient.h>
#include <ESP8266httpUpdate.h>

#include <time.h>

#ifndef APSSID
#define APSSID "<YOUR-SSID>"
#define APPSK  "<YOUR-PASSWD>"
#endif

ESP8266WiFiMulti WiFiMulti;

// Set time via NTP, as required for x.509 validation
time_t setClock() {
  configTime(3 * 3600, 0, "pool.ntp.org", "time.nist.gov");

  Serial.print("Waiting for NTP time sync: ");
  time_t now = time(nullptr);
  while (now < 8 * 3600 * 2) {
    delay(500);
    Serial.print(".");
    now = time(nullptr);
  }
  Serial.println("");
  struct tm timeinfo;
  gmtime_r(&now, &timeinfo);
  Serial.print("Current time: ");
  Serial.print(asctime(&timeinfo));
  return now;
}

void update_started() {
  Serial.println("CALLBACK:  HTTP update process started");
}

void update_finished() {
  Serial.println("CALLBACK:  HTTP update process finished");
}

void update_progress(int cur, int total) {
  Serial.printf("CALLBACK:  HTTP update process at %d of %d bytes...\n", cur, total);
}

void update_error(int err) {
  Serial.printf("CALLBACK:  HTTP update fatal error code %d\n", err);
}

static const char serverCert[] PROGMEM = R"EOF(
-----BEGIN CERTIFICATE-----
MIIDGTCCAgGgAwIBAgIULbAi2zs41Rh6AZy08xumoYMIFJQwDQYJKoZIhvcNAQEL
BQAwHDEaMBgGA1UEAwwRMTkyLjE2OC4xLjcwOjM0NDMwHhcNMjEwOTEzMDcwODUw
WhcNMjIwOTEzMDcwODUwWjAcMRowGAYDVQQDDBExOTIuMTY4LjEuNzA6MzQ0MzCC
ASIwDQYJKoZIhvcNAQEBBQADggEPADCCAQoCggEBAM/BTwpvOvg+Io6T5LgLCPbS
2CfFiV6y/30VuaK+Xs+PCFhogRfrxp9rNhSh5BrWc0zwZIpGHiBJmdFmTrVFHl3V
T8S1ZFUVaEhQHZThXLopDe9RpWhdGO0ePOW9qu6W8u8cXf/futMkyqCuc/YRt0pR
DLG4Bbs/c4x9IsTOfUtu48a1lEd6lyRec6l12CEG+ohGu+szwY+jRGgBfOJdkxDi
FCBLFmimc/rZeKe18zV/95lU/Cz3DD/kNUsVCzSOLYu4I+3FqiQ2CSq3TAYdLpA1
pYNsHsgGFt6DuguDQcfPZIwmRisaSZaGS74FWRZZ/2ycwr9GM3Y00wDMwYAOhI8C
AwEAAaNTMFEwHQYDVR0OBBYEFKyvsHqrsHBj+V5H8aDT5qvPOSfdMB8GA1UdIwQY
MBaAFKyvsHqrsHBj+V5H8aDT5qvPOSfdMA8GA1UdEwEB/wQFMAMBAf8wDQYJKoZI
hvcNAQELBQADggEBALwdlitiQayOG2o2y3BAipcdaMxdGbihorheuO17glsZtp2R
H2LUUqnmG8hGH4pHbkd2gozxLt/h7ILrD1xK/EIlXjGueu3MF377GWZpR18OXt+1
cqpxDdAESD3PRbcJnu75uffFYLSKizbuaTbV2D8RY1kcUxRlrFG2bciNP9widbjq
T9B4RhtJb0d+Sk8Z2G2eTlNxESPQ/Oi530rrbZsez0XmdYyogbVHuNdwJvfQdA8U
F1UtWj6vtGAramUn0dS5rJ8REfZ4jdGsXYT2jmCfDTgaE+1sEYm6ry+RInDK5RVi
Kk+bL292uc4d0STCqXciv7YbWDWlZPo9fH0Pxs0=
-----END CERTIFICATE-----
)EOF";

static const char serverKey[] PROGMEM =  R"EOF(
-----BEGIN RSA PRIVATE KEY-----
MIIEvgIBADANBgkqhkiG9w0BAQEFAASCBKgwggSkAgEAAoIBAQDPwU8Kbzr4PiKO
k+S4Cwj20tgnxYlesv99Fbmivl7PjwhYaIEX68afazYUoeQa1nNM8GSKRh4gSZnR
Zk61RR5d1U/EtWRVFWhIUB2U4Vy6KQ3vUaVoXRjtHjzlvarulvLvHF3/37rTJMqg
rnP2EbdKUQyxuAW7P3OMfSLEzn1LbuPGtZRHepckXnOpddghBvqIRrvrM8GPo0Ro
AXziXZMQ4hQgSxZopnP62XintfM1f/eZVPws9ww/5DVLFQs0ji2LuCPtxaokNgkq
t0wGHS6QNaWDbB7IBhbeg7oLg0HHz2SMJkYrGkmWhku+BVkWWf9snMK/RjN2NNMA
zMGADoSPAgMBAAECggEBAMQ8NHuHquy2TA/edAi/K51wdInElUekzZyJ+8lUBdwJ
n3laZK2CoB8OtotwizQqYchHvL+7EVOwEaFwAGJKQi+hf/Iu3/FaAiFjwz1QTTTt
+GKX/SQB47x9dkoPCDjKzfa7FbLN0fsEYny5q4C/JSEGQ3ZOeuNuQKdvv3qkDEdF
Z90JBHWzOrfUR2SpHuuk366ixwBjohOwyOHSP8VLXfPYp/RcgU/7/cRBSPN+xxIB
2Ovv/ERnTUbLqYlgU0Ok5KMMc7RmtXO9mwE6wFwNGJImYgn4IcCxAe41h6UTxmaG
gdeS2Ixil20Fi7wuLntOGkaqGewdjmjZN2apJ33gCukCgYEA7zE0hVzgfzLXPRVe
y7ouuLLrhZlkJfFsk75aVv9vfLD4eX6JgN/VU34vqmzqVSdszfum6fWyycSXwc9s
xrCLMYMS9lbz/HuiQn1c+7mZT+3hF4Qazy4ZU1rA4CBgGoyJK4eiO7tC9Vl29PvR
osDTdCOjJbIOCIAKsswrixHfgDsCgYEA3lqWDEuxQTctplL6gtXRUyBAooMLrrGZ
9/5Ut3qLlTWqdKr5+RlJCF4hc/1iYQHxDq+6SV2GpOO/0E7w0GlcoO3ME+AMf4qq
OHMcAGoJXYCEw/0u2MjuEnXlo8L3qp1+LK9rvGUViCx7Fha4OCIRuNWeJ4g8eIAl
qqzUd6fJ+70CgYEAiBDEoMzZxGIGgPAEMf5ij5zwT9qXVuJEcrNJLs41/IergWmT
DOXHs6xHrzov/2rjATYTmGm1YAPelFjLtyc8t1ip08pZFxq5jftEhsnoxcg7UKZM
nejKbVll+NlR8ihZ65JHnpUDHRDck7YgZeYtI5cWOt5UD0/PRjDQ4Fa1fnsCgYAL
+gEfBGy1wI0a6llH9tBhk9knZ7uXW0WZz/8sKtOd49gclKEGQ9BlPPy8TKeh5gLf
8aMtFHaOJx5L0BS0hRhSKrzVTTofHI7yn3CgrRV4DdYY4GhHkPsRz3vhCD1i2TzU
l1ZMPX2dahfvJqYhj+Q4enkcVAA91VkyCkEfeNAuWQKBgH+82agy+jlRyRBvQ6eI
i5n7FbCMJSw/1mfOmxGiEQhshaQkPDx+PfPgy+LOMuXAr1ZBsWMCGERdUsesXjIH
AHcY8Nl0tC5dG8q7B3A11xttwFbhQ4fgq+AUEzSH3ykTvuobGCNtM5AuawNWIjj7
VO0JDqUFQcom1brJIHowKKNU
-----END RSA PRIVATE KEY-----
)EOF";

#define FIRMWARE_VERSION "0.2"

void setup() {

  Serial.begin(115200);
  // Serial.setDebugOutput(true);

  Serial.println();
  Serial.println();
  Serial.println();

  for (uint8_t t = 4; t > 0; t--) {
    Serial.printf("[SETUP] WAIT %d...\n", t);
    Serial.flush();
    delay(1000);
  }

  WiFi.mode(WIFI_STA);
  WiFiMulti.addAP(APSSID, APPSK);

}

const char* updateServer = "192.168.1.70";
const int updateServerPort = 3443;

void loop() {
  // wait for WiFi connection
  if ((WiFiMulti.run() == WL_CONNECTED)) {

    BearSSL::WiFiClientSecure client;

    bool mfln = client.probeMaxFragmentLength(updateServer, updateServerPort, 1024);  // server must be the same as in ESPhttpUpdate.update()
    Serial.printf("MFLN supported: %s\n", mfln ? "yes" : "no");
    if (mfln) {
      client.setBufferSizes(1024, 1024);
    }
    client.setClientRSACert(new BearSSL::X509List(serverCert), new BearSSL::PrivateKey(serverKey));
    client.allowSelfSignedCerts();
    setClock();

    // The line below is optional. It can be used to blink the LED on the board during flashing
    // The LED will be on during download of one buffer of data from the network. The LED will
    // be off during writing that buffer to flash
    // On a good connection the LED should flash regularly. On a bad connection the LED will be
    // on much longer than it will be off. Other pins than LED_BUILTIN may be used. The second
    // value is used to put the LED on. If the LED is on with HIGH, that value should be passed
    ESPhttpUpdate.setLedPin(LED_BUILTIN, LOW);

    // Add optional callback notifiers
    ESPhttpUpdate.onStart(update_started);
    ESPhttpUpdate.onEnd(update_finished);
    ESPhttpUpdate.onProgress(update_progress);
    ESPhttpUpdate.onError(update_error);

    ESPhttpUpdate.rebootOnUpdate(false); // remove automatic update

    Serial.println(F("Update start now!"));

     t_httpUpdate_return ret = ESPhttpUpdate.update(client, "https://192.168.1.70:3443/update", FIRMWARE_VERSION);

    switch (ret) {
      case HTTP_UPDATE_FAILED:
        Serial.printf("HTTP_UPDATE_FAILD Error (%d): %s\n", ESPhttpUpdate.getLastError(), ESPhttpUpdate.getLastErrorString().c_str());
        Serial.println(F("Retry in 10secs!"));
        delay(10000); // Wait 10secs
        break;

      case HTTP_UPDATE_NO_UPDATES:
        Serial.println("HTTP_UPDATE_NO_UPDATES");
        Serial.println("Your code is up to date!");
          delay(10000); // Wait 10secs
        break;

      case HTTP_UPDATE_OK:
        Serial.println("HTTP_UPDATE_OK");
        delay(1000); // Wait a second and restart
        ESP.restart();
        break;
    }
  }
}
L’output seriale è lo stesso dell’aggiornamento HTTP.
[SETUP] WAIT 4...
[SETUP] WAIT 3...
[SETUP] WAIT 2...
[SETUP] WAIT 1...
Firmware version 0.2
Update start now!
CALLBACK:  HTTP update process started
CALLBACK:  HTTP update process at 0 of 307888 bytes...
CALLBACK:  HTTP update process at 0 of 307888 bytes...
CALLBACK:  HTTP update process at 4096 of 307888 bytes...
CALLBACK:  HTTP update process at 8192 of 307888 bytes...
CALLBACK:  HTTP update process at 12288 of 307888 bytes...
CALLBACK:  HTTP update process at 16384 of 307888 bytes...
CALLBACK:  HTTP update process at 20480 of 307888 bytes...
CALLBACK:  HTTP update process at 24576 of 307888 bytes...
CALLBACK:  HTTP update process at 28672 of 307888 bytes...
CALLBACK:  HTTP update process at 32768 of 307888 bytes...
CALLBACK:  HTTP update process at 36864 of 307888 bytes...
CALLBACK:  HTTP update process at 40960 of 307888 bytes...
CALLBACK:  HTTP update process at 45056 of 307888 bytes...
CALLBACK:  HTTP update process at 49152 of 307888 bytes...
CALLBACK:  HTTP update process at 53248 of 307888 bytes...
CALLBACK:  HTTP update process at 57344 of 307888 bytes...
CALLBACK:  HTTP update process at 61440 of 307888 bytes...
CALLBACK:  HTTP update process at 65536 of 307888 bytes...
CALLBACK:  HTTP update process at 69632 of 307888 bytes...
CALLBACK:  HTTP update process at 73728 of 307888 bytes...
CALLBACK:  HTTP update process at 77824 of 307888 bytes...
CALLBACK:  HTTP update process at 81920 of 307888 bytes...
CALLBACK:  HTTP update process at 86016 of 307888 bytes...
CALLBACK:  HTTP update process at 90112 of 307888 bytes...
CALLBACK:  HTTP update process at 94208 of 307888 bytes...
CALLBACK:  HTTP update process at 98304 of 307888 bytes...
CALLBACK:  HTTP update process at 102400 of 307888 bytes...
CALLBACK:  HTTP update process at 106496 of 307888 bytes...
CALLBACK:  HTTP update process at 110592 of 307888 bytes...
CALLBACK:  HTTP update process at 114688 of 307888 bytes...
CALLBACK:  HTTP update process at 118784 of 307888 bytes...
CALLBACK:  HTTP update process at 122880 of 307888 bytes...
CALLBACK:  HTTP update process at 126976 of 307888 bytes...
CALLBACK:  HTTP update process at 131072 of 307888 bytes...
CALLBACK:  HTTP update process at 135168 of 307888 bytes...
CALLBACK:  HTTP update process at 139264 of 307888 bytes...
CALLBACK:  HTTP update process at 143360 of 307888 bytes...
CALLBACK:  HTTP update process at 147456 of 307888 bytes...
CALLBACK:  HTTP update process at 151552 of 307888 bytes...
CALLBACK:  HTTP update process at 155648 of 307888 bytes...
CALLBACK:  HTTP update process at 159744 of 307888 bytes...
CALLBACK:  HTTP update process at 163840 of 307888 bytes...
CALLBACK:  HTTP update process at 167936 of 307888 bytes...
CALLBACK:  HTTP update process at 172032 of 307888 bytes...
CALLBACK:  HTTP update process at 176128 of 307888 bytes...
CALLBACK:  HTTP update process at 180224 of 307888 bytes...
CALLBACK:  HTTP update process at 184320 of 307888 bytes...
CALLBACK:  HTTP update process at 188416 of 307888 bytes...
CALLBACK:  HTTP update process at 192512 of 307888 bytes...
CALLBACK:  HTTP update process at 196608 of 307888 bytes...
CALLBACK:  HTTP update process at 200704 of 307888 bytes...
CALLBACK:  HTTP update process at 204800 of 307888 bytes...
CALLBACK:  HTTP update process at 208896 of 307888 bytes...
CALLBACK:  HTTP update process at 212992 of 307888 bytes...
CALLBACK:  HTTP update process at 217088 of 307888 bytes...
CALLBACK:  HTTP update process at 221184 of 307888 bytes...
CALLBACK:  HTTP update process at 225280 of 307888 bytes...
CALLBACK:  HTTP update process at 229376 of 307888 bytes...
CALLBACK:  HTTP update process at 233472 of 307888 bytes...
CALLBACK:  HTTP update process at 237568 of 307888 bytes...
CALLBACK:  HTTP update process at 241664 of 307888 bytes...
CALLBACK:  HTTP update process at 245760 of 307888 bytes...
CALLBACK:  HTTP update process at 249856 of 307888 bytes...
CALLBACK:  HTTP update process at 253952 of 307888 bytes...
CALLBACK:  HTTP update process at 258048 of 307888 bytes...
CALLBACK:  HTTP update process at 262144 of 307888 bytes...
CALLBACK:  HTTP update process at 266240 of 307888 bytes...
CALLBACK:  HTTP update process at 270336 of 307888 bytes...
CALLBACK:  HTTP update process at 274432 of 307888 bytes...
CALLBACK:  HTTP update process at 278528 of 307888 bytes...
CALLBACK:  HTTP update process at 282624 of 307888 bytes...
CALLBACK:  HTTP update process at 286720 of 307888 bytes...
CALLBACK:  HTTP update process at 290816 of 307888 bytes...
CALLBACK:  HTTP update process at 294912 of 307888 bytes...
CALLBACK:  HTTP update process at 299008 of 307888 bytes...
CALLBACK:  HTTP update process at 303104 of 307888 bytes...
CALLBACK:  HTTP update process at 307200 of 307888 bytes...
CALLBACK:  HTTP update process at 307888 of 307888 bytes...
CALLBACK:  HTTP update process at 307888 of 307888 bytes...
CALLBACK:  HTTP update process at 307888 of 307888 bytes...
CALLBACK:  HTTP update process finished
HTTP_UPDATE_OK

 ets Jan  8 2013,rst cause:2, boot mode:(3,6)

load 0x4010f000, len 3460, room 16
tail 4
chksum 0xcc
load 0x3fff20b8, len 40, room 4
tail 4
chksum 0xc9
csum 0xc9
v0005cd20
@cp:B0
ld


[SETUP] WAIT 4...
[SETUP] WAIT 3...
[SETUP] WAIT 2...
[SETUP] WAIT 1...
Firmware version 0.3
Update start now!
HTTP_UPDATE_NO_UPDATES
Your code is up to date!
Grazie
- ESP32: piedinatura, specifiche e configurazione dell’Arduino IDE
- ESP32: fileSystem integrato SPIFFS
- ESP32: gestire più seriali e logging per il debug
- ESP32 risparmio energetico pratico
- ESP32 risparmio energetico pratico: gestire WiFi e CPU
- ESP32 risparmio energetico pratico: modem e light sleep
- ESP32 risparmio energetico pratico: deep sleep e ibernazione
- ESP32 risparmio energetico pratico: preservare dati al riavvio, sveglia a tempo e tramite tocco
- ESP32 risparmio energetico pratico: sveglia esterna e da ULP
- ESP32 risparmio energetico pratico: sveglia da UART e GPIO
- ESP32: filesystem integrato LittleFS
- ESP32: filesystem integrato FFat (Fat/exFAT)
- ESP32-wroom-32
- ESP32-CAM
- ESP32: ethernet w5500 con chiamate standard (HTTP) e SSL (HTTPS)
- ESP32: ethernet enc28j60 con chiamate standard (HTTP) e SSL (HTTPS)
- Come usare la scheda SD con l’esp32
- esp32 e esp8266: file system FAT su memoria SPI flash esterna
- Gestione aggiornamenti firmware e OTA
- Gestione del firmware
- Aggiornamento OTA con Arduino IDE
- Aggiornamento OTA con browser web
- Aggiornamenti automatici OTA da un server HTTP
- Aggiornamento del firmware non standard
- Integrare LAN8720 con ESP32 per la connettività Ethernet con plain (HTTP) e SSL (HTTPS)
- Collegare l’EByte E70 (CC1310) ai dispositivi ESP32 c3/s3 ed un semplice sketch di esempio
- ESP32-C3: piedinatura, specifiche e configurazione dell’IDE Arduino
- Integrazione del modulo W5500 su ESP32 con Core 3: supporto nativo ai protocolli Ethernet con SSL e altre funzionalità
- Integrazione del modulo LAN8720 su ESP32 con Core 3: supporto nativo del protocollo Ethernet con SSL e altre funzionalità.
- Dallas DS18B20
- Guida all’I2C su ESP32: comunicazione con dispositivi eterogenei 5v 3.3v, gestione interfacce aggiuntive
- Display
- Guida Completa: Come Usare un Display ILI9341 con la Libreria TFT_eSPI
- Come integrare la funzionalità touch screen nel display TFT ILI9341
- Display eInk SSD1683 con GxEPD e ESP32 (e HMI CrowPanel 4,2″): nozioni di base e configurazione