
STM32: add SPI flash memory with FAT FS
Early SMT32 prototype boards did not have built-in SPI flash, but the latest ones, like the WeAct STM32F4 board, have a footprint to add it. And I find this option very useful, the only problem is that the Arduino Core doesn’t have a native library, so we’re going to use the Adafruit one.
We already had explained how to manage SD (you can look at SD management on “How to use SD card with stm32 and SdFat library“), and now we’d like to look at alternative storage like external SPI Flash, similar to the EEPROM but with the biggest size. The SPI Flash has a smaller capacity but is small, fast, and has very low power consumption. SD It’s surely the best choice for size and compatibility, but we pay for these features with a good quantity of energy.
Here my selection of STM32 STM32F103C8T6 STM32F401 STM32F411 ST-Link v2 ST-Link v2 official
Today, we will see the SPI Flash memory (NOR Flash); they are a single chip that can be managed via SPI and have high-speed access and low power consumption.
Flash memory is an electronic non-volatile computer memory storage medium that can be electrically erased and reprogrammed. The two main types of flash memory, NOR flash and NAND flash, are named for the NOR and NAND logic gates. NAND flash and NOR flash use the same cell design, consisting of floating gate MOSFETs. They differ at the circuit level: in NAND flash, the relationship between the bit line and the word lines resembles a NAND gate; in NOR flash, it resembles a NOR gate; this depends on whether the state of the bit line or word lines is pulled high or low.
Wikipedia
Flash memory, a type of floating-gate memory, was invented at Toshiba in 1980 and is based on EEPROM technology. Toshiba began marketing flash memory in 1987. EPROMs had to be erased completely before they could be rewritten. NAND flash memory, however, may be erased, written, and read in blocks (or pages), which generally are much smaller than the entire device. NOR flash memory allows a single machine word to be written – to an erased location – or read independently. A flash memory device typically consists of one or more flash memory chips (each holding many flash memory cells), along with a separate flash memory controller chip.
Flash memories
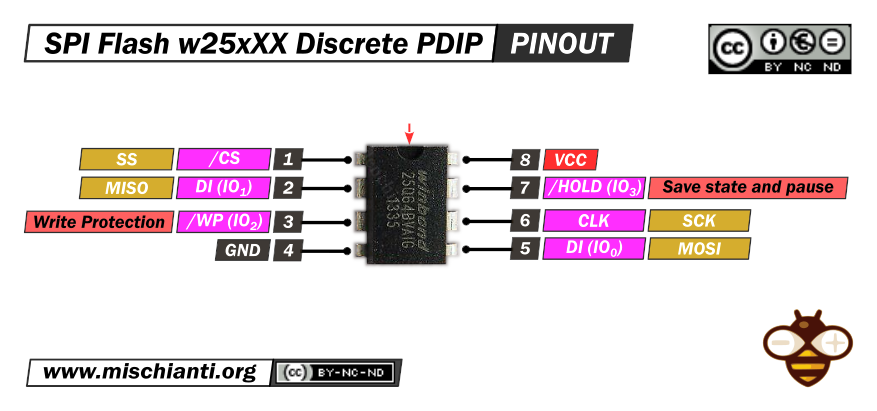
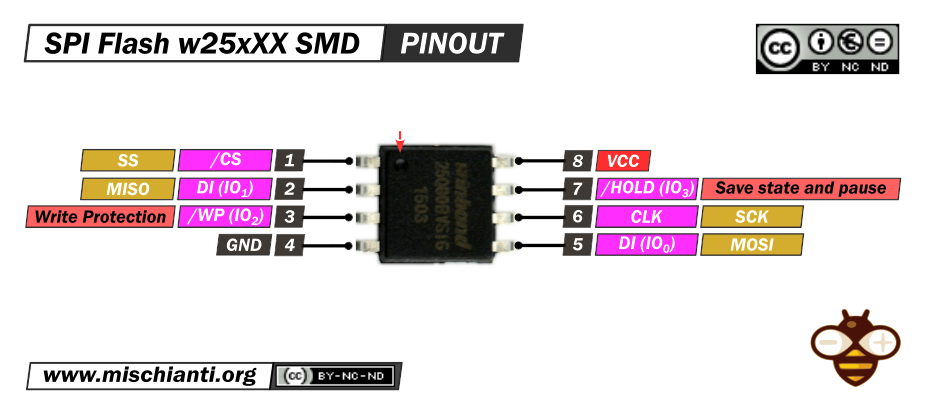
There are SMD and Discrete IC managed by SPI protocol.
Here a set of SPI flash with different size w25q16 SMD 2Mb - w25q16 Discrete 2Mb - w25q32 SMD 4Mb - w25q32 Discrete 4Mb - w25q64 SMD 8Mb - w25q64 Discrete 8Mb - w25q128 SMD 16Mb - w25q128 Discrete 16Mb W25Q32 W25Q64 w25q128 module 4Mb 8Mb 16Mb
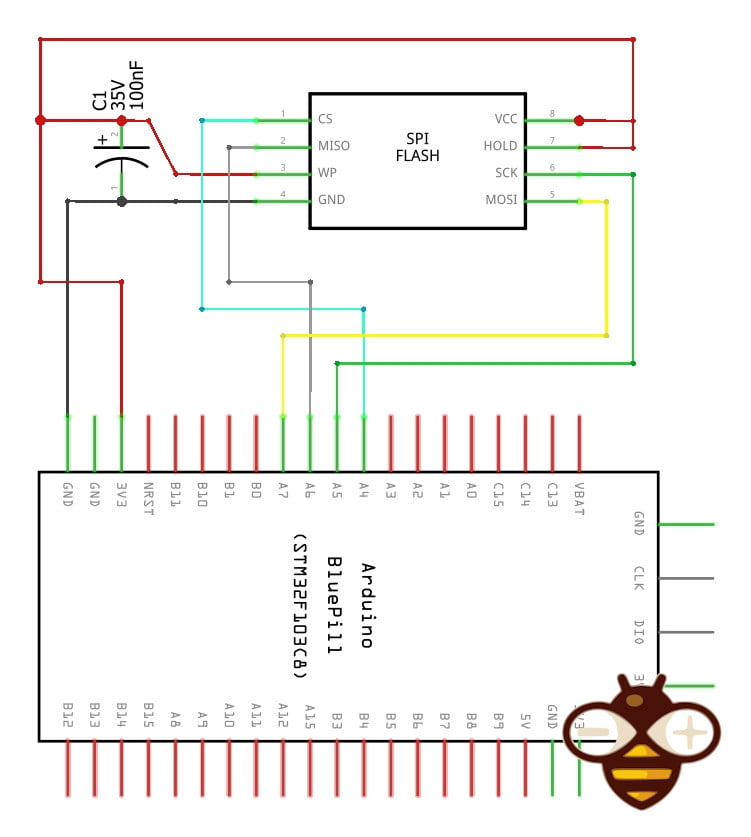
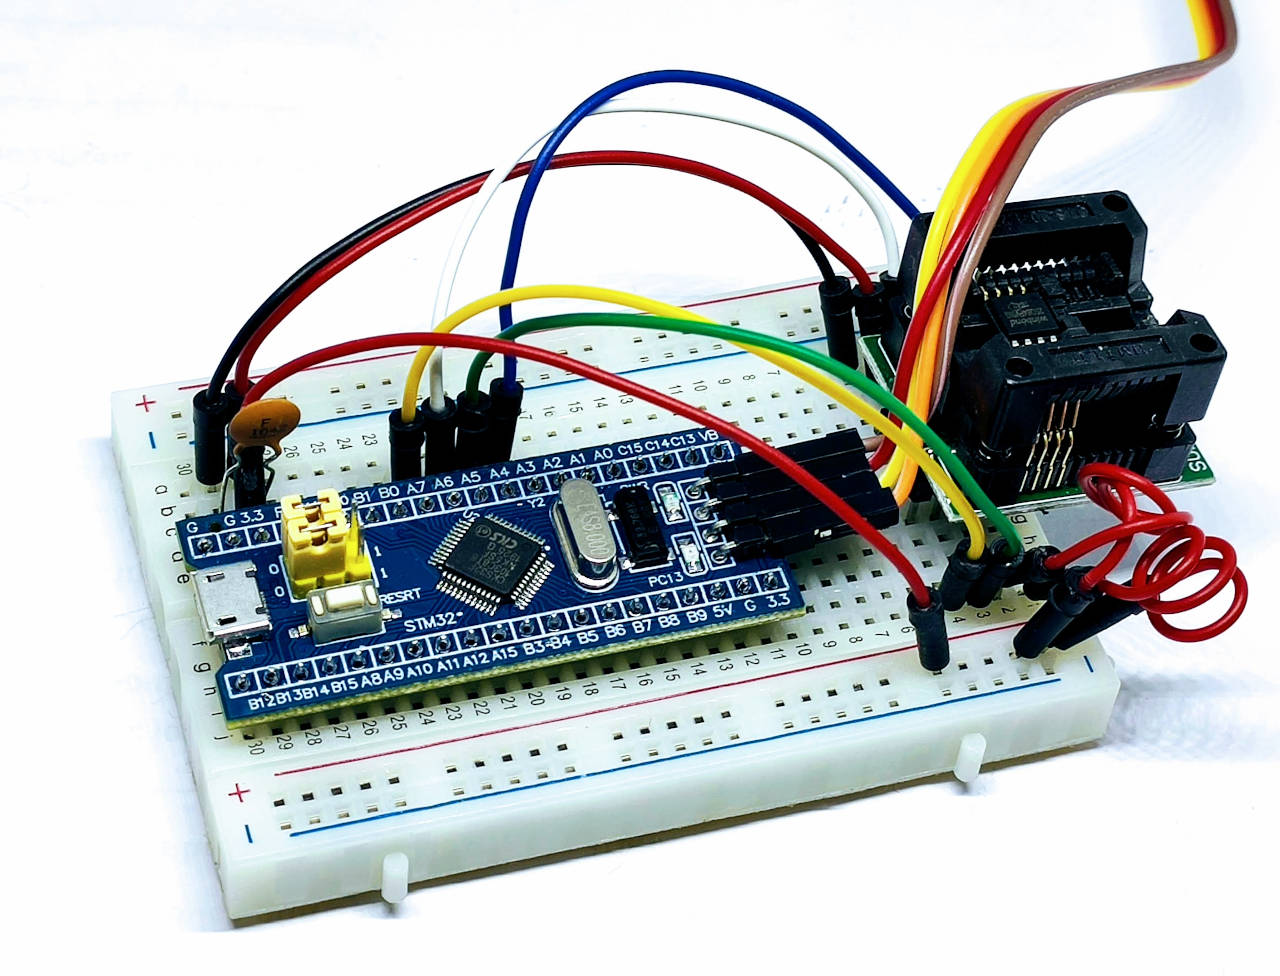
STM32F1 blue-pill wiring
We start with the classic STM32F1 blue-pill very common prototype board without SPI Flash footprint.
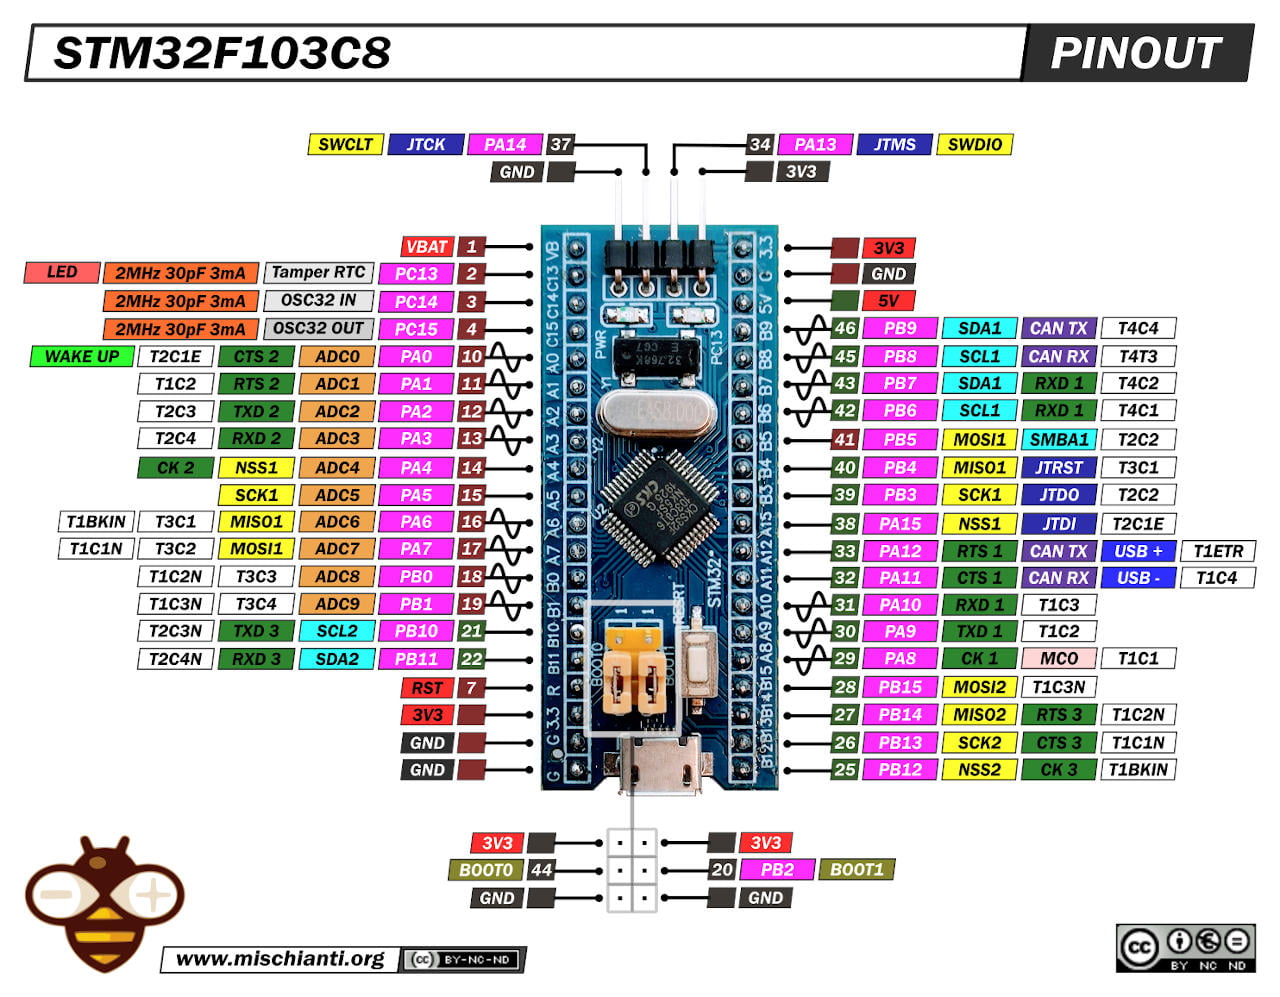
So you can refer to the pinout and connect pins 8, 9, 10, and 4 for CS.
| STM32F1 | SPI Flash | |
|---|---|---|
| PA4 | /CS | Pulled UP if not standard CS |
| PA6 | DI (IO1) | |
| PA7 | DI (IO0) | |
| PA5 | CLK | |
| 3.3v | /WP | |
| 3.3v | /Hold | |
| GND | GND | |
| 3.3v | VCC |
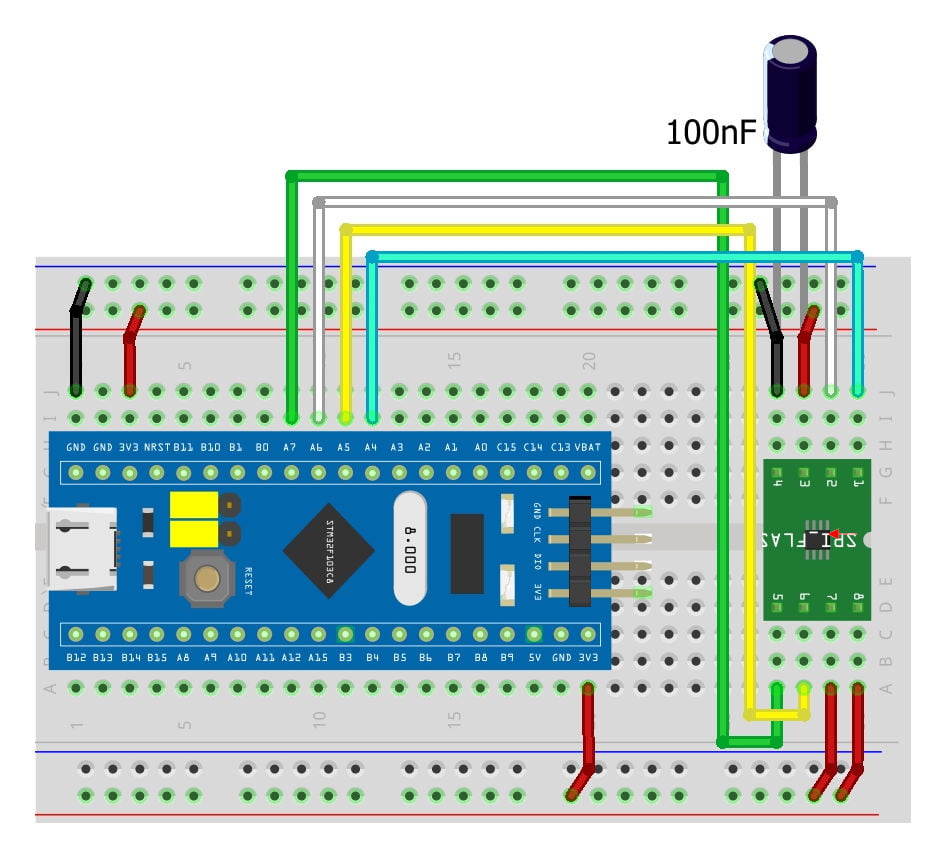
For the capacitor, I use a 0.1μF, and It works correctly, but the standard value was 0.01μF.
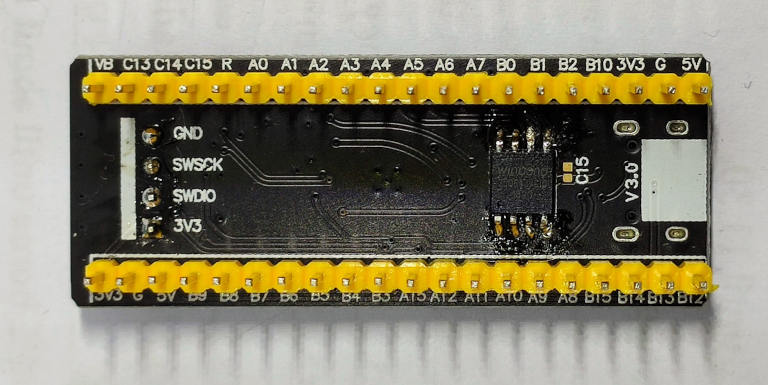
STM32F4 black-pill wiring
This device has a native footprint to add SPI Flash.
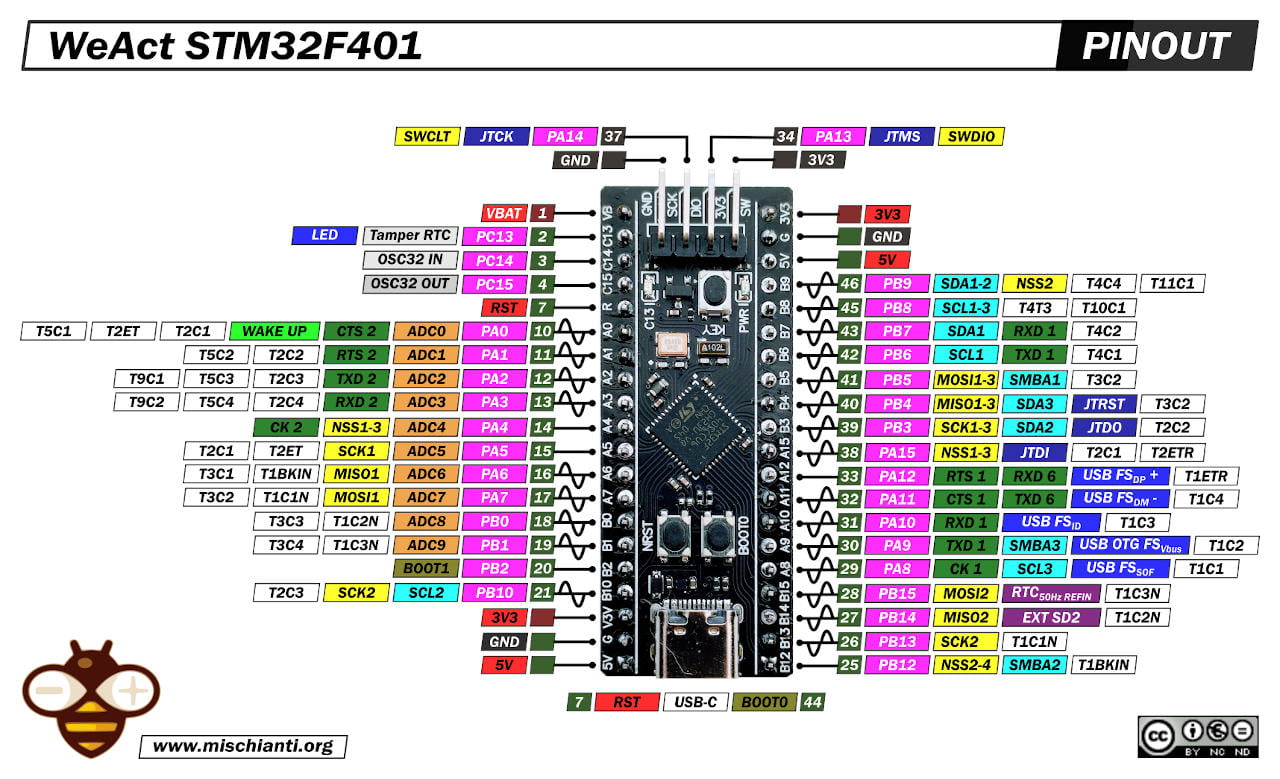
For this device, we are going to use the default footprint.
| STM32F4 | SPI Flash |
|---|---|
| PA4 | CS |
| PA6 | DI (IO1) |
| PA7 | DI (IO0) |
| PA5 | CLK |
| 3.3v | /WP |
| 3.3v | /Hold |
| GND | GND |
| 3.3v | VCC |
For the capacitor, I used a 0.1μF, and It works correctly, but the standard value was 0.01μF.
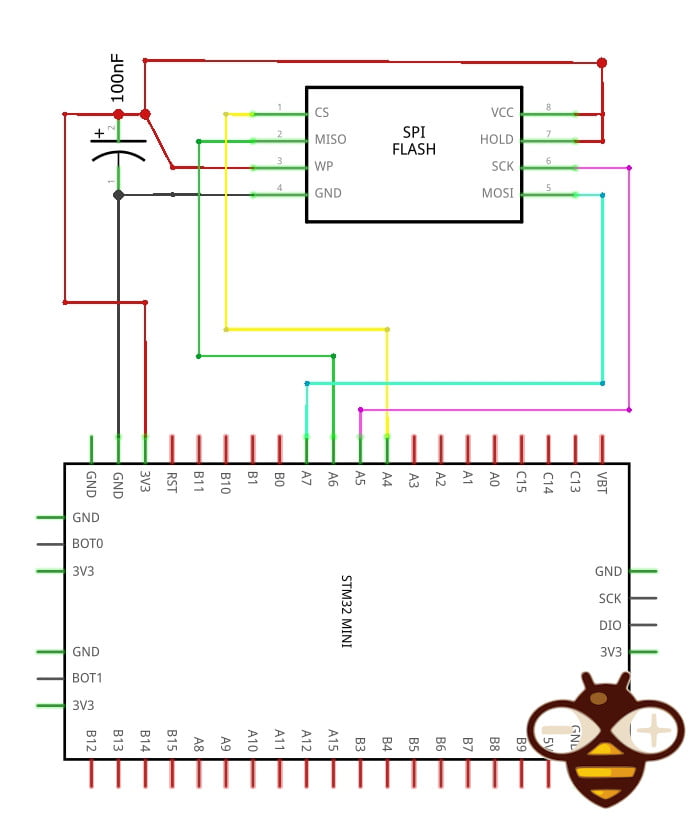
Here is the footprint before adding the SPI Flash. You can also see the footprint for a capacitor (C15) for the best performance, you must add a 104 0.1uF 0402 cap.

You can get more information on the relative article with the pinout and schema.
SPI Flash basic usage
If you don’t need a particular data structures, you can do basic and raw usage of the SPI Flash.
For additional information on this library, you can see the article “Arduino: fast external SPI Flash memory“.
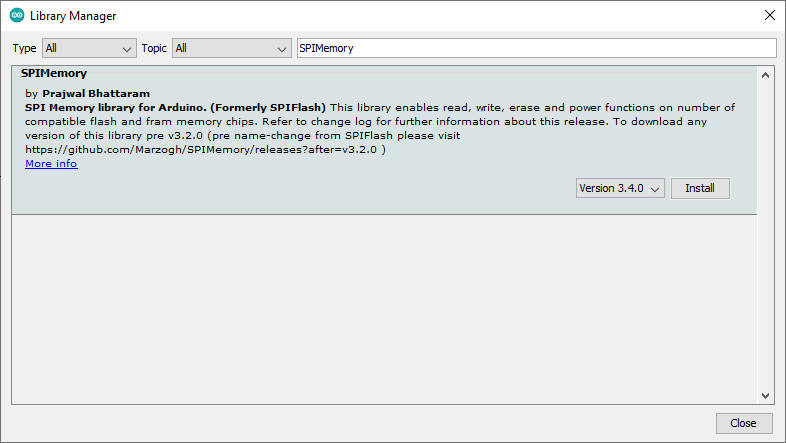
For basic usage, I advise using a library named SPIMemory, which is quite simple but with good support without difficulty. You can download It via the library manager from Arduino IDE.
Here is a simple example that stores a JSON string in the initial address 0, and I re-read It, then I ask the method getAddress for the first available contiguous position where I can store another JSON string, and I save It and re-read.
/*
 *  Manage external SPI Flash with STM32
 *  Write and read a JSON structure like a String,
 *  find first address available
 *  and write and read another JSON structure
 *
 *  with library SPIMemory
 *
 *  by Mischianti Renzo <https://mischianti.org>
 *
 *  https://mischianti.org/
 *
 *	SPIFlash connected via SPI standard
 *
 */

#include <SPI.h>
#include <SPIMemory.h>
#include <ArduinoJson.h>

//SPIFlash flash; // If you don't specify the library use standard SPI connection
SPIFlash flash(SS);
void setup() {
  Serial.begin(115200);

  while (!Serial) ; // Wait for Serial monitor to open
  delay(100);

  flash.begin(); // If SPIMemory isn't recognized you can specify the size of memory

  // flash.eraseChip();

  Serial.print(F("Flash size: "));
  Serial.print((long)(flash.getCapacity()/1000));
  Serial.println(F("Kb"));

  unsigned long strAddr = 0;
  unsigned long strAddrSecondString = 0;

  Serial.println();

  // Allocate a temporary JsonDocument
  // Don't forget to change the capacity to match your requirements.
  // Use arduinojson.org/v6/assistant to compute the capacity.
  //  StaticJsonDocument<512> doc;
  // You can use DynamicJsonDocument as well
  Serial.println(F("Generate JSON file!"));
  DynamicJsonDocument doc(512);

  // Set the values in the document
  doc["energyLifetime"] = 21698620;
  doc["energyYearly"] = 1363005;

  Serial.print(F("Put data in a buffer.. "));
  // Serialize JSON to file
  String buf;
  if (serializeJson(doc, buf) == 0) {
	  Serial.println(F("failed to write buffer"));
  }

  if (flash.writeStr(strAddr, buf)){
	  Serial.print(F("OK, writed on address "));
	  Serial.println(strAddr);
  }else{
	  Serial.println(F("KO"));
  }

  String outputString = "";
  if (flash.readStr(strAddr, outputString)) {
    Serial.print(F("Read json: "));
    Serial.println(outputString);
    Serial.print(F("From address: "));
    Serial.println(strAddr);
  }


  Serial.println(F("Generate JSON file!"));
  DynamicJsonDocument doc2(512);

  // Set the values in the document
  doc2["energyLifetime"] = 222;
  doc2["energyYearly"] = 333;


  Serial.println();
  Serial.print(F("Check first free sector: "));
  strAddrSecondString = flash.getAddress(doc2.size());
  Serial.println(strAddrSecondString);
  Serial.println();

  Serial.print(F("Stream data in flash memory!"));

  Serial.print(F("Put data in a buffer.."));
  // Serialize JSON to file
  String buf2;
  if (serializeJson(doc2, buf2) == 0) {
	  Serial.println(F("failed to write buffer"));
  }
    // Print test file

  if (flash.writeStr(strAddrSecondString, buf2)){
	  Serial.print(F("OK, writed on address "));
	  Serial.println(strAddrSecondString);
  }else{
	  Serial.println(F("KO"));
  }

  String outputString2 = "";
  if (flash.readStr(strAddrSecondString, outputString2)) {
    Serial.print(F("Read data: "));
    Serial.println(outputString2);
    Serial.print(F("From address: "));
    Serial.println(strAddrSecondString);
  }

  while (!flash.eraseSector(strAddr));
  while (!flash.eraseSector(strAddrSecondString));

}

void loop() {

}
Here is the console result.
Flash size: 8388Kb

Generate JSON file!
Put data in a buffer.. OK, writed on address 0
Read json: {"energyLifetime":21698620,"energyYearly":1363005}
From address: 0
Generate JSON file!

Check first free sector: 56

Stream data in flash memory!Put data in a buffer..OK, writed on address 56
Read data: {"energyLifetime":222,"energyYearly":333}
From address: 56
SPI Flash advanced use with SdFat filesystem
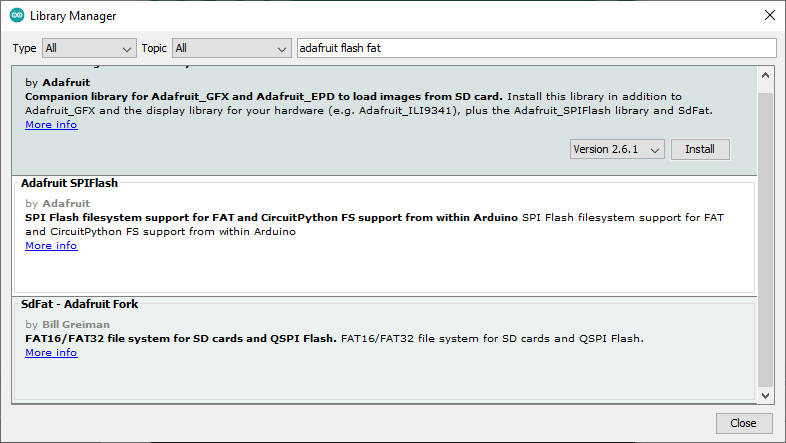
A more complex library (and more hungry of resources) It’s the Adafruit one, the Adafruit SPIFlash, that needs to be used with the SdFat Adafruit fork.
You can also find these libraries on library manager “Adafruit SPIFlash” and “SdFat – Adafruit Fork”.
Add new SPI Flash type
The set of chips is supported. It’s limited to a specified list but creates a new device. It’s simple; for example, I have a W25X80AVAIZ (I think Winbond clone), a discrete component buy for a very low price.
It has these characteristics:
- 1Mb capacity;
- 104Mhz of speed;
- Winbond clone;
- Single dual and quad SPI.
Then, I write a simple sketch to check the compatibility:
/*
 *  Retrieve basic core info of Flash SPI
 *  Add a custom device w25x80
 *  library Adafruit_SPIFlash and SdFat - AdafruitFork
 *
 *  by Mischianti Renzo <https://mischianti.org>
 *
 *  https://mischianti.org/
 *
 *	SPIFlash connected via SPI standard check wiring on the article
 *
 */

#include "SdFat.h"
#include "Adafruit_SPIFlash.h"

Adafruit_FlashTransport_SPI flashTransport(SS, SPI); // Set CS and SPI interface
Adafruit_SPIFlash flash(&flashTransport);

void setup()
{
  Serial.begin(115200);
  while ( !Serial ) delay(100);   // wait for native usb

  if (flash.begin()) {
	  Serial.println(F("Device finded and supported!"));
  } else {
	  Serial.println(F("Problem to discover and configure device, check wiring also!"));
  }
  // Set 4Mhz SPI speed
  flashTransport.setClockSpeed(4000000, 4000000); // added to prevent speed problem

  Serial.println();

  Serial.println("Adafruit Serial Flash get basic info: ");
  Serial.print("JEDEC ID (FFFFFF for unknown): "); Serial.println(flash.getJEDECID(), HEX);
  Serial.print("Flash size: "); Serial.println(flash.size());

  Serial.println();Serial.println();

  uint8_t jedec_ids[4];
  flashTransport.readCommand(SFLASH_CMD_READ_JEDEC_ID, jedec_ids, 4);

  // For simplicity with commonly used device, we only check for continuation
  // code at 2nd byte (e.g Fujitsu FRAM devices)
  if (jedec_ids[1] == 0x7F) {
    // Shift and skip continuation code in 2nd byte
    jedec_ids[1] = jedec_ids[2];
    jedec_ids[2] = jedec_ids[3];
  }

  Serial.println("Retrieve JDEC_ID");

  Serial.print("Manufacturer ID: 0x");
  Serial.println(jedec_ids[0], HEX);

  Serial.print("Memory Type: 0x");
  Serial.println(jedec_ids[1], HEX);

  Serial.print("Capacity: 0x");
  Serial.println(jedec_ids[2], HEX);
  Serial.print("Capacity DEC: ");
  Serial.println(jedec_ids[2], DEC);
}

void loop()
{
  // nothing to do
}
The serial output for my unsupported device is:
Unknown flash device 0xEF4014
Problem to discover and configure device, check wiring also!

Adafruit Serial Flash get basic info:
JEDEC ID (FFFFFF for unknown): FFFFFF
Flash size: 0


Retrieve JDEC_ID
Manufacturer ID: 0xEF
Memory Type: 0x40
Capacity: 0x14
Capacity DEC: 20
So I get from the Adafruit_SPIFlash library the file flash_devices.h, and I get the most similar device is in the list.
Then I use:
Capacity DEC to get the size: .total_size = (1UL << 20), /* 1 MiB */
Manufacturer ID for the manufacturer: .manufacturer_id = 0xef
Memory type for the memory_type: .memory_type = 0x40
The Capacity for capacity: .capacity = 0x14
I try to find some information on the compatible device datasheet.
  // Settings for the Winbond W25Q80BV (1 MiB SPI flash.)
  // https://pdf1.alldatasheet.com/datasheet-pdf/view/555565/WINBOND/W25Q80BV.html
  #define W25X80BV                                                            \
    {                                                                            \
      .total_size = (1UL << 20), /* 1 MiB */                                     \
          .start_up_time_us = 5000, .manufacturer_id = 0xef,                     \
      .memory_type = 0x40, .capacity = 0x14, .max_clock_speed_mhz = 104,         \
      .quad_enable_bit_mask = 0x02, .has_sector_protection = false,              \
      .supports_fast_read = true, .supports_qspi = true,                         \
      .supports_qspi_writes = true, .write_status_register_split = false,        \
      .single_status_byte = false, .is_fram = false,                             \
    }


  static const SPIFlash_Device_t possible_devices[] = {
		  W25X80BV,
  };

  // Initialize flash library and check its chip ID.
  if (!flash.begin(possible_devices)) {
    Serial.println("Error, failed to initialize flash chip!");
    while(1) yield();
  }
Now the complete test sketch become:
/*
 *  Retrieve basic core info of Flash SPI
 *  Add a custom device w25x80
 *  library Adafruit_SPIFlash and SdFat - AdafruitFork
 *
 *  by Mischianti Renzo <https://mischianti.org>
 *
 *  https://mischianti.org/
 *
 *	SPIFlash connected via SPI standard check wiring on the article
 *
 */

#include "SdFat.h"
#include "Adafruit_SPIFlash.h"

Adafruit_FlashTransport_SPI flashTransport(SS, SPI); // Set CS and SPI interface
Adafruit_SPIFlash flash(&flashTransport);

void setup()
{
  Serial.begin(115200);
  while ( !Serial ) delay(100);   // wait for native usb

  // Settings for the Winbond W25Q80BV (1 MiB SPI flash.)
  // https://pdf1.alldatasheet.com/datasheet-pdf/view/555565/WINBOND/W25Q80BV.html
  #define W25X80BV                                                            \
    {                                                                            \
      .total_size = (1UL << 20), /* 1 MiB */                                     \
          .start_up_time_us = 5000, .manufacturer_id = 0xef,                     \
      .memory_type = 0x40, .capacity = 0x14, .max_clock_speed_mhz = 104,         \
      .quad_enable_bit_mask = 0x02, .has_sector_protection = false,              \
      .supports_fast_read = true, .supports_qspi = true,                         \
      .supports_qspi_writes = true, .write_status_register_split = false,        \
      .single_status_byte = false, .is_fram = false,                             \
    }


  static const SPIFlash_Device_t possible_devices[] = {
		  W25X80BV,
  };

  if (flash.begin(possible_devices)) {
	  Serial.println(F("Device finded and supported!"));
  } else {
	  Serial.println(F("Problem to discover and configure device, check wiring also!"));
  }
  // Set 4Mhz SPI speed
  flashTransport.setClockSpeed(4000000, 4000000); // added to prevent speed problem

  Serial.println();

  Serial.println("Adafruit Serial Flash get basic info: ");
  Serial.print("JEDEC ID (FFFFFF for unknown): "); Serial.println(flash.getJEDECID(), HEX);
  Serial.print("Flash size: "); Serial.println(flash.size());

  Serial.println();Serial.println();

  uint8_t jedec_ids[4];
  flashTransport.readCommand(SFLASH_CMD_READ_JEDEC_ID, jedec_ids, 4);

  // For simplicity with commonly used device, we only check for continuation
  // code at 2nd byte (e.g Fujitsu FRAM devices)
  if (jedec_ids[1] == 0x7F) {
    // Shift and skip continuation code in 2nd byte
    jedec_ids[1] = jedec_ids[2];
    jedec_ids[2] = jedec_ids[3];
  }

  Serial.println("Retrieve JDEC_ID");

  Serial.print("Manufacturer ID: 0x");
  Serial.println(jedec_ids[0], HEX);

  Serial.print("Memory Type: 0x");
  Serial.println(jedec_ids[1], HEX);

  Serial.print("Capacity: 0x");
  Serial.println(jedec_ids[2], HEX);
  Serial.print("Capacity DEC: ");
  Serial.println(jedec_ids[2], DEC);


}

void loop()
{
  // nothing to do
}
And now the result is:
Device finded and supported!

Adafruit Serial Flash get basic info:
JEDEC ID (FFFFFF for unknown): EF4014
Flash size: 1048576


Retrieve JDEC_ID
Manufacturer ID: 0xEF
Memory Type: 0x40
Capacity: 0x14
Capacity DEC: 20
Test and Troubleshooting
To check if It’s ok, you can use the test given in the library. First, you must launch the example SdFat_speedtest; for Arduino UNO, like the board with little RAM, you must reduce the buffer from
#define BUFSIZE 4096
to
#define BUFSIZE 512
here is the complete sketch with custom IC:
// The MIT License (MIT)
// Copyright (c) 2019 Ha Thach for Adafruit Industries

#include "SdFat.h"
#include "Adafruit_SPIFlash.h"

// Uncomment to run example with custom SPI and SS e.g with FRAM breakout
 #define CUSTOM_CS   SS
 #define CUSTOM_SPI  SPI
#define EXTERNAL_FLASH_USE_QSPI

  Adafruit_FlashTransport_SPI flashTransport(CUSTOM_CS, CUSTOM_SPI);

  Adafruit_SPIFlash flash(&flashTransport);

#define BUFSIZE   4096

// 4 byte aligned buffer has best result with nRF QSPI
uint8_t bufwrite[BUFSIZE] __attribute__ ((aligned(4)));
uint8_t bufread[BUFSIZE] __attribute__ ((aligned(4)));

// the setup function runs once when you press reset or power the board
void setup()
{
  Serial.begin(115200);
  while ( !Serial ) delay(100);   // wait for native usb
//  SPI.setFrequency(12000000);

  // Settings for the Winbond W25Q80BV (1 MiB SPI flash.)
  // https://pdf1.alldatasheet.com/datasheet-pdf/view/555565/WINBOND/W25Q80BV.html
  #define W25X80BV                                                            \
    {                                                                            \
      .total_size = (1UL << 20), /* 1 MiB */                                     \
          .start_up_time_us = 5000, .manufacturer_id = 0xef,                     \
      .memory_type = 0x40, .capacity = 0x14, .max_clock_speed_mhz = 104,         \
      .quad_enable_bit_mask = 0x02, .has_sector_protection = false,              \
      .supports_fast_read = true, .supports_qspi = true,                         \
      .supports_qspi_writes = true, .write_status_register_split = false,        \
      .single_status_byte = false, .is_fram = false,                             \
    }


  /// List of all possible flash devices used by Adafruit boards
  static const SPIFlash_Device_t possible_devices[] = {
      // Main devices used in current Adafruit products
		  W25X80BV,
  };

//  flash.begin(possible_devices); // custom board
  flash.begin(); // start with standard board

  Serial.println("Adafruit Serial Flash Speed Test example");
  Serial.print("JEDEC ID: "); Serial.println(flash.getJEDECID(), HEX);
  Serial.print("Flash size: "); Serial.println(flash.size());
  Serial.flush();

  write_and_compare(0xAA);
  write_and_compare(0x55);

  Serial.println("Speed test is completed.");
  Serial.flush();
}

void print_speed(const char* text, uint32_t count, uint32_t ms)
{
  Serial.print(text);
  Serial.print(count);
  Serial.print(" bytes in ");
  Serial.print(ms / 1000.0F, 2);
  Serial.println(" seconds.");

  Serial.print("Speed : ");
  Serial.print( (count / 1000.0F) / (ms / 1000.0F), 2);
  Serial.println(" KB/s.\r\n");
}

bool write_and_compare(uint8_t pattern)
{
  uint32_t ms;

  Serial.println("Erase chip");
  Serial.flush();

#define TEST_WHOLE_CHIP

#ifdef TEST_WHOLE_CHIP
  uint32_t const flash_sz = flash.size();
  flash.eraseChip();
#else
  uint32_t const flash_sz = 4096;
  flash.eraseSector(0);
#endif

  flash.waitUntilReady();

  // write all
  memset(bufwrite, (int) pattern, sizeof(bufwrite));
  Serial.printf("Write flash with 0x%02X\n", pattern);
  Serial.flush();
  ms = millis();

  for(uint32_t addr = 0; addr < flash_sz; addr += sizeof(bufwrite))
  {
    flash.writeBuffer(addr, bufwrite, sizeof(bufwrite));
  }

  uint32_t ms_write = millis() - ms;
  print_speed("Write ", flash_sz, ms_write);
  Serial.flush();

  // read and compare
  Serial.println("Read flash and compare");
  Serial.flush();
  uint32_t ms_read = 0;
  for(uint32_t addr = 0; addr < flash_sz; addr += sizeof(bufread))
  {
    memset(bufread, 0, sizeof(bufread));

    ms = millis();
    flash.readBuffer(addr, bufread, sizeof(bufread));
    ms_read += millis() - ms;

    if ( memcmp(bufwrite, bufread, BUFSIZE) )
    {
      Serial.printf("Error: flash contents mismatched at address 0x%08X!!!", addr);
      for(uint32_t i=0; i<sizeof(bufread); i++)
      {
        if ( i != 0 ) Serial.print(' ');
        if ( (i%16 == 0) )
        {
          Serial.println();
          Serial.printf("%03X: ", i);
        }

        Serial.printf("%02X", bufread[i]);
      }

      Serial.println();
      return false;
    }
  }

  print_speed("Read  ", flash_sz, ms_read);
  Serial.flush();

  return true;
}

void loop()
{
  // nothing to do
}
If you have a Serial output like this (I use […] to indicate the line replication):
Adafruit Serial Flash Speed Test example
JEDEC ID: EF4014
Flash size: 1048576
Erase chip
Write flash with 0xAA
Write 1048576 bytes in 1.03 seconds.
Speed : 1016.06 KB/s.

Read flash and compare
Error: flash contents mismatched at address 0x00000000!!!
000: 00 00 00 00 00 00 00 00 00 00 00 00 00 00 00 00
[...]
FF0: 00 00 00 00 00 00 00 00 00 00 00 00 00 00 00 00
Erase chip
Write flash with 0x55
Write 1048576 bytes in 1.03 seconds.
Speed : 1017.05 KB/s.

Read flash and compare
Error: flash contents mismatched at address 0x00000000!!!
000: 00 00 00 00 00 00 00 00 00 00 00 00 00 00 00 00
[...]
FF0: 00 00 00 00 00 00 00 00 00 00 00 00 00 00 00 00
Speed test is completed.
The lines (or other HEX characters) with
000: 00 00 00 00 00 00 00 00 00 00 00 00 00 00 00 00
indicate that the data compared don’t match, so (If the previous test sketch work) probably you had some problem.
In most cases, the SPI speed is too high; this does not mean that the speed is too high for the microcontroller or IC, but it can be a problem with a poor connection cable.
Arduino MKR SAMD is supported very well by this library, so you don’t have to do anything, read more in the next paragraph.
But the solution to this was to reduce the speed, so you must go to add a line like this after the flash.begin():
flashTransport.setClockSpeed(24000000, 24000000);
the command set the SPI speed to 24Mhz, and now the result becomes like so:
Adafruit Serial Flash Speed Test example
JEDEC ID: EF4014
Flash size: 1048576
Erase chip
Write flash with 0xAA
Write 1048576 bytes in 4.07 seconds.
Speed : 257.38 KB/s.

Read flash and compare
Read  1048576 bytes in 0.47 seconds.
Speed : 2226.28 KB/s.

Erase chip
Write flash with 0x55
Write 1048576 bytes in 4.07 seconds.
Speed : 257.38 KB/s.

Read flash and compare
Read  1048576 bytes in 0.47 seconds.
Speed : 2231.01 KB/s.

Speed test is completed.
If no compare errors are shown, the SPI Flash was correctly configured.
Practical sketch
First of all, you must Format the SPI Flash; in the examples of Adafruit_SPIFlash, you can find the SdFat_format example, that format the SPI flash for you.
When you launch the sketch, It asks you to insert, in the Serial monitor, “OK” in camel case, here the Serial output result.
Adafruit SPI Flash FatFs Format Example
Flash size: 8192 KB
Flash chip JEDEC ID: 0xEF4017
!!!!!!!!!!!!!!!!!!!!!!!!!!!!!!!!!!!!!!!!!!!!!!!!!!!!!!!!!!!!!!!!!!!!!
This sketch will ERASE ALL DATA on the flash chip and format it with a new filesystem!
Type OK (all caps) and press enter to continue.
!!!!!!!!!!!!!!!!!!!!!!!!!!!!!!!!!!!!!!!!!!!!!!!!!!!!!!!!!!!!!!!!!!!!!

>>Send to COM17: "OK"<<
Creating and formatting FAT filesystem (this takes ~60 seconds)...
Setting disk label to: EXT FLASH
Formatted flash!
Flash chip successfully formatted with new empty filesystem!
Now you are ready to use the SPI Flash with FAT FS.
If you want to use the file-system FAT, I advise using a SPIFlash with more than 1Mb of space.
Here is a simple sketch that creates a test.txt file with the string <num> -> testing 1, 2, 3. 100 times.
/*
 *  Add new txt file and add  the string <num> -> testing 1, 2, 3. 100 times
 *  than read the file and put on serial output.
 *  library Adafruit_SPIFlash and SdFat - AdafruitFork
 *
 *  by Mischianti Renzo <https://mischianti.org>
 *
 *  https://mischianti.org/
 *
 *	SPIFlash connected via SPI standard check wiring on the article
 *
 */

#include "SdFat.h"
#include "Adafruit_SPIFlash.h"

Adafruit_FlashTransport_SPI flashTransport(SS, SPI); // Set CS and SPI interface
Adafruit_SPIFlash flash(&flashTransport);

// file system object from SdFat
FatFileSystem fatfs;
File myFile;

void setup()
{
  Serial.begin(115200);
  while ( !Serial ) delay(100);   // wait for native usb

  if (flash.begin()) {
	  Serial.println(F("Device finded and supported!"));
  } else {
	  Serial.println(F("Problem to discover and configure device, check wiring also!"));
  }

  Serial.println("Adafruit Serial Flash read write example");
  Serial.print("JEDEC ID: "); Serial.println(flash.getJEDECID(), HEX);
  Serial.print("Flash size: "); Serial.println(flash.size());
  Serial.flush();

  Serial.println();
  // First call begin to mount the filesystem.  Check that it returns true
  // to make sure the filesystem was mounted.
  if (!fatfs.begin(&flash)) {
    Serial.println("Error, failed to mount newly formatted filesystem!");
    Serial.println("Was the flash chip formatted with the SdFat_format example?");
    while(1) yield();
  }
  Serial.println("Mounted filesystem!");
  Serial.println();

  // open the file. note that only one file can be open at a time,
  // so you have to close this one before opening another.
  myFile = fatfs.open("test.txt", FILE_WRITE);

  // if the file opened okay, write to it:
  if (myFile) {
    Serial.print("Writing to test.txt...");
    for (int i=0;i<100;i++){
    	myFile.print(i);
    	myFile.println(" -> testing 1, 2, 3.");
    }
    // close the file:
    myFile.close();
    Serial.println("done.");
  } else {
    // if the file didn't open, print an error:
    Serial.println("error opening test.txt");
  }

  // re-open the file for reading:
  myFile = fatfs.open("test.txt");
  if (myFile) {
    Serial.println("test.txt:");

    // read from the file until there's nothing else in it:
    while (myFile.available()) {
      Serial.write(myFile.read());
    }
    // close the file:
    myFile.close();
  } else {
    // if the file didn't open, print an error:
    Serial.println("error opening test.txt");
  }
}

void loop() {
  // nothing happens after setup
}
The result becomes like so:
Device finded and supported!
Adafruit Serial Flash Speed Test example
JEDEC ID: EF4017
Flash size: 8388608

Mounted filesystem!

Writing to test.txt...done.
test.txt:
0 -> testing 1, 2, 3.
[...]
99 -> testing 1, 2, 3.
ets Jun  8 2016 00:22:57
Now we can call some command to retrieve the filesystem info and then get the list of files with the ls command.
/*
 *  Retrieve basic core info of Flash SPI
 *  library Adafruit_SPIFlash and SdFat - AdafruitFork
 *
 *  by Mischianti Renzo <https://mischianti.org>
 *
 *  https://mischianti.org/
 *
 *	SPIFlash connected via SPI standard check wiring on the article
 *
 */

#include "SdFat.h"
#include "Adafruit_SPIFlash.h"

Adafruit_FlashTransport_SPI flashTransport(SS, SPI); // Set CS and SPI interface
Adafruit_SPIFlash flash(&flashTransport);

// file system object from SdFat
FatFileSystem fatfs;

void setup()
{
  Serial.begin(115200);

  while ( !Serial ) delay(100);   // wait for native usb
  if (flash.begin()) {
	  Serial.println(F("Device finded and supported!"));
  } else {
	  Serial.println(F("Problem to discover and configure device, check wiring also!"));
  }

  Serial.println("Adafruit Serial Flash Speed Test example");
  Serial.print("JEDEC ID: "); Serial.println(flash.getJEDECID(), HEX);
  Serial.print("Flash size: "); Serial.println(flash.size());
  Serial.flush();

  // First call begin to mount the filesystem.  Check that it returns true
  // to make sure the filesystem was mounted.
  if (!fatfs.begin(&flash)) {
    Serial.println("Error, failed to mount newly formatted filesystem!");
    Serial.println("Was the flash chip formatted with the SdFat_format example?");
    while(1) yield();
  }
  Serial.println("Mounted filesystem!");

  Serial.print("Clusters:          ");
  Serial.println(fatfs.clusterCount());
  Serial.print("Blocks x Cluster:  ");
  Serial.println(fatfs.blocksPerCluster());

  Serial.print("Total Blocks:      ");
  Serial.println(fatfs.blocksPerCluster() * fatfs.clusterCount());
  Serial.println();

  // print the type and size of the first FAT-type volume
  uint32_t volumesize;
  Serial.print("Volume type is:    FAT");
  Serial.println(fatfs.fatType(), DEC);

  volumesize = fatfs.blocksPerCluster();    // clusters are collections of blocks
  volumesize *= fatfs.clusterCount();       // we'll have a lot of clusters
  volumesize /= 2;                           // SD card blocks are always 512 bytes (2 blocks are 1KB)
  Serial.print("Volume size (Kb):  ");
  Serial.println(volumesize);
  Serial.print("Volume size (Mb):  ");
  volumesize /= 1024;
  Serial.println(volumesize);
  Serial.print("Volume size (Gb):  ");
  Serial.println((float)volumesize / 1024.0);

  Serial.println("\nFiles found on the card (name, date and size in bytes): ");
  fatfs.rootDirStart();

  // list all files in the card with date and size
  fatfs.ls(LS_R | LS_DATE | LS_SIZE);
}

void loop(void) {
}
The result becomes
Device finded and supported!
Adafruit Serial Flash Speed Test example
JEDEC ID: EF4017
Flash size: 8388608
Mounted filesystem!
Clusters:          2043
Blocks x Cluster:  8
Total Blocks:      16344

Volume type is:    FAT12
Volume size (Kb):  8172
Volume size (Mb):  7
Volume size (Gb):  0.01

Files found on the card (name, date and size in bytes):
2000-01-01 01:00:00          0 mischianti/
2000-01-01 01:00:00         65 test.txt
Thanks
- Arduino: fast external SPI Flash memory
- Arduino MKR SAMD: FAT filesystem on external SPI flash memory
- esp32 and esp8266: FAT filesystem on external SPI flash memory
- STM32: SPI flash memory FAT FS
- STM32F1 Blue-Pill: pinout, specs, and Arduino IDE configuration (STM32duino and STMicroelectronics)
- STM32: program (STM32F1) via USB with STM32duino bootloader
- STM32: programming (STM32F1 STM32F4) via USB with HID boot-loader
- STM32F4 Black-Pill: pinout, specs, and Arduino IDE configuration
- STM32: ethernet w5500 with plain HTTP and SSL (HTTPS)
- STM32: ethernet enc28j60 with plain HTTP and SSL (HTTPS)
- STM32: WiFiNINA with ESP32 WiFi Co-Processor
- How to use SD card with stm32 and SdFat library
- \STM32: SPI flash memory FAT FS
- STM32: internal RTC, clock, and battery backup (VBAT)
- STM32 LoRa
- STM32 Power saving
- STM32F1 Blue-Pill clock and frequency management
- STM32F4 Black-Pill clock and frequency management
- Intro and Arduino vs STM framework
- Library LowPower, wiring, and Idle (STM Sleep) mode
- Sleep, deep sleep, shutdown, and power consumption
- Wake up from RTC alarm and Serial
- Wake up from the external source
- Backup domain intro and variable preservation across reset
- RTC backup register and SRAM preservation
- STM32 send emails with attachments and SSL (like Gmail): w5500, enc28j60, SD, and SPI Fash
- FTP server on STM32 with w5500, enc28j60, SD Card, and SPI Flash
- Connecting the EByte E70 to STM32 (black/blue pill) devices and a simple sketch example


Hi everybody,
I’m Frederic, leabing in France, passionate about IoT projects. I made mines with ESP32-S3, and today i take the chance to contact one of you who could help me.
I’ve been looking for a way to upload data to an External Flash Chip (W25Q64) easily, like the PlatformIO (Visual Studio Code) allows: by clicking first on “Build FileSystem” and then “Upload File System”.
But the thing is, that this way sends data to the Internal Chip…
How can i manage to make it send to the Extrenal Chip?
Is there somewhere i can “Set” the destination. Do i have to create someting to get a second SPIFFS…?
I’m quite newbie here, and it’s almost dark for me all this things work, but i’m ready to learn!
BTW, i know how to upolad data to the internal SPIFFS, (.txt files), i know how to read, write, amend them. I know also hos to access an SD card, but what i really want, is to manage the External Flash Chip in an easy way.
Waiting for your replies, thanks a million in advance!
Hi Frederic,
It’s true, I don’t think about an upload system, probably It’s sufficient to put a Circuitpython bootloader on STM32 and It becomes revealed as an external USB drive, but I must check It.
If you start some tests keep us updated.
If I find some time I start a little analysis too.
Bye Renzo
Hi Renzo,
What a pitty I didn’t get a notification of your reply.
I found it cause I still look for a solution that no one is offering today, or i’m looking on the wrong direction, thank you so much.
So far, my research has ended for now to use the serialflash library from Paul. It has a few examples codes (check spi flash characteristics, erase flash) and one that I was really interested in, the copySDtoflash.
Maybe still not the best option, but quite simple as writing data files on the SD card is easy with a Shield and a computer, and then ”transfer” it to the external flash with this code.
But I’m still facing problems as it does not work. Probably conflict with spi pins. I’m still trying to solve this, but with my knowledge level, it takes ages (modify, test, modify, test…).
In parallel, I was thinking about your option to create a kind of ”USB stick” with thé flash chip, write thé files with a computer, and then ”plug” only the chip to esp32-s3 to read files.
But I started this research just Yesterday, and seems to be as dark as my first way…I hope you will have time to help me, i’m quite surprised that no one is more interested in this problem like I was the only one in the World who wanted to do that?
Thanks à million, Frederic. Enjoy Xmas period!
Hi Frederic,
to copy data to the SPI Flash drive I use the SimpleFTPServer library (with WiFi or Ethernet), which allows you to write the SPI Flash with an FTP client.
But you need to use a network device, so It’s quite tedious.
Bye Renzo
Hi Renzo,
What a pleasure to read you.
Yes, i Saw this webserver option, but i did’nt want to write a Book on my previous message…
I’ll may try this one as the SD to flash is going nowhere as i’m writing those lines. If you know a solution which could work by setting platformio, it would be so nice…i’ll work so for now on the webserver solution fingers crossed. Thanks you so much for your Time.
Hi,
I use the FTP solution on the Aurora inverter project with esp8266 to upload the web interface.
I add a define to enable or disable the FTP server (on development)
I created an FTP library to manage that situation and add support for STM32 (ethernet and wifi with SPI Flash).
If I find an IDE-integrated solution, I will add it here.
Keep in touch with the progress of your research.
Bye Renzo
Hi Renzo,
First fo all, all the best for this new year!
I whish it wil bring you happiness for you and your family, and a lot of new projetcs!
I still investigate how to upload my files to my external flash (W25Q64) connected via SPI protocol.
What i understood, is that i need to follow those steps:
1/ Erase all data (blocks)->OK.
2/ Format as FAT (NOK: message “Error, f_mkfs failed with error code: 14”). 🙁
3/ Create an FTP protocol for an easy upload: I did it for the internal flash, and it worked, i can access to the files.(uploaded via the PlatformIO process).
But with your code “SimpleFTPServer”, how to “point” to the external one?
I would like to add a screenshot but i can’t, so here is the part of the code where i would like to understand:
Adafruit_FlashTransport_SPI flashTransport(SS, SPI); // Set CS and SPI interface
Adafruit_SPIFlash flash(&flashTransport);
Where do i “set” the SPI interface?
Thanks a lot for your help
Frederic
Hi Frederic,
you must set on EMailSenderKey.h file this define.
In this place (STM32 storage section).
If you need more detail, create a topic in the forum section so that we can share the code and attachments.
Bye Renzo
Hi Renzo,
I’ve created a new topic, but it’s showed as “This topic is marked as spam.”
Can you “unmark” it or do i have to create a new one?
Thanks,
Frederic.
Fixed It. Bye Renzo
Hi,
I am trying to use stmf411 black pill, however i am getting an error for format fatfs.
Error, f_mount failed with error code: 13
I have tried setting 1MHz to 100MHz clock speed, then to same error.
Hi Paul,
what is the response of compatibility sketch?
Bye Renzo
Hey Renzo where can i find compatibility sketch ??
Are you asking about Flash chip weather detecting, Its detecting W25Q128JV_SQ but when trying to run compare and read i am getting
Read flash and compare
Error: flash contents mismatched at address 0x00000000!!!
000: 00 00 00 00 00 00 00 00 00 00 00 00 00 00 00 00
[…]
FF0: 00 00 00 00 00 00 00 00 00 00 00 00 00 00 00 00
Speed test is completed.
tried with setting multiple setClockFrequency From 1mhz to 100mhz
No Luck
Hi Paul,
The sketch is this.
I tested It with STM32 blue pill and STM32 Black pill and various SPI Flash, witch kind of SPI Flash you use?
Bye Renzo
Hi Renzo,
I am using black pill stm32f411ce with spi flash W25Q128JV_SQ breakout board.
Stm32 is able to detect flash and display its capacity.
However when i run,
write and compare example sketch (write(0xAA)),
I get address mismatched at READ operation.
I have tried running sketch by setting different clockfrequency but still no luck.
when i run sd format sketch i get error 13 for mounting.
It’s very strange, check your wires, if you use a breadboard sometime you can get noise problem.
Can you try with different SPI Flash?
Renzo,
i don’t think it’s problem with SPI Flash.
I followed your example for ESP32 and sketch work perfect.
Thanks Renzo,
I found the problem,
Stm32 works with external flash.
You were right , the problem was breadboard.
Ahh! ok, the noise can create a lot of problem, I’m glad we found the solution.
Bye Renzo