STM32 send emails with attachments and SSL (like Gmail): w5500, enc28j60, SD, and SPI Fash
Finally an upgrade for my library EMailSender. the previous version (v2.x) can send emails with ethernet by using services without SSL like SendGrid (“Send emails with attachments (v2.x library): Arduino Ethernet“) after a big work and study now I can send emails with standard ethernet device like w5500 or enc28j60 with SSL support, and we can use Gmail or other SSL service provider.
But we need devices like STM32 and ESP32, because we need more than 64Kb on flash an a good quantity of SRAM.
This library uses the SMTP:
The Simple Mail Transfer Protocol (SMTP) is a communication protocol for electronic mail transmission. As an Internet standard, SMTP was first defined in 1982 by RFC 821, and updated in 2008 by RFC 5321 to Extended SMTP additions, which is the protocol variety in widespread use today. Mail servers and other message transfer agents use SMTP to send and receive mail messages. Proprietary systems such as Microsoft Exchange and IBM Notes and webmail systems such as Outlook.com, Gmail and Yahoo! Mail may use non-standard protocols internally, but all use SMTP when sending to or receiving email from outside their own systems. SMTP servers commonly use the Transmission Control Protocol on port number 25. (cit WiKi)
For example, I use a dedicated Gmail account; I create a new account because I need to create application passwords.
Library
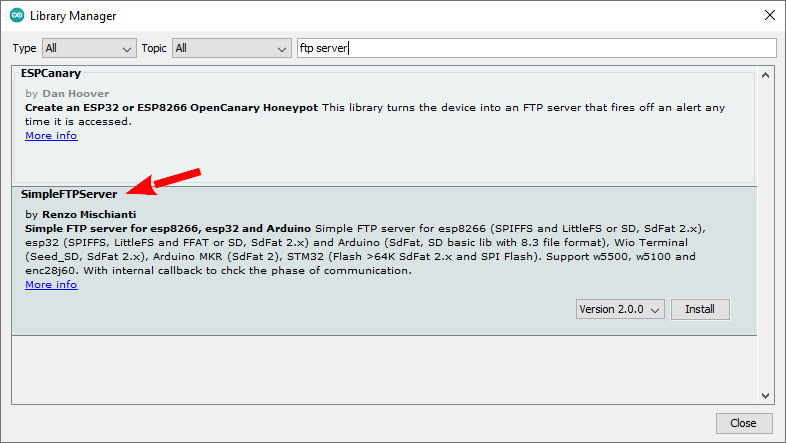
You can get the library directly from Arduino Library Manager.
Or you can download it from GitHub
Ethernet and SSL support
First of all remember to read the article “STM32: ethernet w5500 with plain (HTTP) and SSL (HTTPS)” for a better understanding.
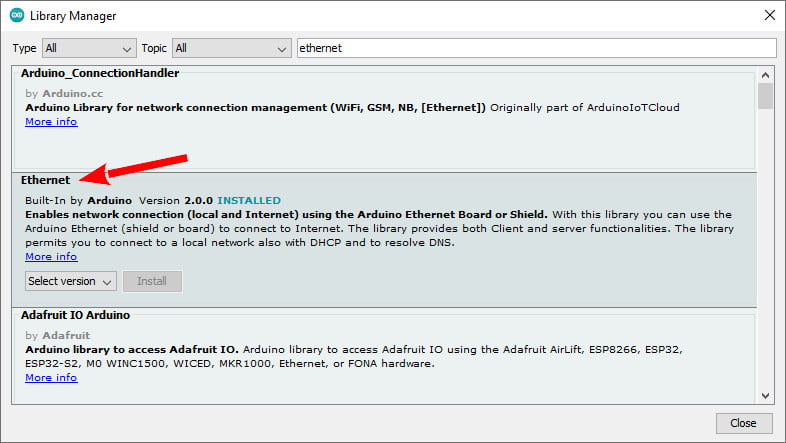
A wide selection of libraries exists, but the standard one Is the best choice. You can find It in the standard Arduino library manager.
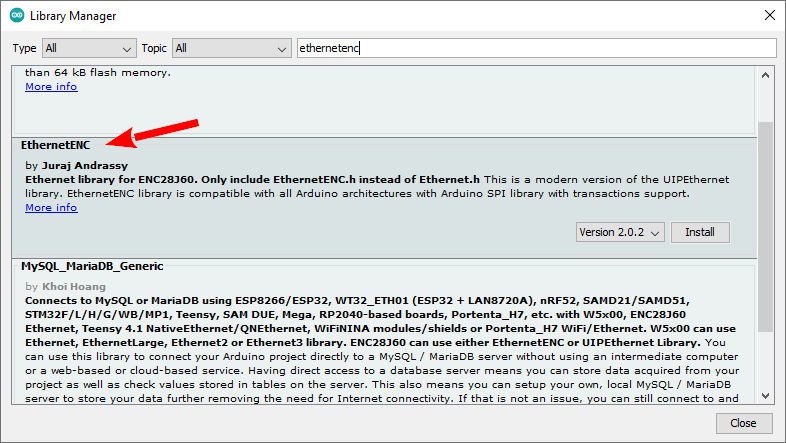
If you use enc28j60 you can use EthernetENC ready to be used with SSLClient, read the article “STM32: ethernet enc28j60 with plain (HTTP) and SSL (HTTPS)“.
SSLClient
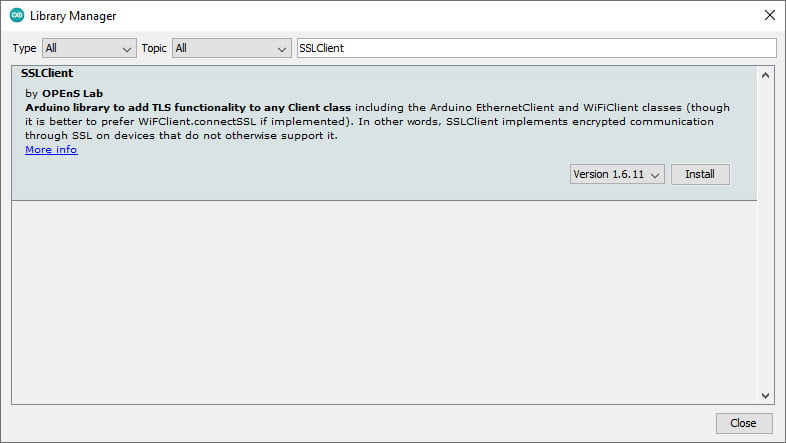
This library and device do not support SSL, so adding these features exists an alternate library named SSLClient that needs a little patch of Ethernet.
SSLClient adds TLS 1.2 functionality to any network library implementing the Arduino Client interface, including the Arduino EthernetClient and WiFiClient classes. SSLClient was created to integrate TLS seamlessly with the Arduino infrastructure using BearSSL as an underlying TLS engine. Unlike ArduinoBearSSL, SSLClient is entirely self-contained and does not require any additional hardware (other than a network connection). (cit.)
SSLClient with Ethernet
If you are using the Arduino Ethernet library, you will need to modify the library to support the large buffer sizes required by SSL (detailed in resources). You can either modify the library yourself or use this fork of the Ethernet library with the modification. To use the fork: download a zipped copy of the fork through GitHub, use the “add a .zip library” button in Arduino to install the library, and replace #include "Ethernet.h" it with #include "EthernetLarge.h" in your sketch. Alternatively, if, for some reason, this solution does not work, you can apply the modification manually using the instructions below.
Buffer extension
I notice also that to get good stability probably you must change something.
In SSLClient.h you must change this line.
unsigned char m_iobuf[2048];
to
unsigned char m_iobuf[BR_SSL_BUFSIZE_BIDI];
Manual Modification
First, find the location of the library in the directory where Arduino is installed (C:\Program Files (x86)\Arduino on Windows). Inside of this directory, navigate to libraries\Ethernet\src (C:\Program Files (x86)\Arduino\libraries\Ethernet\src on Windows). Modify Ethernet.h to replace these lines:
...
// Configure the maximum number of sockets to support.  W5100 chips can have
// up to 4 sockets.  W5200 & W5500 can have up to 8 sockets.  Several bytes
// of RAM are used for each socket.  Reducing the maximum can save RAM, but
// you are limited to fewer simultaneous connections.
#if defined(RAMEND) && defined(RAMSTART) && ((RAMEND - RAMSTART) <= 2048)
#define MAX_SOCK_NUM 4
#else
#define MAX_SOCK_NUM 8
#endif

// By default, each socket uses 2K buffers inside the Wiznet chip.  If
// MAX_SOCK_NUM is set to fewer than the chip's maximum, uncommenting
// this will use larger buffers within the Wiznet chip.  Large buffers
// can really help with UDP protocols like Artnet.  In theory larger
// buffers should allow faster TCP over high-latency links, but this
// does not always seem to work in practice (maybe Wiznet bugs?)
//#define ETHERNET_LARGE_BUFFERS
...
With this:
...
// Configure the maximum number of sockets to support.  W5100 chips can have
// up to 4 sockets.  W5200 & W5500 can have up to 8 sockets.  Several bytes
// of RAM are used for each socket.  Reducing the maximum can save RAM, but
// you are limited to fewer simultaneous connections.
#define MAX_SOCK_NUM 2

// By default, each socket uses 2K buffers inside the Wiznet chip.  If
// MAX_SOCK_NUM is set to fewer than the chip's maximum, uncommenting
// this will use larger buffers within the Wiznet chip.  Large buffers
// can really help with UDP protocols like Artnet.  In theory larger
// buffers should allow faster TCP over high-latency links, but this
// does not always seem to work in practice (maybe Wiznet bugs?)
#define ETHERNET_LARGE_BUFFERS
...
You may need to use sudo or administrator permissions to make this modification. We change MAX_SOCK_NUM and ETHERNET_LARGE_BUFFERS so the Ethernet hardware can allocate a larger space for SSLClient. However, a downside of this modification is that we can only have two sockets concurrently. As most microprocessors barely have enough memory for one SSL connection, this limitation will rarely be encountered in practice.
Retrieve certificate
In the default file I already loaded the Gmail certificate, but if you want use another SSL provider you must retrieve the relative certificate.
To use an SSL, we need the server certificate, but in this case, SSLClient uses a trick given by BearSSL implementation. This minimal x509 verification engine allows using of Trust Anchors.
I add a simple online generator that you can find here.
You must only write the site’s address (httpbin.org) in the first input box, click Generate code, copy the code, and put it inside a file called trust_anchors.h.
Constructor
The default value is quite simple and uses Gmail as an SMTP server.
EMailSender emailSend("smtp.account@gmail.com", "password");
If you want to use another provider, you can use a more complex (but simple) constructor
EMailSender(const char* email_login, const char* email_password, const char* email_from, const char* name_from, const char* smtp_server, uint16_t smtp_port );
	EMailSender(const char* email_login, const char* email_password, const char* email_from, const char* smtp_server, uint16_t smtp_port);
	EMailSender(const char* email_login, const char* email_password, const char* email_from, const char* name_from );
	EMailSender(const char* email_login, const char* email_password, const char* email_from);
	EMailSender(const char* email_login, const char* email_password);
email_login: login to account SMTP- email_password: password account SMTP
- email_from: email of the sender
- name_from: the user name of the sender
smtp_server: server SMTPsmtp_port: SMTP port
You can also manage di parameter in realtime with these commands:
	void setSMTPPort(uint16_t smtp_port);
	void setSMTPServer(const char* smtp_server);
	void setEMailLogin(const char* email_login);
	void setEMailFrom(const char* email_from);
	void setNameFrom(const char* name_from);
	void setEMailPassword(const char* email_password);
Another parameter that you can set post constructor is
void setUseAuth(bool useAuth = true);
void setPublicIpDescriptor(const char *publicIpDescriptor = "mischianti");
The first permit excludes the authentication handshake, the second change the HELO message identification.
The other two additional configurations are
	void setEHLOCommand(bool useEHLO = false)
	void setSASLLogin(bool isSASLLogin = false)
The first change HELO command in EHLO, is needed by Postfix SMTP servers.
The second activates SASL login, so the login and password are sent all in one line.
You must connect to WIFI :P.
Send email
Create a message with the structure EMailMessage
    EMailSender::EMailMessage message;
    message.subject = "Subject";
    message.message = "Hi, How are you<br>Fine.";
Send message:
EMailSender::Response resp = emailSend.send("account_to_send@gmail.com", message);
Then check the response:
    Serial.println("Sending status: ");
    Serial.println(resp.code);
    Serial.println(resp.desc);
    Serial.println(resp.status);
Example output:
Connection: ESTABLISHED
Got IP address: 192.168.1.104
Sending status:
1
0
Message sent!
You can send to a list of emails and select a CC or CCn; for example, send to 3 email
    const char* arrayOfEmail[] = {"<FIRST>@gmail.com", "<SECOND>@yahoo.com", "<THIRD>@hotmail.com"};
    EMailSender::Response resp = emailSend.send(arrayOfEmail, 3, message);
or to 3 emails, the first as To and the last as CC
    const char* arrayOfEmail[] = {"<FIRST>@gmail.com", "<SECOND>@yahoo.com", "<THIRD>@hotmail.com"};
    EMailSender::Response resp = emailSend.send(arrayOfEmail, 1, 2, message);
or first as To, second as CC, and third as CCn
    const char* arrayOfEmail[] = {"<FIRST>@gmail.com", "<SECOND>@yahoo.com", "<THIRD>@hotmail.com"};
    EMailSender::Response resp = emailSend.send(arrayOfEmail, 1,1,1, message);
Manage attachments
This library allows you to send attachments, now I show you only the basic code, but next, we must examine better the configuration of the storage devices.
    byte attachsNumber = 2;

    EMailSender::FileDescriptior fileDescriptor[attachsNumber];
    fileDescriptor[0].filename = F("test.txt");
    fileDescriptor[0].url = F("/test.txt");
    fileDescriptor[0].mime = MIME_TEXT_HTML;
    fileDescriptor[0].storageType = EMailSender::EMAIL_STORAGE_TYPE_SD;

    fileDescriptor[1].filename = F("logo.jpg");
    fileDescriptor[1].url = F("/logo.jpg");
    fileDescriptor[1].mime = "image/jpg";
    fileDescriptor[1].encode64 = true;
    fileDescriptor[1].storageType = EMailSender::EMAIL_STORAGE_TYPE_SD;

    EMailSender::Attachments attachs = {attachsNumber, fileDescriptor};
Basically, FileDescriptior (yes there is an error but for backward compatibility, I can’t fix It), is the structure that identifies the file to upload.
	typedef struct {
		StorageType storageType = EMAIL_STORAGE_TYPE_SD;
		String mime;
		bool encode64 = false;
		String filename;
		String url;
	} FileDescriptior;
It needs the storageType, the mime type if the file must be encoded, the filename, and the URL where the file is.
You must generate an array with the number of the file you want, and add the Attachments structure to the end of send command.
Send Emails with Gmail, STM32F4, and w5500
Check the paragraph on how to create a password for the application (at the end of the article).
The first thing to do is the library configuration, we need to set the correct network type and activate the SSL for the client.
Library configuration
You must open the file EMailSenderKey.h and do this change, in the STM32 section:
#ifndef DEFAULT_EMAIL_NETWORK_TYPE_STM32
	#define DEFAULT_EMAIL_NETWORK_TYPE_STM32 	NETWORK_W5100
	#define DEFAULT_INTERNAL_STM32_STORAGE STORAGE_NONE
	#define DEFAULT_EXTERNAL_STM32_STORAGE STORAGE_NONE
#endif
Now we don’t need any storage, we don’t send attachments.
And to activate SSL it’s important to uncomment the SSLCLIENT_WRAPPER define.
#define SSLCLIENT_WRAPPER
STM32F4 Black-pill
For this test we are going to use an STM32F4 because as already described we need more than 64Kb flash to manage an SSL connection, if you have a device with less power you can follow the tutorial for Arduino devices with SendGrid “Send email with attachments (v2.x library): Arduino Ethernet”.

Here my selection of STM32 devices STM32F103C8T6 STM32F401 STM32F411 ST-Link v2 ST-Link v2 official
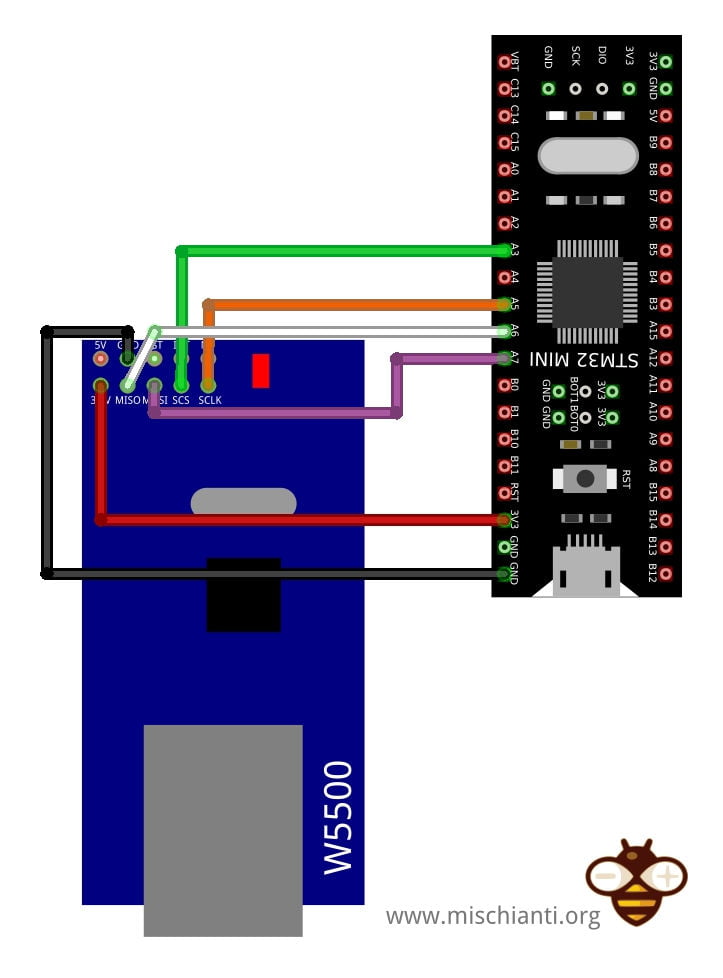
Wiring ethernet w5500
We are going to attach the w5500 on primary SPI with SS on PA3.
Here my tested ethernet devices w5500 lite - w5500 - enc26j60 mini - enc26j60 - lan8720
| STM32 | w5500 SPI1 |
|---|---|
| PA3 | CS |
| PA5 | SCK |
| PA6 | MISO |
| PA7 | MOSI |
| 3.3v | 3.3v |
| GND | GND |
You can get all the wiring and code information in the relative article “STM32: ethernet w5500 with plain (HTTP) and SSL (HTTPS)”.
Sketch example
Here is the full sketch example.
/**
 * EMailSender ^3.0.0 on STM32
 *
 * Send Email with GMail (application password see the article on how to configure)
 *
 * Need FLASH > 64K if you want use GMail with SSL
 * alternatively you can use SendGrid without activation
 * of SSLClient
 *
 * and ethernet w5500 SS
 *
To activate SSL you must uncomment
#define SSLCLIENT_WRAPPER

#ifndef DEFAULT_EMAIL_NETWORK_TYPE_STM32
	#define DEFAULT_EMAIL_NETWORK_TYPE_STM32 	NETWORK_W5100
	#define DEFAULT_INTERNAL_STM32_STORAGE STORAGE_NONE
	#define DEFAULT_EXTERNAL_STM32_STORAGE STORAGE_NONE
#endif
 *
 * @author Renzo Mischianti <www.mischianti.org>
 * @details www.mischianti.org
 * @version 0.1
 * @date 2022-03-22
 *
 * @copyright Copyright (c) 2022
 *
 */

#include <Arduino.h>
#include <SPI.h>
#include <EthernetLarge.h>
#include "EMailSender.h"

#define MACADDRESS 0x00,0x01,0x02,0x03,0x04,0x05
#define MYIPADDR 192,168,1,28
#define MYIPMASK 255,255,255,0
#define MYDNS 192,168,1,1
#define MYGW 192,168,1,1

uint8_t macaddress[6] = {MACADDRESS};
EMailSender emailSend("account@gmail.com", "<APPLICATION PASSWORD>");

void setup() {

    Serial.begin(115200);

    while (!Serial) {
	    delay(100);
	  }

    Serial.println("Begin Ethernet");

    Ethernet.init(PA3);
    if (Ethernet.begin(macaddress)) { // Dynamic IP setup
        Serial.println("DHCP OK!");
    }else{
        Serial.println("Failed to configure Ethernet using DHCP");
        // Check for Ethernet hardware present
        if (Ethernet.hardwareStatus() == EthernetNoHardware) {
          Serial.println("Ethernet shield was not found.  Sorry, can't run without hardware. :(");
          while (true) {
            delay(1); // do nothing, no point running without Ethernet hardware
          }
        }
        if (Ethernet.linkStatus() == LinkOFF) {
          Serial.println("Ethernet cable is not connected.");
        }

    	  IPAddress ip(MYIPADDR);
    	  IPAddress dns(MYDNS);
    	  IPAddress gw(MYGW);
    	  IPAddress sn(MYIPMASK);
    	  Ethernet.begin(macaddress, ip, dns, gw, sn);
		  Serial.println("STATIC OK!");
    }
    delay(5000);


    Serial.print("Local IP : ");
    Serial.println(Ethernet.localIP());
    Serial.print("Subnet Mask : ");
    Serial.println(Ethernet.subnetMask());
    Serial.print("Gateway IP : ");
    Serial.println(Ethernet.gatewayIP());
    Serial.print("DNS Server : ");
    Serial.println(Ethernet.dnsServerIP());

   Serial.println("Ethernet Successfully Initialized");

   EMailSender::EMailMessage message;
   message.subject = "Soggetto";
   message.message = "Ciao come stai<br>io bene.<br>www.mischianti.org";

   // Send to 3 different email
   const char* arrayOfEmail[] = {"destination1@gmail.com", "destination2@yahoo.com", "destination3@other.com"};

   Serial.println("All structure created!");

   EMailSender::Response resp = emailSend.send(arrayOfEmail, 3, message);

   Serial.println("Sending status: ");

   Serial.println(resp.status);
   Serial.println(resp.code);
   Serial.println(resp.desc);

}

void loop() {
  // put your main code here, to run repeatedly:

}
As you can see the only configuration that you must apply is the account configuration.
EMailSender emailSend("account@gmail.com", "<APPLICATION PASSWORD>");
And naturally the destinations, in this case, there is a distribution list
   // Send to 3 different email
   const char* arrayOfEmail[] = {"destination1@gmail.com", "destination2@yahoo.com", "destination3@other.com"};

   Serial.println("All structure created!");

   EMailSender::Response resp = emailSend.send(arrayOfEmail, 3, message);
but you can send to only one destination like so.
EMailSender::Response resp = emailSend.send("account_to_send@gmail.com", message);
Send Emails with Gmail, STM32F4, w5500, and attachments from SD card
To better understand this example go to read these articles: “STM32: ethernet w5500 with plain (HTTP) and SSL (HTTPS)” and “How to use SD card with stm32 and SdFat library”.
Library configuration
In this example, we activate the SdFat integration with this configuration on EMailSenderKey.h.
#ifndef DEFAULT_EMAIL_NETWORK_TYPE_STM32
	#define DEFAULT_EMAIL_NETWORK_TYPE_STM32 	NETWORK_W5100
	#define DEFAULT_INTERNAL_STM32_STORAGE STORAGE_NONE
	#define DEFAULT_EXTERNAL_STM32_STORAGE STORAGE_SDFAT2
#endif
And remember to uncomment the SSLClient activation.
#define SSLCLIENT_WRAPPER
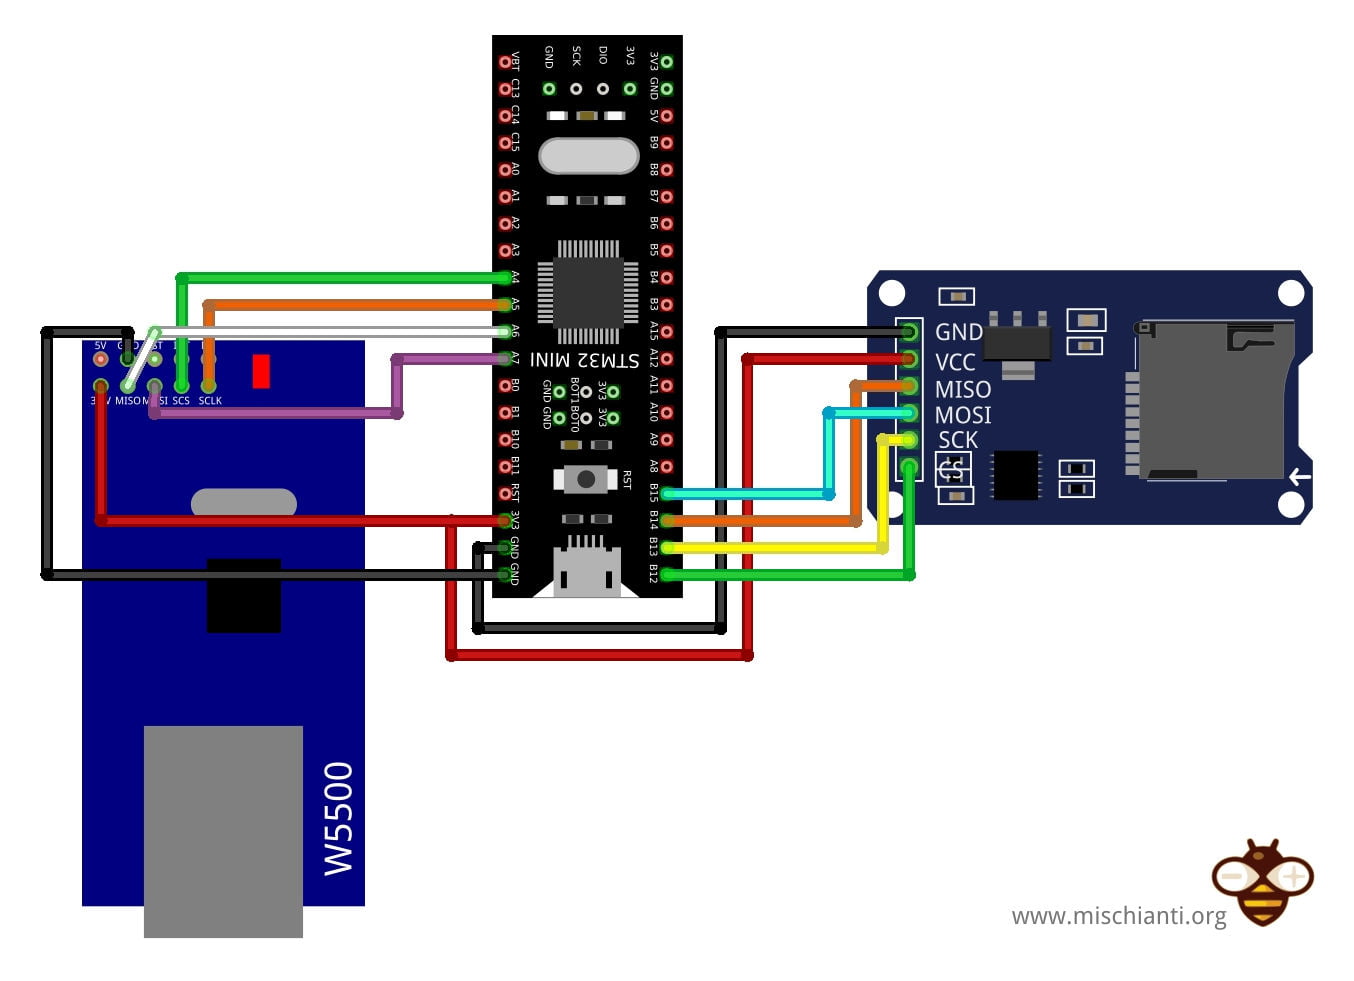
Wiring w5500 and SD card adapter
I use the secondary SPI interface to use the SD card.
SD card adapters AliExpress
| STM32 | w5500 SPI1 |
|---|---|
| PA4 | CS |
| PA5 | SCK |
| PA6 | MISO |
| PA7 | MOSI |
| 3.3v | 3.3v |
| GND | GND |
| STM32 | SD card SPI2 |
|---|---|
| PA12 | CS |
| PA13 | SCK |
| PA14 | MISO |
| PA15 | MOSI |
| 3.3v | VCC |
| GND | GND |
Sketch example
Here is the full sketch code, pay attention to the Ethernet and SD declaration.
/**
 * EMailSender ^3.0.0 on STM32
 *
 * Send Email with GMail (application password see the article on how to configure)
 * and attach a file from SD
 *
 * Need FLASH > 64K if you want use GMail with SSL
 * alternatively you can use SendGrid without activation
 * of SSLClient
 *
 * and ethernet w5500 SS
 * SD on secondary SPI
 *
To activate SSL you must uncomment
#define SSLCLIENT_WRAPPER

#ifndef DEFAULT_EMAIL_NETWORK_TYPE_STM32
	#define DEFAULT_EMAIL_NETWORK_TYPE_STM32 	NETWORK_W5100
	#define DEFAULT_INTERNAL_STM32_STORAGE STORAGE_NONE
	#define DEFAULT_EXTERNAL_STM32_STORAGE STORAGE_SDFAT2
#endif
 *
 * @author Renzo Mischianti <www.mischianti.org>
 * @details www.mischianti.org
 * @version 0.1
 * @date 2022-03-22
 *
 * @copyright Copyright (c) 2022
 *
 */


#include <Arduino.h>
#include <SPI.h>
#include <EthernetLarge.h>
#include <SdFat.h>
#include <sdios.h>

#include "EMailSender.h"
#define MACADDRESS 0x00,0x01,0x02,0x03,0x04,0x05
#define MYIPADDR 192,168,1,28
#define MYIPMASK 255,255,255,0
#define MYDNS 192,168,1,1
#define MYGW 192,168,1,1

// To use SD with secondary SPI
#define SD_CS_PIN PB12
static SPIClass mySPI2(PB15, PB14, PB13, SD_CS_PIN);
#define SD2_CONFIG SdSpiConfig(SD_CS_PIN, DEDICATED_SPI, SD_SCK_MHZ(18), &mySPI2)

SdFat sd;


uint8_t macaddress[6] = {MACADDRESS};
EMailSender emailSend("account@gmail.com", "<APPLICATION PASSWORD>");

void setup() {

    Serial.begin(115200);

    while (!Serial) {
	    delay(100);
	  }
    Serial.println("Begin SD");

  // Secondary SPI for SD
  if (!sd.begin(SD2_CONFIG)) {
  // Primary SPI for SD
  // if (!SD.begin(SD_CS_PIN)) {
    Serial.println(F("initialization failed. Things to check:"));
    Serial.println(F("* is a card inserted?"));
    Serial.println(F("* is your wiring correct?"));
    Serial.println(F("* did you change the chipSelect pin to match your shield or module?"));
    while (1);
  } else {
    Serial.println(F("Wiring is correct and a card is present."));
  }

  // Show capacity and free space of SD card
  Serial.print(F("Capacity of card:   ")); Serial.print(long( sd.card()->sectorCount() >> 1 )); Serial.println(F(" kBytes"));

    Serial.println("Begin Ethernet");

    Ethernet.init(PA4);
    if (Ethernet.begin(macaddress)) { // Dynamic IP setup
        Serial.println("DHCP OK!");
    }else{
        Serial.println("Failed to configure Ethernet using DHCP");
        // Check for Ethernet hardware present
        if (Ethernet.hardwareStatus() == EthernetNoHardware) {
          Serial.println("Ethernet shield was not found.  Sorry, can't run without hardware. :(");
          while (true) {
            delay(1); // do nothing, no point running without Ethernet hardware
          }
        }
        if (Ethernet.linkStatus() == LinkOFF) {
          Serial.println("Ethernet cable is not connected.");
        }

    	  IPAddress ip(MYIPADDR);
    	  IPAddress dns(MYDNS);
    	  IPAddress gw(MYGW);
    	  IPAddress sn(MYIPMASK);
    	  Ethernet.begin(macaddress, ip, dns, gw, sn);
		  Serial.println("STATIC OK!");
    }

  Serial.println();

      // To remove previous test
      // SD.remove(F("/testCreate.txt"));

      FsFile testFile = sd.open("/test.txt", O_WRITE);

      if (testFile){
          Serial.println("Write file content!");
          testFile.print("Here the test text!! From SdFat2");

          testFile.close();
      }else{
          Serial.println("Problem on create file!");
      }

      testFile.close();

    delay(5000);


    Serial.print("Local IP : ");
    Serial.println(Ethernet.localIP());
    Serial.print("Subnet Mask : ");
    Serial.println(Ethernet.subnetMask());
    Serial.print("Gateway IP : ");
    Serial.println(Ethernet.gatewayIP());
    Serial.print("DNS Server : ");
    Serial.println(Ethernet.dnsServerIP());

   Serial.println("Ethernet Successfully Initialized");

    byte attachsNumber = 1;

    EMailSender::FileDescriptior fileDescriptor[attachsNumber];
    fileDescriptor[0].filename = F("test.txt");
    fileDescriptor[0].url = F("/test.txt");
    fileDescriptor[0].mime = MIME_TEXT_HTML;
    fileDescriptor[0].storageType = EMailSender::EMAIL_STORAGE_TYPE_SD;

//    fileDescriptor[1].filename = F("logo.jpg");
//    fileDescriptor[1].url = F("/logo.jpg");
//    fileDescriptor[1].mime = "image/jpg";
//    fileDescriptor[1].encode64 = true;
//     fileDescriptor[1].storageType = EMailSender::EMAIL_STORAGE_TYPE_LITTLE_FS;

    EMailSender::Attachments attachs = {attachsNumber, fileDescriptor};


   EMailSender::EMailMessage message;
   message.subject = "Soggetto";
   message.message = "Ciao come stai<br>io bene.<br>www.mischianti.org";

   // Send to 3 different email
   const char* arrayOfEmail[] = {"destination1@gmail.com", "destination2@yahoo.com", "destination3@other.com"};

   Serial.println("All structure created!");

   EMailSender::Response resp = emailSend.send(arrayOfEmail, 3, message, attachs);

//    // Send to 3 different email, 2 in C and 1 in CC
//    const char* arrayOfEmail[] = {"mischianti@gmail.com", "smtp.mischianti@gmail.com", "renzo.mischianti@gmail.com"};
//    EMailSender::Response resp = emailSend.send(arrayOfEmail, 2, 1, message);
//
//    // Send to 3 different email first to C second to CC and third to CCn
//    const char* arrayOfEmail[] = {"mischianti@gmail.com", "smtp.mischianti@gmail.com", "renzo.mischianti@gmail.com"};
//    EMailSender::Response resp = emailSend.send(arrayOfEmail, 3, message);


   Serial.println("Sending status: ");

   Serial.println(resp.status);
   Serial.println(resp.code);
   Serial.println(resp.desc);

}

void loop() {
  // put your main code here, to run repeatedly:

}
In the sketch, I do the declaration of SdFat to the secondary SPI interface
// To use SD with secondary SPI
#define SD_CS_PIN PB12
static SPIClass mySPI2(PB15, PB14, PB13, SD_CS_PIN);
#define SD2_CONFIG SdSpiConfig(SD_CS_PIN, DEDICATED_SPI, SD_SCK_MHZ(18), &mySPI2)

SdFat sd;

[...]

  // Secondary SPI for SD
  if (!sd.begin(SD2_CONFIG)) {
  // Primary SPI for SD
  // if (!SD.begin(SD_CS_PIN)) {
    Serial.println(F("initialization failed. Things to check:"));
    Serial.println(F("* is a card inserted?"));
    Serial.println(F("* is your wiring correct?"));
    Serial.println(F("* did you change the chipSelect pin to match your shield or module?"));
    while (1);
  } else {
    Serial.println(F("Wiring is correct and a card is present."));
  }
And I create a text file
      FsFile testFile = sd.open("/test.txt", O_WRITE);

      if (testFile){
          Serial.println("Write file content!");
          testFile.print("Here the test text!! www.mischianti.org From SdFat2");

          testFile.close();
      }else{
          Serial.println("Problem on create file!");
      }

      testFile.close();
then I generate a descriptor of the attachment file
    EMailSender::FileDescriptior fileDescriptor[attachsNumber];
    fileDescriptor[0].filename = F("test.txt");
    fileDescriptor[0].url = F("/test.txt");
    fileDescriptor[0].mime = MIME_TEXT_HTML;
    fileDescriptor[0].storageType = EMailSender::EMAIL_STORAGE_TYPE_SD;
Send Emails with Gmail, STM32F4, enc28j60, and attachments from SPI Flash
Now we are going to use another standard device for ethernet connection, the enc28j60, and a set of memory IC like SPI Flash. I think you must read these articles first: “STM32: ethernet enc28j60 with plain (HTTP) and SSL (HTTPS)” and “STM32: SPI flash memory FAT FS”
Library configuration
In this example, we activate the SdFat integration with this configuration on EMailSenderKey.h.
#ifndef DEFAULT_EMAIL_NETWORK_TYPE_STM32
	#define DEFAULT_EMAIL_NETWORK_TYPE_STM32 	NETWORK_ETHERNET_ENC
	#define DEFAULT_INTERNAL_STM32_STORAGE STORAGE_SPIFM
	#define DEFAULT_EXTERNAL_STM32_STORAGE STORAGE_NONE
#endif
And remember to uncomment the SSLClient activation.
#define SSLCLIENT_WRAPPER
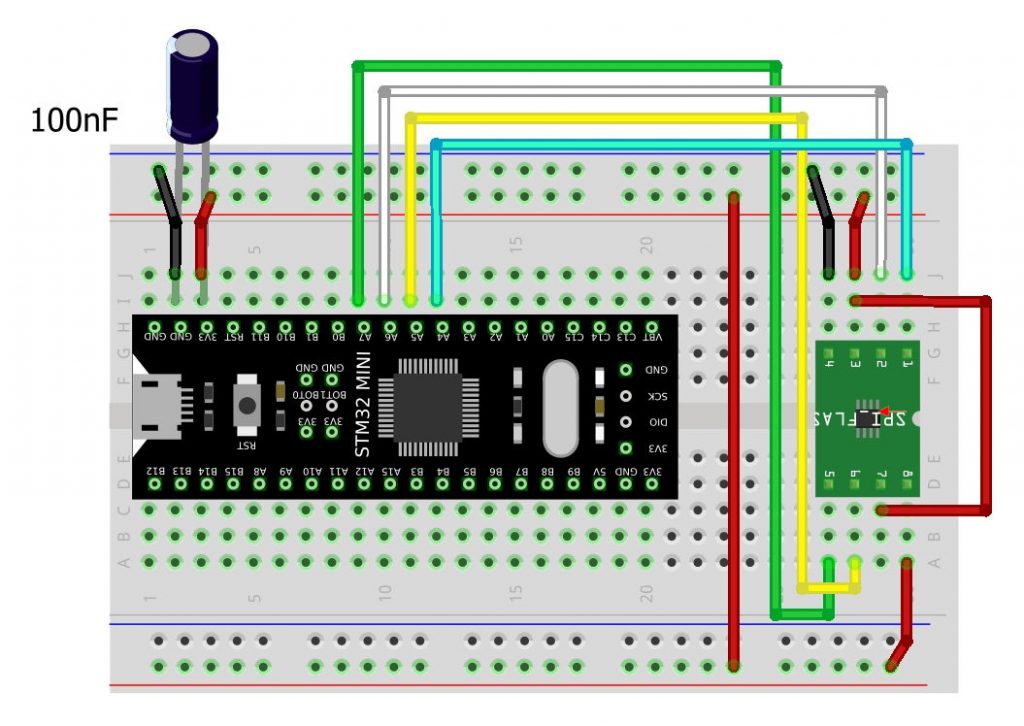
Wiring enc28j60 and SPI Flash
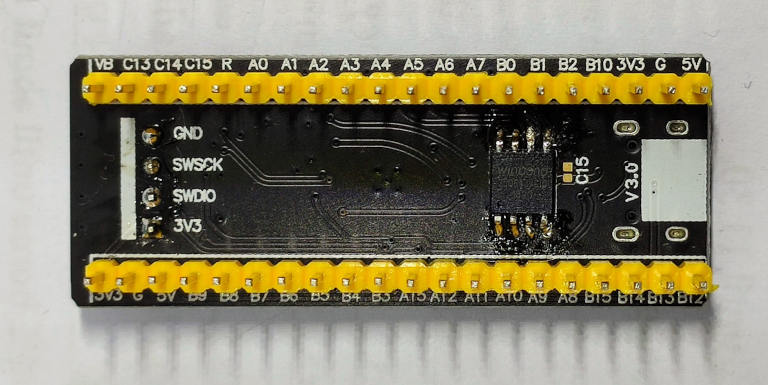
We are going to use the STM32F4 Black-pill with the integrated footprint (if you want to use external SPI Flash read the relative article).

Here my tested ethernet devices w5500 lite - w5500 - enc26j60 mini - enc26j60 - lan8720
Pay attention you must use PA3, not PA4.
| ESP32 | w5500 |
|---|---|
| PA3 | CS |
| PA5 | SCK |
| PA6 | MISO |
| PA7 | MOSI |
| 3.3v (better with external 200mha) | VCC |
| GND | GND |
I add also the “manual” wiring if you don’t use this device.
I tested these SPI Flash for our purpose w25q16 SMD 2Mb - w25q16 Discrete 2Mb - w25q32 SMD 4Mb - w25q32 Discrete 4Mb - w25q64 SMD 8Mb - w25q64 Discrete 8Mb - w25q128 SMD 16Mb - w25q128 Discrete 16Mb W25Q32 W25Q64 w25q128 module 4Mb 8Mb 16Mb
| STM32F4 | SPI Flash |
|---|---|
| PA4 | CS |
| PA6 | DI (IO1) |
| PA7 | DI (IO0) |
| PA5 | CLK |
| 3.3v | /WP |
| 3.3v | /Hold |
| GND | GND |
| 3.3v | VCC |
Sketch example
And finally the complete code.
/**
 * EMailSender ^3.0.0 on STM32
 *
 * Send Email with GMail (application password see the article on how to configure)
 * and attach a file from SPI Flash
 *
 * Need FLASH > 64K if you want use GMail with SSL
 * alternatively you can use SendGrid without activation
 * of SSLClient
 *
 * and ethernet enc28j60 SS PA3
 * SPI Flash on standard SPI with SS
 *
 To activate SSL you must uncomment
#define SSLCLIENT_WRAPPER

#ifndef DEFAULT_EMAIL_NETWORK_TYPE_STM32
	#define DEFAULT_EMAIL_NETWORK_TYPE_STM32 	NETWORK_ETHERNET_ENC
	#define DEFAULT_INTERNAL_STM32_STORAGE STORAGE_SPIFM
	#define DEFAULT_EXTERNAL_STM32_STORAGE STORAGE_NONE
#endif
 *
 * @author Renzo Mischianti <www.mischianti.org>
 * @details www.mischianti.org
 * @version 0.1
 * @date 2022-03-22
 *
 * @copyright Copyright (c) 2022
 *
 */

#include <Arduino.h>

#include <EthernetEnc.h>

#include "SdFat.h"
#include "Adafruit_SPIFlash.h"

#include <EMailSender.h>

Adafruit_FlashTransport_SPI flashTransport(SS, SPI); // Set CS and SPI interface
Adafruit_SPIFlash flash(&flashTransport);

// file system object from SdFat
FatFileSystem fatfs;

#define ETHERNET_CS_PIN PA3

// Enter a MAC address for your controller below.
// Newer Ethernet shields have a MAC address printed on a sticker on the shield
byte mac[] = { 0xDE, 0xAD, 0xBE, 0xEF, 0xFE, 0xED };

// Set the static IP address to use if the DHCP fails to assign
#define MYIPADDR 192,168,1,28
#define MYIPMASK 255,255,255,0
#define MYDNS 192,168,1,1
#define MYGW 192,168,1,1

EMailSender emailSend("account@gmail.com", "<APPLICATION PASSWORD>");

void setup() {
	  // Initialize serial port and wait for it to open before continuing.
	  Serial.begin(115200);
	  while (!Serial) {
	    delay(100);
	  }
	  Serial.println("Adafruit SPI Flash FatFs Full Usage Example");

	  // Initialize flash library and check its chip ID.
	  if (!flash.begin()) {
	    Serial.println("Error, failed to initialize flash chip!");
	    while(1) yield();
	  }

	  Serial.print("JEDEC ID: "); Serial.println(flash.getJEDECID(), HEX);
	  Serial.print("Flash size: "); Serial.println(flash.size());
	  Serial.flush();

	  // First call begin to mount the filesystem.  Check that it returns true
	  // to make sure the filesystem was mounted.
	  if (!fatfs.begin(&flash)) {
	    Serial.println("Error, failed to mount newly formatted filesystem!");
	    Serial.println("Was the flash chip formatted with the SdFat_format example?");
	    while(1) yield();
	  }
	  Serial.println("Mounted filesystem!");
	  Serial.println();


    // You can use Ethernet.init(pin) to configure the CS pin
    Ethernet.init(ETHERNET_CS_PIN);

    if (Ethernet.begin(mac)) { // Dynamic IP setup
        Serial.println(F("DHCP OK!"));
    }else{
        Serial.println(F("Failed to configure Ethernet using DHCP"));
        // Check for Ethernet hardware present
        if (Ethernet.hardwareStatus() == EthernetNoHardware) {
          Serial.println(F("Ethernet shield was not found.  Sorry, can't run without hardware. :("));
          while (true) {
            delay(1); // do nothing, no point running without Ethernet hardware
          }
        }
        if (Ethernet.linkStatus() == LinkOFF) {
          Serial.println(F("Ethernet cable is not connected."));
        }

    	  IPAddress ip(MYIPADDR);
    	  IPAddress dns(MYDNS);
    	  IPAddress gw(MYGW);
    	  IPAddress sn(MYIPMASK);
    	  Ethernet.begin(mac, ip, dns, gw, sn);
		  Serial.println("STATIC OK!");
    }
    delay(5000);


    Serial.print("Local IP : ");
    Serial.println(Ethernet.localIP());
    Serial.print("Subnet Mask : ");
    Serial.println(Ethernet.subnetMask());
    Serial.print("Gateway IP : ");
    Serial.println(Ethernet.gatewayIP());
    Serial.print("DNS Server : ");
    Serial.println(Ethernet.dnsServerIP());

    Serial.println("Ethernet Successfully Initialized");
    Serial.println();

      // To remove previous test
      // SD.remove(F("/testCreate.txt"));

      File testFile = fatfs.open("/test.txt", FILE_WRITE);

      if (testFile){
          Serial.println("Write file content!");
          testFile.print("Here the test text!! From SPI Flash");

          testFile.close();
      }else{
          Serial.println("Problem on create file!");
      }

      testFile.close();

    delay(5000);


    byte attachsNumber = 1;

    EMailSender::FileDescriptior fileDescriptor[attachsNumber];
    fileDescriptor[0].filename = F("test.txt");
    fileDescriptor[0].url = F("/test.txt");
    fileDescriptor[0].mime = MIME_TEXT_HTML;
    fileDescriptor[0].storageType = EMailSender::EMAIL_STORAGE_TYPE_SPIFM;

//    fileDescriptor[1].filename = F("logo.jpg");
//    fileDescriptor[1].url = F("/logo.jpg");
//    fileDescriptor[1].mime = "image/jpg";
//    fileDescriptor[1].encode64 = true;
//     fileDescriptor[1].storageType = EMailSender::EMAIL_STORAGE_TYPE_LITTLE_FS;

    EMailSender::Attachments attachs = {attachsNumber, fileDescriptor};


   EMailSender::EMailMessage message;
   message.subject = "Soggetto";
   message.message = "Ciao come stai<br>io bene.<br>www.mischianti.org";

   // Send to 3 different email
   const char* arrayOfEmail[] = {"destination1@gmail.com", "destination2@yahoo.com", "destination3@other.com"};

   Serial.println("All structure created!");

   EMailSender::Response resp = emailSend.send(arrayOfEmail, 3, message, attachs);

//    // Send to 3 different email, 2 in C and 1 in CC
//    const char* arrayOfEmail[] = {"mischianti@gmail.com", "smtp.mischianti@gmail.com", "renzo.mischianti@gmail.com"};
//    EMailSender::Response resp = emailSend.send(arrayOfEmail, 2, 1, message);
//
//    // Send to 3 different email first to C second to CC and third to CCn
//    const char* arrayOfEmail[] = {"mischianti@gmail.com", "smtp.mischianti@gmail.com", "renzo.mischianti@gmail.com"};
//    EMailSender::Response resp = emailSend.send(arrayOfEmail, 3, message);


   Serial.println("Sending status: ");

   Serial.println(resp.status);
   Serial.println(resp.code);
   Serial.println(resp.desc);

}

void loop() {
  // put your main code here, to run repeatedly:

}
The process is the same as the SD card example, we start with the declaration/configuration.
Adafruit_FlashTransport_SPI flashTransport(SS, SPI); // Set CS and SPI interface
Adafruit_SPIFlash flash(&flashTransport);

// file system object from SdFat
FatFileSystem fatfs;

#define ETHERNET_CS_PIN PA3
then the initialization
	  // Initialize flash library and check its chip ID.
	  if (!flash.begin()) {
	    Serial.println("Error, failed to initialize flash chip!");
	    while(1) yield();
	  }

	  Serial.print("JEDEC ID: "); Serial.println(flash.getJEDECID(), HEX);
	  Serial.print("Flash size: "); Serial.println(flash.size());
	  Serial.flush();

	  // First call begin to mount the filesystem.  Check that it returns true
	  // to make sure the filesystem was mounted.
	  if (!fatfs.begin(&flash)) {
	    Serial.println("Error, failed to mount newly formatted filesystem!");
	    Serial.println("Was the flash chip formatted with the SdFat_format example?");
	    while(1) yield();
	  }
	  Serial.println("Mounted filesystem!");
	  Serial.println();
I create a file
      File testFile = fatfs.open("/test.txt", FILE_WRITE);

      if (testFile){
          Serial.println("Write file content!");
          testFile.print("Here the test text!! From SPI Flash");

          testFile.close();
      }else{
          Serial.println("Problem on create file!");
      }

      testFile.close();
And the declaration of the attached
    byte attachsNumber = 1;

    EMailSender::FileDescriptior fileDescriptor[attachsNumber];
    fileDescriptor[0].filename = F("test.txt");
    fileDescriptor[0].url = F("/test.txt");
    fileDescriptor[0].mime = MIME_TEXT_HTML;
    fileDescriptor[0].storageType = EMailSender::EMAIL_STORAGE_TYPE_SPIFM;

//    fileDescriptor[1].filename = F("logo.jpg");
//    fileDescriptor[1].url = F("/logo.jpg");
//    fileDescriptor[1].mime = "image/jpg";
//    fileDescriptor[1].encode64 = true;
//     fileDescriptor[1].storageType = EMailSender::EMAIL_STORAGE_TYPE_LITTLE_FS;

    EMailSender::Attachments attachs = {attachsNumber, fileDescriptor};
Enable Gmail SMTP provider to be used with SSL
To use Gmail, you must create an application password
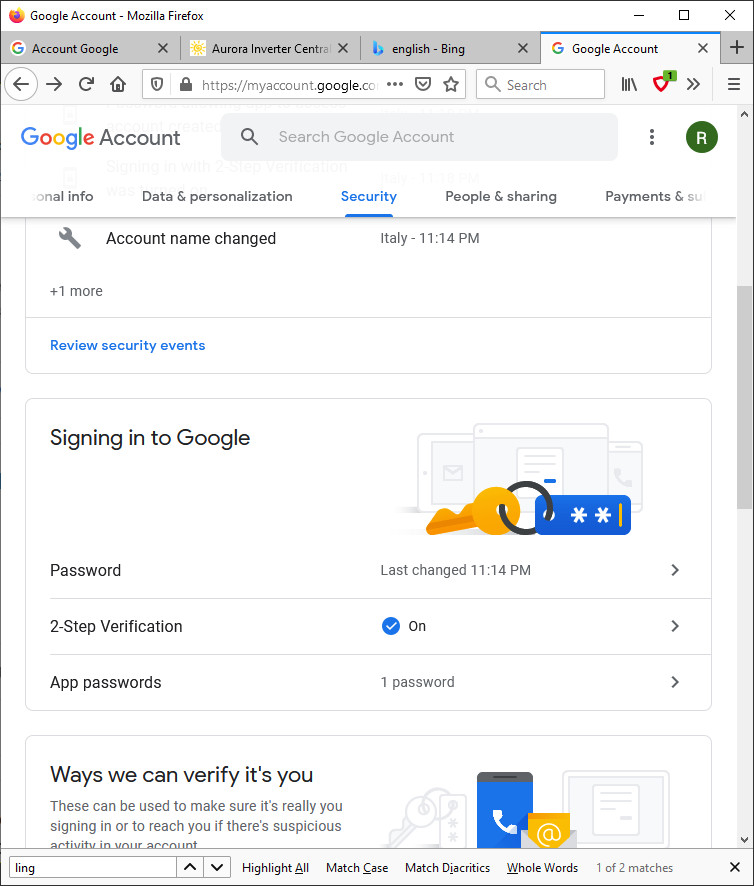
- Go to the Gmail security settings page: https://myaccount.google.com/security
- First, you must enable 2-factor identification.
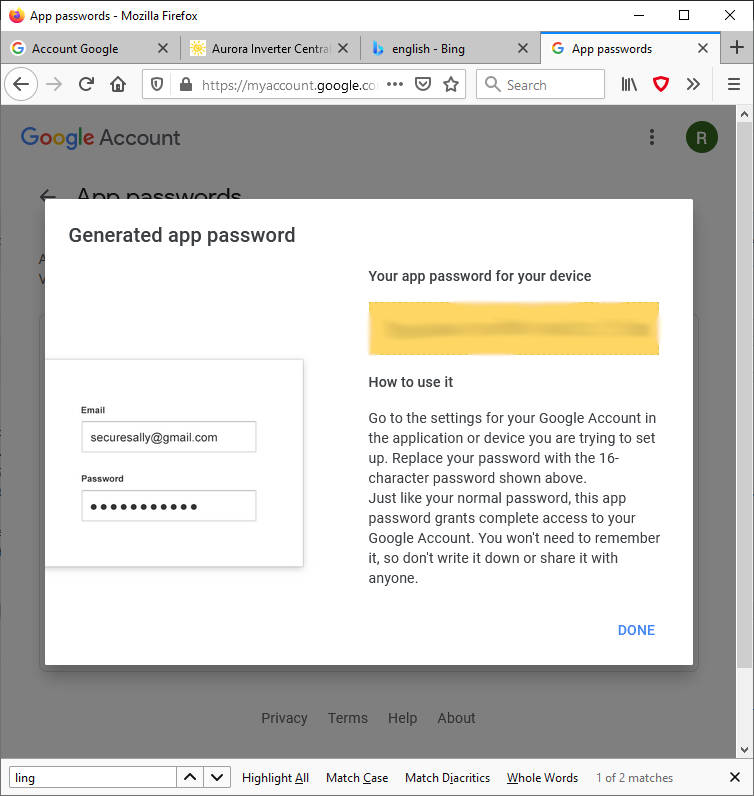
- Then you need to create a password for this application. The password is a 16-character string, copy it and use it as your standard SMTP Gmail account password!
Thanks
- STM32F1 Blue-Pill: pinout, specs, and Arduino IDE configuration (STM32duino and STMicroelectronics)
- STM32: program (STM32F1) via USB with STM32duino bootloader
- STM32: programming (STM32F1 STM32F4) via USB with HID boot-loader
- STM32F4 Black-Pill: pinout, specs, and Arduino IDE configuration
- STM32: ethernet w5500 with plain HTTP and SSL (HTTPS)
- STM32: ethernet enc28j60 with plain HTTP and SSL (HTTPS)
- STM32: WiFiNINA with ESP32 WiFi Co-Processor
- How to use SD card with stm32 and SdFat library
- \STM32: SPI flash memory FAT FS
- STM32: internal RTC, clock, and battery backup (VBAT)
- STM32 LoRa
- STM32 Power saving
- STM32F1 Blue-Pill clock and frequency management
- STM32F4 Black-Pill clock and frequency management
- Intro and Arduino vs STM framework
- Library LowPower, wiring, and Idle (STM Sleep) mode
- Sleep, deep sleep, shutdown, and power consumption
- Wake up from RTC alarm and Serial
- Wake up from the external source
- Backup domain intro and variable preservation across reset
- RTC backup register and SRAM preservation
- STM32 send emails with attachments and SSL (like Gmail): w5500, enc28j60, SD, and SPI Fash
- FTP server on STM32 with w5500, enc28j60, SD Card, and SPI Flash
- Connecting the EByte E70 to STM32 (black/blue pill) devices and a simple sketch example