
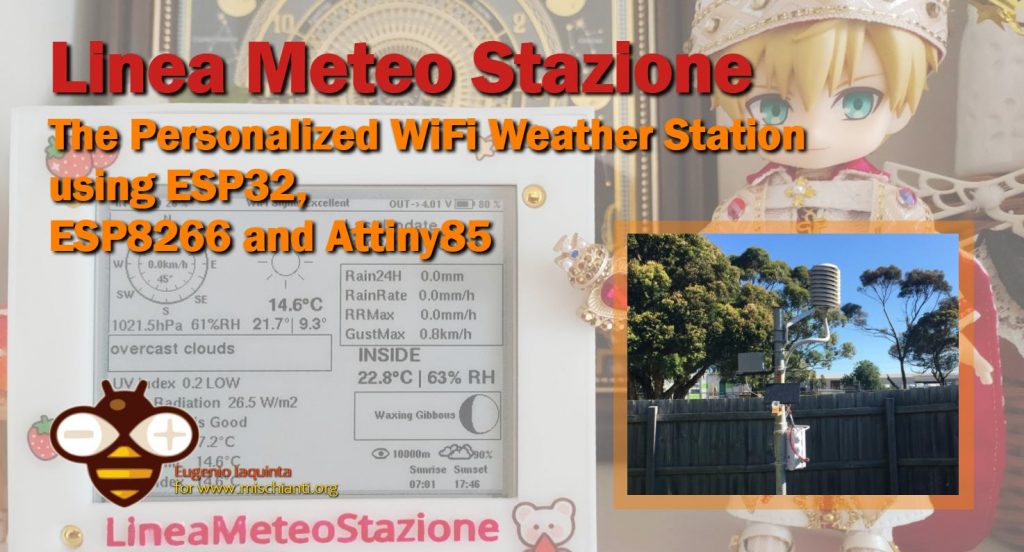
LineaMeteoStazione: The Personalized WiFi Weather Station using ESP32, ESP8266 and Attiny85 with OTA – 4
Guest post created with ♥ by Eugenio 🙂|
LineaMeteoStazione is a complete weather station solar powered which can be interfaced with professional sensors from Sensirion as well as some Davis Instrument components (Rain Gauge, Anemometer)
It also can be interfaced with a less expensive set of anemometers and rain gauge from Misol. It has a real UV sensor as well as very accurate monitoring of the SOC of the battery provided by the EZSBC board ESP32 Battery Pro with also very low sleep current of just 12uA. It has email notifications, alerts and other services.
The project is aimed at DIY weather stations with a customized choice of sensors and solar shields and just requires the assembly part. Compared to other weather station in the market where most of the time they sell a complete product that actually doesn’t test the real accuracy of the weather station shield and sensors, this weather station allow you to choose between the different professional sensor and different types and also different solar shields, rain gauge and anemometer. So, the goal is to make a weather station that is up to you how much you want to make it accurate! Based on experience and metereological passion you can source material and use one of the top sensors on the market, SHT35. The boards can be given programmed by me as well as the complete PCB. The code will be shared Opensource for the people who want to try to do it from the beginning or modify it! See GitHub Link for prices and configurations.
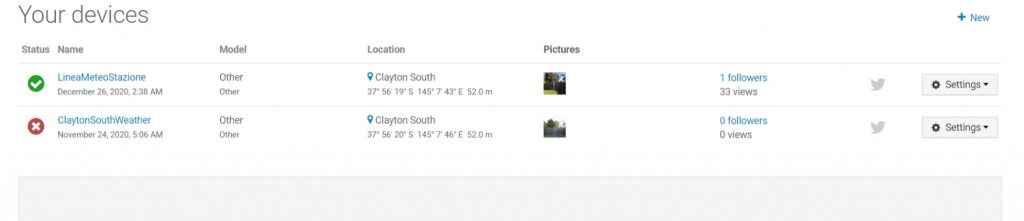
See the page of someone who already installed the weather station here on WunderGround and Weathercloud and PWS.

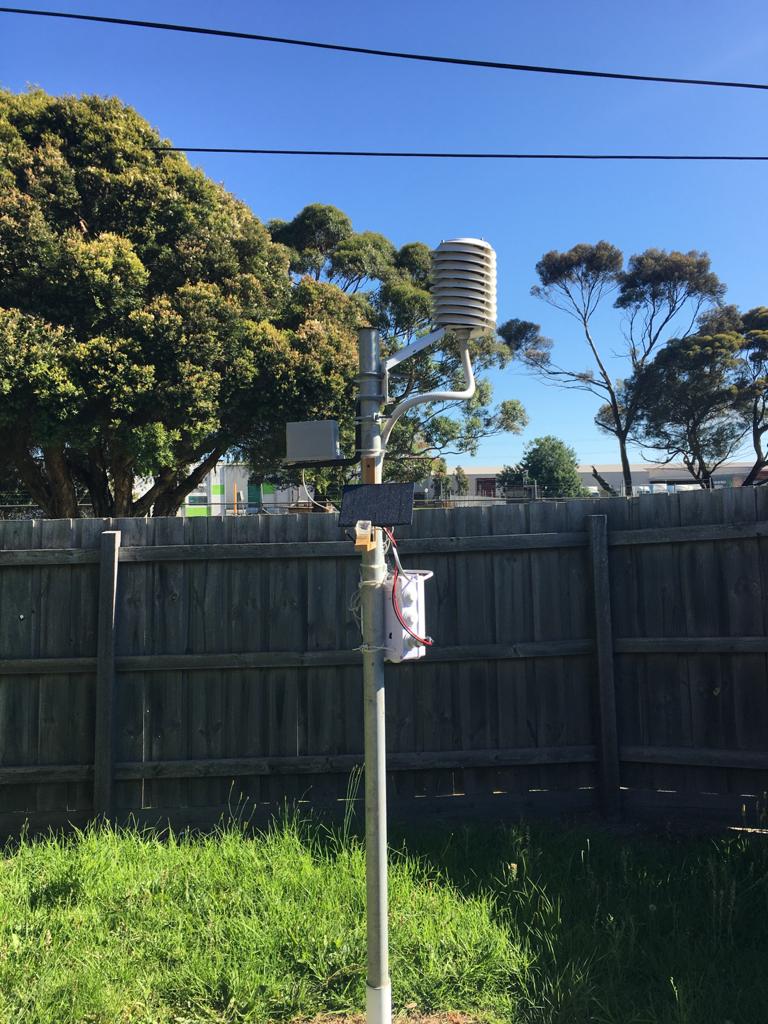
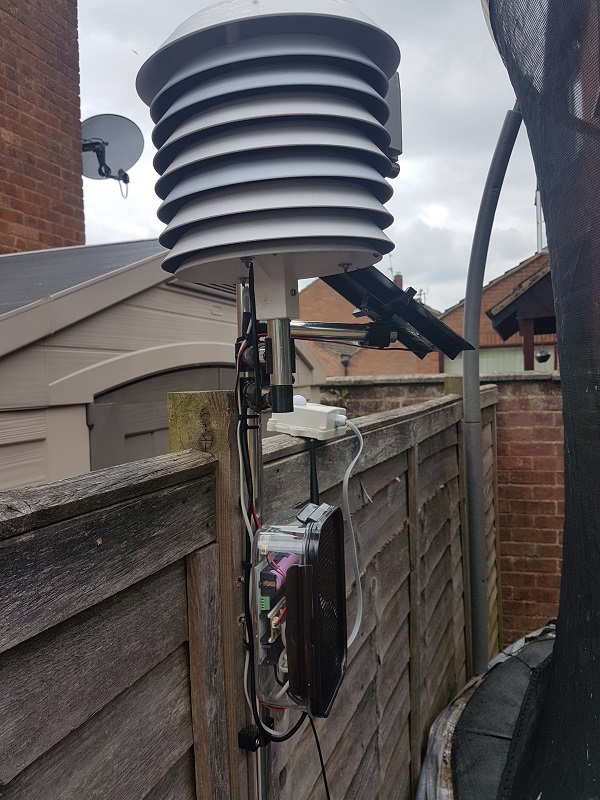
Example Setup of Weather Station
Features
· Can be interfaced with Sensirion SHT30/31/35 as a probe or as breakout board with RJ12 cable board adapter included in the kit.
· Can be interfaced with an extra sensor Sensirion SHT20/21/25 as a probe or as breakout board with RJ12 cable board.
· Can be interfaced with every rain gauge tipping bucket and it is possible to calibrate and set the resolution of the rain gauge in the settings in the database.
· Can be interfaced with 2 different types of an anemometer, one is entry-level from Misol brand and the other is a Davis Anemometer. The anemometer can be calibrated for accurate Wind direction with the Offset setting.
· It has a UV REAL index measurement and also a separate Solar Radiation measurement calculated with a very wide Lux range sensor.
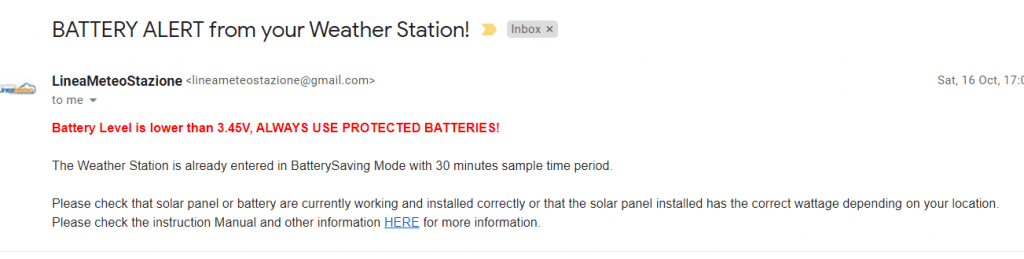
· It has onboard an accurate State of Charge of the battery provided by the EZSBC prototype board ESP32, to track inaccurate way if the battery needs replacement or if it is too low voltage.
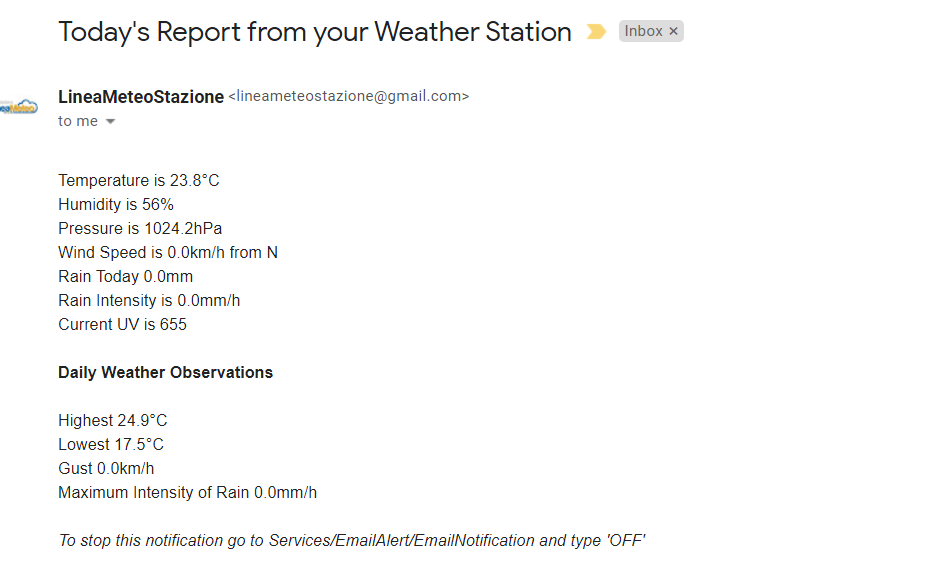
· It has EMAIL ALERTS (Italian or English) as battery alerts and hour or daily reports of the weather condition.
· It has Max and Min Temperature and Humidity alert of the main Temperature and Humidity sensor and alert of UV index, as well as Alert of the second sensor Max and Min Temperature and Humidity and Rain and Rain Intensity Alert and Gust alert.
· 3 seconds time sampling of Wind Speed and Gust and real-time Rain intensity and Rain sampling.
· Sample time or upload time of all the sensors can be modified! Choose between 45 seconds to hours. Usually, should not be as frequent as 1 minute to improve battery life and to avoid sampling error of the temperature sensor caused by adjustment of the sensor to the new temperature of the air.
· Can send data to Wunderground, Weathercloud, Blynk, ThingSpeak, PWS and LineaMeteo weather network! The frequency of sending data is also selectable in the menu config for all services in the database.
· In the Display, you can select languages between Italian and English and between a metric and imperial units of measurement of data.
List of Components
I used the EZSBC board ESP32 Battery pro with Gas Gauge for monitoring the battery level. It has a real deep sleep current of just 12uA, I definitely recommend all boards from EZSBC!
The Station works with a combination of ESP8266 and ESP32 development boards and is composed mainly of 4 devices:
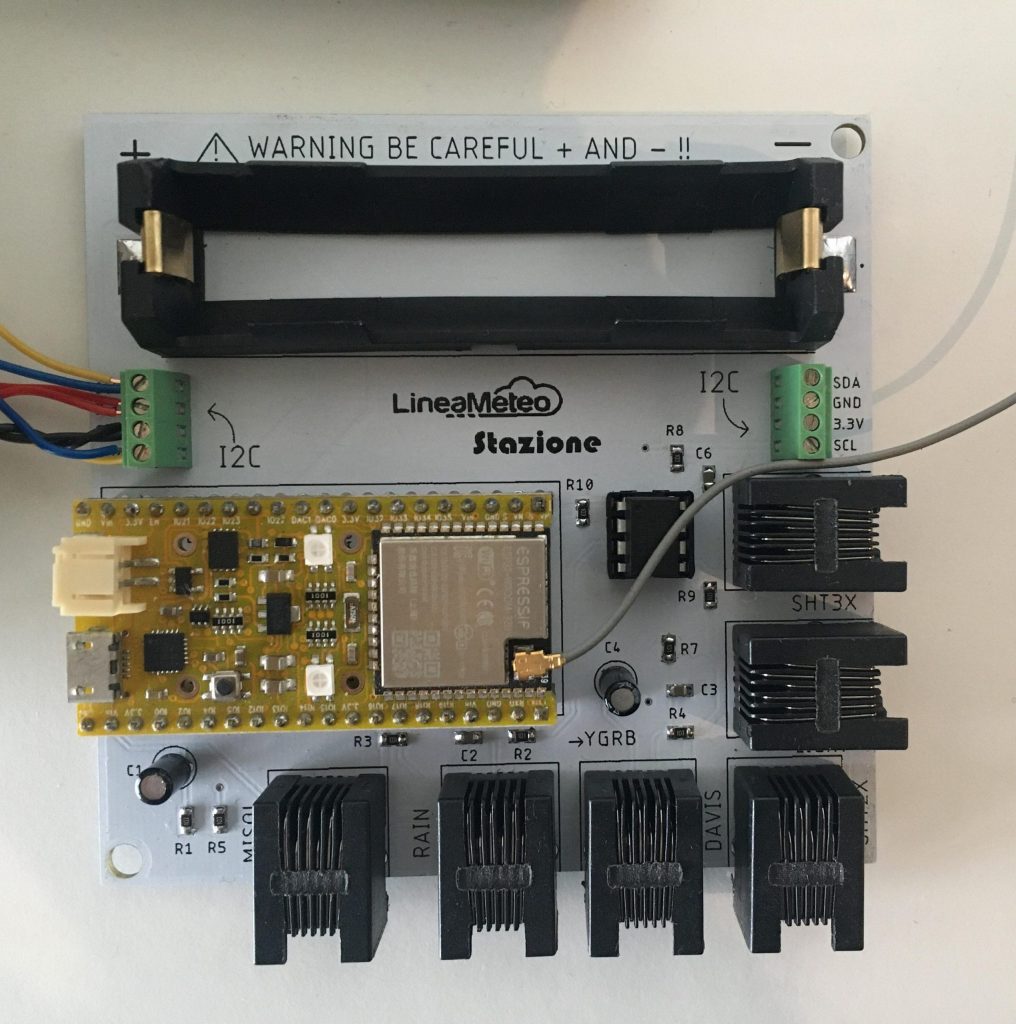
1. DEVICE 1 (OUTSIDE UNIT): EZSBC battery Pro ESP32 board + designed PCB + Attiny85 + Solar Charger Board and SOLAR PANEL (Solar Panel and Battery not included)
This is the part that will be outside and it consists of one development board and the PCB.
It is used to collect the weather data which will be sent to the Firebase of Google.
The DEVICE 1 needs to be installed with protection provided underneath to avoid damage to the PCB as well as the solar charger board. Please install the board in a weatherproof box with IP65 standard minimum.
PCB Top Solar Board Connection PCB description

2. DEVICE 2: WEMOS D1 MINI PRO + BMP180 Pressure
This is the part that handles all the network communications and it also collects the data from the Firebase of Google.
The duties of the board consist in:
· Collecting the data
· Sharing some data to an IP Address in a format ready to be used to communicate with LineaMeteo weather network.
· Send Data to Weathercloud
· Send Data to Wunderground
· Send Data to Thingspeak
· Send Data to Blynk
· Send Data to PWS Weather.
· Pressure Sensor
· Email Notifications
The case is 3D printed from https://www.thingiverse.com/thing:4081064
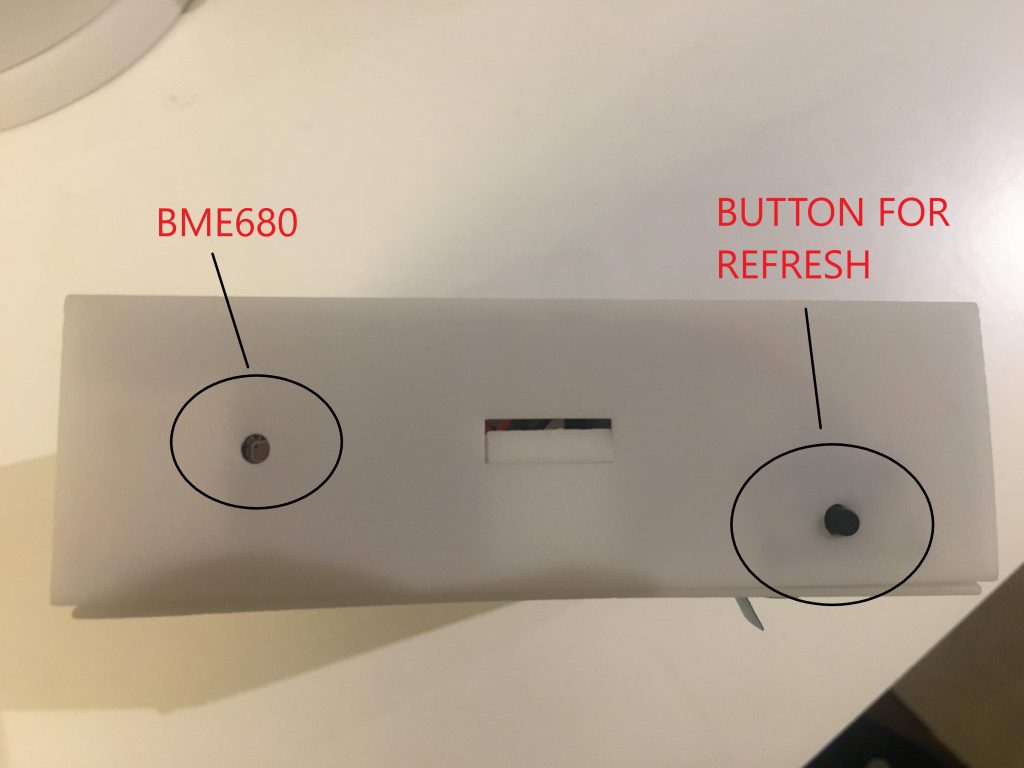
3. DEVICE 3: EZSBC BAT PRO ESP32 + PCB designed + INK Display + BME680
This is the part that just handles the visualization of the data on the display and it has also a sensor that monitors the air quality, temperature and humidity.
The display used is a 4.2 Inch ink display, which can be used as a WaweShare or GoodDisplay brand.
The case
is inspired by:
Box for ePaper + ESP32 Information Display by sidoh10 – Thingiverse
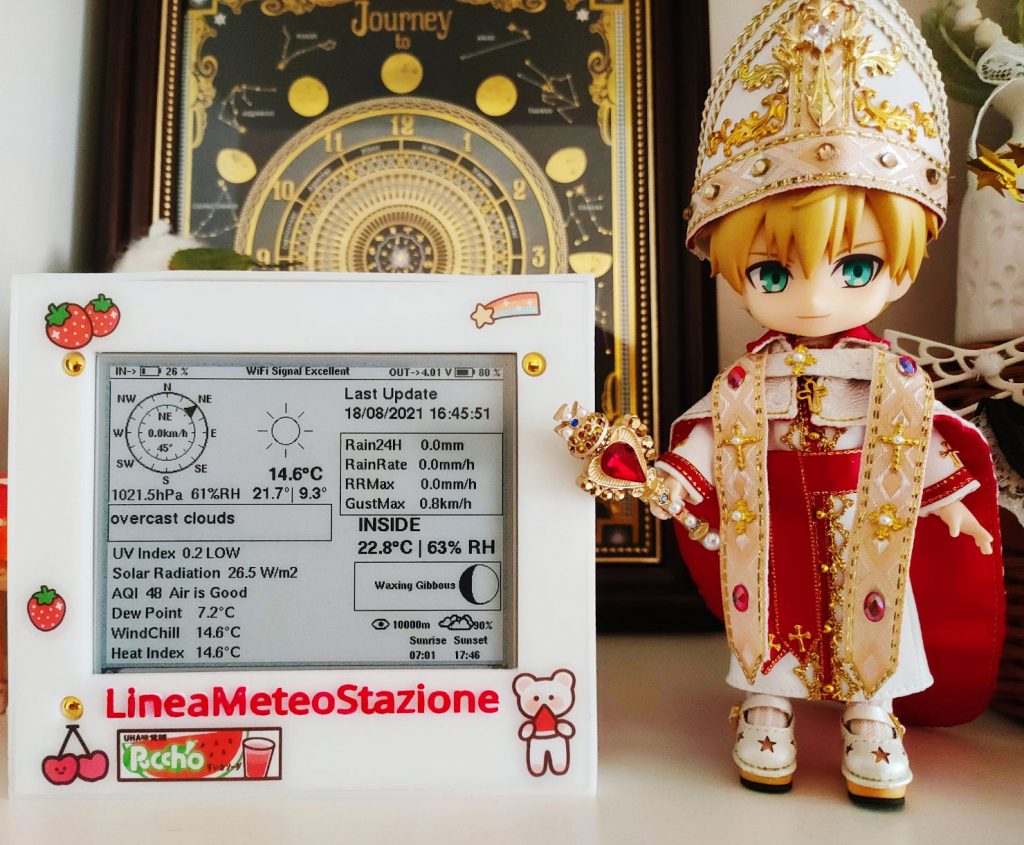
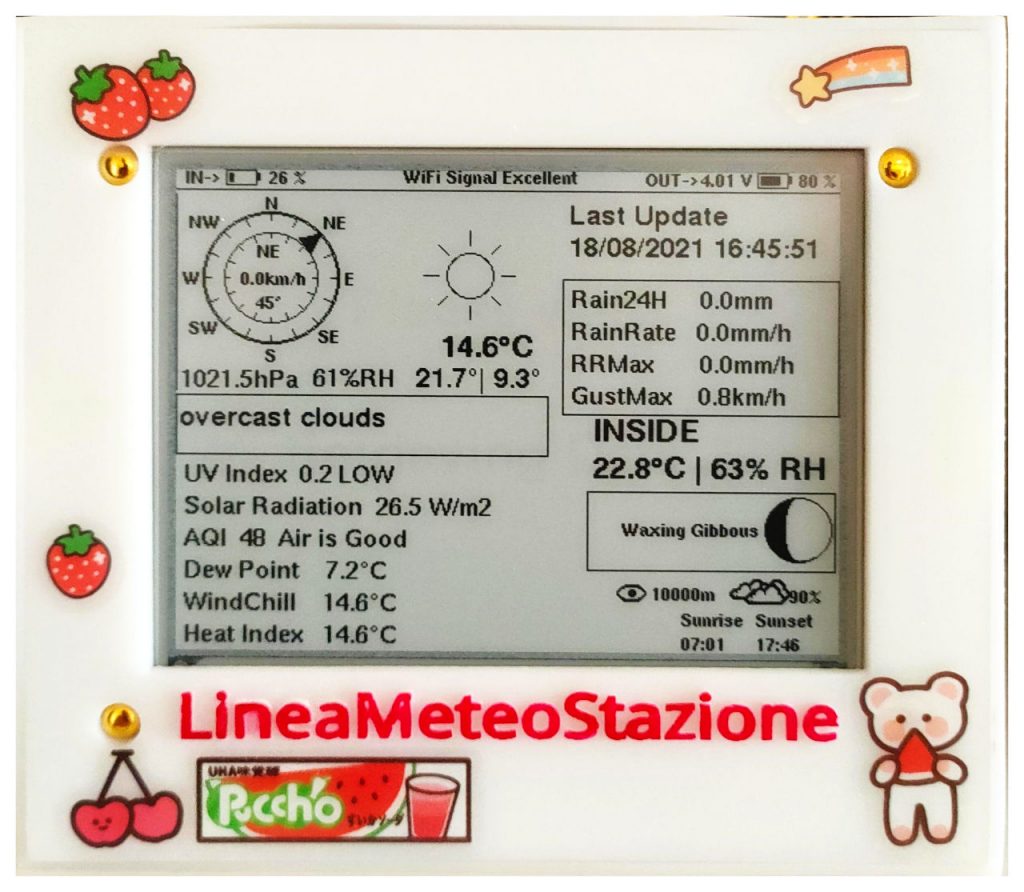
LineaMeteo Weather Station Display e-ink E-paper-Background Display with personalized stickers
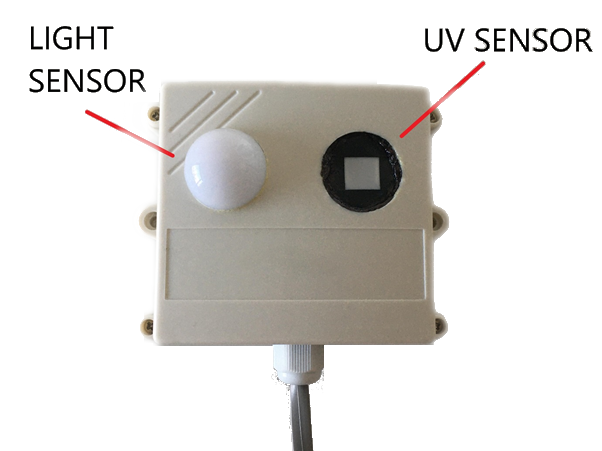
4. BOX FOR LIGHT AND UV SENSOR AND ADDITIONAL BREAKOUT BOARD FOR EXTRA SENSOR RJ12
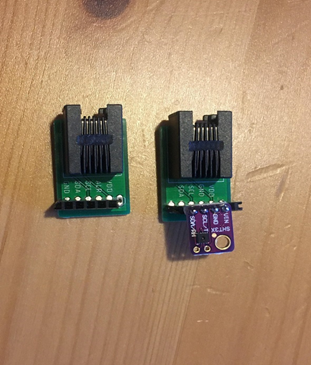
This is the box that contains the MAX44009 and the VEML6075. The Light sensor has a diffuser dome and the UV sensor has a Teflon 0.4mm thick with an aperture window of 10mm. The sensor is separated from the window of 5.65mm calculated based on the datasheet application note, in order to avoid the light reaching the corner of the sensor. Also available ‘breakout boards’ for extra sensors with an easy plug and play RJ12 connection.
Box with UV and Solar Radiation Sensor Sensor sample boards
EASY SETUP WEATHER STATION STEP BY STEP (FIREBASE)
STEP 1: Getting Started with Firebase!
First of all, we need to create a Firebase account. To do that you will need an account Google which you can create if you don’t already have one.
To set up the Firebase account you need to follow the following steps:
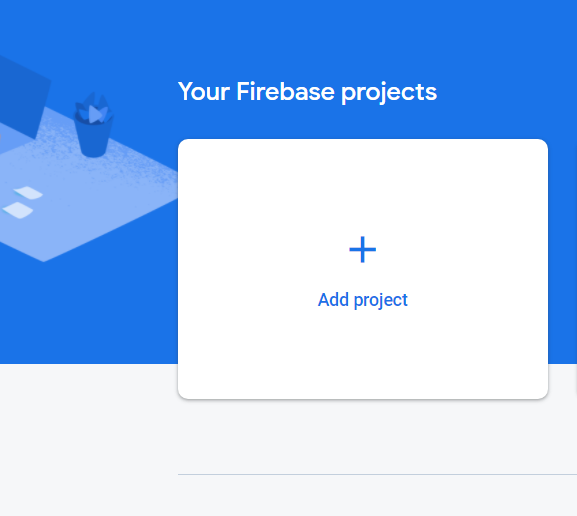
1. Go to FIREBASE and click on ‘Get Started’

2. Sign IN to your Google account
3. Click on ‘Add a project’
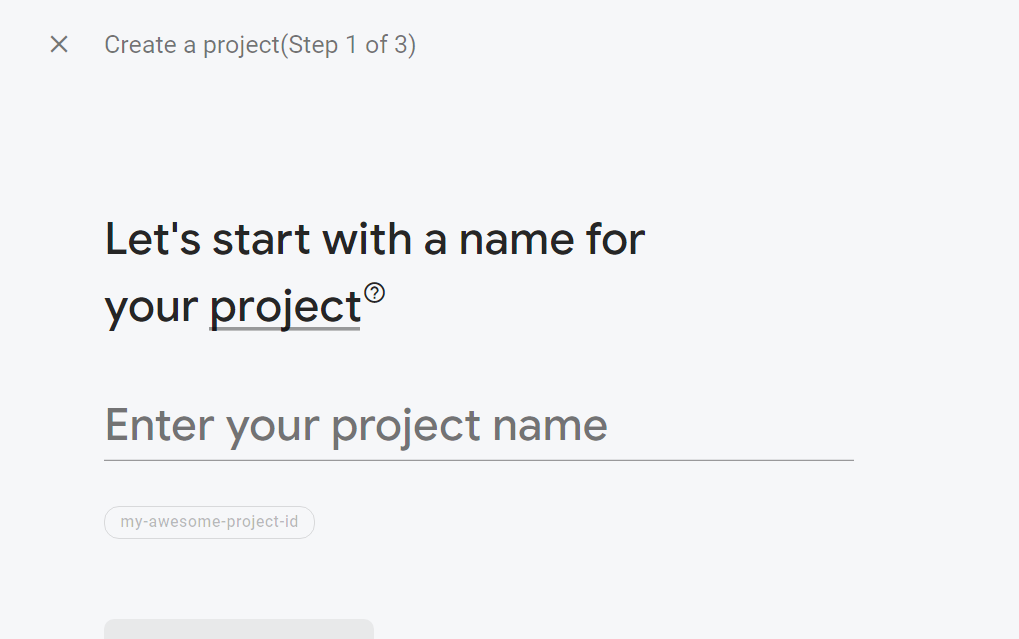
4. Give a name to your project! Click ‘Continue’. Follow the steps and create the project. Use the default account for Firebase.
5. ‘Go on ‘project overview’ on top and select ‘project settings’
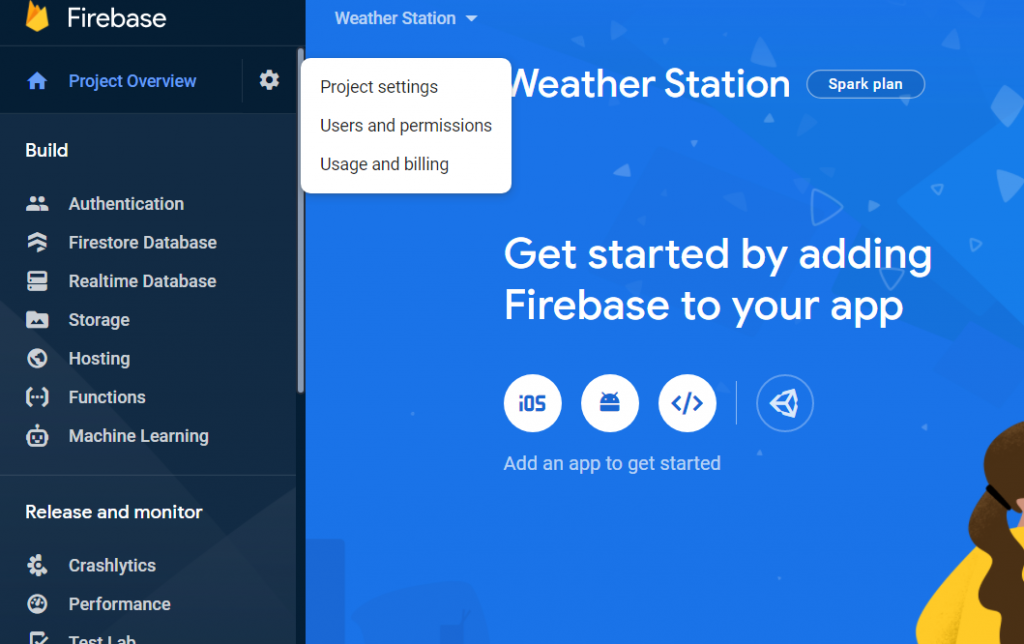
6. Click on ‘Service Account’ and ‘Create Service Account’
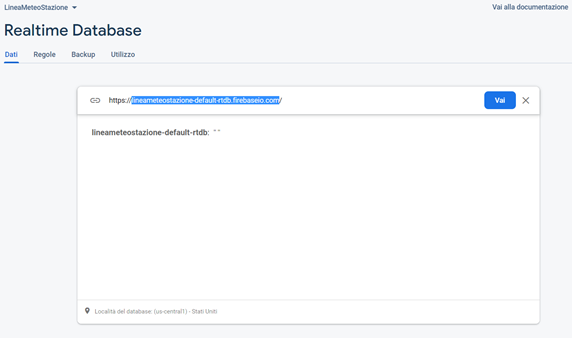
7. Go back to ‘Project Overview’ and Create Realtime Database and follow the steps and use default security read and write and select the nearest location for the database.
8. ALL DONE! Now save the project link that you can find in the real-time database and also the secret that you can find ‘Service Account’ ‘Account di servizio’ under ‘Database Secret’ ‘Segreti Database’
You will need just the one highlighted in the picture below and the database secret to programming the weather station! To send you the board already programmed I will need those credentials.

Setup DEVICE 1(Outside)
This is the installation that requires securing the weather station outside. A solar radiation shield Is required for the air temperature and humidity sensor. It is also required a weatherproof box for the correct storage of the battery and PCB. DEVICE 1 is powered up by a single 18650 battery and the battery need to be installed otherwise the device won’t work properly if just powered up directly by USB.
OVERVIEW
- Connect all the available sensors on the board using the RJ12 connectors or the screw terminal, depending on the type of sensor used. (Refer to the list of ‘Compatible sensor and specification) (SENSORS ARE CONNECTED WITH AN ADAPTOR BOARD DESIGNED SPECIFICALLY FOR SOME I2C DEVICES AND THE SHT35 ON TINDIE) Those boards will be provided.
- Install the board in a weatherproof box and install the battery (BE CAREFUL + AND – AND BATTERY SHOULD BE ENOUGH CHARGED BEFORE FIRST START):
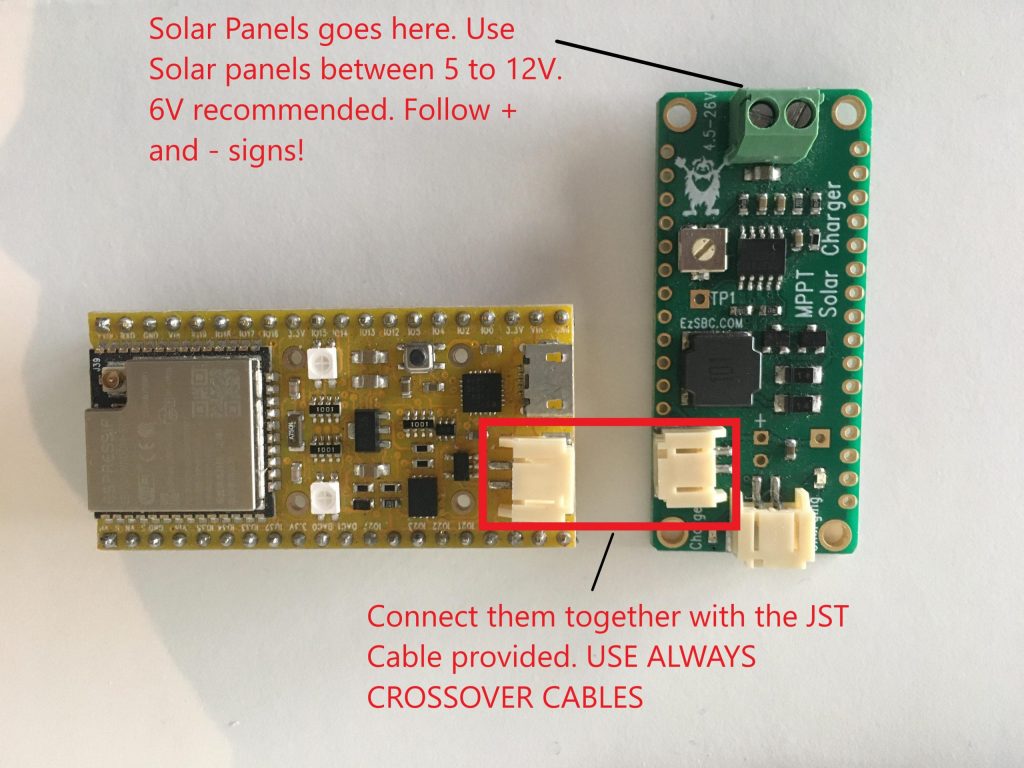
- Connect Solar Panel to the Solar Charger Board and Plug IN the battery connector provided from the SolarCharger Board into the EZSBC BAT PRO and set up the Wi-Fi connection as explained below. (Please, use just the cable provided or any crossover cable)
SETUP WI-FI (PROCEDURES FOR ALL DEVICES)
To set up the Wi-Fi connection follows the following steps:
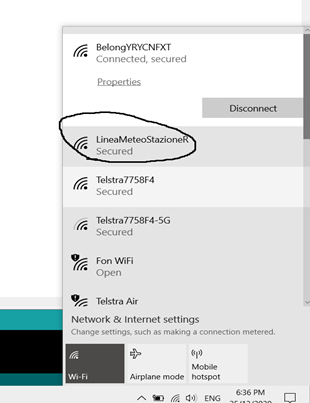
· Once DEVICES are ON you will find them in the Wi-Fi connections available on your smartphone or computer with the name of LineaMeteoStazioneS for DEVICE 1, LineaMeteoStazioneR for DEVICE 2 and LineaMeteoStazioneVisual for DEVICE 3.
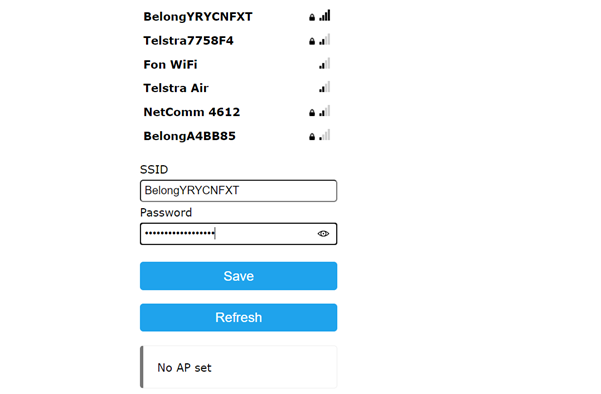
· Try to connect by clicking on the network and it will ask for a password. PASSWORD: LaMeteo2005 (Same for all devices) (If it doesn’t prompt you automatically you can go to 192.168.4.1 in the web browser to access the page)
After that it will prompt you on a page like the following:
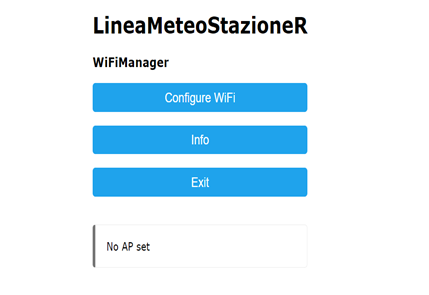
· Click on configure Wi-Fi and select your Wi-Fi network and enter your password and click Save. Now the DEVICE will try to connect and if fails you will be required to start again the procedures followed before.
· Once DEVICE 1 is ready outside it is time to set up the DEVICE 2 with the same procedures. The last to set up will be the display DEVICE 3.
Configure Weather Station Settings Using Firebase
ATTENTION: EVERY SETTING IS CASE SENSITIVE.
FOR SOME SETTINGS AS EMAIL ACCOUNT, API AND ID OF THE SERVICES THE DEVICE 2 NEED TO BE RESTARTED IN ORDER FOR THE SETTING TO BE EFFECTIVE. Remember to always use “” when adding data that contains words.
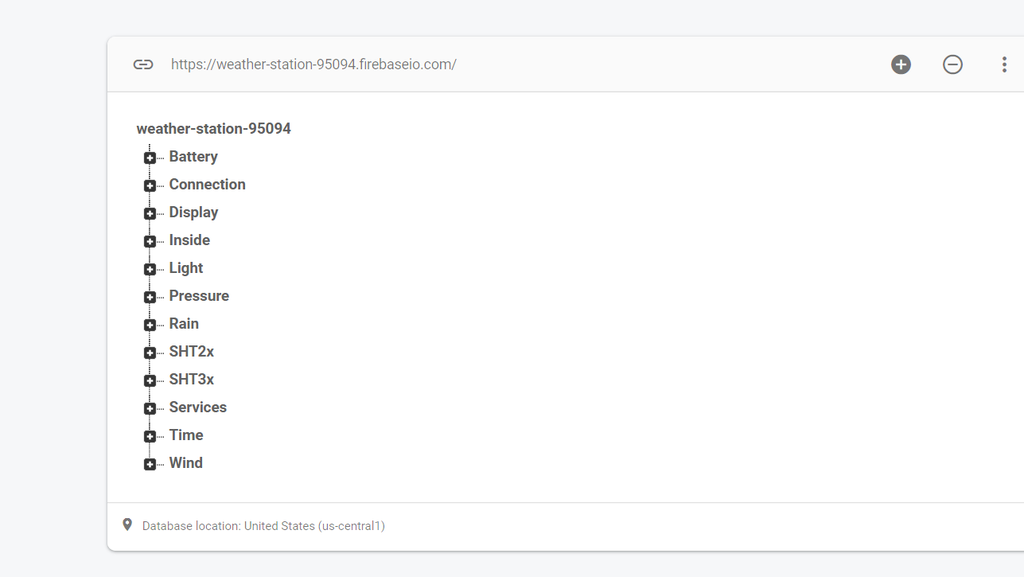
Once DEVICE 2 is ready, you should have a page like this in the Database.
The database is categorized as follows:
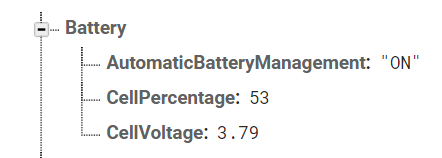
- Battery
Here you can see the current level of the battery voltage, as well as the battery percentage. You can also set if you want the AutomaticBatteryManagement “ON” or “OFF”. The ABS simple adjust the consumption of DEVICE 1 depending on the Battery Voltage. Sample Time will change based on the condition of the battery. You can put this setting OFF if you want to manage the Sample Time on your own, but when the battery level is more than 4.1V or less than 3.45 the Sample Time will be adjusted automatically independently if is ON or OFF.
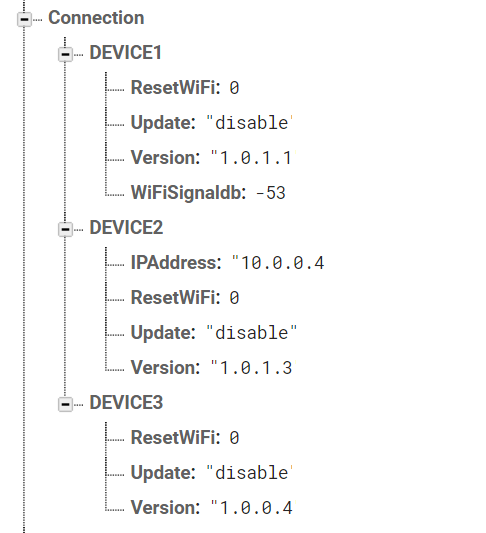
- Connection
Connection is used for OTA updates and for other information about the Devices. It is also to manually reset the WiFi by inserting 1 in the Reset WiFi setting.
IPAddress of Device 2 can be used to port forward the IP in order to set up your devices in the LineaMeteo weather network. (PortForwarding can be done in the router, but every router is different, so you need to know yours. The external port should be 4600 and the internal port should be 80)
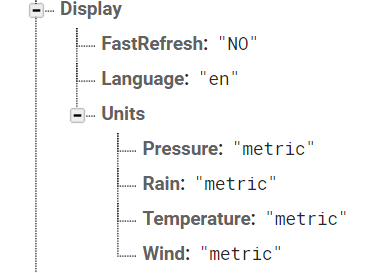
- Display
These are the Display Settings. Here you can set the language between “en” (English) or “it” (Italian) of the Display and the Unit for different values such as Rain, Pressure, Temperature and Wind, from “imperial” or “metric”. You can also set if you want a Fast or Slow refresh mode. If the Fast mode is used the display need to be connected to the USB power otherwise it will run out of battery in a day. In FastRefresh mode, every setting made in the Display section requires pressing the button on the Display for the settings to actually change. Select “YES” or “NO” to activate or deactivate the FastRefresh mode.
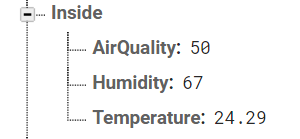
- Inside
Here is where is stored the data of the Indoor condition of Temperature, Humidity and AirQuality score.
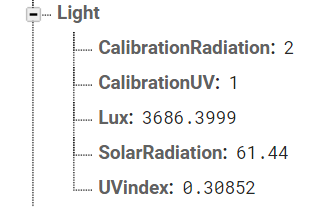
- Light
Here is stored the Light Data, like Solar Radiation and UV index. You can also Calibrate the Solar Radiation and the UV Index values using the Calibration line. The value in calibration is a multiplication value, for example, 2 will be double.
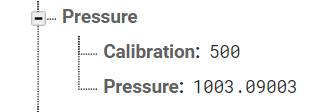
- Pressure
Here is stored the value of the Pressure and also is possible to Calibrate it based on sea level. Refer to some near weather station or look at the current atmospheric pressure on the forecast. Every number added or subtracted on Calibration means +- 1Pa and the value of Pressure shown is in hPa.
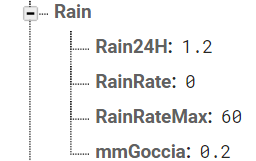
- Rain
Here is stored the value of the rain in 24H and also other values related to the rain. You can use every tipping bucket rain gauge so this means that you will need to calibrate how much every tipping count for. Modify ‘mmGoccia’ to change the tipping count in mm. Default is 0.2mm. This option can be used also to calibrate the Rain Gauge.
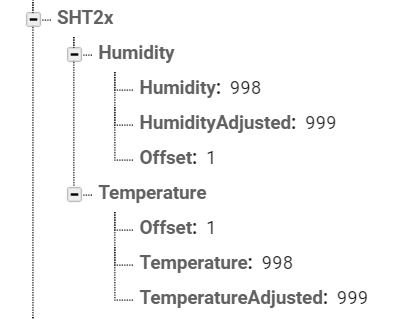
- SHT2x
This contains the data of the Sensirion SHT20 and can also be set as an Offset if some calibration is needed. The offset is in degree Celsius and can be set with every decimal place, for example even 0.01. When Offset is applied and different than 0, it will appear in the database the Temperature Adjusted, otherwise it will be deleted automatically. Same for the humidity. (If the sensor is not connected it will show 998/999 values.)
- SHT3x
This contains the data of the Sensirion SHT3x and can also be set as an Offset if some calibration is needed. The offset is in degree Celsius and can be set with every decimal place, for example even 0.01. When Offset is applied and different than 0, it will appear in the database the Temperature Adjusted, otherwise it will be deleted automatically. Same for the humidity.

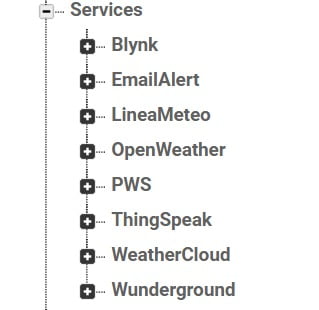
- Services
This contains all the services available to use with this weather station and also the Email Alert settings.
BLYNK
Here you can set your Blynk details and also if you want that Blynk is ON or OFF, that will decide if the data is actually sent to Blynk or not. (FOR THESE SETTINGS DEVICE 2 NEED TO BE RESTARTED)
Blynk values sent are:
- V0 = Main Temperature
- V1 = Main Humidity
- V2 = Pressure
- V3 = Uv Index
- V4 = Wind Speed
- V5 = Direction of The Wind
- V6 = Rain
- V7 = Battery Voltage
- V8 = Temperature Indoor
- V9 = Humidity Indoor
- V10 = Lux
- V11 = Solar Radiation
- V12 = Air Quality
- V13 = Temperature Second Sensor
- V14 = Humidity Second Sensor
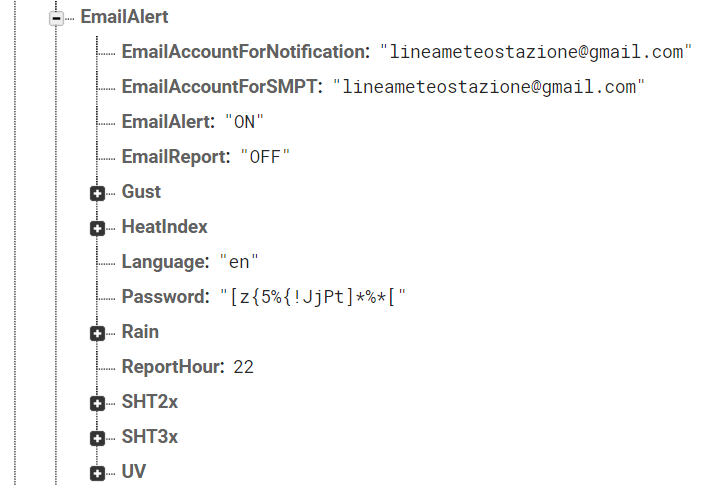
EMAIL ALERT
To use the email alert feature you need to have an account email to use as server SMPT. It can be also your personal account, but for safety is better to create an account just for SMPT use with Google. You will need to put the email and the password of the account in the database. If you want the Email Report just leave “ON” the EmailReport settings. If you want to turn ON or OFF all Email Alert notifications based on some condition you can set “ON” or “OFF” on the email alert settings. You can also set if you would like the notification individually with the “Enable” setting “ON” or “OFF”. EmailAlert must be “ON” if you want to set the notification individually:
You can set all the alert threshold values here for Rain, Rain Intensity, Temperature Max and Min for the SHT2x and SHT3x and also for their Humidity values Max and Min. You can also set alerts for UV index, Gust and heat index. It is also possible to set the language of the email between Italian and English.

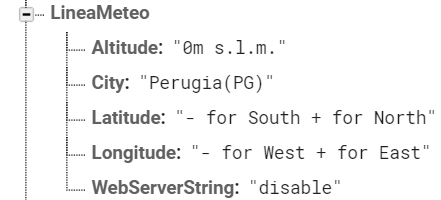
LINEAMETEO
Here you can set some of your personal data for the Linea Meteo weather network. If you communicate to LineaMeteo using Wunderground you can disable the server string. Just type “disable” in the WebServerString setting.
OPEN WEATHER
You can set up your own account on OpenWeather for current condition weather description on DEVICE 3 Display (find My API Keys and copy in the API in Services, OpenWeather.)
Hemisphere type ‘north’ if you live in the northern hemisphere or ‘south’ in the southern hemisphere to display the correct astronomy section on display.
Latitude and longitude, just use 2 decimal place values to display correct weather condition description on DEVICE 3 Display.
THINGSPEAK
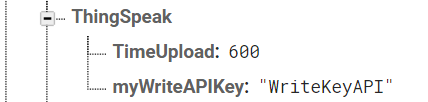
Create an account on ThingSpeak and find the WriteAPIkey and copy in myWriteAPIKey, to see the difference with graphics between the SHT2x and SHT3x series if both sensors are connected, or to just monitor the SHT2x. You will also see on ThingSpeak other values such as current Wind Speed, Gust and Solar Radiation. You can also select the Time Upload in seconds, but be mindful of the maximum amount of data that can be sent on the ThingSpeak free version.
WeatherCloud
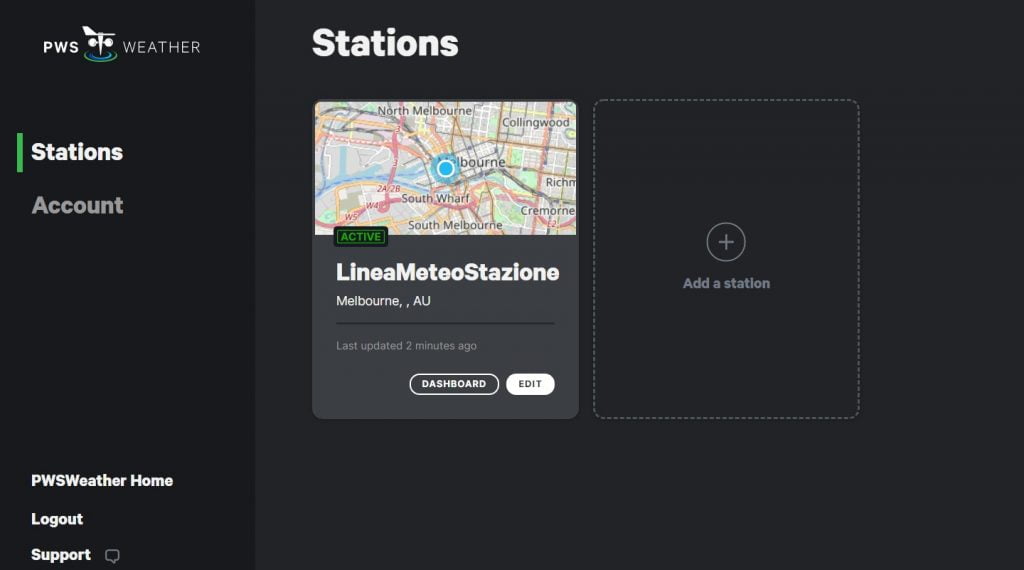
You can link the weather station to the Weather Cloud network using this option. Go to Settings on your devices and select ‘Link’, it will give you the ID and Key that you can copy into the database. You can also set the Time Upload to WeatherCloud in seconds, but with the free version, this is capped to a maximum of every 10 minutes.
WunderGround
You can link the weather station to WunderGround using this option.
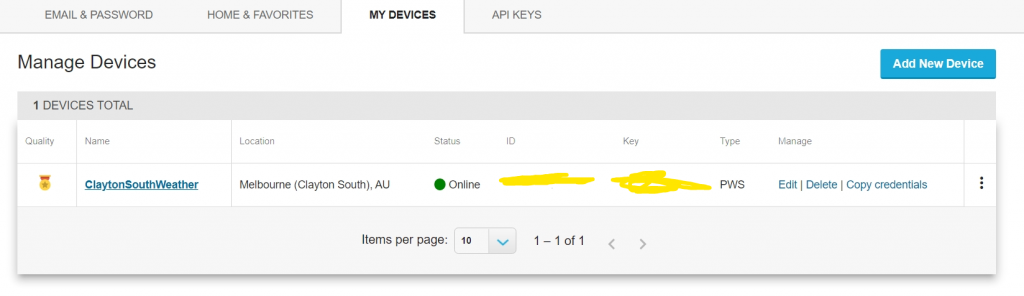
Find the ID and Key on My Devices and copy them to the database.
You can also set the Time Upload of the data to WunderGround in seconds.
PWS Weather
You can link the weather station to the PWS network
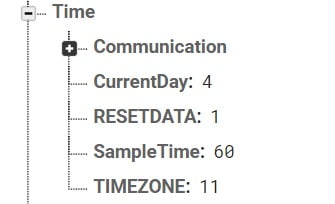
- Time
This option is used to set your TIMEZONE which will be your time (need to modify when daylight saving applies) and to set the sample time in seconds. It is recommended to don’t upload the data faster than 45 seconds to save the battery life of DEVICE 1. Data is read just every 45 seconds maximum from DEVICE 2 so it won’t make much difference to make it faster.
CurrentDay, RESETDATA and Communication don’t need to be touched. To reset all data in the database, enter 0 in RESETDATA.
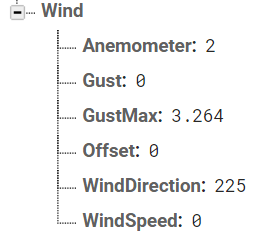
- Wind
This contains the values of the Wind, like degrees of the Wind Direction and also the Wind Speed and the Gust. In order for DEVICE 1 to know which anemometer you’re using between the Misol and the Davis Anemometer, you have to select the type of Anemometer in Wind/Anemometer. Type 2 for Misol and 1 for Davis.
It is also possible to adjust the Offset here, in order to point the right direction of the Wind Direction of the Anemometer. 0 degrees or 360 degrees should point North. Or it is best to adjust the anemometer itself to point in that direction. The wind direction adjusted will appear if Offset is applied.
Setup DEVICE 3 DISPLAY
The DEVICE 3 is powered up with one single battery 18650, which can be recharged through USB. You can open the box for installing the battery by using the support on the side of the box.
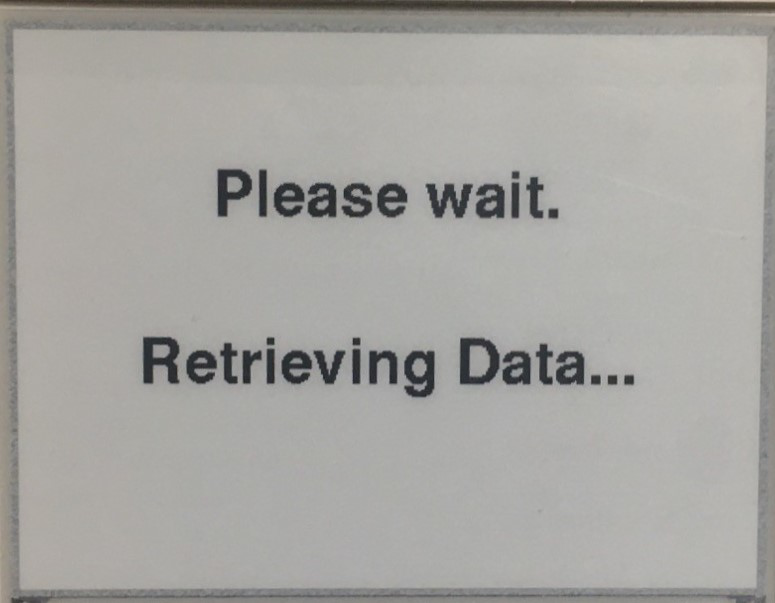
The display supports fast refresh or slow refresh mode. Fast Refresh can be set in the database set as explained above and it will update the display every 50 seconds. Slow refresh will update the display every 10 minutes and every 2 hours after midnight and until 6 AM. In Slow Refresh mode, the display can also be updated manually by clicking on the button on the right side of the box.
When Button is pressed or when the display is automatically updated, it will appear ‘Please wait. Retrieving Data…’ message.
After the battery has been installed follow the same procedures for all DEVICES to connect to Wi-Fi.
The name of the network will be ‘LineaMeteoStazioneVisual’
The battery should be sufficiently charged before starting.
Part of the Display concept is taken from David Bird software!
OTA Updates
The Devices are able to be programmed remotely and via local WiFi with Ota settings under ‘Connection’ as shown in the Services. To update one of the Devices you will need to insert enable under update. You can enable the Update of the Device that you want to update. Once enabled, after a while, the Devices will check if some updates are available in OTADRIVE and it will install them manually if a newer version is available.

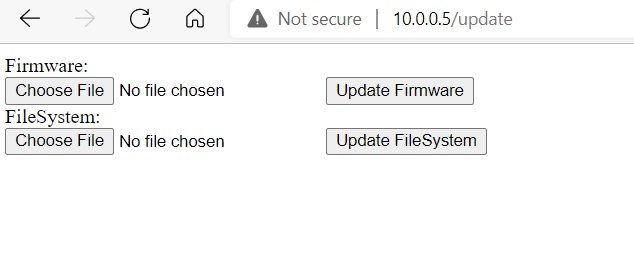
If no update is available it will go in a local webserver where you can also update the firmware by choosing a file from your computer. To access the webserver you can follow the address shown in Update Here. If no file is detected, after 5 minutes it will go back to normal operation.
Compatible Sensors


- Temperature/humidity MAIN: SHT3x series Sensirion. Accuracy refers to the datasheet of each sensor.
- Temperature/humidity SECOND (can be used for soil temperature and moisture): SHT20/21/25 series Sensirion. Accuracy refers to the datasheet of each sensor.
- Temperature, Humidity, Air quality Inside: BME680
- Pressure: BMP180
- Rain Gauge: Every tipping bucket rain gauge, adjustable resolution and calibration.
- Anemometer: Davis Anemometer and Misol Anemometer Wind Speed and Wind Direction
- UV Index: VEML6075 (Real UV sensor)
- Solar Radiation: MAX44009(Based on Calculation from “A conversion guide: solar irradiance and lux illuminance”)
Specifications
- Battery DEVICE 1: 3.7V 18650 Battery lithium PROTECTED BATTERY (Recommended minimum 3000mAh)
WARNING: Be careful with lithium batteries with high temperatures (more than 45C), the weatherproof box should be put in the shade. Furthermore, if negative temperature -10C occur often or extreme negative temperature occurs (example -20C) a specific battery for cold temperature will be required.
- Battery DEVICE 3: 3.7V 18650 Battery lithium (3000mAh)(Autonomy without recharging 1 month Slow Refresh, 1 day Fast Refresh)
- Solar Panel 5-12V (6V recommended)
Watt depending on your location from Global Solar Atlas.
| GTI opta per day | Less than 1000kWh/m2 | 10W (minimum) |
| GTI opta per day | 1500Wh/m2 | 6W (minimum) |
| GTI opta per day | 2000kWh/m2 | 4.5W (minimum) |
| GTI opta per day | 2500kWh/m2 | 3.5W (minimum) |
| GTI opta per day | 3500kWh/m2 | 3W (minimum) |
| GTI opta per day | 4000 and 5500kWh/m2 | 2.5W to 2W (minimum) |
| GTI opta per day | 5500kWh/m2 or more | 1W (minimum) |
- Length of cable for SHT3x and SHT2x and VEML6075 and MAX44009 should not exceed 3m. If more length is required, please contact me.
Troubleshooting
- If one of the DEVICES is not working as expected a RESET would be required. Remove the battery and restart the device if RESET doesn’t work.
- If you can’t see one of the DEVICES in the WIFI network, remember that you have just 5 minutes to setup the Wi-Fi connection for all DEVICES once is ON, otherwise it will need to be restarted to appear again.
- If the Temperature Minimum says 0 when first starting, make sure the DEVICE 1 is already ON with the sensor properly connected before starting DEVICE 2. If still 0, reset max and min value by changing the Current Day in Time settings and restart DEVICE 2.
- IF YOU’RE USING A FIREWALL: keep in mind the devices when communicating with Google It needs to have ports 443 (HTTPS), 5228 (HTTPS), 5229 (HTTPS), and 5230 (HTTPS)free, and sometimes it also could still have an issue if you’re using some firewall.
- For other questions regarding problems please contact me.
Links
- LineaMeteoStazione: Technical Guide Master Device, Sending and Collecting Data
- LineaMeteoStazione: Technical Guide Display
- LineaMeteoStazione: Technical Guide Receiver, Network and Manager Device
- LineaMeteoStazione: The Personalized WiFi Weather Station using ESP32, ESP8266 and Attiny85 with OTA
For the pre-assembled weather station or source of the material please email me Eugenio
eugenioiaquinta@outlook.it


