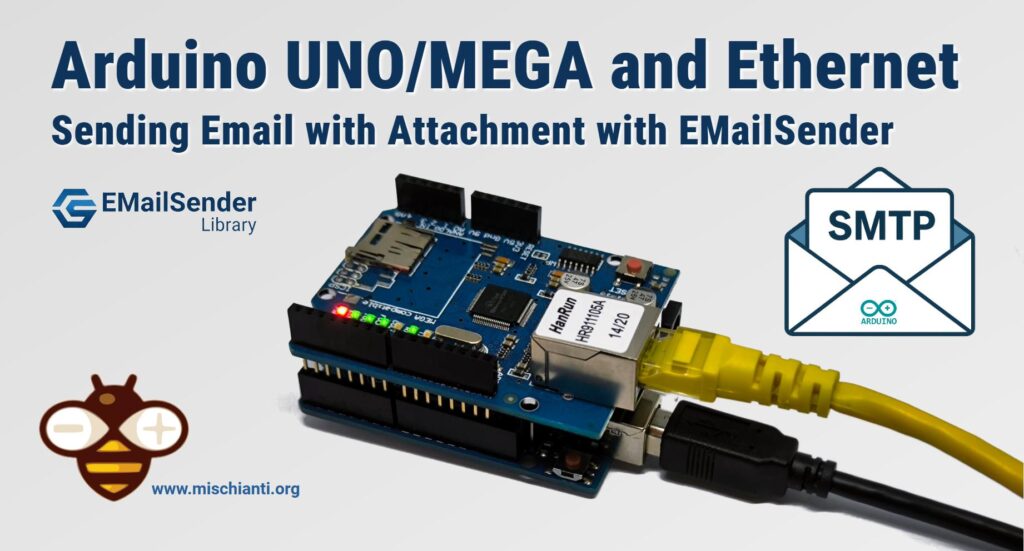
Arduino UNO/Mega e Ethernet: inviare Email con allegati (Libreria EMailSender v4.0.0)
È tempo di una guida aggiornata per inviare email con Arduino UNO e Mega utilizzando la mia libreria EmailSender v4.0.0. Questo articolo si basa su quello precedente, concentrandosi sulla nuova versione della libreria e introducendo una soluzione robusta e affidabile per schede con RAM limitata: il servizio SMTP di Brevo.
Limitazioni della RAM di Arduino e la Soluzione
Prima di iniziare, è fondamentale chiarire un punto cruciale: Arduino UNO e Arduino Mega non hanno abbastanza RAM per gestire la crittografia SSL/TLS.
- Arduino UNO: Ha solo 2KB di RAM.
- Arduino Mega: Ha 8KB di RAM.
- Requisiti SSL/TLS: Una connessione sicura richiede almeno 24KB di RAM solo per i buffer di crittografia.
Ciò significa che non è possibile connettersi direttamente a servizi come Gmail, Outlook o Yahoo, che richiedono rigorosamente SSL/TLS.
Qual è la soluzione? Utilizzare un servizio SMTP professionale che consenta l’autenticazione su porte standard (come la 587) senza forzare la crittografia SSL/TLS. Brevo (precedentemente Sendinblue) è la scelta perfetta e quella che consiglio, poiché offre un generoso piano gratuito ed è perfettamente compatibile con le limitazioni di Arduino.
In questa guida, vedremo come configurare un progetto completo e funzionante utilizzando un Arduino Mega, uno Shield Ethernet W5500 e il servizio Brevo.
Il controller W5500 è la scelta migliore, grazie al suo stack TCP/IP hardware che riduce il carico sulla CPU di Arduino.
| Piattaforma | WiFi | Ethernet | SSL/TLS | STARTTLS | Stato |
|---|---|---|---|---|---|
| ESP32 | ✅ | ✅ | ✅ | ✅ | Supporto Completo |
| ESP8266 | ✅ | ✅ | ✅ | ✅ | Supporto Completo |
| Arduino Mega | ❌ | ✅ | ❌ | ❌ | Memoria Limitata |
| Arduino Uno | ❌ | ✅ | ❌ | ❌ | Memoria Limitata |
| Arduino SAMD | ✅ | ✅ | ✅ | ✅ | Supporto Completo |
| STM32 | ❌ | ✅ | ✅* | ❌ | Con Ethernet |
| Raspberry Pi Pico W | ✅ | ✅ | ✅ | ✅ | Supporto Completo |
* Necessita di una buona quantità di RAM (>24K)
Requisiti Arduino
Cosa Funziona su Arduino Mega/Uno
| Funzionalità | Arduino Mega | Arduino Uno | Note |
| RAM Disponibile | 8KB | 2KB | Sufficiente per SMTP base |
| Porta SMTP 587 | ✅ SÌ | ⚠️ Limitato | Con AUTH LOGIN (no SSL) |
| Porta SMTP 25 | ✅ SÌ | ✅ SÌ | Solo reti locali/relay |
| SSL/TLS (465) | ❌ NO | ❌ NO | Richiede 24KB+ RAM |
| STARTTLS (587 sicuro) | ❌ NO | ❌ NO | Richiede BearSSL |
| Allegati da SD | ✅ SÌ | ⚠️ Limitato | Mega raccomandato |
Servizi Email Compatibili con Arduino Mega/Uno
IMPORTANTE: Su Arduino Mega/Uno, è possibile inviare email solo tramite servizi SMTP che accettano connessioni senza SSL/TLS, a causa delle limitazioni di RAM e della mancanza di supporto hardware per SSL.
| Servizio | Porta | SSL | Dominio Richiesto | Email/Giorno | Arduino Mega | Raccomandazione |
|---|---|---|---|---|---|---|
| Brevo | 587 | ❌ | ❌ | 300 | ✅ | ⭐⭐⭐⭐⭐ |
| SMTP2GO | 2525 | ❌ | ✅ | 1000 | ✅ | ⭐⭐⭐ |
| Mailgun | 587 | ❌ | ✅ | 5000 | ✅ | ⭐⭐⭐ |
| Relay Locale | 25 | ❌ | ❌ | Illimitate | ✅ | ⭐⭐⭐⭐ |
Controlla l’elenco aggiornato nella sezione relativa del forum.
Requisiti Hardware
Qui per acquistare Arduino a basso prezzo Arduino UNO - Arduino MEGA 2560 R3 - Arduino Nano - Arduino Pro Mini
Qui per acquistare alcune varianti di moduli ethernet w5500 lite - w5500 - enc26j60 mini - enc26j60 - lan8720
Per questo progetto, consiglio la seguente configurazione per assicurarti di avere abbastanza memoria e pin:
- Scheda Arduino: Arduino Mega 2560 R3 (raccomandato per i suoi 8KB di RAM); tuttavia, Arduino Uno è sufficiente per l’esempio base.
- Shield di Rete: Shield Ethernet basato su W5500.
- Archiviazione (Opzionale): Un modulo lettore di schede MicroSD per inviare allegati.
- Alimentazione: Un alimentatore stabile da 5V, 1A.
- Cavo Ethernet.
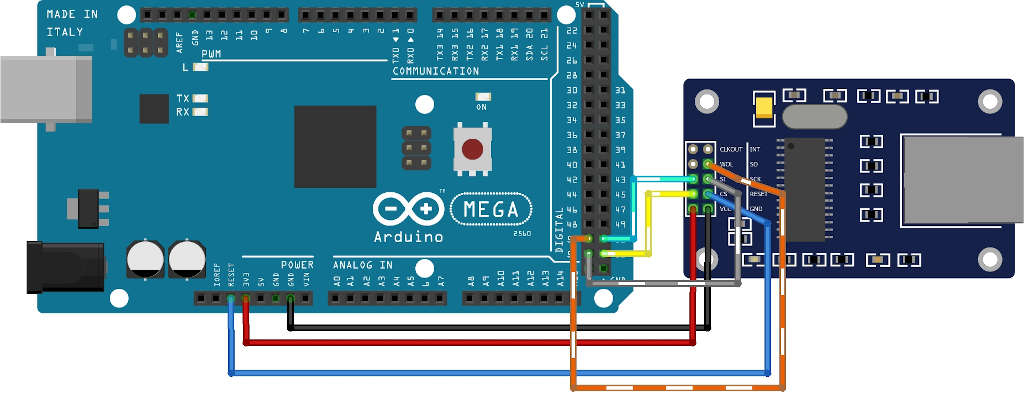
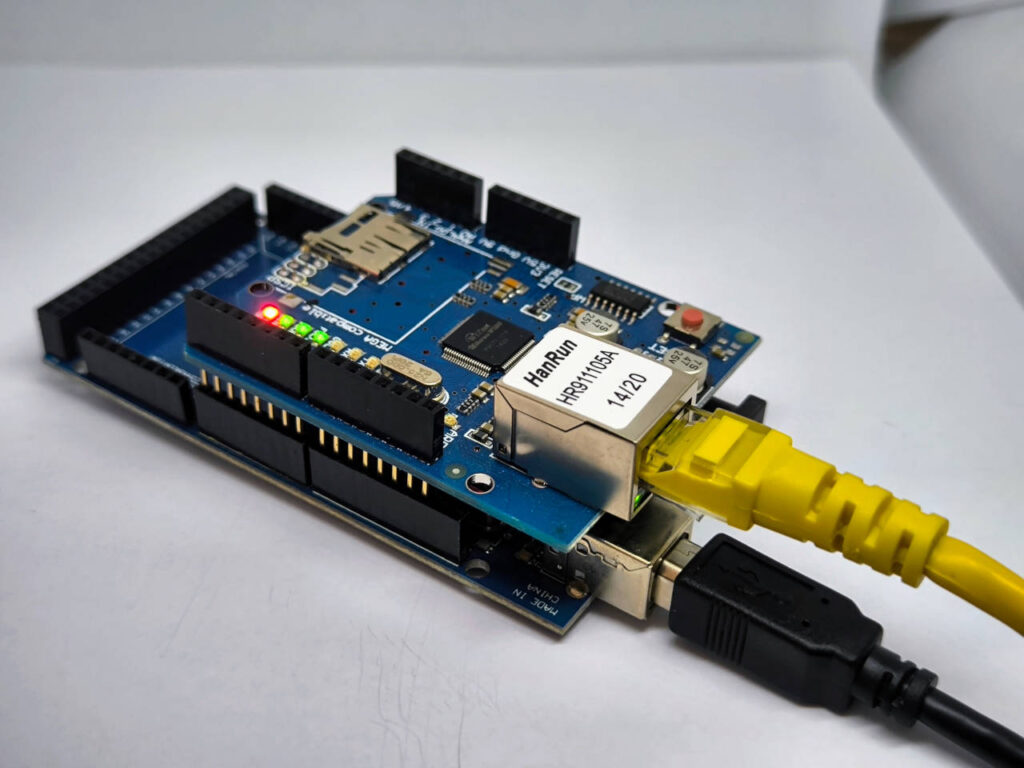
Ecco lo schema di connessione del modulo Ethernet
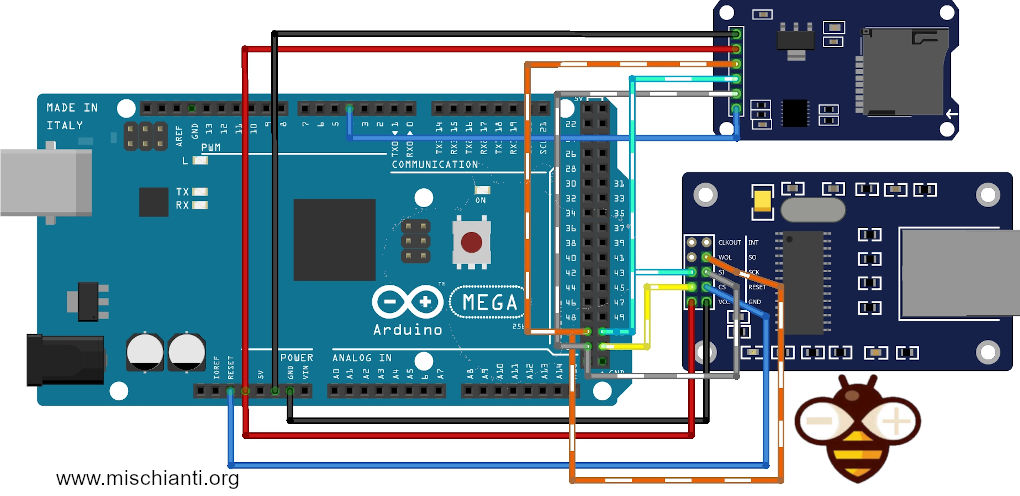
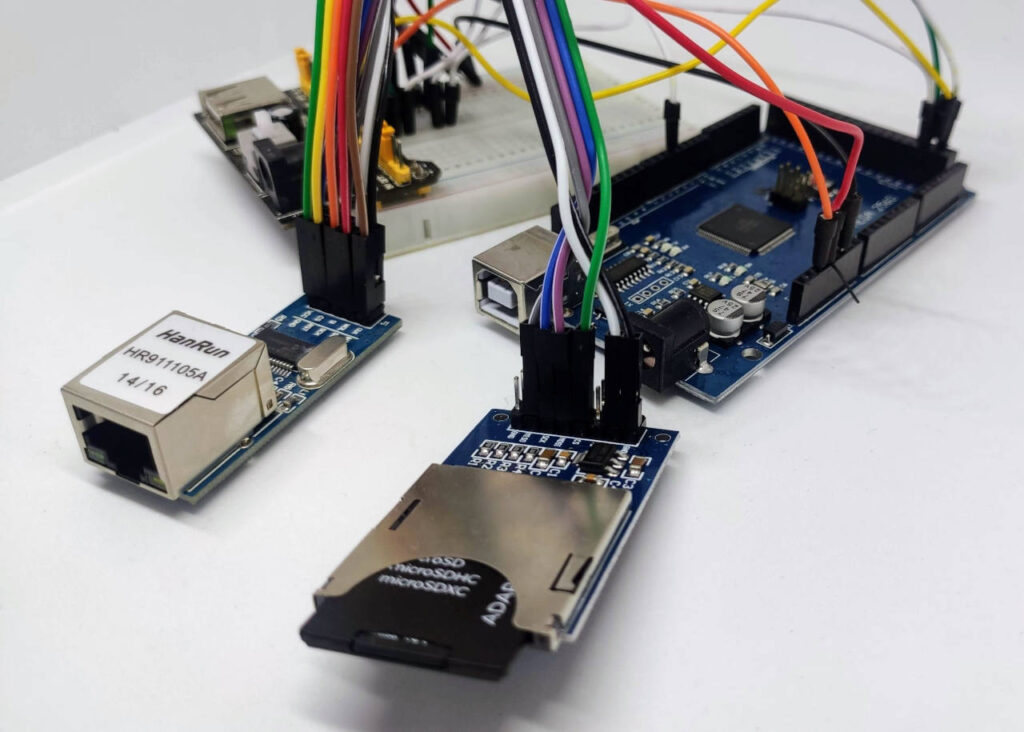
Per gestire gli allegati da SD, ecco lo schema di connessione con il modulo SD.
Qui per acquistare la mia selezione di moduli per schede SD AliExpress
Configurazione Software e Librerie
1. IDE Arduino
Assicurati di avere l’ultima versione dell’IDE Arduino dal sito ufficiale.
2. Installa le Librerie
IDE Arduino
- Apri l’IDE Arduino
- Vai su Sketch > Includi Libreria > Gestisci Librerie
- Cerca “EMailSender“
- Fai clic su Installa
PlatformIO
Aggiungi al tuo platformio.ini:
lib_deps =
    xreef/EMailSender@^4.0.0
Installazione Manuale
- Scarica la libreria da GitHub
- Estrai nella cartella delle librerie di Arduino
- Riavvia l’IDE Arduino
Configurazione del Tuo Account Brevo
Brevo è un servizio eccellente che offre 300 email gratuite al giorno, perfetto per i progetti IoT.
- Crea un Account Gratuito: Vai su brevo.com e registrati.
- Verifica il Tuo Account: Completa il processo di verifica. Potrebbero essere necessarie alcune ore.
- Ottieni le Tue Credenziali SMTP: Una volta che il tuo account è attivo, vai su Account -> SMTP & API. Qui troverai le tue credenziali:
- Server SMTP:
smtp-relay.brevo.com - Porta:
587 - Login: Il tuo indirizzo email di registrazione.
- Password: La tua chiave SMTP (copiala e conservala in un posto sicuro).
- Server SMTP:
- Verifica un Mittente: Nella sezione Mittenti & IP, assicurati di aver verificato l’indirizzo email che userai come mittente (
From) nel tuo codice.
Esempio Base di EMailSender
| Esempi per Arduino Mega | ||||
|---|---|---|---|---|
ArduinoMega_EthernetW5500_Brevo | Arduino Mega | Brevo SMTP | ❌ Porta 587 | RACCOMANDATO – Nessun SSL richiesto |
Questo sketch dimostra come inviare una semplice email utilizzando un Arduino Mega e le tue credenziali Brevo.
/*
 * EMailSender Library - Arduino Mega + Brevo (Sendinblue) Example
 *
 * This example shows how to send email using Arduino Mega with Ethernet shield
 * and Brevo SMTP service (port 587 without SSL/TLS).
 *
 * WHY BREVO?
 * - Arduino Mega has only 8KB RAM (not enough for SSL/TLS which needs 24KB+)
 * - Brevo accepts port 587 WITHOUT SSL/TLS encryption
 * - 300 emails/day free tier
 * - No domain verification required (just verify your email address)
 *
 * SETUP INSTRUCTIONS:
 * 1. Register at https://www.brevo.com (free account)
 * 2. Go to SMTP & API → SMTP settings
 * 3. Get your SMTP credentials:
 *    - Login: something like "98a01e002@smtp-brevo.com"
 *    - Password: your API key (e.g., "xsmtpsib-abc123...")
 * 4. Verify a sender email address in Brevo dashboard
 * 5. Update the credentials below
 *
 * HARDWARE:
 * - Arduino Mega 2560
 * - W5500 or W5100 Ethernet Shield
 * - Ethernet cable connected to router
 *
 * WIRING (W5500):
 * - MOSI → Pin 51
 * - MISO → Pin 50
 * - SCK  → Pin 52
 * - CS   → Pin 10
 * - VCC  → 5V
 * - GND  → GND
 *
 * Author: Renzo Mischianti
 * Website: https://www.mischianti.org
 * Library: https://github.com/xreef/EMailSender
 * License: MIT
 * Date: 2025-01-07
 */

#include <SPI.h>
#include <Ethernet.h>
#include <EMailSender.h>

// ========== CONFIGURATION - UPDATE THESE VALUES ==========

// Brevo SMTP Credentials (get from https://app.brevo.com/settings/keys/smtp)
const char* BREVO_LOGIN = "<YOUR-BREVO-SMTP-LOGIN>";        // Your Brevo SMTP login
const char* BREVO_PASSWORD = "<YOUR-BREVO-PASSWD>";   // Your Brevo SMTP password/API key

// Email addresses
const char* EMAIL_FROM = "<YOUR-EMAIL-VERIFIED-IN-BREVO>";   // Must be verified in Brevo
const char* EMAIL_TO = "<RECEIVER-EMAIL>";               // Recipient email

// Ethernet MAC address (make it unique on your network)
byte mac[] = {0xDE, 0xAD, 0xBE, 0xEF, 0xFE, 0xED};

// Optional: Static IP configuration (comment out to use DHCP)
// IPAddress ip(192, 168, 1, 177);
// IPAddress gateway(192, 168, 1, 1);
// IPAddress subnet(255, 255, 255, 0);
// IPAddress dns(8, 8, 8, 8);

// ========== END CONFIGURATION ==========

// Create EMailSender instance for Brevo
EMailSender emailSend(
  BREVO_LOGIN,              // Brevo SMTP login
  BREVO_PASSWORD,           // Brevo SMTP password
  EMAIL_FROM,               // From email (must be verified in Brevo)
  "ArduinoMega",            // Sender name
  "smtp-relay.brevo.com",   // Brevo SMTP server
  587                        // Port 587 (AUTH LOGIN without SSL)
);

void setup() {
  Serial.begin(115200);
  while (!Serial) {
    ; // Wait for serial port to connect (needed for native USB)
  }

  Serial.println("\n========================================");
  Serial.println("Arduino Mega + Brevo Email Example");
  Serial.println("========================================\n");

  // Initialize Ethernet
  Serial.println("Initializing Ethernet...");

  // Try DHCP first
  if (Ethernet.begin(mac) == 0) {
    Serial.println("DHCP failed!");

    // Fallback to static IP (uncomment the IP variables above)
    // Serial.println("Trying static IP...");
    // Ethernet.begin(mac, ip, dns, gateway, subnet);

    Serial.println("ERROR: Cannot initialize Ethernet!");
    Serial.println("Check:");
    Serial.println("  - Ethernet cable is connected");
    Serial.println("  - Shield is properly seated");
    Serial.println("  - Router DHCP is enabled");
    while (1) {
      delay(1000);
    }
  }

  // Give Ethernet time to initialize
  delay(1500);

  // Print network information
  Serial.println("✓ Ethernet connected!");
  Serial.print("  IP Address: ");
  Serial.println(Ethernet.localIP());
  Serial.print("  Gateway: ");
  Serial.println(Ethernet.gatewayIP());
  Serial.print("  Subnet Mask: ");
  Serial.println(Ethernet.subnetMask());
  Serial.print("  DNS Server: ");
  Serial.println(Ethernet.dnsServerIP());
  Serial.println();

  // Check link status
  if (Ethernet.linkStatus() == LinkOFF) {
    Serial.println("WARNING: Ethernet cable not connected!");
  }

  // Send test email
  Serial.println("Preparing to send email...");
  sendTestEmail();
}

void loop() {
  // Keep Ethernet connection alive
  Ethernet.maintain();

  // Nothing else to do in loop
  delay(10000);
}

void sendTestEmail() {
  Serial.println("\n--- Sending Email ---");

  // Prepare email message
  EMailSender::EMailMessage message;
  message.subject = "Test from Arduino Mega + Brevo";

  // IMPORTANT: Add space at beginning to avoid first character bug
  message.message = " Hello from Arduino Mega!\n\n";
  message.message += "This email was sent using:\n";
  message.message += "- Arduino Mega 2560\n";
  message.message += "- Ethernet Shield (W5500/W5100)\n";
  message.message += "- Brevo SMTP service (port 587 without SSL)\n";
  message.message += "- EMailSender Library v4.0.0\n\n";
  message.message += "Brevo is perfect for Arduino because:\n";
  message.message += "✓ No SSL/TLS required (Arduino Mega has only 8KB RAM)\n";
  message.message += "✓ 300 emails/day free tier\n";
  message.message += "✓ No domain verification needed\n";
  message.message += "✓ Simple AUTH LOGIN authentication\n\n";
  message.message += "Timestamp: " + String(millis() / 1000) + " seconds\n\n";
  message.message += "---\n";
  message.message += "Sent using EMailSender Library by Renzo Mischianti\n";
  message.message += "More info: https://www.mischianti.org\n";
  message.message += "GitHub: https://github.com/xreef/EMailSender\n";

  message.mime = MIME_TEXT_PLAIN;

  // Print email details
  Serial.println("From: " + String(EMAIL_FROM));
  Serial.println("To: " + String(EMAIL_TO));
  Serial.println("Subject: " + message.subject);
  Serial.println();

  // Send email
  Serial.println("Connecting to Brevo SMTP server...");
  Serial.println("Server: smtp-relay.brevo.com:587");

  EMailSender::Response resp = emailSend.send(EMAIL_TO, message);

  // Print result
  Serial.println("\n--- Result ---");
  Serial.print("Status Code: ");
  Serial.println(resp.code);
  Serial.print("Description: ");
  Serial.println(resp.desc);
  Serial.print("Success: ");
  Serial.println(resp.status ? "YES ✓" : "NO ✗");

  if (resp.status) {
    Serial.println("\n✓✓✓ EMAIL SENT SUCCESSFULLY! ✓✓✓");
    Serial.println("Check your inbox at: " + String(EMAIL_TO));
  } else {
    Serial.println("\n✗✗✗ EMAIL SENDING FAILED! ✗✗✗");
    Serial.println("\nTroubleshooting:");
    Serial.println("1. Check Brevo credentials are correct");
    Serial.println("2. Verify sender email in Brevo dashboard");
    Serial.println("3. Check internet connection");
    Serial.println("4. Make sure port 587 is not blocked by firewall");
    Serial.println("5. Verify Brevo account is active");
  }

  Serial.println("\n========================================\n");
}
E qui l’output sul Monitor Seriale.
========================================
Arduino Mega + Brevo Email Example
========================================

Initializing Ethernet...
✓ Ethernet connected!
  IP Address: 192.168.1.54
  Gateway: 192.168.1.1
  Subnet Mask: 255.255.255.0
  DNS Server: 192.168.1.10

Preparing to send email...

--- Sending Email ---
From: xxx@xxx.xx
To: xxx@xxx.xx
Subject: Test from Arduino Mega + Brevo
Connecting to Brevo SMTP server...
Server: smtp-relay.brevo.com:587

--- Result ---
Status Code: 0
Description: Message sent!
Success: YES ✓

✓✓✓ EMAIL SENT SUCCESSFULLY! ✓✓✓
Check your inbox at: xxx@xxx.xx

========================================
Note sul Codice
- Credenziali: Sostituisci i segnaposto con le tue effettive credenziali SMTP di Brevo.
- Email Mittente: L’indirizzo
verified-sender@yourdomain.comdeve corrispondere a un mittente che hai verificato nella tua dashboard di Brevo. - Spazio nel Messaggio: Aggiungere uno spazio iniziale a
message.messagerisolve un bug noto per cui il primo carattere potrebbe essere tagliato durante la trasmissione.
Invio di Email con Allegati da Scheda SD
| Esempi per Arduino Mega | ||||
|---|---|---|---|---|
ArduinoMega_EthernetW5500_Brevo_SD_Attach | Arduino Mega | Brevo + SD | ❌ Porta 587 | Email con allegati da scheda SD |
La libreria EMailSender eccelle nell’invio di allegati. Ecco come inviare un file log.txt da una scheda SD.
/*
 * EMailSender Library - Arduino Mega + Brevo + SD Card Attachment Example
 *
 * This sketch demonstrates how to send an email with a file attachment
 * from an SD card using an Arduino Mega, Ethernet Shield, and Brevo.
 *
 * HARDWARE:
 * - Arduino Mega 2560
 * - W5500 or W5100 Ethernet Shield
 * - MicroSD Card Reader Module
 * - MicroSD Card (formatted as FAT16 or FAT32)
 *
 * WIRING (Common SD Card Module):
 * - VCC  → 5V
 * - GND  → GND
 * - MISO → Pin 50 (shared with Ethernet)
 * - MOSI → Pin 51 (shared with Ethernet)
 * - SCK  → Pin 52 (shared with Ethernet)
 * - CS   → Pin 4 (or any other free digital pin)
 *
 * Author: Renzo Mischianti
 * Website: https://www.mischianti.org
 * Date: 2025-10-07
 */

#include <SPI.h>
#include <Ethernet.h>
#include <SD.h>
#include <EMailSender.h>

// ========== CONFIGURATION - UPDATE THESE VALUES ==========

// Brevo SMTP Credentials
const char* BREVO_LOGIN = "<YOUR-BREVO-SMTP-LOGIN>";
const char* BREVO_PASSWORD = "<YOUR-BREVO-SMTP-KEY>";

// Email addresses
const char* EMAIL_FROM = "<YOUR-EMAIL-VERIFIED-IN-BREVO>";
const char* EMAIL_TO = "<RECEIVER-EMAIL>";

// Network configuration
byte mac[] = {0xDE, 0xAD, 0xBE, 0xEF, 0xFE, 0xED};

// SD Card configuration
const int SD_CS_PIN = 4; // Chip Select pin for the SD card module

// ========== END CONFIGURATION ==========

EMailSender emailSend(
  BREVO_LOGIN,
  BREVO_PASSWORD,
  EMAIL_FROM,
  "ArduinoLogger", // Sender name (no spaces)
  "smtp-relay.brevo.com",
  587
);

void setup() {
  Serial.begin(115200);
  while (!Serial) { ; }

  Serial.println("\n==================================================");
  Serial.println("Arduino Mega + Brevo Email with SD Attachment");
  Serial.println("==================================================\n");

  // Initialize Ethernet
  Serial.println("Initializing Ethernet...");
  if (Ethernet.begin(mac) == 0) {
    Serial.println("ERROR: DHCP configuration failed. Halting.");
    while (true);
  }
  Serial.println("✓ Ethernet connected!");
  Serial.print("  IP Address: ");
  Serial.println(Ethernet.localIP());
  delay(1500);

  // Initialize SD Card
  Serial.println("\nInitializing SD card...");
  if (!SD.begin(SD_CS_PIN)) {
    Serial.println("ERROR: SD card initialization failed! Check wiring and card format. Halting.");
    while (true);
  }
  Serial.println("✓ SD card ready.");

  // Send the email with an attachment
  sendEmailWithAttachment();
}

void loop() {
  Ethernet.maintain();
  delay(10000);
}

void sendEmailWithAttachment() {
  Serial.println("\n--- Sending Email with Attachment ---");

  // 1. Create a sample log file on the SD card
  Serial.println("Creating sample file 'datalog.txt' on SD card...");
  File dataFile = SD.open("datalog.txt", FILE_WRITE);
  if (dataFile) {
    dataFile.println("System Status Report");
    dataFile.print("Timestamp: ");
    dataFile.println(millis());
    dataFile.println("Temperature: 24.7 C");
    dataFile.println("Humidity: 55%");
    dataFile.println("Status: OK");
    dataFile.close();
    Serial.println("✓ File created successfully.");
  } else {
    Serial.println("ERROR: Failed to create file on SD card.");
    return;
  }

  // 2. Prepare the email message
  EMailSender::EMailMessage message;
  message.subject = "Daily System Report with Attachment";
  message.message = " Hello,\n\nPlease find the daily system log attached.\n\n- Arduino Monitoring System";
  message.mime = MIME_TEXT_PLAIN;

  // 3. Configure the attachment
  EMailSender::FileDescriptior fileDescriptor;
  fileDescriptor.filename = "datalog.txt";
  fileDescriptor.url = "/datalog.txt"; // Absolute path on the SD card
  fileDescriptor.mime = MIME_TEXT_PLAIN;
  fileDescriptor.storageType = EMailSender::EMAIL_STORAGE_TYPE_SD;
  fileDescriptor.encode64 = true; // Use Base64 encoding for reliability

  EMailSender::Attachments attachments;
  attachments.number = 1;
  attachments.fileDescriptor = &fileDescriptor;

  // 4. Send the email
  Serial.println("\nConnecting to Brevo SMTP server to send email...");
  EMailSender::Response resp = emailSend.send(EMAIL_TO, message, attachments);

  // 5. Print the result
  Serial.println("\n--- Result ---");
  Serial.print("Status Code: ");
  Serial.println(resp.code);
  Serial.print("Description: ");
  Serial.println(resp.desc);

  if (resp.status) {
    Serial.println("\n✓✓✓ EMAIL WITH ATTACHMENT SENT SUCCESSFULLY! ✓✓✓");
  } else {
    Serial.println("\n✗✗✗ EMAIL SENDING FAILED! ✗✗✗");
    Serial.println("\nTroubleshooting tips:");
    Serial.println(" - Double-check your Brevo credentials and sender email.");
    Serial.println(" - Ensure the SD card is working and the file path is correct.");
    Serial.println(" - Check your network connection and firewall settings.");
  }
  Serial.println("\n==================================================\n");
}
Lavorare con Arduino UNO: Un Approccio Ottimizzato per la Memoria
L’Arduino UNO, con i suoi minuscoli 2KB di RAM, presenta una sfida significativa. Tuttavia, è ancora possibile inviare notifiche email di base gestendo attentamente la memoria. La chiave è disabilitare la funzione degli allegati nella libreria, poiché consuma una grande porzione della RAM disponibile.
Disabilitare gli Allegati per Risparmiare Memoria
Per rendere la libreria EMailSender abbastanza leggera per l’UNO, devi disabilitare la funzionalità degli allegati.
- Naviga nella cartella delle librerie di Arduino.
- Apri la cartella
EMailSender. - Modifica il file
EMailSenderKey.h. - Trova la seguente riga:C++
#define ENABLE_ATTACHMENTS - Commentala aggiungendo
//all’inizio:C++// #define ENABLE_ATTACHMENTS - Salva il file. Questo escluderà tutto il codice relativo agli allegati dalla compilazione, liberando RAM critica.
Arduino UNO + Brevo: Codice di Esempio Ottimizzato per la Memoria
| Esempi per Arduino UNO | ||||
|---|---|---|---|---|
ArduinoUNO_EthernetShield_Brevo_Basic | Arduino UNO | Brevo SMTP | ❌ Porta 587 | OTTIMIZZATO – Solo 58% di utilizzo RAM |
Questo codice è progettato specificamente per funzionare entro i ristretti limiti di memoria dell’Arduino UNO. Invia un semplice rapporto di stato senza allegati.
/*
 * EMailSender Library - Arduino UNO + Ethernet Shield + Brevo Basic Email
 *
 * This example shows how to send simple emails from Arduino UNO using minimal RAM.
 * Perfect for memory-constrained projects that need email notifications.
 *
 * MEMORY USAGE:
 * - RAM:   [======    ]  58.1% (used 1190 bytes from 2048 bytes)
 * - Flash: [=======   ]  70.8% (used 22832 bytes from 32256 bytes)
 * - No attachments to minimize memory usage (comment #define ENABLE_ATTACHMENTS in EMailSenderKey.h)
 *
 * WHY BREVO FOR ARDUINO UNO?
 * - No SSL/TLS required (UNO has only 2KB RAM)
 * - Port 587 with simple AUTH LOGIN
 * - 300 emails/day free tier
 *
 * HARDWARE:
 * - Arduino UNO R3
 * - W5100/W5500 Ethernet Shield
 * - Ethernet cable
 *
 * WIRING:
 * - Stack the shield on top of Arduino UNO
 * - MOSI → Pin 11, MISO → Pin 12, SCK → Pin 13, CS → Pin 10
 *
 * SETUP:
 * 1. Register at https://www.brevo.com
 * 2. Get SMTP credentials from SMTP & API settings
 * 3. Verify sender email address in Brevo dashboard
 * 4. Update credentials below
 *
 * Author: Renzo Mischianti
 * Website: https://www.mischianti.org
 * Library: https://github.com/xreef/EMailSender
 */

#include <SPI.h>
#include <Ethernet.h>
#include <EMailSender.h>

// ========== CONFIGURATION ==========
const char* BREVO_LOGIN = "your-login@smtp-brevo.com";
const char* BREVO_PASSWORD = "xsmtpsib-YOUR-API-KEY";
const char* EMAIL_FROM = "your-verified@example.com";
const char* EMAIL_TO = "recipient@example.com";
const char* SENDER_NAME = "ArduinoUNO";

byte mac[] = {0xDE, 0xAD, 0xBE, 0xEF, 0xFE, 0xED};

// Optional: Static IP (uncomment if needed)
// IPAddress ip(192, 168, 1, 177);
// IPAddress gateway(192, 168, 1, 1);
// IPAddress subnet(255, 255, 255, 0);

// ========== GLOBALS ==========
EMailSender emailSend(BREVO_LOGIN, BREVO_PASSWORD, EMAIL_FROM, SENDER_NAME, "smtp-relay.brevo.com", 587);

// ========== FUNCTIONS ==========
int freeRam() {
  extern int __heap_start, *__brkval;
  int v;
  return (int) &v - (__brkval == 0 ? (int) &__heap_start : (int) __brkval);
}

bool initializeEthernet() {
  Serial.println(F("Initializing Ethernet..."));

  if (Ethernet.begin(mac) == 0) {
    Serial.println(F("DHCP failed!"));
    #ifdef ip
    Ethernet.begin(mac, ip, gateway, subnet);
    #else
    return false;
    #endif
  }

  delay(1500);

  if (Ethernet.linkStatus() == LinkOFF) {
    Serial.println(F("No Ethernet cable!"));
    return false;
  }

  Serial.print(F("IP: "));
  Serial.println(Ethernet.localIP());
  return true;
}

void sendEmail() {
  Serial.println(F("\n--- Sending Email ---"));
  Serial.print(F("Free RAM: "));
  Serial.print(freeRam());
  Serial.println(F(" bytes"));

  EMailSender::EMailMessage message;
  message.subject = F("Arduino UNO + Brevo Test");
  message.message = F(" Hello from Arduino UNO!\n\n");
  message.message += F("This email was sent using:\n");
  message.message += F("- Arduino UNO R3\n");
  message.message += F("- Ethernet Shield\n");
  message.message += F("- Brevo SMTP (port 587)\n");
  message.message += F("- EMailSender Library\n\n");
  message.message += F("System Info:\n- Free RAM: ");
  message.message += String(freeRam());
  message.message += F(" bytes\n- Uptime: ");
  message.message += String(millis() / 1000);
  message.message += F(" sec\n\n");
  message.message += F("---\nby Renzo Mischianti\n");
  message.message += F("mischianti.org\n");
  message.mime = MIME_TEXT_PLAIN;

  Serial.print(F("From: "));
  Serial.println(EMAIL_FROM);
  Serial.print(F("To: "));
  Serial.println(EMAIL_TO);
  Serial.println(F("Connecting to Brevo..."));

  EMailSender::Response resp = emailSend.send(EMAIL_TO, message);

  Serial.println(F("\n--- Result ---"));
  Serial.print(F("Code: "));
  Serial.println(resp.code);
  Serial.print(F("Status: "));
  Serial.println(resp.status ? F("✓ OK") : F("✗ FAILED"));

  if (!resp.status) {
    Serial.print(F("Error: "));
    Serial.println(resp.desc);
  }
}

// ========== MAIN ==========
void setup() {
  Serial.begin(115200);
  while (!Serial);

  Serial.println(F("\n=============================="));
  Serial.println(F("Arduino UNO + Brevo"));
  Serial.println(F("==============================\n"));
  Serial.print(F("Free RAM: "));
  Serial.print(freeRam());
  Serial.println(F(" bytes"));

  if (!initializeEthernet()) {
    Serial.println(F("Network init failed!"));
    while (1) {
      delay(5000);
      if (initializeEthernet()) break;
    }
  }

  Serial.println(F("✓ Network ready!\n"));
  sendEmail();
  Serial.println(F("\n=== Setup Complete ==="));
}

void loop() {
  Ethernet.maintain();
  delay(10000);
}
E qui il risultato sul monitor seriale.
==============================
Arduino UNO + Brevo
==============================

Free RAM: 634 bytes
Initializing Ethernet...
IP: 192.168.1.54
✓ Network ready!


--- Sending Email ---
Free RAM: 634 bytes
From: renzo.mischianti@gmail.com
To: renzo.mischianti@gmail.com
Connecting to Brevo...

--- Result ---
Code: 0
Status: ✓ OK

=== Setup Complete ===
Ottimizzazioni Chiave nel Codice per UNO
- Allegati Disabilitati: Come indicato, questo è il passo più critico per liberare RAM.
- Macro F(): Tutte le stringhe letterali come
Serial.println(F("Ciao"));sono racchiuse nella macroF(). Questo le mantiene nella memoria Flash invece di copiarle nella RAM all’avvio. - Costruzione Efficiente delle Stringhe: Il corpo del messaggio è costruito con attenzione per minimizzare la creazione di oggetti
Stringtemporanei, che possono frammentare la piccola quantità di RAM disponibile. - Monitoraggio della Memoria: La funzione
freeRam()è inclusa per aiutarti a monitorare l’uso della memoria e diagnosticare potenziali problemi.
Risoluzione dei Problemi Comuni
- “Errore: 220 -> …” o Timeout:
- Verifica che il cavo Ethernet sia collegato correttamente.
- Controlla che il server SMTP (
smtp-relay.brevo.com) e la porta (587) siano corretti. - Assicurati che il firewall della tua rete non blocchi la porta 587.
- “Errore: 535 -> Authentication failed”:
- Le tue credenziali (Login o Chiave SMTP) sono errate. Controlla due volte la chiave SMTP dalla tua dashboard di Brevo.
- Assicurati che il tuo indirizzo email mittente sia stato verificato in Brevo.
- Inizializzazione della Scheda SD Fallita:
- Controlla il cablaggio del tuo modulo per schede SD.
- Assicurati che il
SD_CS_PINsia corretto e non entri in conflitto con il pin CS dello Shield Ethernet (solitamente il pin 10).
Specifiche della Libreria
Piattaforme Supportate
| Piattaforma | WiFi | Ethernet | SSL/TLS | STARTTLS |
|---|---|---|---|---|
| ESP32 | ✅ | ✅ | ✅ | ✅ |
| ESP8266 | ✅ | ✅ | ✅ | ✅ |
| Arduino Mega/Uno | ❌ | ✅ | ❌ | ❌ |
| Arduino SAMD | ✅ | ✅ | ✅ | ✅ |
| STM32 | ❌ | ✅ | ✅ | ✅ |
| Raspberry Pi Pico (RP2040) | ✅ | ✅ | ✅ | ✅ |
Arduino Mega e Uno NON supportano SSL/TLS a causa di gravi limitazioni di RAM:
- Arduino Mega ha solo 8KB di RAM
- Arduino Uno ha solo 2KB di RAM
- BearSSL per SSL/TLS richiede almeno 24KB di RAM per i buffer di crittografia
Soluzioni alternative per Arduino Mega/Uno:
- ✅ Usa SMTP non sicuro (porta 25) – Funziona ma non è raccomandato
- ✅ Usa un relay SMTP locale – Configura un server locale che gestisca SSL
- ✅ Passa a ESP32/ESP8266 – Hanno più RAM e supporto nativo SSL/TLS
- ✅ Usa Arduino SAMD (MKR WiFi 1010) – Ha 32KB di RAM e supporta SSL/TLS
Gli esempi per Arduino Mega/Uno in questa libreria usano solo SMTP non sicuro!
Interfacce di Rete Supportate
- WiFi (ESP32/ESP8266) – WiFiClient / WiFiClientSecure
- WiFi (SAMD/MBED) – Libreria WiFiNINA
- Ethernet W5100/W5200/W5500 – Libreria Ethernet standard
- Ethernet ENC28J60 – Libreria UIPEthernet
- Ethernet con SSL – Wrapper SSLClient per connessioni sicure
Sistemi di Archiviazione Supportati
Archiviazione Interna (Flash del Microcontrollore)
- SPIFFS (ESP32, ESP8266)
- LittleFS (ESP32, ESP8266, RP2040)
- FFAT (ESP32)
- SPIFM (SPI Flash con Adafruit_SPIFlash)
Archiviazione Esterna (Schede SD/microSD)
- SD (Libreria SD standard)
- SdFat (Versione 1.x per RP2040/ESP8266)
- SdFat2 (Versione 2.x per piattaforme moderne)
Funzionalità della Libreria
Email HTML con Destinatari Multipli
EMailSender::EMailMessage message;
message.subject = "Test Email HTML";
message.message = "<h1>Ciao!</h1><p>Questa è un'email <b>HTML</b>.</p>";
message.mime = MIME_TEXT_HTML;  // Imposta il tipo MIME su HTML

// Destinatari multipli
const char* recipients[] = {
  "destinatario1@example.com",
  "destinatario2@example.com",
  "destinatario3@example.com"
};

EMailSender::Response resp = emailSend.send(recipients, 3, message);
Email con CC e BCC
// Array con indirizzi A, Cc e Ccn
const char* allRecipients[] = {
  "a@example.com",      // A (1)
  "cc@example.com",     // Cc (1)
  "ccn@example.com"     // Ccn (1)
};

// send(destinatari, numA, numCc, numCcn, messaggio)
EMailSender::Response resp = emailSend.send(allRecipients, 1, 1, 1, message);
Porta 587 (STARTTLS) – Raccomandato per Gmail
STARTTLS inizia con una connessione in chiaro e poi passa a una crittografata.
// Abilita SSLClient interno in EMailSenderKey.h
#define EMAIL_ENABLE_INTERNAL_SSLCLIENT

// Usa la porta 587
EMailSender emailSend("utente@gmail.com", "password_app",
                      "utente@gmail.com", "Nome Mittente",
                      "smtp.gmail.com", 587);

// Abilita EHLO (richiesto per STARTTLS)
emailSend.setEHLOCommand(true);
Porta 465 (SSL/TLS Implicito)
La connessione è crittografata fin dall’inizio.
// Usa WiFiClientSecure (ESP32/ESP8266)
EMailSender emailSend("utente@gmail.com", "password_app",
                      "utente@gmail.com", "Nome Mittente",
                      "smtp.gmail.com", 465);

// Nessuna configurazione aggiuntiva necessaria
Uso di SSLClient con Ethernet (Arduino/STM32)
Per schede senza supporto SSL nativo:
#define EMAIL_ENABLE_OPENSLAB_SSLCLIENT

// La libreria userà SSLClient basato su BearSSL
// per connessioni sicure su Ethernet
Funzionalità Avanzate
Metodi di Autenticazione Personalizzati
// Usa AUTH PLAIN (SASL)
emailSend.setSASLLogin(true);

// Usa CRAM-MD5 (solo ESP32)
emailSend.setCramMD5Login(true);

// Disabilita l'autenticazione (open relay)
emailSend.setUseAuth(false);
Configurazione EHLO
// Usa EHLO invece di HELO (raccomandato per server moderni)
emailSend.setEHLOCommand(true);

// Imposta un identificatore personalizzato per HELO/EHLO
emailSend.setPublicIpDescriptor("miodispositivo");
Email con Allegati da Scheda SD
#include <SD.h>

// Inizializza la scheda SD
SD.begin(SD_CS_PIN);

// Prepara l'allegato
EMailSender::FileDescriptior fileDescriptor;
fileDescriptor.filename = "foto.jpg";
fileDescriptor.url = "/foto.jpg";  // Percorso sulla scheda SD
fileDescriptor.mime = MIME_IMAGE_JPG;
fileDescriptor.encode64 = true;  // Codifica in Base64
fileDescriptor.storageType = EMailSender::EMAIL_STORAGE_TYPE_SD;

EMailSender::Attachments attachments;
attachments.number = 1;
attachments.fileDescriptor = &fileDescriptor;

// Invia email con allegato
EMailSender::Response resp = emailSend.send("destinatario@example.com",
                                            message,
                                            attachments);
Allegati Multipli
EMailSender::FileDescriptior files[3];

files[0].filename = "documento.pdf";
files[0].url = "/docs/documento.pdf";
files[0].mime = "application/pdf";
files[0].encode64 = true;
files[0].storageType = EMailSender::EMAIL_STORAGE_TYPE_SD;

files[1].filename = "immagine.png";
files[1].url = "/images/immagine.png";
files[1].mime = MIME_IMAGE_PNG;
files[1].encode64 = true;
files[1].storageType = EMailSender::EMAIL_STORAGE_TYPE_SD;

files[2].filename = "dati.txt";
files[2].url = "/dati.txt";
files[2].mime = MIME_TEXT_PLAIN;
files[2].encode64 = false;
files[2].storageType = EMailSender::EMAIL_STORAGE_TYPE_SD;

EMailSender::Attachments attachments;
attachments.number = 3;
attachments.fileDescriptor = files;

EMailSender::Response resp = emailSend.send("destinatario@example.com",
                                            message,
                                            attachments);
Allegati da SPIFFS/LittleFS/FFat (ESP32/ESP8266)
#include <SPIFFS.h>

// Inizializza SPIFFS
SPIFFS.begin();

EMailSender::FileDescriptior fileDescriptor;
fileDescriptor.filename = "config.json";
fileDescriptor.url = "/config.json";
fileDescriptor.mime = "application/json";
fileDescriptor.encode64 = false;
fileDescriptor.storageType = EMailSender::EMAIL_STORAGE_TYPE_SPIFFS;

// O usa LittleFS
// fileDescriptor.storageType = EMailSender::EMAIL_STORAGE_TYPE_LITTLE_FS;

// O usa FFAT
// fileDescriptor.storageType = EMailSender::EMAIL_STORAGE_TYPE_FFAT;
Tipo di archiviazione SPIFM
C’è anche il supporto per SPI Flash, ma è meglio fare riferimento al tutorial specifico.
// fileDescriptor.storageType = EMailSender::EMAIL_STORAGE_TYPE_SPIFM;
Tipo di archiviazione String o Stream
String jsonData = "{\"device\":\"ESP32\",\"temp\":22.5,\"hum\":65.3}";

EMailSender::FileDescriptior files[1];

// Allegato JSON
files[0].filename = "data.json";
files[0].mime = "application/json";
files[0].storageType = EMailSender::EMAIL_STORAGE_TYPE_STRING;
files[0].content = jsonData;
Stream* myDataStream = ...; // La tua implementazione di Stream
size_t dataSize = 1024;     // Dimensione dei dati in byte

EMailSender::FileDescriptior fileDescriptor;
fileDescriptor.filename = "sensor_data.csv";
fileDescriptor.mime = "text/csv";
fileDescriptor.encode64 = false;
fileDescriptor.storageType = EMailSender::EMAIL_STORAGE_TYPE_STREAM;
fileDescriptor.stream = myDataStream;      // Puntatore allo Stream
fileDescriptor.streamSize = dataSize;      // La dimensione è richiesta!
Tipi MIME Comuni per Allegati Stringa
| Tipo di File | Tipo MIME | Utilizzo |
|---|---|---|
| JSON | application/json | Dati API, letture sensori |
| CSV | text/csv | Dati compatibili con Excel |
| XML | application/xml | File di configurazione |
| Testo | text/plain | Log, report |
| HTML | text/html | Documenti formattati |
| JavaScript | application/javascript | File di codice |
Confronto Tipi di Archiviazione
| Tipo di Archiviazione | Ideale Per | Complessità | Uso Memoria |
|---|---|---|---|
EMAIL_STORAGE_TYPE_STRING | 📝 Contenuto testuale dinamico | ⭐ Molto Facile | Solo RAM |
EMAIL_STORAGE_TYPE_STREAM | 🔄 Sorgenti dati personalizzate | ⭐⭐ Medio | Streaming RAM |
EMAIL_STORAGE_TYPE_SD | 📁 File di grandi dimensioni | ⭐⭐ Medio | Scheda SD |
EMAIL_STORAGE_TYPE_SPIFFS | 🔧 Piccoli file di configurazione | ⭐⭐ Medio | Flash Interna |
EMAIL_STORAGE_TYPE_LITTLE_FS | 📊 File medi (ESP32/ESP8266) | ⭐⭐ Medio | Flash Interna |
EMAIL_STORAGE_TYPE_FFAT | 📈 File grandi (solo ESP32) | ⭐⭐ Medio | Flash Interna |
Configurazione Gmail
Per usare Gmail, hai bisogno di una Password per le App:
- Abilita l’Autenticazione a 2 Fattori sul tuo account Google
- Vai su Password per le app di Google
- Genera una nuova password per le app
- Usa questa password di 16 caratteri nel tuo codice
Impostazioni Gmail:
- Server SMTP:
smtp.gmail.com - Porta:
587(STARTTLS) o465(SSL/TLS) - Autenticazione: Richiesta
Su ESP32 ed ESP8266 puoi abilitare EMAIL_ENABLE_INTERNAL_SSLCLIENT nel file EMailSenderKey.h per usare STARTTLS sulla porta 587
// If you want to ENABLE the internal SSLClient wrapper (needed for STARTTLS on port 587)
// instead of relying solely on the native secure client (e.g., WiFiClientSecure for 465),
// uncomment the following define. Enabling it increases flash and RAM usage
// but provides STARTTLS support on non-secure base clients.
//#define EMAIL_ENABLE_INTERNAL_SSLCLIENT
Per la porta 465 e SSL/TLS, ESP32 ed ESP8266 non necessitano di librerie aggiuntive, ma per usarle con STM32 ed Ethernet (o altri dispositivi simili), puoi abilitare EMAIL_ENABLE_OPENSLAB_SSLCLIENT, un’implementazione leggera di SSL.
// Enable integration with OPEnSLab-OSU SSLClient (BearSSL) per AVR/Ethernet o schede che ne hanno bisogno.
// Usa questo backend solo se hai INSTALLATO la libreria esterna "SSLClient" (OPEnSLab-OSU).
// STARTTLS (porta 587) NON è supportato da questo backend; è pensato per TLS implicito (465) su Client non-SSL.
// Di default DISABILITATO: abilitalo nel tuo sketch o nelle build flags definendo
//   - EMAIL_ENABLE_EXTERNAL_SSLCLIENT_OPENSLAB (preferito) oppure
//   - EMAIL_ENABLE_OPENSLAB_SSLCLIENT
// #define EMAIL_ENABLE_OPENSLAB_SSLCLIENT
Riferimento API
Costruttore
EMailSender(const char* email_login,
            const char* email_password);

EMailSender(const char* email_login,
            const char* email_password,
            const char* email_from);

EMailSender(const char* email_login,
            const char* email_password,
            const char* email_from,
            const char* name_from);

EMailSender(const char* email_login,
            const char* email_password,
            const char* email_from,
            const char* name_from,
            const char* smtp_server,
            uint16_t smtp_port);
Metodi di Configurazione
void setSMTPServer(const char* smtp_server);
void setSMTPPort(uint16_t smtp_port);
void setEMailLogin(const char* email_login);
void setEMailFrom(const char* email_from);
void setNameFrom(const char* name_from);
void setEMailPassword(const char* email_password);

void setUseAuth(bool useAuth);
void setEHLOCommand(bool useEHLO);
void setSASLLogin(bool isSASLLogin);
void setCramMD5Login(bool onoff);  // Solo ESP32

void setPublicIpDescriptor(const char* descriptor);
void setAdditionalResponseLineOnConnection(uint8_t numLines);
void setAdditionalResponseLineOnHELO(uint8_t numLines);
Metodi di Invio
// Destinatario singolo
Response send(const char* to, EMailMessage &email, Attachments att = {0, 0});
Response send(String to, EMailMessage &email, Attachments att = {0, 0});

// Destinatari multipli (Solo A)
Response send(const char* to[], byte sizeOfTo, EMailMessage &email, Attachments att = {0, 0});
Response send(String to[], byte sizeOfTo, EMailMessage &email, Attachments att = {0, 0});

// Destinatari multipli con Cc
Response send(const char* to[], byte sizeOfTo, byte sizeOfCc, EMailMessage &email, Attachments att = {0, 0});

// Destinatari multipli con Cc e Ccn
Response send(const char* to[], byte sizeOfTo, byte sizeOfCc, byte sizeOfCCn, EMailMessage &email, Attachments att = {0, 0});
Strutture Dati
// Messaggio Email
struct EMailMessage {
    String mime = "text/html";  // o "text/plain"
    String subject;
    String message;
};

// Descrittore File per Allegati
struct FileDescriptior {
    StorageType storageType = EMAIL_STORAGE_TYPE_SD;
    String mime;
    bool encode64 = false;
    String filename;
    String url;  // Percorso del file
};

// Allegati
struct Attachments {
    byte number;
    FileDescriptior *fileDescriptor;
};

// Risposta
struct Response {
    String code;
    String desc;
    bool status = false;
};
Tipi di Archiviazione
enum StorageType {
    EMAIL_STORAGE_TYPE_SPIFFS,
    EMAIL_STORAGE_TYPE_LITTLE_FS,
    EMAIL_STORAGE_TYPE_FFAT,
    EMAIL_STORAGE_TYPE_SPIFM,
    EMAIL_STORAGE_TYPE_SD
};
Tipi MIME
Costanti predefinite per i tipi MIME:
MIME_TEXT_HTML    // "text/html"
MIME_TEXT_PLAIN   // "text/plain"
MIME_IMAGE_JPG    // "image/jpg"
MIME_IMAGE_PNG    // "image/png"
File di Configurazione (EMailSenderKey.h)
La libreria usa un file di configurazione per abilitare/disabilitare le funzionalità:
// Abilita il supporto STARTTLS con SSLClient interno (ESP32/ESP8266)
#define EMAIL_ENABLE_INTERNAL_SSLCLIENT

// Abilita OpenSLab SSLClient per shield Ethernet (Arduino/STM32)
#define EMAIL_ENABLE_OPENSLAB_SSLCLIENT

// Abilita il supporto per gli allegati
#define ENABLE_ATTACHMENTS

// Abilita la gestione dell'header della data
#define MANAGE_DATE_HEADER

// Tipo di rete (rilevato automaticamente in base alla piattaforma)
// EMAIL_NETWORK_TYPE può essere:
// - NETWORK_ESP8266 (ESP8266 WiFi)
// - NETWORK_ESP32 (ESP32 WiFi)
// - NETWORK_W5100 (Ethernet W5100/W5200/W5500)
// - NETWORK_ENC28J60 (Ethernet ENC28J60)
// - NETWORK_WiFiNINA (SAMD/Arduino WiFiNINA)
// - ecc.

// Tipi di archiviazione
// INTERNAL_STORAGE può essere: STORAGE_SPIFFS, STORAGE_LITTLEFS, STORAGE_FFAT
// EXTERNAL_STORAGE può essere: STORAGE_SD, STORAGE_SDFAT2
Modalità Debug
Abilita il debug decommentando in EMailSenderKey.h:
#define EMAIL_SENDER_DEBUG
#define DEBUG_PRINTER Serial
Questo stamperà la comunicazione SMTP dettagliata sul Monitor Seriale.
Grazie
- Arduino Programmazione remota/wireless
- BMP280, DHT11 and DHT22, DHT12, Dallas Temperature ds18b20, Thermistor
- Scheda di programmazione ATtiny (ArduinoUNO come ISP)
- Inviare email con esp8266 e Arduino (Libreria v1.x)
- Come usare la scheda SD con esp8266 e Arduino
- Ebyte LoRa E32 per Arduino, esp32 o esp8266 : WOR (wake on radio) del microcontrollore e uno shield per Arduino
- Gestire file JSON con Arduino, esp32 ed esp8266
- Come interfacciare Arduino, esp8266 o esp32 alla seriale RS-485
- Inviare email con allegati (libreria v2.x): Arduino Ethernet
- WebSocket
- Arduino AVR: binario compilato (.hex) da riga di comando o strumenti grafici
- Arduino: memoria SPI flash esterna veloce
- Accelerometro GY-291 ADXL345 i2c spi con interrupt per esp32, esp8266, stm32 e Arduino
- i2c Arduino: come creare una rete, parametri e scanner di indirizzi
- Magnetometro GY-273 QMC5883L clone HMC5883L per Arduino, esp8266 e esp32
- Debug remoto via WiFi di un Arduino con DT-06
- Programmare Arduino UNO da remoto via WiFi con il firmware ESP-Link su DT-06
- Introduzione alla Programmazione Remota dell’Arduino UNO r3 tramite WiFi con l’ESP8266
- Debug remoto via WiFi su Arduino utilizzando un ESP8266 (NodeMCU e ESP01) con firmware ESP-LINK
- Arduino: gestire il segnale GPS con GY NEO 6M e dispositivi simili
- Arduino UNO/Mega e Ethernet: inviare Email con allegati (Libreria EMailSender v4.0.0)