Arduino SAMD NINA: WiFiNINA, aggiornamento firmware e led RGB – 2
Importa e usa la libreria WiFiNINA
Questa libreria consente di utilizzare le funzionalità di Arduino UNO WiFi Rev.2, Arduino NANO 33 IoT, Arduino MKR 1010 e Arduino MKR VIDOR 4000 WiFi. Può fungere sia da server che accetta le connessioni in entrata che da client che ne effettua quelle in uscita. La libreria supporta le crittografie WEP, WPA2 Personal e WPA2 Enterprise. Questa libreria supporta tutti gli stessi metodi della libreria WiFi originale più il file connectSSL(). La libreria è molto simile all’Ethernet e alla libreria WiFi e molte delle chiamate di funzione sono le stesse.
Download
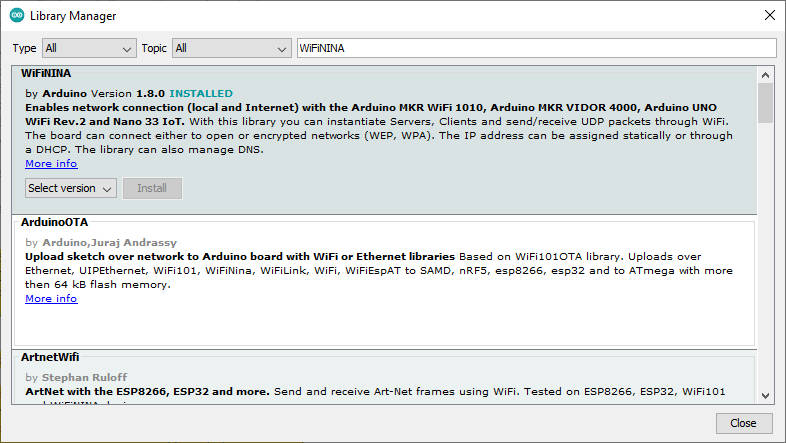
Puoi semplicemente scaricare WiFiNINA lib dal repository delle librerie.
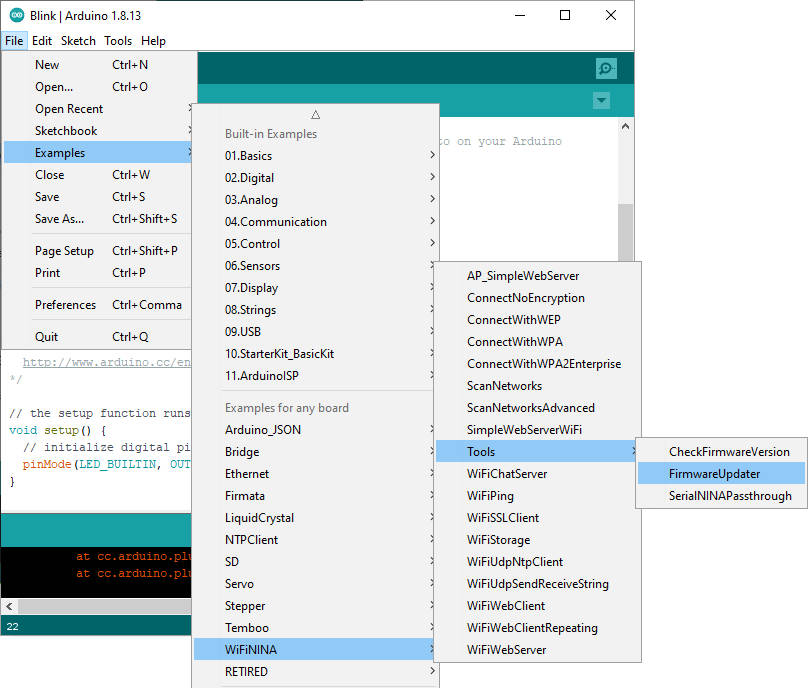
Ora hai anche una nuova voce di menu, WiFi101/ WiFiNINA firmware
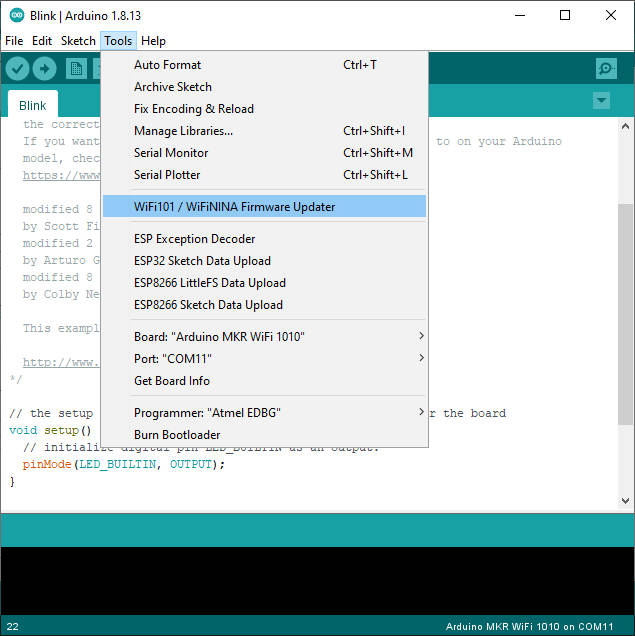
Verificare il firmware
È essenziale che la versione WiFiNINA e il chip NINA-W10 abbiano la versione corretta; puoi verificarlo con uno sketch di esempio che puoi trovare inFile --> Examples --> WiFiNINA --> Tools --> CheckFirmwareVersion
aprilo e caricalo.
/*
 * This example check if the firmware loaded on the NINA module
 * is updated.
 *
 * Circuit:
 * - Board with NINA module (Arduino MKR WiFi 1010, MKR VIDOR 4000 and UNO WiFi Rev.2)
 *
 * Created 17 October 2018 by Riccardo Rosario Rizzo
 * This code is in the public domain.
 */
#include <SPI.h>
#include <WiFiNINA.h>

void setup() {
  // Initialize serial
  Serial.begin(9600);
  while (!Serial) {
    ; // wait for serial port to connect. Needed for native USB port only
  }

  // Print a welcome message
  Serial.println("WiFiNINA firmware check.");
  Serial.println();

  // check for the WiFi module:
  if (WiFi.status() == WL_NO_MODULE) {
    Serial.println("Communication with WiFi module failed!");
    // don't continue
    while (true);
  }

  // Print firmware version on the module
  String fv = WiFi.firmwareVersion();
  String latestFv;
  Serial.print("Firmware version installed: ");
  Serial.println(fv);

  latestFv = WIFI_FIRMWARE_LATEST_VERSION;

  // Print required firmware version
  Serial.print("Latest firmware version available : ");
  Serial.println(latestFv);

  // Check if the latest version is installed
  Serial.println();
  if (fv >= latestFv) {
    Serial.println("Check result: PASSED");
  } else {
    Serial.println("Check result: NOT PASSED");
    Serial.println(" - The firmware version on the module do not match the");
    Serial.println("   version required by the library, you may experience");
    Serial.println("   issues or failures.");
  }
}

void loop() {
  // do nothing
}
Se hai la versione firmware errata, viene visualizzato questo messaggio.
WiFiNINA firmware check.

Firmware version installed: 1.3.0
Latest firmware version available : 1.4.2

Check result: NOT PASSED
 - The firmware version on the module do not match the
   version required by the library, you may experience
   issues or failures.
Aggiornare il firmware
Se hai la versione del firmware sbagliata, devi caricare l’ultima.
Per farlo, devi usare un altro sketch di esempio daFile --> Examples --> WiFiNINA --> Tools --> FirmwareUpdater
/*
  FirmwareUpdater - Firmware Updater for the
  Arduino MKR WiFi 1010, Arduino MKR Vidor 4000, and Arduino UNO WiFi Rev.2.

  Copyright (c) 2018 Arduino SA. All rights reserved.

  This library is free software; you can redistribute it and/or
  modify it under the terms of the GNU Lesser General Public
  License as published by the Free Software Foundation; either
  version 2.1 of the License, or (at your option) any later version.

  This library is distributed in the hope that it will be useful,
  but WITHOUT ANY WARRANTY; without even the implied warranty of
  MERCHANTABILITY or FITNESS FOR A PARTICULAR PURPOSE.  See the GNU
  Lesser General Public License for more details.

  You should have received a copy of the GNU Lesser General Public
  License along with this library; if not, write to the Free Software
  Foundation, Inc., 51 Franklin St, Fifth Floor, Boston, MA  02110-1301  USA
*/

#include "ESP32BootROM.h"

typedef struct __attribute__((__packed__)) {
  uint8_t command;
  uint32_t address;
  uint32_t arg1;
  uint16_t payloadLength;

  // payloadLenght bytes of data follows...
} UartPacket;

static const int MAX_PAYLOAD_SIZE = 1024;

#define CMD_READ_FLASH        0x01
#define CMD_WRITE_FLASH       0x02
#define CMD_ERASE_FLASH       0x03
#define CMD_MD5_FLASH         0x04
#define CMD_MAX_PAYLOAD_SIZE  0x50
#define CMD_HELLO             0x99

void setup() {
  Serial.begin(1000000);

  if (!ESP32BootROM.begin(921600)) {
    Serial.println("Unable to communicate with ESP32 boot ROM!");
    while (1);
  }
}

void receivePacket(UartPacket *pkt, uint8_t *payload) {
  // Read command
  uint8_t *p = reinterpret_cast<uint8_t *>(pkt);
  uint16_t l = sizeof(UartPacket);
  while (l > 0) {
    int c = Serial.read();
    if (c == -1)
      continue;
    *p++ = c;
    l--;
  }

  // Convert parameters from network byte order to cpu byte order
  pkt->address = fromNetwork32(pkt->address);
  pkt->arg1 = fromNetwork32(pkt->arg1);
  pkt->payloadLength = fromNetwork16(pkt->payloadLength);

  // Read payload
  l = pkt->payloadLength;
  while (l > 0) {
    int c = Serial.read();
    if (c == -1)
      continue;
    *payload++ = c;
    l--;
  }
}

// Allocated statically so the compiler can tell us
// about the amount of used RAM
static UartPacket pkt;
static uint8_t payload[MAX_PAYLOAD_SIZE];

void loop() {
  receivePacket(&pkt, payload);

  if (pkt.command == CMD_HELLO) {
    if (pkt.address == 0x11223344 && pkt.arg1 == 0x55667788)
      Serial.print("v10000");
  }

  if (pkt.command == CMD_MAX_PAYLOAD_SIZE) {
    uint16_t res = toNetwork16(MAX_PAYLOAD_SIZE);
    Serial.write(reinterpret_cast<uint8_t *>(&res), sizeof(res));
  }

  if (pkt.command == CMD_READ_FLASH) {
    // not supported!
    Serial.println("ER");
  }

  if (pkt.command == CMD_WRITE_FLASH) {
    uint32_t len = pkt.payloadLength;
    if (!ESP32BootROM.dataFlash(payload, len)) {
      Serial.print("ER");
    } else {
      Serial.print("OK");
    }
  }

  if (pkt.command == CMD_ERASE_FLASH) {
    uint32_t address = pkt.address;
    uint32_t len = pkt.arg1;
    if (!ESP32BootROM.beginFlash(address, len, MAX_PAYLOAD_SIZE)) {
      Serial.print("ER");
    } else {
      Serial.print("OK");
    }
  }

  if (pkt.command == CMD_MD5_FLASH) {
    uint32_t address = pkt.address;
    uint32_t len = pkt.arg1;

    if (!ESP32BootROM.endFlash(1)) {
      Serial.print("ER");
    } else {
      ESP32BootROM.end();

      uint8_t md5[16];

      if (!ESP32BootROM.begin(921600)) {
        Serial.print("ER");
      } else if (!ESP32BootROM.md5Flash(address, len, md5)) {
        Serial.print("ER");
      } else {
        Serial.print("OK");
        Serial.write(md5, sizeof(md5));
      }
    }
  }
}
dopo aver aperto lo sketch fai l’upload.
Ora puoi fare clic su WiFi101/ WiFiNINA firmware updater.
Seleziona la porta del dispositivo corretta, prova la connessione di prova; se tutto è a posto, selezionare l’ultima versione del firmware e fare clic su Aggiorna firmware.
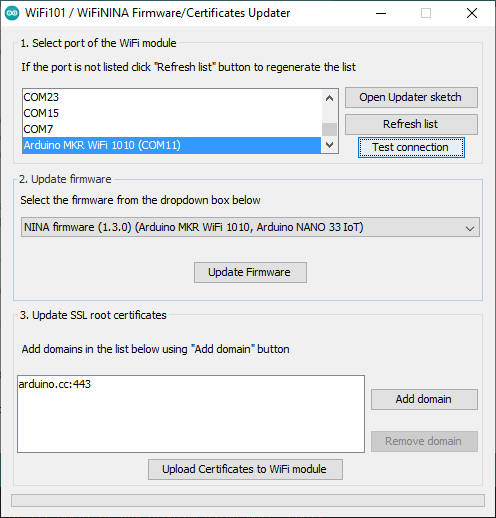
Come puoi vedere, puoi anche aggiungere un dominio certificato al NINA-W101, in modo che diventino sicuri.
Semplice connessione WiFi con WiFiNINA
Ecco un semplice sketch per connettere il tuo dispositivo con WiFiNINA.
/*
 * WiFiNINA usage
 * Connect to WiFi
 *
 * www.mischianti.org
 */
#include <WiFiNINA.h>

const char* ssid     = "SSID";         // The SSID (name) of the Wi-Fi network you want to connect to
const char* password = "PASSWORD";     // The password of the Wi-Fi network

void setup() {
  Serial.begin(115200);         // Start the Serial communication to send messages to the computer
  delay(10);
  Serial.println('\n');

  WiFi.begin(ssid, password);             // Connect to the network
  Serial.print("Connecting to ");
  Serial.print(ssid); Serial.print(" .");

  while (WiFi.status() != WL_CONNECTED) { // Wait for the Wi-Fi to connect
    delay(1000);
    Serial.print('.');
  }

  Serial.println('\n');
  Serial.println("Connection established!");
  Serial.print("IP address:\t");
  Serial.println(WiFi.localIP());         // Send the IP address of the ESP8266 to the computer
}

void loop() { }
Gestisci il Led RGB con WiFiNINA
La libreria WiFiNINA contiene anche il codice per gestire i LED RGB presenti sul dispositivo MKR, e utilizza il protocollo SPI dell’IC per inviare il valore ai tre pin Rosso, Verde e Blu.
Nella libreria, la gestione del pin è racchiusa con un comando clone di digitalWrite e un clone di analogWrite.
Ecco uno schizzo con digitalWrite che cambia il colore
/*
 *  Here a simple sketch to test the use of RGB LED.
 *  Change the leds color.
 *  by Mischianti Renzo <https://mischianti.org>
 *
 *  https://mischianti.org/
 *
 */
#include <WiFiNINA.h>
#include <utility/wifi_drv.h>

#define RGB_LED_GREEN 25
#define RGB_LED_RED 26
#define RGB_LED_BLUE 27

void setup()
{
	WiFiDrv::pinMode(RGB_LED_GREEN, OUTPUT); //GREEN
	WiFiDrv::pinMode(RGB_LED_RED, OUTPUT); //RED
	WiFiDrv::pinMode(RGB_LED_BLUE, OUTPUT); //BLUE
}

uint8_t currentLedCounter = 0;

uint8_t leds[] = {RGB_LED_GREEN, RGB_LED_RED, RGB_LED_BLUE};

void loop()
{
	WiFiDrv::digitalWrite(leds[currentLedCounter], LOW);
	currentLedCounter++;
	if (currentLedCounter>2){
		currentLedCounter = 0;
	}
	WiFiDrv::digitalWrite(leds[currentLedCounter], HIGH);
	delay(1000);
}
Ecco un cambio di colore in dissolvenza con analogWrite
/*
 *  Here a simple sketch to test the use of RGB LED.
 *  Fade the leds color.
 *  by Mischianti Renzo <https://mischianti.org>
 *
 *  https://mischianti.org/
 *
 */
#include <WiFiNINA.h>
#include <utility/wifi_drv.h>

#define RGB_LED_GREEN 25
#define RGB_LED_RED 26
#define RGB_LED_BLUE 27

void setup()
{
       WiFiDrv::pinMode(RGB_LED_GREEN, OUTPUT); //GREEN
       WiFiDrv::pinMode(RGB_LED_RED, OUTPUT); //RED
       WiFiDrv::pinMode(RGB_LED_BLUE, OUTPUT); //BLUE
}

uint8_t counter = 0;
uint8_t currentLedCounter = 0;

uint8_t leds[] = {RGB_LED_GREEN, RGB_LED_RED, RGB_LED_BLUE};

int8_t progress = 1;
void loop()
{
	if (counter<1) {
		progress = 1;
		currentLedCounter++;
		if (currentLedCounter>2){
			currentLedCounter = 0;
		}
	}
	if (counter>254) {
		progress = -1;
	}
	WiFiDrv::analogWrite(leds[currentLedCounter], counter);
	counter = counter + progress;
	delay(5);
}
Ecco il risultato

Grazie
- Arduino SAMD NINA: piedinatura, specifiche e configurazione Arduino IDE
- Arduino SAMD NINA: WiFiNINA, aggiornamento firmware e led RGB
- Arduino SAMD (NANO 33 e MKR): file system FAT su memoria flash SPI esterna
- i2c Arduino SAMD MKR: interfaccia aggiuntiva SERCOM, rete e scanner di indirizzi
- Arduino MKR SAMD: file system FAT su memoria flash SPI esterna
- Collegamento dell’EByte E70 ai dispositivi Arduino SAMD (Nano 33, MKR…) e un semplice sketch di esempio