BNO055 per esp32, esp8266 e Arduino: cablaggio e libreria Bosch avanzata – 2
Questo è il secondo articolo sul BNO055. Se hai bisogno di una gestione di base, puoi fare riferimento all’articolo precedente, “BNO055 accelerometro, giroscopio, magnetometro con la semplice libreria Adafruit“, ma se hai bisogno di una gestione avanzata (e più complessa) con interrupt, devi leggere anche questo articolo.
Il BNO055 è un System in Package (SiP), che integra un accelerometro triassiale a 14 bit, un giroscopio triassiale a 16 bit con una gamma di ±2000 gradi al secondo, un sensore geomagnetico triassiale e un microcontrollore cortex M0+ a 32 bit con sistema Bosch Software Sensortec per la fusione dei sensori, in un unico pacchetto.
Il BNO055 può emettere i seguenti dati del sensore:
- Orientamento assoluto (Vettore di Eulero, 100Hz) Dati di orientamento a tre assi basati su una sfera a 360°
- Orientamento assoluto (quaternione, 100Hz) Uscita quaternione a quattro punti per una manipolazione dei dati più accurata
- Angular Velocity Vector (100Hz) Tre assi di ‘velocità di rotazione’ in rad/s
- Acceleration Vector (100Hz) Tre assi di accelerazione (gravità + movimento lineare) in m/s^2
- Vettore di intensità del campo magnetico (20Hz) Rilevamento a tre assi del campo magnetico in micro Tesla (uT)
- Vettore di accelerazione lineare (100 Hz) Tre assi di dati di accelerazione lineare (accelerazione meno gravità) in m/s^2
- Vettore di gravità (100 Hz) Tre assi di accelerazione gravitazionale (meno qualsiasi movimento) in m/s^2
- Temperatura (1Hz) Temperatura ambiente in gradi centigradi
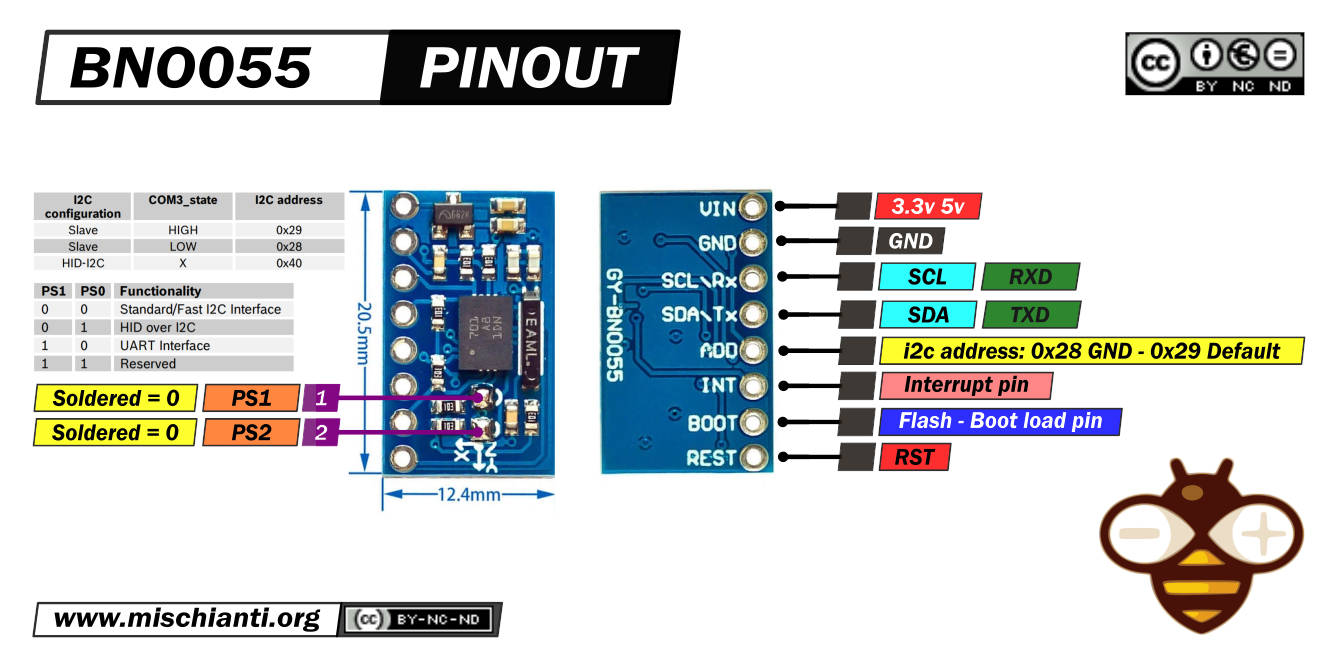
Pinout BNO055
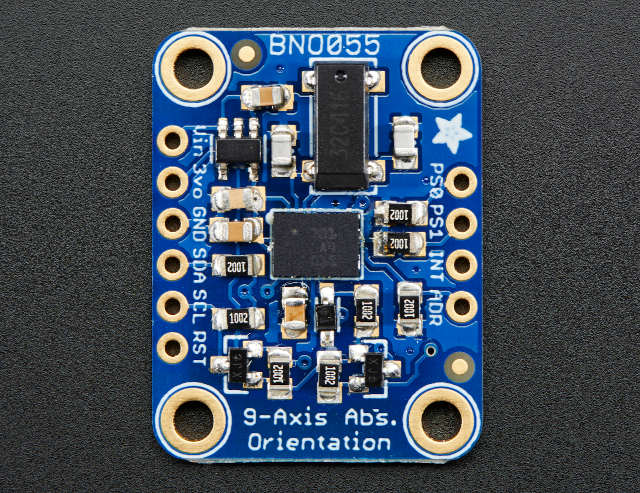
Esistono molte versioni dei moduli di questo sensore, scelgo il più piccolo ed economico.
Ecco il modulo Aliexpress
Tutti i moduli avevano le stesse caratteristiche, ma per abilitarli è necessario eseguire operazioni diverse.
Questo è il clone che uso:
Ed ecco quello di Adafruit:
Il sensore supporta un livello logico 3.3v, ma il modulo può essere alimentato da 5v.
Puoi comunicare tramite i2c (opzione di default) e tramite UART, per attivare l’ultima modalità devi dissaldare PS1.
| PS1 | PS0 | Functionality |
|---|---|---|
| 0 | 0 | Standard/Fast I2C Interface |
| 0 | 1 | HID over I2C |
| 1 | 0 | UART Interface |
| 1 | 1 | Reserved |
Nella modalità i2c standard, puoi selezionare due indirizzi. Di default, in questo modulo, l’indirizzo 0x29 è attivo. Se metti su GND il pin ADD, l’indirizzo diventa 0x28.
| i2c configuration | ADD | I2C address |
|---|---|---|
| Slave | HIGH | 0x29 |
| Slave | LOW (default) | 0x28 |
| HID-I2C | 0x40 |
INT è configurato come un pin di interrupt per segnalare un’interruzione all’host. Il trigger di interruzione è configurato come un raising edge ed è agganciato al pin INT. Una volta che si verifica un’interruzione, il pin INT viene impostato su alto e rimarrà alto fino a quando non viene ripristinato dall’host .
Connessioni di base
Per l’utilizzo di base di i2c, devi solo connettere VCC, GND, SDA e SCL.
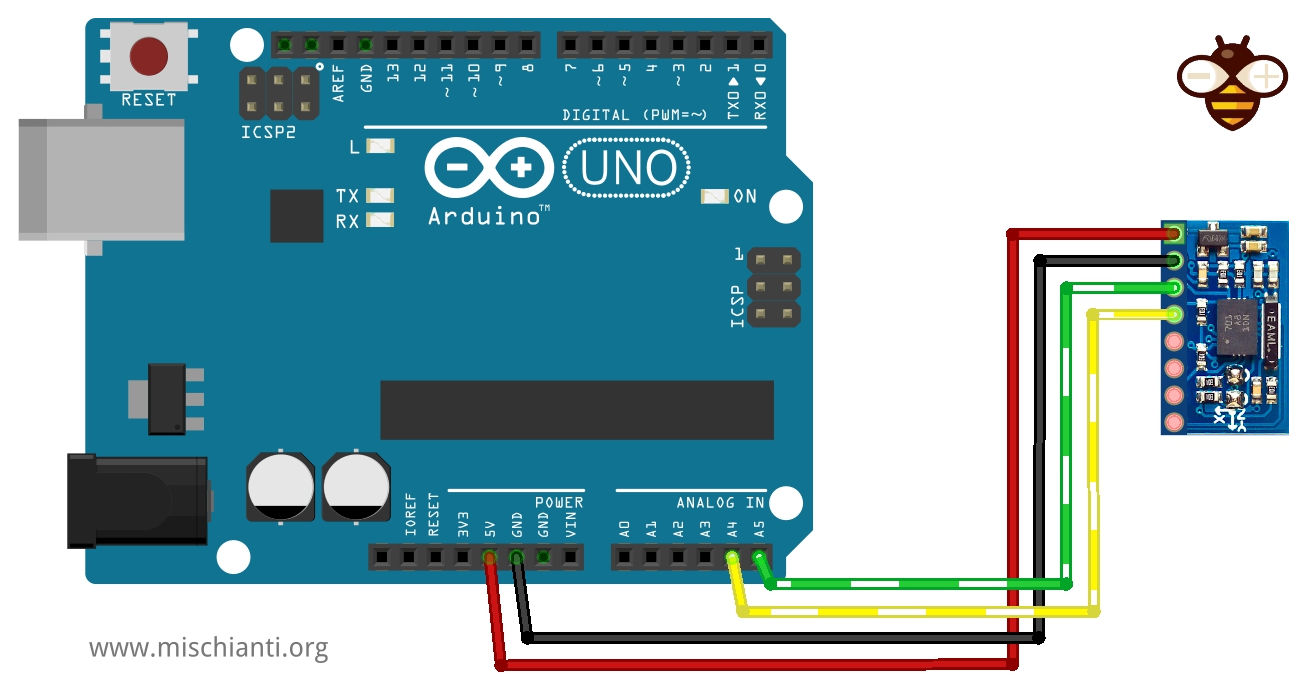
Cablaggio Arduino UNO
La versione Adafruit del sensore è ben documentata e supporta pienamente il livello logico 5v.
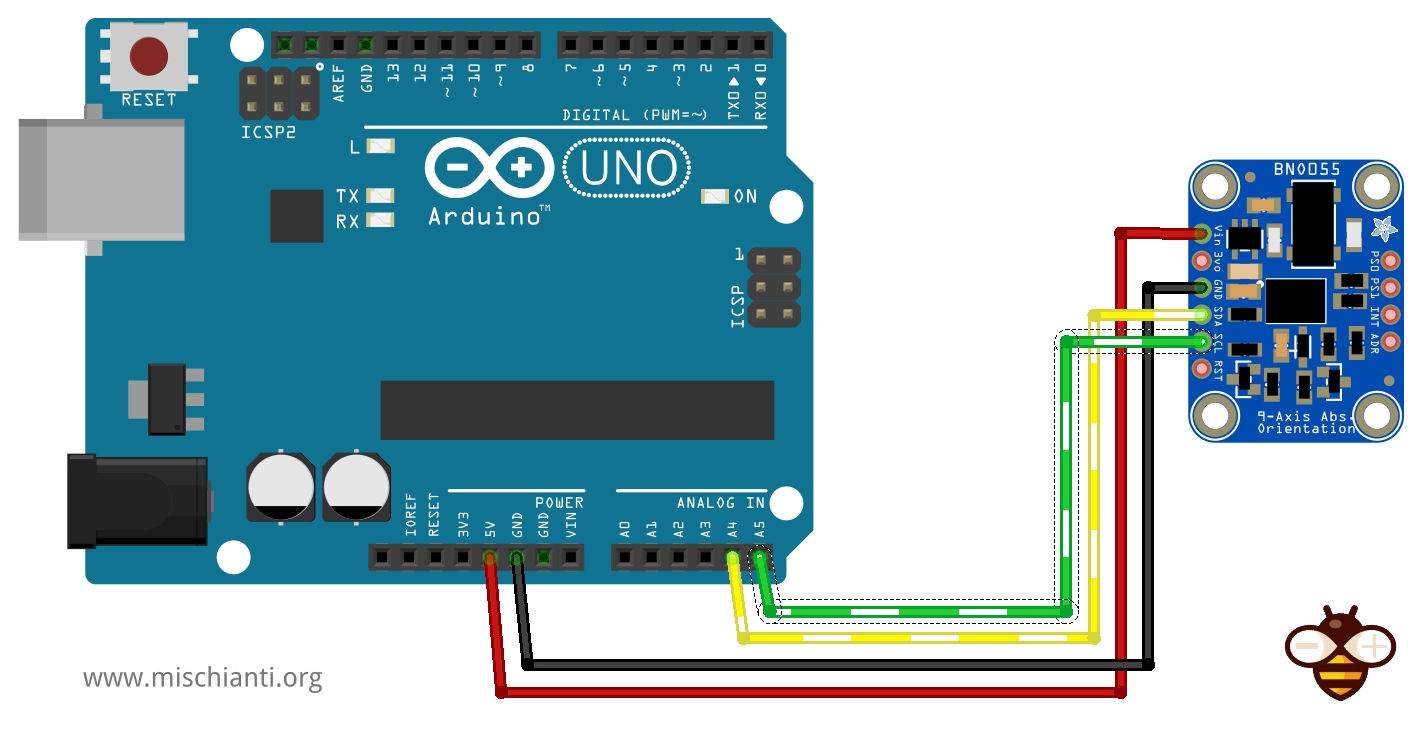
La versione clone non era chiaro se supporti completamente un livello logico 5v, ma sicuramente supporta un’alimentazione 5v. Ho usato un Arduino UNO e funziona correttamente senza LLC.
Ecco le schede Arduino Arduino UNO - Arduino MEGA 2560 R3 - Arduino Nano - Arduino Pro Mini
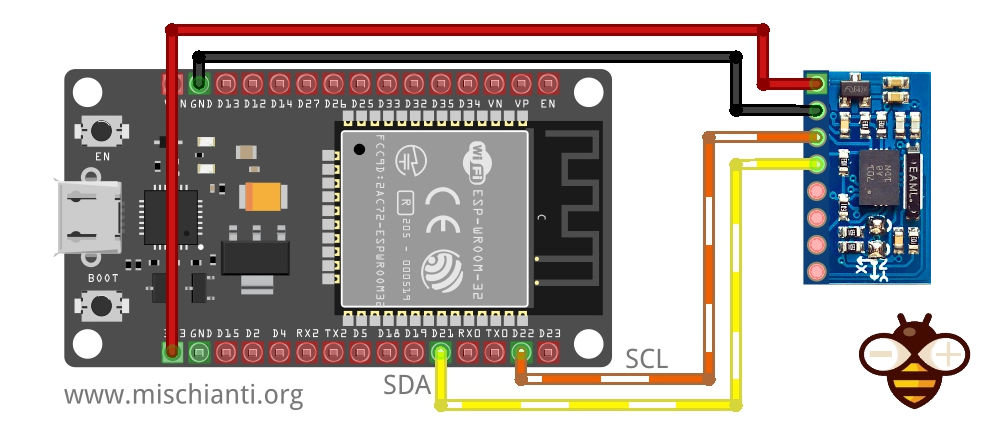
Cablaggio esp32
L’esp32 funziona a 3.3v, quindi il cablaggio è stato più semplice.
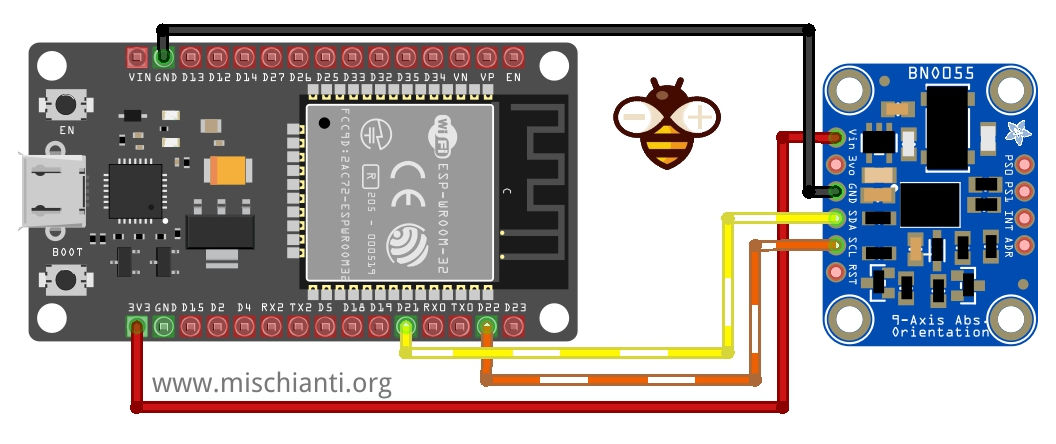
E qui il clone.
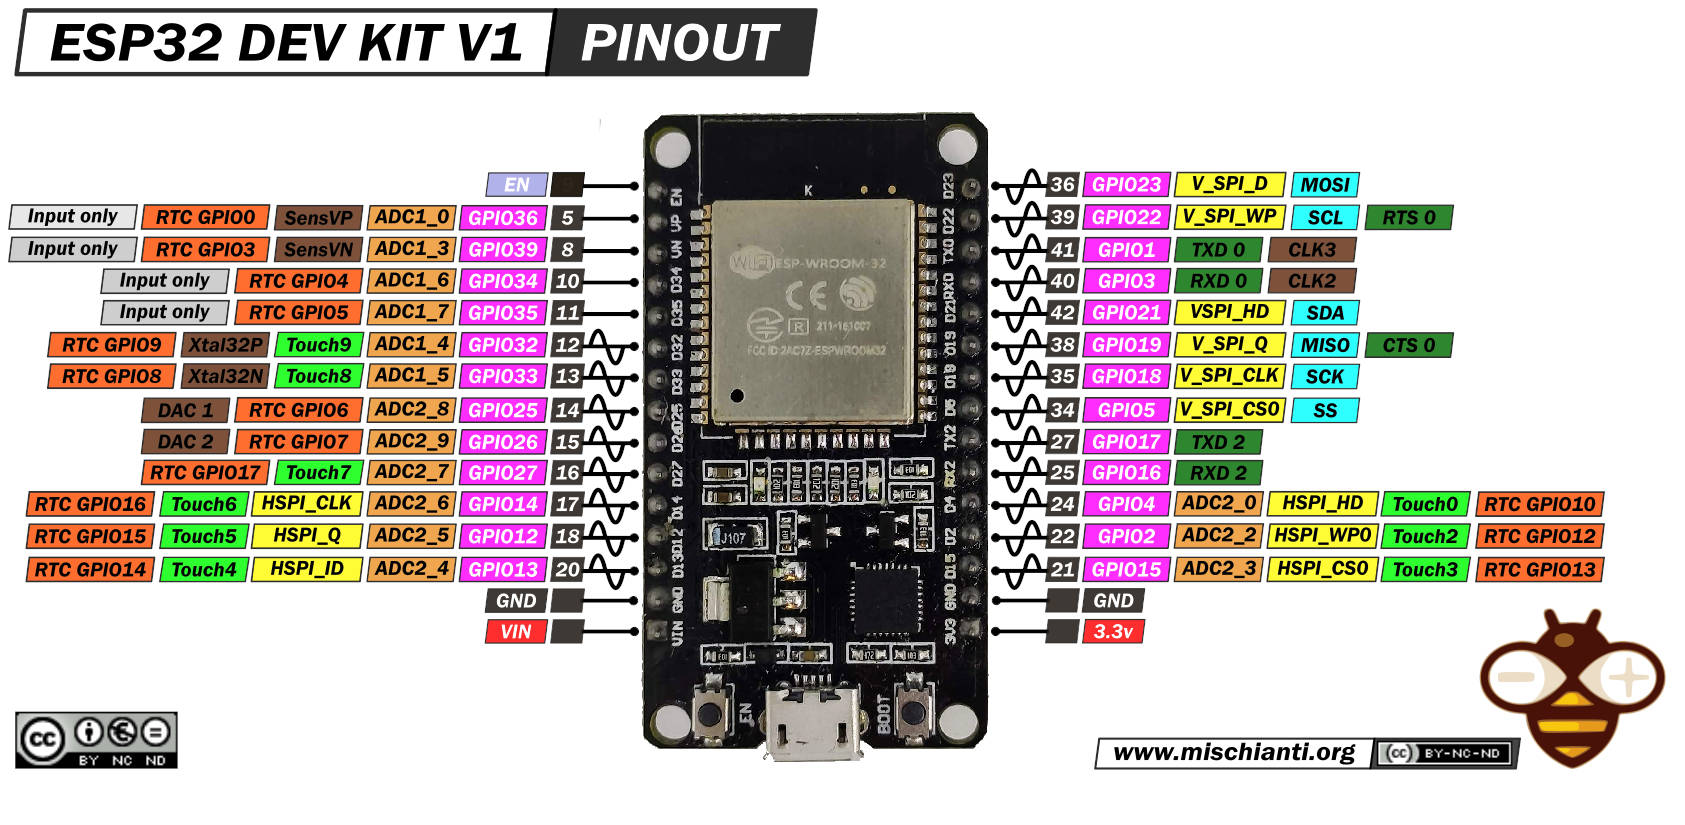
Ecco la mia selezione di esp32 ESP32 Dev Kit v1 - TTGO T-Display 1.14 ESP32 - NodeMCU V3 V2 ESP8266 Lolin32 - NodeMCU ESP-32S - WeMos Lolin32 - WeMos Lolin32 mini - ESP32-CAM programmer - ESP32-CAM bundle - ESP32-WROOM-32 - ESP32-S
Cablaggio esp8266
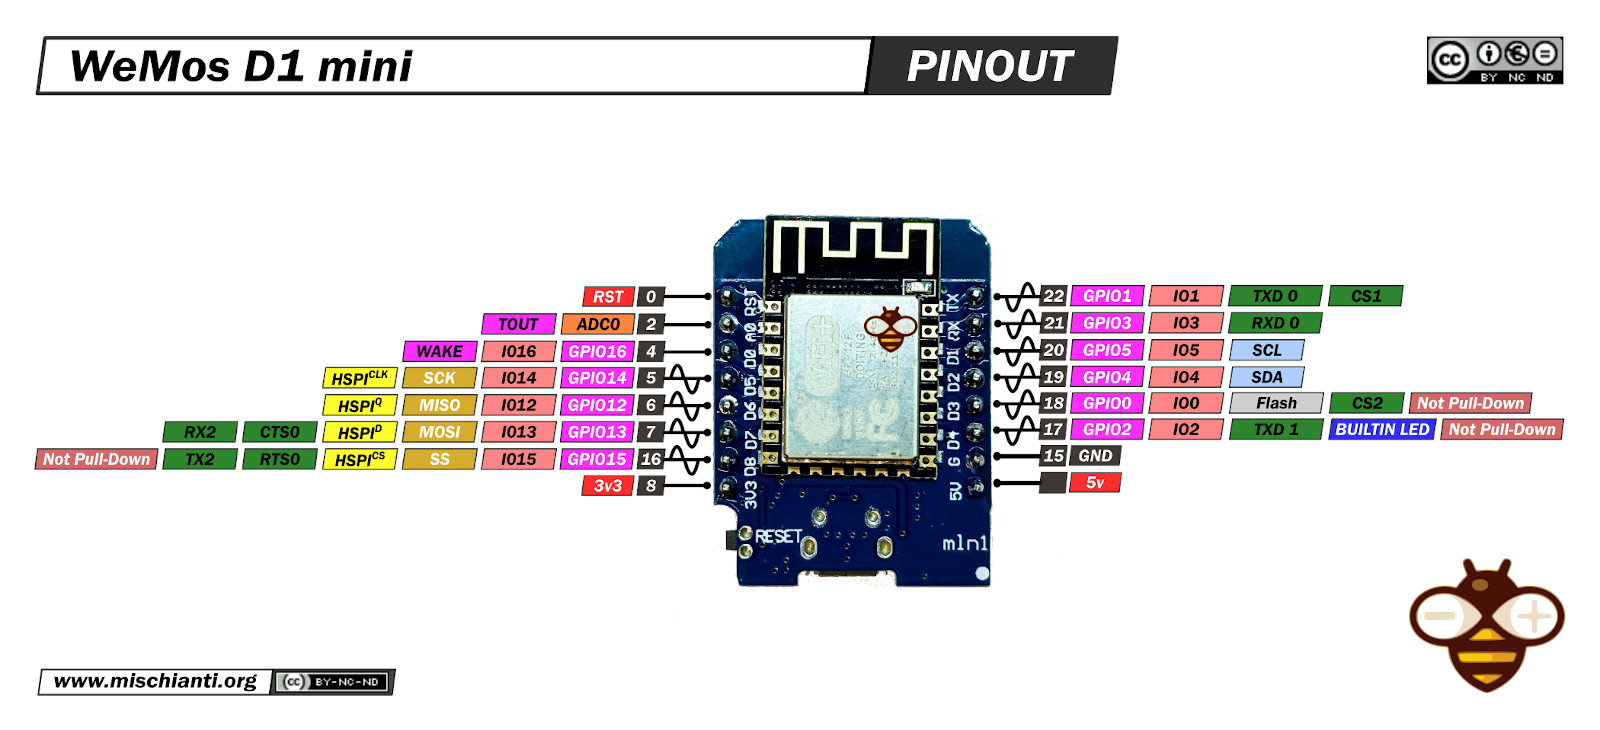
L’esp8266 come esp32 funziona a 3.3v, quindi il cablaggio è lineare.
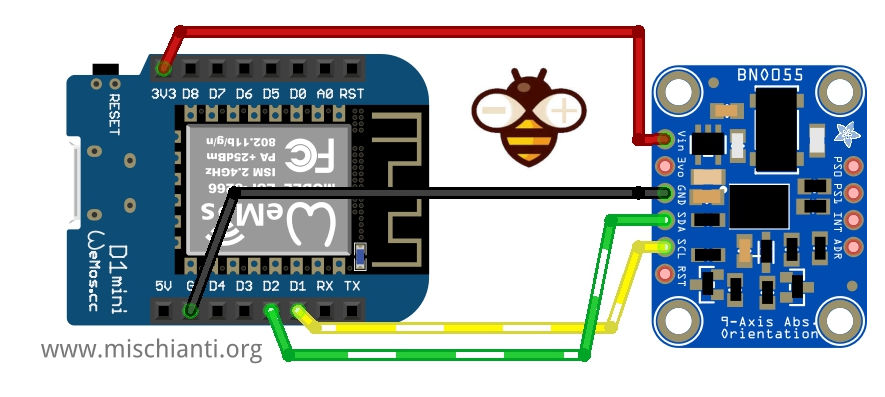
E ora il clone.

Qui la mia selezione di schede esp8266 WeMos D1 mini - NodeMCU V2 V2.1 V3 - esp01 - esp01 programmer
Libreria Bosch
Bosh offre una libreria completa ma non documentata e non strutturata.
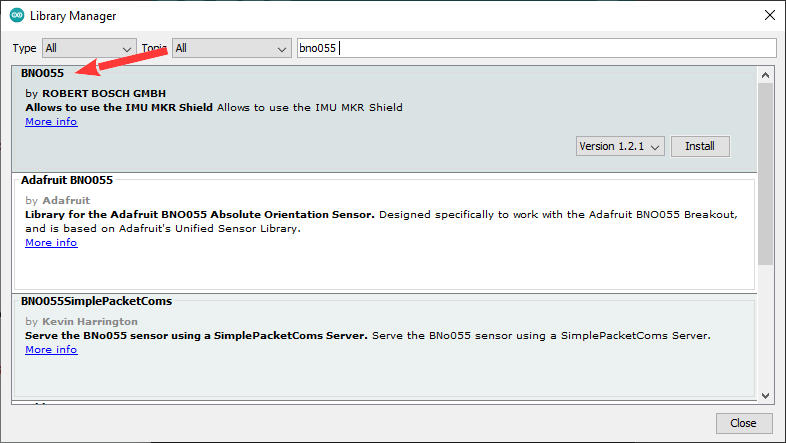
Puoi scaricare la libreria da GitHub qui. Oppure puoi scaricarlo direttamente dal gestore delle librerie IDE di Arduino.
Sketch di esempio di imbardata, rollio e beccheggio
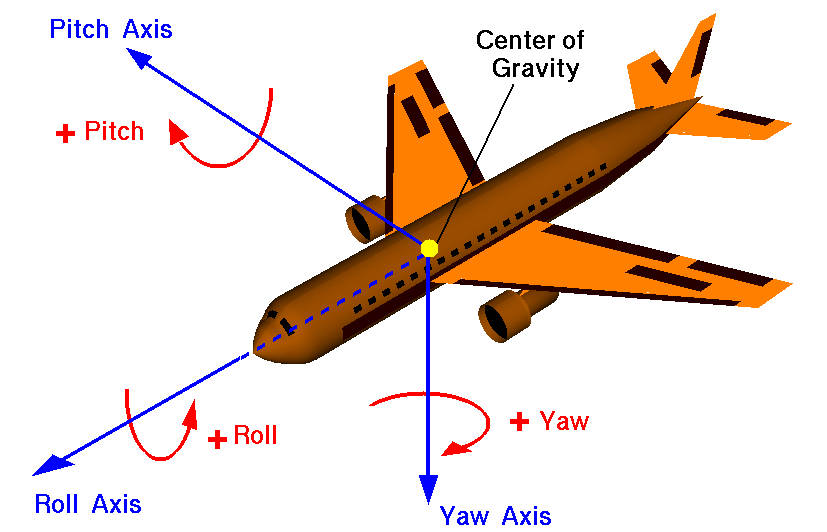
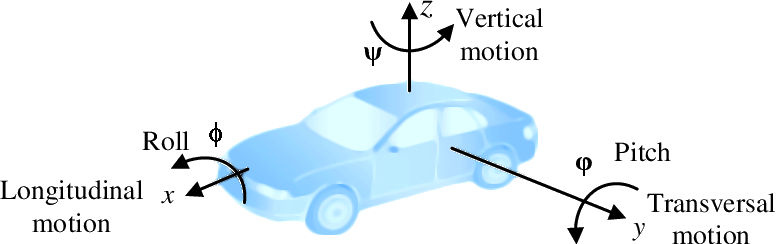
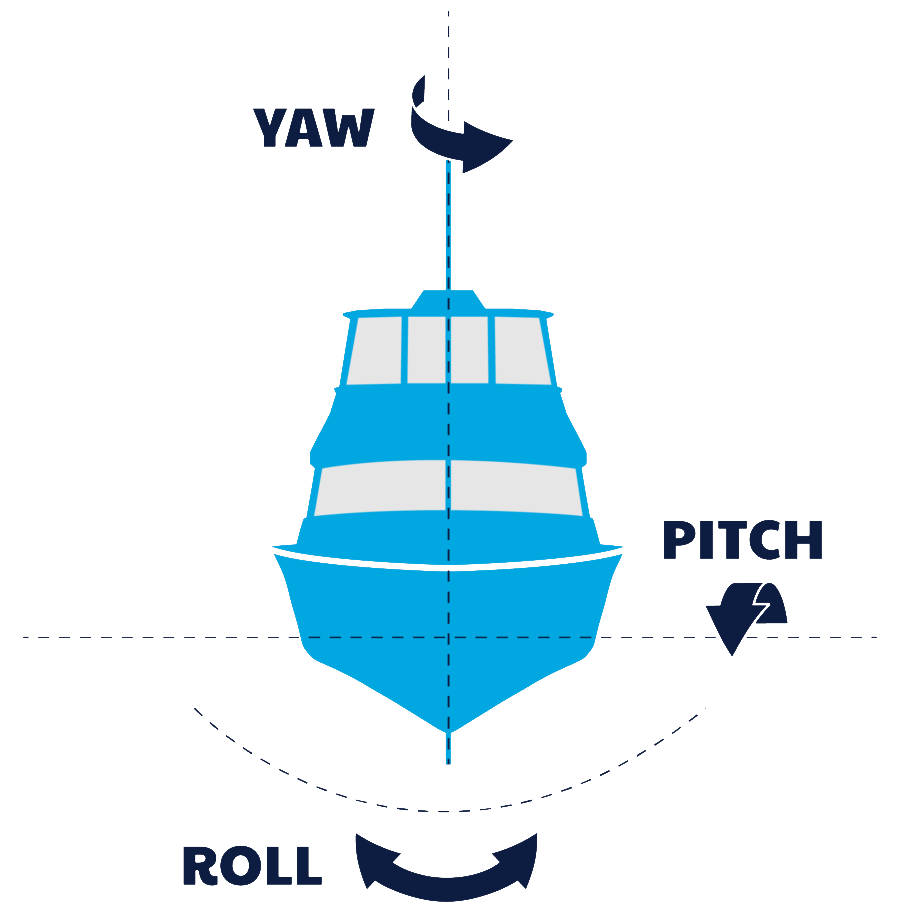
Quando abbiamo bisogno di controllare la robotica, l’aerodinamica o la macchina, la soluzione migliore è usare imbardata, rollio e beccheggio. Ho aggiunto alcune cifre per capire dove sono posizionati questi valori.
Il sensore bosh può fornire dati elaborati, un esempio è Euler_Streaming sulla libreria BNO055.
/*
 ***************************************************************************

    Euler_Streaming.pde - part of sample SW for using BNO055 with Arduino

   (C) All rights reserved by ROBERT BOSCH GMBH

   Copyright (C) 2014 Bosch Sensortec GmbH

 	This program is free software: you can redistribute it and/or modify
    it under the terms of the GNU General Public License as published by
    the Free Software Foundation, either version 3 of the License, or
   (at your option) any later version.

    This program is distributed in the hope that it will be useful,
    but WITHOUT ANY WARRANTY; without even the implied warranty of
    MERCHANTABILITY or FITNESS FOR A PARTICULAR PURPOSE.  See the
    GNU General Public License for more details.

    You should have received a copy of the GNU General Public License
    along with this program.  If not, see <http://www.gnu.org/licenses/>.

 **************************************************************************/
/*	Date: 2014/01/07
 	 Revision: 1.2

*/

#include "BNO055_support.h"		//Contains the bridge code between the API and Arduino
#include <Wire.h>

//The device address is set to BNO055_I2C_ADDR2 in this example. You can change this in the BNO055.h file in the code segment shown below.
// /* bno055 I2C Address */
// #define BNO055_I2C_ADDR1                0x28
// #define BNO055_I2C_ADDR2                0x29
// #define BNO055_I2C_ADDR                 BNO055_I2C_ADDR2

//Pin assignments as tested on the Arduino Due.
//Vdd,Vddio : 3.3V
//GND : GND
//SDA/SCL : SDA/SCL
//PSO/PS1 : GND/GND (I2C mode)

//This structure contains the details of the BNO055 device that is connected. (Updated after initialization)
struct bno055_t myBNO;
struct bno055_euler myEulerData; //Structure to hold the Euler data

unsigned long lastTime = 0;

void setup() //This code is executed once
{
  //Initialize I2C communication
  Wire.begin();

  //Initialization of the BNO055
  BNO_Init(&myBNO); //Assigning the structure to hold information about the device

  //Configuration to NDoF mode
  bno055_set_operation_mode(OPERATION_MODE_NDOF);

  delay(1);

  //Initialize the Serial Port to view information on the Serial Monitor
  Serial.begin(115200);
}

void loop() //This code is looped forever
{
  if ((millis() - lastTime) >= 100) //To stream at 10Hz without using additional timers
  {
    lastTime = millis();

    bno055_read_euler_hrp(&myEulerData);			//Update Euler data into the structure

    Serial.print("Time Stamp: ");				//To read out the Time Stamp
    Serial.println(lastTime);

    Serial.print("Heading(Yaw): ");				//To read out the Heading (Yaw)
    Serial.println(float(myEulerData.h) / 16.00);		//Convert to degrees

    Serial.print("Roll: ");					//To read out the Roll
    Serial.println(float(myEulerData.r) / 16.00);		//Convert to degrees

    Serial.print("Pitch: ");				//To read out the Pitch
    Serial.println(float(myEulerData.p) / 16.00);		//Convert to degrees

    Serial.println();					//Extra line to differentiate between packets
  }
}
E il risultato nell’output seriale è:
Time Stamp: 6500
Heading(Yaw): 182.50
Roll: -3.44
Pitch: -26.00

Time Stamp: 6600
Heading(Yaw): 187.69
Roll: -16.37
Pitch: -18.69

Time Stamp: 6700
Heading(Yaw): 193.50
Roll: -27.75
Pitch: -8.25

Time Stamp: 6800
Heading(Yaw): 197.44
Roll: -34.81
Pitch: 1.19

Time Stamp: 6900
Heading(Yaw): 199.87
Roll: -37.25
Pitch: 9.00

Time Stamp: 7000
Heading(Yaw): 201.25
Roll: -36.88
Pitch: 16.25

Time Stamp: 7100
Heading(Yaw): 199.94
Roll: -30.75
Pitch: 21.94

Time Stamp: 7200
Heading(Yaw): 198.25
Roll: -20.62
Pitch: 27.50

Time Stamp: 7300
Heading(Yaw): 196.50
Roll: -12.44
Pitch: 30.31

Time Stamp: 7400
Heading(Yaw): 196.19
Roll: -4.06
Pitch: 31.44

Time Stamp: 7500
Heading(Yaw): 194.31
Roll: 4.50
Pitch: 31.31

Time Stamp: 7600
Heading(Yaw): 190.56
Roll: 12.75
Pitch: 28.00

Time Stamp: 7700
Heading(Yaw): 186.87
Roll: 22.94
Pitch: 23.12

Time Stamp: 7800
Heading(Yaw): 184.62
Roll: 29.81
Pitch: 19.37

Time Stamp: 7900
Heading(Yaw): 182.75
Roll: 35.19
Pitch: 15.94

Time Stamp: 8000
Heading(Yaw): 181.12
Roll: 42.63
Pitch: 11.63

Time Stamp: 8100
Heading(Yaw): 180.37
Roll: 47.56
Pitch: 9.13

Time Stamp: 8200
Heading(Yaw): 181.69
Roll: 53.44
Pitch: 4.12

Time Stamp: 8300
Heading(Yaw): 184.31
Roll: 57.81
Pitch: -0.94

Time Stamp: 8400
Heading(Yaw): 183.44
Roll: 60.81
Pitch: -3.62
Questi valori erano gli elementi base per tutte le macchine, come automobili o barche.
E può essere gestito con frequenze 10Hz. Ho anche controllato che il rumore fosse gestito bene.
Sposta il coniglietto 3d con WebGL e posizione assoluta.
Qui scrivo un semplice schizzo come quello di Adafruit (controlla il precedente articolo BNO055) che legge i dati seriali e li converte in una rotazione 3D per farlo in modo semplice utilizzando l’API Web Serial per il browser Chrome.
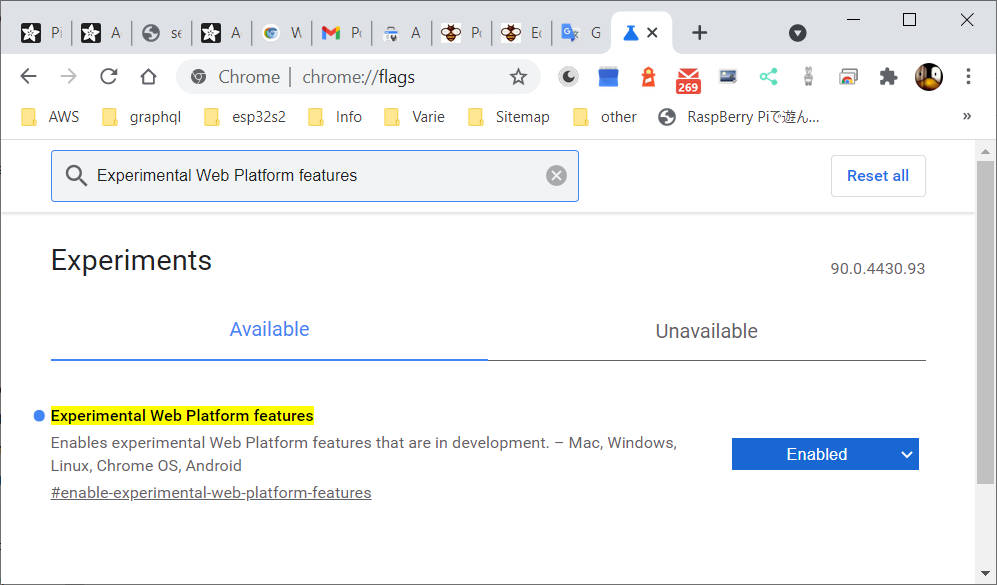
Quindi, prima, hai bisogno del browser Chrome.
Poi devi abilitare l’API WebSerial e, per farlo, devi inserire l’URL di input del browser chrome://flags quindi cercare (con Ctrl + f) le funzionalità della piattaforma Web sperimentale e abilitarlo.
Quindi carica l’esempio.
/**
 * Simple example with bosch library for bno055 to work with
 * Adafruit webGL example with euler angles
 * https://adafruit.github.io/Adafruit_WebSerial_3DModelViewer/
 *
 * by Renzo Mischianti <www.mischianti.org>
 *
 * https://mischianti.org/
 */

#include "BNO055_support.h"		//Contains the bridge code between the API and Arduino
#include <Wire.h>

//The device address is set to BNO055_I2C_ADDR2 in this example. You can change this in the BNO055.h file in the code segment shown below.
// /* bno055 I2C Address */
// #define BNO055_I2C_ADDR1                0x28
// #define BNO055_I2C_ADDR2                0x29
// #define BNO055_I2C_ADDR                 BNO055_I2C_ADDR2

//Pin assignments as tested on the Arduino Due.
//Vdd,Vddio : 3.3V
//GND : GND
//SDA/SCL : SDA/SCL
//PSO/PS1 : GND/GND (I2C mode)

//This structure contains the details of the BNO055 device that is connected. (Updated after initialization)
struct bno055_t myBNO;
struct bno055_euler myEulerData; //Structure to hold the Euler data

unsigned char accelCalibStatus = 0;		//Variable to hold the calibration status of the Accelerometer
unsigned char magCalibStatus = 0;		//Variable to hold the calibration status of the Magnetometer
unsigned char gyroCalibStatus = 0;		//Variable to hold the calibration status of the Gyroscope
unsigned char sysCalibStatus = 0;		//Variable to hold the calibration status of the System (BNO055's MCU)

unsigned long lastTime = 0;

/* Set the delay between fresh samples */
#define BNO055_SAMPLERATE_DELAY_MS (100)

void setup() //This code is executed once
{
  //Initialize I2C communication
  Wire.begin();

  //Initialization of the BNO055
  BNO_Init(&myBNO); //Assigning the structure to hold information about the device

  //Configuration to NDoF mode
  bno055_set_operation_mode(OPERATION_MODE_NDOF);

  delay(1);

  //Initialize the Serial Port to view information on the Serial Monitor
  Serial.begin(115200);
}

void loop() //This code is looped forever
{
  if ((millis() - lastTime) >= BNO055_SAMPLERATE_DELAY_MS) //To stream at 10Hz without using additional timers
  {
    lastTime = millis();

    bno055_read_euler_hrp(&myEulerData);			//Update Euler data into the structure

    /* The WebSerial 3D Model Viewer expects data as heading, pitch, roll */
    Serial.print(F("Orientation: "));
    Serial.print(360-(float(myEulerData.h) / 16.00));
    Serial.print(F(", "));
    Serial.print(360-(float(myEulerData.p) / 16.00));
    Serial.print(F(", "));
    Serial.print(360-(float(myEulerData.r) / 16.00));
    Serial.println(F(""));

	bno055_get_accelcalib_status(&accelCalibStatus);
	bno055_get_gyrocalib_status(&gyroCalibStatus);
	bno055_get_syscalib_status(&sysCalibStatus);
	bno055_get_magcalib_status(&magCalibStatus);

	Serial.print(F("Calibration: "));
	Serial.print(sysCalibStatus, DEC);
	Serial.print(F(", "));
	Serial.print(gyroCalibStatus, DEC);
	Serial.print(F(", "));
	Serial.print(accelCalibStatus, DEC);
	Serial.print(F(", "));
	Serial.print(magCalibStatus, DEC);
	Serial.println(F(""));


  }
}
Ora apri nel browser questo URL:
https://adafruit.github.io/Adafruit_WebSerial_3DModelViewer/
Seleziona 115200 baud, fai clic su Connetti e selezionare la porta seriale del dispositivo.
Il risultato è che puoi cambiare l’orientamento del coniglietto con il movimento del bno055.
Grazie
- BNO055 accelerometro, giroscopio, magnetometro con la semplice libreria Adafruit
- BNO055 per esp32, esp8266 e Arduino: cablaggio e libreria Bosch avanzata
- BNO055 per esp32, esp8266 e Arduino: caratteristiche, configurazione e rimappatura assi
- BNO055: modalità di alimentazione, accelerometro e interrupt di movimento
- BNO055 per esp32, esp8266 e Arduino: abilitare il pin INT e High G Interrupt dell’accelerometro
- BNO055 per esp32, esp8266 e Arduino: giroscopio ad alta velocità e interrupt per ogni movimento