
Ebyte LoRa E220 LLCC68 per Arduino, esp32 o esp8266: power saving ed invio di dati strutturati – 5
Ora andiamo ad esaminare il Wake On Radio (WOR) e il risparmio energetico, una delle caratteristiche essenziali del nostro dispositivo Ebyte E220 UART LoRa basato sui moduli wireless LLCC68.
Poi dobbiamo capire come gestire strutture complesse che sono meglio ottimizzate rispetto ai dati in formato stringa.
Ecco la mia selezione di dispositivi LoRa E220 E220-400T22D 433MHz 5Km - E220-400T30D 433MHz 10Km - E220-900T22D 868MHz 915MHz 5Km - E220-900T30D 868MHz 915MHz 10Km
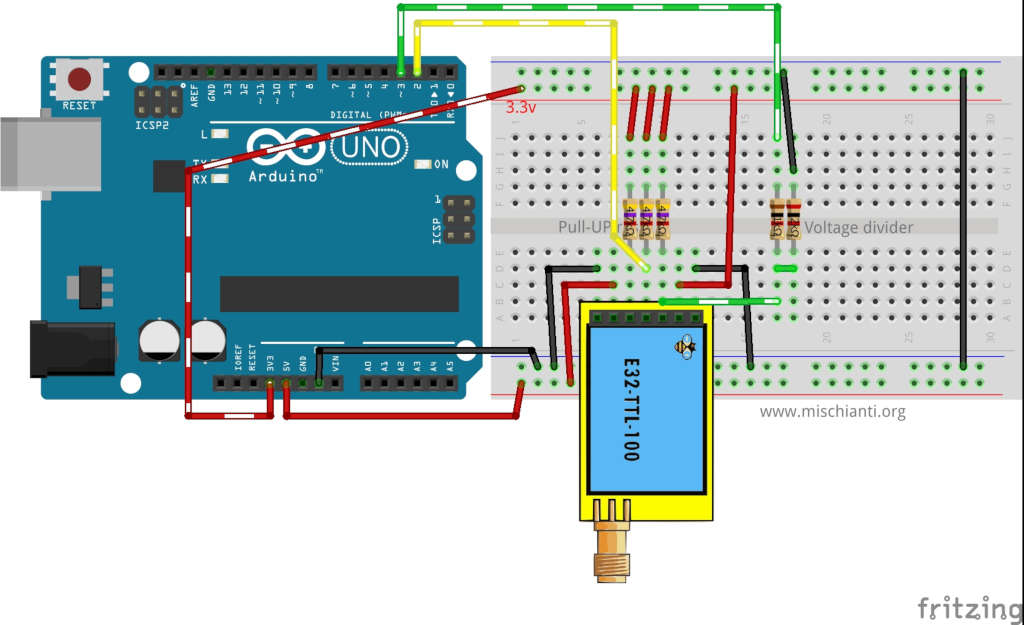
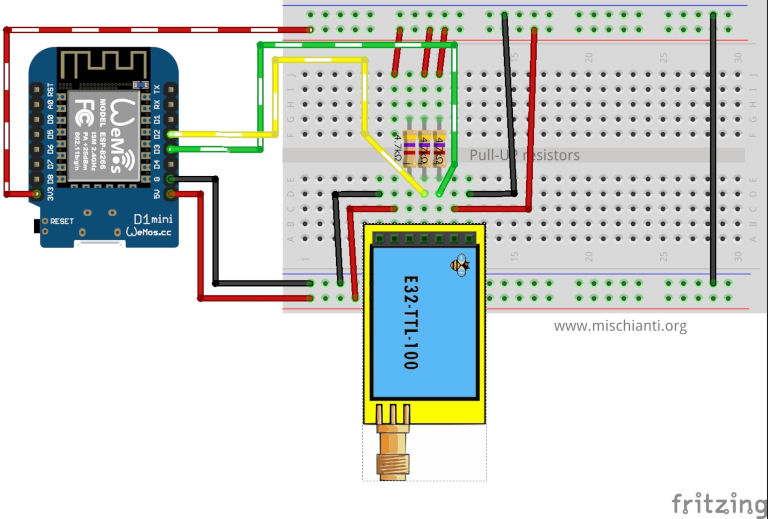
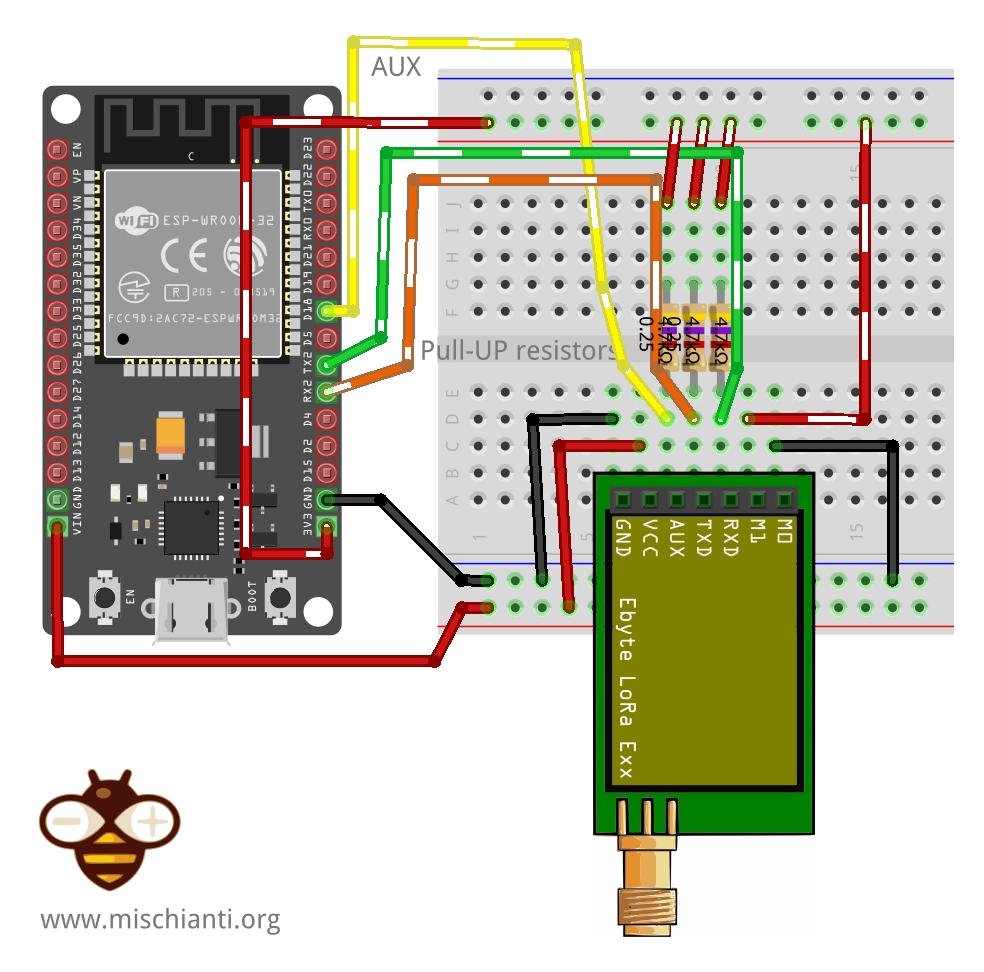
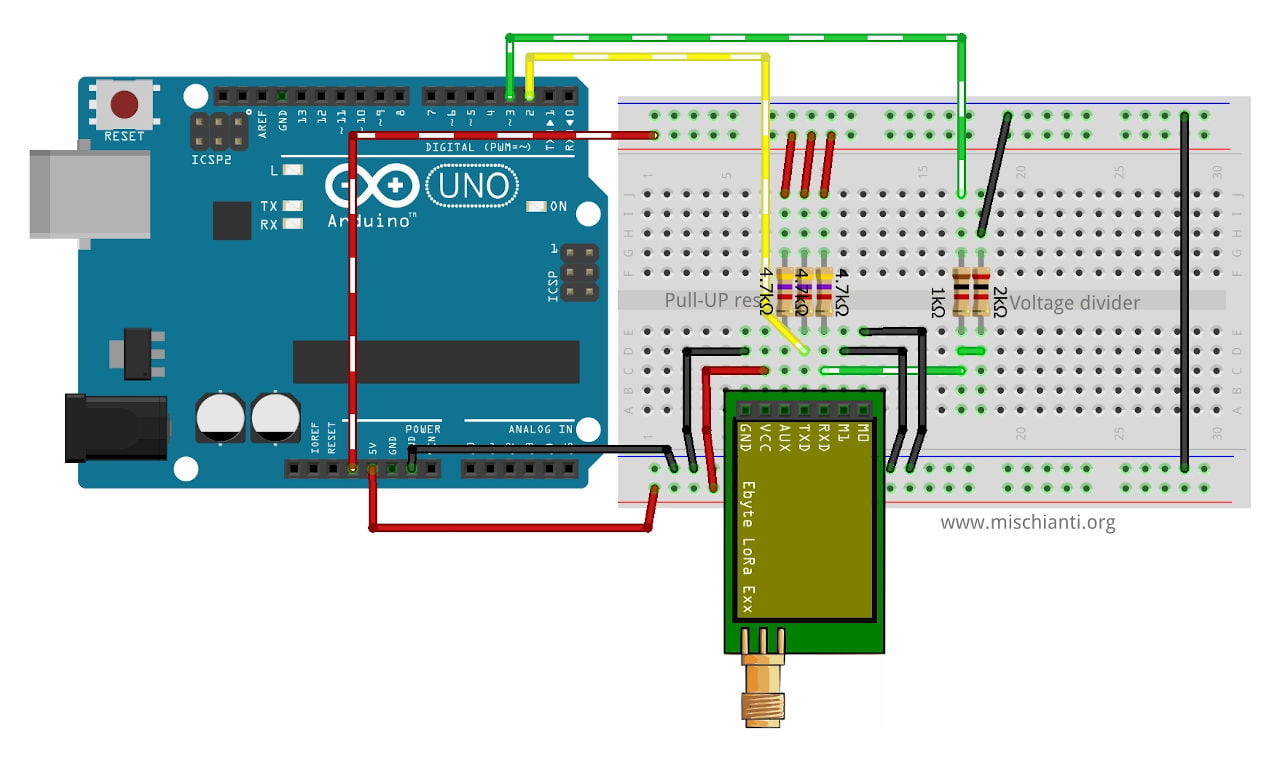
Se hai problemi con il blocco del dispositivo, devi mettere una resistenza di pull-up da 4,7k o meglio collegarti al pin AUX del dispositivo.

Gestione WOR (Wake On Radio)
Come già detto, questi dispositivi offrono alcune interessanti funzionalità per gestire il risparmio energetico e puoi impostare M0 e M1 per eseguire un risveglio da un dispositivo a un altro dispositivo in modalità di ricezione WOR.
| Mode | M1 | M0 | Explanation |
|---|---|---|---|
| Normal | 0 | 0 | UART e canale wireless sono open, e la transparent transmission è attiva |
| WOR Transmitter | 0 | 1 | Trasmettitore WOR (Wake on radio) |
| WOR Receiver | 1 | 0 | Ricevitore WOR (Supporta sveglia via radio) |
| Deep sleep mode | 1 | 1 | Il modulo va in sleep (ma si sveglia automaticamente quando riceve i parametri di configurazione) |
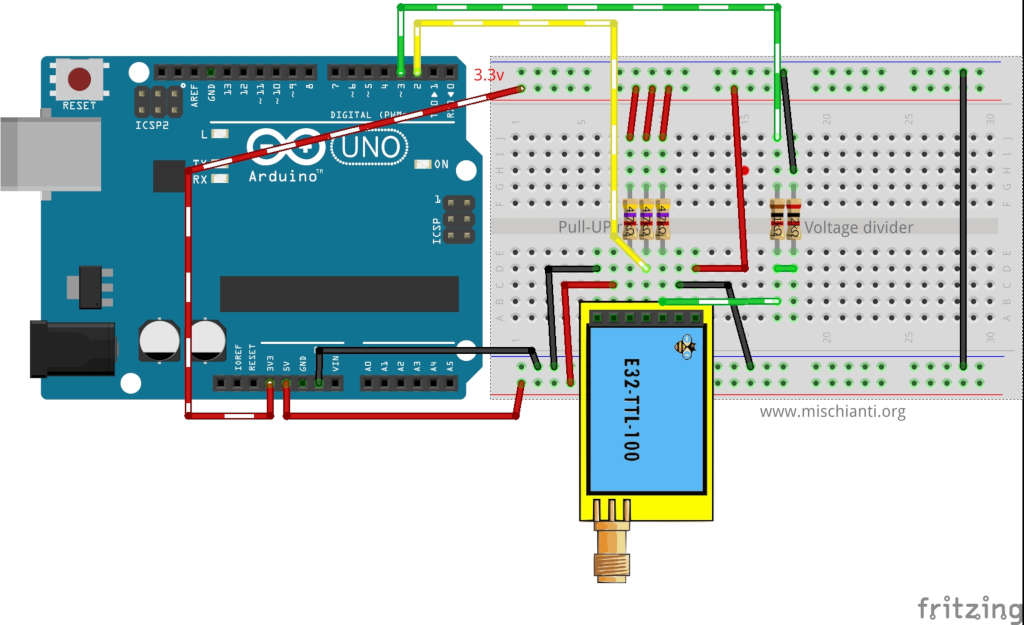
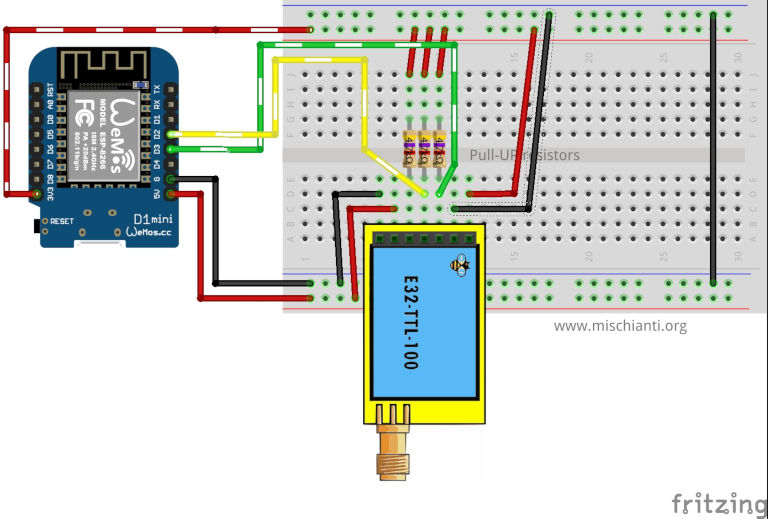
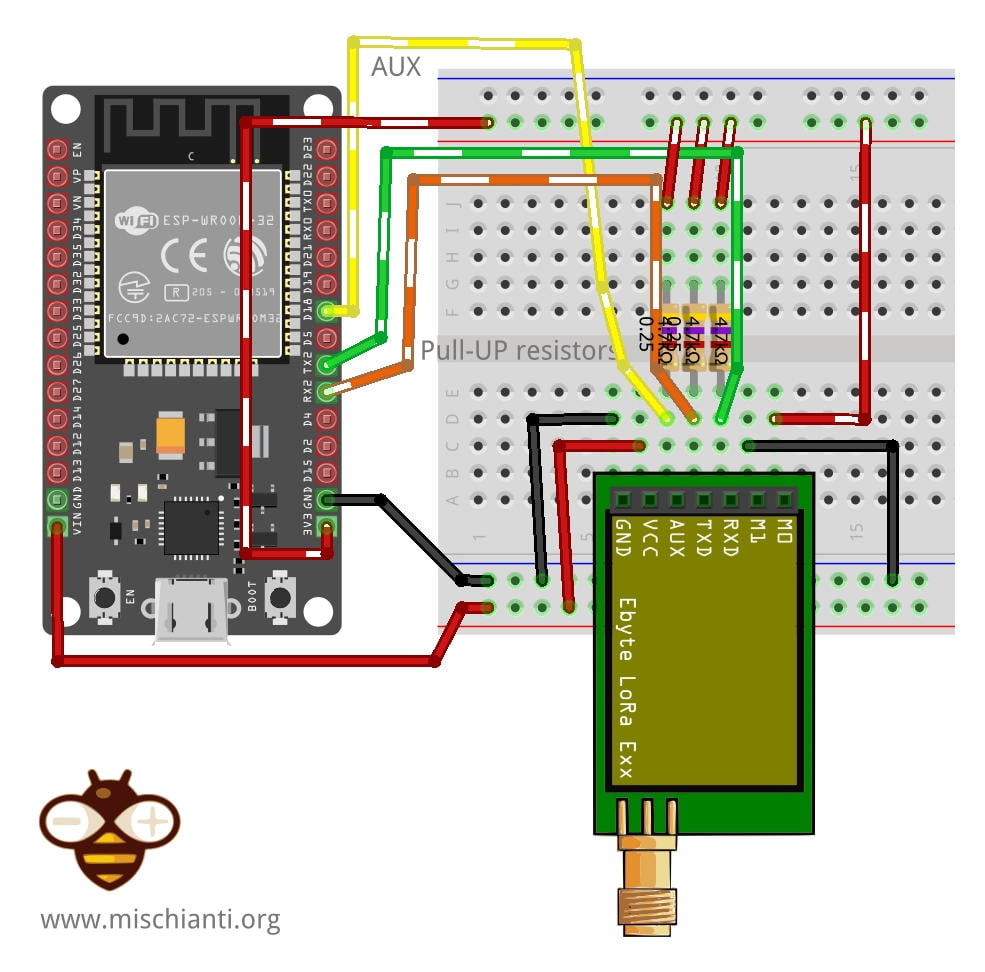
Cablaggio
WOR Modalità di trasmissione
Quindi dobbiamo connettere il dispositivo di invio in modalità di trasmissione WOR (se colleghi completamente il dispositivo, la libreria gestirà tutte le modalità per te):
Modalità di risparmio energetico/ricezione WOR
E il dispositivo ricevitore deve essere in modalità di risparmio energetico/ricezione WOR (se il dispositivo è stato completamente collegato, la libreria si occuperà di tutte le modalità per te):
Codice
Ciclo WOR
Un parametro di configurazione critico è il WOR Cycle, per il mittente è essenziale perché aggiunge un lungo preambolo al messaggio (lungo come il tempo di attivazione). Il ricevitore utilizza il tempo di attivazione come cadenza del controllo di un messaggio di sveglia (polling).
Quindi, se il destinatario controlla ogni 2000 ms (tempo di polling) se c’è un messaggio, il mittente aggiunge un preambolo di 2000 ms. Il ricevitore intercetta il preambolo del messaggio, attende la lettura del messaggio effettivo e torna alla modalità di risparmio energetico.
Quindi, se vuoi massimizzare il risparmio energetico, devi mettere un ciclo WOR minimo. Se vuoi una maggiore efficienza, devi fare il contrario.
Il mittente e il destinatario in questo dispositivo devono avere lo stesso ciclo WOR.
Ecco la configurazione di un trasmettitore WOR:
	configuration.ADDL = 0x02;
	configuration.ADDH = 0x00;

	configuration.CHAN = 23;

	configuration.SPED.uartBaudRate = UART_BPS_9600;
	configuration.SPED.airDataRate = AIR_DATA_RATE_010_24;
	configuration.SPED.uartParity = MODE_00_8N1;

	configuration.OPTION.subPacketSetting = SPS_200_00;
	configuration.OPTION.RSSIAmbientNoise = RSSI_AMBIENT_NOISE_DISABLED;
	configuration.OPTION.transmissionPower = POWER_22;

	configuration.TRANSMISSION_MODE.enableRSSI = RSSI_DISABLED;
	configuration.TRANSMISSION_MODE.fixedTransmission = FT_FIXED_TRANSMISSION;
	configuration.TRANSMISSION_MODE.enableLBT = LBT_DISABLED;
	configuration.TRANSMISSION_MODE.WORPeriod = WOR_2000_011;
Sketch per invio di uno WOR
Sketch di invio (se non si effettua una connessione completa ricorda che prima devi impostare la configurazione in modalità trasmissione WOR e poi tornare nella modalità specificata)
/*
* EBYTE LoRa E220
* Send wake up WOR message to a device in Sleep (WOR transmitter)
*
* You must configure the address with 0 3 23 (FIXED SENDER configuration)
* and pay attention that WOR period must be the same of receiver
*
* by Renzo Mischianti <https://mischianti.org>
*
* https://mischianti.org
*
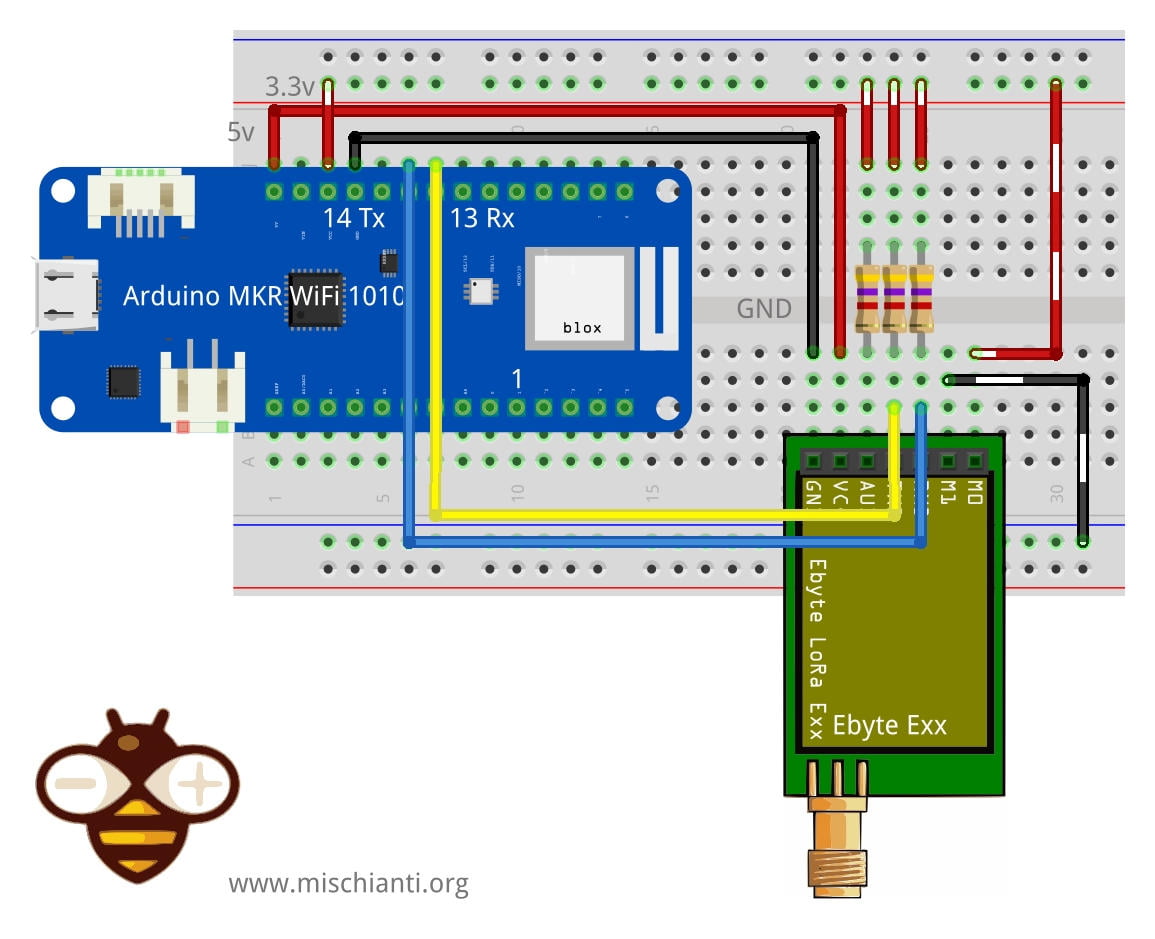
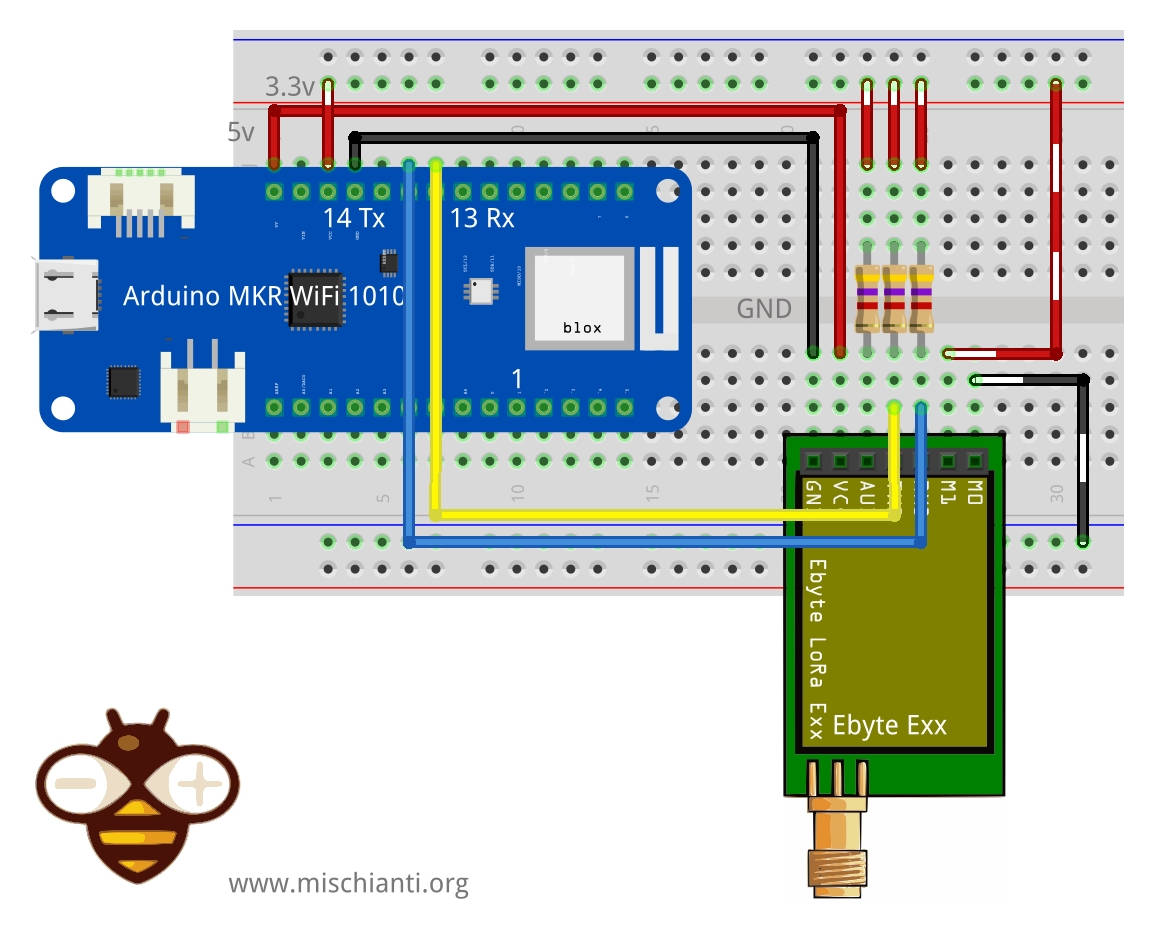
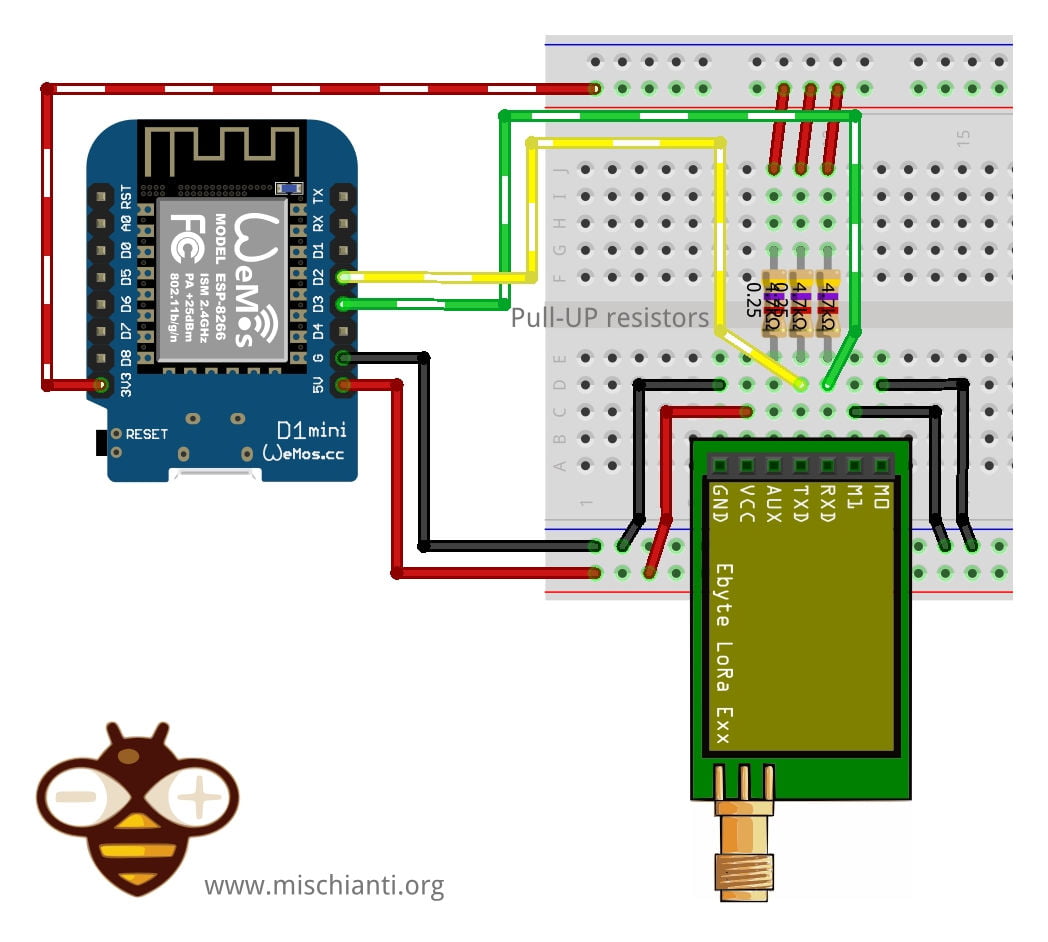
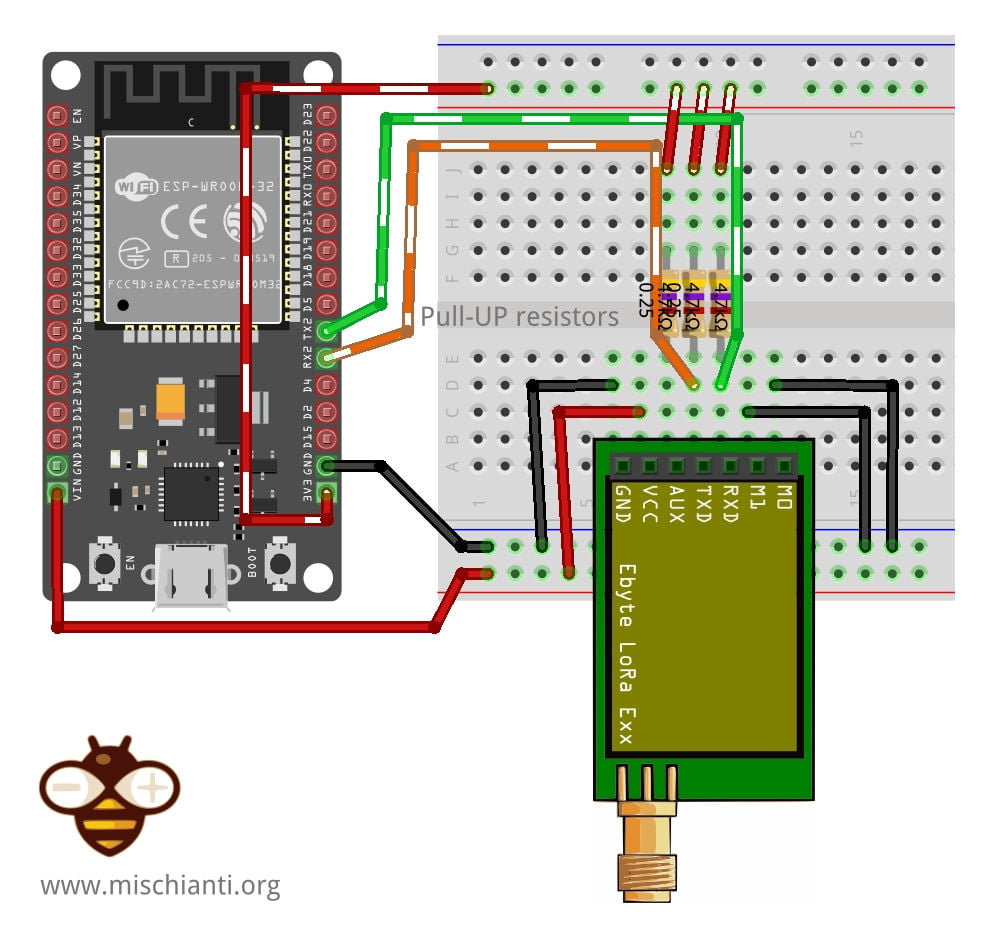
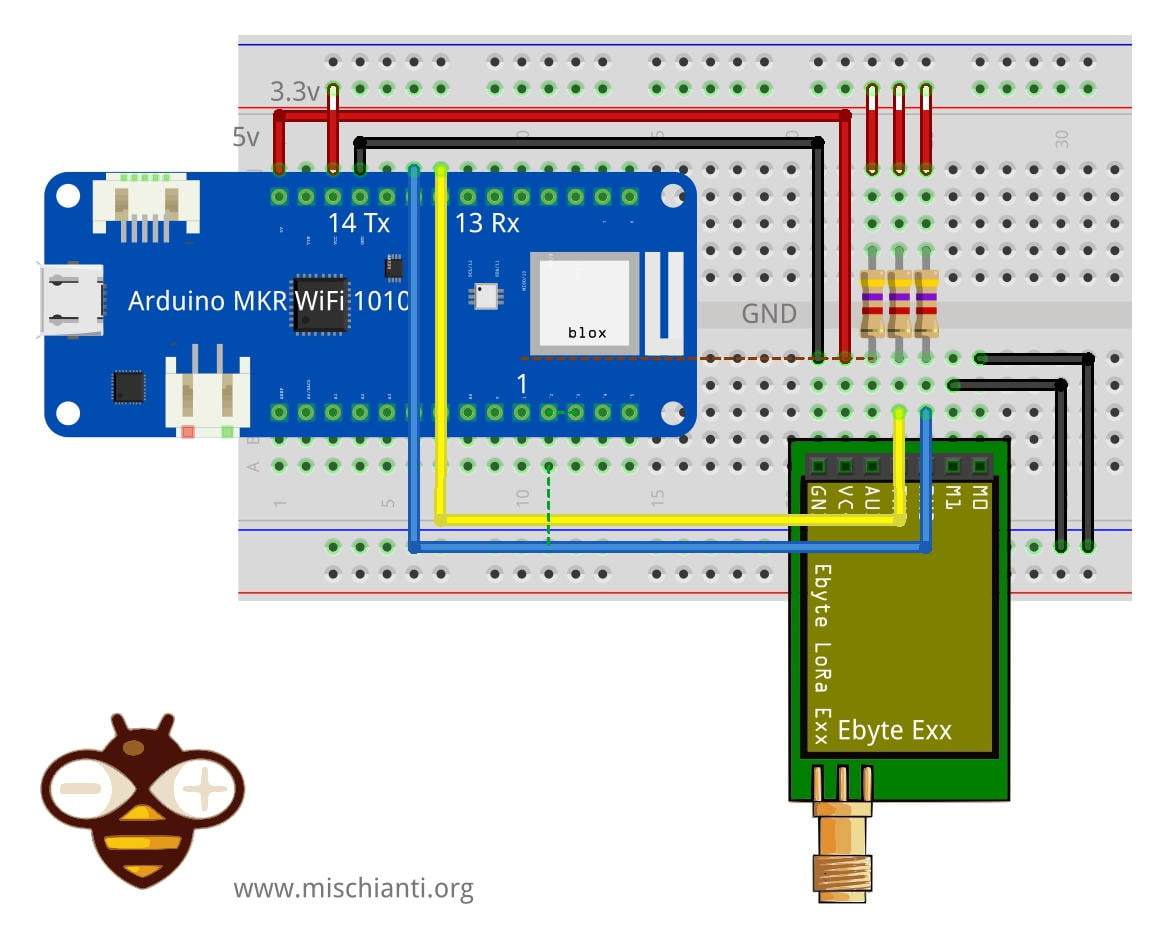
* E220 ----- WeMos D1 mini ----- esp32 ----- Arduino Nano 33 IoT ----- Arduino MKR ----- ArduinoUNO
* M0 ----- D7 (or 3.3v) ----- 19 (or 3.3v) ----- 2 (or 3.3v) ----- 2 (or 3.3v) ----- 7 Volt div (or 3.3v)
* M1 ----- D6 (or GND) ----- 21 (or GND) ----- 4 (or GND) ----- 4 (or GND) ----- 6 Volt div (or GND)
* TX ----- D3 (PullUP) ----- TX2 (PullUP) ----- TX1 (PullUP) ----- 14 (PullUP) ----- 4 (PullUP)
* RX ----- D4 (PullUP) ----- RX2 (PullUP) ----- RX1 (PullUP) ----- 13 (PullUP) ----- 5 Volt div (PullUP)
* AUX ----- D5 (PullUP) ----- 18 (PullUP) ----- 0 (PullUP) ----- 0 (PullUP) ----- 3 (PullUP)
* VCC ----- 3.3v/5v ----- 3.3v/5v ----- 3.3v/5v ----- 3.3v/5v ----- 3.3v/5v
* GND ----- GND ----- GND ----- GND ----- GND ----- GND
*
*/
// With FIXED SENDER configuration
#define DESTINATION_ADDL 3
#include "Arduino.h"
#include "LoRa_E220.h"
// ---------- esp8266 pins --------------
//LoRa_E220 e220ttl(RX, TX, AUX, M0, M1); // Arduino RX <-- e220 TX, Arduino TX --> e220 RX
LoRa_E220 e220ttl(D3, D4, D5, D7, D6); // Arduino RX <-- e220 TX, Arduino TX --> e220 RX AUX M0 M1
//LoRa_E220 e220ttl(D2, D3); // Config without connect AUX and M0 M1
//#include <SoftwareSerial.h>
//SoftwareSerial mySerial(D2, D3); // Arduino RX <-- e220 TX, Arduino TX --> e220 RX
//LoRa_E220 e220ttl(&mySerial, D5, D7, D6); // AUX M0 M1
// -------------------------------------
// ---------- Arduino pins --------------
//LoRa_E220 e220ttl(4, 5, 3, 7, 6); // Arduino RX <-- e220 TX, Arduino TX --> e220 RX AUX M0 M1
//LoRa_E220 e220ttl(4, 5); // Config without connect AUX and M0 M1
//#include <SoftwareSerial.h>
//SoftwareSerial mySerial(4, 5); // Arduino RX <-- e220 TX, Arduino TX --> e220 RX
//LoRa_E220 e220ttl(&mySerial, 3, 7, 6); // AUX M0 M1
// -------------------------------------
// ------------- Arduino MKR WiFi 1010 -------------
// LoRa_E220 e220ttl(&Serial1, 2, 4, 6); // RX AUX M0 M1
// -------------------------------------------------
// ------------- Arduino MKR WiFi 1010 -------------
// LoRa_E220 e220ttl(&Serial1, 0, 2, 4); // RX AUX M0 M1
// -------------------------------------------------
// ---------- esp32 pins --------------
// LoRa_E220 e220ttl(&Serial2, 15, 21, 19); // RX AUX M0 M1
//LoRa_E220 e220ttl(&Serial2, 22, 4, 18, 21, 19, UART_BPS_RATE_9600); // esp32 RX <-- e220 TX, esp32 TX --> e220 RX AUX M0 M1
// -------------------------------------
void setup() {
Serial.begin(9600);
delay(500);
// Startup all pins and UART
e220ttl.begin();
e220ttl.setMode(MODE_1_WOR_TRANSMITTER);
Serial.println("Hi, I'm going to send WOR message!");
// Send message
ResponseStatus rs = e220ttl.sendFixedMessage(0, DESTINATION_ADDL, 23, "Hello, world? WOR!");
// Check If there is some problem of succesfully send
Serial.println(rs.getResponseDescription());
// e220ttl.setMode(MODE_0_NORMAL);
}
void loop() {
// If something available
if (e220ttl.available()>1) {
// read the String message
ResponseContainer rc = e220ttl.receiveMessage();
// Is something goes wrong print error
if (rc.status.code!=1){
Serial.println(rc.status.getResponseDescription());
}else{
// Print the data received
Serial.println(rc.status.getResponseDescription());
Serial.println(rc.data);
}
}
if (Serial.available()) {
String input = Serial.readString();
ResponseStatus rs = e220ttl.sendFixedMessage(0, DESTINATION_ADDL, 23, input);
// Check If there is some problem of succesfully send
Serial.println(rs.getResponseDescription());
}
}
Ora la configurazione del ricevitore:
	configuration.ADDL = 0x03;
	configuration.ADDH = 0x00;

	configuration.CHAN = 23;

	configuration.SPED.uartBaudRate = UART_BPS_9600;
	configuration.SPED.airDataRate = AIR_DATA_RATE_010_24;
	configuration.SPED.uartParity = MODE_00_8N1;

	configuration.OPTION.subPacketSetting = SPS_200_00;
	configuration.OPTION.RSSIAmbientNoise = RSSI_AMBIENT_NOISE_DISABLED;
	configuration.OPTION.transmissionPower = POWER_22;

	configuration.TRANSMISSION_MODE.enableRSSI = RSSI_DISABLED;
	configuration.TRANSMISSION_MODE.fixedTransmission = FT_FIXED_TRANSMISSION;
	configuration.TRANSMISSION_MODE.enableLBT = LBT_DISABLED;
	configuration.TRANSMISSION_MODE.WORPeriod = WOR_2000_011;

Sketch per sveglia da WOR
E lo sketch di ricezione (se non effettui una connessione completa , ricorda che prima devi impostare la configurazione in modalità programma/sleep e poi tornare nella modalità specificata) :
/*
 * EBYTE LoRa E220
 * Stay in sleep mode and wait a wake up WOR message
 *
 * You must configure the address with 0 2 23 (FIXED RECEIVER configuration)
 * and pay attention that WOR period must be the same of sender
 *
 * You must uncommend the correct constructor and set the correct AUX_PIN define.
 *
 * by Renzo Mischianti <https://mischianti.org>
 *
 * https://mischianti.org
 *
 * E220		  ----- WeMos D1 mini	----- esp32			----- Arduino Nano 33 IoT	----- Arduino MKR	----- ArduinoUNO
 * M0         ----- D7 (or GND)		----- 19 (or GND)	----- 2 (or GND)			----- 2 (or GND)	----- 7 Volt div (or GND)
 * M1         ----- D6 (or 3.3v)	----- 21 (or 3.3v)	----- 4 (or 3.3v)			----- 4 (or 3.3v)	----- 6 Volt div (or 3.3v)
 * TX         ----- D3 (PullUP)		----- TX2 (PullUP)	----- TX1 (PullUP)			----- 14 (PullUP)	----- 4 (PullUP)
 * RX         ----- D4 (PullUP)		----- RX2 (PullUP)	----- RX1 (PullUP)			----- 13 (PullUP)	----- 5 Volt div (PullUP)
 * AUX        ----- D5 (PullUP)		----- 18  (PullUP)	----- 0  (PullUP)			----- 0  (PullUP)	----- 3 (PullUP)
 * VCC        ----- 3.3v/5v			----- 3.3v/5v		----- 3.3v/5v				----- 3.3v/5v		----- 3.3v/5v
 * GND        ----- GND				----- GND			----- GND					----- GND			----- GND
 *
 */

// With FIXED RECEIVER configuration
#define DESTINATION_ADDL 2

#define AUX_PIN 15

#include "Arduino.h"
#include "LoRa_E220.h"

// ---------- esp8266 pins --------------
//LoRa_E220 e220ttl(RX, TX, AUX, M0, M1);  // Arduino RX <-- e220 TX, Arduino TX --> e220 RX
//LoRa_E220 e220ttl(D3, D4, D5, D7, D6); // Arduino RX <-- e220 TX, Arduino TX --> e220 RX AUX M0 M1
//LoRa_E220 e220ttl(D2, D3); // Config without connect AUX and M0 M1

//#include <SoftwareSerial.h>
//SoftwareSerial mySerial(D2, D3); // Arduino RX <-- e220 TX, Arduino TX --> e220 RX
//LoRa_E220 e220ttl(&mySerial, D5, D7, D6); // AUX M0 M1
// -------------------------------------

// ---------- Arduino pins --------------
//LoRa_E220 e220ttl(4, 5, 3, 7, 6); // Arduino RX <-- e220 TX, Arduino TX --> e220 RX AUX M0 M1
//LoRa_E220 e220ttl(4, 5); // Config without connect AUX and M0 M1

//#include <SoftwareSerial.h>
//SoftwareSerial mySerial(4, 5); // Arduino RX <-- e220 TX, Arduino TX --> e220 RX
//LoRa_E220 e220ttl(&mySerial, 3, 7, 6); // AUX M0 M1
// -------------------------------------

// ------------- Arduino MKR WiFi 1010 -------------
// LoRa_E220 e220ttl(&Serial1, 2, 4, 6); //  RX AUX M0 M1
// -------------------------------------------------

// ------------- Arduino MKR WiFi 1010 -------------
// LoRa_E220 e220ttl(&Serial1, 0, 2, 4); //  RX AUX M0 M1
// -------------------------------------------------

// ---------- esp32 pins --------------
 LoRa_E220 e220ttl(&Serial2, 15, 21, 19); //  RX AUX M0 M1

//LoRa_E220 e220ttl(&Serial2, 22, 4, 18, 21, 19, UART_BPS_RATE_9600); //  esp32 RX <-- e220 TX, esp32 TX --> e220 RX AUX M0 M1
// -------------------------------------

 bool interruptExecuted = false;
#ifdef ESP32
 void IRAM_ATTR wakeUp() {
	 // Do not use Serial on interrupt callback
	 interruptExecuted = true;
	 detachInterrupt(AUX_PIN);
 }
#elif define(ESP8266)
 ICACHE_RAM_ATTR void wakeUp() {
	 // Do not use Serial on interrupt callback
	 interruptExecuted = true;
	 detachInterrupt(AUX_PIN);
 }
#else
 void wakeUp() {
 	 // Do not use Serial on interrupt callback
 	 interruptExecuted = true;
 	 detachInterrupt(AUX_PIN);
  }
#endif

//The setup function is called once at startup of the sketch
void setup() {
	Serial.begin(9600);
	while (!Serial) {
		; // wait for serial port to connect. Needed for native USB
	}
	delay(100);

	e220ttl.begin();

	e220ttl.setMode(MODE_2_WOR_RECEIVER);

	delay(1000);
	Serial.println();
	Serial.println("Start sleep!");
	delay(100);
    attachInterrupt(AUX_PIN, wakeUp, FALLING);
}

// The loop function is called in an endless loop
void loop() {
	if (e220ttl.available() > 1) {
		Serial.println("Message arrived!");
		ResponseContainer rs = e220ttl.receiveMessage();
		// First of all get the data
		String message = rs.data;

		Serial.println(rs.status.getResponseDescription());
		Serial.println(message);

		// Work only with full connection
		e220ttl.setMode(MODE_0_NORMAL);

		delay(1000);

		ResponseStatus rsSend = e220ttl.sendFixedMessage(0, DESTINATION_ADDL, 23, "We have received the message!");
		// Check If there is some problem of succesfully send
		Serial.println(rsSend.getResponseDescription());
	}

	if(interruptExecuted) {
		Serial.println("WakeUp Callback, AUX pin go LOW and start receive message!");
		Serial.flush();
		interruptExecuted = false;
	}
}
Presta attenzione a questo sketch del ricevitore solo il LoRa E220 va in modalità sleep, quindi in un esempio reale, devi gestire lo sleep del microcontrollore. Nei successivi articoli, verificheremo il deep sleep di ogni microcontrollore con esempi dettagliati.
Invia struttura complessa
Per inviare e ricevere, è necessario impostare la modalità normale; se si effettua una connessione completa, la libreria esegue automaticamente l’impostazione corretta.
Cablaggio in modalità normale
| M0 | GND (Set normal mode) |
| M1 | GND (Set normal mode) |
| TX | PIN 2 (PullUP 4,7KΩ) |
| RX | PIN 3 (PullUP 4,7KΩ & Voltage divider) |
| AUX | Not connected (PullUP 4,7KΩ) |
| VCC | 5v |
| GND | GND |
qui la configurazione per il Wemos D1 mini:
| M0 | GND (Set normal mode) |
| M1 | GND (Set normal mode) |
| TX | PIN D2 (PullUP 4,7KΩ) |
| RX | PIN D3 (PullUP 4,7KΩ) |
| AUX | Not connected (PullUP 4,7KΩ) |
| VCC | 3.3v/5v |
| GND | GND |
ESP-32:
| M0 | GND (Set normal mode) |
| M1 | GND (Set normal mode) |
| RX | TX2 (PullUP 4,7KΩ) |
| TX | RX2 (PullUP 4,7KΩ) |
| AUX | Not connected (PullUP 4,7KΩ) |
| VCC | 3.3v/5v |
| GND | GND |
Arduino MKR WiFi 1010:
Possiamo usare la stringa come vogliamo, usarla come formato JSON e così via, ma se utilizzerai messaggi strutturati in modalità nativa (array di byte), è più efficiente.
Codice
Il codice di esempio per il mittente può essere:
struct Message {
	char type[5];
	char message[8];
	float temperature;
};

  struct	Message message = {"TEMP", ROOM, 19.2};

  // Send message
  ResponseStatus rs = e220ttl.sendFixedMessage(0, DESTINATION_ADDL, 23, &message, sizeof(Message));
  // Check If there is some problem of succesfully send
  Serial.println(rs.getResponseDescription());
e per ricevere:
	// If something available
  if (e220ttl.available()>1) {
	  // read the String message
#ifdef ENABLE_RSSI
		ResponseStructContainer rsc = e220ttl.receiveMessageRSSI(sizeof(Message));
#else
		ResponseStructContainer rsc = e220ttl.receiveMessage(sizeof(Message));
#endif

	// Is something goes wrong print error
	if (rsc.status.code!=1){
		Serial.println(rsc.status.getResponseDescription());
	}else{
		// Print the data received
		Serial.println(rsc.status.getResponseDescription());
		struct Message message = *(Message*) rsc.data;
		Serial.println(message.type);
		Serial.println(message.message);
		Serial.println(message.temperature);

#ifdef ENABLE_RSSI
		Serial.print("RSSI: "); Serial.println(rsc.rssi, DEC);
#endif
	}
  }
Per gestire Mittente e Ricevente è possibile utilizzare la configurazione FIXED_SENDER e FIXED_RECEIVER:
Mittente:
//	----------------------- FIXED SENDER -----------------------
	configuration.ADDL = 0x02;
	configuration.ADDH = 0x00;

	configuration.CHAN = 23;

	configuration.SPED.uartBaudRate = UART_BPS_9600;
	configuration.SPED.airDataRate = AIR_DATA_RATE_010_24;
	configuration.SPED.uartParity = MODE_00_8N1;

	configuration.OPTION.subPacketSetting = SPS_200_00;
	configuration.OPTION.RSSIAmbientNoise = RSSI_AMBIENT_NOISE_DISABLED;
	configuration.OPTION.transmissionPower = POWER_22;

	configuration.TRANSMISSION_MODE.enableRSSI = RSSI_DISABLED;
	configuration.TRANSMISSION_MODE.fixedTransmission = FT_FIXED_TRANSMISSION;
	configuration.TRANSMISSION_MODE.enableLBT = LBT_DISABLED;
	configuration.TRANSMISSION_MODE.WORPeriod = WOR_2000_011;
E devi decommentare la relativa definizione nello schizzo:
// With FIXED SENDER configuration
#define DESTINATION_ADDL 3
#define ROOM "Kitchen"
Ricevitore:
//	----------------------- FIXED RECEIVER -----------------------
	configuration.ADDL = 0x03;
	configuration.ADDH = 0x00;

	configuration.CHAN = 23;

	configuration.SPED.uartBaudRate = UART_BPS_9600;
	configuration.SPED.airDataRate = AIR_DATA_RATE_010_24;
	configuration.SPED.uartParity = MODE_00_8N1;

	configuration.OPTION.subPacketSetting = SPS_200_00;
	configuration.OPTION.RSSIAmbientNoise = RSSI_AMBIENT_NOISE_DISABLED;
	configuration.OPTION.transmissionPower = POWER_22;

	configuration.TRANSMISSION_MODE.enableRSSI = RSSI_DISABLED;
	configuration.TRANSMISSION_MODE.fixedTransmission = FT_FIXED_TRANSMISSION;
	configuration.TRANSMISSION_MODE.enableLBT = LBT_DISABLED;
	configuration.TRANSMISSION_MODE.WORPeriod = WOR_2000_011;
E devi decommentare la relativa definizione nello schizzo
// With FIXED RECEIVER configuration
#define DESTINATION_ADDL 2
#define ROOM "Bathroo"
Schizzo completo di mittente e destinatario:
/*
 * EBYTE LoRa E220
 * send a structured message to the device that have ADDH ADDL CHAN -> 0 DESTINATION_ADDL 23
 *
 * write the int humidity value on serial (or reset device that send default message)
 *
 * You must configure 2 device: one as SENDER (with FIXED SENDER config) and uncomment the relative
 * define with the correct DESTINATION_ADDL, and one as RECEIVER (with FIXED RECEIVER config)
 * and uncomment the relative define with the correct DESTINATION_ADDL.
 *
 * Write a string on serial monitor or reset to resend default value.
 *
 * Pay attention e220 support RSSI, if you want use that functionality you must enable RSSI on configuration
 * configuration.TRANSMISSION_MODE.enableRSSI = RSSI_ENABLED;
 *
 * and uncomment #define ENABLE_RSSI true in this sketch
 *
 * You must uncommend the correct constructor and set the correct AUX_PIN define.
 *
 * by Renzo Mischianti <https://mischianti.org>
 *
 * https://mischianti.org
 *
 * E220		  ----- WeMos D1 mini	----- esp32			----- Arduino Nano 33 IoT	----- Arduino MKR	----- ArduinoUNO
 * M0         ----- D7 (or GND)		----- 19 (or GND)	----- 4 (or GND)			----- 2 (or GND)	----- 7 Volt div (or GND)
 * M1         ----- D6 (or GND)		----- 21 (or GND)	----- 6 (or GND)			----- 4 (or GND)	----- 6 Volt div (or GND)
 * TX         ----- D3 (PullUP)		----- TX2 (PullUP)	----- TX1 (PullUP)			----- 14 (PullUP)	----- 4 (PullUP)
 * RX         ----- D4 (PullUP)		----- RX2 (PullUP)	----- RX1 (PullUP)			----- 13 (PullUP)	----- 5 Volt div (PullUP)
 * AUX        ----- D5 (PullUP)		----- 18  (PullUP)	----- 2  (PullUP)			----- 0  (PullUP)	----- 3 (PullUP)
 * VCC        ----- 3.3v/5v			----- 3.3v/5v		----- 3.3v/5v				----- 3.3v/5v		----- 3.3v/5v
 * GND        ----- GND				----- GND			----- GND					----- GND			----- GND
 *
 */

// With FIXED SENDER configuration
#define DESTINATION_ADDL 3
#define ROOM "Kitchen"

// With FIXED RECEIVER configuration
//#define DESTINATION_ADDL 2
//#define ROOM "Bath"

// If you want use RSSI uncomment //#define ENABLE_RSSI true
// and use relative configuration with RSSI enabled
// #define ENABLE_RSSI true

#include "Arduino.h"
#include "LoRa_E220.h"

// ---------- esp8266 pins --------------
//LoRa_E220 e220ttl(RX, TX, AUX, M0, M1);  // Arduino RX <-- e220 TX, Arduino TX --> e220 RX
//LoRa_E220 e220ttl(D3, D4, D5, D7, D6); // Arduino RX <-- e220 TX, Arduino TX --> e220 RX AUX M0 M1
//LoRa_E220 e220ttl(D2, D3); // Config without connect AUX and M0 M1

//#include <SoftwareSerial.h>
//SoftwareSerial mySerial(D2, D3); // Arduino RX <-- e220 TX, Arduino TX --> e220 RX
//LoRa_E220 e220ttl(&mySerial, D5, D7, D6); // AUX M0 M1
// -------------------------------------

// ---------- Arduino pins --------------
//LoRa_E220 e220ttl(4, 5, 3, 7, 6); // Arduino RX <-- e220 TX, Arduino TX --> e220 RX AUX M0 M1
//LoRa_E220 e220ttl(4, 5); // Config without connect AUX and M0 M1

//#include <SoftwareSerial.h>
//SoftwareSerial mySerial(4, 5); // Arduino RX <-- e220 TX, Arduino TX --> e220 RX
//LoRa_E220 e220ttl(&mySerial, 3, 7, 6); // AUX M0 M1
// -------------------------------------

// ------------- Arduino Nano 33 IoT -------------
// LoRa_E220 e220ttl(&Serial1, 2, 4, 6); //  RX AUX M0 M1
// -------------------------------------------------

// ------------- Arduino MKR WiFi 1010 -------------
// LoRa_E220 e220ttl(&Serial1, 0, 2, 4); //  RX AUX M0 M1
// -------------------------------------------------

// ---------- esp32 pins --------------
 LoRa_E220 e220ttl(&Serial2, 15, 21, 19); //  RX AUX M0 M1

//LoRa_E220 e220ttl(&Serial2, 22, 4, 18, 21, 19, UART_BPS_RATE_9600); //  esp32 RX <-- e220 TX, esp32 TX --> e220 RX AUX M0 M1
// -------------------------------------

struct Message {
	char type[5];
	char message[8];
	float temperature;
};

void setup() {
  Serial.begin(9600);
  delay(500);

  // Startup all pins and UART
  e220ttl.begin();

  Serial.println("Hi, I'm going to send message!");

  struct	Message message = {"TEMP", ROOM, 19.2};

  // Send message
  ResponseStatus rs = e220ttl.sendFixedMessage(0, DESTINATION_ADDL, 23, &message, sizeof(Message));
  // Check If there is some problem of succesfully send
  Serial.println(rs.getResponseDescription());
}

void loop() {
	// If something available
  if (e220ttl.available()>1) {
	  // read the String message
#ifdef ENABLE_RSSI
		ResponseStructContainer rsc = e220ttl.receiveMessageRSSI(sizeof(Message));
#else
		ResponseStructContainer rsc = e220ttl.receiveMessage(sizeof(Message));
#endif

	// Is something goes wrong print error
	if (rsc.status.code!=1){
		Serial.println(rsc.status.getResponseDescription());
	}else{
		// Print the data received
		Serial.println(rsc.status.getResponseDescription());
		struct Message message = *(Message*) rsc.data;
		Serial.println(message.type);
		Serial.println(message.message);
		Serial.println(message.temperature);

#ifdef ENABLE_RSSI
		Serial.print("RSSI: "); Serial.println(rsc.rssi, DEC);
#endif
	}
  }
  if (Serial.available()) {
	  struct Message message = { "TEMP", ROOM, 0 };
	  message.temperature = Serial.parseFloat();

	  // Send message
	  ResponseStatus rs = e220ttl.sendFixedMessage(0, DESTINATION_ADDL, 23, &message, sizeof(Message));
	  // Check If there is some problem of succesfully send
	  Serial.println(rs.getResponseDescription());
  }
}
Ma la vita reale non è così semplice e probabilmente hai più sensori con strutture diverse nella tua casa, quindi devi ricevere varie strutture. Una possibile soluzione è leggere la prima parte della struttura e istanziare il resto come si vuole.
Read a piece of structure
Leggi un pezzo di struttura
Quindi se desideri il TYPE della struttura leggerai:
		// read the String message
		char type[5]; // first part of structure
		ResponseContainer rs = e220ttl.receiveInitialMessage(sizeof(type));
		String typeStr = rs.data;
Con queste informazioni, possiamo creare strutture specifiche da diversi dispositivi, ad esempio:
struct MessageTemperature {
	char type[5];
	char message[8];
	byte temperature[4];
};

[...]

	struct MessageTemperature messageT = { "TEMP", ROOM, 0 };
	*(float*)(messageT.temperature) = 19.2;

	// Send message
	ResponseStatus rsT = e220ttl.sendFixedMessage(0, DESTINATION_ADDL, 23, &messageT, sizeof(MessageTemperature));
	// Check If there is some problem of succesfully send
	Serial.println(rsT.getResponseDescription());
o
struct MessageHumidity {
	char type[5];
	char message[8];
	byte humidity;
};

[...]

	struct MessageHumidity message = { "HUMI", ROOM, 80 };
	// Send message
	ResponseStatus rs = e220ttl.sendFixedMessage(0, DESTINATION_ADDL, 23, &message, sizeof(MessageHumidity));
	// Check If there is some problem of succesfully send
	Serial.println(rs.getResponseDescription());
E così puoi caricare la struttura specificata dal ricevitore:
	// If something available
	if (e220ttl.available() > 1) {
		// read the String message
		char type[5]; // first part of structure
		ResponseContainer rs = e220ttl.receiveInitialMessage(sizeof(type));
		String typeStr = rs.data;

		// Is something goes wrong print error
		if (rs.status.code != 1) {
			Serial.println(rs.status.getResponseDescription());
		} else {
			Serial.println(typeStr);
			if (typeStr == "TEMP") {
				struct MessageTemperaturePartial {
					char message[8];
					byte temperature[4];
				};

				ResponseStructContainer rsc = e220ttl.receiveMessage( sizeof(MessageTemperaturePartial));
				struct MessageTemperaturePartial message = *(MessageTemperaturePartial*) rsc.data;

				Serial.println(*(float*)(message.temperature));
				Serial.println(message.message);
				rsc.close();
			} else if (typeStr == "HUMI") {
				struct MessageHumidityPartial {
					char message[8];
					byte humidity;
				};

				ResponseStructContainer rsc = e220ttl.receiveMessage(sizeof(MessageHumidityPartial));
				struct MessageHumidityPartial message = *(MessageHumidityPartial*) rsc.data;

				Serial.println(message.humidity);
				Serial.println(message.message);
				rsc.close();
			} else {
				Serial.println("Something goes wrong!!");
			}
		}
	}
Qui uno sketch mittente invia umidità e temperatura, leggiamo la prima parte, il tipo, ed eseguiamo il codice corretto per recuperare il resto dei dati:
/*
 * EBYTE LoRa E220
 * send a structured message to the device that have ADDH ADDL CHAN -> 0 DESTINATION_ADDL 23
 *
 * The receiver read the first part of the packet and undestand the type.
 * If the type is HUMI read the message and the humidity as int
 * else read the temperature as float.
 * I use byte array because some microcontroller can have different size for float
 *
 * You must configure 2 device: one as SENDER (with FIXED SENDER config) and uncomment the relative
 * define with the correct DESTINATION_ADDL, and one as RECEIVER (with FIXED RECEIVER config)
 * and uncomment the relative define with the correct DESTINATION_ADDL.
 *
 * Write a string on serial monitor or reset to resend default value.
 *
 * You must uncommend the correct constructor and set the correct AUX_PIN define.
 *
 * by Renzo Mischianti <https://mischianti.org>
 *
 * https://mischianti.org
 *
 * E220		  ----- WeMos D1 mini	----- esp32			----- Arduino Nano 33 IoT	----- Arduino MKR	----- ArduinoUNO
 * M0         ----- D7 (or GND)		----- 19 (or GND)	----- 4 (or GND)			----- 2 (or GND)	----- 7 Volt div (or GND)
 * M1         ----- D6 (or GND)		----- 21 (or GND)	----- 6 (or GND)			----- 4 (or GND)	----- 6 Volt div (or GND)
 * TX         ----- D3 (PullUP)		----- TX2 (PullUP)	----- TX1 (PullUP)			----- 14 (PullUP)	----- 4 (PullUP)
 * RX         ----- D4 (PullUP)		----- RX2 (PullUP)	----- RX1 (PullUP)			----- 13 (PullUP)	----- 5 Volt div (PullUP)
 * AUX        ----- D5 (PullUP)		----- 18  (PullUP)	----- 2  (PullUP)			----- 0  (PullUP)	----- 3 (PullUP)
 * VCC        ----- 3.3v/5v			----- 3.3v/5v		----- 3.3v/5v				----- 3.3v/5v		----- 3.3v/5v
 * GND        ----- GND				----- GND			----- GND					----- GND			----- GND
 *
 */

#define MESSAGE_TYPE "HUMI"

// With FIXED SENDER configuration
//#define DESTINATION_ADDL 3
//#define ROOM "Kitchen"

// With FIXED RECEIVER configuration
#define DESTINATION_ADDL 2
#define ROOM "Bathroo"

// If you want use RSSI uncomment //#define ENABLE_RSSI true
// and use relative configuration with RSSI enabled
// #define ENABLE_RSSI true

#include "Arduino.h"
#include "LoRa_E220.h"

// ---------- esp8266 pins --------------
//LoRa_E220 e220ttl(RX, TX, AUX, M0, M1);  // Arduino RX <-- e220 TX, Arduino TX --> e220 RX
//LoRa_E220 e220ttl(D3, D4, D5, D7, D6); // Arduino RX <-- e220 TX, Arduino TX --> e220 RX AUX M0 M1
//LoRa_E220 e220ttl(D2, D3); // Config without connect AUX and M0 M1

//#include <SoftwareSerial.h>
//SoftwareSerial mySerial(D2, D3); // Arduino RX <-- e220 TX, Arduino TX --> e220 RX
//LoRa_E220 e220ttl(&mySerial, D5, D7, D6); // AUX M0 M1
// -------------------------------------

// ---------- Arduino pins --------------
//LoRa_E220 e220ttl(4, 5, 3, 7, 6); // Arduino RX <-- e220 TX, Arduino TX --> e220 RX AUX M0 M1
//LoRa_E220 e220ttl(4, 5); // Config without connect AUX and M0 M1

//#include <SoftwareSerial.h>
//SoftwareSerial mySerial(4, 5); // Arduino RX <-- e220 TX, Arduino TX --> e220 RX
//LoRa_E220 e220ttl(&mySerial, 3, 7, 6); // AUX M0 M1
// -------------------------------------

// ------------- Arduino Nano 33 IoT -------------
// LoRa_E220 e220ttl(&Serial1, 2, 4, 6); //  RX AUX M0 M1
// -------------------------------------------------

// ------------- Arduino MKR WiFi 1010 -------------
 LoRa_E220 e220ttl(&Serial1, 0, 2, 4); //  RX AUX M0 M1
// -------------------------------------------------

// ---------- esp32 pins --------------
// LoRa_E220 e220ttl(&Serial2, 15, 21, 19); //  RX AUX M0 M1

//LoRa_E220 e220ttl(&Serial2, 22, 4, 18, 21, 19, UART_BPS_RATE_9600); //  esp32 RX <-- e220 TX, esp32 TX --> e220 RX AUX M0 M1
// -------------------------------------

struct MessageTemperature {
	char type[5];
	char message[8];
	byte temperature[4];
};

struct MessageHumidity {
	char type[5];
	char message[8];
	byte humidity;
};

void setup() {
	Serial.begin(9600);
	delay(500);

	// Startup all pins and UART
	e220ttl.begin();

	Serial.println("Hi, I'm going to send message!");

	struct MessageHumidity message = { "HUMI", ROOM, 80 };
	// Send message
	ResponseStatus rs = e220ttl.sendFixedMessage(0, DESTINATION_ADDL, 23, &message, sizeof(MessageHumidity));
	// Check If there is some problem of succesfully send
	Serial.println(rs.getResponseDescription());

	struct MessageTemperature messageT = { "TEMP", ROOM, 0 };
	*(float*)(messageT.temperature) = 19.2;

	// Send message
	ResponseStatus rsT = e220ttl.sendFixedMessage(0, DESTINATION_ADDL, 23, &messageT, sizeof(MessageTemperature));
	// Check If there is some problem of succesfully send
	Serial.println(rsT.getResponseDescription());
}

void loop() {
	// If something available
	if (e220ttl.available() > 1) {
		// read the String message
		char type[5]; // first part of structure
		ResponseContainer rs = e220ttl.receiveInitialMessage(sizeof(type));
		String typeStr = rs.data;

		// Is something goes wrong print error
		if (rs.status.code != 1) {
			Serial.println(rs.status.getResponseDescription());
		} else {
			Serial.println(typeStr);
			if (typeStr == "TEMP") {
				struct MessageTemperaturePartial {
					char message[8];
					byte temperature[4];
				};

				ResponseStructContainer rsc = e220ttl.receiveMessage( sizeof(MessageTemperaturePartial));
				struct MessageTemperaturePartial message = *(MessageTemperaturePartial*) rsc.data;

				Serial.println(*(float*)(message.temperature));
				Serial.println(message.message);
				rsc.close();
			} else if (typeStr == "HUMI") {
				struct MessageHumidityPartial {
					char message[8];
					byte humidity;
				};

				ResponseStructContainer rsc = e220ttl.receiveMessage(sizeof(MessageHumidityPartial));
				struct MessageHumidityPartial message = *(MessageHumidityPartial*) rsc.data;

				Serial.println(message.humidity);
				Serial.println(message.message);
				rsc.close();
			} else {
				Serial.println("Something goes wrong!!");
			}
		}
	}
 	if (Serial.available()) {
 		if (MESSAGE_TYPE == "HUMI") {
 			struct MessageHumidity message = { "HUMI", ROOM, 0 };
 			message.humidity = Serial.parseInt();

 	 		// Send message
 	 		ResponseStatus rs = e220ttl.sendFixedMessage(0, DESTINATION_ADDL, 23, &message, sizeof(MessageHumidity));
 	 		// Check If there is some problem of succesfully send
 	 		Serial.println(rs.getResponseDescription());
 		} else {
 			struct MessageTemperature message = { "TEMP", ROOM, 0 };
 			*(float*)(message.temperature) = Serial.parseFloat();

 	 		// Send message
 	 		ResponseStatus rs = e220ttl.sendFixedMessage(0, DESTINATION_ADDL, 23, &message, sizeof(MessageTemperature));
 	 		// Check If there is some problem of succesfully send
 	 		Serial.println(rs.getResponseDescription());
 		}
 	}
}
Grazie
E questa è stata l’ultima parte del mio piccolo tutorial. Successivamente, esamineremo in dettaglio il risveglio dei microcontrollori, non solo del dispositivo LoRa.
- Ebyte LoRa E220 LLCC68 per Arduino, esp32 o esp8266: specifiche ed utilizzo base
- Ebyte LoRa E220 LLCC68 per Arduino, esp32 o esp8266: libreria
- Ebyte LoRa E220 LLCC68 per Arduino, esp32 o esp8266: configurazione
- Ebyte LoRa E220 LLCC68 per Arduino, esp32 o esp8266: trasmissione fissa, broadcast, monitor e RSSI
- Ebyte LoRa E220 LLCC68 per Arduino, esp32 o esp8266: power saving ed invio di dati strutturati
- Ebyte LoRa E220 LLCC68 per Arduino, esp32 o esp8266: WOR il microcontrollore e lo shield per Arduino
- Ebyte LoRa E220 LLCC68 per Arduino, esp32 o esp8266: WOR il microcontrollore e lo shield per il WeMos D1 mini
- Ebyte LoRa E220 LLCC68 per Arduino, esp32 o esp8266: WOR il microcontrollore e lo shield per l’esp32 dev v1

Shield e PCB
- Mischianti Arduino LoRa shield (Open source)
- Mischianti WeMos LoRa shield (Open source)
- Mischianti ESP32 DOIT DEV KIT v1 shield (Open source)


Grazie per gli ottimi articoli su llcc68.
– mi pare che lo sketch del trasmettitore wor sia uguale allo sketch del ricevitore wor.
Una domanda:
– visto che nel modulo ebyte si può solo impostare l’air data rate ( ma non spread factor/bandwidth/… ) hai verificato, per caso, a quali impostazioni ‘tipo sx1278’ corrispondano?
Ciao Davide,
si è vero, grazie ho sistemato.
No, non ho fatto comparazioni di quel tipo tra i vari dispositivi.
Ciao e grazie ancora Renzo
Buongiorno Renzo,
sto provando a configurare una E220-900T22D con una ESP32 ma ho le seguenti problematiche:
* Se utilizzo il software della Ebyte quando vado a rileggere la configurazione con la tua libreria i parametri settati non coincidono.
* Se carico il codice sulla scheda con il TX collegato ricevo l’errore seguente:
A fatal error occurred: Timed out waiting for packet header
Caricamento non riuscito: errore durante il caricamento: exit status 2
* Se invece carico il codice con il TX scollegato il codice viene caricato correttamente ma ricevo i seguenti errori:
Data size not match!
7
Save mode returned not recognized!
11
No response from device! (Check wiring)
12
Ho effettuato le seguenti verifiche:
* verificato che la tensione sia corretta
* collegato M0 e M1 sia a 3.3 V
* collegato M0 ed M1 ai pin 21 e19
* installato EspSoftwareSerial 7
* libreria scheda ESP32 Arduino 1.0.6
* provato a cambiare sia ESP32 che E200
il problema può derivare dal fatto che utilizzo resistenze da 5 Kohm per collegare TX RX ed AUX a 3.3V?
Quale potrebbe essere la soluzione?
Grazie in anticipo
Ciao Nino,
per il primo problema penso che stai usando la seriale di base per gestire l’E220 e questo fa andare in tilt l’uploader.
per il secondo ho molti topic e issue di questo tipo, e tutti si sono risolti mettendo un’alimentazione adeguata.
Prova ad alimentare esternamente a 5v e fammi sapere.
Ciao RM
Ciao Renzo,
ho risolto.
Spostando Rx e Tx sui pin 16 e 17.
Ora funziona tutto correttamente.
Un’altra domanda al volo.
impostando come canale il 6 ottengo 416MHz .
Visto che mi trovo in Italia dovrei utilizzare un canale diverso per lavorare alla frequenza 868?
Grazie
Per avere la visualizzazione della potenza corretta devi impostarla come descritto qui.
Se non viene modificato il contesto inserisci la define direttamente all’interno di stateNaming.h.
Ciao Renzo
Buongiorno Renzo,
ti confermo che va modificato il file stateNaming.h perchè al suo interno non è prevista l’opzione per l’868 come ti ricopio di seguito.
Grazie come sempre per la tua disponibilità
Buondì,
ahh!! ok, in realtà il valore dovrebbe essere quello del dispositivo nel tuo caso 900.
A questo punto lo fixo e rilascio la libreria aggiornata.
Grazie Renzo