Schede Raspberry Pi Pico e rp2040: WiFiNINA con coprocessore WiFi ESP32
Anche se Raspberry Pi Foundation ha rilasciato la versione Pico W, credo che sia molto utile questo tutorial per aggiungere il WiFi alle schede rp2040 usando gli ESP32.

Ho cercato di trovare la soluzione migliore, che significa funzionalità ed economica, quindi ho subito scartato l’uso di AT esp8266, che è molto limitante, e NINA_B302_ublox o simili, che sono molto costosi.
Ma la soluzione è data dal fornitore che per me è il top, l’Adafruit, che ha creato un dispositivo chiamato Airlift che utilizza semplicemente un ESP32-WROOM-32 di base per fornire una soluzione WiFi completa e potente a un’ampia gamma di dispositivi.
Firmware e libreria
Per lavorare con le schede Raspberry Pi Pico o rp2040, devo fare una correzione e aggiungo una pull request. Se la richiesta pull è confermata, puoi utilizzare Adafruit WiFiNINA, oppure passare alla mia.
Adafruit WiFiNINA
Non possiamo usare il WiFiNINA originale e il firmware NINA-FW originale, ma quello Adafruit.

Dobbiamo scaricare Adafruit WiFiNINA da questo link.
La mia versione con il FIX per rp2040
Ecco la mia versione WiFiNINA che corregge un bug di cast per Raspberry Pi Pico (o rp2040).
Dobbiamo scaricare la mia versione di Adafruit WiFiNINA da questo link.
Firmware esp32
Dopo il download, copialo nella cartella della libreria Arduino.
E il firmware Adafruit nina da qui.
Per caricare il firmware nell’ESP32, è necessario scaricare e utilizzare esptool seguendo questi passaggi.
- Scarica Python.

- Installalo e ricorda di aggiungerlo alla PATH.
- Esegui quanto segue nel tuo terminale:
pip3 install esptool - Caricamento
nina-fwcon esptool
Se stai usando macOS o Linux, esegui il comando seguente, sostituendolo /dev/ttyACM0 con la porta seriale della tua scheda e NINA_W102-1.7.4 con il file binario per fare il flashing su ESP32.
esptool.py --port /dev/ttyACM0 --before no_reset --baud 115200 write_flash 0 NINA_W102-1.7.4.bin
Se stai usando Windows, esegui il seguente comando, sostituendolo COM7 con la porta seriale della tua scheda e NINA_W102-1.6.0 con il file binario per fare il flashing su ESP32
esptool.py --port COM7 --before no_reset --baud 115200 write_flash 0 NINA_W102-1.7.4.bin
Collegamenti
Andiamo a testare la scheda Raspberry Pi Pico; prima testeremo la soluzione con un DOIT ESP32 DEV KIT v1, quindi utilizzeremo direttamente (con un adattatore) ESP32-WROOM-32 e ESP32-S.
Raspberry Pi Pico con DOIT ESP32 DEV KIT v1 come co-processore WiFi
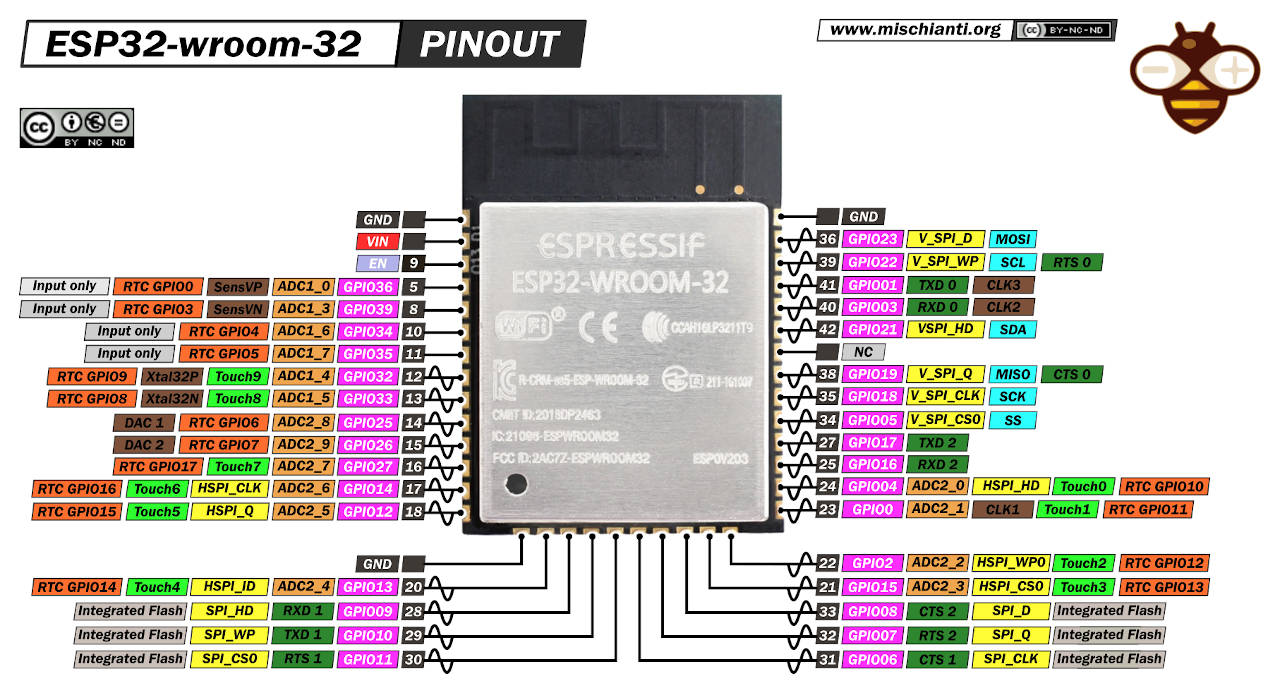
Ecco il pinout delle schede suggerite. Ma attenzione: useremo lo SPI secondario (SPI1) per mantenere libero il primario.
Utilizzeremo un’interfaccia SPI secondaria (SPI1), non quella primaria (SPI).
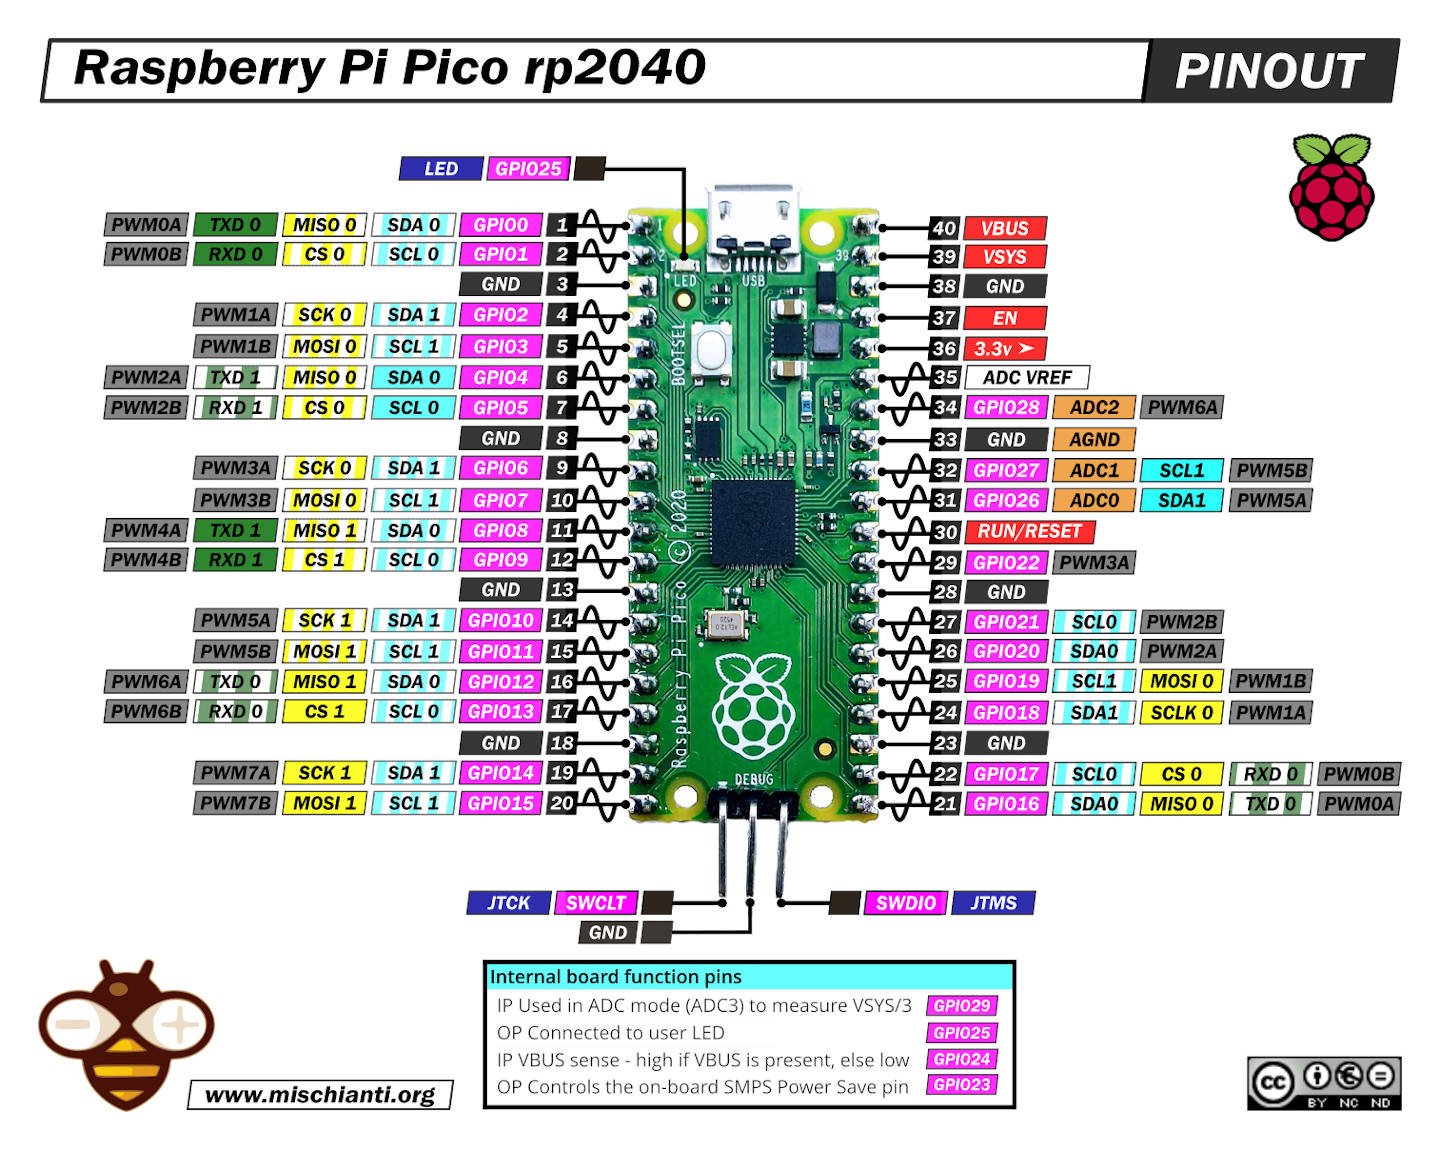
Qui lamia selezione di schede rp2040 Official Pi Pico - Official Pi Pico W - Waveshare rp2040-zero - WeAct Studio rp2040
E per semplificare il cablaggio, useremo una scheda prototipo per l’ESP32.
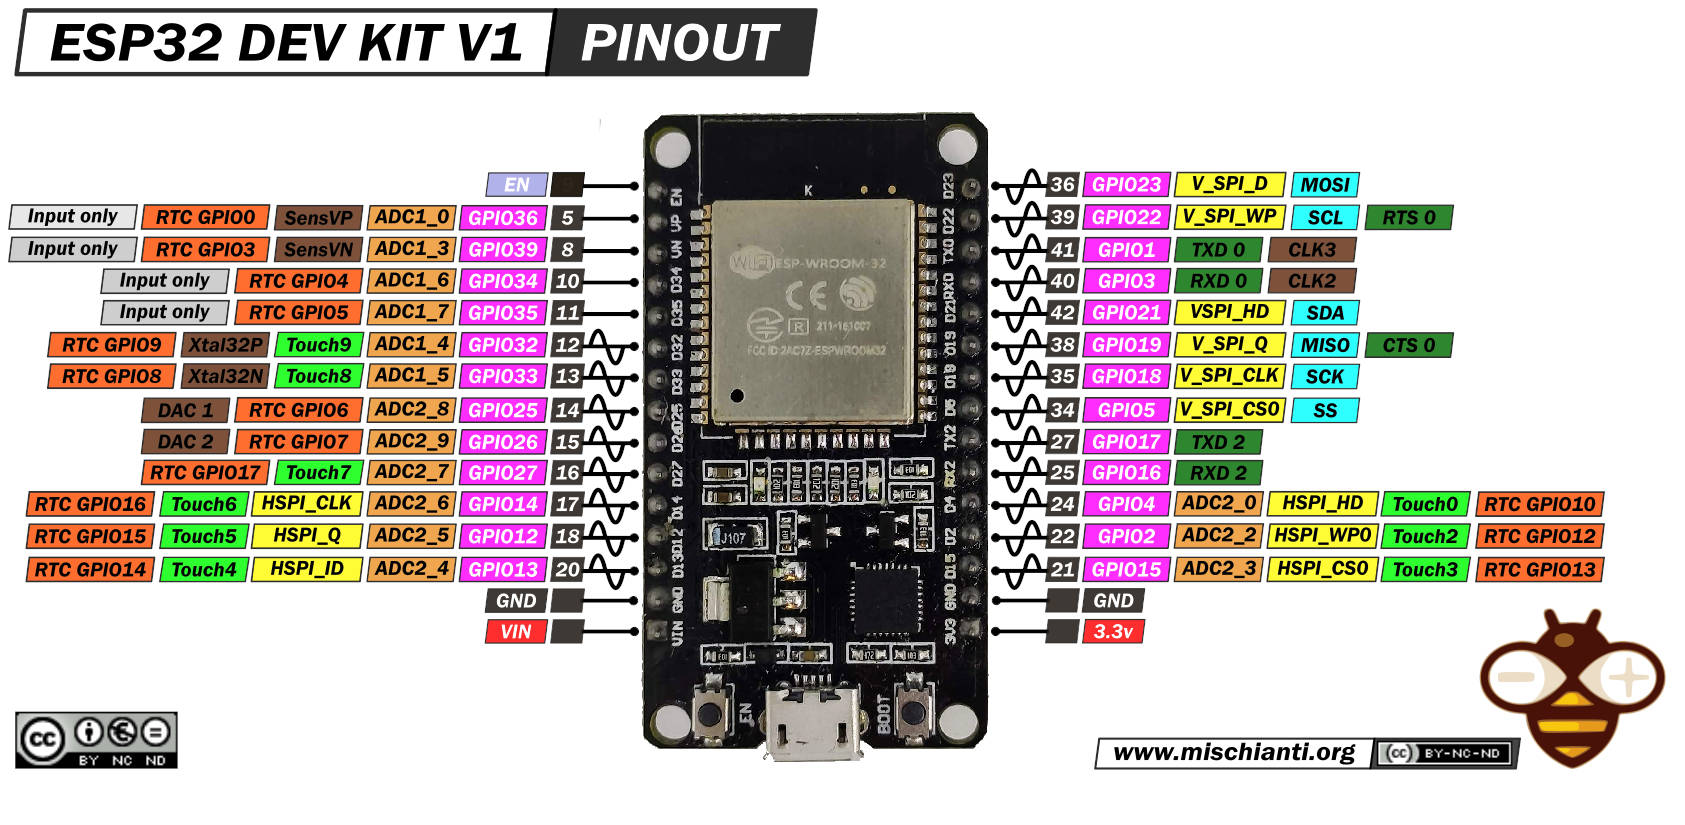
Qui la mia selezione di schede ESP32 ESP32 Dev Kit v1 - TTGO T-Display 1.14 ESP32 - NodeMCU V3 V2 ESP8266 Lolin32 - NodeMCU ESP-32S - WeMos Lolin32 - WeMos Lolin32 mini - ESP32-CAM programmer - ESP32-CAM bundle - ESP32-WROOM-32 - ESP32-S
Per comprendere l’output di nina-fw di Adafruit, possiamo guardare lo schema Airlift.
Come puoi vedere, ci sono alcuni output e input da configurare.
| ESP32 | Microcontroller | Raspberry Pi Pico |
|---|---|---|
| GPIO05 | CS | GPIO13 |
| GPIO18 | SCK | GPIO14 |
| GPIO23 | MISO | GPIO12 |
| GPIO14 | MOSI | GPIO15 |
| GPIO33 | BUSY/READY (IRQ) | GPIO10 |
| EN (reset on LOW) | RST/EN | GPIO11 |
| GND | GND | GND |
| VIN | 3.3v |
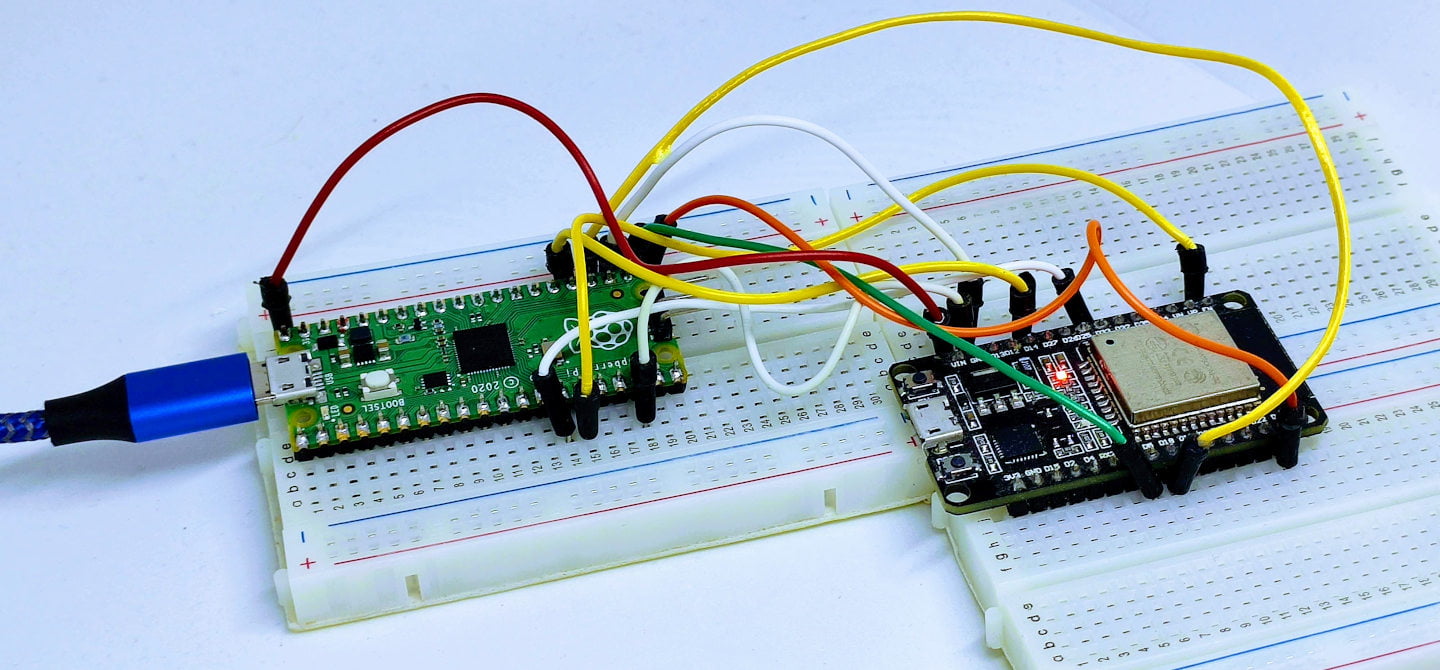
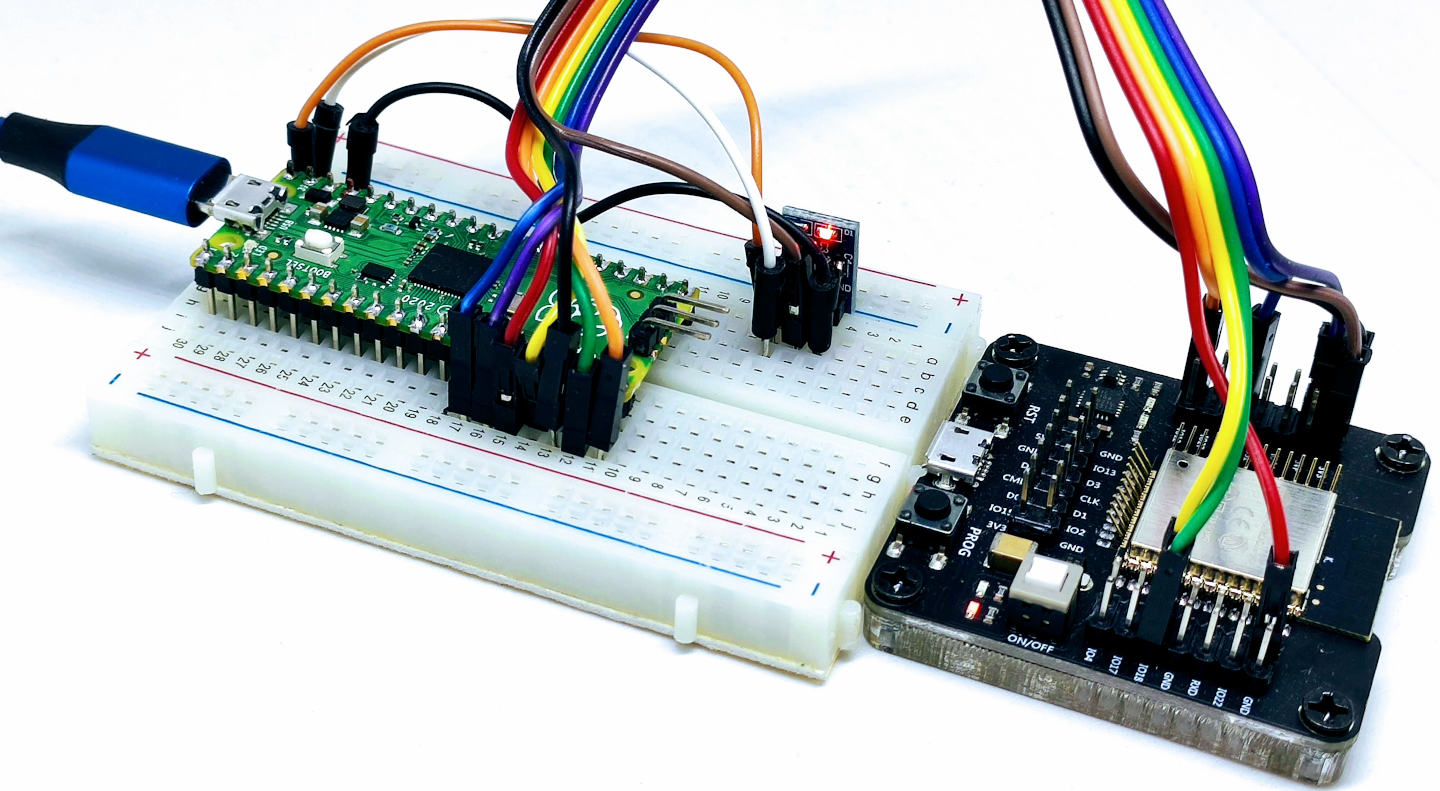
Il risultato è questo.
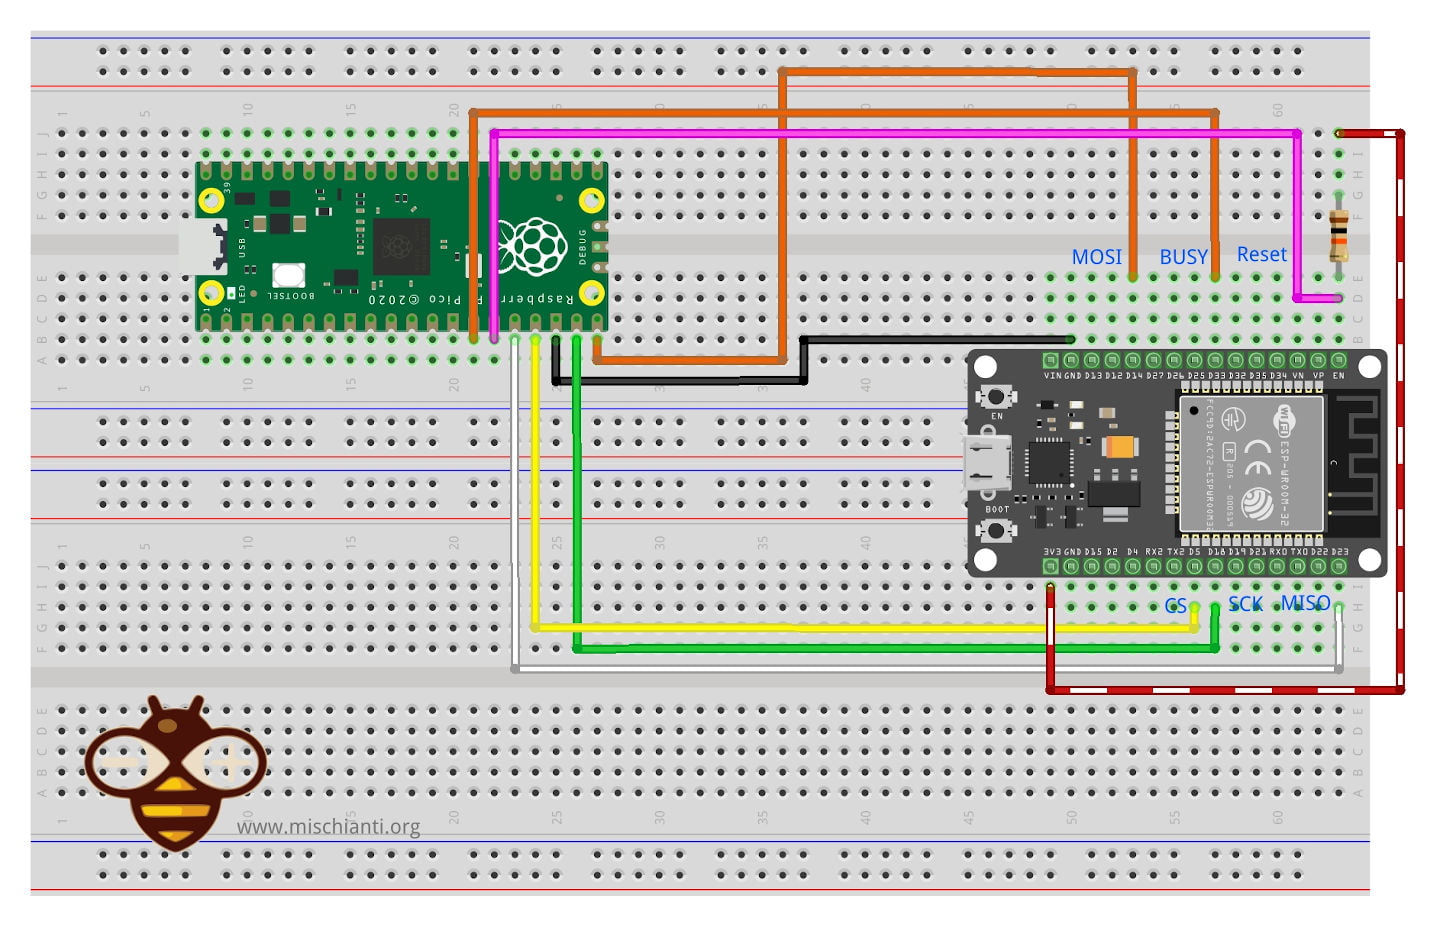
Per alimentare ora l’ESP32, utilizzo una USB direttamente collegata alla relativa porta.
Collegamento dell’interfaccia SPI standard
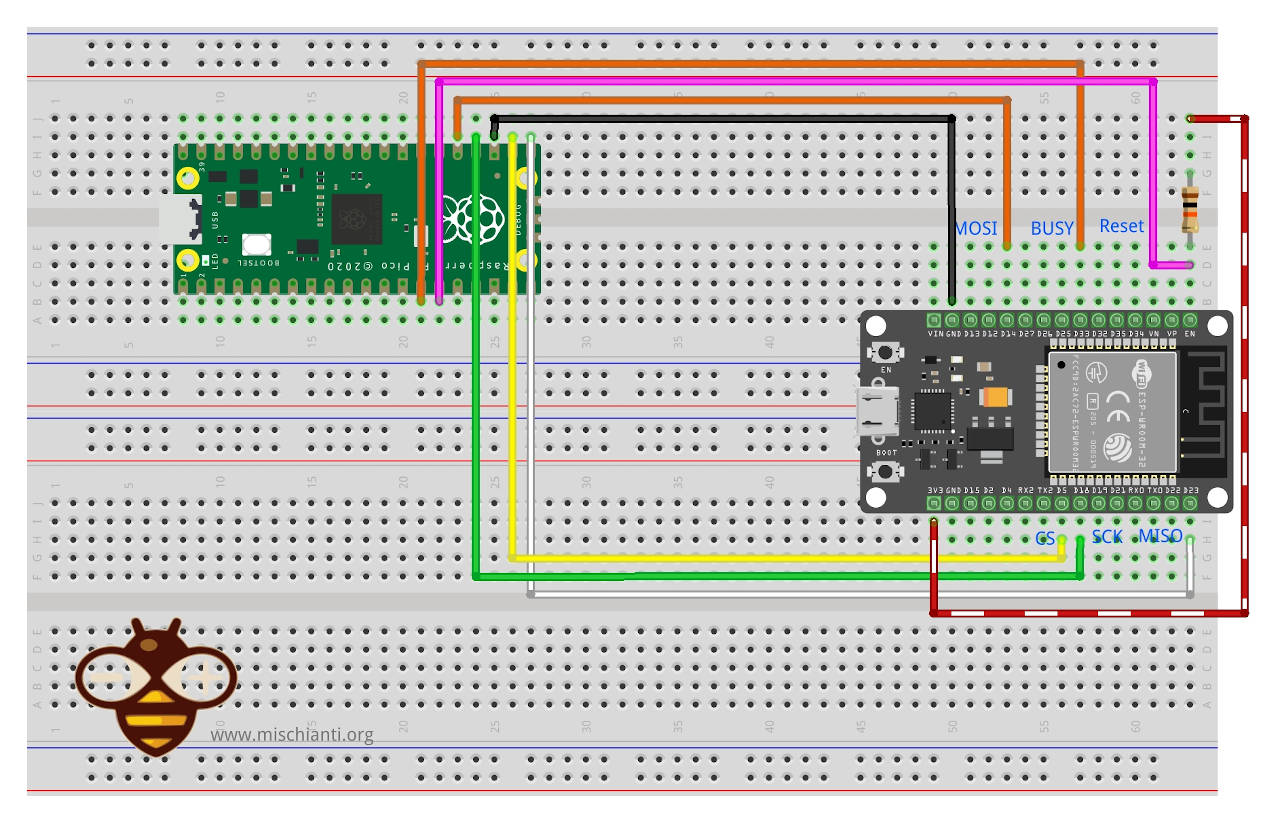
| ESP32 | Microcontroller | Raspberry Pi Pico |
|---|---|---|
| GPIO05 | CS | GPIO17 |
| GPIO18 | SCK | GPIO18 |
| GPIO23 | MISO | GPIO16 |
| GPIO14 | MOSI | GPIO19 |
| GPIO33 | BUSY/READY (IRQ) | GPIO10 |
| EN (reset on LOW) | RST/EN | GPIO11 |
| GND | GND | GND |
| VIN | 3.3v |
Collegamento di un esp32-wroom-32
Naturalmente, vogliamo utilizzare il singolo chip ESP32 invece di una scheda prototipo. Per utilizzare il chip singolo, abbiamo bisogno di un adattatore e possiamo seguire gli articoli precedenti a riguardo “ESP32-wroom-32, esp32-S: flash, piedinatura, spec e config dell’IDE Arduino“.
Ecco la mia selezione di ESP32 ESP32 Dev Kit v1 - TTGO T-Display 1.14 ESP32 - NodeMCU V3 V2 ESP8266 Lolin32 - NodeMCU ESP-32S - WeMos Lolin32 - WeMos Lolin32 mini - ESP32-CAM programmer - ESP32-CAM bundle - ESP32-WROOM-32 - ESP32-S
Qui la scheda per programmare Aliexpress adapter esp8266 esp32
Ecco lo schema di collegamento base.
| ESP32 | Microcontroller | Raspberry Pi Pico |
|---|---|---|
| GPIO05 | CS | GPIO13 |
| GPIO18 | SCK | GPIO14 |
| GPIO23 | MISO | GPIO12 |
| GPIO14 | MOSI | GPIO15 |
| GPIO33 | BUSY/READY (IRQ) | GPIO10 |
| EN (reset on LOW) | RST/EN | GPIO11 |
| GND | GND | GND |
| VIN | 3.3v |

Il cablaggio è simile, ma utilizzeremo un singolo alimentatore Pico con un regolatore di tensione.
| ESP32 | Description | Raspberry Pi Pico |
|---|---|---|
| GPIO05 | CS | GPIO13 |
| GPIO18 | SCK | GPIO14 |
| GPIO23 | MISO | GPIO12 |
| GPIO14 | MOSI | GPIO15 |
| GPIO33 | BUSY/READY (IRQ) | GPIO10 |
| EN (reset on LOW) | RST/EN | GPIO11 |
| GPIO0 (Flash) | Flash | (not needed) |
| GND | GND | GND |
| VIN | 3.3v | From 5v to a voltage regulator |
Il risultato è in questo schema.
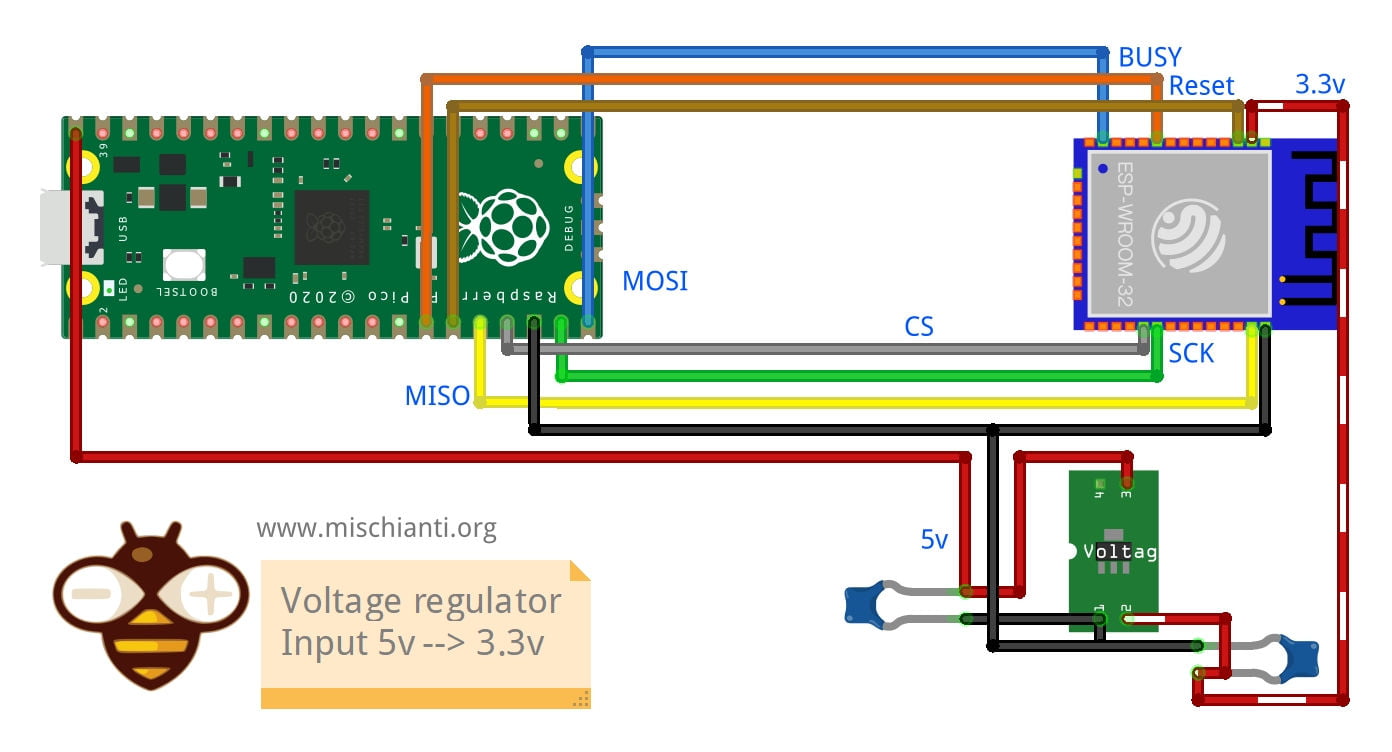
Qui i moduli per la regolazione di voltaggio Aliexpress 4 pin - Aliexpress 3 pin
Qui gli IC per regolare il voltaggio AliExpress SMD (AMS1117) - AliExpress 3.3v (LM1117) - AliExpress 5v (7805) - AliExpress 9v (7809)AliExpress 12v (7812) - AliExpress 3.3v TO-92 (78L33)
Codice
Ora, dopo aver scaricato l’Adafruit WiFiNINA, scaricato e caricato su esp32 il nina-fw e fatto tutto il cablaggio, possiamo provare a testare se il coprocessore comunica bene.
Sketch di controllo del firmware
Innanzitutto lo sketch chiede la versione del firmware installato sull’ESP32.
/*
 * This example check if the firmware loaded on the NINA module
 * is updated.
 *
 * modified by Renzo Mischianti <www.mischianti.org>
 *
 * www.mischianti.org
 *
 */
#include <SPI.h>
#include <WiFiNINA.h>

// Configure the pins used for the ESP32 connection
#if defined(ADAFRUIT_FEATHER_M4_EXPRESS) || \
  defined(ADAFRUIT_FEATHER_M0) || \
  defined(ADAFRUIT_FEATHER_M0_EXPRESS) || \
  defined(ARDUINO_AVR_FEATHER32U4) || \
  defined(ARDUINO_NRF52840_FEATHER) || \
  defined(ADAFRUIT_ITSYBITSY_M0) || \
  defined(ADAFRUIT_ITSYBITSY_M4_EXPRESS) || \
  defined(ARDUINO_AVR_ITSYBITSY32U4_3V) || \
  defined(ARDUINO_NRF52_ITSYBITSY)
  // Configure the pins used for the ESP32 connection
  #define SPIWIFI       SPI  // The SPI port
  #define SPIWIFI_SS    13   // Chip select pin
  #define ESP32_RESETN  12   // Reset pin
  #define SPIWIFI_ACK   11   // a.k.a BUSY or READY pin
  #define ESP32_GPIO0   -1
#elif defined(ARDUINO_AVR_FEATHER328P)
  #define SPIWIFI       SPI  // The SPI port
  #define SPIWIFI_SS     4   // Chip select pin
  #define ESP32_RESETN   3   // Reset pin
  #define SPIWIFI_ACK    2   // a.k.a BUSY or READY pin
  #define ESP32_GPIO0   -1
#elif defined(TEENSYDUINO)
  #define SPIWIFI       SPI  // The SPI port
  #define SPIWIFI_SS     5   // Chip select pin
  #define ESP32_RESETN   6   // Reset pin
  #define SPIWIFI_ACK    9   // a.k.a BUSY or READY pin
  #define ESP32_GPIO0   -1
#elif defined(ARDUINO_NRF52832_FEATHER )
  #define SPIWIFI       SPI  // The SPI port
  #define SPIWIFI_SS    16   // Chip select pin
  #define ESP32_RESETN  15   // Reset pin
  #define SPIWIFI_ACK    7   // a.k.a BUSY or READY pin
  #define ESP32_GPIO0   -1
#elif defined(ARDUINO_ARCH_STM32) // Here my STM32 configuration
  #define SPIWIFI       SPI  // The SPI port
  #define SPIWIFI_SS    PB0   // Chip select pin
  #define ESP32_RESETN  PA2   // Reset pin
  #define SPIWIFI_ACK   PA3   // a.k.a BUSY or READY pin
  #define ESP32_GPIO0   -1
#elif defined(ARDUINO_ARCH_RP2040) // Here my STM32 configuration
  #define SPIWIFI       SPI1  // The SPI port
  #define SPIWIFI_SS    13   // Chip select pin
  #define ESP32_RESETN  11   // Reset pin
  #define SPIWIFI_ACK   10   // a.k.a BUSY or READY pin
  #define ESP32_GPIO0   -1
#elif !defined(SPIWIFI_SS)   // if the wifi definition isnt in the board variant
  // Don't change the names of these #define's! they match the variant ones
  #define SPIWIFI       SPI
  #define SPIWIFI_SS    10   // Chip select pin
  #define SPIWIFI_ACK    7   // a.k.a BUSY or READY pin
  #define ESP32_RESETN   5   // Reset pin
  #define ESP32_GPIO0   -1   // Not connected
#endif

void setup() {
  // Initialize serial
  Serial.begin(9600);
  while (!Serial) {
    ; // wait for serial port to connect. Needed for native USB port only
  }

  // Print a welcome message
  Serial.println("WiFiNINA firmware check.");
  Serial.println();

  // Set up the pins!
  WiFi.setPins(SPIWIFI_SS, SPIWIFI_ACK, ESP32_RESETN, ESP32_GPIO0, &SPIWIFI);

  // check for the WiFi module:
  if (WiFi.status() == WL_NO_MODULE) {
    Serial.println("Communication with WiFi module failed!");
    // don't continue
    while (true);
  }

  // Print firmware version on the module
  String fv = WiFi.firmwareVersion();
  String latestFv;
  Serial.print("Firmware version installed: ");
  Serial.println(fv);

  latestFv = WIFI_FIRMWARE_LATEST_VERSION;

  // Print required firmware version
  Serial.print("Latest firmware version available : ");
  Serial.println(latestFv);

  // Check if the latest version is installed
  Serial.println();
  if (fv >= latestFv) {
    Serial.println("Check result: PASSED");
  } else {
    Serial.println("Check result: NOT PASSED");
    Serial.println(" - The firmware version on the module do not match the");
    Serial.println("   version required by the library, you may experience");
    Serial.println("   issues or failures.");
  }
}

void loop() {
  // do nothing
}
Lo sketch è lo stesso dell’originale WiFiNINA tranne per la possibilità di definire i pin. Questa caratteristica è fondamentale per utilizzare il WiFi sul nostro microcontrollore.
  // Set up the pins!
  WiFi.setPins(SPIWIFI_SS, SPIWIFI_ACK, ESP32_RESETN, ESP32_GPIO0, &SPIWIFI);
L’output dello sketch è:
Firmware version installed: 1.7.4
Latest firmware version available : 1.2.1

Check result: PASSED
Sketch scansione della rete WiFi
Uno sketch per trovare tutte le reti vicine al dispositivo, con il relativo RSSI e tipo di crittografia.
/*

 This example  prints the board's MAC address, and
 scans for available Wifi networks using the NINA module.
 Every ten seconds, it scans again. It doesn't actually
 connect to any network, so no encryption scheme is specified.

 Circuit:
 * Board with NINA firmware on it (In this case its an Adafruit AirLift)

 created 13 July 2010
 by dlf (Metodo2 srl)
 modified 21 Junn 2012
 by Tom Igoe and Jaymes Dec
 modified 17 May 2022
 by Renzo Mischianti

 */


#include <SPI.h>
#include <WiFiNINA.h>

 // Configure the pins used for the ESP32 connection
 #if defined(ADAFRUIT_FEATHER_M4_EXPRESS) || \
   defined(ADAFRUIT_FEATHER_M0) || \
   defined(ADAFRUIT_FEATHER_M0_EXPRESS) || \
   defined(ARDUINO_AVR_FEATHER32U4) || \
   defined(ARDUINO_NRF52840_FEATHER) || \
   defined(ADAFRUIT_ITSYBITSY_M0) || \
   defined(ADAFRUIT_ITSYBITSY_M4_EXPRESS) || \
   defined(ARDUINO_AVR_ITSYBITSY32U4_3V) || \
   defined(ARDUINO_NRF52_ITSYBITSY)
   // Configure the pins used for the ESP32 connection
   #define SPIWIFI       SPI  // The SPI port
   #define SPIWIFI_SS    13   // Chip select pin
   #define ESP32_RESETN  12   // Reset pin
   #define SPIWIFI_ACK   11   // a.k.a BUSY or READY pin
   #define ESP32_GPIO0   -1
 #elif defined(ARDUINO_AVR_FEATHER328P)
   #define SPIWIFI       SPI  // The SPI port
   #define SPIWIFI_SS     4   // Chip select pin
   #define ESP32_RESETN   3   // Reset pin
   #define SPIWIFI_ACK    2   // a.k.a BUSY or READY pin
   #define ESP32_GPIO0   -1
 #elif defined(TEENSYDUINO)
   #define SPIWIFI       SPI  // The SPI port
   #define SPIWIFI_SS     5   // Chip select pin
   #define ESP32_RESETN   6   // Reset pin
   #define SPIWIFI_ACK    9   // a.k.a BUSY or READY pin
   #define ESP32_GPIO0   -1
 #elif defined(ARDUINO_NRF52832_FEATHER )
   #define SPIWIFI       SPI  // The SPI port
   #define SPIWIFI_SS    16   // Chip select pin
   #define ESP32_RESETN  15   // Reset pin
   #define SPIWIFI_ACK    7   // a.k.a BUSY or READY pin
   #define ESP32_GPIO0   -1
 #elif defined(ARDUINO_ARCH_STM32) // Here my STM32 configuration
   #define SPIWIFI       SPI  // The SPI port
   #define SPIWIFI_SS    PB0   // Chip select pin
   #define ESP32_RESETN  PA2   // Reset pin
   #define SPIWIFI_ACK   PA3   // a.k.a BUSY or READY pin
   #define ESP32_GPIO0   -1
 #elif defined(ARDUINO_ARCH_RP2040) // Here my STM32 configuration
   #define SPIWIFI       SPI1  // The SPI port
   #define SPIWIFI_SS    13   // Chip select pin
   #define ESP32_RESETN  11   // Reset pin
   #define SPIWIFI_ACK   10   // a.k.a BUSY or READY pin
   #define ESP32_GPIO0   -1
 #elif !defined(SPIWIFI_SS)   // if the wifi definition isnt in the board variant
   // Don't change the names of these #define's! they match the variant ones
   #define SPIWIFI       SPI
   #define SPIWIFI_SS    10   // Chip select pin
   #define SPIWIFI_ACK    7   // a.k.a BUSY or READY pin
   #define ESP32_RESETN   5   // Reset pin
   #define ESP32_GPIO0   -1   // Not connected
 #endif

void printMacAddress(byte mac[]);
void printEncryptionType(int thisType);
void listNetworks();

void setup() {
  //Initialize serial and wait for port to open:
  Serial.begin(9600);
  while (!Serial) {
    ; // wait for serial port to connect. Needed for native USB port only
  }

  Serial.println("WiFi Scanning test");

  // Set up the pins!
  WiFi.setPins(SPIWIFI_SS, SPIWIFI_ACK, ESP32_RESETN, ESP32_GPIO0, &SPIWIFI);

  // check for the WiFi module:
  while (WiFi.status() == WL_NO_MODULE) {
    Serial.println("Communication with WiFi module failed!");
    // don't continue
    delay(10000);
  }
  String fv = WiFi.firmwareVersion();
  Serial.println(fv);
  if (fv < "1.0.0") {
    Serial.println("Please upgrade the firmware");
    while (1) delay(10);
  }
  Serial.println("Firmware OK");

  // print your MAC address:
  byte mac[6];
  WiFi.macAddress(mac);
  Serial.print("MAC: ");
  printMacAddress(mac);
}

void loop() {
  // scan for existing networks:
  Serial.println("Scanning available networks...");
  listNetworks();
  delay(10000);
}

void listNetworks() {
  // scan for nearby networks:
  Serial.println("** Scan Networks **");
  int numSsid = WiFi.scanNetworks();
  if (numSsid == -1) {
    Serial.println("Couldn't get a wifi connection");
    while (true);
  }

  // print the list of networks seen:
  Serial.print("number of available networks:");
  Serial.println(numSsid);

  // print the network number and name for each network found:
  for (int thisNet = 0; thisNet < numSsid; thisNet++) {
    Serial.print(thisNet);
    Serial.print(") ");
    Serial.print(WiFi.SSID(thisNet));
    Serial.print("\tSignal: ");
    Serial.print(WiFi.RSSI(thisNet));
    Serial.print(" dBm");
    Serial.print("\tEncryption: ");
    printEncryptionType(WiFi.encryptionType(thisNet));
  }
}

void printEncryptionType(int thisType) {
  // read the encryption type and print out the name:
  switch (thisType) {
    case ENC_TYPE_WEP:
      Serial.println("WEP");
      break;
    case ENC_TYPE_TKIP:
      Serial.println("WPA");
      break;
    case ENC_TYPE_CCMP:
      Serial.println("WPA2");
      break;
    case ENC_TYPE_NONE:
      Serial.println("None");
      break;
    case ENC_TYPE_AUTO:
      Serial.println("Auto");
      break;
    case ENC_TYPE_UNKNOWN:
    default:
      Serial.println("Unknown");
      break;
  }
}


void printMacAddress(byte mac[]) {
  for (int i = 5; i >= 0; i--) {
    if (mac[i] < 16) {
      Serial.print("0");
    }
    Serial.print(mac[i], HEX);
    if (i > 0) {
      Serial.print(":");
    }
  }
  Serial.println();
}
Puoi utilizzare la libreria WiFiNINA per scoprire tutte le reti e il risultato nel mio caso è:
Scanning available networks...
** Scan Networks **
number of available networks:6
0) reef-casa-sopra	Signal: -49 dBm	Encryption: WPA2
1) reef-casa-orto	Signal: -69 dBm	Encryption: WPA2
2) reef-casa-centro	Signal: -78 dBm	Encryption: WPA2
3) reef-casa-centro	Signal: -83 dBm	Encryption: WPA2
4) reef-casa-sotto	Signal: -87 dBm	Encryption: WPA2
5) TIM-18355607	Signal: -91 dBm	Encryption: WPA2
Server web semplice
Ora creeremo un server Web di base che risponda sulla root del dispositivo.
Ecco il semplice sketch.
/*
  Simple WiFi Web Server
  You must add your SSID and PASSWD.
  You can open in the browser the IP given in the standard output
  and the device response with a row web page that give you the IP
  and the time in milliseconds.
  The page refresh every 5 seconds.

  by Renzo Mischianti <www.mischianti.org>

  https://www.mischianti.org

 */


#include <SPI.h>
#include <WiFiNINA.h>

// Use secondary SPI interface
#define SPIWIFI       SPI1  // The SPI port
#define SPIWIFI_SS    13   // Chip select pin
#define ESP32_RESETN  11   // Reset pin
#define SPIWIFI_ACK   10   // a.k.a BUSY or READY pin
#define ESP32_GPIO0   -1
// USE standard SPI interface
//#define SPIWIFI       SPI  // The SPI port
//#define SPIWIFI_SS    17   // Chip select pin
//#define ESP32_RESETN  11   // Reset pin
//#define SPIWIFI_ACK   10   // a.k.a BUSY or READY pin
//#define ESP32_GPIO0   -1

#define SECRET_SSID "<YOUR-SSID>";
#define SECRET_PASS  "<YOUR-PASSWD>";


///////please enter your sensitive data in the Secret tab/arduino_secrets.h
char ssid[] = SECRET_SSID;        // your network SSID (name)
char pass[] = SECRET_PASS;    // your network password (use for WPA, or use as key for WEP)
int keyIndex = 0;                 // your network key index number (needed only for WEP)

int status = WL_IDLE_STATUS;

WiFiServer server(80);

void printWifiStatus();

void setup() {
  //Initialize serial and wait for port to open:
  Serial.begin(9600);
  while (!Serial) {
    ; // wait for serial port to connect. Needed for native USB port only
  }
//  SPI1.beginTransaction(SPISettings(20000000, MSBFIRST, SPI_MODE0));

  WiFi.setPins(SPIWIFI_SS, SPIWIFI_ACK, ESP32_RESETN, ESP32_GPIO0, &SPIWIFI);

  // Print a welcome message
  Serial.println("WiFiNINA firmware check.");
  Serial.println();

  // check for the WiFi module:
  if (WiFi.status() == WL_NO_MODULE) {
    Serial.println("Communication with WiFi module failed!");
    // don't continue
    while (true);
  }

  // Print firmware version on the module
  String fv = WiFi.firmwareVersion();
  String latestFv;
  Serial.print("Firmware version installed: ");
  Serial.println(fv);

  latestFv = WIFI_FIRMWARE_LATEST_VERSION;

  // Print required firmware version
  Serial.print("Latest firmware version available : ");
  Serial.println(latestFv);

  // Check if the latest version is installed
  Serial.println();
  if (fv >= latestFv) {
    Serial.println("Check result: PASSED");
  } else {
    Serial.println("Check result: NOT PASSED");
    Serial.println(" - The firmware version on the module do not match the");
    Serial.println("   version required by the library, you may experience");
    Serial.println("   issues or failures.");
  }


  // check for the WiFi module:
  if (WiFi.status() == WL_NO_MODULE) {
    Serial.println("Communication with WiFi module failed!");
    // don't continue
    while (true);
  }

  if (fv < WIFI_FIRMWARE_LATEST_VERSION) {
    Serial.println("Please upgrade the firmware");
  }

  // attempt to connect to WiFi network:
  while (status != WL_CONNECTED) {
    Serial.print("Attempting to connect to SSID: ");
    Serial.println(ssid);
    // Connect to WPA/WPA2 network. Change this line if using open or WEP network:
    status = WiFi.begin(ssid, pass);

    // wait 10 seconds for connection:
    for (int i = 10;i>0;i--){
      delay(1000);
      Serial.print(" . ");
      Serial.print(i);
    }
    Serial.println();
  }
  Serial.println(" OK");

  server.begin();
  delay(1000);
  // you're connected now, so print out the status:
  printWifiStatus();
}

void loop() {
  // listen for incoming clients
  WiFiClient client = server.available();
  if (client && client.connected()) {
    Serial.println("new client");
    // an HTTP request ends with a blank line
    bool currentLineIsBlank = true;
    while (client.connected()) {
      if (client.available()) {
        char c = client.read();
        Serial.write(c);
        // if you've gotten to the end of the line (received a newline
        // character) and the line is blank, the HTTP request has ended,
        // so you can send a reply
        if (c == '\n' && currentLineIsBlank) {
          Serial.println("Start response!");

          // send a standard HTTP response header
          client.println(F("HTTP/1.1 200 OK"));
          client.println(F("Content-Type: text/html"));
          client.println(F("Connection: close"));  // the connection will be closed after completion of the response
          client.println(F("Refresh: 5"));  // refresh the page automatically every 5 sec
          client.println();
          client.println(F("<!DOCTYPE HTML>"));
           client.println(F("<html>"));
           client.println(F("<body>"));

           client.println(F("<h2>Raspberry Pi Pico WiFiNINA server</h2>"));
           client.println("<br /><br />");

           client.println("Refresh every 5 seconds<br />");

           client.print("IP address:");WiFi.localIP().printTo(client);
           client.println("<br /><br />");

           client.print("millis ");
           client.print(millis());
           client.println("<br />");

           client.println("</body>");
           client.println("</html>");
          Serial.println("Stop response!");

          // client.flush();
          break;
        }
        if (c == '\n') {
          // you're starting a new line
          currentLineIsBlank = true;
        } else if (c != '\r') {
          // you've gotten a character on the current line
          currentLineIsBlank = false;
        }
      }
    }
    // give the web browser time to receive the data
    delay(1);

    // close the connection:
    client.stop();
    // server.flush();
    Serial.println("client disconnected");
    delay(1000);
  }
}

void printWifiStatus() {
  // print the SSID of the network you're attached to:
  Serial.print("SSID: ");
  Serial.println(WiFi.SSID());

  // print your board's IP address:
  IPAddress ip = WiFi.localIP();
  Serial.print("IP Address: ");
  Serial.println(ip);

  // print the received signal strength:
  long rssi = WiFi.RSSI();
  Serial.print("signal strength (RSSI):");
  Serial.print(rssi);
  Serial.println(" dBm");
}
Nello sketch attiveremo un server sulla porta 80 (standard per il protocollo HTTP).
WiFiServer server(80);
Quindi, nel ciclo, controlliamo costantemente se c’è una richiesta del client.
WiFiClient client = server.available();
Se troviamo un client ed è connesso, leggeremo la richiesta.
    while (client.connected()) {
      if (client.available()) {
        char c = client.read();
        Serial.write(c);
Al termine della richiesta, stamperemo la risposta.
        if (c == '\n' && currentLineIsBlank) {
          Serial.println("Start response!");

          // send a standard HTTP response header
          client.println(F("HTTP/1.1 200 OK"));
          client.println(F("Content-Type: text/html"));
          client.println(F("Connection: close"));  // the connection will be closed after completion of the response
          client.println(F("Refresh: 5"));  // refresh the page automatically every 5 sec
          client.println();
          client.println(F("<!DOCTYPE HTML>"));
           client.println(F("<html>"));
           client.println(F("<body>"));

           client.println(F("<h2>Raspberry Pi Pico WiFiNINA server</h2>"));
           client.println("<br /><br />");

           client.println("Refresh every 5 seconds<br />");

           client.print("IP address:");WiFi.localIP().printTo(client);
           client.println("<br /><br />");

           client.print("millis ");
           client.print(millis());
           client.println("<br />");

           client.println("</body>");
           client.println("</html>");
          Serial.println("Stop response!");

          // client.flush();
          break;
        }
L’output della console all’avvio è
WiFiNINA firmware check.

Firmware version installed: 1.7.4
Latest firmware version available : 1.2.1

Check result: PASSED
Attempting to connect to SSID: reef-casa-sopra
 . 10 . 9 . 8 . 7 . 6 . 5 . 4 . 3 . 2 . 1
 OK
SSID: reef-casa-sopra
IP Address: 192.168.1.104
signal strength (RSSI):-48 dBm
Quando apri l’URL http://192.168.1.104 nel browser, il risultato è
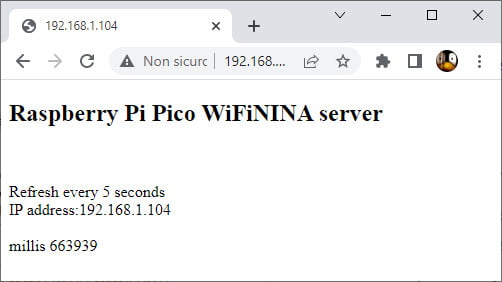
Nella console, stampa la richiesta e l’avviso di risposta.
new client
GET / HTTP/1.1
Host: 192.168.1.104
Connection: keep-alive
Upgrade-Insecure-Requests: 1
User-Agent: Mozilla/5.0 (Windows NT 10.0; Win64; x64) AppleWebKit/537.36 (KHTML, like Gecko) Chrome/105.0.0.0 Safari/537.36
Accept: text/html,application/xhtml+xml,application/xml;q=0.9,image/avif,image/webp,image/apng,*/*;q=0.8,application/signed-exchange;v=b3;q=0.9
Accept-Encoding: gzip, deflate
Accept-Language: it-IT,it;q=0.9,en-US;q=0.8,en;q=0.7,zh-CN;q=0.6,zh;q=0.5

Start response!
Stop response!
client disconnected
Semplice Web Server con pagina HTML di array di byte
Prima di tutto, hai bisogno di una pagina HTML.
<!DOCTYPE html>
<html lang="en">
<head>
    <meta charset="UTF-8">
    <title>Demo index page</title>
</head>
<body style="background-color: azure">
    <h1 style="text-align: center">Here the demo page</h1>
    <h2 style="text-align: center">www.mischianti.org</h2>
    <div style="text-align: justify">

    </div>
    Lorem ipsum dolor sit amet, consectetur adipiscing elit. Integer nec odio. Praesent libero. Sed cursus ante dapibus diam. Sed nisi. Nulla quis sem at nibh elementum imperdiet. Duis sagittis ipsum. Praesent mauris. Fusce nec tellus sed augue semper porta. Mauris massa. Vestibulum lacinia arcu eget nulla. Class aptent taciti sociosqu ad litora torquent per conubia nostra, per inceptos himenaeos. Curabitur sodales ligula in libero. Sed dignissim lacinia nunc. Curabitur tortor. Pellentesque nibh. Aenean quam. In scelerisque sem at dolor. Maecenas mattis. Sed convallis tristique sem. Proin ut ligula vel nunc egestas porttitor. Morbi lectus risus, iaculis vel, suscipit quis, luctus non, massa. Fusce ac turpis quis ligula lacinia aliquet. Mauris ipsum. Nulla metus metus, ullamcorper vel, tincidunt sed, euismod in, nibh.
    </div>
</body>
</html>
Copia il codice HTML in un file e chiamalo index.html, quindi utilizza il convertitore per generare un array di byte.
Utilizzo di un convertitore da file a array.
Puoi usare una semplice utility per creare un array compatto da un file, vado ad aggiungere qui il convertitore usato in esp32-cam, per esempio,
filetoarray "index.html" > web_index.h
ad un repository (aggiungo il file exe che nel repository originale non è presente) e con questo programma il file diventa.
// Filename web_index.h
// File stored is index.html, Size: 1187
#define index_html_len 1187
const uint8_t index_html[] PROGMEM = {
 0x3C, 0x21, 0x44, 0x4F, 0x43, 0x54, 0x59, 0x50, 0x45, 0x20, 0x68, 0x74, 0x6D, 0x6C, 0x3E, 0x0D,
 0x0A, 0x3C, 0x68, 0x74, 0x6D, 0x6C, 0x20, 0x6C, 0x61, 0x6E, 0x67, 0x3D, 0x22, 0x65, 0x6E, 0x22,
 0x3E, 0x0D, 0x0A, 0x3C, 0x68, 0x65, 0x61, 0x64, 0x3E, 0x0D, 0x0A, 0x20, 0x20, 0x20, 0x20, 0x3C,
 0x6D, 0x65, 0x74, 0x61, 0x20, 0x63, 0x68, 0x61, 0x72, 0x73, 0x65, 0x74, 0x3D, 0x22, 0x55, 0x54,
 0x46, 0x2D, 0x38, 0x22, 0x3E, 0x0D, 0x0A, 0x20, 0x20, 0x20, 0x20, 0x3C, 0x74, 0x69, 0x74, 0x6C,
 0x65, 0x3E, 0x44, 0x65, 0x6D, 0x6F, 0x20, 0x69, 0x6E, 0x64, 0x65, 0x78, 0x20, 0x70, 0x61, 0x67,
 0x65, 0x3C, 0x2F, 0x74, 0x69, 0x74, 0x6C, 0x65, 0x3E, 0x0D, 0x0A, 0x3C, 0x2F, 0x68, 0x65, 0x61,
 0x64, 0x3E, 0x0D, 0x0A, 0x3C, 0x62, 0x6F, 0x64, 0x79, 0x20, 0x73, 0x74, 0x79, 0x6C, 0x65, 0x3D,
 0x22, 0x62, 0x61, 0x63, 0x6B, 0x67, 0x72, 0x6F, 0x75, 0x6E, 0x64, 0x2D, 0x63, 0x6F, 0x6C, 0x6F,
 0x72, 0x3A, 0x20, 0x61, 0x7A, 0x75, 0x72, 0x65, 0x22, 0x3E, 0x0D, 0x0A, 0x20, 0x20, 0x20, 0x20,
 0x3C, 0x68, 0x31, 0x20, 0x73, 0x74, 0x79, 0x6C, 0x65, 0x3D, 0x22, 0x74, 0x65, 0x78, 0x74, 0x2D,
 0x61, 0x6C, 0x69, 0x67, 0x6E, 0x3A, 0x20, 0x63, 0x65, 0x6E, 0x74, 0x65, 0x72, 0x22, 0x3E, 0x48,
 0x65, 0x72, 0x65, 0x20, 0x74, 0x68, 0x65, 0x20, 0x64, 0x65, 0x6D, 0x6F, 0x20, 0x70, 0x61, 0x67,
 0x65, 0x3C, 0x2F, 0x68, 0x31, 0x3E, 0x0D, 0x0A, 0x20, 0x20, 0x20, 0x20, 0x3C, 0x68, 0x32, 0x20,
 0x73, 0x74, 0x79, 0x6C, 0x65, 0x3D, 0x22, 0x74, 0x65, 0x78, 0x74, 0x2D, 0x61, 0x6C, 0x69, 0x67,
 0x6E, 0x3A, 0x20, 0x63, 0x65, 0x6E, 0x74, 0x65, 0x72, 0x22, 0x3E, 0x77, 0x77, 0x77, 0x2E, 0x6D,
 0x69, 0x73, 0x63, 0x68, 0x69, 0x61, 0x6E, 0x74, 0x69, 0x2E, 0x6F, 0x72, 0x67, 0x3C, 0x2F, 0x68,
 0x32, 0x3E, 0x0D, 0x0A, 0x20, 0x20, 0x20, 0x20, 0x3C, 0x64, 0x69, 0x76, 0x20, 0x73, 0x74, 0x79,
 0x6C, 0x65, 0x3D, 0x22, 0x74, 0x65, 0x78, 0x74, 0x2D, 0x61, 0x6C, 0x69, 0x67, 0x6E, 0x3A, 0x20,
 0x6A, 0x75, 0x73, 0x74, 0x69, 0x66, 0x79, 0x22, 0x3E, 0x0D, 0x0A, 0x0D, 0x0A, 0x20, 0x20, 0x20,
 0x20, 0x3C, 0x2F, 0x64, 0x69, 0x76, 0x3E, 0x0D, 0x0A, 0x20, 0x20, 0x20, 0x20, 0x4C, 0x6F, 0x72,
 0x65, 0x6D, 0x20, 0x69, 0x70, 0x73, 0x75, 0x6D, 0x20, 0x64, 0x6F, 0x6C, 0x6F, 0x72, 0x20, 0x73,
 0x69, 0x74, 0x20, 0x61, 0x6D, 0x65, 0x74, 0x2C, 0x20, 0x63, 0x6F, 0x6E, 0x73, 0x65, 0x63, 0x74,
 0x65, 0x74, 0x75, 0x72, 0x20, 0x61, 0x64, 0x69, 0x70, 0x69, 0x73, 0x63, 0x69, 0x6E, 0x67, 0x20,
 0x65, 0x6C, 0x69, 0x74, 0x2E, 0x20, 0x49, 0x6E, 0x74, 0x65, 0x67, 0x65, 0x72, 0x20, 0x6E, 0x65,
 0x63, 0x20, 0x6F, 0x64, 0x69, 0x6F, 0x2E, 0x20, 0x50, 0x72, 0x61, 0x65, 0x73, 0x65, 0x6E, 0x74,
 0x20, 0x6C, 0x69, 0x62, 0x65, 0x72, 0x6F, 0x2E, 0x20, 0x53, 0x65, 0x64, 0x20, 0x63, 0x75, 0x72,
 0x73, 0x75, 0x73, 0x20, 0x61, 0x6E, 0x74, 0x65, 0x20, 0x64, 0x61, 0x70, 0x69, 0x62, 0x75, 0x73,
 0x20, 0x64, 0x69, 0x61, 0x6D, 0x2E, 0x20, 0x53, 0x65, 0x64, 0x20, 0x6E, 0x69, 0x73, 0x69, 0x2E,
 0x20, 0x4E, 0x75, 0x6C, 0x6C, 0x61, 0x20, 0x71, 0x75, 0x69, 0x73, 0x20, 0x73, 0x65, 0x6D, 0x20,
 0x61, 0x74, 0x20, 0x6E, 0x69, 0x62, 0x68, 0x20, 0x65, 0x6C, 0x65, 0x6D, 0x65, 0x6E, 0x74, 0x75,
 0x6D, 0x20, 0x69, 0x6D, 0x70, 0x65, 0x72, 0x64, 0x69, 0x65, 0x74, 0x2E, 0x20, 0x44, 0x75, 0x69,
 0x73, 0x20, 0x73, 0x61, 0x67, 0x69, 0x74, 0x74, 0x69, 0x73, 0x20, 0x69, 0x70, 0x73, 0x75, 0x6D,
 0x2E, 0x20, 0x50, 0x72, 0x61, 0x65, 0x73, 0x65, 0x6E, 0x74, 0x20, 0x6D, 0x61, 0x75, 0x72, 0x69,
 0x73, 0x2E, 0x20, 0x46, 0x75, 0x73, 0x63, 0x65, 0x20, 0x6E, 0x65, 0x63, 0x20, 0x74, 0x65, 0x6C,
 0x6C, 0x75, 0x73, 0x20, 0x73, 0x65, 0x64, 0x20, 0x61, 0x75, 0x67, 0x75, 0x65, 0x20, 0x73, 0x65,
 0x6D, 0x70, 0x65, 0x72, 0x20, 0x70, 0x6F, 0x72, 0x74, 0x61, 0x2E, 0x20, 0x4D, 0x61, 0x75, 0x72,
 0x69, 0x73, 0x20, 0x6D, 0x61, 0x73, 0x73, 0x61, 0x2E, 0x20, 0x56, 0x65, 0x73, 0x74, 0x69, 0x62,
 0x75, 0x6C, 0x75, 0x6D, 0x20, 0x6C, 0x61, 0x63, 0x69, 0x6E, 0x69, 0x61, 0x20, 0x61, 0x72, 0x63,
 0x75, 0x20, 0x65, 0x67, 0x65, 0x74, 0x20, 0x6E, 0x75, 0x6C, 0x6C, 0x61, 0x2E, 0x20, 0x43, 0x6C,
 0x61, 0x73, 0x73, 0x20, 0x61, 0x70, 0x74, 0x65, 0x6E, 0x74, 0x20, 0x74, 0x61, 0x63, 0x69, 0x74,
 0x69, 0x20, 0x73, 0x6F, 0x63, 0x69, 0x6F, 0x73, 0x71, 0x75, 0x20, 0x61, 0x64, 0x20, 0x6C, 0x69,
 0x74, 0x6F, 0x72, 0x61, 0x20, 0x74, 0x6F, 0x72, 0x71, 0x75, 0x65, 0x6E, 0x74, 0x20, 0x70, 0x65,
 0x72, 0x20, 0x63, 0x6F, 0x6E, 0x75, 0x62, 0x69, 0x61, 0x20, 0x6E, 0x6F, 0x73, 0x74, 0x72, 0x61,
 0x2C, 0x20, 0x70, 0x65, 0x72, 0x20, 0x69, 0x6E, 0x63, 0x65, 0x70, 0x74, 0x6F, 0x73, 0x20, 0x68,
 0x69, 0x6D, 0x65, 0x6E, 0x61, 0x65, 0x6F, 0x73, 0x2E, 0x20, 0x43, 0x75, 0x72, 0x61, 0x62, 0x69,
 0x74, 0x75, 0x72, 0x20, 0x73, 0x6F, 0x64, 0x61, 0x6C, 0x65, 0x73, 0x20, 0x6C, 0x69, 0x67, 0x75,
 0x6C, 0x61, 0x20, 0x69, 0x6E, 0x20, 0x6C, 0x69, 0x62, 0x65, 0x72, 0x6F, 0x2E, 0x20, 0x53, 0x65,
 0x64, 0x20, 0x64, 0x69, 0x67, 0x6E, 0x69, 0x73, 0x73, 0x69, 0x6D, 0x20, 0x6C, 0x61, 0x63, 0x69,
 0x6E, 0x69, 0x61, 0x20, 0x6E, 0x75, 0x6E, 0x63, 0x2E, 0x20, 0x43, 0x75, 0x72, 0x61, 0x62, 0x69,
 0x74, 0x75, 0x72, 0x20, 0x74, 0x6F, 0x72, 0x74, 0x6F, 0x72, 0x2E, 0x20, 0x50, 0x65, 0x6C, 0x6C,
 0x65, 0x6E, 0x74, 0x65, 0x73, 0x71, 0x75, 0x65, 0x20, 0x6E, 0x69, 0x62, 0x68, 0x2E, 0x20, 0x41,
 0x65, 0x6E, 0x65, 0x61, 0x6E, 0x20, 0x71, 0x75, 0x61, 0x6D, 0x2E, 0x20, 0x49, 0x6E, 0x20, 0x73,
 0x63, 0x65, 0x6C, 0x65, 0x72, 0x69, 0x73, 0x71, 0x75, 0x65, 0x20, 0x73, 0x65, 0x6D, 0x20, 0x61,
 0x74, 0x20, 0x64, 0x6F, 0x6C, 0x6F, 0x72, 0x2E, 0x20, 0x4D, 0x61, 0x65, 0x63, 0x65, 0x6E, 0x61,
 0x73, 0x20, 0x6D, 0x61, 0x74, 0x74, 0x69, 0x73, 0x2E, 0x20, 0x53, 0x65, 0x64, 0x20, 0x63, 0x6F,
 0x6E, 0x76, 0x61, 0x6C, 0x6C, 0x69, 0x73, 0x20, 0x74, 0x72, 0x69, 0x73, 0x74, 0x69, 0x71, 0x75,
 0x65, 0x20, 0x73, 0x65, 0x6D, 0x2E, 0x20, 0x50, 0x72, 0x6F, 0x69, 0x6E, 0x20, 0x75, 0x74, 0x20,
 0x6C, 0x69, 0x67, 0x75, 0x6C, 0x61, 0x20, 0x76, 0x65, 0x6C, 0x20, 0x6E, 0x75, 0x6E, 0x63, 0x20,
 0x65, 0x67, 0x65, 0x73, 0x74, 0x61, 0x73, 0x20, 0x70, 0x6F, 0x72, 0x74, 0x74, 0x69, 0x74, 0x6F,
 0x72, 0x2E, 0x20, 0x4D, 0x6F, 0x72, 0x62, 0x69, 0x20, 0x6C, 0x65, 0x63, 0x74, 0x75, 0x73, 0x20,
 0x72, 0x69, 0x73, 0x75, 0x73, 0x2C, 0x20, 0x69, 0x61, 0x63, 0x75, 0x6C, 0x69, 0x73, 0x20, 0x76,
 0x65, 0x6C, 0x2C, 0x20, 0x73, 0x75, 0x73, 0x63, 0x69, 0x70, 0x69, 0x74, 0x20, 0x71, 0x75, 0x69,
 0x73, 0x2C, 0x20, 0x6C, 0x75, 0x63, 0x74, 0x75, 0x73, 0x20, 0x6E, 0x6F, 0x6E, 0x2C, 0x20, 0x6D,
 0x61, 0x73, 0x73, 0x61, 0x2E, 0x20, 0x46, 0x75, 0x73, 0x63, 0x65, 0x20, 0x61, 0x63, 0x20, 0x74,
 0x75, 0x72, 0x70, 0x69, 0x73, 0x20, 0x71, 0x75, 0x69, 0x73, 0x20, 0x6C, 0x69, 0x67, 0x75, 0x6C,
 0x61, 0x20, 0x6C, 0x61, 0x63, 0x69, 0x6E, 0x69, 0x61, 0x20, 0x61, 0x6C, 0x69, 0x71, 0x75, 0x65,
 0x74, 0x2E, 0x20, 0x4D, 0x61, 0x75, 0x72, 0x69, 0x73, 0x20, 0x69, 0x70, 0x73, 0x75, 0x6D, 0x2E,
 0x20, 0x4E, 0x75, 0x6C, 0x6C, 0x61, 0x20, 0x6D, 0x65, 0x74, 0x75, 0x73, 0x20, 0x6D, 0x65, 0x74,
 0x75, 0x73, 0x2C, 0x20, 0x75, 0x6C, 0x6C, 0x61, 0x6D, 0x63, 0x6F, 0x72, 0x70, 0x65, 0x72, 0x20,
 0x76, 0x65, 0x6C, 0x2C, 0x20, 0x74, 0x69, 0x6E, 0x63, 0x69, 0x64, 0x75, 0x6E, 0x74, 0x20, 0x73,
 0x65, 0x64, 0x2C, 0x20, 0x65, 0x75, 0x69, 0x73, 0x6D, 0x6F, 0x64, 0x20, 0x69, 0x6E, 0x2C, 0x20,
 0x6E, 0x69, 0x62, 0x68, 0x2E, 0x0D, 0x0A, 0x20, 0x20, 0x20, 0x20, 0x3C, 0x2F, 0x64, 0x69, 0x76,
 0x3E, 0x0D, 0x0A, 0x3C, 0x2F, 0x62, 0x6F, 0x64, 0x79, 0x3E, 0x0D, 0x0A, 0x3C, 0x2F, 0x68, 0x74,
 0x6D, 0x6C, 0x3E
};
Ho scritto un semplice script HTML per semplificare il processo, caricare e copiare il risultato all’interno del file web_index.h.
Filearray converter
Select file
Generated filearray
Devi aggiungere il file web_index.h all’interno della cartella principale del progetto Arduino e ora puoi eseguire lo streaming del file in questo modo
/*
  Simple WiFi Web Server
  You must add your SSID and PASSWD.
  You can open in the browser the IP given in the standard output
  and the device response with a byte array web page that give you the IP
  and the time in milliseconds.
  The page refresh every 5 seconds.

  by Renzo Mischianti <www.mischianti.org>

  https://www.mischianti.org

 */


#include <SPI.h>
#include <WiFiNINA.h>
#include "web_index.h"

// Use secondary SPI interface
//#define SPIWIFI       SPI1  // The SPI port
//#define SPIWIFI_SS    13   // Chip select pin
//#define ESP32_RESETN  11   // Reset pin
//#define SPIWIFI_ACK   10   // a.k.a BUSY or READY pin
//#define ESP32_GPIO0   -1
// USE standard SPI interface
#define SPIWIFI       SPI  // The SPI port
#define SPIWIFI_SS    17   // Chip select pin
#define ESP32_RESETN  11   // Reset pin
#define SPIWIFI_ACK   10   // a.k.a BUSY or READY pin
#define ESP32_GPIO0   -1

#define SECRET_SSID "<YOUR-SSID>";
#define SECRET_PASS  "<YOUR-PASSWD>";


///////please enter your sensitive data in the Secret tab/arduino_secrets.h
char ssid[] = SECRET_SSID;        // your network SSID (name)
char pass[] = SECRET_PASS;    // your network password (use for WPA, or use as key for WEP)
int keyIndex = 0;                 // your network key index number (needed only for WEP)

int status = WL_IDLE_STATUS;

WiFiServer server(80);

void printWifiStatus();

void setup() {
  //Initialize serial and wait for port to open:
  Serial.begin(9600);
  while (!Serial) {
    ; // wait for serial port to connect. Needed for native USB port only
  }

  WiFi.setPins(SPIWIFI_SS, SPIWIFI_ACK, ESP32_RESETN, ESP32_GPIO0, &SPIWIFI);

  // Print a welcome message
  Serial.println("WiFiNINA firmware check.");
  Serial.println();

  // check for the WiFi module:
  if (WiFi.status() == WL_NO_MODULE) {
    Serial.println("Communication with WiFi module failed!");
    // don't continue
    while (true);
  }

  // Print firmware version on the module
  String fv = WiFi.firmwareVersion();
  String latestFv;
  Serial.print("Firmware version installed: ");
  Serial.println(fv);

  latestFv = WIFI_FIRMWARE_LATEST_VERSION;

  // Print required firmware version
  Serial.print("Latest firmware version available : ");
  Serial.println(latestFv);

  // Check if the latest version is installed
  Serial.println();
  if (fv >= latestFv) {
    Serial.println("Check result: PASSED");
  } else {
    Serial.println("Check result: NOT PASSED");
    Serial.println(" - The firmware version on the module do not match the");
    Serial.println("   version required by the library, you may experience");
    Serial.println("   issues or failures.");
  }


  // check for the WiFi module:
  if (WiFi.status() == WL_NO_MODULE) {
    Serial.println("Communication with WiFi module failed!");
    // don't continue
    while (true);
  }

  if (fv < WIFI_FIRMWARE_LATEST_VERSION) {
    Serial.println("Please upgrade the firmware");
  }

  // attempt to connect to WiFi network:
  while (status != WL_CONNECTED) {
    Serial.print("Attempting to connect to SSID: ");
    Serial.println(ssid);
    // Connect to WPA/WPA2 network. Change this line if using open or WEP network:
    status = WiFi.begin(ssid, pass);

    // wait 10 seconds for connection:
    for (int i = 10;i>0;i--){
      delay(1000);
      Serial.print(" . ");
      Serial.print(i);
    }
    Serial.println();
  }
  Serial.println(" OK");

  server.begin();
  // you're connected now, so print out the status:
  printWifiStatus();
}

void loop() {
  // listen for incoming clients
  WiFiClient client = server.available();
  if (client && client.connected()) {
    Serial.println("new client");
    // an HTTP request ends with a blank line
    bool currentLineIsBlank = true;
    while (client.connected()) {
      if (client.available()) {
        char c = client.read();
        Serial.write(c);
        // if you've gotten to the end of the line (received a newline
        // character) and the line is blank, the HTTP request has ended,
        // so you can send a reply
        if (c == '\n' && currentLineIsBlank) {
          Serial.println("Start response!");

          // send a standard HTTP response header
          client.println(F("HTTP/1.1 200 OK"));
          client.println(F("Content-Type: text/html"));
          client.println(F("Connection: close"));  // the connection will be closed after completion of the response
          client.println(F("Refresh: 5"));  // refresh the page automatically every 5 sec
          client.println();

           client.write(index_html, index_html_len);

           client.println();
          Serial.println("Stop response!");

          // client.flush();
          break;
        }
        if (c == '\n') {
          // you're starting a new line
          currentLineIsBlank = true;
        } else if (c != '\r') {
          // you've gotten a character on the current line
          currentLineIsBlank = false;
        }
      }
    }
    // give the web browser time to receive the data
    delay(1);

    // close the connection:
    client.stop();
    // server.flush();
    Serial.println("client disconnected");
    delay(1000);
  }
}

void printWifiStatus() {
  // print the SSID of the network you're attached to:
  Serial.print("SSID: ");
  Serial.println(WiFi.SSID());

  // print your board's IP address:
  IPAddress ip = WiFi.localIP();
  Serial.print("IP Address: ");
  Serial.println(ip);

  // print the received signal strength:
  long rssi = WiFi.RSSI();
  Serial.print("signal strength (RSSI):");
  Serial.print(rssi);
  Serial.println(" dBm");
}
Ed ecco la pagina web nel browser.

Grazie
- Schede Raspberry Pi Pico e rp2040: pinout, specifiche e configurazione IDE Arduino
- Schede Raspberry Pi Pico e rp2040: filesystem LittleFS integrato
- Scheda Raspberry Pi Pico e rp2040: ethernet w5500 e requests HTTP e HTTPS (SSL)
- Schede Raspberry Pi Pico e rp2040: WiFiNINA con coprocessore WiFi ESP32
- Schede Raspberry Pi Pico e rp2040: come utilizzare una scheda SD
- Dallas ds18b20