
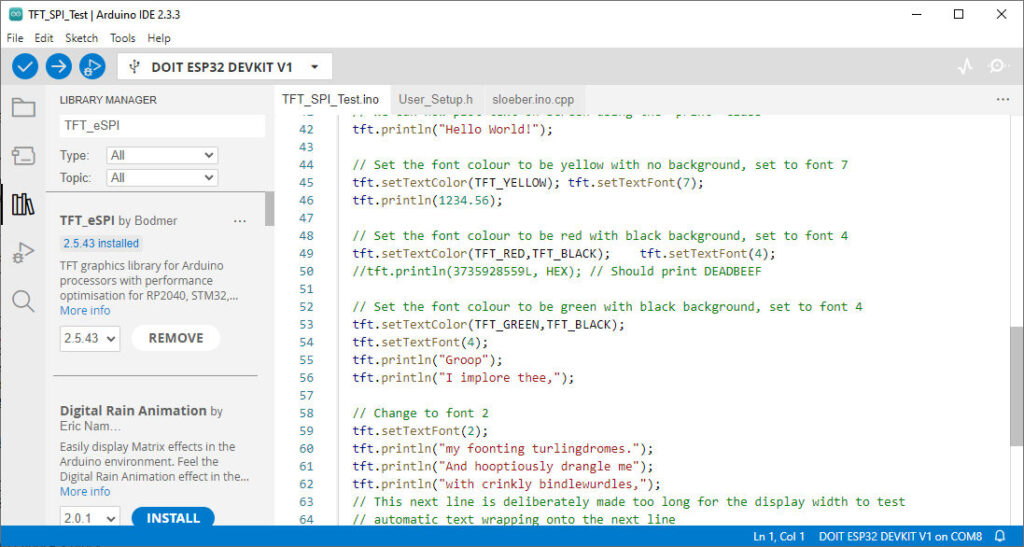
Come integrare la funzionalità touch screen nel display TFT ILI9341
Nel nostro precedente articolo, “Utilizzo di un display ILI9341 con la libreria TFT_eSPI”, abbiamo esplorato le capacità del display TFT ILI9341. Abbiamo trattato tutto, dall’inizializzazione di base e disegno di grafica fino alla configurazione della libreria e al cablaggio del display con un ESP32. Basandoci su queste basi, questo articolo fa un ulteriore passo avanti integrando la funzionalità touchscreen nel vostro progetto. Con l’aggiunta del tocco, potete creare interfacce interattive—come tastiere virtuali e pannelli di controllo—per migliorare ulteriormente i vostri progetti.
Prima di addentrarci nei dettagli specifici del touch, rivediamo gli schemi di cablaggio del precedente articolo per assicurarci che la nostra configurazione hardware rimanga coerente.
Cablaggio
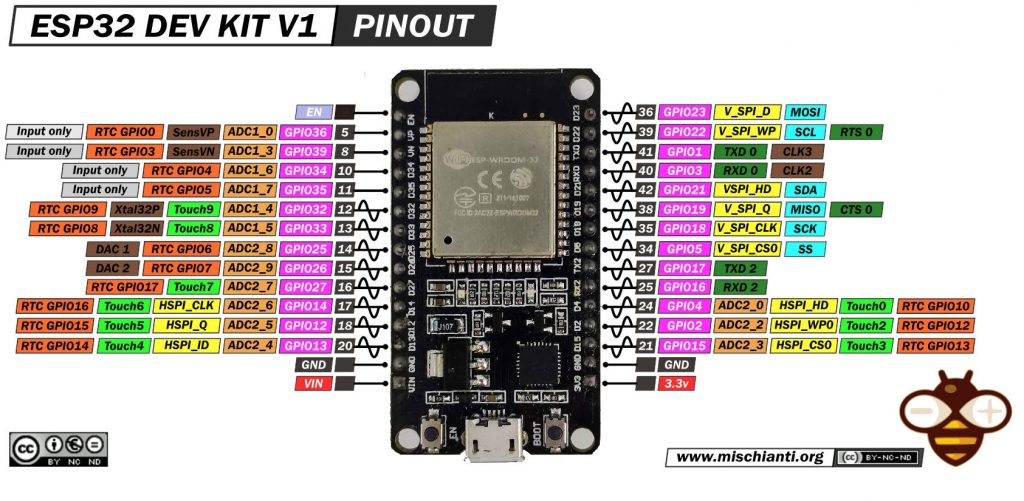
Per questo test useremo un DOIT ESP32 DevKit V1. Questo dispositivo è molto diffuso e semplice.
Ecco dove acquistare la mia selezione di ESP32 ESP32 Dev Kit v1 - TTGO T-Display 1.14 ESP32 - NodeMCU V3 V2 ESP8266 Lolin32 - NodeMCU ESP-32S - WeMos Lolin32 - WeMos Lolin32 mini - ESP32-CAM programmer - ESP32-CAM bundle - ESP32-WROOM-32 - ESP32-S - ESP32-WROOM-32 - ESP32 2.8 Inch Touch ESP32-2432S028
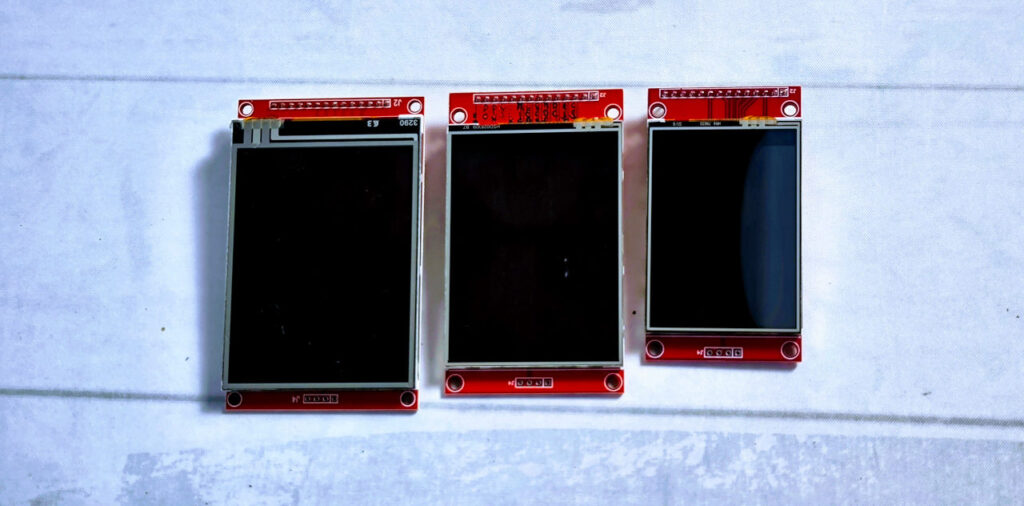
L’ILI9143 è disponibile in vari formati.
Ecco dove acquistare la mia selezione di Display 240 * 320 ILI9341 2,8 - from 320 * 240 ILI9341 from 2,2 to 3,5 - TFT Round 240 * 240 GC9A01 1,28" - CrowPanel ESP32-C3 240*240 Round IPS Display Capacitive Touch 1,28" - Aliexpress CrowPanel ESP32-C3 240*240 Round IPS Display Capacitive Touch 1,28"- ESP32 2.8 Inch Touch ESP32-2432S028
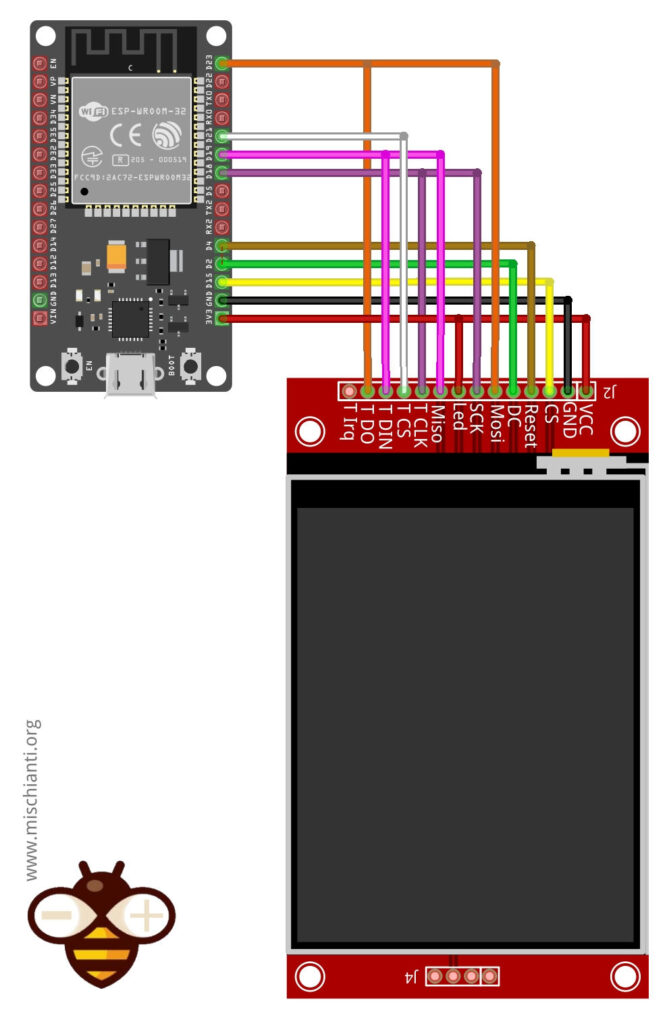
L’ILI9341 usa SPI per comunicare con l’ESP32. Di seguito la configurazione di cablaggio standard:
| Pin TFT ILI9341 | Pin ESP32 | Descrizione |
|---|---|---|
| VCC | 3,3V (con J1 saldato) o 5V | Alimentazione |
| GND | GND | Massa |
| CS | GPIO15 | Selezione chip (TFT_CS) |
| RESET | GPIO4 | Reset display |
| DC | GPIO2 | Dati/Comando (TFT_DC) |
| SDI (MOSI) | GPIO23 | MOSI SPI |
| SCK | GPIO18 | Clock SPI (SCLK) |
| SDO (MISO) | Non collegato | Non richiesto |
| LED | 3,3V | Retroilluminazione |
Nota: Se il vostro modulo ILI9341 ha un pin LED, collegatelo a 3,3V o a un pin GPIO per il controllo della retroilluminazione.
Installazione della libreria TFT_eSPI
La libreria TFT_eSPI non riguarda solo la grafica ad alta velocità: è anche progettata per semplificare l’integrazione del touch sui display TFT con ESP32 e microcontrollori simili. Progettata per alte prestazioni, la libreria non solo supporta un’ampia gamma di driver di display (incluso l’ILI9143), ma semplifica anche il processo di acquisizione e elaborazione degli input touch.
Un grande vantaggio di TFT_eSPI è la sua API user-friendly, che consente agli sviluppatori di incorporare la funzionalità touch nei loro progetti senza doversi occupare dei dettagli hardware a basso livello. Con funzioni integrate per rilevazione del tocco, calibrazione e mappatura delle coordinate, la libreria permette di aggiungere rapidamente funzionalità interattive—come pulsanti virtuali, cursori o tastiere—al vostro display.
Inoltre, le opzioni di configurazione di TFT_eSPI offrono la flessibilità di adattare sia l’output grafico che la sensibilità del touch alle esigenze specifiche del vostro progetto. Che stiate creando interfacce semplici o applicazioni touch-driven complesse, il supporto della libreria a funzionalità come aggiornamenti parziali dello schermo e tipi di font multipli garantisce che la vostra esperienza utente touch sia sia reattiva sia esteticamente gradevole.
Aprite l’Arduino IDE.
- Andate su Strumenti > Gestisci librerie.
- Cercate
TFT_eSPIe installate la libreria di Bodmer.
Configurazione della libreria
Questa libreria non è pronta all’uso. Dobbiamo configurare correttamente il display e i PIN del microcontrollore. Per facilitare questo, esiste un file chiamato UserSetupSelect.h nella cartella principale della libreria. Qui il contenuto di default.
// This header file contains a list of user setup files and defines which one the
// compiler uses when the IDE performs a Verify/Compile or Upload.
//
// Users can create configurations for different boards and TFT displays.
// This makes selecting between hardware setups easy by "uncommenting" one line.

// The advantage of this hardware configuration method is that the examples provided
// with the library should work with immediately without any other changes being
// needed. It also improves the portability of users sketches to other hardware
// configurations and compatible libraries.
//
// Create a shortcut to this file on your desktop to permit quick access for editing.
// Re-compile and upload after making and saving any changes to this file.

// Example User_Setup files are stored in the "User_Setups" folder. These can be used
// unmodified or adapted for a particular hardware configuration.

#ifndef USER_SETUP_LOADED //  Lets PlatformIO users define settings in
                          //  platformio.ini, see notes in "Tools" folder.

///////////////////////////////////////////////////////
//   User configuration selection lines are below    //
///////////////////////////////////////////////////////

// Only ONE line below should be uncommented to define your setup.  Add extra lines and files as needed.

#include <User_Setup.h>           // Default setup is root library folder

//#include <User_Setups/Setup1_ILI9341.h>  // Setup file for ESP8266 configured for my ILI9341
//#include <User_Setups/Setup2_ST7735.h>   // Setup file for ESP8266 configured for my ST7735
//#include <User_Setups/Setup3_ILI9163.h>  // Setup file for ESP8266 configured for my ILI9163
//#include <User_Setups/Setup4_S6D02A1.h>  // Setup file for ESP8266 configured for my S6D02A1
//#include <User_Setups/Setup5_RPi_ILI9486.h>        // Setup file for ESP8266 configured for my stock RPi TFT
//#include <User_Setups/Setup6_RPi_Wr_ILI9486.h>     // Setup file for ESP8266 configured for my modified RPi TFT
//#include <User_Setups/Setup7_ST7735_128x128.h>     // Setup file for ESP8266 configured for my ST7735 128x128 display
//#include <User_Setups/Setup8_ILI9163_128x128.h>    // Setup file for ESP8266 configured for my ILI9163 128x128 display
//#include <User_Setups/Setup9_ST7735_Overlap.h>     // Setup file for ESP8266 configured for my ST7735
//#include <User_Setups/Setup10_RPi_touch_ILI9486.h> // Setup file for ESP8266 configured for ESP8266 and RPi TFT with touch

//#include <User_Setups/Setup11_RPi_touch_ILI9486.h> // Setup file configured for ESP32 and RPi TFT with touch
//#include <User_Setups/Setup12_M5Stack_Basic_Core.h>// Setup file for the ESP32 based M5Stack (Basic Core only)
//#include <User_Setups/Setup13_ILI9481_Parallel.h>  // Setup file for the ESP32 with parallel bus TFT
//#include <User_Setups/Setup14_ILI9341_Parallel.h>  // Setup file for the ESP32 with parallel bus TFT
//#include <User_Setups/Setup15_HX8357D.h>           // Setup file for ESP8266 configured for HX8357D
//#include <User_Setups/Setup16_ILI9488_Parallel.h>  // Setup file for the ESP32 with parallel bus TFT
//#include <User_Setups/Setup17_ePaper.h>            // Setup file for ESP8266 and any Waveshare ePaper display
//#include <User_Setups/Setup18_ST7789.h>            // Setup file for ESP8266 configured for ST7789

//#include <User_Setups/Setup19_RM68140_Parallel.h>	 // Setup file configured for RM68140 with parallel bus

//#include <User_Setups/Setup20_ILI9488.h>           // Setup file for ESP8266 and ILI9488 SPI bus TFT
//#include <User_Setups/Setup21_ILI9488.h>           // Setup file for ESP32 and ILI9488 SPI bus TFT

//#include <User_Setups/Setup22_TTGO_T4.h>           // Setup file for ESP32 and TTGO T4 version 1.2
//#include <User_Setups/Setup22_TTGO_T4_v1.3.h>      // Setup file for ESP32 and TTGO T4 version 1.3
//#include <User_Setups/Setup23_TTGO_TM.h>           // Setup file for ESP32 and TTGO TM ST7789 SPI bus TFT
//#include <User_Setups/Setup24_ST7789.h>            // Setup file for DSTIKE/ESP32/ESP8266 configured for ST7789 240 x 240
//#include <User_Setups/Setup25_TTGO_T_Display.h>    // Setup file for ESP32 and TTGO T-Display ST7789V SPI bus TFT
//#include <User_Setups/Setup26_TTGO_T_Wristband.h>  // Setup file for ESP32 and TTGO T-Wristband ST7735 SPI bus TFT

//#include <User_Setups/Setup27_RPi_ST7796_ESP32.h>    // ESP32   RPi MHS-4.0 inch Display-B
//#include <User_Setups/Setup28_RPi_ST7796_ESP8266.h>  // ESP8266 RPi MHS-4.0 inch Display-B

//#include <User_Setups/Setup29_ILI9341_STM32.h>          // Setup for Nucleo board
//#include <User_Setups/Setup30_ILI9341_Parallel_STM32.h> // Setup for Nucleo board and parallel display
//#include <User_Setups/Setup31_ST7796_Parallel_STM32.h>  // Setup for Nucleo board and parallel display
//#include <User_Setups/Setup32_ILI9341_STM32F103.h>      // Setup for "Blue/Black Pill"

//#include <User_Setups/Setup33_RPi_ILI9486_STM32.h>      // Setup for Nucleo board

//#include <User_Setups/Setup34_ILI9481_Parallel_STM32.h> // Setup for Nucleo board and parallel display
//#include <User_Setups/Setup35_ILI9341_STM32_Port_Bus.h> // Setup for STM32 port A parallel display

//#include <User_Setups/Setup36_RPi_touch_ST7796.h>      // Setup file configured for ESP32 and RPi ST7796 TFT with touch

// #include <User_Setups/Setup42_ILI9341_ESP32.h>           // Setup file for ESP32 and SPI ILI9341 240x320
//#include <User_Setups/Setup43_ST7735.h>            // Setup file for ESP8266 & ESP32 configured for my ST7735S 80x160
//#include <User_Setups/Setup44_TTGO_CameraPlus.h>   // Setup file for ESP32 and TTGO T-CameraPlus ST7789 SPI bus TFT    240x240
//#include <User_Setups/Setup45_TTGO_T_Watch.h>      // Setup file for ESP32 and TTGO T-Watch ST7789 SPI bus TFT  240x240
//#include <User_Setups/Setup46_GC9A01_ESP32.h>      // Setup file for ESP32 and GC9A01 SPI bus TFT  240x240

//#include <User_Setups/Setup47_ST7735.h>            // Setup file for ESP32 configured for ST7735 128 x 128 animated eyes

//#include <User_Setups/Setup50_SSD1963_Parallel.h>  // Setup file for ESP32 and SSD1963 TFT display

//#include <User_Setups/Setup51_LilyPi_ILI9481.h>    // Setup file for LilyGo LilyPi with ILI9481 display
//#include <User_Setups/Setup52_LilyPi_ST7796.h>     // Setup file for LilyGo LilyPi with ST7796 display

//#include <User_Setups/Setup60_RP2040_ILI9341.h>              // Setup file for RP2040 with SPI ILI9341
//#include <User_Setups/Setup61_RP2040_ILI9341_PIO_SPI.h>      // Setup file for RP2040 with PIO SPI ILI9341
//#include <User_Setups/Setup62_RP2040_Nano_Connect_ILI9341.h> // Setup file for RP2040 with SPI ILI9341

//#include <User_Setups/Setup66_Seeed_XIAO_Round.h>     // Setup file for Seeed XIAO with GC9A01 240x240

//#include <User_Setups/Setup70_ESP32_S2_ILI9341.h>     // Setup file for ESP32 S2 with SPI ILI9341
//#include <User_Setups/Setup70b_ESP32_S3_ILI9341.h>    // Setup file for ESP32 S3 with SPI ILI9341
//#include <User_Setups/Setup70c_ESP32_C3_ILI9341.h>    // Setup file for ESP32 C3 with SPI ILI9341
//#include <User_Setups/Setup70d_ILI9488_S3_Parallel.h> // Setup file for ESP32 S3 with SPI ILI9488

//#include <User_Setups/Setup71_ESP32_S2_ST7789.h>       // Setup file for ESP32 S2 with ST7789
//#include <User_Setups/Setup72_ESP32_ST7789_172x320.h>  // Setup file for ESP32 with ST7789 1.47" 172x320

//#include <User_Setups/Setup100_RP2040_ILI9488_parallel.h> // Setup file for Pico/RP2040 with 8-bit parallel ILI9488
//#include <User_Setups/Setup101_RP2040_ILI9481_parallel.h> // Setup file for Pico/RP2040 with 8-bit parallel ILI9481
//#include <User_Setups/Setup102_RP2040_ILI9341_parallel.h> // Setup file for Pico/RP2040 with 8-bit parallel ILI9341
//#include <User_Setups/Setup103_RP2040_ILI9486_parallel.h> // Setup file for Pico/RP2040 with 8-bit parallel ILI9486
//#include <User_Setups/Setup104_RP2040_ST7796_parallel.h>  // Setup file for Pico/RP2040 with 8-bit parallel ST7796

//#include <User_Setups/Setup105_RP2040_ST7796_16bit_parallel.h>  // Setup file for RP2040 16-bit parallel display
//#include <User_Setups/Setup106_RP2040_ILI9481_16bit_parallel.h> // Setup file for RP2040 16-bit parallel display
//#include <User_Setups/Setup107_RP2040_ILI9341_16bit_parallel.h> // Setup file for RP2040 16-bit parallel display
//#include <User_Setups/Setup108_RP2040_ST7735.h> // Setup file for Waveshare RP2040 board with onboard ST7735 0.96" 160x80 display

//#include <User_Setups/Setup135_ST7789.h>           // Setup file for ESP8266 and ST7789 135 x 240 TFT

//#include <User_Setups/Setup136_LilyGo_TTV.h>       // Setup file for ESP32 and Lilygo TTV ST7789 SPI bus TFT  135x240
//#include <User_Setups/Setup137_LilyGo_TDisplay_RP2040.h>  // Setup file for Lilygo T-Display RP2040 (ST7789 on SPI bus with 135x240 TFT)

//#include <User_Setups/Setup138_Pico_Explorer_Base_RP2040_ST7789.h> // Setup file for Pico Explorer Base by Pimoroni for RP2040 (ST7789 on SPI bus with 240x240 TFT)

//#include <User_Setups/Setup200_GC9A01.h>           // Setup file for ESP32 and GC9A01 240 x 240 TFT

//#include <User_Setups/Setup201_WT32_SC01.h>        // Setup file for ESP32 based WT32_SC01 from Seeed

//#include <User_Setups/Setup202_SSD1351_128.h>      // Setup file for ESP32/ESP8266 based SSD1351 128x128 1.5inch OLED display

//#include <User_Setups/Setup203_ST7789.h>     // Setup file for ESP32/ESP8266 based ST7789 240X280 1.69inch TFT

//#include <User_Setups/Setup204_ESP32_TouchDown.h>     // Setup file for the ESP32 TouchDown based on ILI9488 480 x 320 TFT

//#include <User_Setups/Setup205_ESP32_TouchDown_S3.h>     // Setup file for the ESP32 TouchDown S3 based on ILI9488 480 x 320 TFT

//#include <User_Setups/Setup206_LilyGo_T_Display_S3.h>     // For the LilyGo T-Display S3 based ESP32S3 with ST7789 170 x 320 TFT
//#include <User_Setups/Setup207_LilyGo_T_HMI.h>            // For the LilyGo T-HMI S3 based ESP32S3 with ST7789 240 x 320 TFT
//#include <User_Setups/Setup209_LilyGo_T_Dongle_S3.h>      // For the LilyGo T-Dongle S3 based ESP32 with ST7735 80 x 160 TFT
//#include <User_Setups/Setup210_LilyGo_T_Embed_S3.h>         // For the LilyGo T-Embed S3 based ESP32S3 with ST7789 170 x 320 TFT
//#include <User_Setups/Setup211_LilyGo_T_QT_Pro_S3.h>         // For the LilyGo T-QT Pro S3 based ESP32S3 with GC9A01 128 x 128 TFT
// #include <User_Setups/Setup212_LilyGo_T_PicoPro.h>         // For the LilyGo T-PICO-Pro with ST7796 222 x 480 TFT
// #include <User_Setups/Setup213_LilyGo_T_Beam_Shield.h>         // For the LilyGo T-BEAM V1.x with ST7796 222 x 480 TFT

//#include <User_Setups/Setup250_ESP32_S3_Box_Lite.h>      // For the ESP32 S3 Box Lite
//#include <User_Setups/Setup251_ESP32_S3_Box.h>            // For the ESP32 S3 Box

//#include <User_Setups/Setup301_BW16_ST7735.h>            // Setup file for Bw16-based boards with ST7735 160 x 80 TFT
//#include <User_Setups/Setup302_Waveshare_ESP32S3_GC9A01.h>            // Setup file for Waveshare ESP32-S3-Touch-LCD-1.28 board with GC9A01 240*240 TFT

//#include <User_Setups/SetupX_Template.h>     // Template file for a setup


//#include <User_Setups/Dustin_ILI9488.h>          // Setup file for Dustin Watts PCB with ILI9488
//#include <User_Setups/Dustin_ST7796.h>           // Setup file for Dustin Watts PCB with ST7796
//#include <User_Setups/Dustin_ILI9488_Pico.h>     // Setup file for Dustin Watts Pico PCB with ST7796
//#include <User_Setups/Dustin_ST7789_Pico.h>      // Setup file for Dustin Watts PCB with ST7789 240 x 240 on 3.3V adapter board
//#include <User_Setups/Dustin_GC9A01_Pico.h>      // Setup file for Dustin Watts PCB with GC9A01 240 x 240 on 3.3V adapter board
//#include <User_Setups/Dustin_GC9A01_ESP32.h>     // Setup file for Dustin Watts PCB with GC9A01 240 x 240 on 3.3V adapter board
//#include <User_Setups/Dustin_STT7789_ESP32.h>    // Setup file for Dustin Watts PCB with ST7789 240 x 240 on 3.3V adapter board
//#include <User_Setups/Dustin_ILI9341_ESP32.h>    // Setup file for Dustin Watts PCB with ILI9341
//#include <User_Setups/ILI9225.h>

#endif // USER_SETUP_LOADED


/////////////////////////////////////////////////////////////////////////////////////
//                                                                                 //
//     DON'T TINKER WITH ANY OF THE FOLLOWING LINES, THESE ADD THE TFT DRIVERS     //
//       AND ESP8266 PIN DEFINITONS, THEY ARE HERE FOR BODMER'S CONVENIENCE!       //
//                                                                                 //
/////////////////////////////////////////////////////////////////////////////////////


// Identical looking TFT displays may have a different colour ordering in the 16-bit colour
#define TFT_BGR 0   // Colour order Blue-Green-Red
#define TFT_RGB 1   // Colour order Red-Green-Blue

// Legacy setup support, RPI_DISPLAY_TYPE replaces RPI_DRIVER
#if defined (RPI_DRIVER)
  #if !defined (RPI_DISPLAY_TYPE)
    #define RPI_DISPLAY_TYPE
  #endif
#endif

// Legacy setup support, RPI_ILI9486_DRIVER form is deprecated
// Instead define RPI_DISPLAY_TYPE and also define driver (e.g. ILI9486_DRIVER)
#if defined (RPI_ILI9486_DRIVER)
  #if !defined (ILI9486_DRIVER)
    #define ILI9486_DRIVER
  #endif
  #if !defined (RPI_DISPLAY_TYPE)
    #define RPI_DISPLAY_TYPE
  #endif
#endif

// Invoke 18-bit colour for selected displays
#if !defined (RPI_DISPLAY_TYPE) && !defined (TFT_PARALLEL_8_BIT) && !defined (TFT_PARALLEL_16_BIT) && !defined (ESP32_PARALLEL)
  #if defined (ILI9481_DRIVER) || defined (ILI9486_DRIVER) || defined (ILI9488_DRIVER)
    #define SPI_18BIT_DRIVER
  #endif
#endif

// Load the right driver definition - do not tinker here !
#if   defined (ILI9341_DRIVER) || defined(ILI9341_2_DRIVER) || defined (ILI9342_DRIVER)
     #include <TFT_Drivers/ILI9341_Defines.h>
     #define  TFT_DRIVER 0x9341
#elif defined (ST7735_DRIVER)
     #include <TFT_Drivers/ST7735_Defines.h>
     #define  TFT_DRIVER 0x7735
#elif defined (ILI9163_DRIVER)
     #include <TFT_Drivers/ILI9163_Defines.h>
     #define  TFT_DRIVER 0x9163
#elif defined (S6D02A1_DRIVER)
     #include <TFT_Drivers/S6D02A1_Defines.h>
     #define  TFT_DRIVER 0x6D02
#elif defined (ST7796_DRIVER)
      #include "TFT_Drivers/ST7796_Defines.h"
      #define  TFT_DRIVER 0x7796
#elif defined (ILI9486_DRIVER)
     #include <TFT_Drivers/ILI9486_Defines.h>
     #define  TFT_DRIVER 0x9486
#elif defined (ILI9481_DRIVER)
     #include <TFT_Drivers/ILI9481_Defines.h>
     #define  TFT_DRIVER 0x9481
#elif defined (ILI9488_DRIVER)
     #include <TFT_Drivers/ILI9488_Defines.h>
     #define  TFT_DRIVER 0x9488
#elif defined (HX8357D_DRIVER)
     #include "TFT_Drivers/HX8357D_Defines.h"
     #define  TFT_DRIVER 0x8357
#elif defined (EPD_DRIVER)
     #include "TFT_Drivers/EPD_Defines.h"
     #define  TFT_DRIVER 0xE9D
#elif defined (ST7789_DRIVER)
     #include "TFT_Drivers/ST7789_Defines.h"
     #define  TFT_DRIVER 0x7789
#elif defined (R61581_DRIVER)
     #include "TFT_Drivers/R61581_Defines.h"
     #define  TFT_DRIVER 0x6158
#elif defined (ST7789_2_DRIVER)
     #include "TFT_Drivers/ST7789_2_Defines.h"
     #define  TFT_DRIVER 0x778B
#elif defined (RM68140_DRIVER)
     #include "TFT_Drivers/RM68140_Defines.h"
     #define  TFT_DRIVER 0x6814
#elif defined (SSD1351_DRIVER)
     #include "TFT_Drivers/SSD1351_Defines.h"
     #define  TFT_DRIVER 0x1351
#elif defined (SSD1963_480_DRIVER)
     #include "TFT_Drivers/SSD1963_Defines.h"
     #define  TFT_DRIVER 0x1963
#elif defined (SSD1963_800_DRIVER)
     #include "TFT_Drivers/SSD1963_Defines.h"
     #define  TFT_DRIVER 0x1963
#elif defined (SSD1963_800ALT_DRIVER)
     #include "TFT_Drivers/SSD1963_Defines.h"
     #define  TFT_DRIVER 0x1963
#elif defined (SSD1963_800BD_DRIVER)
     #include "TFT_Drivers/SSD1963_Defines.h"
     #define  TFT_DRIVER 0x1963
#elif defined (GC9A01_DRIVER)
     #include "TFT_Drivers/GC9A01_Defines.h"
     #define  TFT_DRIVER 0x9A01
#elif defined (ILI9225_DRIVER)
     #include "TFT_Drivers/ILI9225_Defines.h"
     #define  TFT_DRIVER 0x9225
#elif defined (RM68120_DRIVER)
     #include "TFT_Drivers/RM68120_Defines.h"
     #define  TFT_DRIVER 0x6812
#elif defined (HX8357B_DRIVER)
     #include "TFT_Drivers/HX8357B_Defines.h"
     #define  TFT_DRIVER 0x835B
#elif defined (HX8357C_DRIVER)
     #include "TFT_Drivers/HX8357C_Defines.h"
     #define  TFT_DRIVER 0x835C

                              // <<<<<<<<<<<<<<<<<<<<<<<< ADD NEW DRIVER HERE
                              // XYZZY_init.h and XYZZY_rotation.h must also be added in TFT_eSPI.cpp
#elif defined (XYZZY_DRIVER)
     #include "TFT_Drivers/XYZZY_Defines.h"
     #define  TFT_DRIVER 0x0000
#else
     #define  TFT_DRIVER 0x0000
#endif

// These are the pins for ESP8266 boards
//      Name   GPIO    NodeMCU      Function
#define PIN_D0  16  // GPIO16       WAKE
#define PIN_D1   5  // GPIO5        User purpose
#define PIN_D2   4  // GPIO4        User purpose
#define PIN_D3   0  // GPIO0        Low on boot means enter FLASH mode
#define PIN_D4   2  // GPIO2        TXD1 (must be high on boot to go to UART0 FLASH mode)
#define PIN_D5  14  // GPIO14       HSCLK
#define PIN_D6  12  // GPIO12       HMISO
#define PIN_D7  13  // GPIO13       HMOSI  RXD2
#define PIN_D8  15  // GPIO15       HCS    TXD0 (must be low on boot to enter UART0 FLASH mode)
#define PIN_D9   3  //              RXD0
#define PIN_D10  1  //              TXD0

#define PIN_MOSI 8  // SD1          FLASH and overlap mode
#define PIN_MISO 7  // SD0
#define PIN_SCLK 6  // CLK
#define PIN_HWCS 0  // D3

#define PIN_D11  9  // SD2
#define PIN_D12 10  // SD4
Questo file di configurazione è abilitato di default e, per impostazione predefinita, il file User_Setup.h è decommentato e selezionato. Ma potete vedere una riga commentata con questo testo:
#include <User_Setups/Setup42_ILI9341_ESP32.h> // Setup file per ESP32 e SPI ILI9341 240x320
All’interno di quel file c’è una configurazione di base per il nostro display.
// See SetupX_Template.h for all options available
#define USER_SETUP_ID 42

#define ILI9341_DRIVER

#define TFT_MISO 19  // (leave TFT SDO disconnected if other SPI devices share MISO)
#define TFT_MOSI 23
#define TFT_SCLK 18
#define TFT_CS   15  // Chip select control pin
#define TFT_DC    2  // Data Command control pin
#define TFT_RST   4  // Reset pin (could connect to RST pin)

// Optional touch screen chip select
#define TOUCH_CS 21 // Chip select pin (T_CS) of touch screen

#define LOAD_GLCD    // Font 1. Original Adafruit 8 pixel font needs ~1820 bytes in FLASH
#define LOAD_FONT2   // Font 2. Small 16 pixel high font, needs ~3534 bytes in FLASH, 96 characters
#define LOAD_FONT4   // Font 4. Medium 26 pixel high font, needs ~5848 bytes in FLASH, 96 characters
#define LOAD_FONT6   // Font 6. Large 48 pixel font, needs ~2666 bytes in FLASH, only characters 1234567890:-.apm
#define LOAD_FONT7   // Font 7. 7 segment 48 pixel font, needs ~2438 bytes in FLASH, only characters 1234567890:.
#define LOAD_FONT8   // Font 8. Large 75 pixel font needs ~3256 bytes in FLASH, only characters 1234567890:-.
#define LOAD_GFXFF   // FreeFonts. Include access to the 48 Adafruit_GFX free fonts FF1 to FF48 and custom fonts

#define SMOOTH_FONT

// TFT SPI clock frequency
// #define SPI_FREQUENCY  20000000
// #define SPI_FREQUENCY  27000000
#define SPI_FREQUENCY  40000000
// #define SPI_FREQUENCY  80000000

// Optional reduced SPI frequency for reading TFT
#define SPI_READ_FREQUENCY  16000000

// SPI clock frequency for touch controller
#define SPI_TOUCH_FREQUENCY  2500000
Questa configurazione va abbastanza bene, ma preferisco impostare un file specifico all’interno della cartella del progetto senza modificare i file della libreria perché con un aggiornamento si perdono tutte le modifiche effettuate.
Quindi possiamo disabilitare il contenuto della configurazione di default aggiungendo una definizione USER_SETUP e ho creato un file personalizzato User_Setup.h nella cartella del mio progetto.
// Aggiungere questo nell'header del file del progetto
#define USER_SETUP_LOADED // per non caricare le impostazioni interne

#include "User_Setup.h"
Il nostro User_Setup.h personalizzato diventa così.
/**
 * User setup for ili9143 and esp32
 * by Renzo Mischianti <mischianti.org>
 * Tutorial for ili9143
 */

#define USER_SETUP_INFO "User_Setup"

// ##################################################################################
//
// Section 1. Call up the right driver file and any options for it
//
// ##################################################################################

#define ILI9341_DRIVER       // Generic driver for common displays

#define TFT_WIDTH  240 // ST7789 240 x 240 and 240 x 320
#define TFT_HEIGHT 320 // ST7789 240 x 320


// ##################################################################################
//
// Section 2. Define the pins that are used to interface with the display here
//
// ##################################################################################

// If a backlight control signal is available then define the TFT_BL pin in Section 2
// below. The backlight will be turned ON when tft.begin() is called, but the library
// needs to know if the LEDs are ON with the pin HIGH or LOW. If the LEDs are to be
// driven with a PWM signal or turned OFF/ON then this must be handled by the user
// sketch. e.g. with digitalWrite(TFT_BL, LOW);

// ###### EDIT THE PIN NUMBERS IN THE LINES FOLLOWING TO SUIT YOUR ESP32 SETUP   ######

// For ESP32 Dev board (only tested with ILI9341 display)
// The hardware SPI can be mapped to any pins

#define TFT_MISO 19
#define TFT_MOSI 23
#define TFT_SCLK 18
#define TFT_CS   15  // Chip select control pin
#define TFT_DC    2  // Data Command control pin
#define TFT_RST   4  // Reset pin (could connect to RST pin)

//#define TFT_RST  -1  // Set TFT_RST to -1 if display RESET is connected to ESP32 board RST
//#define TFT_BL   22  // LED back-light

#define TOUCH_CS 21     // Chip select pin (T_CS) of touch screen

// ##################################################################################
//
// Section 3. Define the fonts that are to be used here
//
// ##################################################################################

// Comment out the #defines below with // to stop that font being loaded
// The ESP8366 and ESP32 have plenty of memory so commenting out fonts is not
// normally necessary. If all fonts are loaded the extra FLASH space required is
// about 17Kbytes. To save FLASH space only enable the fonts you need!

#define LOAD_GLCD   // Font 1. Original Adafruit 8 pixel font needs ~1820 bytes in FLASH
#define LOAD_FONT2  // Font 2. Small 16 pixel high font, needs ~3534 bytes in FLASH, 96 characters
#define LOAD_FONT4  // Font 4. Medium 26 pixel high font, needs ~5848 bytes in FLASH, 96 characters
#define LOAD_FONT6  // Font 6. Large 48 pixel font, needs ~2666 bytes in FLASH, only characters 1234567890:-.apm
#define LOAD_FONT7  // Font 7. 7 segment 48 pixel font, needs ~2438 bytes in FLASH, only characters 1234567890:-.
#define LOAD_FONT8  // Font 8. Large 75 pixel font needs ~3256 bytes in FLASH, only characters 1234567890:-.
//#define LOAD_FONT8N // Font 8. Alternative to Font 8 above, slightly narrower, so 3 digits fit a 160 pixel TFT
#define LOAD_GFXFF  // FreeFonts. Include access to the 48 Adafruit_GFX free fonts FF1 to FF48 and custom fonts

// Comment out the #define below to stop the SPIFFS filing system and smooth font code being loaded
// this will save ~20kbytes of FLASH
#define SMOOTH_FONT

// ##################################################################################
//
// Section 4. Other options
//
// ##################################################################################

// TFT SPI clock frequency
// #define SPI_FREQUENCY  20000000
// #define SPI_FREQUENCY  27000000
#define SPI_FREQUENCY  40000000
// #define SPI_FREQUENCY  80000000

// Optional reduced SPI frequency for reading TFT
#define SPI_READ_FREQUENCY  16000000

// SPI clock frequency for touch controller
#define SPI_TOUCH_FREQUENCY  2500000
//#define SPI_TOUCH_FREQUENCY 1000000 // Reduce to 1 MHz for debugging

// Transactions are automatically enabled by the library for an ESP32 (to use HAL mutex)
// so changing it here has no effect

// #define SUPPORT_TRANSACTIONS
Introduzione alla libreria XPT2046_Touchscreen
Mentre la libreria TFT_eSPI offre supporto integrato per funzionalità touch di base, la libreria XPT2046_Touchscreen è una soluzione dedicata per display equipaggiati con il controller touch XPT2046. Questa libreria è ottimizzata specificamente per touchscreen resistivi basati sul chip XPT2046, offrendo routine di calibrazione avanzate, miglior filtraggio del rumore e gestione degli eventi touch più dettagliata rispetto a una soluzione generica.
Quando usare XPT2046_Touchscreen:
- Specificità hardware: Se il vostro modulo TFT incorpora il controller XPT2046, questa libreria è progettata per funzionare in modo ottimale con quel chip.
- Gestione avanzata del tocco: Per progetti che richiedono input touch raffinati—come calibrazione migliorata, riconoscimento di gesture o sensibilità alla pressione—la libreria XPT2046_Touchscreen offre funzionalità aggiuntive oltre al supporto di base offerto da TFT_eSPI.
- Modularità del codice: Separare il controllo del display (gestito da TFT_eSPI) dalla gestione del touch (gestito da XPT2046_Touchscreen) può aiutare a mantenere un codicebase più pulito e modulare.
Esempio base di sketch con XPT2046_Touchscreen
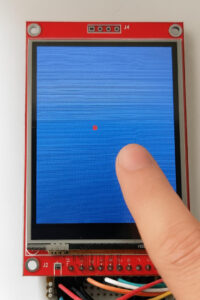
Di seguito un semplice sketch che dimostra come inizializzare e usare la libreria XPT2046_Touchscreen insieme a TFT_eSPI. In questo esempio, quando toccate lo schermo, un piccolo cerchio rosso verrà disegnato nella posizione del tocco e le coordinate verranno stampate nel Monitor Seriale.
/*
  Basic Touch Drawing Example Using XPT2046_Touchscreen
  and TFT_eSPI (shared SPI bus)

  Created by Renzo Mischianti
  www.mischianti.org
*/

#include <TFT_eSPI.h>
#include <XPT2046_Touchscreen.h>
#include <SPI.h>

// TFT_eSPI uses the default SPI bus
TFT_eSPI tft = TFT_eSPI();  // TFT driver

#define TOUCH_CS 21
#define TOUCH_IRQ 255  // Not used, set to -1 or 255 if unused

XPT2046_Touchscreen ts(TOUCH_CS, TOUCH_IRQ);

// Calibration range (adjust if needed)
uint16_t touchScreenMinimumX = 200, touchScreenMaximumX = 3700;
uint16_t touchScreenMinimumY = 240, touchScreenMaximumY = 3800;

void setup() {
  Serial.begin(115200);

  tft.init();
  tft.setRotation(0);        // Match your setup
  tft.fillScreen(TFT_BLACK);

  ts.begin();                // Init touchscreen
  ts.setRotation(1);         // May vary depending on your wiring

  Serial.println("Touch test with XPT2046 ready.");
}

void loop() {
  if (ts.touched()) {
    TS_Point p = ts.getPoint();

    // Auto-calibrate (basic min/max tracker)
    if (p.x < touchScreenMinimumX) touchScreenMinimumX = p.x;
    if (p.x > touchScreenMaximumX) touchScreenMaximumX = p.x;
    if (p.y < touchScreenMinimumY) touchScreenMinimumY = p.y;
    if (p.y > touchScreenMaximumY) touchScreenMaximumY = p.y;

    // Map to display coordinates
    uint16_t x = map(p.x, touchScreenMinimumX, touchScreenMaximumX, 0, tft.width());
    uint16_t y = map(p.y, touchScreenMinimumY, touchScreenMaximumY, 0, tft.height());

    tft.fillCircle(x, y, 5, TFT_RED);  // Draw red dot

    Serial.print("Touch at: ");
    Serial.print(x);
    Serial.print(", ");
    Serial.println(y);

    delay(100);  // debounce
  }
}
Spiegazione:
- Inizializzazione:
Lo sketch inizia inizializzando sia il display TFT (con TFT_eSPI) sia il touchscreen (con XPT2046_Touchscreen). - Mappatura calibrazione:
I valori grezzi del touchscreen (p.x e p.y) vengono mappati alle dimensioni in pixel del display usando costanti di calibrazione preimpostate. Queste costanti devono essere regolate per il vostro setup. - Risposta al tocco:
Quando viene rilevato un tocco, il codice disegna un piccolo cerchio rosso alle coordinate corrispondenti e le invia via Serial.
Questo esempio illustra l’integrazione di base della libreria XPT2046_Touchscreen, che potete ampliare ulteriormente per interfacce touch più complesse.
Introduzione al supporto touch di TFT_eSPI
La libreria TFT_eSPI non riguarda solo la grafica ad alta velocità: fornisce anche una soluzione integrata per la funzionalità touch sui display TFT. Se il vostro modulo display include un touchscreen (tipicamente resistivo), potete sfruttare il supporto touch fornito dalla libreria senza bisogno di una libreria esterna specifica per il touch. Questa integrazione è controllata in parte dal parametro TOUCH_CS, che indica il pin Chip Select (CS) per il controller touch.
Il ruolo di TOUCH_CS
In molti moduli display TFT con touchscreen, il controller touch comunica tramite SPI. Per consentire alla libreria TFT_eSPI di gestire l’input touch, dovete definire il pin a cui è collegata la linea CS del touchscreen. Ad esempio, se la linea CS del vostro touchscreen è collegata al GPIO 21 di un ESP32, dovreste impostare quanto segue nel vostro file User_Setup.h:
#define TOUCH_CS 21 // Selezione chip per il controller touch
Questa definizione permette alla libreria di inizializzare e comunicare correttamente con l’hardware del touchscreen. Adattatela in base al vostro cablaggio.
Che siate principianti che esplorano display interattivi o sviluppatori esperti che vogliono realizzare applicazioni touch-driven sofisticate, la libreria TFT_eSPI con il suo supporto touch integrato offre una soluzione flessibile ed efficiente.
In definitiva, sia che tu sia un principiante che esplora display interattivi, sia che tu sia uno sviluppatore esperto desideroso di creare applicazioni touch-driven sofisticate, la libreria TFT_eSPI con il suo supporto touch integrato offre una soluzione flessibile ed efficiente.
Di seguito un esempio molto basilare che utilizza il supporto touch integrato della libreria TFT_eSPI. Questo sketch inizializzerà il display, rileverà un tocco, disegnerà un piccolo cerchio rosso nella posizione toccata e stamperà le coordinate sul Monitor Seriale.
/*
  Basic Example Using TFT_eSPI Touch

  Created by Renzo Mischianti
  www.mischianti.org

  This sketch initializes the TFT display and uses the built-in
  touch support provided by the TFT_eSPI library to detect touch events.
  When a touch is detected, a small red circle is drawn at the touch location,
  and the coordinates are printed to the Serial Monitor.

  Make sure you have defined the TOUCH_CS pin in your User_Setup.h file, e.g.,
  #define TOUCH_CS 21
*/

#include <TFT_eSPI.h>
#include <SPI.h>

// Create TFT display instance
TFT_eSPI tft = TFT_eSPI();

void setup() {
  Serial.begin(115200);
  tft.init();
  tft.fillScreen(TFT_BLACK);
  tft.setRotation(0);  // Adjust rotation if necessary
}

void loop() {
  uint16_t x, y;
  // getTouch() returns true if a valid touch is detected and assigns coordinates to x and y.
  if (tft.getTouch(&x, &y)) {
    // Draw a small red circle at the touched position
    tft.fillCircle(x, y, 5, TFT_RED);

    // Print the touch coordinates to the Serial Monitor
    Serial.print("Touch at: ");
    Serial.print(x);
    Serial.print(", ");
    Serial.println(y);

    delay(100);  // Simple debouncing delay
  }
}
Questo esempio mostra un modo semplice per integrare l’interattività touch utilizzando solo la libreria TFT_eSPI. È perfetto per progetti rapidi, prototipi e applicazioni didattiche in cui facilità d’uso e configurazione minima sono fondamentali.
Serial output:
Touch at: 75, 120
Touch at: 80, 115
Touch at: 120, 100
Grazie
- ESP32: piedinatura, specifiche e configurazione dell’Arduino IDE
- ESP32: fileSystem integrato SPIFFS
- ESP32: gestire più seriali e logging per il debug
- ESP32 risparmio energetico pratico
- ESP32 risparmio energetico pratico: gestire WiFi e CPU
- ESP32 risparmio energetico pratico: modem e light sleep
- ESP32 risparmio energetico pratico: deep sleep e ibernazione
- ESP32 risparmio energetico pratico: preservare dati al riavvio, sveglia a tempo e tramite tocco
- ESP32 risparmio energetico pratico: sveglia esterna e da ULP
- ESP32 risparmio energetico pratico: sveglia da UART e GPIO
- ESP32: filesystem integrato LittleFS
- ESP32: filesystem integrato FFat (Fat/exFAT)
- ESP32-wroom-32
- ESP32-CAM
- ESP32: ethernet w5500 con chiamate standard (HTTP) e SSL (HTTPS)
- ESP32: ethernet enc28j60 con chiamate standard (HTTP) e SSL (HTTPS)
- Come usare la scheda SD con l’esp32
- esp32 e esp8266: file system FAT su memoria SPI flash esterna
- Gestione aggiornamenti firmware e OTA
- Gestione del firmware
- Aggiornamento OTA con Arduino IDE
- Aggiornamento OTA con browser web
- Aggiornamenti automatici OTA da un server HTTP
- Aggiornamento del firmware non standard
- Integrare LAN8720 con ESP32 per la connettività Ethernet con plain (HTTP) e SSL (HTTPS)
- Collegare l’EByte E70 (CC1310) ai dispositivi ESP32 c3/s3 ed un semplice sketch di esempio
- ESP32-C3: piedinatura, specifiche e configurazione dell’IDE Arduino
- Integrazione del modulo W5500 su ESP32 con Core 3: supporto nativo ai protocolli Ethernet con SSL e altre funzionalità
- Integrazione del modulo LAN8720 su ESP32 con Core 3: supporto nativo del protocollo Ethernet con SSL e altre funzionalità.
- Dallas DS18B20
- Guida all’I2C su ESP32: comunicazione con dispositivi eterogenei 5v 3.3v, gestione interfacce aggiuntive
- Display
- Guida Completa: Come Usare un Display ILI9341 con la Libreria TFT_eSPI
- Come integrare la funzionalità touch screen nel display TFT ILI9341
- Display eInk SSD1683 con GxEPD e ESP32 (e HMI CrowPanel 4,2″): nozioni di base e configurazione
- Display e-ink SSD1683 con GxEPD e ESP32 (e CrowPanel 4.2″ HMI): font, forme e immagini


Salve,
sono passato a testare il Touch sul display ILI9341, ma ho un problemino.
Ho installato l’esempio “Basic Example Using TFT_eSPI Touch”.
Si compila regolarmente ma se premo una qualsiasi parte del display, sul Monitor seriale mi scrive sempre “Touch at: 0, 0” e sul display non mi compare il dischetto rosso.
Ho verificato il “User_Setup.h” ed è identico a quello suo modificato.
Infatti mi funziona regolarmente con gli esempi della libreria TFT_eSPI.
Il display mi era stato venduto con la opzione del Touch, è forse guasto.
Grazie
Ciao Ezio,
fai una prova con entrambi i metodi di touch, potrebbe essere che tu hai la versione con il touch XPT2046 e allora devi fare riferimento a questo sketch.
Ciao Renzo
Ciao,
ho verificato il “User_Setup.h” e riporta correttamente il T_CS al pin 21.
Anche i collegamenti sono corretti.
Ho installato tutti e due gli sketch.
Uno mi visualizza sul Monitor seriale le coordinate 0,0 e posiziona sei punti rossi casualmente sui bordi dello schermo.
L’altro esempio non visualizza niente sul monitor seriale e lo schermo rimane nero.
Comincio a pensare che mi hanno venduto un display senza il Touch oppure è guasto.
Non ho fatto la verifica del filo che collega il T_CS al GPIO21.
Farò anche quello nel fine settimana.
Grazie comunque dei consigli
Ezio
Prova a eseguire dei test di base e verifica se per caso c’è qualche problema di versione della libreria.
Ciao, fammi sapere Renzo
Ho testato i due sketch ogni volta, cambiando la versione della libreria XPT2046_Touchscreen.
Ho usato la 1.4.0, la 1.3.0 e la 1.2.0 che mi da un errore in compilazione perché non conosce un comando.
Come avevo accennato in precedenza o è guasto il GPO21 o il pin T_CS.
Quando avevo ricevuto il display l’avevo provato per sbaglio con Arduino UNO che ha le uscite sui pin a 5v.
Potrei aver bruciato l’ingresso del T_CS.
Proverò a cambiare il GPI del ESP32, per vedere cosa succede, usando per esempio il GPO22, o il GPO17.
Ti farò sapere
Ezio
Anche cambiando il GPO non riesco a far funzionare il Touchscreen.
Per il momento ho abbandonato l’idea di usarlo.
ezio
È veramente strano, in definitiva sarebbe un unico pin in più e una corretta libreria.
Ciao Renzo
Quando deciderò di portare avanti il progetto che avevo in mente, ne comprerò uno nuovo.
Grazie dei consigli che mi hai dato, mi sono comunque utili.
Saluti
Ezio