
Forum Replies Created
-
AuthorPosts
-
Hi Dave,
I think you don’t need to use alternate pins, you can connect more than one device to the same 2 pins, you must only put the a different address.
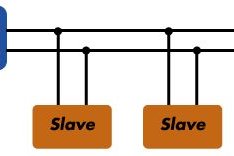
Usually there is one master and one or multiple slaves on the line, although there can be multiple masters, but we’ll talk about that later.
Both masters and slaves can transmit or receive data, therefore, a device can be in one of these four states: master transmit, master receive, slave transmit, slave receive.
You must pay attention only if you manage i2c with interrupt.
Tell me if this can be a solution.
Bye Renzo
19 October 2020 at 08:13 in reply to: Yahoo SMTP mail suitable with SSL with esp8266 and esp32 #7053Hi mohammed,
there is a topic with the informations you need, here you are
Send a simple mail including the value of a declared variable in the message
Bye Renzo
15 October 2020 at 07:56 in reply to: LORA E22 Doesn’t work with No response from device! (Check wiring) #6888Hi Martin,
any news?
Bye Renzo
14 October 2020 at 09:01 in reply to: Yahoo SMTP mail suitable with SSL with esp8266 and esp32 #6863Hi Mohammed,
to send email from your iot project you can follow this guide
Send email with attachments (EMailSender v2.x library): esp32 and esp8266 – Part 2
12 October 2020 at 17:32 in reply to: LORA E22 Doesn’t work with No response from device! (Check wiring) #6824It’s strange,
please check the connection schema, and tell me, all the data that device return It’s wrong.
Bye Renzo
Hi Jones,
I check and seems that esp8266 have TwoWire and I think I must include in esp8266 implementation.
I try to test.
Bye Renzo
I had thought about that, but the problem is that I must add an identification that use some byte (58byte is the limit of the packet) to identify the ack of the message and so lost a lot of space.
And the other problem is that when receive message from multiple device, so I must add another id for the device, and lost other space, It’s a problem.
I can’t find a generic solution without use a lot of resources.
Bye Renzo
Hi Ludophot,
the creation of generic acknowledge become difficult,
I think you can manage with set a variable like mesArrived with set with the result of millis() when you send a message
and set mesArrived to 0 when acknowledge arrive
and you can set a condition like mesArrived !=0 && mesArrived + interval < millis() if enter in the if raise an error that ack not arrived.
Or something similar.
Bye Renzo
Hi Norbert,
I try to fix, please do some test with the version on this branch.
Give me a feedback.
Thanks Renzo
Hi Norbert,
please do this test comment the line
#define OPEN_CLOSE_SPIFFSon
EMailSender.hfile and retry.Give me a feedback.
Bye Renzo
Hi Mauro,
now the library with this features is in the official branch, and released on Arduino Library manager.
Bye Renzo
Thanks to all,
I’m going to release a new library version with this fix and new distribution list features.
Thanks again Renzo
I check on the web and seems there are a lot of problems with Outlook,
can you try to send the txt file directly from gmail and check in outlook?
Bye Renzo
Try to send the attach via classic email from gmail or similar.
I think the problem is outlook.
Hi Michael,
there is an error on index of txt file, so the mime type is not setfileDescriptor[0].filename = F("test.txt"); fileDescriptor[0].url = F("/test.txt"); fileDescriptor[1].mime = "text/plain"; fileDescriptor[0].storageType = EMailSender::EMAIL_STORAGE_TYPE_SD;I rewrite the sketch and put some example, I test It with SPIFFS and work correctly
I attach the sketch with all sampe file.
Bye Renzo
Attachments:
You must be logged in to view attached files. -
AuthorPosts
