- This topic has 2 replies, 1 voice, and was last updated 3 years, 10 months ago by
Martin.
-
AuthorPosts
-
-
9 February 2022 at 14:56 #18519
Martin
Hi all,
I would like to ask you for help with code which would be able to upload stored bin file from NodeMCU v3 (ESP8266) from SPIFFS (or LittleFS) to Arduino UNO board via serial (rx, tx) communication.I am working on a project for kids and want to avoid installing Arduino IDE, drivers etc… I just want to store couple of compiled projects (bin files produce by Arduino IDE) in SPIFFS (or LittleFS) of NodeMCU v3 (ESP8266).
My idea is to use your very interesting project published HERE and add one more functionality to it. It could be just a web button which would upload (flash) the stored bin file to Arduino Uno board (with standard bootloader in it).
Same as the PC would do. There could be a web button for every project, it is not so important for now. I would just need a bit of help with the code to extend the existing project with this functionality. The NodeMCU would be connected to Arduino Uno via serial (rx, tx) pins + reset pin, or even better to connect both boards with USB cable.
That would be the best solution to really simplify it as much as possible. I have been searching for some time if such solution already exist but did not find it yet. Please would be there somebody able to help me with this project? I would really appreciate your help.
Thanks and have a good day.
-
9 February 2022 at 15:38 #18526
Hi Martin,
from a Medium article I extract this, and I think It’s what you need.How does firmware update work on Arduino Uno?
The Arduino Uno comes with a bootloader (known as Optiboot) which implements the STK500 protocol for receiving the compiled program binaries through the UART.
Explanation on Optiboot in Updating Arduino Firmware
- On reset:
Arduino reboot from bootloader and check for the cause of the reset. If it was an internal reset (eg. reset by watchdog timer), then it directly jumps to the main application program. However, if it was an external reset, it will set up a watchdog timer which will timeout in 1 second. - Listen to UART port:
If it was an external reset, the bootloader will start an infinite loop to listen to the UART port after the watchdog timer setup. If there is no valid command dedicated to the STK500 protocol received in 1 second, the watchdog timer will timeout and cause an internal reset. However, on receiving any valid command code, the watchdog timer counter will be reset to avoid unnecessary system reset from occurring. According to the application note of STK500 Communication Protocol, the format of the command is: <Command_Code> <Data (if any)> <CRC_EOP>
List of valid and useful command codes for Optiboot:
1. STK_GET_SYNC : — 0x30
2. STK_ENTER_PROGMODE : — 0x50
3. STK_LEAVE_PROGMODE : — 0x51
4. STK_LOAD_ADDRESS : — 0x55
5. STK_PROG_PAGE : — 0x64
6. CRC_EOP : — 0x20List of useful reply codes from Optiboot:
1. STK_INSYNC : — 0x14
2. STK_OK : — 0x10
Algorithm of Optiboot in receiving compiled binaries:
- Programmer send <STK_ENTER_PROGMODE> <CRC_EOP> to Arduino to command for starting of programming mode. The bootloader will reply <STK_INSYNC> <STK_OK> if it is in sync with the programmer.
*Note: After reading through the source code of Optiboot, I found that this step is not necessary as there is no specific condition checking for this command. However, it could be used for checking whether the Arduino is in sync with the programmer or not. Alternatively, by sending <STK_GET_SYNC> <CRC_EOP> could also check whether it is in sync or not. - If the Arduino is in sync with the programmer, the programmer can then send <STK_LOAD_ADDRESS> <Low byte of address> <High byte of address> <CRC_EOP>. This command is for loading the starting address of flash memory which will be filled with the bytes of program binary codes that will be sent later.
* low byte of address = address & 0xFF
* high byte of address = address >> 8
** address starts from 0 - If <STK_INSYNC> <STK_OK> is received, the programmer can then send <STK_PROG_PAGE> <Low byte of length> <High byte of length> <Dest type> <bytes of program of the specified length> <CRC_EOP>.
* The length specified the number of bytes of program binaries to be written in the flash memory.
low byte of length = length & 0xFF
high byte of length = length >> 8
* The <Dest type> specified the location (eeprom [‘E’] or flash [default]) at which the program codes to be written. - Check for reply. If <STK_INSYNC> <STK_OK> is received, update the as address := address + (length / 2), then continue the loop from step 2 until all the program binaries are sent and written into the flash memory.
* Since the address is a word pointer, so it is updated by half of the length (byte). - After sending all program binaries, the programmer then send <STK_LEAVE_PROGMODE> <CRC_EOP> for leaving programming mode.
OTA Firmware Update on Arduino Uno through ESP8266

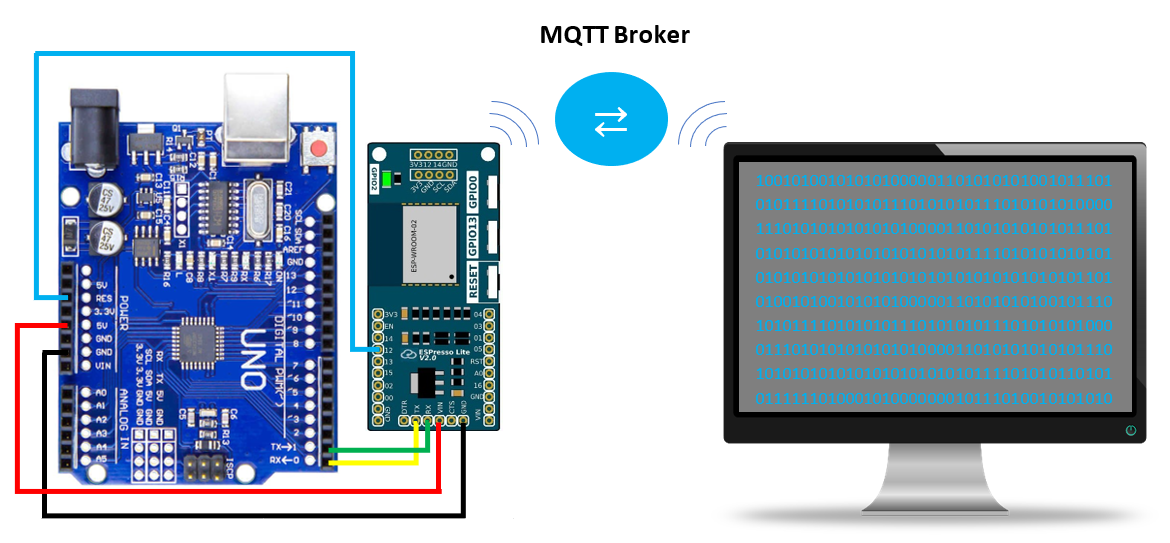
Figure 1: Wiring of Arduino Uno with Espresso Lite V2.0 (ESP8266). The Arduino Uno is connected with a WiFi module to enable OTA firmware update. In this project, ESP8266 WiFi module is used. A simple ESP8266 library is developed to remotely interface with the connected Arduino Uno. This library enables the OTA firmware update functionality for the Arduino by implementing STK500 protocol (as explained above) for writing the compiled binaries to the Arduino. Besides, remote debug message logging is also enabled in this library.
On the host machine, a graphical user interface (GUI) is also developed to aid the process of remotely interfacing with the connected Arduino.
The remote interfacing process is done through MQTT protocol. So, the WiFi module and the host machine must connect to a MQTT broker for communication. The library used for establishing MQTT connection on the WiFi module here is the PubSubClient by knolleary.
GitHub Link of the complete project: https://github.com/JayLooi/RemoteArduino
Demo Video
References
- https://www.wired.com/2012/08/nasa-patch/
- “AVR061: STK500 Communication Protocol” retrieved from http://ww1.microchip.com/downloads/en/AppNotes/doc2525.pdf
- https://github.com/arduino/ArduinoCore-avr/tree/master/bootloaders/optiboot
- https://github.com/knolleary/pubsubclient
Bye Renzo
- On reset:
-
10 February 2022 at 09:17 #18581
Hello Renzo,
thanks a lot for all the information you have provided. I am going to explore that and do some testing with it. I will see how far I could get with my current knowledge to make the required extension. Really thanks for your time and support you are currently giving me.Have a good day…
Martin
-
-
AuthorPosts
- You must be logged in to reply to this topic.