Chinese X99 motherboards (Huananzhi, Machinist, Kllisre, Atermiter) offer incredible value for money, especially when paired with Intel Xeon E5 V3 processors. However, to unleash their full potential, specifically the All-Core Turbo Boost Unlock, you often need to modify and flash the BIOS.
Turn Cheap Chinese X99 into a Beast: BIOS Unlock & Unbrick Guide
In this guide, we will cover two methods: the Software Method (using FPT via EFI) and the Hardware Method (using a CH341A Programmer), which is essential if you brick your board. We will use the ZX-99EV3 v1.31 as our case study.
Turbo Boost Unlock (TBU): Force all Xeon cores to run at maximum turbo frequency simultaneously (e.g., locking an E5-2678 v3 at 3.3GHz on all cores instead of 2.5GHz).
Undervolting: Lower temperatures and power consumption directly from the BIOS (essential for TBU stability).
Resizing BAR: Enable Re-Size BAR for modern GPU performance.
Unbricking: Recover a dead motherboard after a failed flash or bad settings.
What is BIOS, and why does it sound familiar?
You might wonder why I say I have already spoken about this topic. The answer lies in the hardware: the BIOS firmware resides physically on an SPI Flash memory chip. I have covered these chips extensively in the context of microcontrollers. If you are curious about the underlying technology, looking to expand the storage capabilities of your projects, or simply want to understand the communication protocols used by these chips, here are some essential tutorials from my blog:
Understanding the Protocols: Before diving into hardware, it is useful to understand the differences between the main interfaces: i2c, SPI and UART compared
I added some buy links with some Xeon E5 CPUs, they are different, but you can find your perfect solution.
Feature
Xeon E5-2699 v3
Xeon E5-2697 v3
Xeon E5-2666 v3
Cores / Threads
18 / 36
14 / 28
10 / 20
Base Frequency
2.30 GHz
2.60 GHz
2.90 GHz
Stock All-Core Speed
~2.8 GHz
~3.1 GHz
~3.2 GHz
UNLOCKED All-Core Speed
*~3.6 GHz (Target)
3.6 GHz
3.5 GHz
L3 Cache
45 MB
35 MB
25 MB
Performance Gain (Unlock)
Huge (+25-30%)
High (+15-20%)
Moderate (+10%)
TDP (Power Limit)
145 W
145 W
135 W
Primary Use Case
Extreme Rendering / Server
Balanced Workstation
Gaming / Budget Build
Detailed Breakdown: Before & After the Unlock
Intel Xeon E5-2699 v3 (The “Power Monster”)
Stock: Out of the box, this is a pure multi-thread workhorse. It has massive core density (18 cores), but to keep power consumption in check, Intel aggressively downclocks it to ~2.8 GHz when under full load. It feels sluggish in single-core tasks.
With Turbo Unlock: This CPU undergoes the most dramatic transformation. Forcing 18 cores to attempt 3.6 GHz creates a monster.
The Catch: It almost immediately hits the power limit (TDP throttling). Unless you have a top-tier motherboard with active VRM cooling, it will struggle to maintain that 3.6 GHz, often fluctuating around 3.3–3.5 GHz.
Intel Xeon E5-2697 v3 (The “Sweet Spot”)
Stock: A very capable processor that balances core count (14) with decent clock speeds. It is generally faster than the 2699 in daily tasks due to higher base clocks.
With Turbo Unlock: This is widely considered the best CPU for the unlock mod. Because it has 4 fewer cores than the 2699, it has enough thermal and power headroom to actually sustain 3.6 GHz on all 14 cores without severe throttling. It offers reliable, high-speed performance for both gaming and heavy workstation tasks.
Intel Xeon E5-2666 v3 (The “Gamer’s Favorite”)
Stock: It already runs fast. With a 2.9 GHz base and ~3.2 GHz all-core boost, it is the snappiest of the three for general Windows use and gaming right out of the box.
With Turbo Unlock: The gain is less dramatic here (moving from ~3.2 to 3.5 GHz), but it solidifies its position as a budget gaming king. It provides stable frame rates and matches the performance of much newer desktop CPUs (like the Ryzen 2600/3600 era) for a fraction of the price.
Bonus: It is often compatible with DDR3 RAM on specific motherboards, allowing for the cheapest possible build cost.
The Software Approach (FPT – Flash Programming Tool)
This method is for working systems. It does not require external hardware, but it requires the BIOS to be unlocked for writing.
Prerequisites
A USB Drive formatted in FAT32.
Intel ME System Tools v9.1 r7 (Specifically the fpt.efi file from the Flash Programming Tool/EFI64 folder).
I only describe the steps via USB Key, but if you want to try, you can use fptw64, which you can launch from the Windows command prompt. In Windows 11, there are many security restrictions that block functionality, making it more tedious.
Use the EFI Method (Recommended for X99)
Ditch DOS. DOS is outdated and manages memory poorly on X99 motherboards. Your board is native UEFI, so the most powerful and error-free tool is the EFI Shell. Here is a step-by-step guide to doing it correctly:
1. Prepare the USB Drive (from Windows)
Format the USB drive to FAT32 (you don’t need Rufus; the standard Windows format is sufficient).
Download the specific package for X99: Search Google for “Intel ME System Tools v9.1 r7” (this is the official package containing the correct tools for your board).
Open the ZIP file and navigate to: Flash Programming Tool -> EFI64.
Copy the fpt.efi (or fpt64.efi) file to the empty USB drive.
2. Launch the Shell
Restart your PC with the USB drive inserted.
Enter the BIOS or Boot Menu (usually F11 or F7).
Select the option “UEFI: Built-in EFI Shell” or, if that is missing, select your USB drive with the UEFI prefix.
3. Enter the Commands
You will see a black screen with yellow/white text (Shell>).
Type fs0: and press Enter (if you get an error, try fs1: or fs2: until the prompt changes to FS0:\>).
Type ls (or dir) to check: if you see the fpt.efi file in the list, you are in the right place.
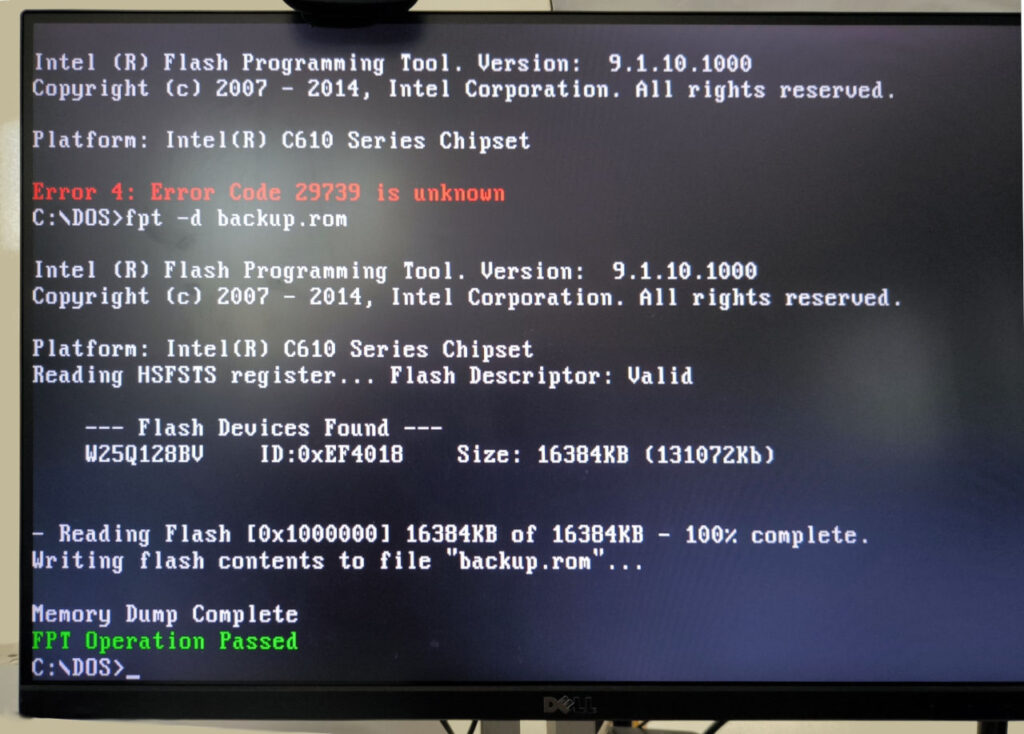
Now run the command:
fpt.efi -d backup.rom
If everything goes well, you will see a green progress bar and finally “FPT Operation Passed”.
Using DOS
If you absolutely cannot boot into the EFI Shell and want to use DOS (FreeDOS), you must replace the fpt.exe file on your USB drive. The one you are currently using is incorrect.
Search for the “Intel ME System Tools v9.1 r7” package again.
This time, navigate to the folder Flash Programming Tool -> DOS.
Take that specific fpt.exe file (it must be accompanied by fparts.txt or similar; copy the entire content of the DOS folder).
Replace the files on your Rufus-created USB drive with these new ones.
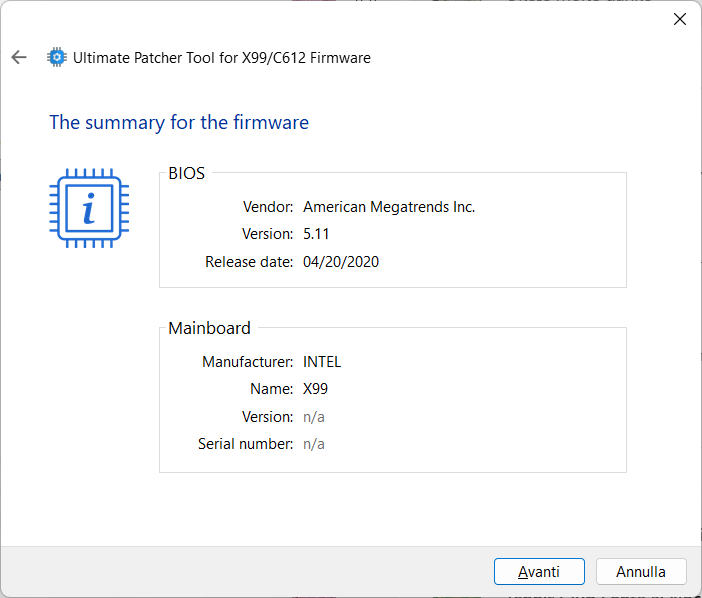
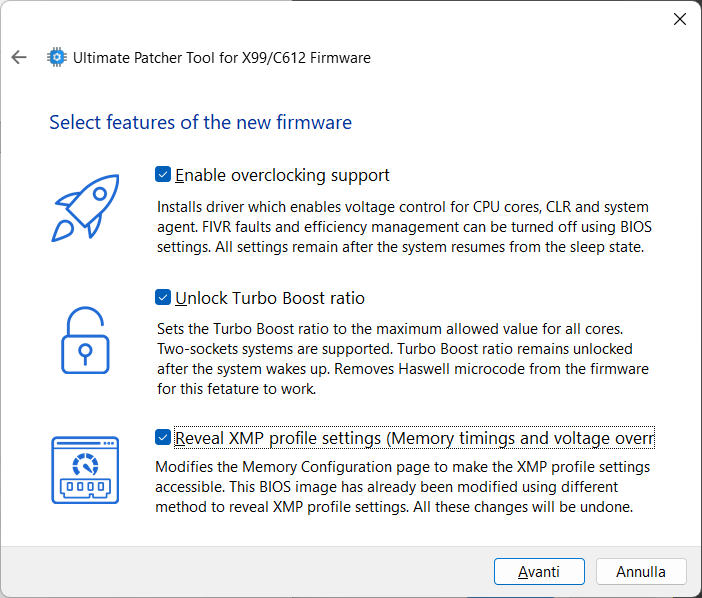
Enabling “Unlock Turbo Boost” and Overclocking support features
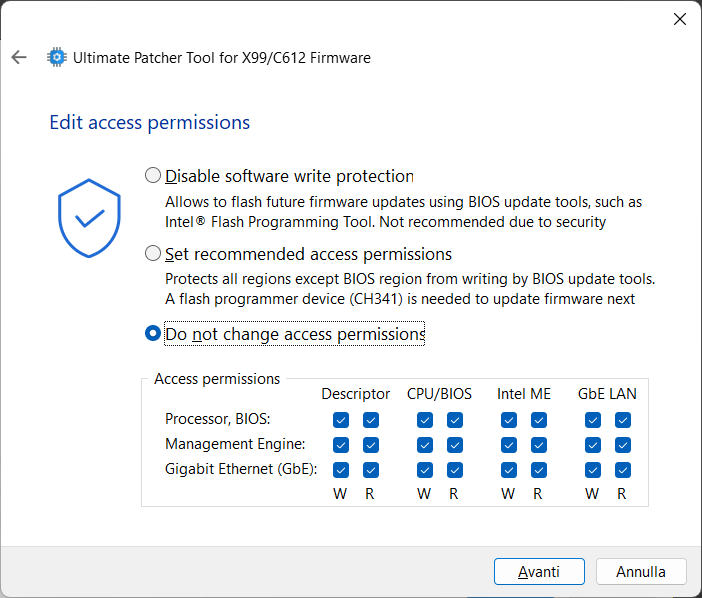
3. Access Permissions
Selection: “Do not change access permissions.”
Why: You are using a hardware programmer (CH341A + Clip), so you don’t need to patch software protections. You will be writing directly to the chip, bypassing the OS restrictions.
Permission settings (left default for hardware programming)
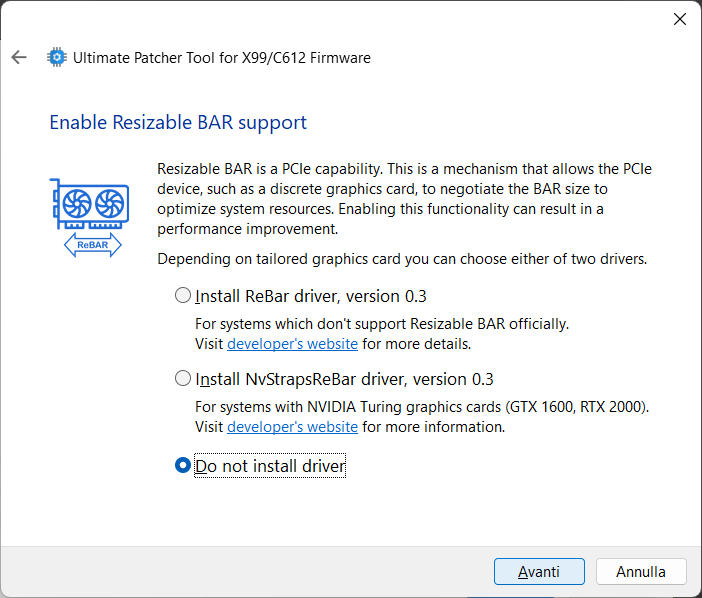
4. Resizable BAR (ReBar)
Selection: “Do not install driver.”
Note: You have chosen not to add Resizable BAR support yet. This is the safe choice for stability. If you have a modern GPU (RTX 3000+ / RX 6000+), you can re-run this tool later to add it.
Resizable BAR menu (Driver installation skipped)
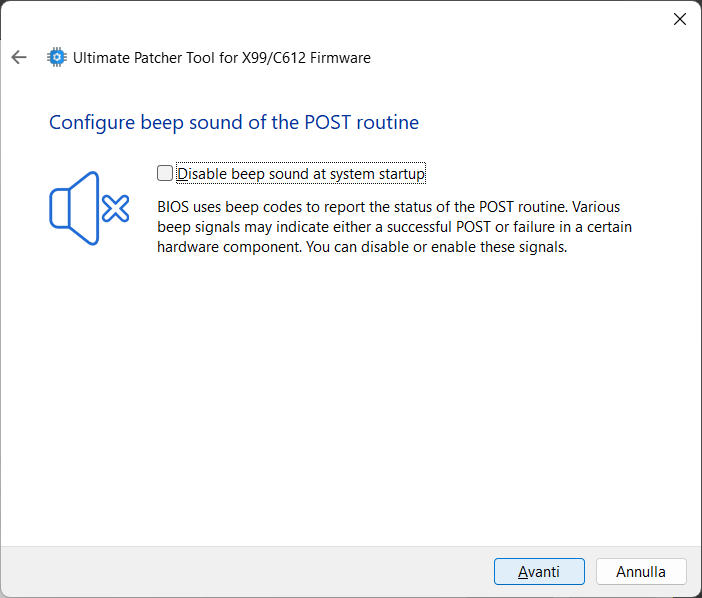
5. Customization (Logo & Sound)
Logo: Kept at default (American Megatrends).
Sound: The startup “Beep” sound is kept enabled.
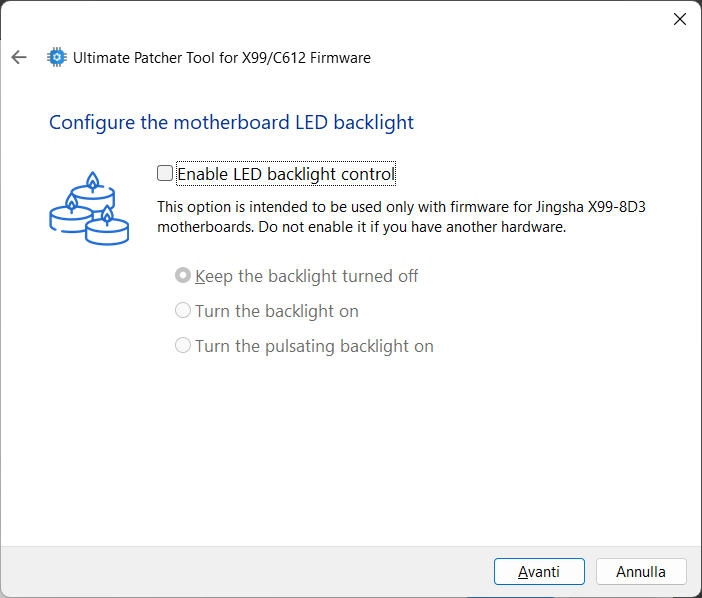
6. LED Control
Selection: Unchecked (Default).
Note: This is specific to “Jingsha” boards. Since you have a ZX-99EV3, it is correct to ignore this.
Mod the bios: S3TurboTool Steps (discouraged)
You can find this guide here. I replicated the steps for your handful, but the original one is from this site.
Click the [Load Image] button and select your BIOS file.
S3TurboTool: Click the [Load Image] button and select your BIOS file
Navigate to the [Cpu Patch] tab.
S3TurboTool: Navigate to the [Cpu Patch] tab
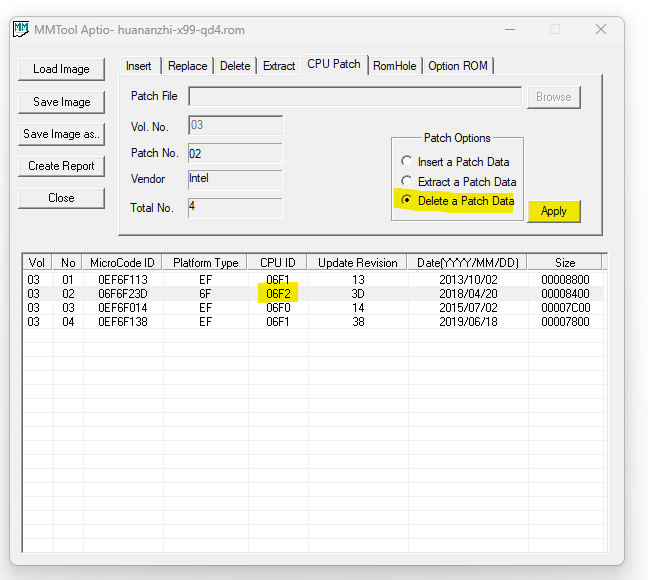
Find and delete all entries from the table where CPU ID equals to 06F2.
S3TurboTool: Find and delete all entries from the table where CPU ID equals to 06F2.
Save the modified BIOS.
Set CPU C State options
Launch the AMIBCP5.exe application.
Open the BIOS file saved in the previous step.
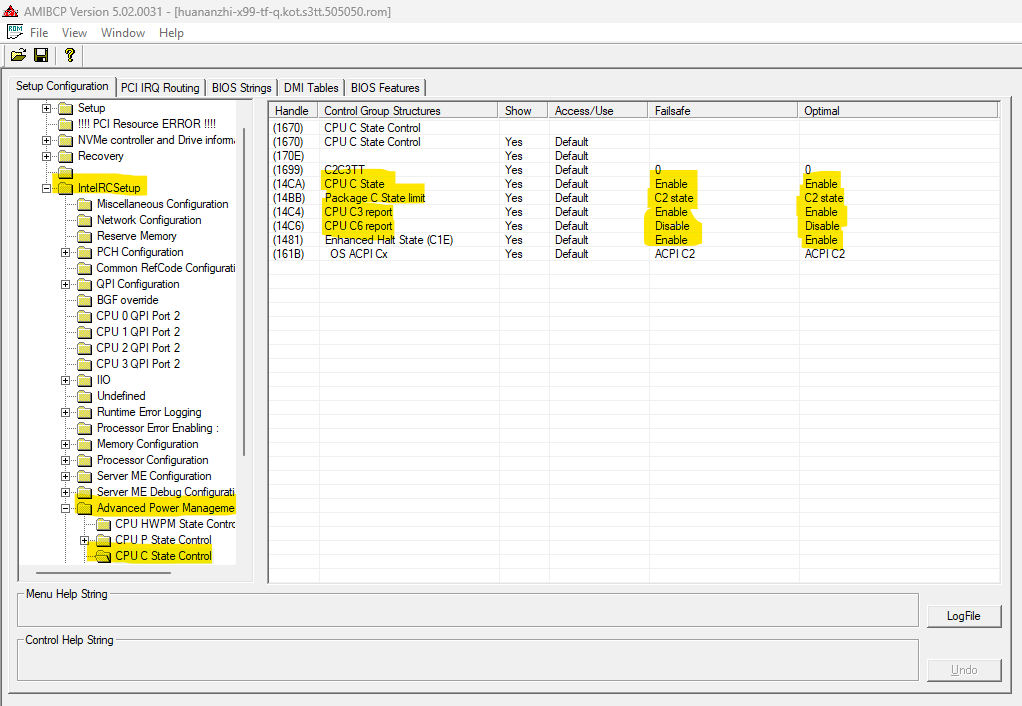
In the left tree find the CPU C State Control option, usually it’s located at the following path: Common RefCode Configuration → IntelRCSetup → Advanced Power Management Configuration → CPU C State Control.
S3TurboTool: Common RefCode Configuration → IntelRCSetup → Advanced Power Management Configuration → CPU C State Control
Set the following values:
Package C State limit to C2 state.
CPU C3 report to Enable.
CPU C6 report to Disable.
Close AMIBCP5 application and agree to save changes.
Inject required TBU driver – Single Socket
Launch the UEFITool.exe application.
Open the BIOS file saved in the previous step.
Inside Intel image → BIOS region search for entry PchS3Peim with UID 271DD6F2-54CB-45E6-8585-8C923C1AC706.
Right-click on the PchS3Peim entry and select [Replace as is ...].
S3TurboTool: Right-click on the PchS3Peim entry and select [Replace as is …]
Select the desired .ffs file you want to inject.
Save the changes.
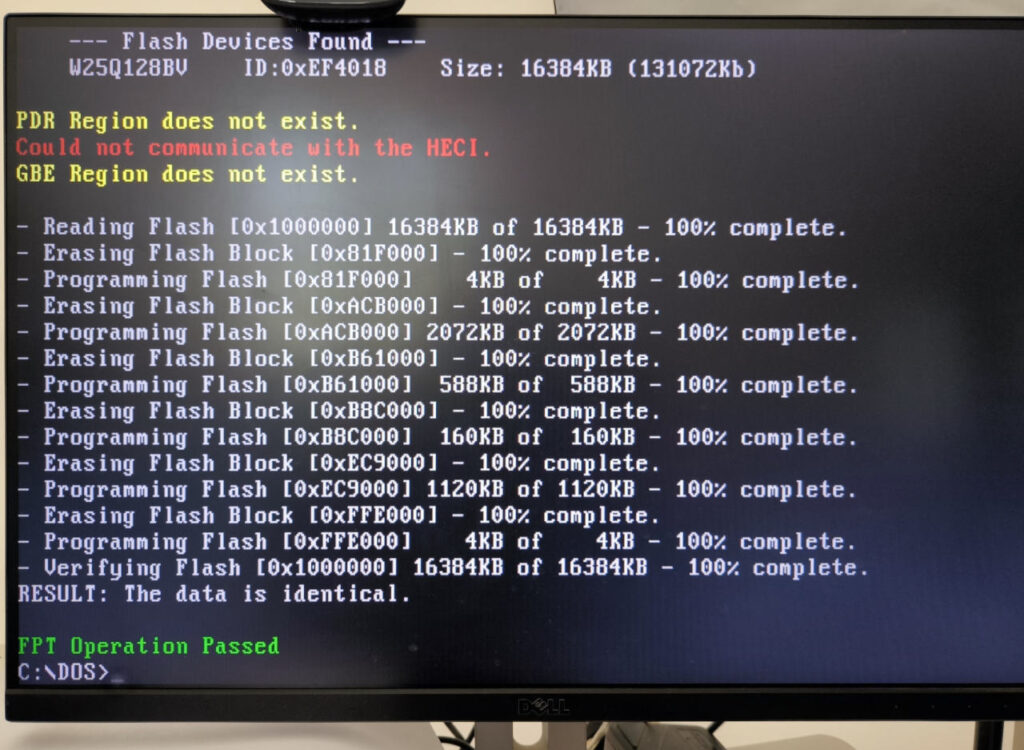
Flash the Modified BIOS
Boot back into EFI Shell.
Run: fpt.efi -f mod.rom
Error 280? If you get a “Write Protection” error, you must disable BIOS Lock in the BIOS settings (Intel RC Setup > PCH Configuration > Security).
FPT output showing successful flash of the W25Q128BV chip
After flashing, perform a Load Optimized Defaults in the BIOS.
Disable C3/C6 States in “Power Management” to prevent freezing.
The Hardware Approach (CH341A Programmer)
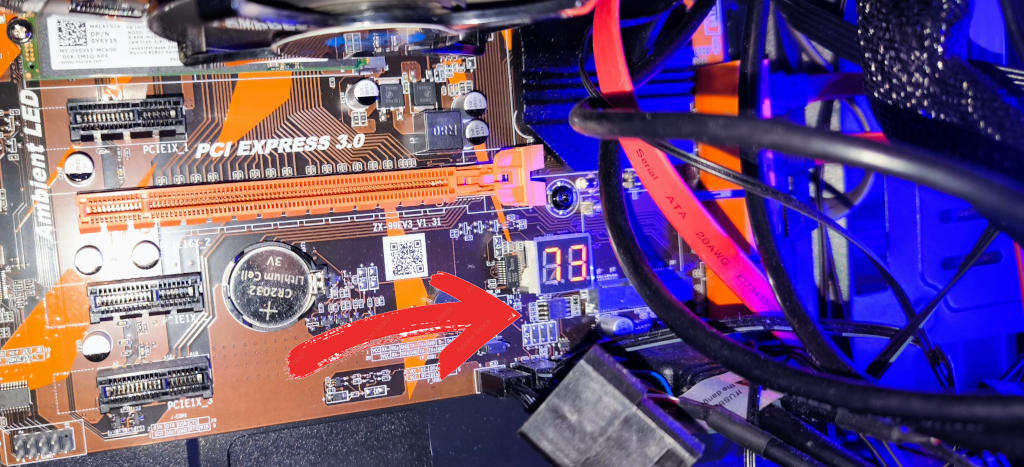
BIOS chip location on X99 motherboard (ZX-99EV3), located between the CMOS battery and the Debug display
If your motherboard doesn’t turn on, hangs on a specific debug code (like 79, FF, or 00), or you flashed a bad undervolt setting, the software method won’t work. You need a hardware programmer.
This is extremely common when experimenting with memory timings or aggressive undervolting (e.g., -70mV/ -90mV).
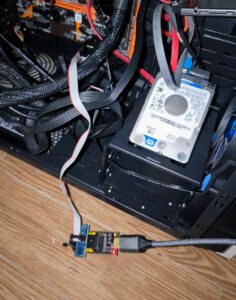
CH341A connected to the motherboard via extension cable
Prerequisites
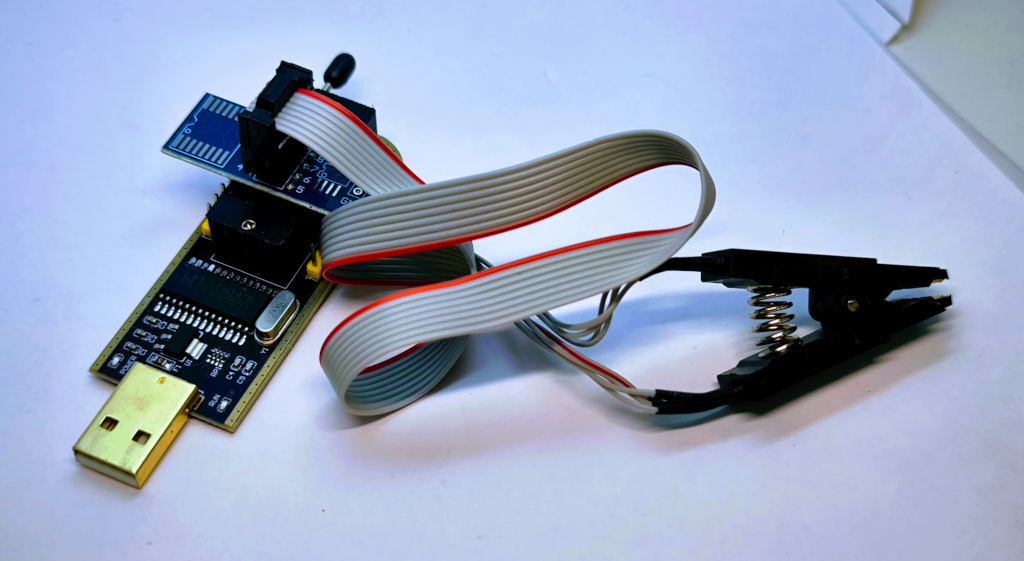
CH341A USB Programmer (Black or Green edition) with a SOIC8 Clip.
NeoProgrammer software (Version 2.2+ is recommended for X99 chips).
A second working computer.
Technical Insight: The CH341A interacts directly with the Serial Peripheral Interface (SPI). For a comprehensive explanation of SPI pinouts and interfacing, check my SPI tutorials on mischianti.org.
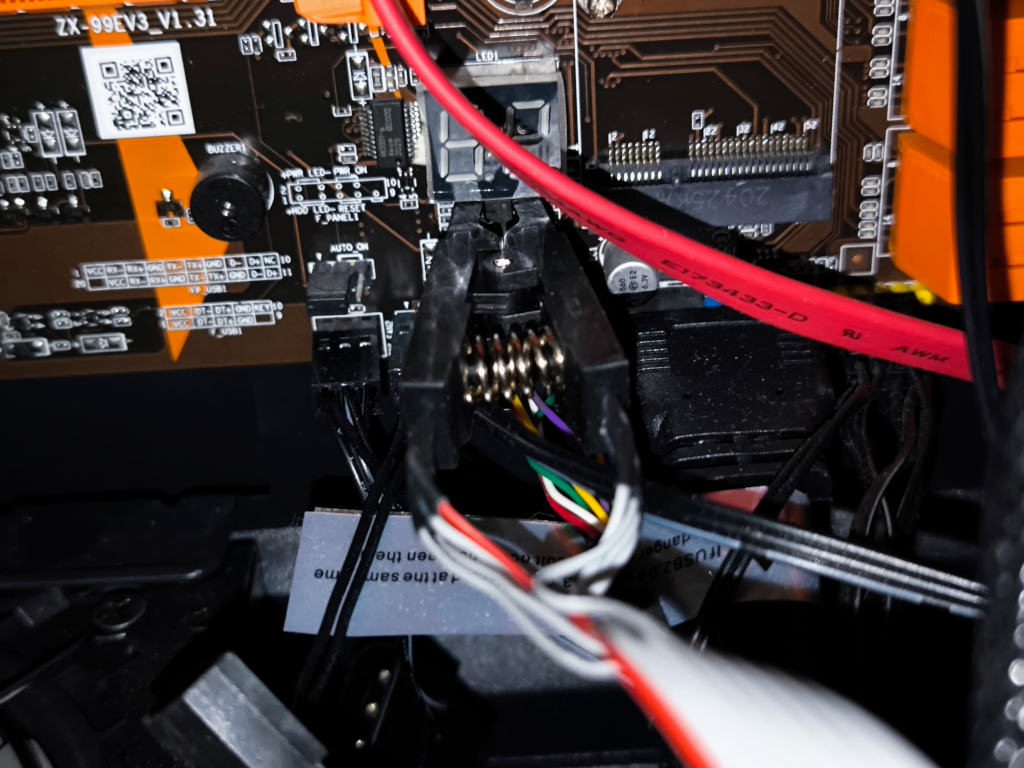
SOIC8 Programming Clip attached to the BIOS chip
The ZX-99EV3 v1.31 Procedure
Locate the BIOS Chip:
On the ZX-99EV3 v1.31, the BIOS chip is an 8-pin Winbond W25Q128 (16MB).
It is located in the bottom-right corner, near the SATA ports and the front panel headers.
Prepare the Board:
Power OFF: Unplug the PSU cable.
Remove Battery: Take out the CR2032 battery.
Jumper Check: Ensure the JCMOS1 jumper is in the default position (1-2) or removed. Do not leave it on 2-3, or the board will appear dead.
Connect the Clip:
Match the Red Wire on the clip to Pin 1 on the chip (indicated by a small dot or indentation on the chip surface).
If the clip is incorrectly connected, you don’t get the correct chip.
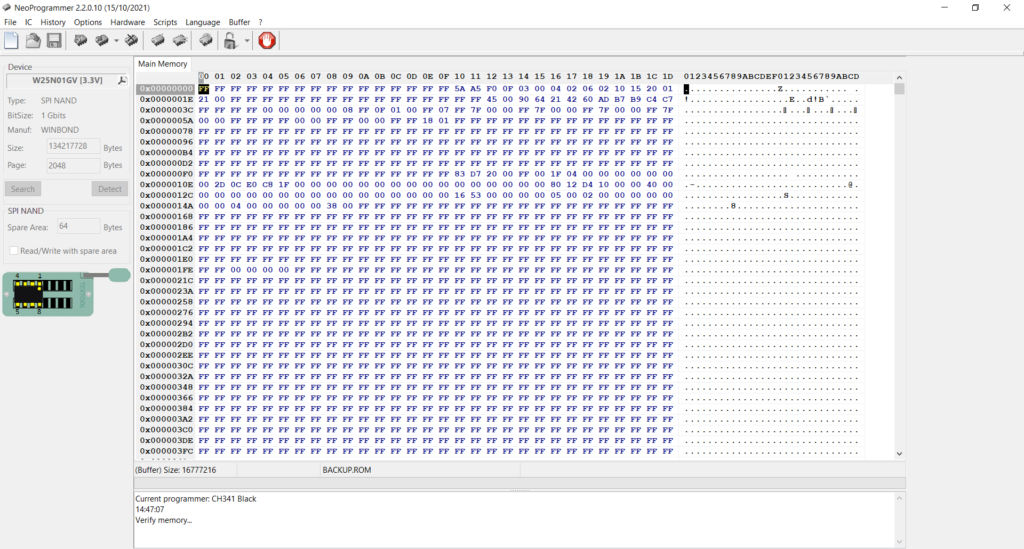
Verification of memory content showing a potential chip model/size mismatch (W25N01GV selected)
Flash with NeoProgrammer:
Detect: Click “Detect”. Ensure it identifies a W25Q128 (SPI NOR) and not a generic N01GV (NAND). If detection fails, reseat the clip.
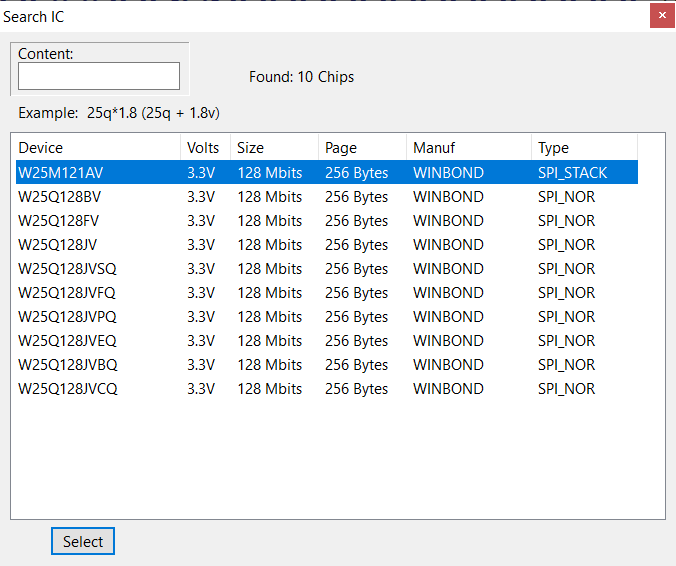
Selecting the correct Winbond W25Q128BV model from the database
Read (Optional): If you haven’t backed up before, click “Read” to save the current (corrupt) state, just in case.
Erase: Click “Erase” to wipe the chip.
Blank Check: Verify the chip is empty.
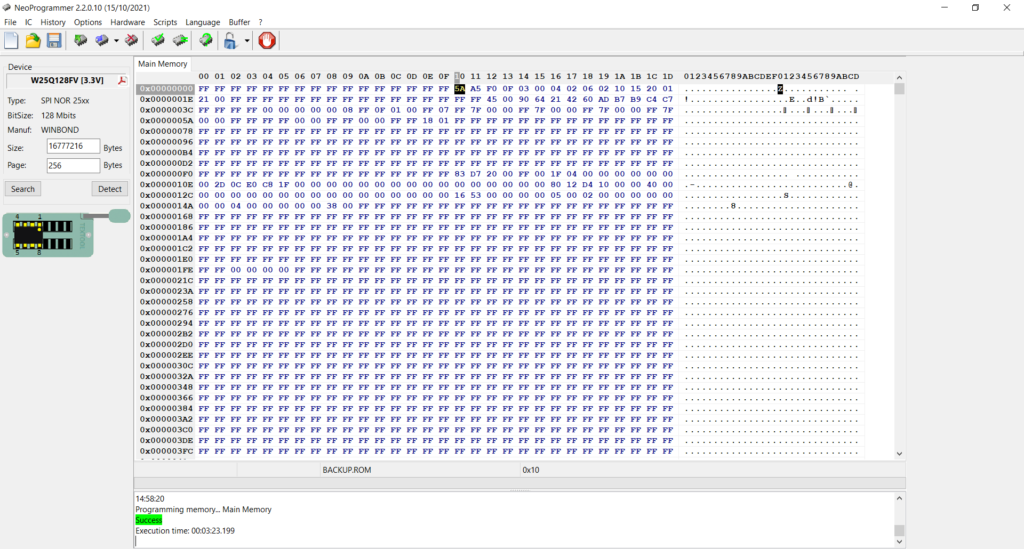
Write: Load your known good backup.rom (or a clean stock BIOS) and click “Program”.
NeoProgrammer confirms “Success” after writing Main Memory
Verify: Wait for the “Success” message.
Troubleshooting: “My PC Won’t Turn On After Flashing!”
If you flashed the chip successfully but the fans don’t spin:
Check the PSU Switch: It sounds trivial, but ensure you actually flipped the I/O switch on the power supply back to “I” (On). It happens to the best of us!
Drain Power: Unplug the cord, hold the power button for 30 seconds to drain capacitors.
CMOS Reset: Double-check that the Clear CMOS jumper is NOT in the shorted position.
First Boot Delay: The first boot after a hardware flash triggers “Memory Training”. The screen may remain black for 1-3 minutes. Be patient.
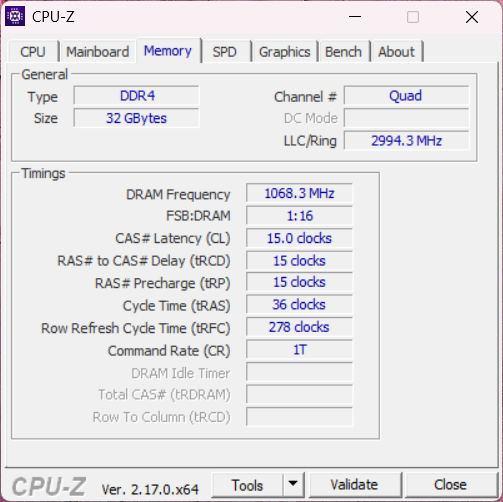
Performance Breakdown: Stock vs. Turbo Unlock
CPU-Z confirming All-Core Turbo Boost locked at 3.3GHz
The following table highlights the tangible gains achieved by applying the Turbo Unlock modification and optimizing the memory configuration on the Intel Xeon E5-2699 v3.
Feature
Stock Configuration
Unlocked & Optimized (Current)
Improvement
All-Core Frequency
~2.80 GHz (x28 Multiplier)
3.30 GHz (x33 Multiplier)
+17.8% Speed
Active Cores @ Max Speed
1-2 Cores
All 18 Cores
Massive Multi-thread Gain
Memory Mode
Single/Dual Channel (64/128-bit)
Quad Channel (256-bit)
Double Bandwidth
System Stability
Conservative
Optimized for AVX
Tuned for heavy workloads
Why Quad Channel is Critical for 18 Cores
Having a powerful CPU like the 18-core Xeon E5-2699 v3 without Quad Channel memory is like having a Ferrari engine with a restricted fuel line. The CPU processes data faster than the RAM can provide it, creating a bottleneck.
Single Channel (1 Stick): 1 Lane of Traffic. The 18 cores must wait in line for data.
Result: Stuttering in games, slow render times.
Dual Channel (2 Sticks): 2 Lanes of Traffic. Better, but still limits this specific CPU under full load.
Result: Decent performance, but leaves potential on the table.
Quad Channel (4 Sticks): 4 Lanes of Traffic (High-Speed Highway).
Result: As confirmed by the CPU-Z validation, the 4x RAM sticks work in parallel (256-bit width), feeding data instantly to all 18 cores. This is essential for the stability and speed shown in the 3.3 GHz benchmark.
The “33x vs 36x” Stability Choice
You might notice that while the theoretical maximum multiplier for the E5-2699 v3 is 36x (3.6 GHz), the unlocked result is stabilized at 33x (3.3 GHz). This is not an error, but a deliberate architectural limitation for system stability.
The AVX Offset: High-performance workloads (like rendering or stress tests) use AVX instructions, which generate significant heat. The CPU automatically applies a negative offset (typically -300 MHz) to protect the silicon and the motherboard’s VRMs from melting.
TDP Limits: Running 18 cores at 3.6 GHz would require power delivery far exceeding the 145W TDP rating.
The Sweet Spot: By locking all cores to 33x, we achieve the perfect balance: the CPU runs significantly faster than the stock 28x without crashing or thermal throttling, ensuring the system remains rock-solid for 24/7 usage.
Thanks
Flashing the BIOS on X99 boards like the ZX-99EV3 is a rite of passage for Xeon enthusiasts. Whether you are doing it via software to get free performance or using a CH341A to recover from a brick, the process is straightforward if you follow the rules.
Support free knowledge!To keep this site free, I use affiliate links. If you buy through these links, I receive a small commission at no extra cost to you. It’s a simple way to support my work. Thank you!
Maintaining a repository (or site or forum) is a lot like tending to a garden - it requires constant care and attention to keep it thriving. If you're a skilled gardener (or coder!) and want to help keep our repository blooming, we'd love to have you on board! We're also looking for talented writers and forum moderators to help us grow our community. Interested in joining our team? Don't hesitate to reach out and let us know how you can contribute!
Are you a fan of electronics or programming? Share your knowledge with others, write a simple tutorial or how to make a great project Contact me: share_your_ideas@mischianti.org
The content displayed on this website is protected under a CC BY-NC-ND license. Visitors are prohibited from using, redistributing, or altering any content from this website for commercial purposes, including generating revenue through advertising. Any unauthorized use is a violation of the license terms and legal action may be taken against individuals or entities found to be in violation.
You must also provide the link to the source.
We are a big community of makers here! 🤝 We use cookies to serve you better content (no spam, we promise!). By clicking “I Understand” or by continuing to browse, you support our work and accept the tracking. If you do not agree with the community spirit, please close this page and exit the website.
Just like a well-organized workbench, this website uses cookies to function properly and efficiently.
🛠️ The Essentials (Necessary): Some cookies are categorized as necessary and are stored on your browser because they are critical for the basic working of the site.
📊 The Analytics (Third-party): We also use third-party cookies to help us analyze traffic and understand which projects you like the most. These are stored only if you give us the green light.
You can choose to opt-out, but keep in mind that disabling them might make the site experience a bit less "smooth".
Necessary cookies are absolutely essential for the website to function properly. These cookies ensure basic functionalities and security features of the website, anonymously.
Cookie
Duration
Description
cookielawinfo-checkbox-analytics
11 months
This cookie is set by GDPR Cookie Consent plugin. The cookie is used to store the user consent for the cookies in the category "Analytics".
cookielawinfo-checkbox-functional
11 months
The cookie is set by GDPR cookie consent to record the user consent for the cookies in the category "Functional".
cookielawinfo-checkbox-necessary
11 months
This cookie is set by GDPR Cookie Consent plugin. The cookies is used to store the user consent for the cookies in the category "Necessary".
cookielawinfo-checkbox-others
11 months
This cookie is set by GDPR Cookie Consent plugin. The cookie is used to store the user consent for the cookies in the category "Other.
cookielawinfo-checkbox-performance
11 months
This cookie is set by GDPR Cookie Consent plugin. The cookie is used to store the user consent for the cookies in the category "Performance".
viewed_cookie_policy
11 months
The cookie is set by the GDPR Cookie Consent plugin and is used to store whether or not user has consented to the use of cookies. It does not store any personal data.
Functional cookies help to perform certain functionalities like sharing the content of the website on social media platforms, collect feedbacks, and other third-party features.
Performance cookies are used to understand and analyze the key performance indexes of the website which helps in delivering a better user experience for the visitors.
Analytical cookies are used to understand how visitors interact with the website. These cookies help provide information on metrics the number of visitors, bounce rate, traffic source, etc.
Advertisement cookies are used to provide visitors with relevant ads and marketing campaigns. These cookies track visitors across websites and collect information to provide customized ads.


![S3TurboTool: Click the [Load Image] button and select your BIOS file](https://mischianti.org/wp-content/uploads/2025/12/s3turbotool-load-image-select-your-bios.jpg)
![S3TurboTool: Navigate to the [Cpu Patch] tab](https://mischianti.org/wp-content/uploads/2025/12/S3TurboTool-Cpu-Patch-tab.jpg)
![S3TurboTool: Right-click on the PchS3Peim entry and select [Replace as is ...]](https://mischianti.org/wp-content/uploads/2025/12/S3TurboTool-Inject-TBU-driver-1024x573.jpg)