WebSocket on Arduino, esp8266 and esp32: client – 1
Definition
WebSocket is a computer communications protocol, providing full-duplex communication channels over a single TCP connection.
Unlike HTTP, WebSocket provides full-duplex communication. Additionally, WebSocket enables streams of messages on top of TCP. TCP alone deals with streams of bytes with no inherent concept of a message.(ct. wiki)
So with WebSocket you can do a full-duplex communucation, and by subscribing to a channel, you can avoid polling. I used this protocol in a lot of application, and I think become the future of modern application.
Architecture
Basically you have a server that share the service, and a set of client that can connect to the server.
The connection open a channel from the devices, but to get information you must subscribe to a topic (sometime subscription is implicit with connect).
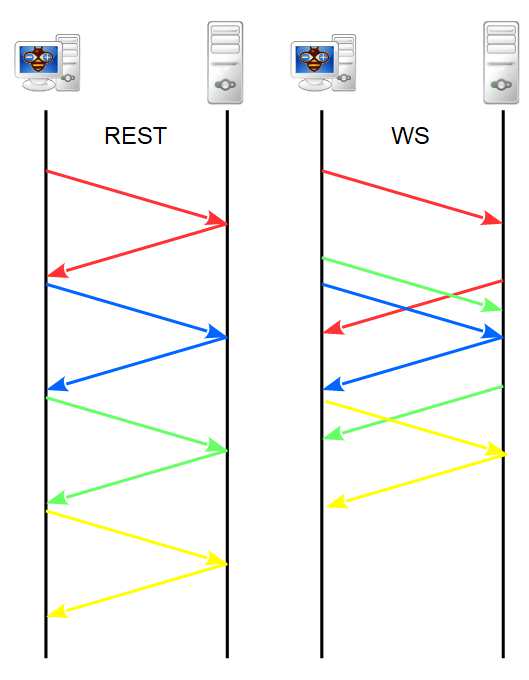
The big difference from REST server is that in an http request you send request and you must wait response to have the data and start new request on the same connection, with the WS you can stream requests and stream responses than operate when you want.
But how can we use the WebSocket in our projects?
A classic example is a table with a lot of row, first we do a REST call and get all the data of the table, but to update the single cell we can use WebSocket subscription, and with JavaScript go to update single cell maybe with a nice graphic effect.
WebSocket client
Now we are going to see a simple WebSocket client, that are going to connect to a WebSocket echo server. Its behavior is pretty simple, you send a message and the server replies with the same message, so you can test the send and the receive of your Client.
I add this simple WebSocket test client in js here, you can test the behavior.
WebSocket Test Client
My site is in https so the embedded clien works only on wss not ws (we use ws without secure layer), so I create a link to a simple http version of the client here.
JavaScript WebSocket client
Here a simplified version of WebSocket test client
<!--
js simple WebSocket client
https://www.mischainti.org

I use the ws://echo.websocket.org/ echo server
When you send a message to this server you receive
a response with the same message
-->

<!DOCTYPE html>
<html>
<head>
    <meta charset="utf-8"/>
    <title>WebSocket Test</title>
    <style>
        #output {
            border: solid 1px #999999;
            border-top-color: #CCCCCC;
            border-left-color: #CCCCCC;
            padding: 5px;
            width: 300px;
            height: 172px;
            overflow-y: scroll;

            font-family: "Open Sans";
            font-size: 13px;
        }
    </style>
    <script language="javascript" type="text/javascript">

        var wsUri = "wss://echo.websocket.org/";
        var output;

        function init() {
            output = document.getElementById("output");
            testWebSocket();
        }

        function testWebSocket() {
            websocket = new WebSocket(wsUri);
            websocket.onopen = function (evt) {
                onOpen(evt)
            };
            websocket.onclose = function (evt) {
                onClose(evt)
            };
            websocket.onmessage = function (evt) {
                onMessage(evt)
            };
            websocket.onerror = function (evt) {
                onError(evt)
            };
        }

        function onOpen(evt) {
            writeToScreen("CONNECTED");
            // doSend("Hi, I'm simple JS client!!");
        }

        function onClose(evt) {
            writeToScreen("DISCONNECTED");
        }

        function onMessage(evt) {
            writeToScreen('<span style="color: blue;">RESPONSE: ' + evt.data + '</span>');
            // websocket.close();
        }

        function onError(evt) {
            writeToScreen('<span style="color: red;">ERROR:</span> ' + evt.data);
        }

        function doSend(message) {
            writeToScreen("SENT: " + message);
            websocket.send(message);
        }

        function writeToScreen(message) {
            var pre = document.createElement("p");
            pre.style.wordWrap = "break-word";
            pre.innerHTML = message;
            output.appendChild(pre);

            output.scrollTop = output.scrollHeight;
        }

        window.addEventListener("load", init, false);

    </script>
</head>
<body>

<h2>WebSocket Test</h2>


<div id="output"></div>
<br/>
<input type="button" value="Send message!" onclick="doSend('Simple js client message!!')"/></div>
<input type="button" value="Close connection!" onclick="websocket.close()"/></div>

</body>
</html>
The core part of the code is
        function testWebSocket() {
            websocket = new WebSocket(wsUri);
            websocket.onopen = function (evt) {
                onOpen(evt)
            };
            websocket.onclose = function (evt) {
                onClose(evt)
            };
            websocket.onmessage = function (evt) {
                onMessage(evt)
            };
            websocket.onerror = function (evt) {
                onError(evt)
            };
        }
This simple code do a connection, and attach a series of callback functions to a specified events:
- onopen: this is called when connection is establish;
- onclose: when client is disconnected;
- onmessage: here when a message is arrived;
- onerror: when an error is generated.
As you can see to send message you must simply call websocket.send after the connection.
Library
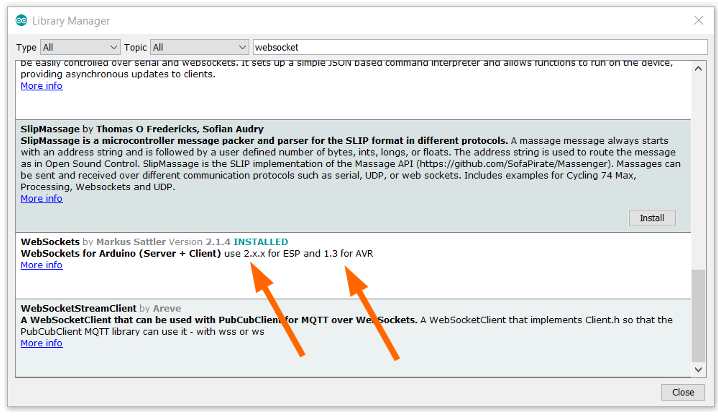
You can find the library directly in the Arduino libraries repository (Tools --> Manage libraries..).
Pay attention for esp8266 and esp32 you must use 2.x.x version for AVR you must use 1.3 version.
esp8266 WebSocket client
To connect with your esp8266 the code is quite simple
/*
 * esp8266 simple WebSocket client
 * https://www.mischainti.org
 *
 * I use the ws://echo.websocket.org/ echo server
 * When you send a message to this server you receive
 * a response with the same message
 *
 */

#include <Arduino.h>

#include <ESP8266WiFi.h>
#include <WebSocketsClient.h>

WebSocketsClient webSocket;

const char *ssid     = "<YOUR-SSID>";
const char *password = "<YOUR-PASSWD>";

unsigned long messageInterval = 5000;
bool connected = false;

#define DEBUG_SERIAL Serial

void webSocketEvent(WStype_t type, uint8_t * payload, size_t length) {
	switch(type) {
		case WStype_DISCONNECTED:
			DEBUG_SERIAL.printf("[WSc] Disconnected!\n");
			connected = false;
			break;
		case WStype_CONNECTED: {
			DEBUG_SERIAL.printf("[WSc] Connected to url: %s\n", payload);
			connected = true;

			// send message to server when Connected
			DEBUG_SERIAL.println("[WSc] SENT: Connected");
			webSocket.sendTXT("Connected");
		}
			break;
		case WStype_TEXT:
			DEBUG_SERIAL.printf("[WSc] RESPONSE: %s\n", payload);
			break;
		case WStype_BIN:
			DEBUG_SERIAL.printf("[WSc] get binary length: %u\n", length);
			hexdump(payload, length);
			break;
                case WStype_PING:
                        // pong will be send automatically
                        DEBUG_SERIAL.printf("[WSc] get ping\n");
                        break;
                case WStype_PONG:
                        // answer to a ping we send
                        DEBUG_SERIAL.printf("[WSc] get pong\n");
                        break;
    }

}

void setup() {
	DEBUG_SERIAL.begin(115200);

//	DEBUG_SERIAL.setDebugOutput(true);

	DEBUG_SERIAL.println();
	DEBUG_SERIAL.println();
	DEBUG_SERIAL.println();

	for(uint8_t t = 4; t > 0; t--) {
		DEBUG_SERIAL.printf("[SETUP] BOOT WAIT %d...\n", t);
		DEBUG_SERIAL.flush();
		delay(1000);
	}

    WiFi.begin(ssid, password);

    while ( WiFi.status() != WL_CONNECTED ) {
      delay ( 500 );
      Serial.print ( "." );
    }
    DEBUG_SERIAL.print("Local IP: "); DEBUG_SERIAL.println(WiFi.localIP());
	// server address, port and URL
	webSocket.begin("echo.websocket.org", 80, "/");

	// event handler
	webSocket.onEvent(webSocketEvent);
}

unsigned long lastUpdate = millis();


void loop() {
	webSocket.loop();
	if (connected && lastUpdate+messageInterval<millis()){
		DEBUG_SERIAL.println("[WSc] SENT: Simple js client message!!");
		webSocket.sendTXT("Simple js client message!!");
		lastUpdate = millis();
	}
}
The core part is:
	switch(type) {
		case WStype_DISCONNECTED:
			DEBUG_SERIAL.printf("[WSc] Disconnected!\n");
			connected = false;
			break;
		case WStype_CONNECTED: {
			DEBUG_SERIAL.printf("[WSc] Connected to url: %s\n", payload);
			connected = true;

			// send message to server when Connected
			DEBUG_SERIAL.println("[WSc] SENT: Connected");
			webSocket.sendTXT("Connected");
		}
			break;
		case WStype_TEXT:
			DEBUG_SERIAL.printf("[WSc] RESPONSE: %s\n", payload);
			break;
		case WStype_BIN:
			DEBUG_SERIAL.printf("[WSc] get binary length: %u\n", length);
			hexdump(payload, length);
			break;
                case WStype_PING:
                        // pong will be send automatically
                        DEBUG_SERIAL.printf("[WSc] get ping\n");
                        break;
                case WStype_PONG:
                        // answer to a ping we send
                        DEBUG_SERIAL.printf("[WSc] get pong\n");
                        break;
    }
e puoi controllare vari eventi:
- WStype_CONNECTED: when connection is established;
- WStype_DISCONNECTED: when client is disconnected;
- WStype_TEXT: when a text message arrive;
- WStype_BIN: when binary message arrive;
- WStype_PING and WStype_PONG: here the keep alive message.
To connect you must use this command
// server address, port and URL
webSocket.begin("echo.websocket.org", 80, "/");
and with webSocket.onEvent you attach the callback to the events.
With the client to send a simple message you can use webSocket.sendTXT.
As you can see the management of WS is quite simple and similar in all language.
esp32 WebSocket client
The esp32 version is quite similar to esp8266
/*
 * esp32 simple WebSocket client
 * https://www.mischainti.org
 *
 * I use the ws://echo.websocket.org/ echo server
 * When you send a message to this server you receive
 * a response with the same message
 *
 */

#include <Arduino.h>
#include <WiFi.h>
#include <WebSocketsClient.h>

WebSocketsClient webSocket;

const char *ssid     = "<YOUR-SSID>";
const char *password = "<YOUR-PASSWD>";

unsigned long messageInterval = 5000;
bool connected = false;

#define DEBUG_SERIAL Serial

void hexdump(const void *mem, uint32_t len, uint8_t cols = 16) {
	const uint8_t* src = (const uint8_t*) mem;
	DEBUG_SERIAL.printf("\n[HEXDUMP] Address: 0x%08X len: 0x%X (%d)", (ptrdiff_t)src, len, len);
	for(uint32_t i = 0; i < len; i++) {
		if(i % cols == 0) {
			DEBUG_SERIAL.printf("\n[0x%08X] 0x%08X: ", (ptrdiff_t)src, i);
		}
		DEBUG_SERIAL.printf("%02X ", *src);
		src++;
	}
	DEBUG_SERIAL.printf("\n");
}

void webSocketEvent(WStype_t type, uint8_t * payload, size_t length) {

	switch(type) {
		case WStype_DISCONNECTED:
			DEBUG_SERIAL.printf("[WSc] Disconnected!\n");
			connected = false;
			break;
		case WStype_CONNECTED: {
			DEBUG_SERIAL.printf("[WSc] Connected to url: %s\n", payload);
			connected = true;

			// send message to server when Connected
			DEBUG_SERIAL.println("[WSc] SENT: Connected");
			webSocket.sendTXT("Connected");
		}
			break;
		case WStype_TEXT:
			DEBUG_SERIAL.printf("[WSc] RESPONSE: %s\n", payload);
			break;
		case WStype_BIN:
			DEBUG_SERIAL.printf("[WSc] get binary length: %u\n", length);
			hexdump(payload, length);
			break;
        case WStype_PING:
            // pong will be send automatically
            DEBUG_SERIAL.printf("[WSc] get ping\n");
            break;
        case WStype_PONG:
            // answer to a ping we send
            DEBUG_SERIAL.printf("[WSc] get pong\n");
            break;
	case WStype_ERROR:
	case WStype_FRAGMENT_TEXT_START:
	case WStype_FRAGMENT_BIN_START:
	case WStype_FRAGMENT:
	case WStype_FRAGMENT_FIN:
	    break;
    }
}

void setup() {
	DEBUG_SERIAL.begin(115200);

//	DEBUG_SERIAL.setDebugOutput(true);

	DEBUG_SERIAL.println();
	DEBUG_SERIAL.println();
	DEBUG_SERIAL.println();

	for(uint8_t t = 4; t > 0; t--) {
		DEBUG_SERIAL.printf("[SETUP] BOOT WAIT %d...\n", t);
		DEBUG_SERIAL.flush();
		delay(1000);
	}

    WiFi.begin(ssid, password);

    while ( WiFi.status() != WL_CONNECTED ) {
      delay ( 500 );
      DEBUG_SERIAL.print ( "." );
    }
    DEBUG_SERIAL.print("Local IP: "); DEBUG_SERIAL.println(WiFi.localIP());
	// server address, port and URL
	webSocket.begin("echo.websocket.org", 80, "/");

	// event handler
	webSocket.onEvent(webSocketEvent);
}

unsigned long lastUpdate = millis();


void loop() {
	webSocket.loop();
	if (connected && lastUpdate+messageInterval<millis()){
		DEBUG_SERIAL.println("[WSc] SENT: Simple js client message!!");
		webSocket.sendTXT("Simple js client message!!");
		lastUpdate = millis();
	}
}
But you can immediately find some difference, in the webSocketEvent you have to pay attention to the hexdump method to decode the binary message and there are a set of case switches that must be implemented (I added them at the end).
Arduino Mega WebSocket client with enc28j60
Library and connection schema
With Arduino you must download another version of the library, you must select 1.3 version from library manager or if you want exist a specific branch for the AVR devices.
You can find library here.
To download.
Click the DOWNLOADS button in the top right corner, rename the uncompressed folder WebSocket-ATMega.
Check that the WebSocket-ATMega folder contains WebSocket.cpp and WebSocket.h.
Place the WebSocket-ATMega library folder your /libraries/ folder.
You may need to create the libraries subfolder if its your first library.
Restart the IDE.
I use an enc28j60 adapter with UIPEthernet (Tools --> Manage libraries..), so you must do a change in the library WebSocket, you must change
// select Network type based
#ifdef ESP8266
#define WEBSOCKETS_NETWORK_TYPE NETWORK_ESP8266
#else
#define WEBSOCKETS_NETWORK_TYPE NETWORK_W5100
#endif
in
// select Network type based
#ifdef ESP8266
#define WEBSOCKETS_NETWORK_TYPE NETWORK_ESP8266
#else
#define WEBSOCKETS_NETWORK_TYPE NETWORK_ENC28J60
#endif
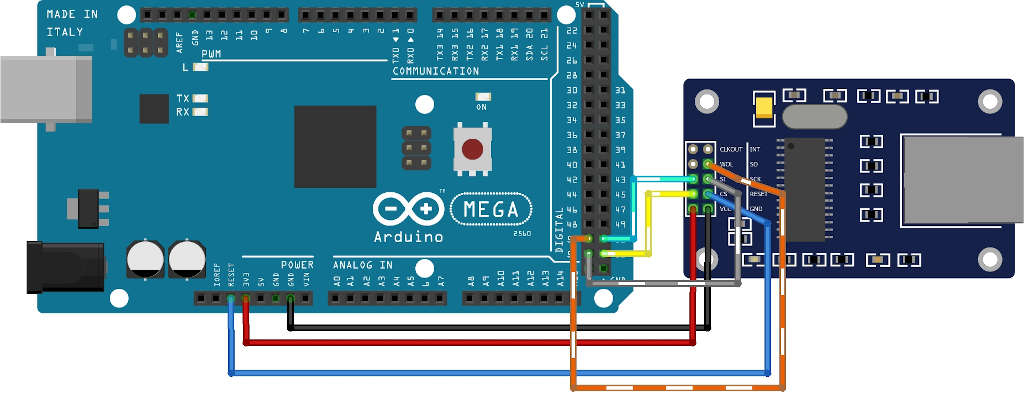
Now the connection schema
I select an Arduino Mega because UIPEthernet need more memory to work.
WebSocket client
Now the sketch
/*
 * Arduino Mega 2560 and enc28j60
 * Simple WebSocket client
 * https://www.mischainti.org
 *
 * I use the ws://echo.websocket.org/ echo server
 * When you send a message to this server you receive
 * a response with the same message
 *
 */


#include <Arduino.h>

#include <SPI.h>
#include <UIPEthernet.h>

#include <WebSocketsClient.h>

#define DEBUG_SERIAL Serial

// Enter a MAC address for your controller below.
// Newer Ethernet shields have a MAC address printed on a sticker on the shield
byte mac[] = { 0xDE, 0xAD, 0xBE, 0xEF, 0xFE, 0xED };

// Set the static IP address to use if the DHCP fails to assign
IPAddress ip(192, 168, 0, 177);

WebSocketsClient webSocket;

unsigned long messageInterval = 5000;
bool connected = false;

void webSocketEvent(WStype_t type, uint8_t * payload, size_t length) {


    switch(type) {
        case WStype_DISCONNECTED:
            DEBUG_SERIAL.println("[WSc] Disconnected!\n");
            connected = false;
            break;
        case WStype_CONNECTED:
            {
    			// send message to server when Connected
    			DEBUG_SERIAL.println("[WSc] SENT: Connected");
                DEBUG_SERIAL.println((char *)payload);
    			webSocket.sendTXT("Connected");

                connected = true;
            }
            break;
        case WStype_TEXT:
			DEBUG_SERIAL.print("[WSc] RESPONSE: ");
			DEBUG_SERIAL.println((char *)payload);
			break;
        case WStype_BIN:
            DEBUG_SERIAL.print("[WSc] get binary length: ");
            DEBUG_SERIAL.println(length);
           // hexdump(payload, length);

            // send data to server
            // webSocket.sendBIN(payload, length);
            break;
		case WStype_ERROR:
			break;
    }

}

void setup()
{
    // Open serial communications and wait for port to open:
    DEBUG_SERIAL.begin(115200);
    while (!Serial) {}

    // start the Ethernet connection:
    if (Ethernet.begin(mac) == 0) {
      DEBUG_SERIAL.println("Failed to configure Ethernet using DHCP");
      Ethernet.begin(mac, ip);
    }
    DEBUG_SERIAL.print("IP address ");
    DEBUG_SERIAL.println(Ethernet.localIP());

    webSocket.begin("echo.websocket.org", 80, "/");
    webSocket.onEvent(webSocketEvent);

}

unsigned long lastUpdate = millis();
void loop() {
	webSocket.loop();
	if (connected && lastUpdate+messageInterval<millis()){
		DEBUG_SERIAL.println("[WSc] SENT: Simple js client message!!");
		webSocket.sendTXT("Simple js client message!!");
		lastUpdate = millis();
	}
}
The sketch is similar, but you can note that there are less event managed (no ping pong), but all core event is correctly manged.
Additional options
SSL
In the previows example we are use a simple connection to ws protocol for exactly we connect to this uri:
but the echo server support SSL also, and you can connect with wss protocol
to do this you must use
webSocket.beginSSL("echo.websocket.org", 80);
Automatic reconnection
Sometime connection can fail, so you can set an automatic reconnection time
	// try ever 5000 again if connection has failed
	webSocket.setReconnectInterval(5000);
Authorization credential
You can also set authorization credentials via this command
	// use HTTP Basic Authorization this is optional remove if not needed
	webSocket.setAuthorization("user", "Password");
Thanks
- WebSocket on Arduino, esp8266 and esp32: client
- WebSocket on Arduino, esp8266 and esp32: server and authentication
- WebSocket on Arduino, esp8266 and esp32: temperature and humidity realtime update
Complete code on GitHub





Can I replace the text
“Simple js client message !! Put the same text in the string variable and display it? I mean send a string variable
Hi mrdsn,
yes, websocket work with string value, you can put JSON value also to send complex data.
Bye Renzo
if i want to make a websocket using a sim800l there is a way to achieve that?
Hi Luis,
yes It’s possible to use MQTT WebSocket with this library TinyGSM.
I find an example code (untested):
// Select your modem: #define TINY_GSM_MODEM_SIM800 // #define TINY_GSM_MODEM_SIM808 // #define TINY_GSM_MODEM_SIM900 // #define TINY_GSM_MODEM_A6 // #define TINY_GSM_MODEM_A7 // #define TINY_GSM_MODEM_M590 // #define TINY_GSM_MODEM_ESP8266 // Increase RX buffer if needed //#define TINY_GSM_RX_BUFFER 512 #include <TinyGsmClient.h> #include <WebSocketsClient.h> #include <Hash.h> WebSocketsClient webSocket; #define MESSAGE_INTERVAL 30000 #define HEARTBEAT_INTERVAL 25000 uint64_t messageTimestamp = 0; uint64_t heartbeatTimestamp = 0; bool isConnected = false; // Uncomment this if you want to see all AT commands //#define DUMP_AT_COMMANDS // Set serial for debug console (to the Serial Monitor, default speed 115200) #define SerialMon Serial // Use Hardware Serial on Mega, Leonardo, Micro #define SerialAT Serial1 // or Software Serial on Uno, Nano //#include <SoftwareSerial.h> //SoftwareSerial SerialAT(2, 3); // RX, TX // Your GPRS credentials // Leave empty, if missing user or pass const char apn[] = "YourAPN"; const char user[] = ""; const char pass[] = ""; // Server details const char resource[] = "/TinyGSM/logo.txt"; #ifdef DUMP_AT_COMMANDS #include <StreamDebugger.h> StreamDebugger debugger(SerialAT, SerialMon); TinyGsm modem(debugger); #else TinyGsm modem(SerialAT); #endif TinyGsmClient client(modem); int waitInternet() { SerialMon.print(F("Waiting for network...")); if (!modem.waitForNetwork()) { SerialMon.println(" fail"); delay(10000); return 0; } SerialMon.println(" OK"); SerialMon.print(F("Connecting to ")); SerialMon.print(apn); if (!modem.gprsConnect(apn, user, pass)) { SerialMon.println(" fail"); delay(10000); return 0; } SerialMon.println(" OK"); webSocket.beginSocketIO("192.168.0.123", 81); //webSocket.setAuthorization("user", "Password"); // HTTP Basic Authorization webSocket.onEvent(webSocketEvent); return 1; } void setup() { // Set console baud rate SerialMon.begin(115200); delay(10); // Set GSM module baud rate SerialAT.begin(115200); delay(3000); // Restart takes quite some time // To skip it, call init() instead of restart() SerialMon.println(F("Initializing modem...")); modem.restart(); String modemInfo = modem.getModemInfo(); SerialMon.print(F("Modem: ")); SerialMon.println(modemInfo); // Unlock your SIM card with a PIN //modem.simUnlock("1234"); } void loop() { while(!waitInternet()) { delay(100); } webSocket.loop(); if(isConnected) { uint64_t now = millis(); if(now - messageTimestamp > MESSAGE_INTERVAL) { messageTimestamp = now; // example socket.io message with type "messageType" and JSON payload webSocket.sendTXT("42[\"messageType\",{\"greeting\":\"hello\"}]"); } if((now - heartbeatTimestamp) > HEARTBEAT_INTERVAL) { heartbeatTimestamp = now; // socket.io heartbeat message webSocket.sendTXT("2"); } } }Does this still work? I couldn’t connect to the server despite copying and pasting the code using an ESP32. I’ve also tried various libraries and different servers, but I still can’t establish a connection.
Hi Ramesh,
When I wrote the code, it was thoroughly tested and worked with the libraries and tools available at that time. However, as technology evolves, library updates, server changes, or even firmware updates can occasionally introduce compatibility issues.
Verify Libraries and Dependencies: Ensure you use the same library versions mentioned in the article (if specified). Sometimes, newer versions introduce changes that require code adjustments.
Double-check the Server: If you’re connecting to an external WebSocket server, confirm it is running correctly and accessible from your ESP32. If it’s a local server, ensure your device is on the same network.
If you need more help, open a forum topic to go deeper into the problem.
Bye Renzo