
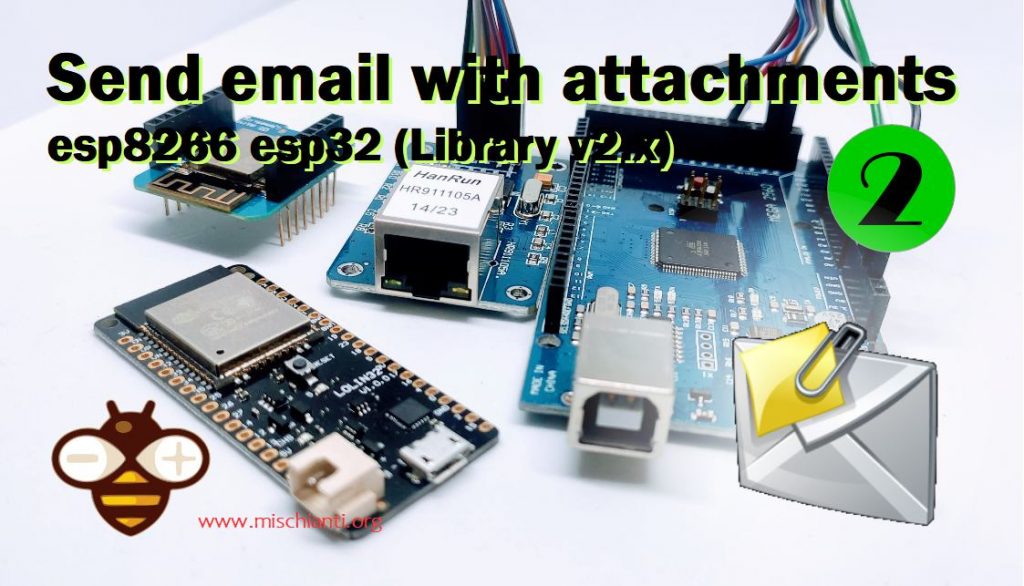
Send emails with attachments (EMailSender v2.x library): esp32 and esp8266 – 2
Here I’d like to explain version 2 of the EMailSender library, significant evolution to version 1, with support for Arduino with w5100, w5200, and w5500 ethernet shields enc28J60 clone devices, and support for esp32 and esp8266.
You can also add attachments loaded from storage devices like SD, SPIFFS, o LittleFS for esp8266.
You can refer to version 1 on this library Send emails with esp8266 and Arduino
Introduction
A simple method to notify a problem is to use email, so I created a library to do It.
This library uses the SMTP:
The Simple Mail Transfer Protocol (SMTP) is a communication protocol for electronic mail transmission. As an Internet standard, SMTP was first defined in 1982 by RFC 821, and updated in 2008 by RFC 5321 to Extended SMTP additions, which is the protocol variety in widespread use today. Mail servers and other message transfer agents use SMTP to send and receive mail messages. Proprietary systems such as Microsoft Exchange and IBM Notes and webmail systems such as Outlook.com, Gmail and Yahoo! Mail may use non-standard protocols internally, but all use SMTP when sending to or receiving email from outside their own systems. SMTP servers commonly use the Transmission Control Protocol on port number 25. (cit WiKi)
For example, I use a Gmail dedicated account; I create a new account because you must reduce Security to use It with an external program.
Library
You can find my library here, or just search for EMailSender on the Arduino IDE library manager.
To download.
Click the DOWNLOADS button in the top right corner, rename the uncompressed folder EMailSender.
Check that the EMailSender folder contains EMailSender.cpp and EMailSender.h.
Place the EMailSender library folder in your /libraries/ folder.
You may need to create the libraries subfolder if it’s your first library.
Restart the IDE.
Usage
Constructor: The default value is quite simple and uses Gmail as an SMTP server.
EMailSender emailSend("smtp.account@gmail.com", "password");
If you want to use another provider, you can use a more complex (but simple) constructor
EMailSender(const char* email_login, const char* email_password, const char* email_from, const char* name_from, const char* smtp_server, uint16_t smtp_port );
	EMailSender(const char* email_login, const char* email_password, const char* email_from, const char* smtp_server, uint16_t smtp_port);
	EMailSender(const char* email_login, const char* email_password, const char* email_from, const char* name_from );
	EMailSender(const char* email_login, const char* email_password, const char* email_from);
	EMailSender(const char* email_login, const char* email_password);
email_login: login to account SMTP- email_password: password account SMTP
- email_from: email of the sender
- name_from: the user name of the sender
smtp_server: server SMTPsmtp_port: SMTP port
You can also manage di parameter in realtime with these commands:
	void setSMTPPort(uint16_t smtp_port);
	void setSMTPServer(const char* smtp_server);
	void setEMailLogin(const char* email_login);
	void setEMailFrom(const char* email_from);
	void setNameFrom(const char* name_from);
	void setEMailPassword(const char* email_password);
Now respect to the v1.x library, you can note that isSecure flag no more exists
isSecure = false: if false BearSSL allows for ‘insecure’ TLS connections (only for >2.4.2 esp8266 core)
but you can manage It with
void setIsSecure(bool isSecure = false);
Another parameter that you can set post constructor is
void setUseAuth(bool useAuth = true);
void setPublicIpDescriptor(const char *publicIpDescriptor = "mischianti");
The first permit excludes the authentication handshake, the second change the HELO message identification.
Updated: 02/01/2021 (v2.1.5)
The other two additional configurations are
	void setEHLOCommand(bool useEHLO = false)
	void setSASLLogin(bool isSASLLogin = false)
The first change HELO command in EHLO, is needed by Postfix SMTP servers.
The second activates SASL login, so the login and password are sent all in one line.
You must connect to WIFI :P.
Basic example with Gmail SMTP
Create a message with the structure EMailMessage
    EMailSender::EMailMessage message;
    message.subject = "Subject";
    message.message = "Hi, How are you<br>Fine.";
Send message:
EMailSender::Response resp = emailSend.send("account_to_send@gmail.com", message);
Then check the response:
    Serial.println("Sending status: ");
    Serial.println(resp.code);
    Serial.println(resp.desc);
    Serial.println(resp.status);
Example output:
Connection: ESTABLISHED
Got IP address: 192.168.1.104
Sending status:
1
0
Message sent!
You can send to a list of emails and select a CC or CCn; for example, send to 3 email
    const char* arrayOfEmail[] = {"<FIRST>@gmail.com", "<SECOND>@yahoo.com", "<THIRD>@hotmail.com"};
    EMailSender::Response resp = emailSend.send(arrayOfEmail, 3, message);
or to 3 emails, the first as To and the last as CC
    const char* arrayOfEmail[] = {"<FIRST>@gmail.com", "<SECOND>@yahoo.com", "<THIRD>@hotmail.com"};
    EMailSender::Response resp = emailSend.send(arrayOfEmail, 1, 2, message);
or first as To, second as CC, and third as CCn
    const char* arrayOfEmail[] = {"<FIRST>@gmail.com", "<SECOND>@yahoo.com", "<THIRD>@hotmail.com"};
    EMailSender::Response resp = emailSend.send(arrayOfEmail, 1,1,1, message);
esp8266
I usually use WeMos D1 mini for my test
You can buy my WeMos D1 mini here WeMos D1 mini - NodeMCU V2 V2.1 V3 - esp01 - esp01 programmer
To send an email with esp8266 with builtin WiFi is quite simple, but you must pay attention to your core version because if you have a core version lesser or equal to 2.4.2, you must select a specified #define.
To select your device, you must go on EMailSenderKey.h library file and replace this line
#define DEFAULT_EMAIL_NETWORK_TYPE_ESP8266 NETWORK_ESP8266
in
#define DEFAULT_EMAIL_NETWORK_TYPE_ESP8266 NETWORK_ESP8266_242
Backward compatibility with library v1.x
To grant backward compatibility with library version 1.x, you can also uncomment the identical define of the old library.
So if you have an esp8266 core 2.4.2 or less, you must uncomment this line
// Uncomment if you use esp8266 core <= 2.4.2
#define ARDUINO_ESP8266_RELEASE_2_4_2
Send simple email
So here is an example of a simple EMail sent with a GMail provider (configure GMail as described at the end of the article).
/*
 * EMailSender library for Arduino, esp8266 and esp32
 * Simple esp8266 Gmail send example
 *
 * https://mischianti.org/category/my-libraries/emailsender-send-email-with-attachments/
 *
 */

#include "Arduino.h"
#include <EMailSender.h>
#include <ESP8266WiFi.h>

const char* ssid = "<YOUR-SSID>";
const char* password = "<YOUR-PASSWD>";

uint8_t connection_state = 0;
uint16_t reconnect_interval = 10000;

EMailSender emailSend("smtp.account@gmail.com", "password");

uint8_t WiFiConnect(const char* nSSID = nullptr, const char* nPassword = nullptr)
{
    static uint16_t attempt = 0;
    Serial.print("Connecting to ");
    if(nSSID) {
        WiFi.begin(nSSID, nPassword);
        Serial.println(nSSID);
    }

    uint8_t i = 0;
    while(WiFi.status()!= WL_CONNECTED && i++ < 50)
    {
        delay(200);
        Serial.print(".");
    }
    ++attempt;
    Serial.println("");
    if(i == 51) {
        Serial.print("Connection: TIMEOUT on attempt: ");
        Serial.println(attempt);
        if(attempt % 2 == 0)
            Serial.println("Check if access point available or SSID and Password\r\n");
        return false;
    }
    Serial.println("Connection: ESTABLISHED");
    Serial.print("Got IP address: ");
    Serial.println(WiFi.localIP());
    return true;
}

void Awaits()
{
    uint32_t ts = millis();
    while(!connection_state)
    {
        delay(50);
        if(millis() > (ts + reconnect_interval) && !connection_state){
            connection_state = WiFiConnect();
            ts = millis();
        }
    }
}

void setup()
{
    Serial.begin(115200);

    connection_state = WiFiConnect(ssid, password);
    if(!connection_state)  // if not connected to WIFI
        Awaits();          // constantly trying to connect

    EMailSender::EMailMessage message;
    message.subject = "Soggetto";
    message.message = "Ciao come stai<br>io bene.<br>www.mischianti.org";

    EMailSender::Response resp = emailSend.send("account_to_send@gmail.com", message);

    Serial.println("Sending status: ");

    Serial.println(resp.status);
    Serial.println(resp.code);
    Serial.println(resp.desc);
}

void loop()
{

}
Send an email with attachments.
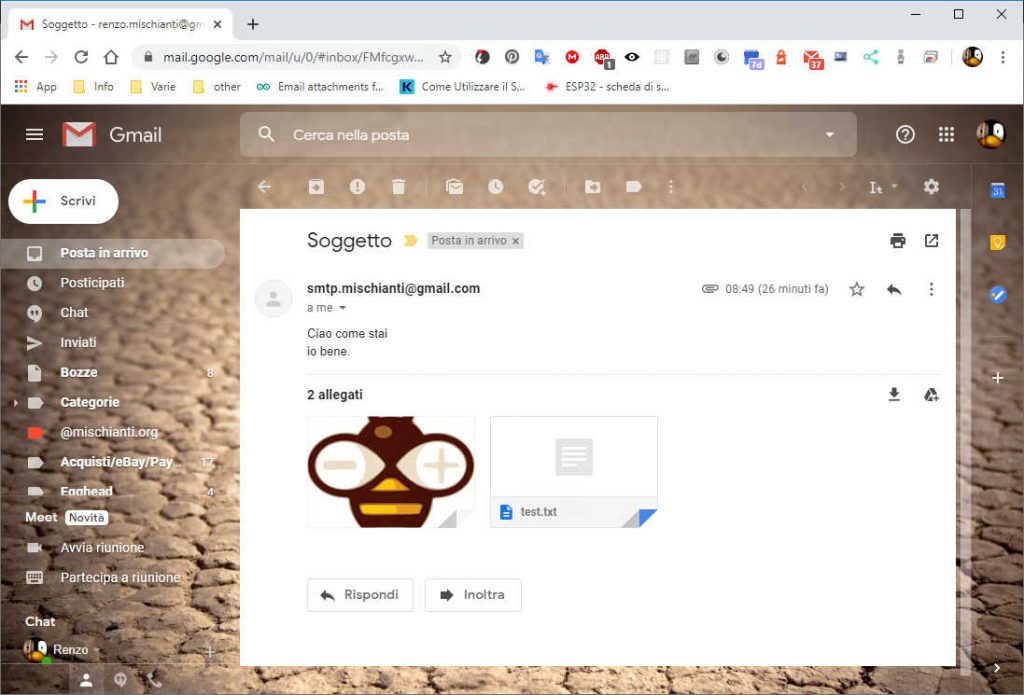
To send attachments, you must select a storage device. To simplify the management, we are going to use SPIFFS integrated filesystem; refer to this article on how to put data on SPIFFS “WeMos D1 mini (esp8266), integrated SPIFFS Filesystem“, but you can select LittleFS also “WeMos D1 mini (esp8266), integrated LittleFS Filesystem“.
Updated: 19/03/2021 (v2.3.0)
Select LittleFS filesystem
From version 2.3.0, you can switch from SPIFFS to LittleFS. You must only change this line in the file. EMailSenderKey.h .
#define DEFAULT_INTERNAL_ESP8266_STORAGE STORAGE_SPIFFS
in
#define DEFAULT_INTERNAL_ESP8266_STORAGE STORAGE_LITTLEFS
and set the correct storage
fileDescriptor[1].storageType = EMailSender::EMAIL_STORAGE_TYPE_LITTLE_FS;
The core of the code is the generation of structure to pass the information to load and stream the files.
    EMailSender::FileDescriptior fileDescriptor[2];
    fileDescriptor[1].filename = F("test.txt");
    fileDescriptor[1].url = F("/test.txt");
    fileDescriptor[1].storageType = EMailSender::EMAIL_STORAGE_TYPE_SPIFFS;

    fileDescriptor[0].filename = F("logo.jpg");
    fileDescriptor[0].url = F("/logo.jpg");
    fileDescriptor[0].mime = "image/jpg";
    fileDescriptor[0].encode64 = true;
    fileDescriptor[0].storageType = EMailSender::EMAIL_STORAGE_TYPE_SPIFFS;

    EMailSender::Attachments attachs = {2, fileDescriptor};

    EMailSender::Response resp = emailSend.send("<receipe@gmail.com>", message, attachs);
The fields EMailSender::FileDescriptior are pretty comprehensive but pay attention to encode64, which specifies if you want to encode all the content, this is useful if some special character is not supported.
For images, if you don’t specify the encode64 probably, they arrive with an artifact.
But pay attention; encoding a big file requires a bit of time.
The field mime specifies the mime type of the file you want to be attached. Here are some examples of existing mime types.
Then you must specify the storageType, in general, we only support SD and SPIFFS; for Arduino, only SD.
The filename and url the filename is the name that appears to the receiver, and the URL is where the file is located in the FS selected.
Than in the EMailSender::Attachments you must specify the number of attachments and set the array of EMailSender::FileDescriptior.
The resulting code is this.
/*
 * EMailSender library for Arduino, esp8266 and esp32
 * esp8266 Gmail send example with 2 attach loaded in SPIFFS
 *
 * The base64 encoding of the image is slow, so be patient
 *
 * https://mischianti.org/category/my-libraries/emailsender-send-email-with-attachments/
 *
 */

#include "Arduino.h"
#include <EMailSender.h>
#include <ESP8266WiFi.h>

uint8_t connection_state = 0;
uint16_t reconnect_interval = 10000;

const char* ssid = "<YOUR_SSID>";
const char* password = "<YOUR_PASSWD>";

EMailSender emailSend("<smtp_account@gmail.com>", "<PASSWORD>");

uint8_t WiFiConnect(const char* nSSID = nullptr, const char* nPassword = nullptr)
{
    static uint16_t attempt = 0;
    Serial.print("Connecting to ");
    if(nSSID) {
        WiFi.begin(nSSID, nPassword);
        Serial.println(nSSID);
    }

    uint8_t i = 0;
    while(WiFi.status()!= WL_CONNECTED && i++ < 50)
    {
        delay(200);
        Serial.print(".");
    }
    ++attempt;
    Serial.println("");
    if(i == 51) {
        Serial.print("Connection: TIMEOUT on attempt: ");
        Serial.println(attempt);
        if(attempt % 2 == 0)
            Serial.println("Check if access point available or SSID and Password\r\n");
        return false;
    }
    Serial.println("Connection: ESTABLISHED");
    Serial.print("Got IP address: ");
    Serial.println(WiFi.localIP());
    return true;
}

void Awaits()
{
    uint32_t ts = millis();
    while(!connection_state)
    {
        delay(50);
        if(millis() > (ts + reconnect_interval) && !connection_state){
            connection_state = WiFiConnect();
            ts = millis();
        }
    }
}

void setup()
{
    Serial.begin(115200);

    if(!SPIFFS.begin()){
          Serial.println("An Error has occurred while mounting SPIFFS");
          return;
    }

    Serial.println("ReadDir");
    Dir dir = SPIFFS.openDir("/");
    while (dir.next()) {
        Serial.print(dir.fileName());
        if(dir.fileSize()) {
            File f = dir.openFile("r");
            Serial.println(f.size());
        }
    }

    connection_state = WiFiConnect(ssid, password);
    if(!connection_state)  // if not connected to WIFI
        Awaits();          // constantly trying to connect

    EMailSender::EMailMessage message;
    message.subject = "Soggetto";
    message.message = "Ciao come stai<br>io bene.<br>www.mischianti.org";

    EMailSender::FileDescriptior fileDescriptor[2];
    fileDescriptor[1].filename = F("test.txt");
    fileDescriptor[1].url = F("/test.txt");
    fileDescriptor[1].storageType = EMailSender::EMAIL_STORAGE_TYPE_SPIFFS;

    fileDescriptor[0].filename = F("logo.jpg");
    fileDescriptor[0].url = F("/logo.jpg");
    fileDescriptor[0].mime = "image/jpg";
    fileDescriptor[0].encode64 = true;
    fileDescriptor[0].storageType = EMailSender::EMAIL_STORAGE_TYPE_SPIFFS;

    EMailSender::Attachments attachs = {2, fileDescriptor};

    EMailSender::Response resp = emailSend.send("<receipe@gmail.com>", message, attachs);

    Serial.println("Sending status: ");

    Serial.println(resp.status);
    Serial.println(resp.code);
    Serial.println(resp.desc);
}

void loop()
{

}
ESP32
You can buy any models of esp32 I use for my test ESP32 Dev Kit v1 - TTGO T-Display 1.14 ESP32 - NodeMCU V3 V2 ESP8266 Lolin32 - NodeMCU ESP-32S - WeMos Lolin32 - WeMos Lolin32 mini - ESP32-CAM programmer - ESP32-CAM bundle - ESP32-WROOM-32 - ESP32-S - ESP32-WROOM-32 - ESP32 2.8 Inch Touch ESP32-2432S028
ESP32 is very similar to esp8266, and SD and SPIFFS without FS_NO_GLOBALS work correctly because use the same FS.h File structure.
So we can now repeat the consideration of esp8266 implementation.
Send simple mail
So here is an example of a simple EMail sent with a GMail provider (configure GMail as described at the end of the article).
/*
 * EMailSender library for Arduino, esp8266 and esp32
 * Simple esp32 Gmail send example
 *
 * https://mischianti.org/category/my-libraries/emailsender-send-email-with-attachments/
 *
 */

#include "Arduino.h"
#include <EMailSender.h>
#include <WiFi.h>

const char* ssid = "<YOUR-SSID>";
const char* password = "<YOUR-PASSWD>";

uint8_t connection_state = 0;
uint16_t reconnect_interval = 10000;

EMailSender emailSend("account_login@gmail.com", "<YOUR-GMAIL-PASSWD>");

uint8_t WiFiConnect(const char* nSSID = nullptr, const char* nPassword = nullptr)
{
    static uint16_t attempt = 0;
    Serial.print("Connecting to ");
    if(nSSID) {
        WiFi.begin(nSSID, nPassword);
        Serial.println(nSSID);
    }

    uint8_t i = 0;
    while(WiFi.status()!= WL_CONNECTED && i++ < 50)
    {
        delay(200);
        Serial.print(".");
    }
    ++attempt;
    Serial.println("");
    if(i == 51) {
        Serial.print("Connection: TIMEOUT on attempt: ");
        Serial.println(attempt);
        if(attempt % 2 == 0)
            Serial.println("Check if access point available or SSID and Password\r\n");
        return false;
    }
    Serial.println("Connection: ESTABLISHED");
    Serial.print("Got IP address: ");
    Serial.println(WiFi.localIP());
    return true;
}

void Awaits()
{
    uint32_t ts = millis();
    while(!connection_state)
    {
        delay(50);
        if(millis() > (ts + reconnect_interval) && !connection_state){
            connection_state = WiFiConnect();
            ts = millis();
        }
    }
}

void setup()
{
    Serial.begin(115200);

    connection_state = WiFiConnect(ssid, password);
    if(!connection_state)  // if not connected to WIFI
        Awaits();          // constantly trying to connect

    EMailSender::EMailMessage message;
    message.subject = "Soggetto";
    message.message = "Ciao come stai<br>io bene.<br>www.mischianti.org";

    EMailSender::Response resp = emailSend.send("receive_email@gmail.com", message);

    Serial.println("Sending status: ");

    Serial.println(resp.status);
    Serial.println(resp.code);
    Serial.println(resp.desc);
}

void loop()
{

}
Send an email with attachments.
To send attachments, you must select a storage device. To simplify the management,
- we can use SPIFFS integrated filesystem. Refer to this article on putting data on SPIFFS “ESP32: integrated SPIFFS FileSystem”.
- We can use LITTLEFS integrated filesystem. Refer to this article on putting data on LITTLEFS “ESP32: integrated LittleFS FileSystem”.
- We can use the FFat integrated filesystem. Refer to this article on putting data on FFat “ESP32: integrated FFat (FAT/exFAT) FileSystem“.
Select LittleFS filesystem Updated: 13/04/2021 (v2.4.1)
From version 2.4.1, you can switch from SPIFFS to LITTLEFS. You must only change this line in the file. EMailSenderKey.h .
#define DEFAULT_INTERNAL_ESP32_STORAGE STORAGE_SPIFFS
in
#define DEFAULT_INTERNAL_ESP32_STORAGE STORAGE_LITTLEFS
and set the correct storage
fileDescriptor[1].storageType = EMailSender::EMAIL_STORAGE_TYPE_LITTLE_FS;
Select FFat filesystem Updated: 13/04/2021 (v2.4.1)
From version 2.4.1, you can switch from SPIFFS to FFat. You must only change this line in the file. EMailSenderKey.h .
#define DEFAULT_INTERNAL_ESP32_STORAGE STORAGE_SPIFFS
in
#define DEFAULT_INTERNAL_ESP32_STORAGE STORAGE_FFAT
and set the correct storage
fileDescriptor[1].storageType = EMailSender::EMAIL_STORAGE_TYPE_FFAT;
The core of the code is the generation of structure to pass the information to load and stream the files.
    EMailSender::FileDescriptior fileDescriptor[2];
    fileDescriptor[1].filename = F("test.txt");
    fileDescriptor[1].url = F("/test.txt");
    fileDescriptor[1].storageType = EMailSender::EMAIL_STORAGE_TYPE_SPIFFS;

    fileDescriptor[0].filename = F("logo.jpg");
    fileDescriptor[0].url = F("/logo.jpg");
    fileDescriptor[0].mime = "image/jpg";
    fileDescriptor[0].encode64 = true;
    fileDescriptor[0].storageType = EMailSender::EMAIL_STORAGE_TYPE_SPIFFS;

    EMailSender::Attachments attachs = {2, fileDescriptor};

    EMailSender::Response resp = emailSend.send("<receipe@gmail.com>", message, attachs);
The field EMailSender::FileDescriptior is quite comprehensive, but pay attention to encode64, which specifies if you want to encode all the content, this is useful if some special character is not supported.
For images, if you don’t specify the encode64 probably, they arrive with an artifact.
But pay attention; encoding a big file requires a bit of time.
The filed mime specifies the mime type of the file you want to be attached. Here are some examples of existing mime types.
Then you must specify the storageType in general; we only support SD and SPIFFS, for Arduino, only SD.
The filename and url the filename is the name that appears to the receiver, and the URL is where the file is located in the FS selected.
Than in the EMailSender::Attachments you must specify the number of attachments and set the array of EMailSender::FileDescriptior.
The resulting code is this.
/*
 * EMailSender library for Arduino, esp8266 and esp32
 * esp32 Gmail send example with 2 attach loaded in SPIFFS
 *
 * The base64 encoding of the image is slow, so be patient
 *
 * https://mischianti.org/category/my-libraries/emailsender-send-email-with-attachments/
 *
 */

#include "Arduino.h"
#include <EMailSender.h>
#include <WiFi.h>

#include <SPIFFS.h>

const char* ssid = "<YOUR-SSID>";
const char* password = "<YOUR-PASSWD>";

uint8_t connection_state = 0;
uint16_t reconnect_interval = 10000;

EMailSender emailSend("account_gmail@gmail.com", "<YOUR-GMAIL-PASSWD>");

uint8_t WiFiConnect(const char* nSSID = nullptr, const char* nPassword = nullptr)
{
    static uint16_t attempt = 0;
    Serial.print("Connecting to ");
    if(nSSID) {
        WiFi.begin(nSSID, nPassword);
        Serial.println(nSSID);
    }

    uint8_t i = 0;
    while(WiFi.status()!= WL_CONNECTED && i++ < 50)
    {
        delay(200);
        Serial.print(".");
    }
    ++attempt;
    Serial.println("");
    if(i == 51) {
        Serial.print("Connection: TIMEOUT on attempt: ");
        Serial.println(attempt);
        if(attempt % 2 == 0)
            Serial.println("Check if access point available or SSID and Password\r\n");
        return false;
    }
    Serial.println("Connection: ESTABLISHED");
    Serial.print("Got IP address: ");
    Serial.println(WiFi.localIP());
    return true;
}

void Awaits()
{
    uint32_t ts = millis();
    while(!connection_state)
    {
        delay(50);
        if(millis() > (ts + reconnect_interval) && !connection_state){
            connection_state = WiFiConnect();
            ts = millis();
        }
    }
}

void setup()
{
    Serial.begin(115200);

    if(!SPIFFS.begin()){
          Serial.println("An Error has occurred while mounting SPIFFS");
          return;
    }

    Serial.println("ReadDir");
    File dir = SPIFFS.open("/");
    File file = dir.openNextFile();
    while (file) {
        Serial.print(file.name());
        Serial.println(file.size());

        file = dir.openNextFile();
    }

    connection_state = WiFiConnect(ssid, password);
    if(!connection_state)  // if not connected to WIFI
        Awaits();          // constantly trying to connect

    EMailSender::EMailMessage message;
    message.subject = "Soggetto";
    message.message = "Ciao come stai<br>io bene.<br>www.mischianti.org";

    EMailSender::FileDescriptior fileDescriptor[2];
    fileDescriptor[1].filename = F("test.txt");
    fileDescriptor[1].url = F("/test.txt");
    fileDescriptor[1].storageType = EMailSender::EMAIL_STORAGE_TYPE_SPIFFS;

    fileDescriptor[0].filename = F("logo.jpg");
    fileDescriptor[0].url = F("/logo.jpg");
    fileDescriptor[0].mime = "image/jpg";
    fileDescriptor[0].encode64 = true;
    fileDescriptor[0].storageType = EMailSender::EMAIL_STORAGE_TYPE_SPIFFS;

    EMailSender::Attachments attachs = {2, fileDescriptor};

    EMailSender::Response resp = emailSend.send("email_to_receive@gmail.com", message, attachs);

    Serial.println("Sending status: ");

    Serial.println(resp.status);
    Serial.println(resp.code);
    Serial.println(resp.desc);
}

void loop()
{

}
Email to a distribution list
From version 2.1.1 distribution list is supported, so you can send emails to multiple accounts and select if you want to send as To, CC or CCn.
Here an example
/*
 * EMailSender library for Arduino, esp8266 and esp32
 * Arduino Mega and UIPEthernet send example with Sendgrid provider
 * to a distribution list
 *
 * Pay attention you must set in the library
 * #define DEFAULT_EMAIL_NETWORK_TYPE_ARDUINO 	NETWORK_ENC28J60
 * for UIPEthernet
 *
 * #define DEFAULT_EMAIL_NETWORK_TYPE_ARDUINO 	NETWORK_W5100
 * for standard Ethernet
 *
 *
 * https://mischianti.org/category/my-libraries/emailsender-send-email-with-attachments/
 *
 */

#include "Arduino.h"
#include <SPI.h>
#include <UIPEthernet.h>

#include <EMailSender.h>

// Enter a MAC address for your controller below.
// Newer Ethernet shields have a MAC address printed on a sticker on the shield
byte mac[] = { 0xDE, 0xAD, 0xBE, 0xEF, 0xFE, 0xED };

EMailSender emailSend("<YOUR-SENDGRID-API-KEY>", "<YOUR-SENDGRID-PASSWD>", "<FROM-EMAIL>", "smtp.sendgrid.net", 25);

void setup()
{
    // Open serial communications and wait for port to open:
    Serial.begin(115200);
//    while (!Serial) {}

    delay(2000);

    Serial.println("Starting!");

    // start the Ethernet connection:
    if (Ethernet.begin(mac) == 0) {
      Serial.println("Failed to configure Ethernet using DHCP");
      while(1);
    }
    Serial.print("IP address ");
    Serial.println(Ethernet.localIP());


    EMailSender::EMailMessage message;
    message.subject = "Soggetto";
    message.message = "Ciao come stai<br>io bene.<br>www.mischianti.org";

    // Send to 3 different email
    const char* arrayOfEmail[] = {"<FIRST>@gmail.com", "<SECOND>@yahoo.com", "<THIRD>@hotmail.com"};
    EMailSender::Response resp = emailSend.send(arrayOfEmail, 3, message);

//    // Send to 3 different email, 2 in C and 1 in CC
//    const char* arrayOfEmail[] = {"<FIRST>@gmail.com", "<SECOND>@yahoo.com", "<THIRD>@hotmail.com"};
//    EMailSender::Response resp = emailSend.send(arrayOfEmail, 2, 1, message);
//
//    // Send to 3 different email first to C second to CC and third to CCn
//    const char* arrayOfEmail[] = {"<FIRST>@gmail.com", "<SECOND>@yahoo.com", "<THIRD>@hotmail.com"};
//    EMailSender::Response resp = emailSend.send(arrayOfEmail, 1,1,1, message);

    Serial.println("Sending status: ");

    Serial.println(resp.status);
    Serial.println(resp.code);
    Serial.println(resp.desc);
}

void loop()
{

}
How to use a Gmail account
By default, you can’t use a Gmail SMTP account, and there are two ways to activate these features.
Allow less secure apps to access your Gmail account
Google may block sign-in attempts from some apps or devices that do not use modern security standards. Since these apps and devices are easier to break into, blocking them helps keep your account safe.
To disable this security feature:
- Sign in to Gmail
- Click here to access Less Secure App Access in My Account.
- Next to “Allow less secure apps: OFF,” select the toggle switch to turn ON.
This setting may not be available for:
- Accounts with 2-Step Verification enabled: Such accounts require an application-specific password for less secure apps access.
- G Suite users: This setting is hidden if your administrator has locked less secure app account access.
For G-Suite users: Enabling less secure apps to access accounts (deprecated)
- Sign in to your Google Admin console (Sign in using an administrator account, not your current account.
- Click Security> Basic settings.
- Under Less secure apps, select Go to settings for less secure apps.
- Select the Allow users to manage their access to a less secure apps radio button in the subwindow.
Once you’ve set Allow users to manage their access to less secure apps to on, affected users within the selected group or Organizational Unit will be able to toggle access for less secure apps on or off themselves.
G-Suite admins: Enforcing access to less secure apps for all users
Use this setting when you want to ensure that access by a less secure app is available to all for a limited time, such as for upgrades.
- Sign in to your Google Admin console. Sign in using an administrator account
- Click Security> Basic settings.
- Under Less secure apps, select Go to settings for less secure apps.
- In the subwindow, select the Enforce access to less secure apps for all users radio button.
Once you’ve set Enforce access to less secure apps for all users to on, affected users within the selected group or Organizational Unit will not be able to toggle access for less secure apps off themselves. You will have to set the setting back to Allow users to manage their access to less secure apps to allow them to toggle access for less secure apps on or off themselves.
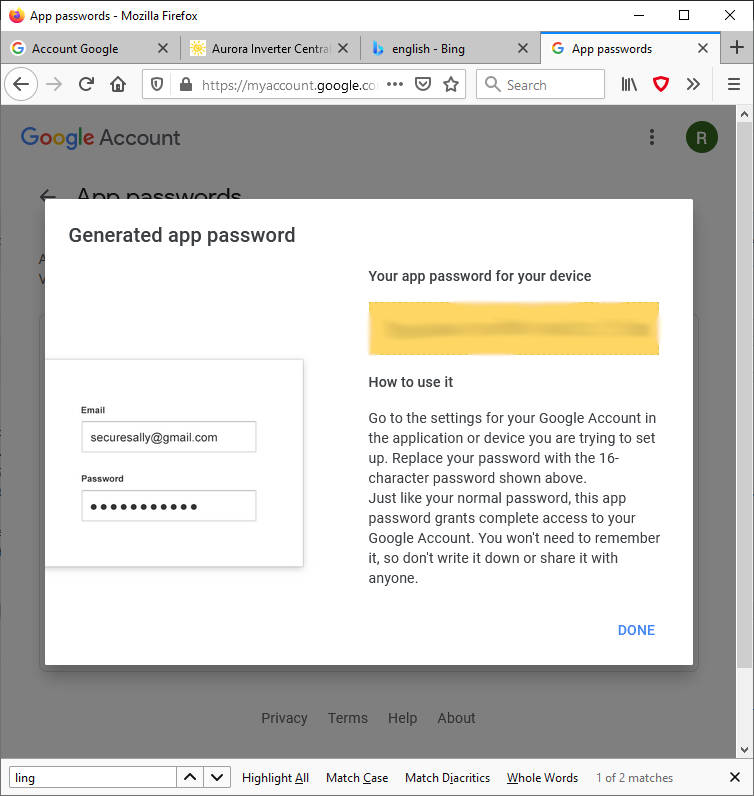
Create an application password
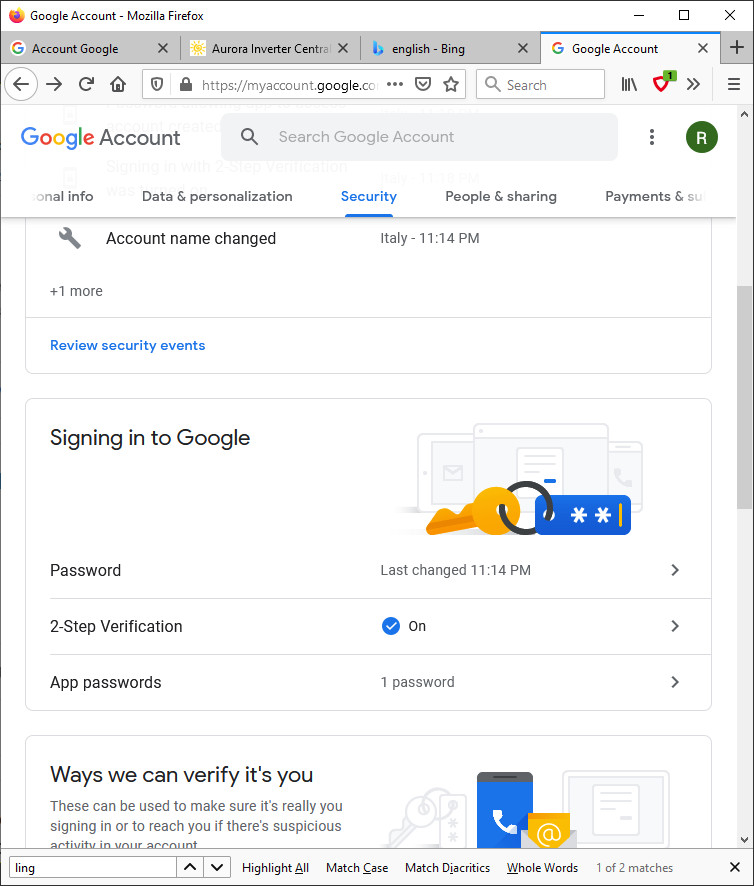
- Go to the Gmail security settings page: https://myaccount.google.com/security
- First, you must enable 2-factor identification.
- Then you need to create a password for this application. The password is a 16-character string, copy it and use it as your regular SMTP Gmail account password!
Thanks
- Send emails with attachments (EMailSender v2.x library): Arduino Ethernet
- Send emails with attachments (EMailSender v2.x library): esp32 and esp8266
- Send emails with attachments (EMailSender v2.x library): Arduino SAMD boards (WiFiNINA)
- Send emails with attachments and SSL (like Gmail): STM32, w5500, enc28j60, SD, and SPI Fash


I have Arduino Mega 2560 and an ESP8266 ESP-01. Is there a way to adapt you code/library to just send simple gmail?
Hi John,
I think you want use AT commands, I don’t have experience with this type of communication, but I think It’s not suitable.
Bye Renzo
Hi
I used your library on esp8266 to send e-mail and it worked great by itself.
I added a HTTP request and after making a request it stops sending e-mails.
response.desc = “Could not connect to mail server”
How can I fix it?
Thank you.
Hi Bob,
please open forum topic, and send me the code, si I can help you.
Bye RM
Hi Renzo
Sorry I don’t know how to open forum topic and what forum?
Thanks
The section of the forum about this library is at this link.
Bye Renzo
Do you have an example using echange server? I can’t get the alternate config to work.
EMailSender (const char* email_login, const char* email_password, const char* email_from, const char* smtp_server, uint16_t smtp_port, bool isSecure = false);
Hi Steve,
no sorry I don’t known exange server, and the configuration change for every installation, I think the only solution is to check your configuration e refet to Microsoft documentation about SMTP account.
Bye Renzo
Hello Renzo,
First of all, thank you very much for this great solution. As far as I’ve been able to tell, your solution is the only one which is working with all SMTP servers.
However, I have a problem with the smtp.gmail.com server when using Tzapu’s WifiManager library (https://github.com/tzapu/WiFiManager) with your library together. In this case, the sending of the e-mails with the gmail stmp server are no longer working. Without this library (WiFiManager) the sending of the e-mails are working well.
So when I add those two lines, the sending of emails with the smtp server “smtp.gmail.com” no longer works:
#include // https://github.com/tzapu/WiFiManager
WiFiManager wifiManager;
It doesn’t matter if I use the functions of this library or not. It is enough if I just speak to this library and define the wifiManager. But other servers seem to be working. It looks like the problem is only happening with gmail’s stmp server.
Or am I doing something wrong?
Best regards
Hi Tans,
do you use a static configuration?
Please open a topic and post your code, so i can test It, WiFiManager have some bad behaivor with DNS management.
How to manage dynamic WIFI configuration on esp8266 or esp32
Bye Renzo
Thank you for this excellent library which uses less memory than others. It is working well for me, but it strips newline characters – “\n” – from the message body. Can you tell me how to correct this? I am using your code without change (except login etc).
Hi Nancy,
by default the library use html format, so the new line character is
, but if you add message.mime = MIME_TEXT_PLAIN; It use text newline character.
It’s better explained here
EMailSender new Line Character in the message
Bye Renzo
Renzo,
Thank you for your super fast reply and again for this library, which is solving a problem for me by using less resources. I have added the MIME type setting as you instruct and now it works perfectly for me, thank you very much!
Best regards,
Nancy
Thanks to you for your feedback.
Bye Renzo
Dear Renzo , Thanks for your contribution.
I literally followed your documentation, but I haven’t received any emails on my Gmail.
While I upload the Sketch I found this not understood message “⸮⸮⸮⸮⸮?0[⸮⸮⸮” on the COM3 monitor.
I’m using ESP32 and changed the wireless SSID, Password and changed the Gmail sender and receiver in the EMailSenderEsp32GMailTest.ino file.
Do I need to change any other line in EMailSender.h file or any other related file?
Regards
Hi Mado,
enable debug by uncomment this line
and send the serial output.
Bye Renzo
Thanks, Renzo for the fast reply, this is my serial output
Connecting to Programmer
…………
Connection: ESTABLISHED
Got IP address: 192.168.1.8
ONLY ONE RECIPIENTmiltiple destination and attachments
Insecure client:0
smtp.gmail.com
465
Sending status:
0
2
Could not connect to mail server
It’s seems you can’t connect to SMTP Google server.
Do you have router or firewall that block tour connection??
Bye Renzo
I have the same problem but I realized that my sketch is working perfectly in the framework I have originally written it (ESP32 1.0.4) but it gives the same error response with the latest 1.0.6 framework.
Hi Norbert,
Thanks for your information, I find the problem (from core version 1.0.5 ESP force the check of certificate), I fixed It.
This evening or tomorrow I release the fixed version.
Thanks again Renzo.
Yes , I have also realized that the problem persist in 1.0.5 (and 1.0.6 as mentioned before) but not in 1.0.4.
Thank you very much for fixing it!
Cheers!
Norbert
Hi Norbert,
you can update EMailSender at versione 2.4.1, now the problem is fixed and I add support for LittleFS and FFat for esp32.
Bye Renzo
Thank you!
Hey Renzo, as i mentioned yesterday i tried to send an email within our internal network. It doesnt work with the external gmail smtp server because we cant establish connection in the internet.
I want to use the alternative “more complex” constructor. My pointer knowledge is very little so is there an example code i can use? If i type the ip address and the port of the exchange server it gives me an error code, when i want to send the email in this line:
“EMailSender::Response resp = emailSend.send(“recipient@example.com”, message); //Sending E-Mail”
basically the code is:
as i dont need a password and username
EMailSender::EMailMessage message; message.subject = "Batteriestand niedrig" + vddString+ "Volt"; // Subject of E-Mail message.message = "Der Batteriestand von Dashbutton in " + currentDashButtonLocation + " ist niedrig! Bitte tauschen sie die Batterien. (Lithium AA Batterien)"; //Message to send in the E-Mail EMailSender::Response resp = emailSend.send("example@googlemail.com", message); //Sending E-Mail Serial.println("Sending status: "); Serial.println(resp.status); //Check if sending E-Mail was successful Serial.println(resp.code); //Print response code of the sending process Serial.println(resp.desc);We are going to continue here here.
Bye Renzo
fatal error: LittleFS.h: No such file or directory
#include “LittleFS.h”
I have this problem, help please !
Hi Nobel,
you must add the LittleFS library to your project.
Bye Renzo
Renzo, thanks alot for your work, found your lib is most optimized in ram consuming, was very helpfull, basically savior for my very fat project… despite messages not sended with basic ram parameter but in final it works well and stable with 48KBIram+2ndheap (shared) option.
tested on wemosd1 r1(esp8266)
from Ukraine with Respect.
Viva Italy!
Thanks Bohdan,
If you don’t need attachment, you can disable it and gain more memory.
Bye Renzo
Hello, struggling to send a attachment from a SD card
    fileDescriptor[4].filename = F("log_1.txt");
    fileDescriptor[4].url = F("/_log_1.txt");
    fileDescriptor[4].mime = "text/plain";
    fileDescriptor[4].storageType = EMailSender::EMAIL_STORAGE_TYPE_SD;
I get the following in the serial prompt
Sending status:
0400
Error no filename specified for the file
Hi Eduard,
if you specify
It means that It’s the fifth file you try to upload, I think the error in the previous 4 files.
Bye Renzo
solved
Hi Renzo,
I’m using your library to send emails from smtp.ionos.co.uk. It does work but when I switch on Verbose messages I see that it appears to be setting the client to run as Insecure which means it will not validate the server connection using the CACert. I have recreated trust_anchors.h to DigiCert Global Root G2 which is the CA cert for ionos.co.uk but it appears not to be using that at all.
Where am I going wrong?
regards
Jon
Hi Jonathan,
with the insecure mode, you don’t need to pass a certificate; the trust_anchors are needed by the SSL library if you use an Ethernet without an SSL layer.
Bye Renzo
Thanks Renzo. I now understand that trust_anchors was not the answer to my problem. What I want to do is to make the connection to my SMTP host secure. Separately I have used WiFiClientSecure to connect to my Over-The-Air server and it uses client.setCACert() to provide the CA cert needed to validate the SSL connection. The example here is what I am trying to achieve https://github.com/espressif/arduino-esp32/blob/2.0.11/libraries/WiFiClientSecure/examples/WiFiClientSecure/WiFiClientSecure.ino
Your implementation uses client.setInsecure() to switch off the CA Cert validation as per the WiFiClientInsecure.ino example. I wonder if you would consider implementing a secure option in your library?
regards
Jon
Hi Jon,
no I think no, the CA is needed if you don’t know if the site is secure, but i think you are going to connect to a known provider.
Bye Renzo
Ok. The intention here is to protect against an attacker spoofing DNS and redirecting my requests to a rogue server. I agree the chance is low and I’m not going to worry about it for now but when I have time I’ll fork your library and add CACert validation in the same way I did for my OTA service.
Many thanks for your work on this library. Very helpful.
regards
Jon
Using FFAT causes errors. The following changes in EMailSender.h will fix it:
line 304: #define EMAIL_FILE_READ ‘r’ => #define EMAIL_FILE_READ “r”
line 348: #define EMAIL_FILE_READ_EX ‘r’ => #define EMAIL_FILE_READ_EX “r”
Hi Uli,
what microcontroller (and core version) do you use?
Bye Renzo
Good morning. I can’t send emails. The message I get is the following:
Connecting to vod*********
Connection: ESTABLISHED
Got IP address: 192.168.1.33
Sending status:
0
2
Could not connect to mail server
I use an Arduino Uno R4 WiFi.
Can you help me?
Thank you
Hi Luigi,
please open a forum topic and put inside all the information (like provider you use) and the code.
Bye Renzo