
Ebyte LoRa E22 device for Arduino, esp32 or esp8266: specs and basic use – 1
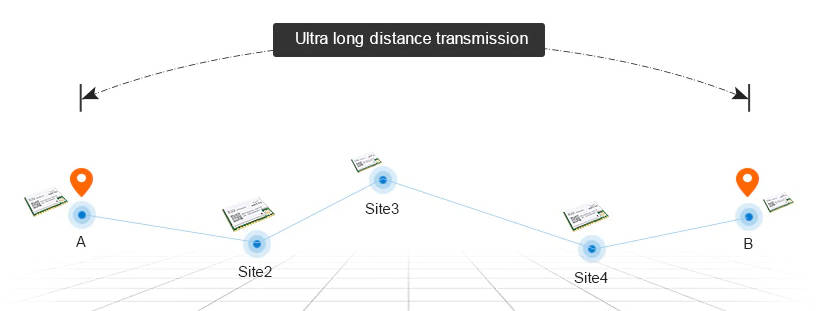
LoRa or Long Range wireless data telemetry is a technology pioneered by Semtech that operates at a lower frequency than NRF24L01 (433 MHz, 868 MHz, or 916 MHz against 2.4 GHz for the NRF24L01) but at thrice the distance (from 4000m to 10000m).
You can find here AliExpress (433MHz 5.5Km) - AliExpress (433MHz 10Km) - AliExpress (868MHz 915Mhz 5.5Km) - AliExpress (868MHz 915Mhz 10Km)
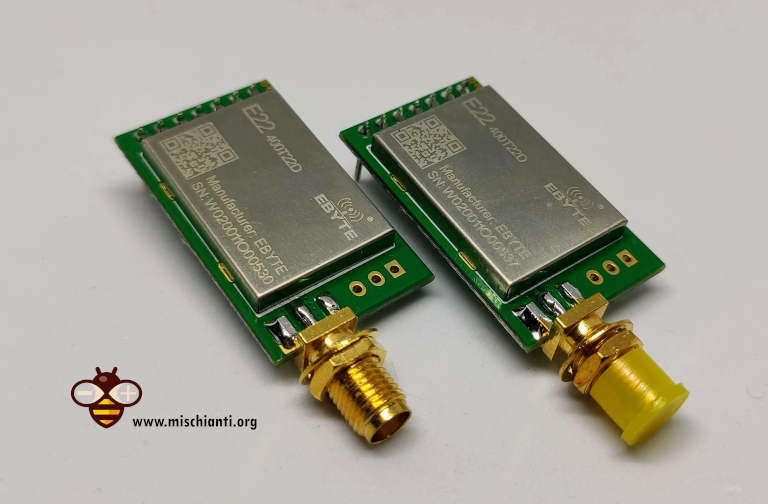
We are going to test E22-400T22D and E22-400T22S. It is a wireless transceiver module, operates at 410 493 MHz based on original RFIC SX1268 from SEMTECH, transparent transmission is available, TTL level. The module adopts LORA spread spectrum technology.
Like the little brother e22 the module features FEC Forward Error Correction algorithm, which ensure its high coding efficiency & good correction performance. In the case of sudden interference, it can correct the interfered data packets automatically, so that the reliability and transmission range are improved correspondingly. But without FEC, those da te packets can only be dropped.
And with the rigorous encryption & decryption, data interception becomes pointless. The function of data compression can decrease the transmission time & probability of being interference, while improving the reliability & transmission efficiency.
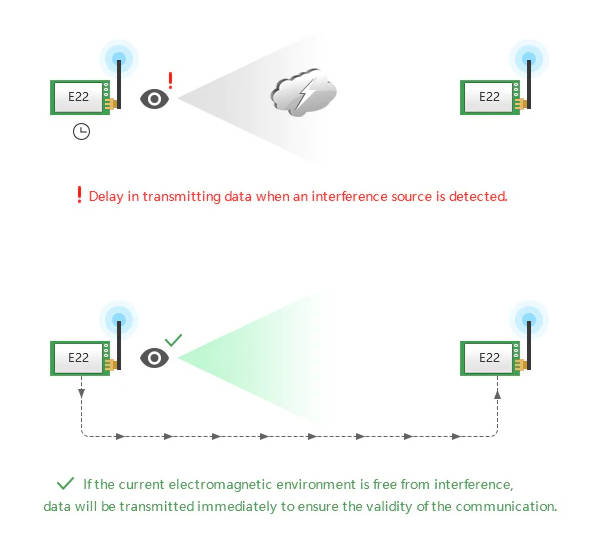
But more than e22 this module have a carrier sense features, that wait transmission if there are some air interference, can be used like a repeater, have watchdog that if there is an error device restart and continue working, have deep sleep for better power saving, and first the sx1268 with less power grant more power.
Remotely configure or read wireless module parameters by sending command packets wirelessly.
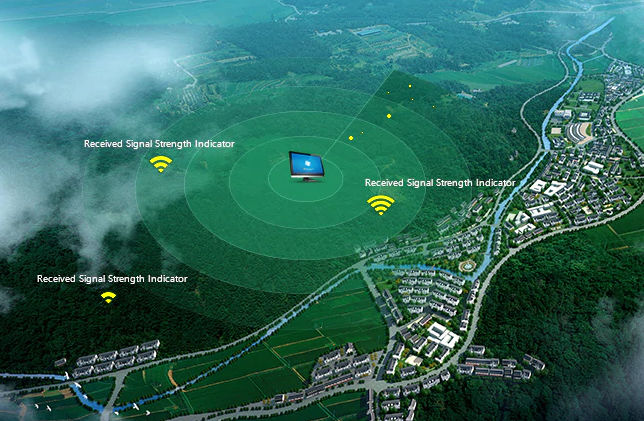
And finally have an important features the RSSI, you can check the signal strenght on all message sended.
Operating and transmission type
This device have some interesting function:
Transmission
Transparent transmission
This can be considered like a “Demo mode”, by default you can send message to all device of same configured address and channel.
Fixed transmission
This type of transmission you can specify an address and a channel where where you want send the message.
You can send message to a:
- Specified device with a predeterminated Address Low, Address High and Channel.
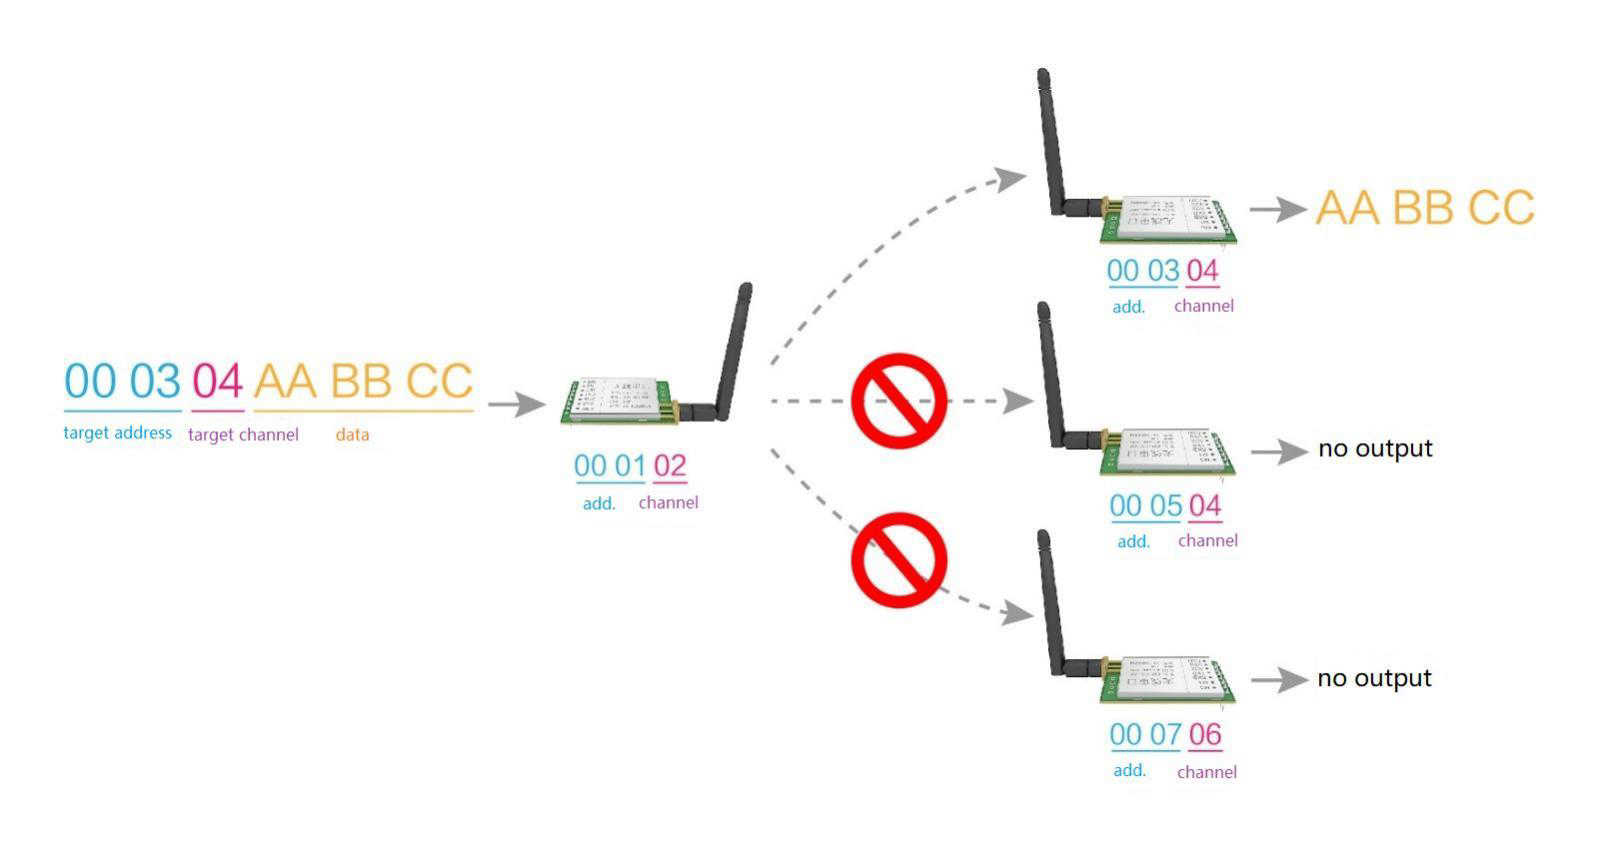
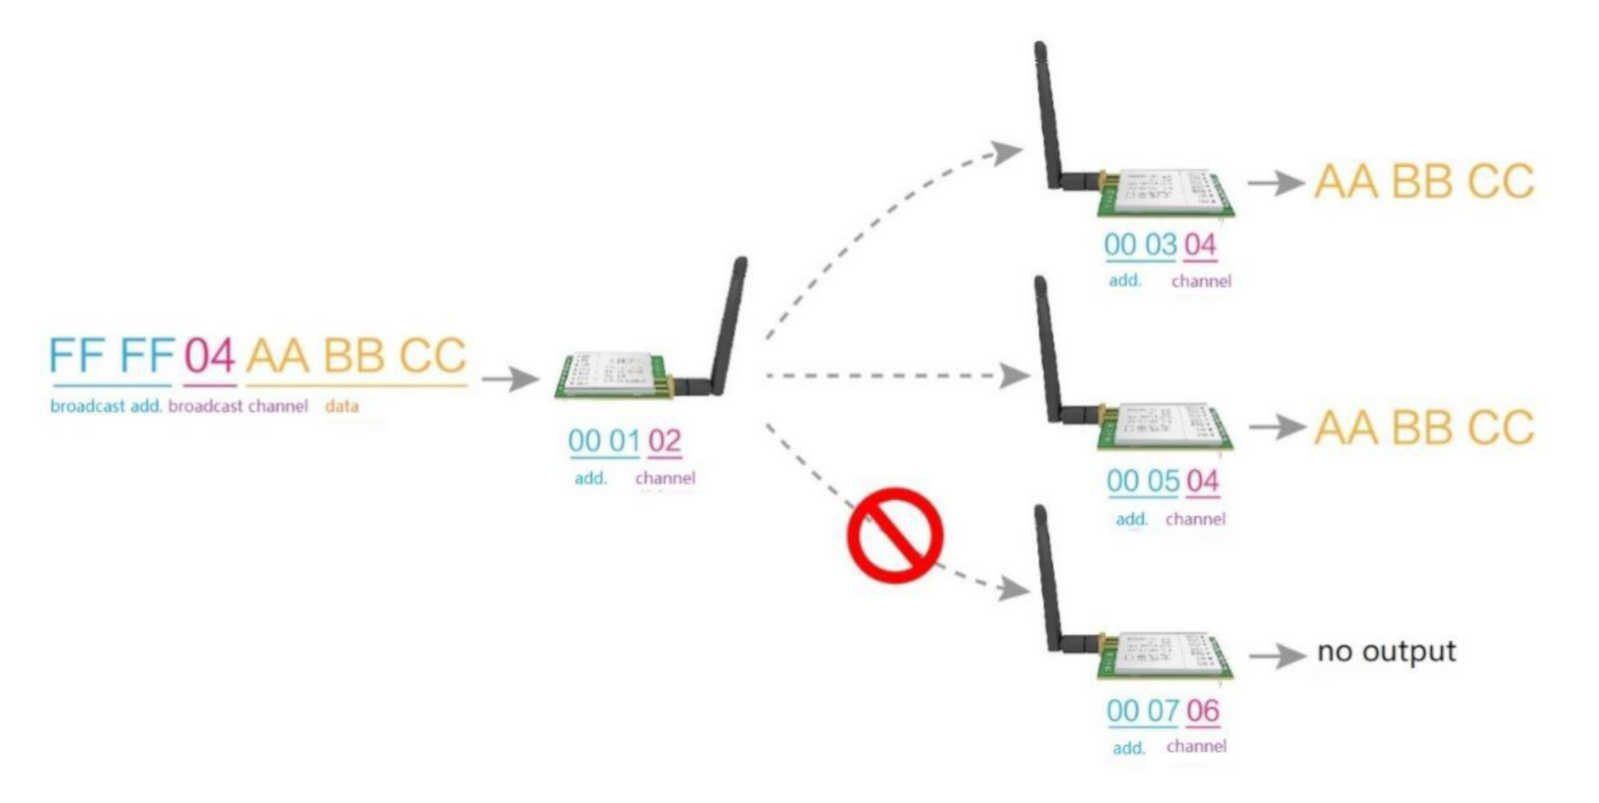
- Broadcast a message on predeterminated Channel.
Normal mode
Simply send message.
Wake-up mode and power-saving mode
As you can intend if a device is in Wake-up mode can “wake” one or more devices that are in power-saving mode with a preamble communication.
Program/sleep mode
With this configuration you can change configuration of your device.
Specifications
Here’s the specifications for the module:
| Main Parameters | Value | Remarks | ||
| Min. | Typical | Max | ||
| Operating voltage(V) | 2.3 | 5.0 | 5.5 | ≥5.0 V ensures output power |
| Communication level(V) | – | 3.3 | – | For 5V TTL, it may be at risk of burning down |
| Operating temperature(℃) | -40 | – | 85 | Industrial design |
| Operating frequency(MHz) | 410.125 | 433.125 | 493.125 | Support ISM band |
| TX Current(mA) | – | 110 | – | Instant power consumption |
| RX current(mA) | – | 12 | – | – |
| Sleep current(μA) | – | 2 | – | Software is shut down |
| Max Tx power(dBm) | 21.5 | 22.0 | 22.5 | – |
| Receiving sensitivity(dBm) | -146 | -147 | -148 | Air data rate is 0.3 kbps |
| Air data rate(bps) | 0.3k | 2.4k | 62.5k | Controlled via user’s programming |
| Main parameter | Description | Remarks |
| Distance for reference | 5km | Test condition:clear and open area, antenna gain: 5dBi,antenna height:2.5m,air data rate: 2.4kbps |
| TX length | 240 Byte | Can be configured via command as 32/64/128/240 bytes per packet totransmit |
| Buffer | 1000 Byte | – |
| Modulation | LoRa | New generation LoRa modulation technology |
| Communication interface | UART | TTL level |
| Package | DIP | – |
| Connector | 1*7*2.54mm | – |
| Size | 21*36 mm | – |
| Antenna | SMA | 50 ohm impedance |
- Communication Interface: UART – 8N1, 8E1, 8O1, Eight kinds of UART baud Rate, from 1200 to 115200bps (Default: 9600)
| Electronic parameter | Min. | Typ. | Max. | Unit | Condition |
|---|---|---|---|---|---|
| Power supply | 3.3 | 3.6 | 5.5 | V | |
| Communication level | 3.0 | 3.3 | 3.6 | V | |
| Transmitting current | 95 | 100 | 105 | mA | 22dBm(160mW) |
| Receiving current | 6 | 6.5 | 7 | mA | |
| Sleep current | 1 | 2 | 3 | nA | |
| Operating temperature | -40 | 20 | +85 | ℃ | |
| Operating humidity | 10 | 60 | 90 | % | |
| Storage temperature | -40 | 20 | +125 | ℃ |
You must pay attention on communication level that differ from power supply, the second can receive voltage like 3.3v (esp8266 and esp32) and 5v (Arduino), but the first want a 3.3v, so to connecto to an Arduino you must use a Voltage divider (Voltage divider: calculator and application) to prevent damage to the device.
Pinout
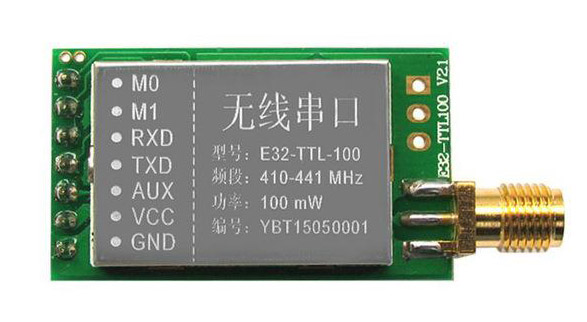
| Pin No. | Pin item | Pin direction | Pin application |
|---|---|---|---|
| 1 | M0 | Input(weak pull-up) | Work with M1 & decide the four operating modes.Floating is not allowed, can be ground. |
| 2 | M1 | Input(weak pull-up) | Work with M0 & decide the four operating modes.Floating is not allowed, can be ground. |
| 3 | RXD | Input | TTL UART inputs, connects to external (MCU, PC) TXD outputpin. Can be configured as open-drain or pull-up input. |
| 4 | TXD | Output | TTL UART outputs, connects to external RXD (MCU, PC) input pin. Can be configured as open-drain or push-pull output |
5 | AUX | Output | To indicate module’s working status & wakes up the external MCU. During the procedure of self-check initialization, the pin outputs low level. Can be configured as open-drain output orpush-pull output (floating is allowed). |
| 6 | VCC | Power supply 2.3V~5.5V DC | |
| 7 | GND | Ground |
As you can see you can set various modes via M0 and M1 pins.
| Mode | M1 | M0 | Explanation |
|---|---|---|---|
| Normal | 0 | 0 | UART and wireless channel are open, transparent transmission is on |
| WOR mode | 0 | 1 | Can be defined as WOR transmitter and WOR receiver |
| Configuration mode | 1 | 0 | Users can access the register through the serial port to control the working state of the module |
| Deep sleep mode | 1 | 1 | Sleep mode. |
Normal mode connection
For the next simple test we are going to use Normal mode.
Connecting Wemos D1 mini (esp8266) for a basic usage
esp8266 have the advantage to have same voltage of communication interface so the connection schema is more simple than Arduino.
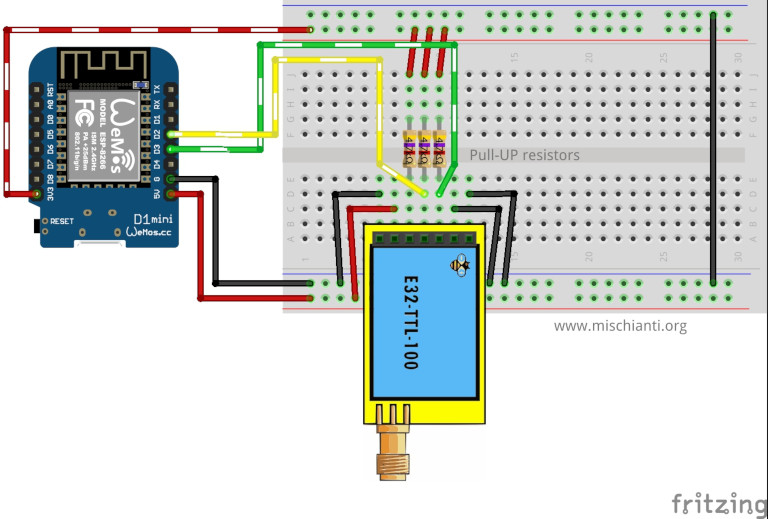
It’s important to add pull-up resistor (4,7Kohm) to get good stability.
| E22 | WeMos |
|---|---|
| M0 | GND (Set normal mode) |
| M1 | GND (Set normal mode) |
| RX | PIN D2 (PullUP 4,7KΩ) |
| TX | PIN D3 (PullUP 4,7KΩ) |
| AUX | Not connected |
| VCC | 3.3v |
| GND | GND |
Connecting esp32 for a basic usage
As WeMos, esp32 logic works at 3.3v but It have 3 HardwareSerial, so we are going to use Serial2.

| E22 | esp32 |
|---|---|
| M0 | GND (Set normal mode) |
| M1 | GND (Set normal mode) |
| RX | TX2 (PullUP 4,7KΩ) |
| TX | RX2 (PullUP 4,7KΩ) |
| AUX | Not connected |
| VCC | 3.3v |
| GND | GND |
Connecting Arduino MKR for a basic usage
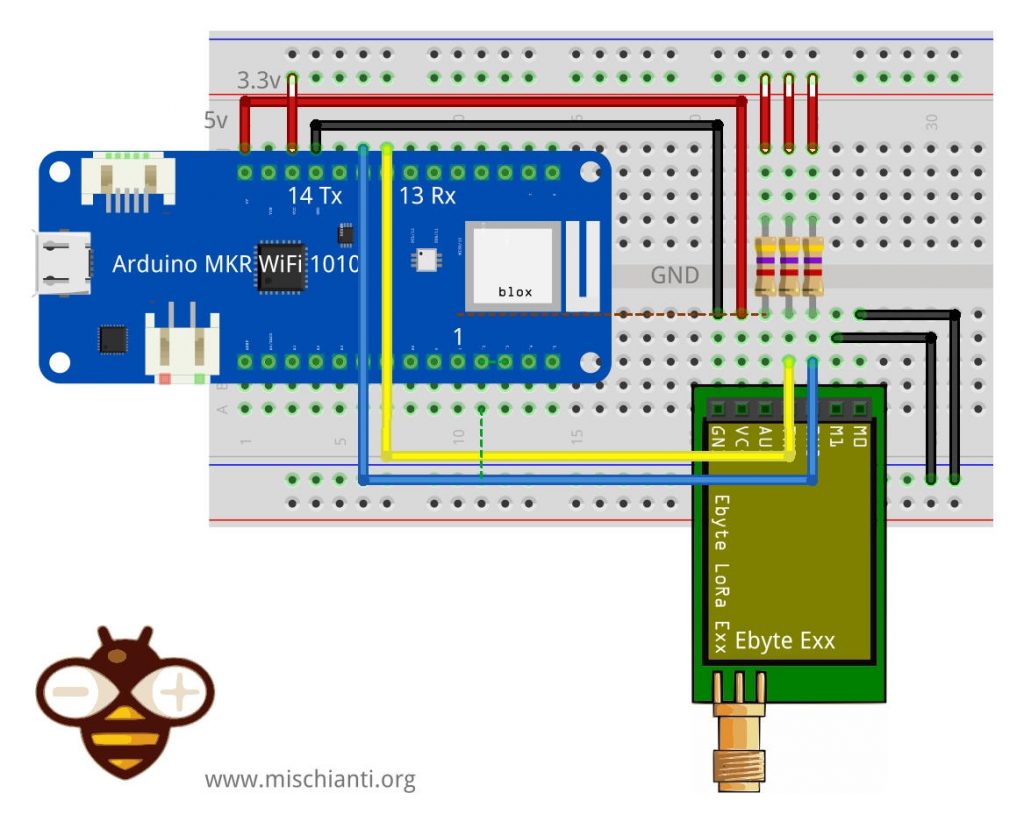
| E22 | Arduino MKR |
|---|---|
| M0 | GND (Set normal mode) |
| M1 | GND (Set normal mode) |
| TX | PIN 14 Tx (PullUP 4,7KΩ) |
| RX | PIN 13 Rx (PullUP 4,7KΩ) |
| AUX | PIN 1 (PullUP 4,7KΩ) |
| VCC | 5V |
| GND | GND |
Connecting Arduino for a basic usage
Arduino working voltage is 5v, so we need to add a voltage divider on RX pin of LoRa module to prevent damage, you can get more information here Voltage divider: calculator and application.
You can use a 2Kohm resistor to GND and 1Kohm from signal than put together on RX.
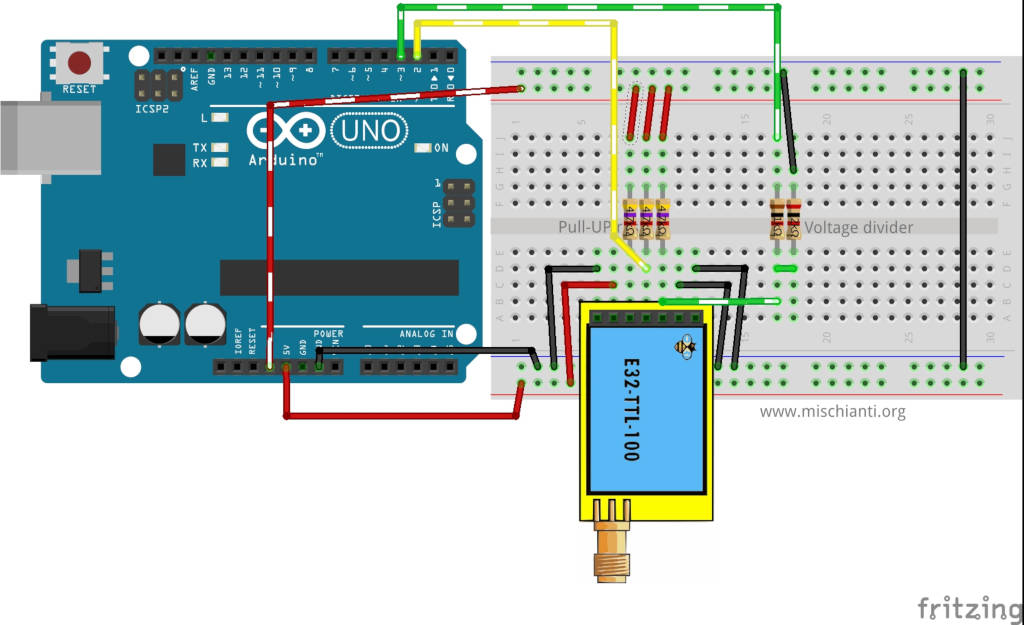
| E22 | Arduino |
|---|---|
| M0 | GND (Set normal mode) |
| M1 | GND (Set normal mode) |
| RX | PIN D2 (PullUP 4,7KΩ & Voltage divider) |
| TX | PIN D3 (PullUP 4,7KΩ) |
| AUX | Not connected |
| VCC | 3.3v |
| GND | GND |
Simple communication sketch
If you put to 0 M1 and M0 pin you enter in “Normal” mode, than you can receive and trasmit all the data from device A to B, this modality is defined “Trasparent transmission”.
You can use 2 Arduinos or 2 Wemos D1 mini or one of kind.
At start send a message and if you write on serial from one of device the text is transferred to the other device. You can use 2 Arduinos or 2 Wemos or one and one as you prefer.
Arduino sketch
/*
 * LoRa E22
 * Start device or reset to send a message
 * https://mischianti.org
 *
 * E22        ----- Arduino UNO
 * M0         ----- GND
 * M1         ----- GND
 * TX         ----- PIN 2 (PullUP)
 * RX         ----- PIN 3 (PullUP & Voltage divider)
 * AUX        ----- Not connected
 * VCC        ----- 3.3v/5v
 * GND        ----- GND
 *
 */
#include "Arduino.h"

#include <SoftwareSerial.h>

SoftwareSerial mySerial(2, 3); // Arduino RX --> e22 TX - Arduino TX --> e22 RX

void setup() {
  Serial.begin(9600);
  delay(500);

  Serial.println("Hi, I'm going to send message!");

  mySerial.begin(9600);
  mySerial.println("Hello, world?");
}

void loop() {
  if (mySerial.available()) {
    Serial.write(mySerial.read());
  }
  if (Serial.available()) {
    mySerial.write(Serial.read());
  }
}
Wemos D1 mini sketch
/*
 * LoRa E22
 * Start device or reset to send a message
 * https://mischianti.org
 *
 * E22         ----- Wemos D1 mini
 * M0         ----- GND
 * M1         ----- GND
 * TX         ----- PIN D2 (PullUP)
 * RX         ----- PIN D3 (PullUP)
 * AUX        ----- Not connected
 * VCC        ----- 3.3v/5v
 * GND        ----- GND
 *
 */
#include "Arduino.h"
#include <SoftwareSerial.h>

SoftwareSerial mySerial(D2, D3); // WeMos RX --> e22 TX - WeMos TX --> e22 RX

void setup() {
  Serial.begin(9600);
  delay(500);

  Serial.println("Hi, I'm going to send message!");

  mySerial.begin(9600);
  mySerial.println("Hello, world?");
}

void loop() {
  if (mySerial.available()) {
    Serial.write(mySerial.read());
  }
  if (Serial.available()) {
    mySerial.write(Serial.read());
  }
}
esp32 sketch
/*
 * LoRa E22
 * Start device or reset to send a message
 * https://mischianti.org
 *
 * E22        ----- esp32
 * M0         ----- GND
 * M1         ----- GND
 * TX         ----- RX2 (PullUP)
 * RX         ----- TX2 (PullUP)
 * AUX        ----- Not connected
 * VCC        ----- 3.3v/5v
 * GND        ----- GND
 *
 */
#include "Arduino.h"

void setup() {
  Serial.begin(9600);
  delay(500);

  Serial.println("Hi, I'm going to send message!");

  Serial2.begin(9600);
  Serial2.println("Hello, world?");
}

void loop() {
  if (Serial2.available()) {
    Serial.write(Serial2.read());
  }
  if (Serial.available()) {
    Serial2.write(Serial.read());
  }
}
Arduino MKR sketch
/*
 * LoRa E22
 * Start device or reset to send a message
 * https://mischianti.org
 *
 * E22        ----- Arduino MKR
 * M0         ----- 2 (or GND)
 * M1         ----- 3 (or GND)
 * RX         ----- 14 (PullUP)
 * TX         ----- 13 (PullUP)
 * AUX        ----- 1  (PullUP)
 * VCC        ----- 3.3v/5v
 * GND        ----- GND
 *
 */
#include "Arduino.h"

void setup() {
  Serial.begin(9600);
  delay(500);

  Serial.println("Hi, I'm going to send message!");

  Serial1.begin(9600);
  Serial1.println("Hello, world?");
}

void loop() {
  if (Serial1.available()) {
    Serial.write(Serial1.read());
  }
  if (Serial.available()) {
    Serial1.write(Serial.read());
  }
}
But this basic usage is quite unusefully, so in the next chapter we are going to use my library and go in deep of device features.
Library
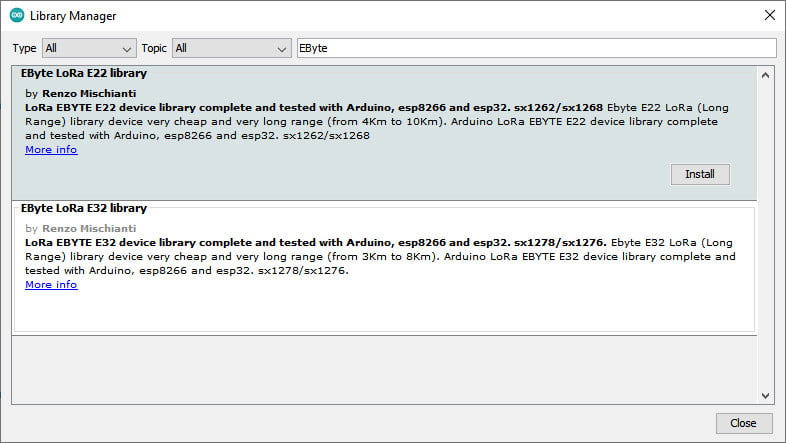
Here the last example with my library:
Arduino sketch
/*
 * LoRa E22
 * Write on serial to transfer a message to other device
 * https://mischianti.org
 *
 * E22        ----- Arduino UNO
 * M0         ----- GND
 * M1         ----- GND
 * TX         ----- PIN 2 (PullUP)
 * RX         ----- PIN 3 (PullUP & Voltage divider)
 * AUX        ----- Not connected
 * VCC        ----- 3.3v/5v
 * GND        ----- GND
 *
 */
#include "Arduino.h"
#include "LoRa_E22.h"

LoRa_E22 e22ttl(2, 3); // Arduino RX --> e22 TX - Arduino TX --> e22 RX

void setup() {
  Serial.begin(9600);
  delay(500);

  Serial.println("Hi, I'm going to send message!");

  // Startup all pins and UART
  e22ttl.begin();

  // Send message
  ResponseStatus rs = e22ttl.sendMessage("Hello, world?");
  // Check If there is some problem of successfully send
  Serial.println(rs.getResponseDescription());
}

void loop() {
	// If something available
  if (e22ttl.available()>1) {
	  // read the String message
	ResponseContainer rc = e22ttl.receiveMessage();
	// Is something goes wrong print error
	if (rc.status.code!=1){
		rc.status.getResponseDescription();
	}else{
		// Print the data received
		Serial.println(rc.data);
	}
  }
  if (Serial.available()) {
	  String input = Serial.readString();
	  e22ttl.sendMessage(input);
  }
}
Wemos D1 (esp8266) sketch
/*
 * LoRa E22
 * Start device or reset to send a message
 * https://mischianti.org
 *
 * E22        ----- Wemos D1 mini
 * M0         ----- GND
 * M1         ----- GND
 * TX         ----- PIN D2 (PullUP)
 * RX         ----- PIN D3 (PullUP)
 * AUX        ----- Not connected
 * VCC        ----- 3.3v/5v
 * GND        ----- GND
 *
 */
#include "Arduino.h"
#include "LoRa_E22.h"

LoRa_E22 e22ttl(D2, D3); // WeMos RX --> e22 TX - WeMos TX --> e22 RX

void setup() {
  Serial.begin(9600);
  delay(500);

  Serial.println("Hi, I'm going to send message!");

  // Startup all pins and UART
  e22ttl.begin();

  // Send message
  ResponseStatus rs = e22ttl.sendMessage("Hello, world?");
  // Check If there is some problem of successfully send
  Serial.println(rs.getResponseDescription());
}

void loop() {
	// If something available
  if (e22ttl.available()>1) {
	  // read the String message
	ResponseContainer rc = e22ttl.receiveMessage();
	// Is something goes wrong print error
	if (rc.status.code!=1){
		rc.status.getResponseDescription();
	}else{
		// Print the data received
		Serial.println(rc.data);
	}
  }
  if (Serial.available()) {
	  String input = Serial.readString();
	  e22ttl.sendMessage(input);
  }
}
esp32 sketch
/*
 * LoRa E22
 * Start device or reset to send a message
 * https://mischianti.org
 *
 * E22        ----- esp32
 * M0         ----- GND
 * M1         ----- GND
 * TX         ----- RX2 (PullUP)
 * RX         ----- TX2 (PullUP)
 * AUX        ----- Not connected
 * VCC        ----- 3.3v/5v
 * GND        ----- GND
 *
 */
#include "Arduino.h"
#include "LoRa_E22.h"

LoRa_E22 e22ttl(&Serial2); // WeMos RX --> e22 TX - WeMos TX --> e22 RX

void setup() {
  Serial.begin(9600);
  delay(500);

  Serial.println("Hi, I'm going to send message!");

  // Startup all pins and UART
  e22ttl.begin();

  // Send message
  ResponseStatus rs = e22ttl.sendMessage("Hello, world?");
  // Check If there is some problem of successfully send
  Serial.println(rs.getResponseDescription());
}

void loop() {
	// If something available
  if (e22ttl.available()>1) {
	  // read the String message
	ResponseContainer rc = e22ttl.receiveMessage();
	// Is something goes wrong print error
	if (rc.status.code!=1){
		rc.status.getResponseDescription();
	}else{
		// Print the data received
		Serial.println(rc.data);
	}
  }
  if (Serial.available()) {
	  String input = Serial.readString();
	  e22ttl.sendMessage(input);
  }
}
Arduino MKR sketch
/*
 * LoRa E22
 * Start device or reset to send a message
 * https://mischianti.org
 *
 * E22        ----- Arduino MKR
 * M0         ----- GND
 * M1         ----- GND
 * RX         ----- 14 (PullUP)
 * TX         ----- 13 (PullUP)
 * AUX        ----- 1  (PullUP)
 * VCC        ----- 3.3v/5v
 * GND        ----- GND
 *
 */
#include "Arduino.h"
#include "LoRa_E22.h"

LoRa_E22 e22ttl(&Serial1); // WeMos RX --> e22 TX - WeMos TX --> e22 RX

void setup() {
  Serial.begin(9600);
  delay(500);

  Serial.println("Hi, I'm going to send message!");

  // Startup all pins and UART
  e22ttl.begin();

  // Send message
  ResponseStatus rs = e22ttl.sendMessage("Hello, world?");
  // Check If there is some problem of successfully send
  Serial.println(rs.getResponseDescription());
}

void loop() {
	// If something available
  if (e22ttl.available()>1) {
	  // read the String message
	ResponseContainer rc = e22ttl.receiveMessage();
	// Is something goes wrong print error
	if (rc.status.code!=1){
		rc.status.getResponseDescription();
	}else{
		// Print the data received
		Serial.println(rc.data);
	}
  }
  if (Serial.available()) {
	  String input = Serial.readString();
	  e22ttl.sendMessage(input);
  }
}
If you have already change configuration you must restore base parameter:
//  If you have ever change configuration you must restore It
	ResponseStructContainer c;
	c = e22ttl.getConfiguration();
	Configuration configuration = *(Configuration*) c.data;
	Serial.println(c.status.getResponseDescription());
	configuration.CHAN = 0x17;
	configuration.OPTION.fixedTransmission = FT_TRANSPARENT_TRANSMISSION;
	e22ttl.setConfiguration(configuration, WRITE_CFG_PWR_DWN_SAVE);
but we are going to see It better in the next article.
Thanks
But this kind of usage is very very reductive, in the next articles we are going more in deep, and we start to use massively the library to simplify the complex configuration and settings.
- Ebyte LoRa E22 device for Arduino, esp32 or esp8266: settings and basic usage
- Ebyte LoRa E22 device for Arduino, esp32 or esp8266: library
- Ebyte LoRa E22 device for Arduino, esp32 or esp8266: configuration
- Ebyte LoRa E22 device for Arduino, esp32 or esp8266: fixed transmission, broadcast, monitor, and RSSI
- Ebyte LoRa E22 device for Arduino, esp32 or esp8266: power-saving and sending structured data
- Ebyte LoRa E22 device for Arduino, esp32 or esp8266: repeater mode and remote settings
- Ebyte LoRa E22 device for Arduino, esp32 or esp8266: WOR microcontroller and Arduino shield
- Ebyte LoRa E22 device for Arduino, esp32 or esp8266: WOR microcontroller and WeMos D1 shield
- Ebyte LoRa E22 device for Arduino, esp32 or esp8266: WOR microcontroller and esp32 dev v1 shield

Shield and PCB


what’s the difference between E22-400T22D and E22-400T22S ?
Hi terr4ik,
the final S is SMD package, the final D is module one.
Bye Renzo
Hello!
Help us! We need the E22 library hahahaha
Thanks for help
Hi Vitor,
hehehe, the link to the library is not very visible, i add It here GitHub Library.
But I think you want the article Libray, it ‘s ready but i must publish different other articles, and I have few time.
If you have problem with the usage you can write on forum without problem.
I think I need to find some people to help me: P
Bye Renzo
Hi Vitor,
I publish the new article library 😛
Bye Renzo
Hello mischianti, I have a problem with e22 model. I enable debug and output as below :
RX MIC —> -1
TX MIC —> -1
AUX —> 18
M0 —> 21
M1 —> 19
Init AUX pin!
Init M0 pin!
Init M1 pin!
Begin ex
Begin Hardware Serial
Begin
MODE NORMAL!
AUX HIGH!
Complete!
MODE CONFIGURATION!
AUX HIGH!
Complete!
3
Available buffer: 12 structure size: 12
AUX HIGH!
Complete!
HEAD : C1 0 9
AddH : 0
AddL : 3
NetID : 0
Chan : 23 -> 433MHz
SpeedParityBit : 0 -> 8N1 (Default)
SpeedUARTDatte : 11 -> 9600bps (default)
SpeedAirDataRate : 10 -> 2.4kbps (default)
OptionSubPacketSett: 0 -> 240bytes (default)
OptionTranPower : 0 -> 22dBm (Default)
OptionRSSIAmbientNo: 1 -> Enabled
TransModeWORPeriod : 11 -> 2000ms (default)
TransModeTransContr: 0 -> WOR Receiver (default)
TransModeEnableLBT : 0 -> Disabled (default)
TransModeEnableRSSI: 0 -> Disabled (default)
TransModeEnabRepeat: 0 -> Disabled (default)
TransModeFixedTrans: 1 -> Fixed transmission (first three bytes can be used as high/low address and channel)
MODE NORMAL!
AUX HIGH!
Complete!
Success
1
HEAD : C1 0 9
AddH : 0
AddL : 3
NetID : 0
Chan : 23 -> 433MHz
SpeedParityBit : 0 -> 8N1 (Default)
SpeedUARTDatte : 11 -> 9600bps (default)
SpeedAirDataRate : 10 -> 2.4kbps (default)
OptionSubPacketSett: 0 -> 240bytes (default)
OptionTranPower : 0 -> 22dBm (Default)
OptionRSSIAmbientNo: 1 -> Enabled
TransModeWORPeriod : 11 -> 2000ms (default)
TransModeTransContr: 0 -> WOR Receiver (default)
TransModeEnableLBT : 0 -> Disabled (default)
TransModeEnableRSSI: 0 -> Disabled (default)
TransModeEnabRepeat: 0 -> Disabled (default)
TransModeFixedTrans: 1 -> Fixed transmission (first three bytes can be used as high/low address and channel)
MODE CONFIGURATION!
AUX HIGH!
Complete!
AUX HIGH!
Complete!
Clear buffer…ok!
Available buffer: 0 structure size: 12
HEAD : C0 0 9
AddH : 0
AddL : 3
NetID : 0
Chan : 23 -> 433MHz
SpeedParityBit : 0 -> 8N1 (Default)
SpeedUARTDatte : 11 -> 9600bps (default)
SpeedAirDataRate : 10 -> 2.4kbps (default)
OptionSubPacketSett: 0 -> 240bytes (default)
OptionTranPower : 0 -> 22dBm (Default)
OptionRSSIAmbientNo: 1 -> Enabled
TransModeWORPeriod : 11 -> 2000ms (default)
TransModeTransContr: 0 -> WOR Receiver (default)
TransModeEnableLBT : 0 -> Disabled (default)
TransModeEnableRSSI: 0 -> Disabled (default)
TransModeEnabRepeat: 0 -> Disabled (default)
TransModeFixedTrans: 1 -> Fixed transmission (first three bytes can be used as high/low address and channel)
MODE NORMAL!
AUX HIGH!
Complete!
Save mode returned not recognized!
11
MODE CONFIGURATION!
AUX HIGH!
Complete!
3
Available buffer: 12 structure size: 12
AUX HIGH!
Complete!
HEAD : C1 0 9
AddH : 0
AddL : 3
NetID : 0
Chan : 23 -> 433MHz
SpeedParityBit : 0 -> 8N1 (Default)
SpeedUARTDatte : 11 -> 9600bps (default)
SpeedAirDataRate : 10 -> 2.4kbps (default)
OptionSubPacketSett: 0 -> 240bytes (default)
OptionTranPower : 0 -> 22dBm (Default)
OptionRSSIAmbientNo: 1 -> Enabled
TransModeWORPeriod : 11 -> 2000ms (default)
TransModeTransContr: 0 -> WOR Receiver (default)
TransModeEnableLBT : 0 -> Disabled (default)
TransModeEnableRSSI: 0 -> Disabled (default)
TransModeEnabRepeat: 0 -> Disabled (default)
TransModeFixedTrans: 1 -> Fixed transmission (first three bytes can be used as high/low address and channel)
MODE NORMAL!
AUX HIGH!
Complete!
Success
1
HEAD : C1 0 9
AddH : 0
AddL : 3
NetID : 0
Chan : 23 -> 433MHz
SpeedParityBit : 0 -> 8N1 (Default)
SpeedUARTDatte : 11 -> 9600bps (default)
SpeedAirDataRate : 10 -> 2.4kbps (default)
OptionSubPacketSett: 0 -> 240bytes (default)
OptionTranPower : 0 -> 22dBm (Default)
OptionRSSIAmbientNo: 1 -> Enabled
TransModeWORPeriod : 11 -> 2000ms (default)
TransModeTransContr: 0 -> WOR Receiver (default)
TransModeEnableLBT : 0 -> Disabled (default)
TransModeEnableRSSI: 0 -> Disabled (default)
TransModeEnabRepeat: 0 -> Disabled (default)
TransModeFixedTrans: 1 -> Fixed transmission (first three bytes can be used as high/low address and channel)
What might be the problem with it ?
Hi Kadir,
sorry if I answer only now, but your message go in spam.
In all the request only one time you have trouble, I think can be a connection problem.
Try to change pull-up resistor.
Bye Renzo
Hi.
First of all, thanks for great library!
I have a question: can E220 modules talk to SX12XX modules?
I have E220-900T30D and some SX1276 modules, but i can’t set them to talk to each other.
SX modules – i can setup: Frequency, Spreading Factor, Signal Bandwidth, Coding Rate, Preamble Length, Sync Word, or CRC, but E220 modules doesn’t have mostly those settings.
On E220 I can set ADDH, ADDL (is that SyncWord???), air data rate (is that freq, and spreading factor combination? couldn’t find any documentation), Channel (no idea how to change channel on SX-modules) etc. If it’s possible, how to connfigure both modules to talk each other?
Thanks
Hi Marcin,
surely not with E220, because these modules not use the old sx12xx but LLCC68 chip.
You can try to use e22 or e32 based on sx12xx, but I think It difficult to communicate each other.
EByte module have a lot of features on top of the raw chip: FEC, spectrum analyzer, repeater function (e22), advanced WOR, and expecially a transparent encryption system so if you receive/intercept the message without encryption algorithm and the relative keyyou can’t read It.
Channel is the frequency, ADDL and ADDH is the address of the remote device.
Bye Renzo
Hola, gracias por tu publicación.
Tienes alguna idea de como se puede hacer un Gateway con ese modulo, tengo 10 dispositivos E220 (con las direcciones del 1 al 10 respectivamente), estos dispositivos envían a un dispositivo con la dirección 11, pero en ocasiones no puedo recibir los datos de los 10 dispositivos en el mismo instante o con algunos segundos de diferencia, (Esto es por que cada 30 minutos se requiere saber los datos que envían los dispositivos ).
Hi Sebastian,
please next time use English.
EByte offer Gateway like this one or you can implement a gateway that use more than one interface that simple read and flush buffer immediately and put the data on an MQTT server.
Bye Renzo
Hi, first thank U for a great libary and documentation.
How to set encryption Key ?
Like this
configuration.CRYPT = 123; // – This produce error
Hi Vasilij,
It uses 2 key sets to 0, you can change the key in the configuration so
    configuration.CRYPT.CRYPT_L = 128;
    configuration.CRYPT.CRYPT_H = 17;
Bye Renzo
Hello – I am using your E22 library to transmit and receive successfully! I have one question – when I receive a message, how can I figure out which device sent it? In other words, how do I read the ADDL and ADDH of the sender? Is there a way to get this information from the ResponseStructContainer rsc = e22ttl.receiveMessageRSSI(sizeof(Message))? Thank you!
Hi Richard,
a lot of people need this, but you must manage the sender address in your data structure, there is no way to retrieve It from the header of the packet.
Bye Renzo
Thank you for your articles and quick response! What you are saying is now clear to me. After carefully reading what you wrote about transmission type you commented: “The module changes its address and channel when transmit. And it will revert to original setting after complete the process.” I guess the correct way to do this would be to add this information as part of the payload as you’ve indicated.
Hello again – RSSI data comes in fine when I receive a message from a transmitter. I notice however in the E22 documentation and your library a comment about RSSIAmbientNoise. If I enable this, how can I get ambient noise data without transmitting? I don’t see how to do this in the library. Thanks!
Hi Richard,
you are right, I forget to create a specified command.
Sorry I try to update the library soon.
Bye Renzo