
DynamoDB: prerequisite and JavaScript SDK v2 and v3 – 1
I want to write a step by step tutorial on how to create an Alexa Smart Home Skill from scratch. So I’m going to present all the prerequisites and steps to create a Smart Home Skill connected to our micro-controller able to manage every connected device.
I’m going to start with a simple argument like the database DynamoDB next we are going to create a Smart Skill and connect to a messaging server the microcontroller and then put all together.
In this schema you can check witch part we are going to analyze (selected in yellow).
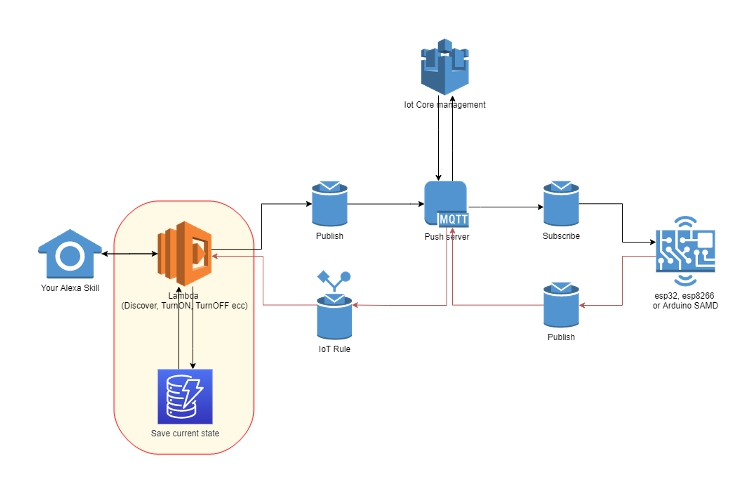
Every lambdas (see lambda like a REST call for now) when called, they may need to save some data, and now we are going to see this part.
Now let’s get started with our DynamoDB.
Amazon DynamoDB is a key-value and document database that delivers single-digit millisecond performance at any scale. It’s a fully managed, multi-region, multi-active, durable database with built-in security, backup and restore, and in-memory caching for internet-scale applications.
Amazon
Prerequisite
You need an AWS console account and a developer account.
Installation of AWS CLI to manage anche check the changes on you DynamoDB.
Install NodeJS to execute script locally.
If you want try to put your DynamoDB locally, Install Docker (or install DynamoDB manually).
Code and resources
First create a folder, for me I create
dynamodb-tutorial-examples-iot
Install Optional Tools
The use of these tools is optional as they are useful, but not required.
Git
Git 2.0 or greater is required only if you want to clone the source code locally. At a command line, you can verify if git is installed by running the command:
git --version
If it is not properly installed or is not a version greater than 2.0, visit https://git-scm.com/downloads to download and install a version for your platform.
Get the Source Code via Git
If you have git installed on your workstation, you can use the following instructions to pull the source code into your working directory.
- From the command-line, navigate into the working directory on your desktop:
dynamodb-examples - Run the following command to pull the source code to a working directory:
git clone https://github.com/xreef/dynamodb-tutorial-examples-iot.git
Get the Source Code via Download
If you do not have git installed, download and unzip the zipped contents of the sample from
https://github.com/xreef/dynamodb-tutorial-examples-iot/archive/refs/heads/master.zip
into your desktop working directory: dynamodb-tutorial-examples-iot.
Manage the setup file
Rename setup-template.txt in setup.txt.
The file should contain:
[Login with Amazon Client ID]
XXXXX.XXXXXXXXXXX-XXX-XXXXXX.XXXXXXXXXXXXXXXXXXXXXXXXXXXXXXXX

[Login with Amazon Client Secret]
XXXXXXXXXXXXXXXXXXXXXXXXXXXXXXXXXXXXXXXXXXXXXXXXXXXXXXXXXXXXXXXX

[AWS Access Key ID]
XXXXXXXXXXXXXXXXXXXX

[AWS Secret Access Key]
XXXXXXXXXXXXXXXXXXXXXXXXXXXXXXXXXXXXXXXX

[Region]
XX-XXXX-X
Create Access key Security Credentials
To grant access from your PC to AWS DynamoDB you must create an Access Key ID and Secret Access Key.

- Go to Identity and Access Management (IAM), from the Profile menu (your user login) select My Security Credential;
https://console.aws.amazon.com/iam/home#/security_credentials - Click on Access keys (access key ID and secret access key) accordion;
- And click on Create New Access Key button.
- Copy Access Key ID and Secret Access Key to setup file in the relative section
[Access Key ID]
XXXXXXXXXXXXXXXXXXXX

[AWS Secret Access Key]
XXXXXXXXXXXXXXXXXXXXXXXXXXXXXXXXXXXXXXX
Configure credential to execute locally DynamoDB script
- Now from the command prompt launch
aws configurecommand;
$ aws configure
AWS Access Key ID [None]: XXXXXXXXXXXXXXXXXXXX
AWS Secret Access Key [None]: XXXXXXXXXXXXXXXXXXXXXXXXXXXXXXXXXXXXXXX
Default region name [None]: eu-west-1
Default output format [None]: json
- Insert your
[AWS Access Key ID]then[AWS Secret Access Key]get from filesetup.txt; - Insert your region (It’s better if you select a region good for your country);
- Now insert an output format (json for me).
Now you are connected to your AWS account, and you can directly launch the scripts to query the database.
Script (JavaScript) V2 and V3
You can use DynamoDB with 2 versions of the library. These libraries allow you to work easily with Amazon Web Services, when I write this article version 2 is the most used, bue v3 is a rewrite of v2 with some new features like a modular architecture with a separate package for each service. It also includes many frequently requested features, such as a first-class TypeScript support and a new middleware stack.
I’d like to show you v2 and v3 code, and you are going to select the version that you prefer.
Initializing environment
Now we must initialize the environment to use the scripts.
- Install NodeJS (and npm if needed).
- Go to folder
dynamodb-tutorial-examples-iot\dynamodb-examples\jsv2for v2 scripts and dynamodb-tutorial-examples-iot\dynamodb-examples\jsv3 for v3 scripts. - Launch
npm i. - In all js scripts change the region in according to your setting (and DB position if needed) put selected region in
setup.txtfile.
[Region]
XX-XXXX-X
You are going to find the region on v2 scripts in AWS.config.update section:
AWS.config.update({
    apiVersion: '2012-08-10',
    region: "eu-west-1",
    // endpoint: "http://localhost:8000",
    // // accessKeyId default can be used while using the downloadable version of DynamoDB.
    // // For security reasons, do not store AWS Credentials in your files. Use Amazon Cognito instead.
    // accessKeyId: "9oiaf7",
    // // secretAccessKey default can be used while using the downloadable version of DynamoDB.
    // // For security reasons, do not store AWS Credentials in your files. Use Amazon Cognito instead.
    // secretAccessKey: "yz5i9"
});
For v3 scripts you are going to find It in a const object.
const configDynamoDB = {
    version: 'latest',
    region: "eu-west-1",
    // endpoint: "http://localhost:8000",
    // credentials: {
    //     // accessKeyId default can be used while using the downloadable version of DynamoDB.
    //     // For security reasons, do not store AWS Credentials in your files. Use Amazon Cognito instead.
    //     accessKeyId: "9oiaf7",
    //     // secretAccessKey default can be used while using the downloadable version of DynamoDB.
    //     // For security reasons, do not store AWS Credentials in your files. Use Amazon Cognito instead.
    //     secretAccessKey: "yz5i9"
    // }
};
Now we are ready to launch the scripts.
JS packages difference
The big difference from v2 and v3 is that v2 have a single package imported
"aws-sdk": "^2.802.0"
v3 have modular packages, so we can go to import only what we need, and in this case import the DynamoDB client.
"@aws-sdk/client-dynamodb": "^1.0.0-rc.7"
Thanks
This was the basic introduction to the work environment, in the next article we will start over from here to start running the code.
- DynamoDB JavaScript SDK v2 v3: prerequisite and SDK v2 v3 introduction
- DynamoDB JavaScript SDK v2 v3: manage tables
- DynamoDB JavaScript SDK v2 v3: add items with DB or DocumentClient
- DynamoDB JavaScript SDK v2 v3: manage items
- DynamoDB JavaScript SDK v2 v3: scan table data and pagination
- DynamoDB JavaScript SDK v2 v3: query


