
WeMos D1 mini (esp8266), the three type of sleep mode to manage energy savings – Part 4
When you create a new IoT project probably you need to connect microcontroller to a battary power source, but if you don’t use a power saving options your battery will run out in no time.
As a lot of IoT microcontroller, WeMos D1 mini have some power saving mode.
To create a simple rechargeable power bank read “Emergency power bank homemade“.
Here the WeMos D1 mini WeMos D1 mini - NodeMCU V2 V2.1 V3 - esp01 - esp01 programmer
The sleep modes types are modem sleep, light sleep, and deep sleep. The table below shows the differences between each mode.
| Item | Modem-sleep | Light-sleep | Deep-sleep |
|---|---|---|---|
| Wi-Fi | OFF | OFF | OFF |
| System clock | ON | OFF | OFF |
| RTC | ON | ON | ON |
| CPU | ON | Pending | OFF |
| Substrate current | 15 mA | 0.4 mA | ~20 uA |
| Average current (DTIM = 1) | 16.2 mA | 1.8 mA | – |
| Average current (DTIM = 3) | 15.4 mA | 0.9 mA | – |
| Average current (DTIM = 10) | 15.2 mA | 0.55 mA | – |
Modem sleep
This is the default state of esp8266, but normally you interrupt this state when connect device via WIFI. But if you don’t use WIFI for a while, the better thing is to put the device in Modem-sleep.
You can put your device in modem-sleep with this command:
WiFi.disconnect();
WiFi.forceSleepBegin();
delay(1); //For some reason the modem won't go to sleep unless you do a delay
you can restore WIFI with:
WiFi.forceSleepWake();
delay(1);
//Insert code to connect to WiFi, start your servers or clients or whatever
Remember that if you want use a delay in normal mode you must add this:
wifi_set_sleep_type(NONE_SLEEP_T);
Or you must disabled the auto sleep mode (better explained in the next paragraph) we are going to call this function.
wifi_fpm_auto_sleep_set_in_null_mode(NULL_MODE);
Here a complete sketch, pay attention I use Serial1 to debug, refer to Part 3 WeMos D1 mini (esp8266), debug on secondary UART
#include "Arduino.h"
#include <ESP8266WiFi.h>
// Required for LIGHT_SLEEP_T delay mode
extern "C" {
#include "user_interface.h"
}

const char* ssid = "<your-ssid>";
const char* password = "<your-passwd>";

//The setup function is called once at startup of the sketch
void setup() {
  Serial1.begin(115200);
  while(!Serial1) { }

  Serial1.println();
  Serial1.println("Start device in normal mode!");

  WiFi.mode(WIFI_STA);

  WiFi.begin(ssid, password);
  Serial1.println("");

  // Wait for connection
  while (WiFi.status() != WL_CONNECTED) {
    delay(500);
    Serial1.print(".");
  }
  Serial1.println("");
  Serial1.print("Connected to ");
  Serial1.println(ssid);
  Serial1.print("IP address: ");
  Serial1.println(WiFi.localIP());
}
void callback() {
  Serial1.println("Callback");
  Serial.flush();
}
void loop() {
	  Serial1.println("Enter modem sleep mode");


      uint32_t sleep_time_in_ms = 10000;
//      WiFi.disconnect();
      WiFi.forceSleepBegin();
      delay(sleep_time_in_ms + 1);

      WiFi.forceSleepWake();
      delay(1);
      Serial1.println("Exit modem sleep mode");

      WiFi.mode(WIFI_STA);
      WiFi.begin(ssid, password);
      Serial1.println("");

      // Wait for connection
      while (WiFi.status() != WL_CONNECTED) {
        delay(500);
        Serial1.print(".");
      }
      Serial1.println("");
      Serial1.print("Connected to ");
      Serial1.println(ssid);
      Serial1.print("IP address: ");
      Serial1.println(WiFi.localIP());

      wifi_set_sleep_type(NONE_SLEEP_T);
      delay(10000);  //  Put the esp to sleep for 15s
}
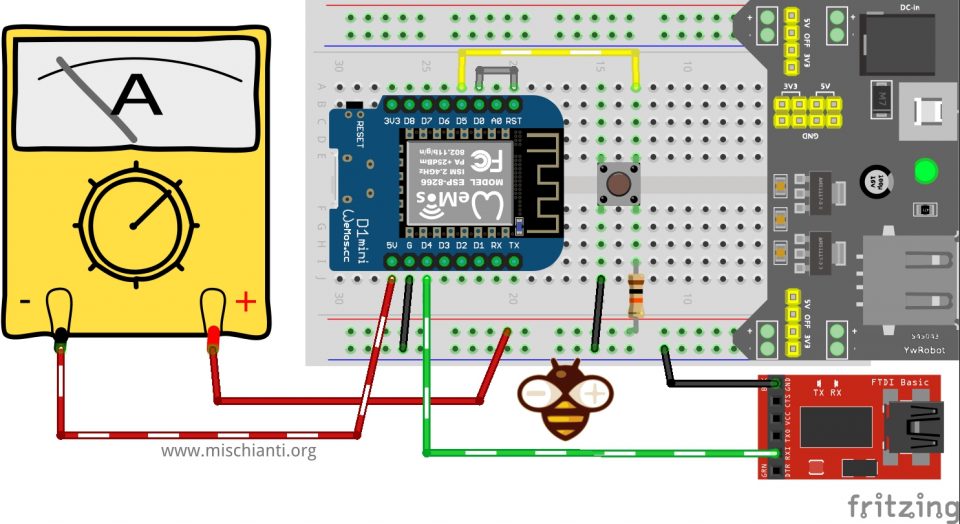
This type of sleep mode, as you can see in the video permit to get 20mA of power consumption from the device.
Light sleep
This type of sleep is quite usefully if you need to mantain the device active, and the big difference from the previous type is that you can wake up the device via interrupt on GPIO.
To put on light sleep mode you must use this code, there isn’t a simple way to activate It like modem sleep.
You must add this configuration to the sketch:
	  // Here all the code to put con light sleep
	  // the problem is that there is a bug on this
	  // process
	  //wifi_station_disconnect(); //not needed
	  uint32_t sleep_time_in_ms = 10000;
	  wifi_set_opmode(NULL_MODE);
	  wifi_fpm_set_sleep_type(LIGHT_SLEEP_T);
	  wifi_fpm_open();
	  wifi_fpm_set_wakeup_cb(callback);
	  wifi_fpm_do_sleep(sleep_time_in_ms *1000 );
	  delay(sleep_time_in_ms + 1);
At the same manner we can use this code to enter in MODEM_SLEEP mode:
	  // Here all the code to put con light sleep
	  // the problem is that there is a bug on this
	  // process
	  //wifi_station_disconnect(); //not needed
	  uint32_t sleep_time_in_ms = 10000;
	  wifi_set_opmode(NULL_MODE);
	  wifi_fpm_set_sleep_type(MODEM_SLEEP_T);
	  wifi_fpm_open();
	  wifi_fpm_set_wakeup_cb(callback);
	  wifi_fpm_do_sleep(sleep_time_in_ms *1000 );
	  delay(sleep_time_in_ms + 1);
The device go in light mode with less use of battery and less temperature.
#include "Arduino.h"
#include <ESP8266WiFi.h>
// Required for LIGHT_SLEEP_T delay mode
extern "C" {
#include "user_interface.h"
}

const char* ssid = "<your-ssid>";
const char* password = "<your-passwd>";

//The setup function is called once at startup of the sketch
void setup() {
  Serial1.begin(115200);
  while(!Serial1) { }

  Serial1.println();
  Serial1.println("Start device in normal mode!");

  WiFi.mode(WIFI_STA);

  WiFi.begin(ssid, password);
  Serial1.println("");

  // Wait for connection
  while (WiFi.status() != WL_CONNECTED) {
    delay(500);
    Serial1.print(".");
  }
  Serial1.println("");
  Serial1.print("Connected to ");
  Serial1.println(ssid);
  Serial1.print("IP address: ");
  Serial1.println(WiFi.localIP());
}
void callback() {
  Serial1.println("Callback");
  Serial.flush();
}
void loop() {
	  Serial1.println("Enter light sleep mode");

      // Here all the code to put con light sleep
      // the problem is that there is a bug on this
      // process
      //wifi_station_disconnect(); //not needed
      uint32_t sleep_time_in_ms = 10000;
      wifi_set_opmode(NULL_MODE);
      wifi_fpm_set_sleep_type(LIGHT_SLEEP_T);
      wifi_fpm_open();
      wifi_fpm_set_wakeup_cb(callback);
      wifi_fpm_do_sleep(sleep_time_in_ms *1000 );
      delay(sleep_time_in_ms + 1);

      Serial1.println("Exit light sleep mode");

      WiFi.begin(ssid, password);
      Serial1.println("");

      // Wait for connection
      while (WiFi.status() != WL_CONNECTED) {
        delay(500);
        Serial1.print(".");
      }
      Serial1.println("");
      Serial1.print("Connected to ");
      Serial1.println(ssid);
      Serial1.print("IP address: ");
      Serial1.println(WiFi.localIP());

      wifi_set_sleep_type(NONE_SLEEP_T);
      delay(10000);  //  Put the esp to sleep for 15s
}
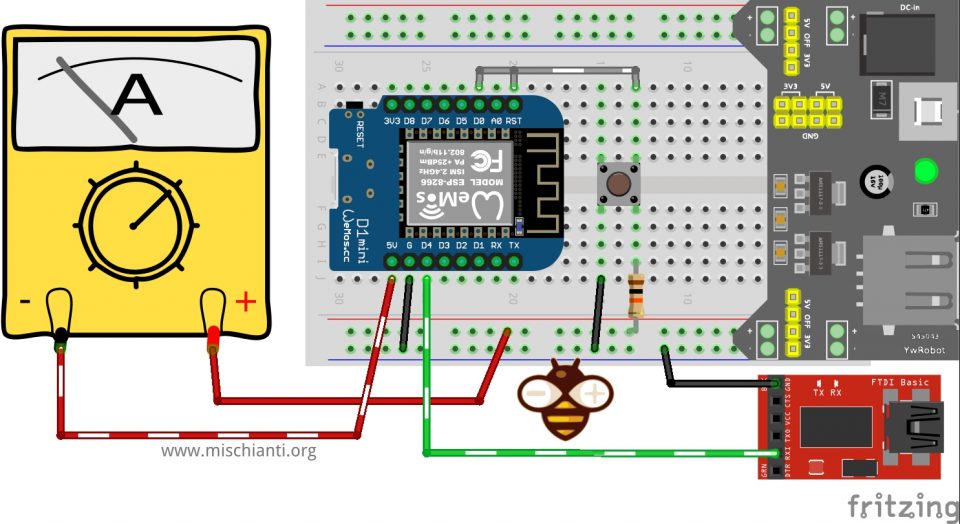
This type of sleep mode, as you can see in the video permit to get 20mA of power to the device, to obtain better power saving you must set the wake up via GPIO.
Light sleep GPIO wake up
Light sleep can be wake up by GPIO interrupt, the command to set is
gpio_pin_wakeup_enable(GPIO_ID_PIN(LIGHT_WAKE_PIN), GPIO_PIN_INTR_LOLEVEL);
Than you must set max sleep time and than put a delay to activate all.
	  wifi_fpm_do_sleep(FPM_SLEEP_MAX_TIME);
	  delay(1000);
The complete code can be like this
#include "Arduino.h"
#include <ESP8266WiFi.h>

#define	FPM_SLEEP_MAX_TIME			 0xFFFFFFF

// Required for LIGHT_SLEEP_T delay mode
extern "C" {
#include "user_interface.h"
}

const char* ssid = "<your-ssid>";
const char* password = "<your-passwd>";

//The setup function is called once at startup of the sketch
void setup() {
  Serial1.begin(115200);
  while(!Serial1) { }

  Serial1.println();
  Serial1.println("Start device in normal mode!");

  WiFi.mode(WIFI_STA);

  WiFi.begin(ssid, password);
  Serial1.println("");

  // Wait for connection
  while (WiFi.status() != WL_CONNECTED) {
    delay(500);
    Serial1.print(".");
  }
  Serial1.println("");
  Serial1.print("Connected to ");
  Serial1.println(ssid);
  Serial1.print("IP address: ");
  Serial1.println(WiFi.localIP());
}
void callback() {
  Serial1.println("Callback");
  Serial.flush();
}

#define LIGHT_WAKE_PIN D5

void loop() {
	  Serial1.println("Enter light sleep mode");

	  //wifi_station_disconnect(); //not needed
	  gpio_pin_wakeup_enable(GPIO_ID_PIN(LIGHT_WAKE_PIN), GPIO_PIN_INTR_LOLEVEL);
	  wifi_set_opmode(NULL_MODE);
	  wifi_fpm_set_sleep_type(LIGHT_SLEEP_T);
	  wifi_fpm_open();
	  wifi_fpm_set_wakeup_cb(callback);
	  wifi_fpm_do_sleep(FPM_SLEEP_MAX_TIME);
	  delay(1000);

  	  Serial1.println("Exit light sleep mode");

      WiFi.begin(ssid, password);
      Serial1.println("");

      // Wait for connection
      while (WiFi.status() != WL_CONNECTED) {
        delay(500);
        Serial1.print(".");
      }
      Serial1.println("");
      Serial1.print("Connected to ");
      Serial1.println(ssid);
      Serial1.print("IP address: ");
      Serial1.println(WiFi.localIP());

      wifi_set_sleep_type(NONE_SLEEP_T);
  	  delay(10000);  //  Put the esp to sleep for 15s
}
The result is
As you can see in the video the power saving is better (6mA), and you can use interrupt to restore device.
Deep sleep
The most common and most used modality is deep-sleep, a pratical application is to send data to a server every predefined time period.
- You must put your device in deep-sleep
- set a timer to wake
- wake
- send data
- put device in sleep
All esp8266 (except esp01) have a pin with wake label, and through this pin connected to the RESET it will be possible to wake up the microcontroller.
You can se various sleep option, check your better choiche.
| system_deep_sleep_set_option(0) | The 108th Byte of init parameter decides whether RF calibration will be performed after the chip wakes up from Deep-sleep. |
| system_deep_sleep_set_option(1) | The chip will make RF calibration after waking up from Deep-sleep. Power consumption is high. |
| system_deep_sleep_set_option(2) | The chip won’t make RF calibration after waking up from Deep-sleep. Power consumption is low. |
| system_deep_sleep_set_option(3) | The chip won’t turn on RF after waking up from Deep-sleep. Power consumption is the lowest, same as in Modem-sleep. |
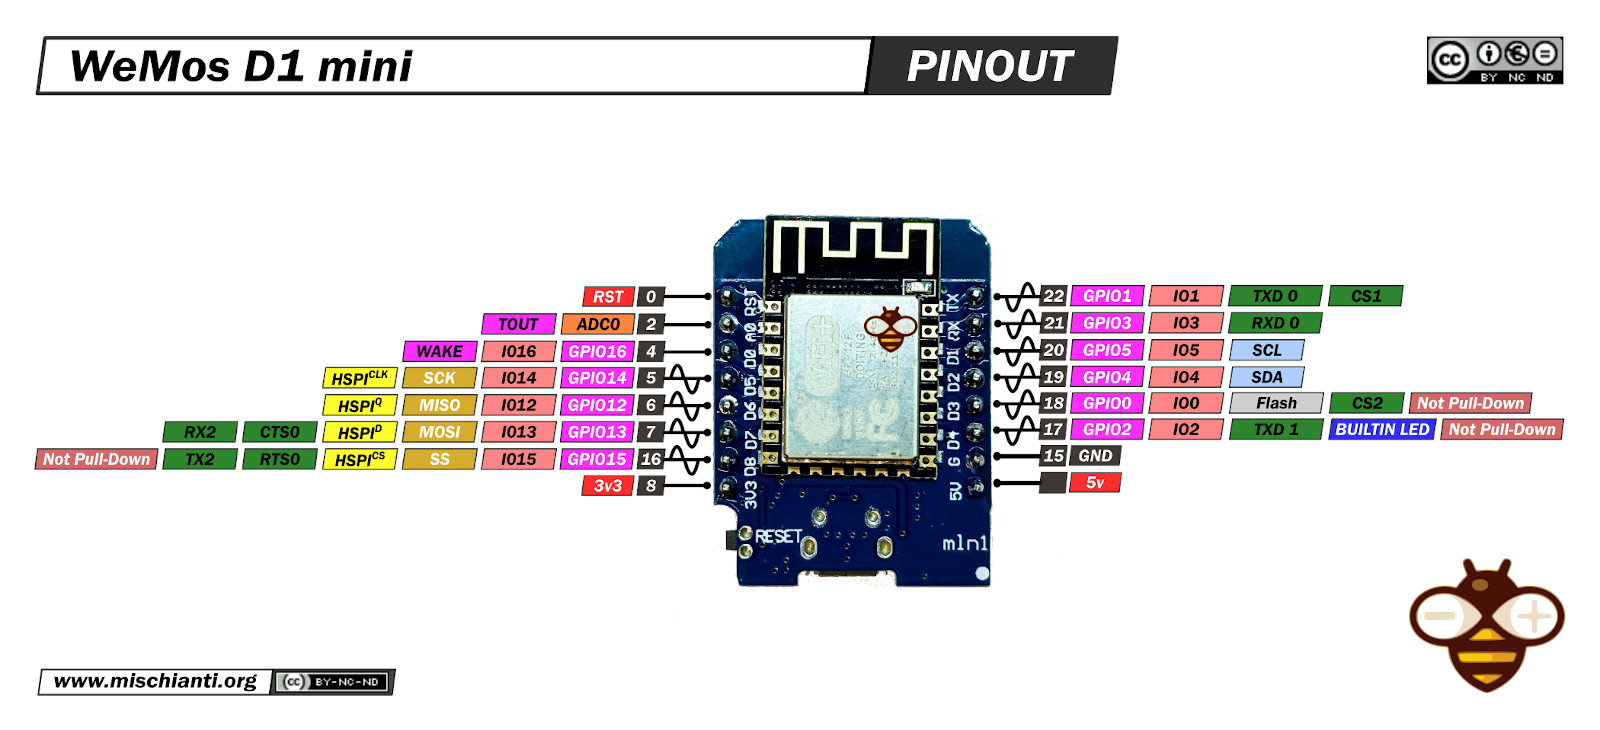
On WeMos D1 mini, as you can see, the pin for wake il D0.
ESP.deepsleep(0) // suspends the module until it is woken up by a spike on the RST pin
ESP.deepsleep(5 * 1000000) // wake up the module every 5 seconds
ESP.deepsleep(5000000, RF_DISABLED) // wakes up the module every 5 seconds without re-activating the WiFi modem
To wake a microcontroller you must put LOW reset PIN.
You can use a Wake pin (D0) connected to Reset to wake after some time, or you can use external button (or other) pulled up and than go LOW on key press.
After putting the esp8266 into deep sleep mode, there are 2 ways to wake it up:
- By setting a timer
- with a button that put low Reset pin.
#include "Arduino.h"

//The setup function is called once at startup of the sketch
void setup() {
  Serial1.begin(115200);
  while(!Serial1) { }
  Serial1.println();
  Serial1.println("Start device in normal mode!");

  delay(5000);
  // Wait for serial to initialize.
  while(!Serial1) { }

  // Deep sleep mode for 10 seconds, the ESP8266 wakes up by itself when GPIO 16 (D0 in NodeMCU board) is connected to the RESET pin
  Serial1.println("I'm awake, but I'm going into deep sleep mode for 10 seconds");
  ESP.deepSleep(10e6);
}

void loop() {
}
The power that use device is similar to light-sleep with wake up via GPIO (6mA).
Automatic mode
By default the esp device have auto sleep mode enabled. If you add the code for light sleep or modem sleep at the setup and not disable the auto mode WeMos go in sleep automaticalli after 10 seconds of delay like so:
#include "Arduino.h"
#include <ESP8266WiFi.h>
// Required for LIGHT_SLEEP_T delay mode
extern "C" {
#include "user_interface.h"
}

const char* ssid = "<your-ssid>";
const char* password = "<your-passwd>";

//The setup function is called once at startup of the sketch
void setup() {
  Serial1.begin(115200);
  while(!Serial1) { }

  Serial1.println();
  Serial1.println("Start device in normal mode!");

  WiFi.mode(WIFI_STA);

  wifi_fpm_set_sleep_type(LIGHT_SLEEP_T);

  WiFi.begin(ssid, password);
  Serial1.println("");

  // Wait for connection
  while (WiFi.status() != WL_CONNECTED) {
    delay(500);
    Serial1.print(".");
  }
  Serial1.println("");
  Serial1.print("Connected to ");
  Serial1.println(ssid);
  Serial1.print("IP address: ");
  Serial1.println(WiFi.localIP());
}
unsigned long interval = 30000;
unsigned long previousMillis = millis() + interval;

void loop() {
	  unsigned long currentMillis = millis();

	  if (currentMillis - previousMillis >= interval) {
		  Serial1.println("Enter delay");

		  delay(20000);

		  Serial1.println("Exit delay");

		  WiFi.begin(ssid, password);
		  Serial1.println("");

		  // Wait for connection
		  while (WiFi.status() != WL_CONNECTED) {
			delay(500);
			Serial1.print(".");
		  }
		  Serial1.println("");
		  Serial1.print("Connected to ");
		  Serial1.println(ssid);
		  Serial1.print("IP address: ");
		  Serial1.println(WiFi.localIP());
		  previousMillis = currentMillis;

	  }
}
the result is this:
When execute delay command for the first 10 seconds nothing append, than after that sleep mode is automatic activated.
- WeMos D1 mini (esp8266), specs and IDE configuration
- WeMos D1 mini (esp8266), integrated SPIFFS Filesystem
- WeMos D1 mini (esp8266), debug on secondary UART
- WeMos D1 mini (esp8266), the three type of sleep mode to manage energy savings
- WeMos D1 mini (esp8266), integrated LittleFS Filesystem
- esp12 esp07 (esp8266): flash, pinout, specs and IDE configuration
- Firmware and OTA update management
- Firmware management
- OTA update with Arduino IDE
- OTA update with Web Browser
- Self OTA uptate from HTTP server
- Non standard Firmware update
- esp32 and esp8266: FAT filesystem on external SPI flash memory
- i2c esp8266: how to, network 5v, 3.3v, speed, and custom pins
- […]


Hi there, your light sleep with GPIO interupt seems to just loop after the initial wake up. How can I point the program back to the initial task that it should do when it wakes up?
Hi,
pur sleep code inside the loop and the action after that.
I think It’s what you need.
Bye Renzo
@Rob, had the same problem, setting LIGHT_WAKE_PIN to INPUT_PULLUP in setup() solved it for me.
@Renzo, this is a SUPERDUPER documentation of sleep modes, saved me so much time, thank you very much!!!!!
Hi Osixer,
thanks to you for the support.
Bye Renzo
#include "user_interface.h" // For maintaining time during light sleep using RTC

#define WAKE_UP_PIN 0 // D3

// Callback function to resume light sleep immediately after a timeout or interrupt
// (without waiting for the full duration of the delay)
void wakeupCallback() {
  delay(3); // Without this, the delay (sleepSeconds * 1000 + 1) would continue
  Serial.println("Callback: Sleep ended");
  // Flushing the serial buffer is crucial here as it is a blocking command,
  // allowing the processor to exit the delay function properly.
  Serial.flush();
}

void sleep(int sleepSeconds) {
  extern os_timer_t *timer_list;
  timer_list = nullptr;

  // Disable the Wi-Fi module by setting the operating mode to NULL_MODE.
  wifi_set_opmode_current(NULL_MODE);

  wifi_fpm_open(); // Open forced power management mode.
  wifi_fpm_set_sleep_type(LIGHT_SLEEP_T); // Set the sleep type to light sleep.

  Serial.println("Entering sleep mode");
  Serial.flush();

  // Enable wakeup on the designated GPIO pin using a low level interrupt.
  gpio_pin_wakeup_enable(GPIO_ID_PIN(WAKE_UP_PIN), GPIO_PIN_INTR_LOLEVEL);

  // Set the wakeup callback function so that the delay after sleep is bypassed.
  wifi_fpm_set_wakeup_cb(wakeupCallback);

  // Enter light sleep mode for the specified duration (converted to microseconds).
  // Note: Light sleep with a timer can last from ~10,000 to 0xFFFFFFE (2^28-1) microseconds (~4.5 minutes).
  wifi_fpm_do_sleep(sleepSeconds * 1000 * 1000);

  // Following the light sleep command, a delay (in milliseconds) is necessary,
  // which must be at least 1 ms longer than the sleep duration.
  delay(sleepSeconds * 1000 + 1);
}

void setup() {
  pinMode(WAKE_UP_PIN, INPUT_PULLUP);
  Serial.begin(9600);
  Serial.println();
}

void loop() {
  delay(3); // Without this delay, the board may go to sleep without waking up properly.

  // Loop three times to read and print the analog value from A0
  for (int i = 0; i < 3; ++i) {
    Serial.print("Analog Pin ");
    Serial.print(i + 1);
    Serial.print(" = ");
    Serial.println(analogRead(A0));
    delay(1000); // Wait 1 second between readings
  }

  // Put the device into light sleep mode for 15 seconds
  sleep(15);
}
Header and Pin Definition
The code begins by including the
user_interface.hheader, which provides functions for managing the ESP’s Wi-Fi and power modes. A wake-up pin is defined as pin 0 (often labeled as D3 on many boards) to be used for waking the device from sleep.wakeupCallback() Function
This callback function is executed when the device wakes up from light sleep. It performs a short
delay(3)to ensure that the longer delay in the sleep routine does not continue unnecessarily, prints the message “Callback: Sleep ended”, and flushes the serial buffer to ensure all output is sent.sleep() Function
The
sleep()function puts the device into light sleep mode for a specified duration (in seconds) and performs the following tasks:Clears any active timers by setting
timer_listtonullptr.Disables the Wi-Fi module by setting the operating mode to
NULL_MODE.Opens forced power management mode and sets the sleep type to light sleep (
LIGHT_SLEEP_T).Prints a message indicating that the device is entering sleep mode.
Enables wakeup on the designated GPIO pin using a low-level interrupt.
Assigns the wakeup callback function to handle immediate wakeup.
Enters light sleep mode for the specified duration (converted to microseconds).
Executes a delay slightly longer than the sleep duration to ensure proper wakeup sequencing.
setup() Function
The
setup()function initializes the board by:Setting the wake-up pin as an input with an internal pull-up resistor.
Starting serial communication at 9600 baud.
Printing a blank line to the Serial monitor.
loop() Function
This is the main loop where the device:
Begins with a short delay to ensure proper operation after waking up.
Reads and prints the analog value from pin A0 three times, with a one-second interval between readings.
Puts the device into light sleep for 15 seconds by calling the
sleep()function.This code demonstrates a practical approach to managing power consumption on an ESP device by alternating between active operation (reading analog values) and entering light sleep mode to conserve energy.
Thank you for sharing your detailed code snippet and insights! I really appreciate you taking the time to contribute this example. Your explanation on handling light sleep and wake-up callbacks adds valuable depth to the discussion, and it’s great to see such practical implementations from the community. Thanks again for your input!
Hi everyone,
I’m testing a very simple deep sleep sketch on a Wemos D1 Mini. Here’s the code I’m using:
void setup() {
Serial.begin(115200);
Serial.println("Going to sleep for 10 seconds...");
delay(2000);
ESP.deepSleep(10e6); // 10 seconds
}
void loop() {}
After uploading the code, I connect D0 (GPIO16) to RST as required for wake-up from deep sleep. The code runs once, prints the message in Serial Monitor, and then the Wemos goes to sleep — but it doesn’t wake up automatically after 10 seconds. Usually the Arduino IDE also crashes.
If I manually press the reset button, the cycle repeats: the message is printed, it goes to sleep, and again it doesn’t wake up unless I reset it manually.
Any idea what might be wrong? Is there something I’m missing in the wiring or the code?
Thanks in advance!
Hi Quick,
I think the program work but you you get this behaivor because the program work like this
Try to blink the onboard LED at the beginning of your setup() function to test It.
void setup() {
  // 1. Set up the LED pin
  pinMode(LED_BUILTIN, OUTPUT);

  // 2. Blink the LED to show we are awake
  digitalWrite(LED_BUILTIN, LOW);  // LED is active-LOW on many Wemos boards
  delay(100);
  digitalWrite(LED_BUILTIN, HIGH); // Turn LED off

  // 3. Set up Serial (even if you don't use it, it's good practice)
  Serial.begin(115200);
  Serial.println("Blinked! Going to sleep for 10 seconds...");
  delay(2000); // Wait 2 seconds so the message can finish sending

  // 4. Go to sleep
  ESP.deepSleep(10e6); // 10 seconds
}

void loop() {
  // This is never reached
}
Bye Renzo
I tested this code and uploaded it to the Wemos, but it doesn’t work. The whole thing only runs once. Is there anything else I could check, or did I do something wrong?
Hi Quick,
the ESP8266 must pull the RST pin LOW to wake itself up. It uses the D0 (GPIO16) pin to do this. If that signal doesn’t get from D0 to RST, the board will sleep forever.
Please double-check these things:
Based on your report (“it only runs once”), the problem is no longer the Serial Monitor crashing. The problem is a hardware failure in the wake-up circuit. The D0-RST wire is the entire circuit, so I would check that connection very, very carefully.
Let me know if checking the wire helps!
Bye Renzo
Hi Renzo,
For this test, I used only the Wemos board itself. I tested on two different Wemos boards, and the result is the same on both. I also checked with different jumper wires.
Currently, I’m running this program:
void setup() {
pinMode(LED_BUILTIN, OUTPUT); // Onboard LED pin
Serial.begin(115200);
Serial.println(“LED ON for 5 seconds…”);
digitalWrite(LED_BUILTIN, LOW); // Turn LED ON (LOW = ON for ESP8266)
delay(5000);
Serial.println(“Going to deep sleep for 5 seconds…”);
digitalWrite(LED_BUILTIN, HIGH); // Turn LED OFF
delay(100); // Small delay before sleep
ESP.deepSleep(5e6); // 5 seconds in microseconds
}
void loop() {
// Nothing here, device will sleep and restart
}
So, nothing is connected to the Wemos. When the code runs for the first time, the Wemos LED stays on for 5 seconds, then briefly blinks and the IDE shows that it went to sleep. When I connect RST to D0, the Wemos blinks again, but nothing else happens. When I manually reset the Wemos, I noticed that I have to reset it twice if I want the code to start from the beginning again.
Hi Quick,
If I undestand you wrote: “So, nothing is connected to the Wemos.” …and then… “When I connect RST to D0, the Wemos blinks again, but nothing else happens.”
This is the key to the problem. The D0-to-RST wire isn’t something you connect after the Wemos goes to sleep. It must be connected the entire time.
Bye Renzo
When I first upload the code to the Wemos, I don’t have D0 and RST connected.
After the upload is finished, I connect D0 and RST together and leave them connected.
Then I try to manually reset the Wemos to test if the code restarts from the beginning, but it never runs again.
During all this time, D0 and RST remain connected.
Is it possible for me to send you a short video or recording of what happens?