
esp12 esp07 (esp8266): flash, pinout, specs and Arduino IDE configuration – 6
Here another article about esp8266, now we are going to introduce the single module, It can be used without integrated developer board, but to program we must do some wiring and get an adapter.
esp-12 and esp-07
esp-12 esp-07 Aliexpress esp-12 - Aliexpress esp-07
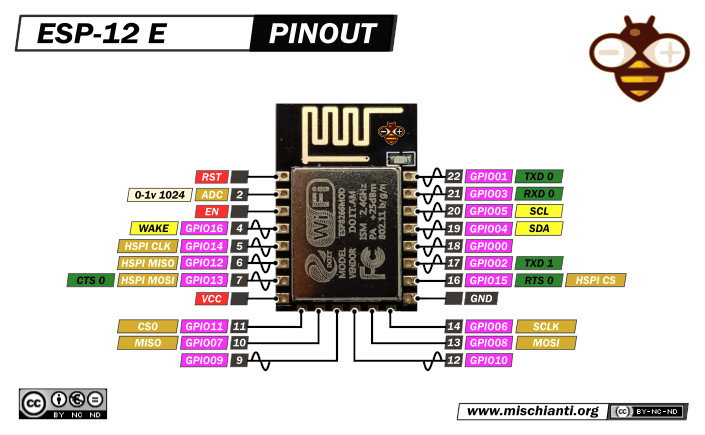
esp12 E pinout hight resolution
Specs
- CPU and Memory
- Processor: L106 32-bit RISC microprocessor core based on the Tensilica Xtensa Diamond Standard 106Micro running at 80 MHz
- RAM size < 36kB, that is to say, when ESP8266EX is working under the station mode and is connected to the router, programmable space accessible to user in heap and data section is around 36kB.)
- External SPI Flash: mounted with an 4 MB external SPI for esp12 and 1Mb for esp07 flash to store user programs.
- the frequency of crystal oscillators supported include 40MHz, 26MHz and 24MHz.
- UART Support 300 ~ 4608000 bps ˈDefault 115200 bps
- Package SMD16 for esp07 and SMD22 for esp12
- Wi-Fi
- 802.11 b/g/n
- Integrated TCP/IP protocol stack
- Integrated TR switch, balun, LNA, power amplifier and matching network
- Integrated PLL, regulators, and power management units
- Supports antenna diversity
- Wi-Fi 2.4 GHz, support WPA/WPA2
- Support STA/AP/STA+AP operation modes
- +20dBm output power in 802.11b mode
- Wake up and transmit packets in < 2ms
- Support Smart Link Function for both Android and iOS devices
- Advanced Peripheral Interfaces
- Integrated 10-bit ADC
- SDIO 2.0, (H) SPI, UART, I2C, I2S, IRDA, PWM, GPIO
- STBC, 1×1 MIMO, 2×1 MIMO
- A-MPDU & A-MSDU aggregation and 0.4s guard interval
- Deep sleep power <10uA, Power down leakage current < 5uA
- Standby power consumption of < 1.0mW (DTIM3)
- Operating temperature range -40C ~ 125C
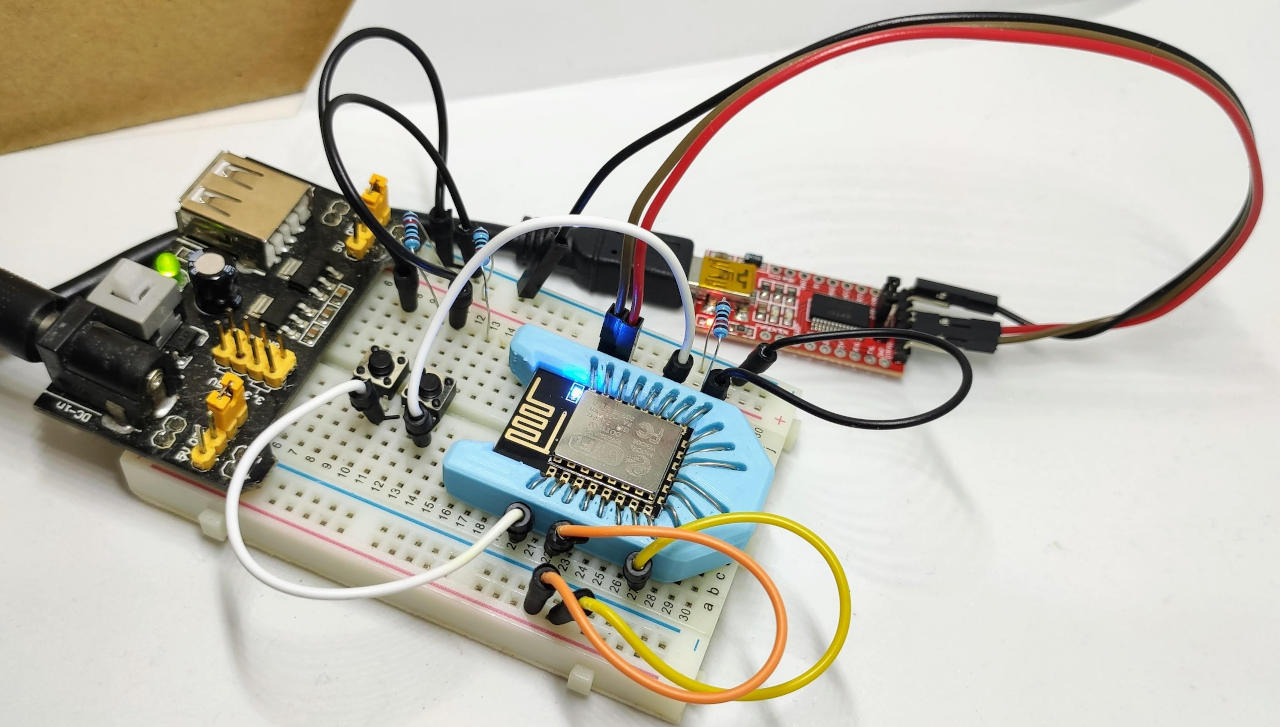
3D printed adapter
A good and fast solution is to print one adapeter. Exists a lot of adapter, but I think this is a good choice.
Socket for esp12 and esp07 with V base
Wiring
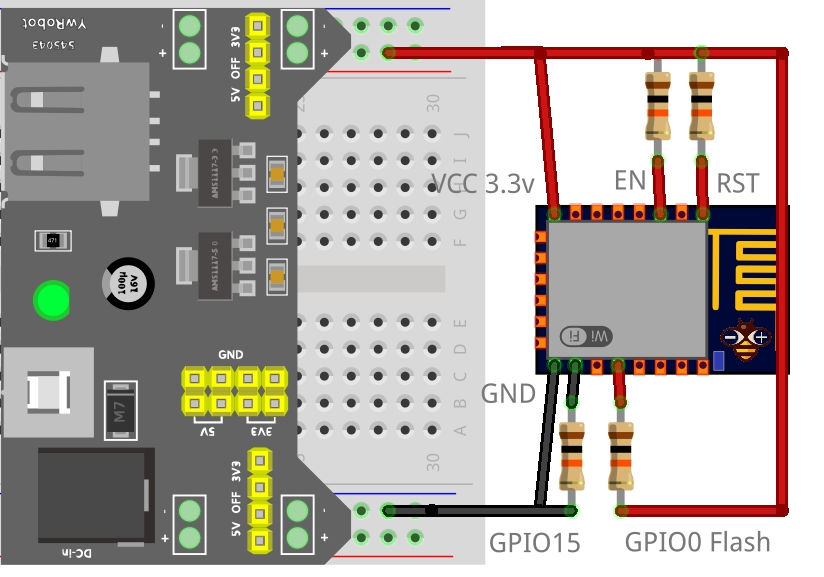
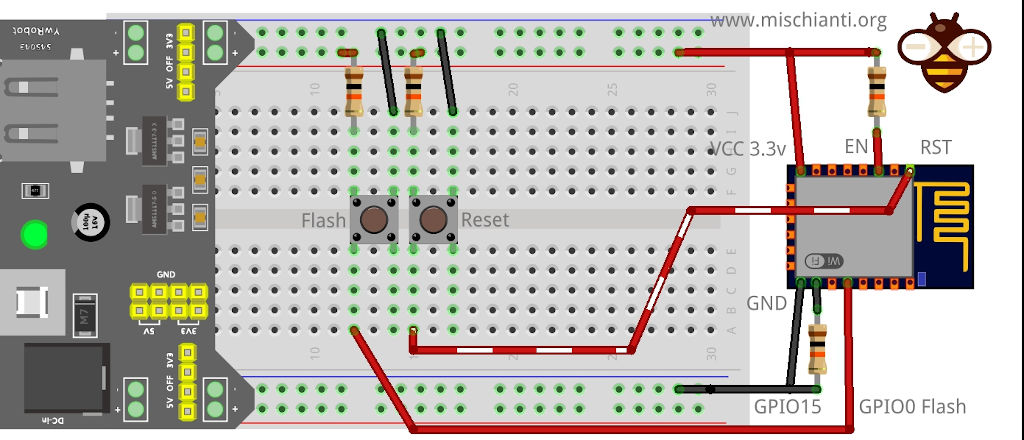
There are some connection to do to correctly use the board, first we must power and pull up and pull down some pins.
Normal start
With this configuration you enable the single-player (PULL-UP EN), and the reset is prevented and a low GPIO0 or FLASH is prevented to prevent enisci in programming mode.
- EN, RST and GPIO0 needs to be pulled high using a 10K resistor;
- GPIO 15 needs to be pulled down using a 10K resistor;
- then we must power the board with 3.3v and more than 200mA of stable current.
Enter flash mode
Now to put in programming mode you must add 2 button, one to reset the device (put to ground RST), and one to send LOW signal to GPIO0.
So pull up RST and GPIO0 with resistor, and attach a button that put the pin to GROUND like the schema.
To enter boot mode you must:
- Hold down the FLASH button;
- Press and release the RST button;
- Release FLASH button.
Programming with FTDI (USB to Serial converter)
To program the device it is necessary to use a FTDI converter, there are various types, some that transmit and receive only, and others that also provide a supply voltage (selectable).
Here some model of FTDI USB to TTL CH340G - USB to TTL FT232RL
Now you must share Ground pin, and put RX of FTDI to TX of esp and TX to RX.
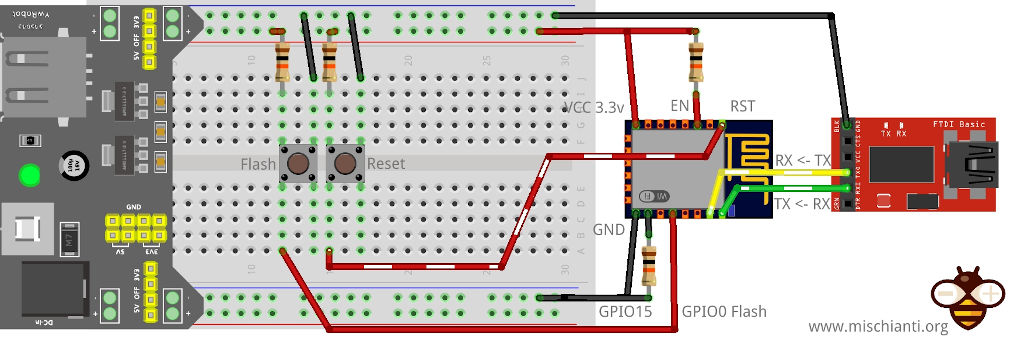
Here the breadboard result.
| Mode | GPIO15 | GPIO0 | GPIO2 |
|---|---|---|---|
| UART | Low | Low | High |
| Flash Boot | Low | High | High |
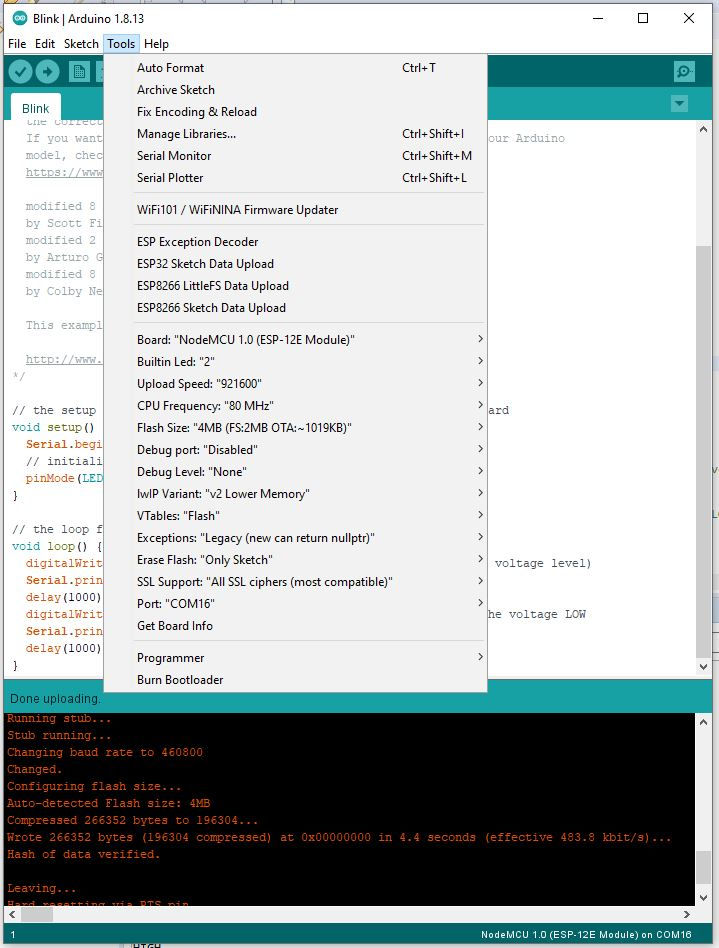
Configure IDE
esp12
In the Arduino IDE you must install esp8266 environment, refer to “WeMos D1 mini (esp8266), pinout, specs and IDE configuration“, so you need to configure the settings on the card, for ESP12 you need to set up:
- Board: NodeMCU 1.0 (ESP-12E Module)
- Builtin Led: 2
- Upload Speed: 921600 (115200 is more secure)
- CPU Frequency: 80 MHz
- Flash Size: 4MB
esp07
For the esp07 I’m going to use this settings
- Board: Generic esp8266 Module
- Builtin Led: 2
- Upload Speed: 921600 (115200 is more secure)
- CPU Frequency: 80 MHz
- Crystal Frequency: 26 MHz
- Reset Method: dtr
- Flash Size: 1MB

Upload a simple blink sketch
Now you must only:
- Hold down the FLASH button;
- Press and release the RST button;
- Release FLASH button;
- Start the upload of this sketch;
// the setup function runs once when you press reset or power the board
void setup() {
	Serial.begin(115200);
  // initialize digital pin LED_BUILTIN as an output.
  pinMode(LED_BUILTIN, OUTPUT);
}

// the loop function runs over and over again forever
void loop() {
  digitalWrite(LED_BUILTIN, HIGH);   // turn the LED on (HIGH is the voltage level)
  Serial.println("HIGH");
  delay(1000);                       // wait for a second
  digitalWrite(LED_BUILTIN, LOW);    // turn the LED off by making the voltage LOW
  Serial.println("LOW");
  delay(1000);                       // wait for a second
}
- connect serial monitor with 115200 baud rate.
Here the console log
Connect to serial port COM18 at 115200
LOW
HIGH
LOW
HIGH
LOW
HIGH
LOW
HIGH
LOW
HIGH
Programming board PCB
I also share the programming board PCB, I’m going to do an article on It.
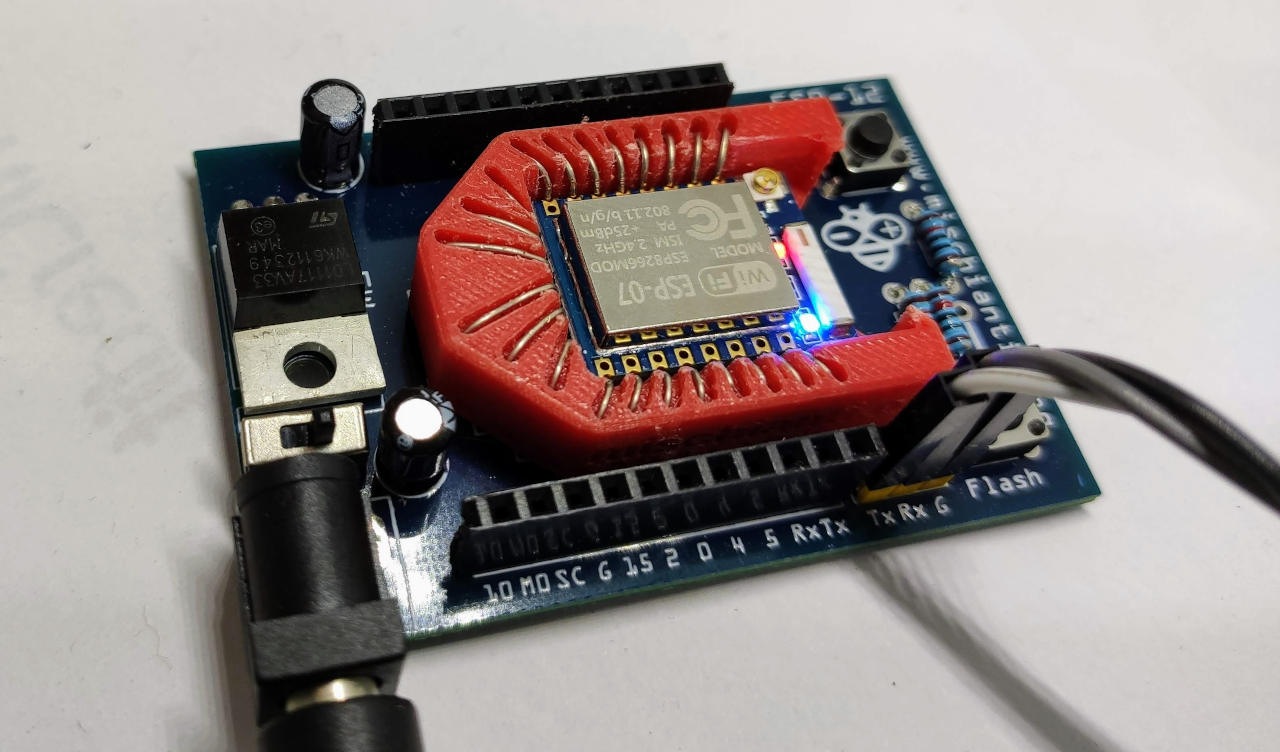
esp-12 esp-07 (esp8266) programming board and breadboard adapter
Thanks
- WeMos D1 mini (esp8266), specs and IDE configuration
- WeMos D1 mini (esp8266), integrated SPIFFS Filesystem
- WeMos D1 mini (esp8266), debug on secondary UART
- WeMos D1 mini (esp8266), the three type of sleep mode to manage energy savings
- WeMos D1 mini (esp8266), integrated LittleFS Filesystem
- esp12 esp07 (esp8266): flash, pinout, specs and IDE configuration
- Firmware and OTA update management
- Firmware management
- OTA update with Arduino IDE
- OTA update with Web Browser
- Self OTA uptate from HTTP server
- Non standard Firmware update
- esp32 and esp8266: FAT filesystem on external SPI flash memory
- i2c esp8266: how to, network 5v, 3.3v, speed, and custom pins
- […]


Hi, is it possible for ESP07 (or 07S), I use Board: NodeMCU 1.0 (ESP-12E Module) for programming?
Thanks,
John
Hi John,
I use this board also for esp07 and with the correct parameter on Arduino IDE works correctly.
Bye Renzo
HI,
What program is shown in the screenshot of “Programming specs esp07 arduino IDE configuration”?
Thank you.
Hi, enjoyneering,
It’s Eclipse Sloeber, for me the best IDE for embedded development.
Sometimes I must fix some execution or link, but It’s potent and allow me to manage sketches in workspaces with specified libraries and configuration.
I can also add more versions of various core (like esp8266 core v2.7.4 and v3.0.2) and compile different sketches in different versions.
It has autocomplete, jump to source, and a lot of features.
I add the logo to the right also.
Bye Renzo