Build and Program Your Own Robot Dog with SunFounder PiDog
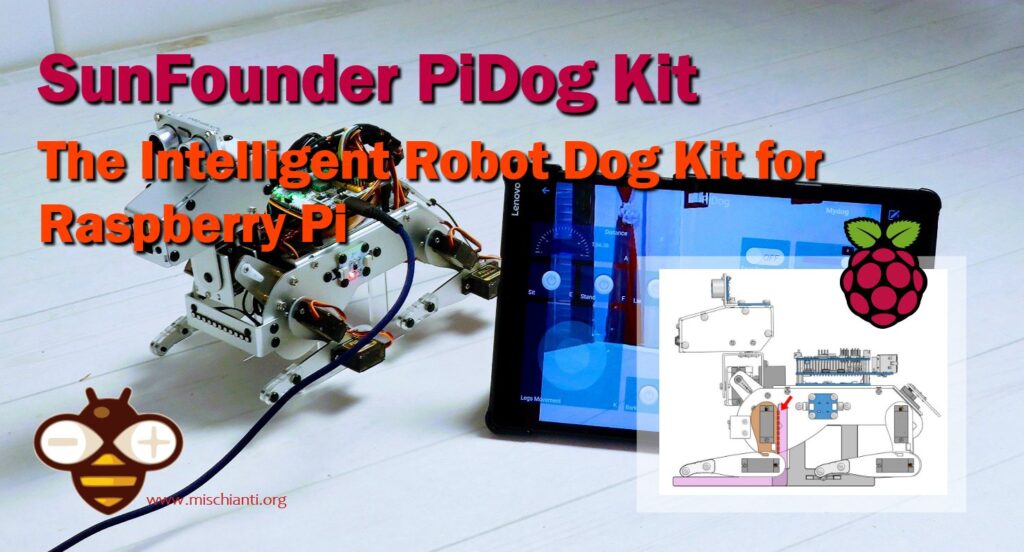
The SunFounder PiDog Robot Dog Kit is an advanced robotics kit designed for Raspberry Pi enthusiasts and educators. This kit enables users to build a robot dog capable of performing realistic dog-like movements, thanks to its comprehensive suite of sensors and servos.
You can find It on: SunFounder
What is the SunFounder PiDog?
The PiDog is a robotic pet you build over a few hours. Featuring an aluminum frame, multiple sensors, and twelve servos, it can mimic the actions and behaviors of a real dog. The PiDog can sit, stand, walk, trot, bark, howl, react to faces, avoid obstacles, and obey voice commands, providing a highly interactive and engaging project.
Technical Specifications
- Size After Assembly: 24cm long x 22.5cm tall x 14 cm wide
- Compatible Motherboards: Raspberry Pi 4, 3B+, 3B, Zero 2 W
- Expansion Board: SunFounder Robot Hat
- Camera: 5MP Camera
- Sensors: Ultrasonic Module, Touch Switch Module, 6 DOF (Gyroscope+Accelerometer) Sensor Module, Sound Direction Module
- Connection Mode: WiFi/ AP
- Body Material: Aluminum Alloy
- Number of Servos: 12
- Action Set: Walking, sleeping, sitting, running, turning left, turning right, scratching ears, bobbing head, wagging tail, stretching, push-up
- Voice Control Commands: Forward, backward, turn left, turn right, trot, stop, lie down, stand up, sit, bark, bark harder, pant, wagtail, shake head, stretch, doze off, push-up, howling, twist body, scratch, handshake, high five
- Use of RGB LED Strips: Emotional Expression

- Battery Type: 2 x 18650 Battery
- Battery Life: 1.5 Hours
- Charging Time: About 2-3 Hours
- Control Mode: SunFounder Controller App
- Programming Language: Python
Hardware
The main component of PiDog is the control boards and sensors.
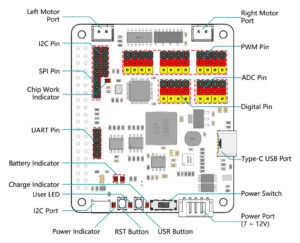
RoboHAT
The Robot HAT is a versatile expansion board that transforms a Raspberry Pi into a functional robot. It features an onboard MCU to extend the Raspberry Pi’s PWM output and ADC input capabilities. Additionally, it includes a motor driver chip, an I2S audio module, and a mono speaker, alongside the GPIOs from the Raspberry Pi.
Key Features
- Speaker: Plays background music, sound effects, and supports TTS functions to enhance your project.
- Power Input: Accepts a 7-12V PH2.0 5-pin power input. Equipped with 2 battery indicators, 1 charge indicator, and 1 power indicator.
- User-Friendly LED and Button: Includes an LED and a button for quick testing of effects.
Detailed Components
- Power Port: 7-12V PH2.0 3-pin input, allowing simultaneous powering of the Raspberry Pi and Robot HAT.
- Power Switch: Controls the power to the Robot HAT. The Raspberry Pi boots upon power connection, but the HAT requires the switch to be turned on.
- Type-C USB Port: Used for charging the battery. The charging indicator lights red when charging and turns off when fully charged. After 4 hours of full charge, the indicator blinks.
- Digital Pins: 4-channel digital pins (D0-D3).
- ADC Pins: 4-channel ADC pins (A0-A3).
- PWM Pins: 12-channel PWM pins (P0-P11).
- Motor Ports: 2-channel XH2.54 motor ports connected to GPIO 4 and GPIO 5.
- I2C Pin and Port: P2.54 4-pin interface and SH1.0 4-pin interface compatible with QWIIC and STEMMA QT, connected via GPIO2 (SDA) and GPIO3 (SCL).
- SPI Pin: P2.54 7-pin SPI interface.
- UART Pin: P2.54 4-pin interface.
- RST Button: Restarts the Ezblock program if used, otherwise customizable.
- USR Button: Programmable button (press = input “0”, release = input “1”).
- Battery Indicator: Two LEDs indicate voltage above 7.6V, one LED for 7.15V to 7.6V, and both off below 7.15V.
- Speaker and Port: 2030 audio chamber speaker with onboard I2S audio output for mono sound.
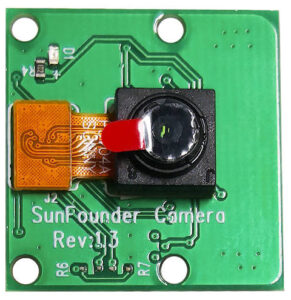
5MP Raspberry Pi Camera Module Overview
This camera module features an OV5647 sensor and is designed for Raspberry Pi, providing a plug-and-play experience via the CSI (Camera Serial Interface) port. The compact board measures 25mm x 23mm x 9mm and weighs only 3 grams, making it perfect for mobile or space-sensitive projects.
Key Specifications
- Resolution: 5MP, capturing still images at 2592 x 1944 pixels.
- Video Support: 1080p at 30 fps, 720p at 60 fps, and 640 x 480 at 60/90 fps.
- Aperture: F1.8
- Visual Angle: 65 degrees
- Dimensions: 24mm x 23.5mm x 8mm
- Weight: 3 grams
- Interface: CSI connector
- Compatibility: Supports Raspberry Pi OS
Sound Direction Sensor Overview
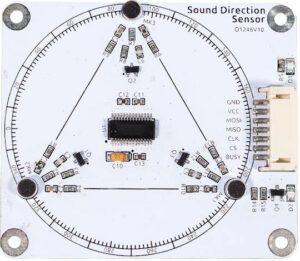
The sound direction recognition module is equipped with three microphones and a TR16F064B processor, which detects and calculates the direction of sound sources from all directions. It provides a 360-degree detection range with a minimum reconnaissance unit of 20 degrees and an angular accuracy of approximately 10 degrees.
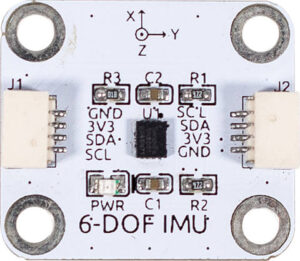
6-DOF IMU Overview
The 6-DOF IMU is based on the SH3001 sensor, which integrates a three-axis gyroscope and a three-axis accelerometer. This small, low-power unit is designed for high-precision real-time angular velocity and linear acceleration data. It’s suitable for various consumer electronics, including smartphones, tablets, drones, AR/VR devices, and smart wearables.
Dual Touch Sensor Overview
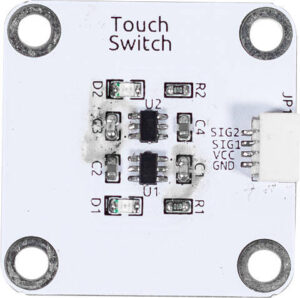
The Dual Touch Sensor is based on two TTP223 touch sensor ICs. It detects touch signals, pulling the corresponding pin level low when activated. The TTP223 is designed to replace traditional keys, offering low power consumption and wide operating voltage.
11-Channel Light Board Overview
The 11-channel RGB LED module, controlled by the SLED1735 chip, features 11 RGB LEDs. The SLED1735 can drive up to 256 LEDs and 75 RGB LEDs, offering various functionalities such as on/off, blinking, breathing light, and automatic synchronization. It includes built-in PWM technology for 256 levels of brightness adjustment and a 16-level dot correction function.
Ultrasonic Module Overview
The HC-SR04 ultrasonic distance sensor provides non-contact measurement from 2 cm to 400 cm with an accuracy of up to 3 mm. It includes an ultrasonic transmitter, receiver, and control circuit. The module operates by sending an 8-cycle burst of ultrasound at 40 kHz and measuring the time it takes for the echo to return, allowing for distance calculation.
18650 Battery Overview
The custom battery pack by SunFounder consists of two 18650 batteries, each with a capacity of 2000mAh. Designed for use with the Robot HAT, the pack includes features to enhance performance and protection.

Unboxing and assembly process
Assembling the SunFounder PiDog Robot Dog Kit is a task that strikes a balance between simplicity and complexity. While the process is not overly complicated, it does require careful attention to detail and a basic level of technical skill to follow the instructions accurately. Think of it as building a complex Lego set, where each step is crucial to the overall structure and functionality of the final product.
Throughout this guide, you will find step-by-step instructions designed to guide you through the assembly process. By paying close attention and taking your time with each step, you will ensure that every component is correctly placed and connected, resulting in a fully functional and responsive robot dog. Whether you’re a beginner or have some experience with similar projects, this guide will help you navigate the assembly with confidence.
Let’s begin this exciting journey of bringing your PiDog to life, ensuring a rewarding and educational experience.
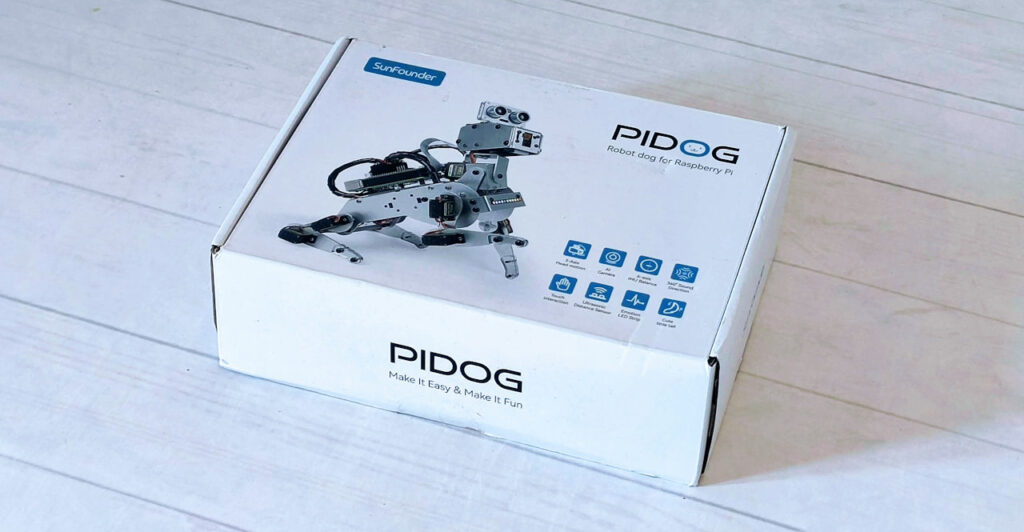
The box
In the photo, the SunFounder PiDog Robot Dog Kit is presented in its initial packaging, showcasing a compact and neatly organized box. The box itself is designed to be space-efficient, ensuring all components are securely packed while minimizing the overall footprint. This compactness not only makes the kit easy to store and transport but also reflects the thoughtful design and attention to detail that SunFounder has put into creating a user-friendly product. The neatly arranged parts inside promise a well-structured and straightforward assembly process, setting the stage for an exciting build.
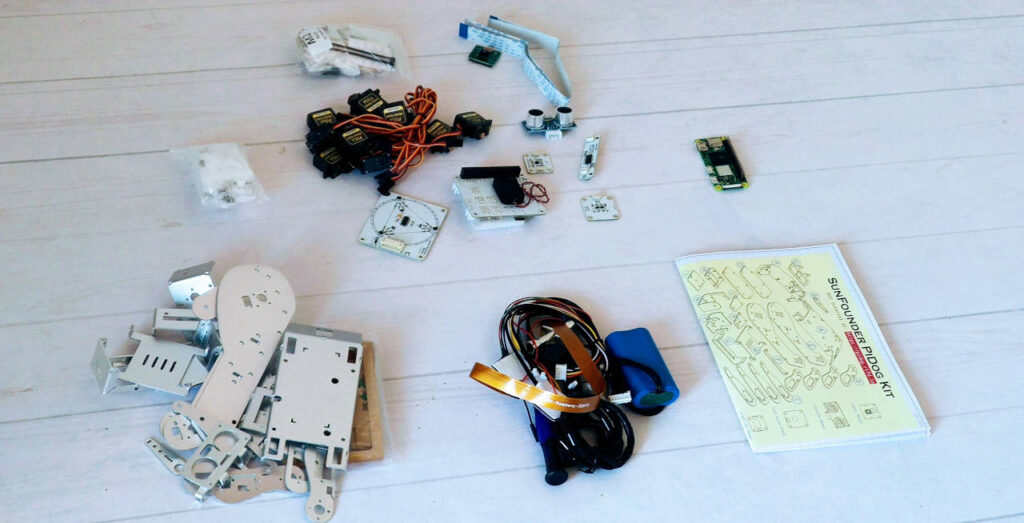
In this photo, all the components of the SunFounder PiDog Robot Dog Kit are meticulously spread out over the table, creating an impressive display of what’s included in the kit. Each piece, from the aluminum frame parts to the various sensors and servos, is clearly visible and organized. The vibrant array of components hints at the intricate assembly process ahead.
This well-organized layout not only showcases the comprehensive nature of the kit but also highlights the attention to detail that SunFounder has put into ensuring every part is easily identifiable and accessible. The assortment of parts—ranging from the 12 metal gear servos to the 13 clear plexiglass pieces—reflects the precision and quality of the materials used.
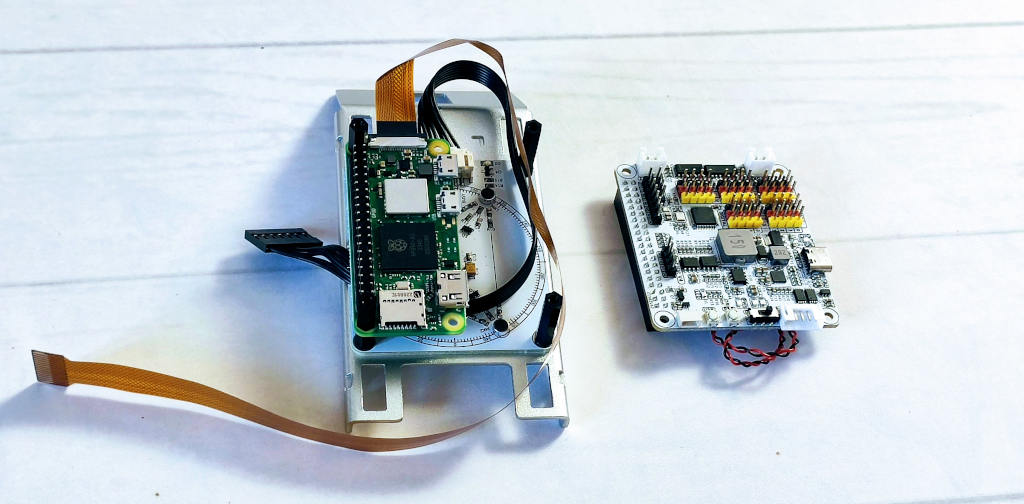
In this photo, you can see the first crucial steps of the assembly process coming together. The main frame, often referred to as “la schiena” (the backbone), is assembled with the Raspberry Pi Zero 2 W securely mounted. The sleek aluminum structure of the backbone provides a sturdy foundation for the robot dog, showcasing the precision engineering behind the kit.
Electronics (RobotHAT)
Adjacent to the backbone and Raspberry Pi Zero 2 W is the Robot HAT, positioned nearby and ready to be integrated. The Robot HAT is designed to extend the functionality of the Raspberry Pi, providing additional ports and connections essential for the robot’s operation. Its proximity in the photo highlights the next step in the assembly process, where it will be attached to the Raspberry Pi and connected to various components.
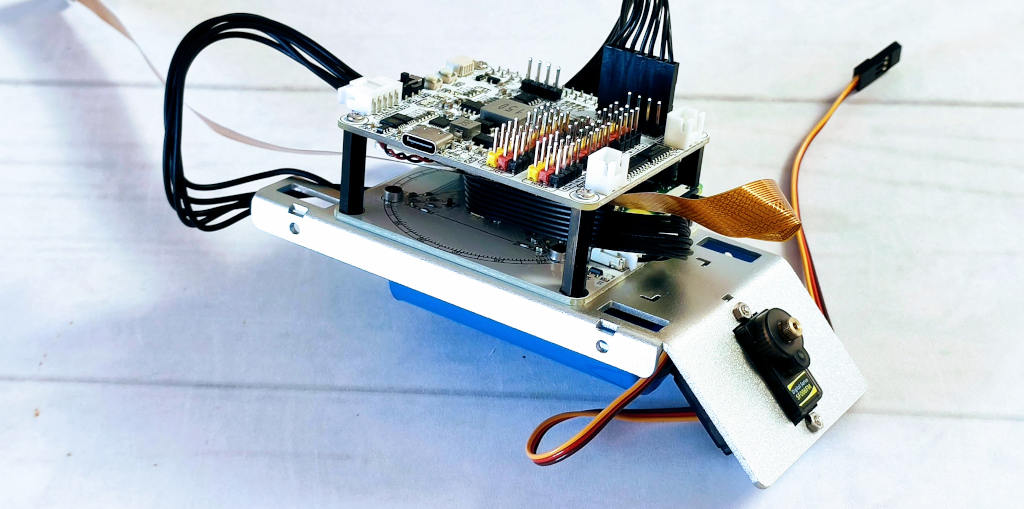
In this lateral view photo, you can see the assembly progressing beautifully with the Robot HAT now securely installed on the Raspberry Pi Zero 2 W. The Robot HAT sits perfectly atop the backbone, adding a layer of sophistication and functionality to the setup. Its array of ports and connectors are clearly visible, ready to interface with the various sensors and motors that will bring the PiDog to life.
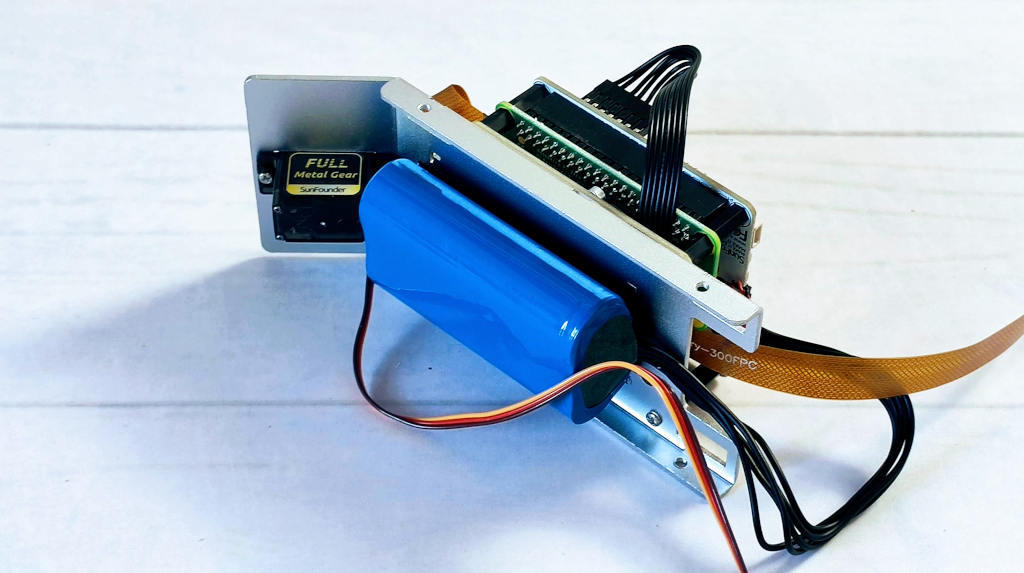
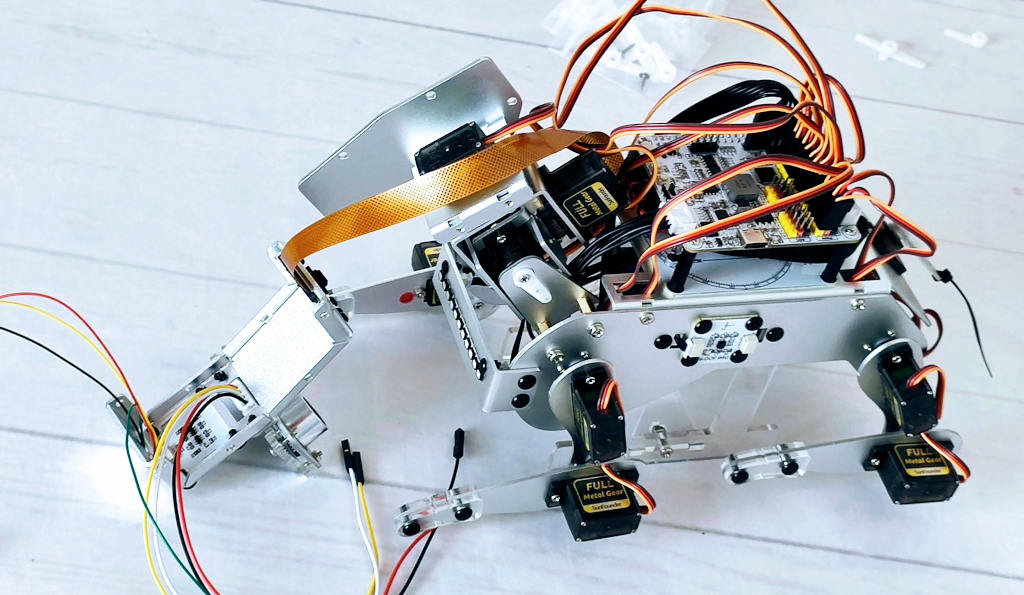
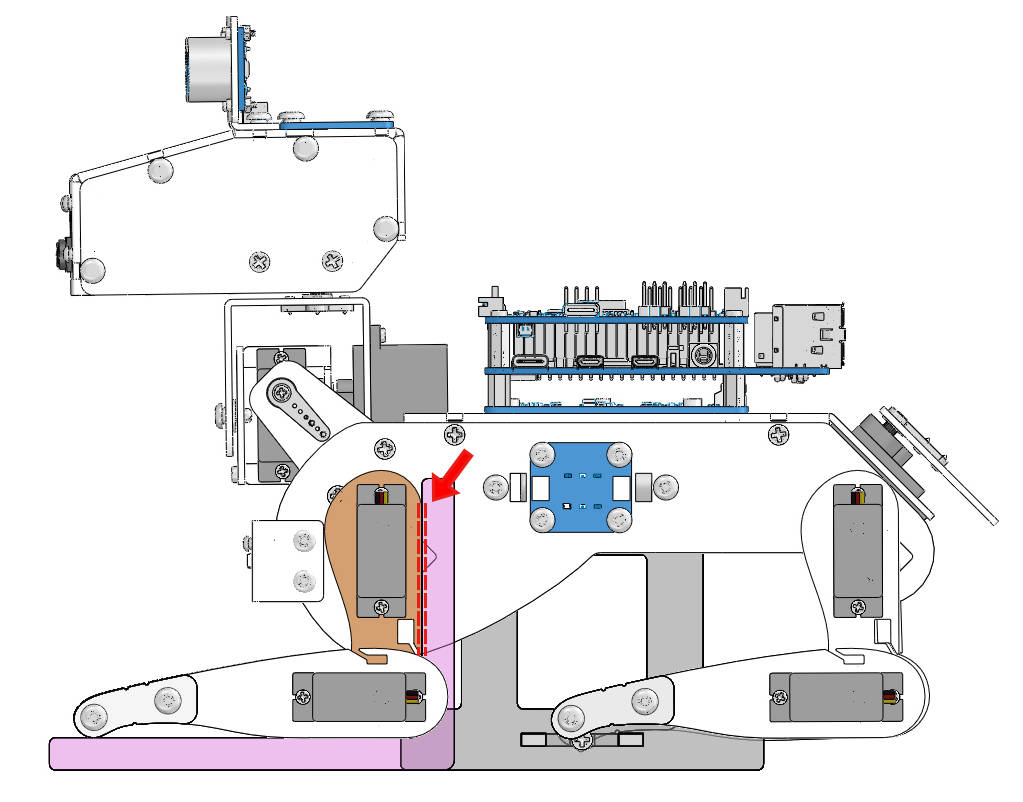
In this photo, we get a clear view of the underside of the SunFounder PiDog, highlighting the placement of the battery. The compact 18650 battery pack is neatly secured using a velcro strap, ensuring it stays in place during the robot’s movements. The careful positioning of the battery demonstrates thoughtful design, balancing the weight to maintain stability and performance.
The battery pack connects to the Robot HAT via a PH2.0-5P connector, which is visible in this angle. This connection ensures a stable power supply to all components, facilitating the seamless operation of the robot. The velcro strap provides easy access for charging and maintenance while keeping the battery securely fastened.
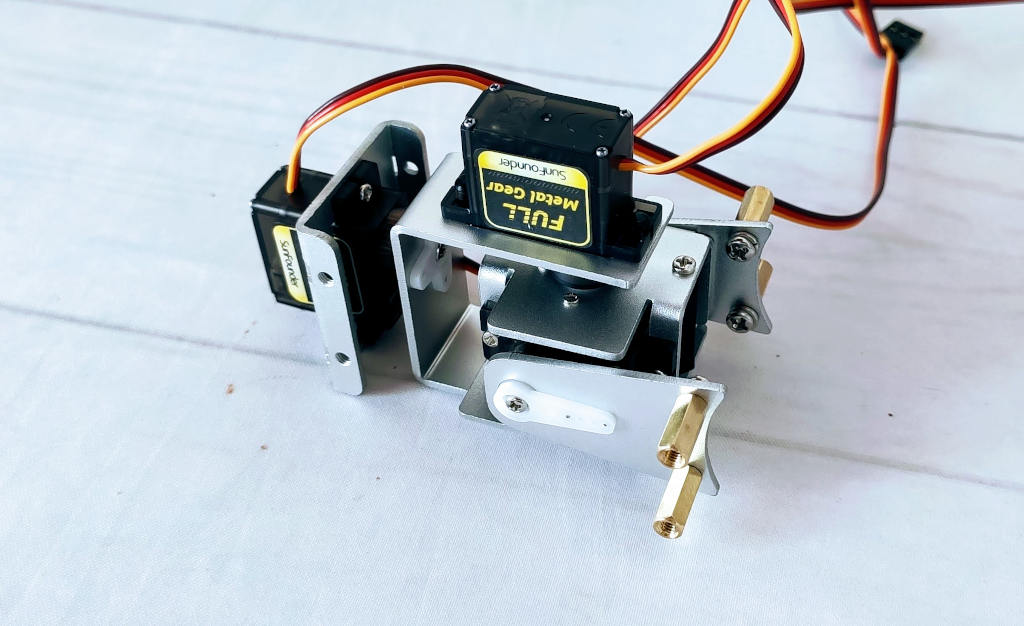
This close-up photo showcases the detailed assembly of the PiDog’s tail. The tail, constructed from durable aluminum parts, is connected to a servo motor that allows it to move with precision. The servo motor is securely mounted to the frame, ensuring stable and responsive tail movements.

Body
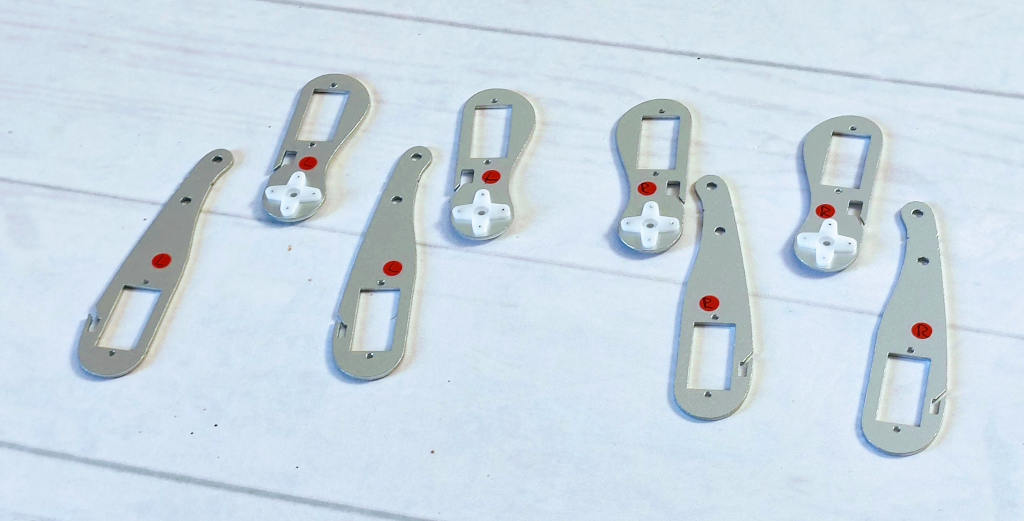
In this detailed photo, the aluminum parts of the PiDog’s legs are showcased. The sleek, durable aluminum components are meticulously assembled, providing a strong and stable structure for the robot’s movements. Each segment is precisely cut and fitted, ensuring smooth and accurate articulation.
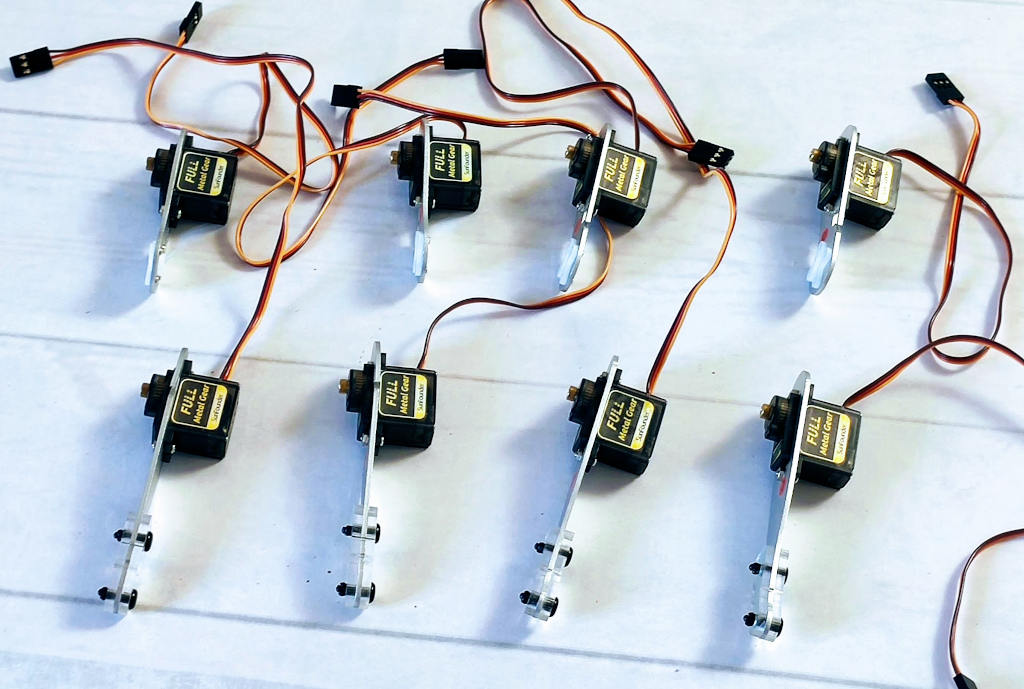
This photo details the PiDog’s leg assembly, highlighting the securely attached servo motors. The sturdy aluminum framework supports the servos, ensuring robust and precise movements. The servos are mounted at key joints, providing the necessary articulation for dynamic actions.
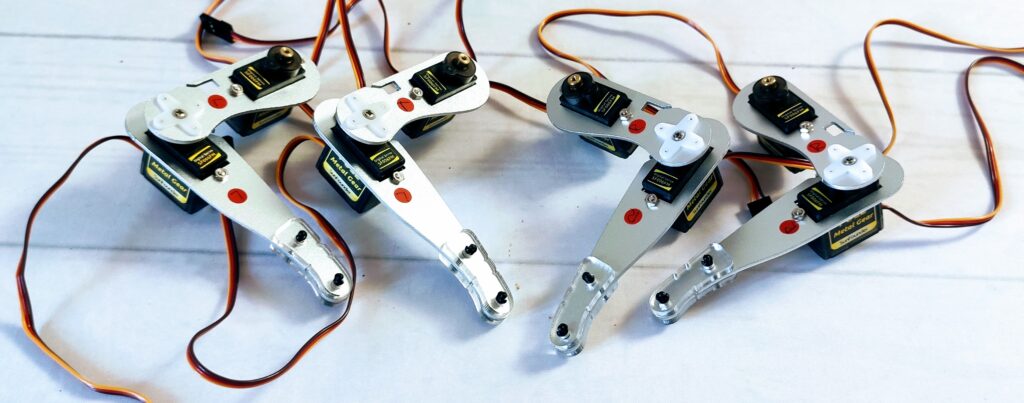
In this photo, the PiDog’s leg is fully assembled, showcasing the complete integration of the aluminum parts and servo motors. The robust aluminum structure provides strength and stability, while the servos are precisely positioned at each joint, enabling a range of articulated movements.
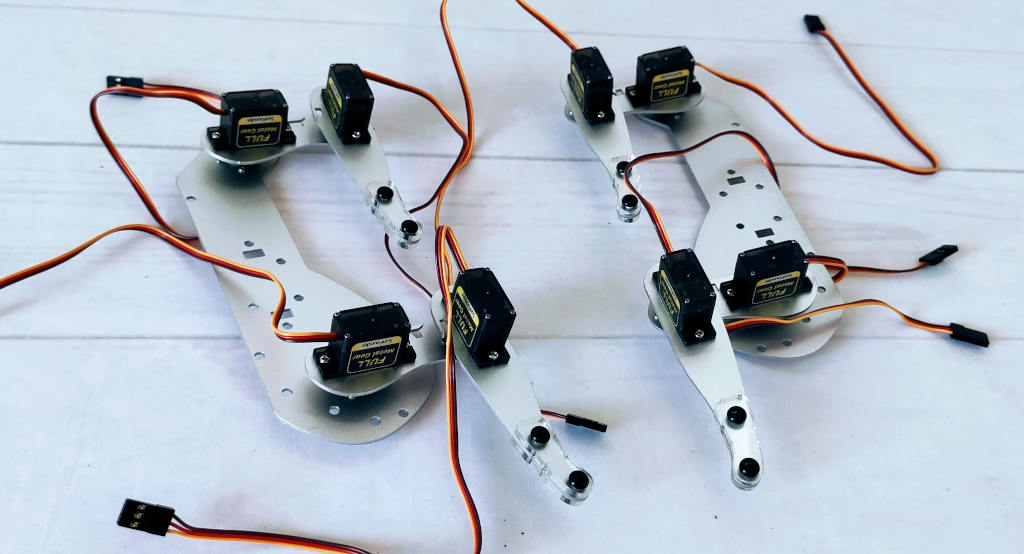
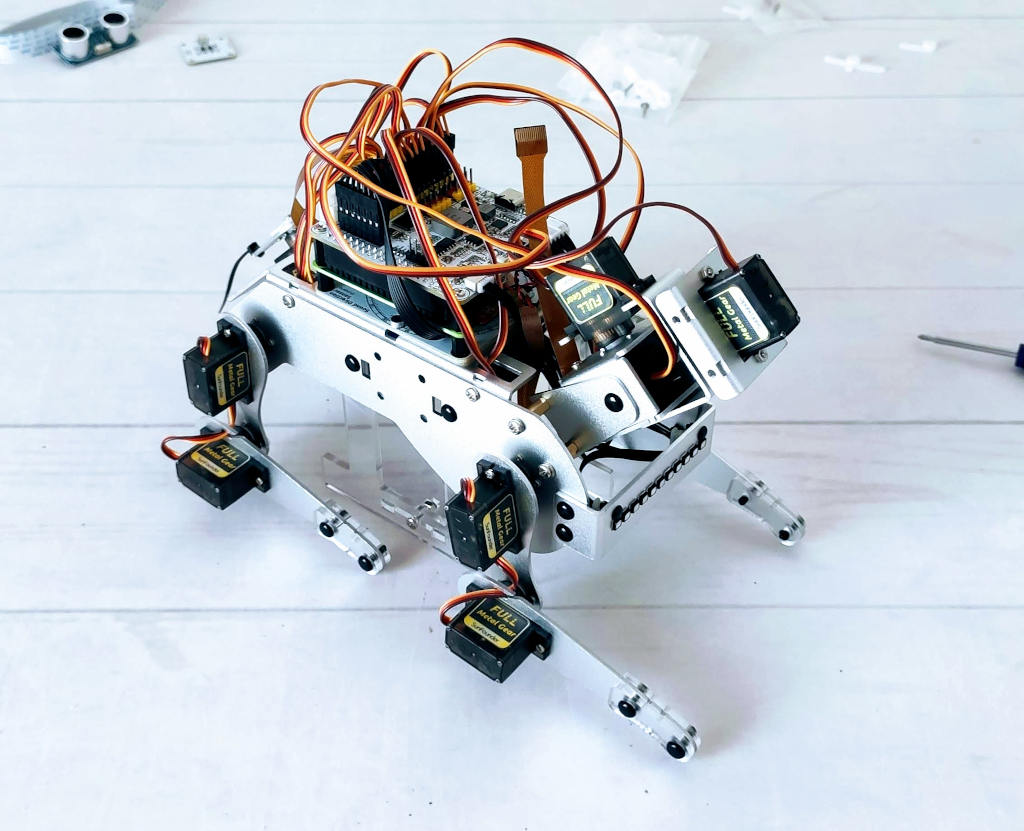
In this photo, the PiDog’s legs are now connected to the main body frame. The integration of the legs into the body structure is clean and precise, showcasing the robust design and ensuring stability. The servos are well-positioned to enable efficient and fluid movements, bringing the PiDog closer to full mobility.
In this photo, the PiDog’s body is now complete with all four legs attached. The integration is sleek and precise, highlighting the sturdy construction and thoughtful design.
Head
This photo captures the detailed assembly of the PiDog’s neck. The neck structure, made of durable materials, is carefully integrated with servo motors to allow smooth and precise head movements.
This photo displays the PiDog’s neck firmly connected to the main body. The attachment is precise, ensuring reliable support for head movements.
This photo showcases the first pieces of the PiDog’s head coming together.
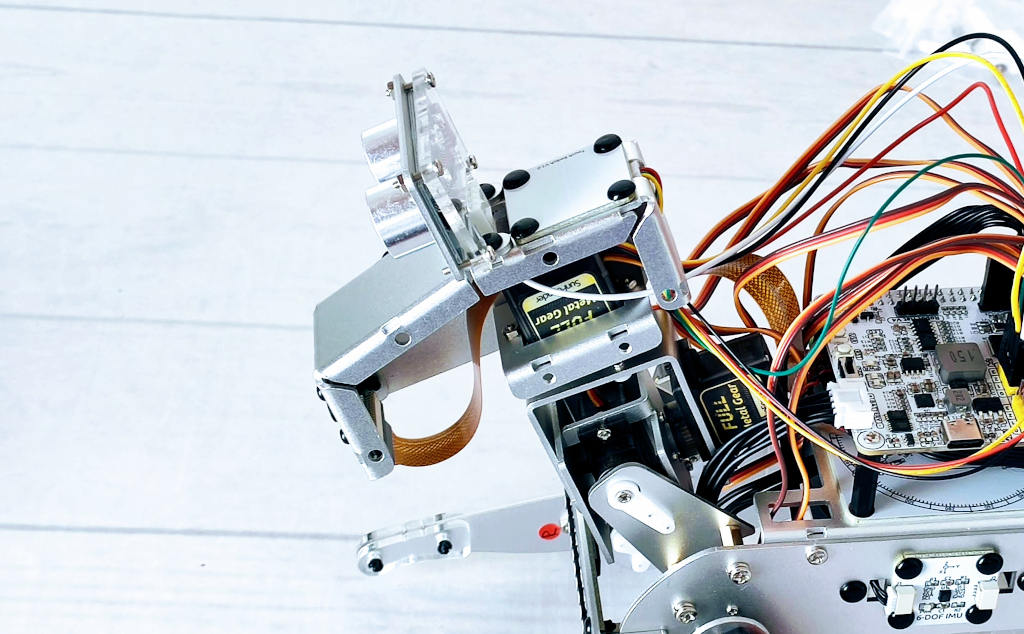
This photo highlights the PiDog’s head nearing completion. Most components, including the aluminum frame, camera module, and various sensors, are now in place.
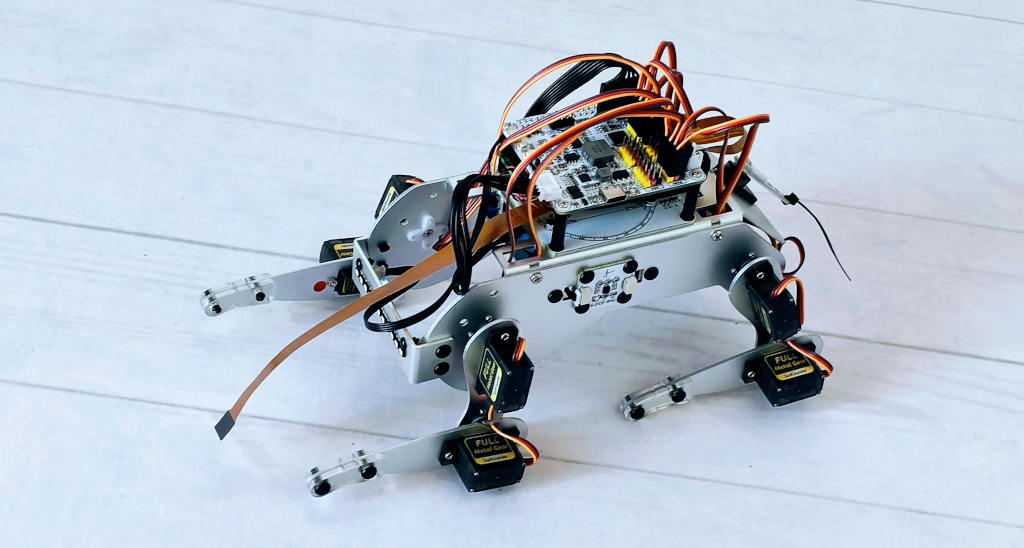
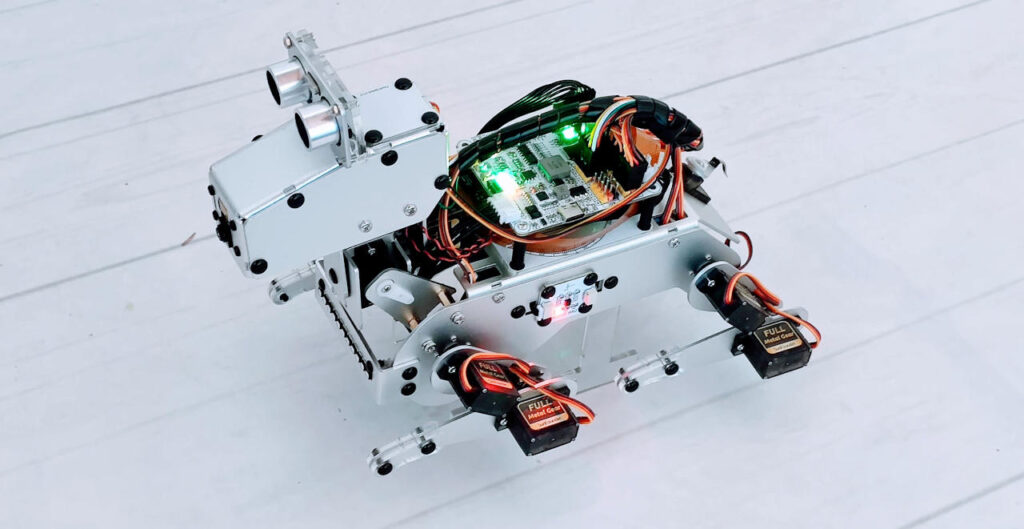
And finally our PiDog assembled.
Installing software and configuring the peripherals
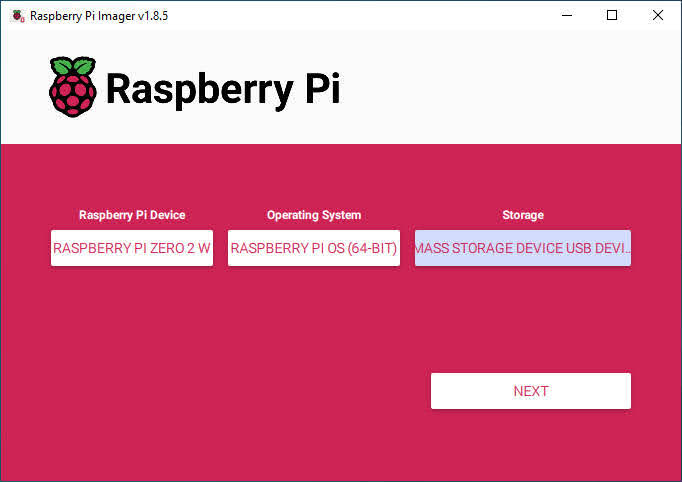
As usual, I advise using Raspberry Pi imager for the installation, I select Raspberry Pi OS (64-bit) for me, and I put all in an SD.
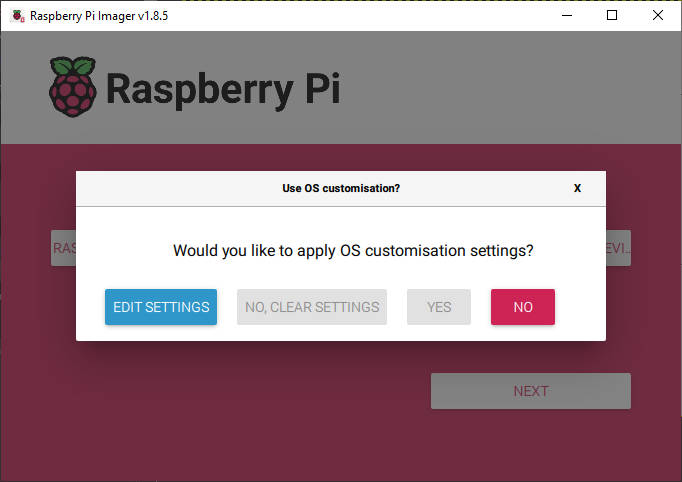
Now put It on the back slot for the SD card and start the device. On NEXT button the program ask for the Settings, select EDIT SETTINGS.
And add all needed information to connect from external programs (if you don’t attach the HDMI).
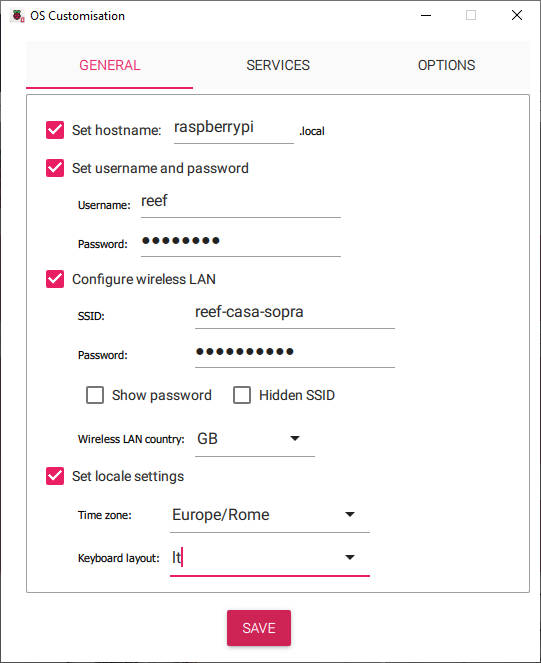
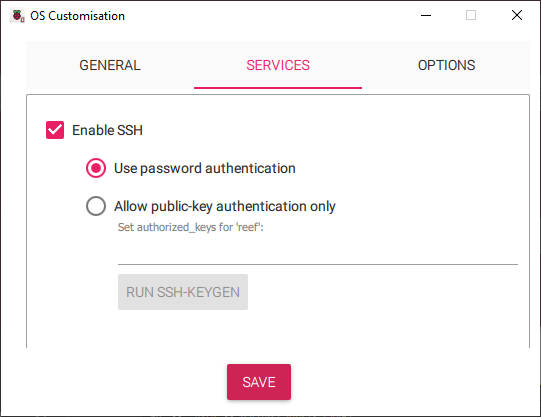
Important the SSH service that allow to use program like Putty or Bitvise SSH
After that, install the SD card on PiDog raspberry and on the device.
If you can’t connect a screen use a program to find the device (or check on your router) and Connect via SSH.
Install All the Modules
- Make sure you are connected to the Internet and update your system:
sudo apt update
sudo apt upgrade
sudo apt install git python3-pip python3-setuptools python3-smbus
- Install
robot-hatmodule.
cd ~/
git clone -b v2.0 https://github.com/sunfounder/robot-hat.git
cd robot-hat
sudo python3 setup.py install
- Install
vilibmodule.
cd ~/
git clone -b picamera2 https://github.com/sunfounder/vilib.git
cd vilib
sudo python3 install.py
- Download the code.
cd ~/
git clone https://github.com/sunfounder/pidog.git
- Install
pidogmodule.
cd pidog
sudo python3 setup.py install
- Run the script
i2samp.sh.
Finally, you need to run the scripti2samp.shto install the components required by the i2s amplifier, otherwise the robot will have no sound.
cd ~/pidog
sudo bash i2samp.sh
Servo Adjust
SunFounder advises setting all servo angles to 0° before assembly. This step is crucial because the factory settings for servo angles are random and can range anywhere from 0° to 45°. Assembling the servos without zeroing them can lead to erratic movements or, worse, cause the servos to block and burn out.
Here’s the recommended process from SunFounder:
- Set Servo to 0°:
- Insert the servo arm into the servo shaft.
- Gently rotate the servo arm to different angles to ensure it is free-moving.
- Run the Zeroing Script:
- Execute
servo_zeroing.pyfound in theexamples/folder. - If an error occurs, re-enable the Raspberry Pi’s I2C port.
- Execute
cd ~/pidog/examples
sudo python3 servo_zeroing.py
- Connect to P11 Port:
- Plug the servo cable into the P11 port.
- The servo arm will rotate to the 0° position (random location, may not be vertical or parallel).
- Fix Servo Arm:
- Remove the servo arm without disconnecting the servo cable and without turning off the power.
- Reattach the servo arm and secure it with a screw before unplugging the cable.
SunFounder advises performing this step during the assembly process. However, I opted to complete it at the end when all the servos were connected, allowing me to handle it in one consolidated step. This approach streamlined the process, ensuring all servos were correctly aligned and connected before finalizing this crucial task. By doing it all at once, I could verify the integrity and functionality of the entire setup, ensuring each component worked harmoniously as part of the complete assembly.
Note: Do not rotate the servo while it is powered on to avoid damage. If the servo shaft is not inserted correctly, remove and reinsert it. Ensure to set each servo angle to 0° before final assembly.
Calibrate the PiDog
Calibrating your PiDog is an essential step to ensure its stable and efficient operation.
Put the PiDog on the base and put the leg like the photo.
And start the calibration program.
cd ~/pidog/examples
sudo python3 0_calibration.py
How to start with PiDog
SunFounder is very committed to software tutorials and education, and offering a set of ready-to-use examples is very important for learning the device.
Python Projects
We can explore a variety of projects that highlight the versatility and capabilities of this innovative robot. From setting up a wakeup routine in the “Wake Up” project to engaging in advanced ball tracking dynamics in “Ball Track,” each project provides a unique glimpse into Python programming for robotics.
Whether you’re interested in having your PiDog patrol an area, respond to voice commands, execute pushups, or even howl on command, there’s a tailored project for you. Additionally, for those looking to extend their PiDog’s capabilities, we offer tutorials on integrating keyboard and app control interfaces.
- 1. Wake Up
- 2. Function Demonstration
- 3. Patrol
- 4. Response
- 5. Rest
- 6. Be Picked Up
- 7. Face Track
- 8. Push Up
- 9. Howling
- 10. Balance
- 11. Play PiDog with Keyboard
- 12. Play PiDog with APP
- 13. Ball Track
Simple program to check basic operation
Here, we have various functions, breaking them down for a comprehensive understanding. Each sub-topic is dedicated to a specific function, making it easier for you to grasp and implement them. Whether it’s initiating parameters, controlling specific movements, or incorporating sensory inputs, we’ve covered them all. Navigate through the sub-topics below to kickstart your coding journey with Pidog.
- 1. PiDog Initialization
- 2. Leg Move
- 3. Head Move
- 4. Tail Move
- 5. Stop All Actions
- 6. Do Preset Action
- 7. PiDog Speak
- 8. Read Distance
- 9. PiDog RGB Strip
- 10. IMU Read
- 11. Sound Direction Detect
- 12. Pat the PiDog’s Head
- 13. More
Start with app
To check all the potential of the PiDog, I advise you to use the work app. With this option, you can seamlessly control and program your PiDog directly from your smartphone, enhancing the convenience and accessibility of managing various commands and routines. The app provides a user-friendly interface, allowing you to explore and utilize the full range of PiDog’s capabilities, from basic movements to advanced interactions. This integrated approach ensures you can maximize the functionality and enjoy a more interactive experience with your PiDog. Dive in and discover the endless possibilities with these hands-on Python projects, and experience the fun and educational aspects of robotics with your PiDog!
First of all, start the app receiver program on our PiDog.
cd ~/pidog/examples
sudo python3 12_app_control.py
Now install the SunFounder controller on your Android device using this link.
Then add PiDog device.
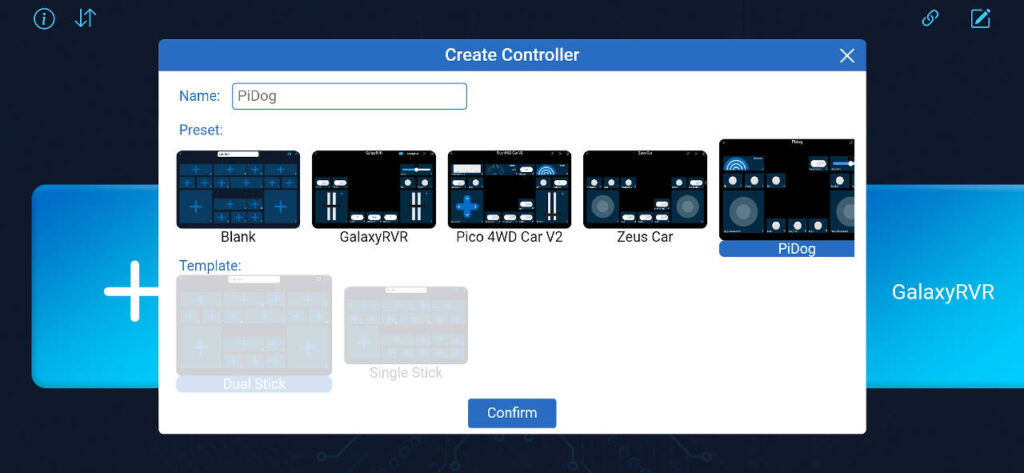
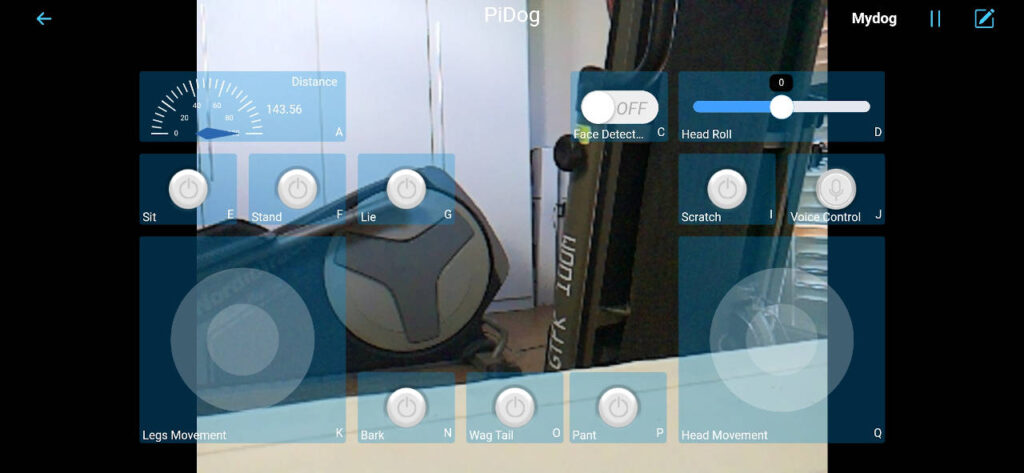
And after connection all the control and camera feed.
And finally, here is a little demo.