EByte LoRa E32 gateway: manage via REST and WebSocket (esp8266, esp32) – 1
I do a lot of projects with EByte LoRa E32, all based on my library “EByte Lora E32 Library“, and a lot of peoples download that, but the tools from EByte are very poor, and sometime buggy.
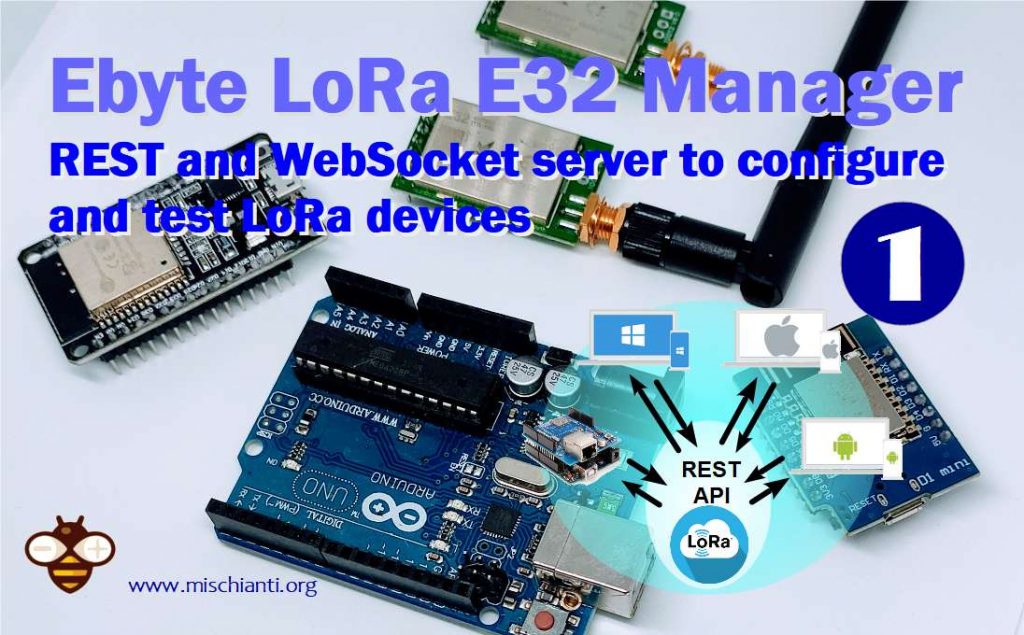
So I try to create an example that via web support all the configuration features and widgets to test send and receive.
Here the LoRa E32 AliExpress (433MHz 5Km) - AliExpress (433MHz 8Km) - AliExpress (433MHz 16Km) - AliExpress (868MHz 915MHz 5.5Km) - AliExpress (868MHz 915MHz 8Km)
You can divide the application in 2 parts
Wiring esp8266
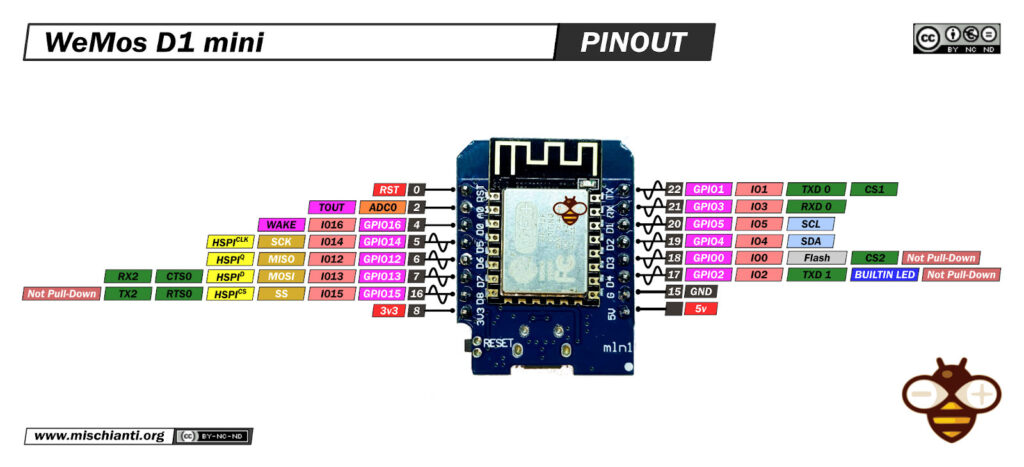
You must connect esp8266 with this configuration
| E32 | WeMos D1 mini (esp8266) |
|---|---|
| M0 | D7 |
| M1 | D6 |
| TX | D3 |
| RX | D4 |
| AUX | D5 |
| VCC | 3.3v or 5v (is better) |
| GND | GND |

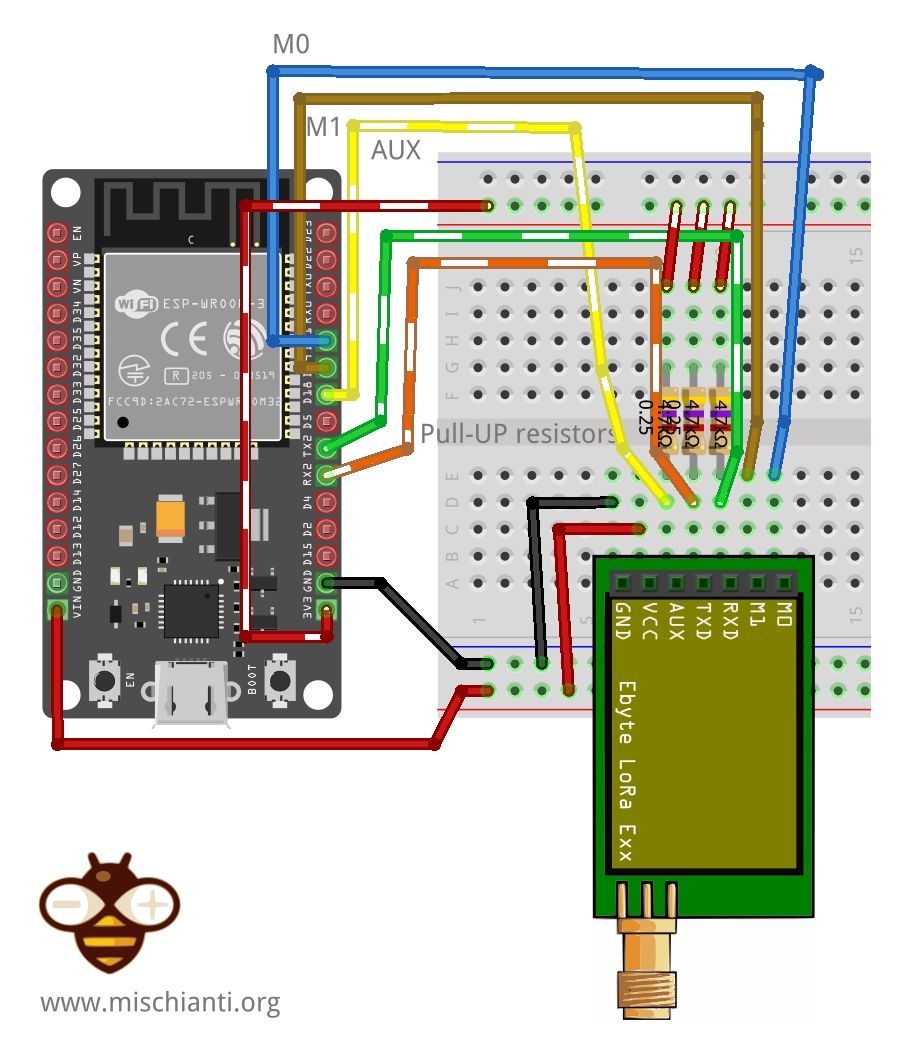
Wiring ESP32
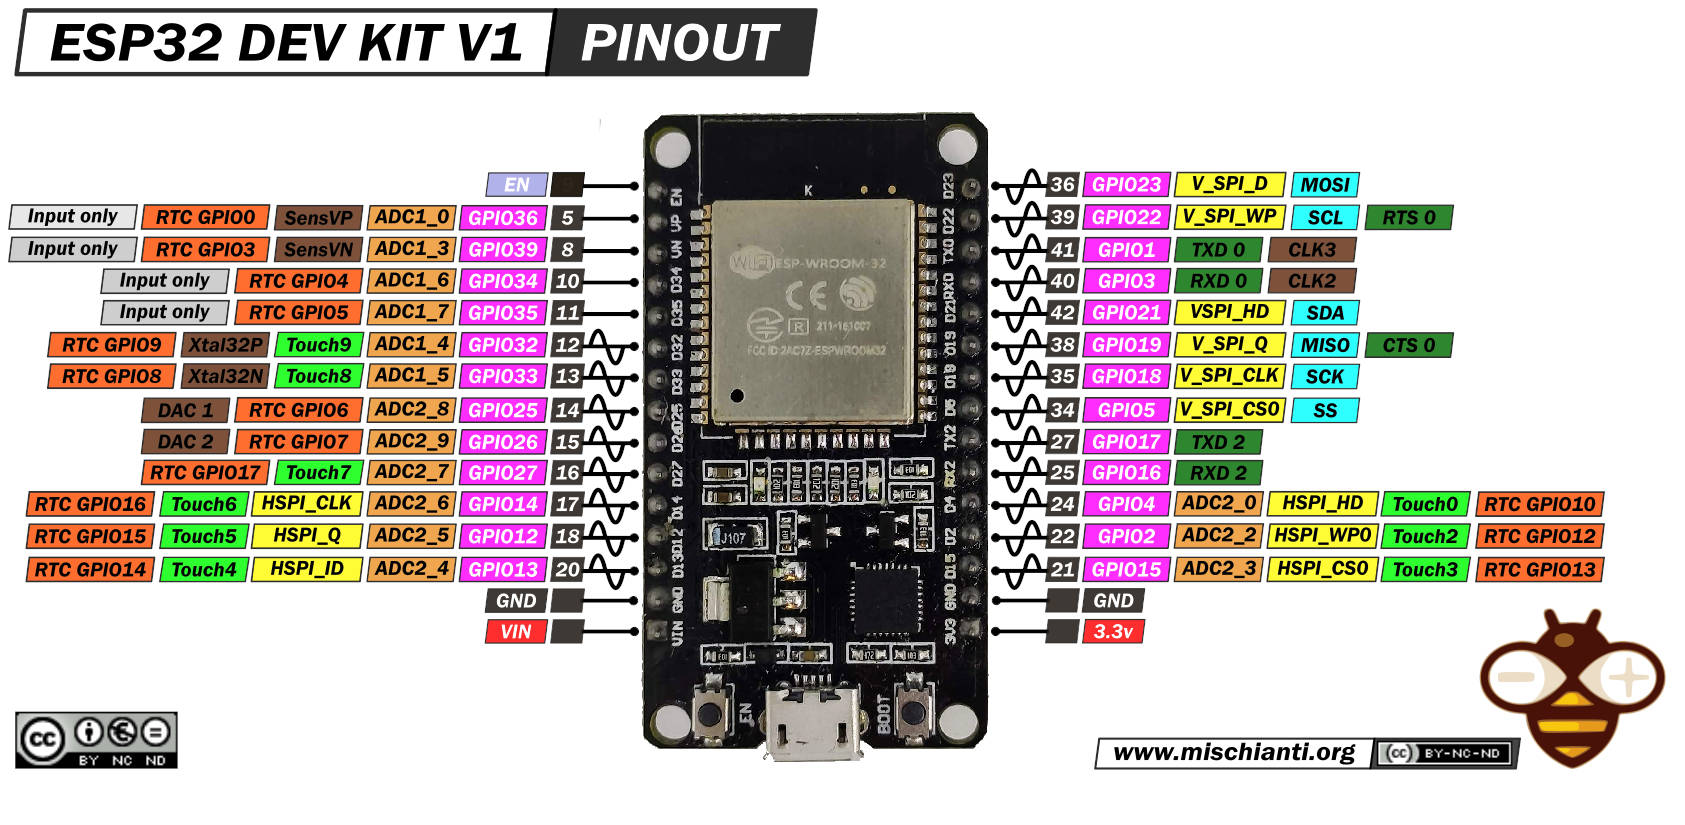
For ESP32 I use this configuration
| E32 | ESP32 |
|---|---|
| M0 | 19 |
| M1 | 21 |
| RX | TX2 |
| TX | RX2 |
| AUX | 15 |
| VCC | 3.3v or 5v (better) |
| GND | GND |
Back End (like simple gateway)
I wrote 2 back end, one for esp8266 and one for esp32, you can find they on examples of my library “EByte LoRa E32 library“.
You can select to work with the device as Soft AP or you can insert your WiFi SSID and password and use they like normal server, to enable Soft AP you must comment this line
#define SERVER_MODE
Than if you attach D0 with pull-up resistor to RESET pin I automatically reset the device when needed.
Upload sketch and Web UI
To upload the sketchs you can refer to the tutorial I’v already write:
- esp8266:
- Manage env and upload sketch “WeMos D1 mini (esp8266), pinout, specs and IDE configuration“
- Upload data to LittleFS “WeMos D1 mini (esp8266), integrated LittleFS Filesystem“
- esp32:
- Manage env and upload sketch “ESP32: pinout, specs and Arduino IDE configuration“
- Upload data to SPIFFS “ESP32: integrated SPIFFS FileSystem“
Interfacing to Back-End
I create a template with Postman with the documentation of Rest API, and the instrument offer a complete set of implementations with the most common languages like .NET, Python, nodejs, PHP ecc.
REST API
The rest API respond from port 8080 without CORS check for more information refer to “How to create a REST server on esp8266 or esp32“.
Get configuration
GET 192.168.1.119:8080/configuration
var requestOptions = {
  method: 'GET',
  redirect: 'follow'
};

fetch("192.168.1.119:8080/configuration", requestOptions)
  .then(response => response.text())
  .then(result => console.log(result))
  .catch(error => console.log('error', error));
Example Response
{
    "configuration": {
        "ADDH": 0,
        "ADDL": 0,
        "CHAN": 23,
        "OPTION": {
            "fec": 1,
            "fixedTransmission": 0,
            "ioDriveMode": 1,
            "transmissionPower": 0,
            "wirelessWakeupTime": 0
        },
        "SPED": {
            "airDataRate": 2,
            "uartBaudRate": 3,
            "uartParity": 0
        }
    }
}
Set configuration
POST 192.168.1.119:8080/configuration
{
    "ADDH": 0,
    "ADDL": 0,
    "CHAN": 23,
    "OPTION": {
        "fec": 1,
        "fixedTransmission": 0,
        "ioDriveMode": 1,
        "transmissionPower": 0,
        "wirelessWakeupTime": 0
    },
    "SPED": {
        "airDataRate": 2,
        "uartBaudRate": 3,
        "uartParity": 0
    }
}
Example Request
var raw = "{
\n    \"ADDH\": 0,
\n    \"ADDL\": 0,
\n    \"CHAN\": 23,
\n    \"OPTION\": {
\n        \"fec\": 1,
\n        \"fixedTransmission\": 0,
\n        \"ioDriveMode\": 1,
\n        \"transmissionPower\": 0,
\n        \"wirelessWakeupTime\": 0
\n    },
\n    \"SPED\": {
\n        \"airDataRate\": 2,
\n        \"uartBaudRate\": 3,
\n        \"uartParity\": 0
\n    }
\n}";

var requestOptions = {
  method: 'POST',
  body: raw,
  redirect: 'follow'
};

fetch("192.168.1.119:8080/configuration", requestOptions)
  .then(response => response.text())
  .then(result => console.log(result))
  .catch(error => console.log('error', error));
Example Response
{
    "configuration": {
        "ADDH": 0,
        "ADDL": 0,
        "CHAN": 23,
        "OPTION": {
            "fec": 1,
            "fixedTransmission": 0,
            "ioDriveMode": 1,
            "transmissionPower": 0,
            "wirelessWakeupTime": 0
        },
        "SPED": {
            "airDataRate": 2,
            "uartBaudRate": 3,
            "uartParity": 0
        }
    }
}
Reset microcontroller
GET 192.168.1.119:8080/reset
Example Request
var requestOptions = {
  method: 'GET',
  redirect: 'follow'
};

fetch("192.168.1.119:8080/reset", requestOptions)
  .then(response => response.text())
  .then(result => console.log(result))
  .catch(error => console.log('error', error));
Reset E32 module
GET 192.168.1.119:8080/resetModule
Example Request
var requestOptions = {
  method: 'GET',
  redirect: 'follow'
};

fetch("192.168.1.119:8080/resetModule", requestOptions)
  .then(response => response.text())
  .then(result => console.log(result))
  .catch(error => console.log('error', error));
Example Response
{
  "status": {
    "code": "1",
    "error": false,
    "description": "Success"
  }
}
Get module info
GET 192.168.1.119:8080/moduleInfo
Example Request
var requestOptions = {
  method: 'GET',
  redirect: 'follow'
};

fetch("192.168.1.119:8080/moduleInfo", requestOptions)
  .then(response => response.text())
  .then(result => console.log(result))
  .catch(error => console.log('error', error));
Example Response
{
  "moduleInfo": {
    "frequency": "32",
    "version": "48",
    "features": "14"
  }
}
Send transparent message
POST 192.168.1.119:8080/transparentMessage
{
    "message": "Messaggio prova"
}
Example Request
var raw = "{
\n    \"message\": \"Messaggio prova\"
\n}";

var requestOptions = {
  method: 'POST',
  body: raw,
  redirect: 'follow'
};

fetch("192.168.1.119:8080/transparentMessage", requestOptions)
  .then(response => response.text())
  .then(result => console.log(result))
  .catch(error => console.log('error', error));
Example Response
{
  "status": {
    "code": "1",
    "error": false,
    "description": "Success"
  }
}
Send fixed message
POST 192.168.1.119:8080/fixedMessage
{
    "CHAN": 23,
    "ADDL": 2,
    "ADDH": 0,
    "message": "Messaggio prova"
}
Example Request
var raw = "{
\n    \"CHAN\": 23,
\n    \"ADDL\": 2,
\n    \"ADDH\": 0,
\n    \"message\": \"Messaggio prova\"
\n}";

var requestOptions = {
  method: 'POST',
  body: raw,
  redirect: 'follow'
};

fetch("192.168.1.119:8080/fixedMessage", requestOptions)
  .then(response => response.text())
  .then(result => console.log(result))
  .catch(error => console.log('error', error));
Example Response
{
  "status": {
    "code": "1",
    "error": false,
    "description": "Success"
  }
}
Send broadcast message
POST 192.168.1.119:8080/broadcastMessage
{
    "CHAN": 23,
    "message": "Messaggio prova"
}
Example Request
var raw = "{
\n    \"CHAN\": 23,
\n    \"message\": \"Messaggio prova\"
\n}";

var requestOptions = {
  method: 'POST',
  body: raw,
  redirect: 'follow'
};

fetch("192.168.1.119:8080/broadcastMessage", requestOptions)
  .then(response => response.text())
  .then(result => console.log(result))
  .catch(error => console.log('error', error));
Example Response
{
  "status": {
    "code": "1",
    "error": false,
    "description": "Success"
  }
}
Web Socket
WebSocket respond from port 8081 in ws protocol (ws://192.168.1.119:8081/)
Upon opening the connection, you receive first message with basic information
{"type":"connection", "connection": true, "simpleMessage": true}
Than you start to receive the message with realtime signal strenght information
{"type":"wifi_rt","value":"-38"}
to start receive messages you must send this message
{"startReceiveDevMsg":true,"singleMessage":true}
if It’s all ok you receive
{"type": "device_msg", "receiving": true}
then you can listen to the messages received by the device
{"type":"message","code":true,"description":"Success","message":"Messaggio di prova","error":false}
You can use this simple WebSocket client
http://home.mischianti.org/WebSocketClient/MischiantiWebSocketClient.html
Thanks
Link to Front-End GitHub project
Link to REST API implementations.
- EByte LoRa E32 gateway: manage via REST and WebSocket
- EByte LoRa E32 Web Manager: description, configure and demo