AWS IoT core and MQTT services: creating AWS thing with certificate and policy – 2
Now we need to connect our device via MQTT; the security system used by Amazon is via certificate generated directly from the web interface. You can connect only one device with the relative certificate, so you must make five certificates if you want to create five devices.
To communicate with the esp8266, esp32, or Arduino devices, it must connect to AWS IoT Core with device credentials. You must also specify the topics it has permission to publish and subscribe to.
Select correct region
It’s essential to prevent errors or select the correct region to develop and host your resources.
- North America the default region is
us-east-1 - Europe I select
eu-west-1
Pay attention if you select a region not supported by your Alexa device when we test on the device; your skill will not work.
To support all devices, you must release lambda in multiple regions.
Retrieve your Account ID
First, you need Account ID, and to do that, open this link Account Settings, get the value Account Id, and put It in the setup.txt file on [Account ID] section.
Retrieve IoT MQTT EndPoint
IoT Core creates an MQTT End-point for you; you can find It on AWS IoT Console and click on left Menu Settings.
https://eu-west-1.console.aws.amazon.com/iot/home?region=eu-west-1#/settings (Europe)
https://us-east-1.console.aws.amazon.com/iot/home?region=us-east-1#/settings (North America)
Get Custom endpoint XXXXXXXXXXXXXX-ats.iot.eu-west-1.amazonaws.com and paste on setup.txt to [IoT MQTT EndPoint] section.
Create new thing
In the project, you have already downloaded, check the folder esp8266_relay_iot_core/certificates.
- In the AWS IoT console (IoT Core), choose from the left menù Manage and Things.
Or directly:
https://us-east-1.console.aws.amazon.com/iot/home?region=us-east-1#/thinghub (North America)
https://eu-west-1.console.aws.amazon.com/iot/home?region=eu-west-1#/thinghub (Europe)
- Than click on Create button in the top right, than Register a single AWS IoT thing.
- Name the new thing esp8266_relay, and copy this also in the
setup.txtfile on[Device name]section. Leave the remaining fields set to their defaults. Choose Next. - Choose Create certificate.
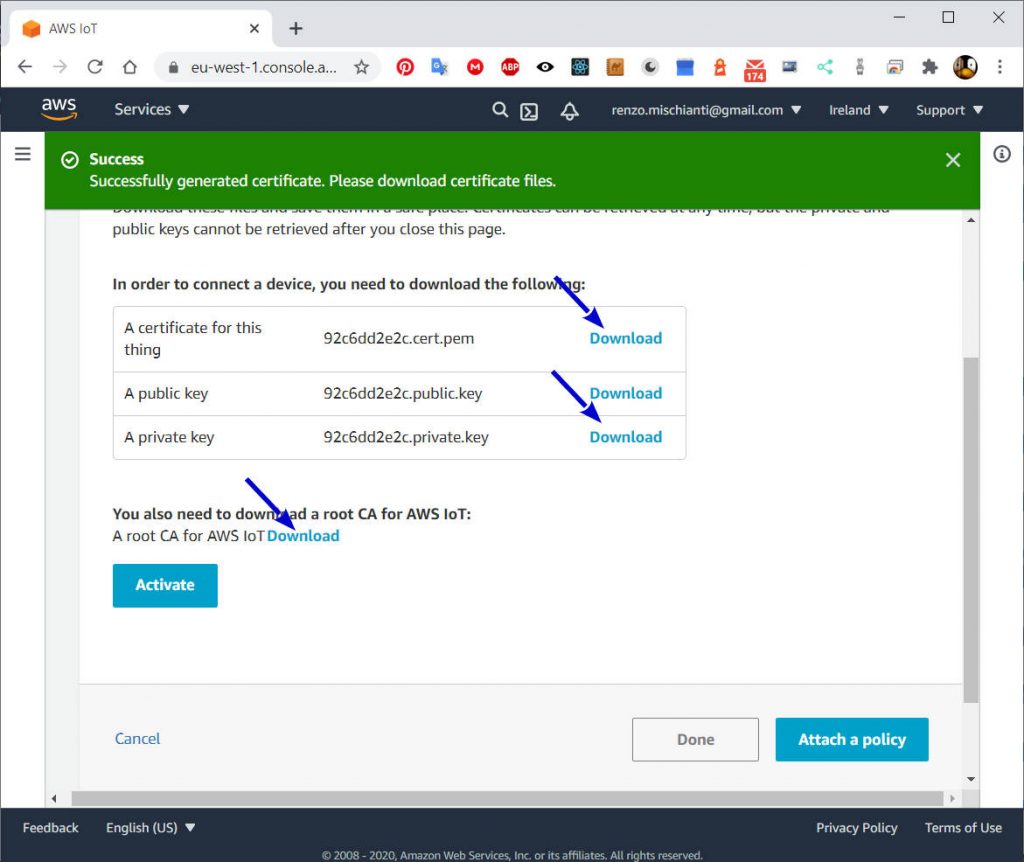
- Download inside the folder
esp8266_relay_iot_core/certificates: Thing cert/Certificato per questo Oggetto, private key/chiave privata, than click near A CA root per AWS IoT the Download link, and select Amazon Root CA 1. - Choose Activate.
- Then click on Attach a policy.
- For now here click Done.
Create a policy
- Now on AWS IoT Console click to the left menu Secure and on sub-menu click Policies.
https://eu-west-1.console.aws.amazon.com/iot/home?region=eu-west-1#/policyhub (Europe)
https://us-east-1.console.aws.amazon.com/iot/home?region=us-east-1#/policyhub (North America)
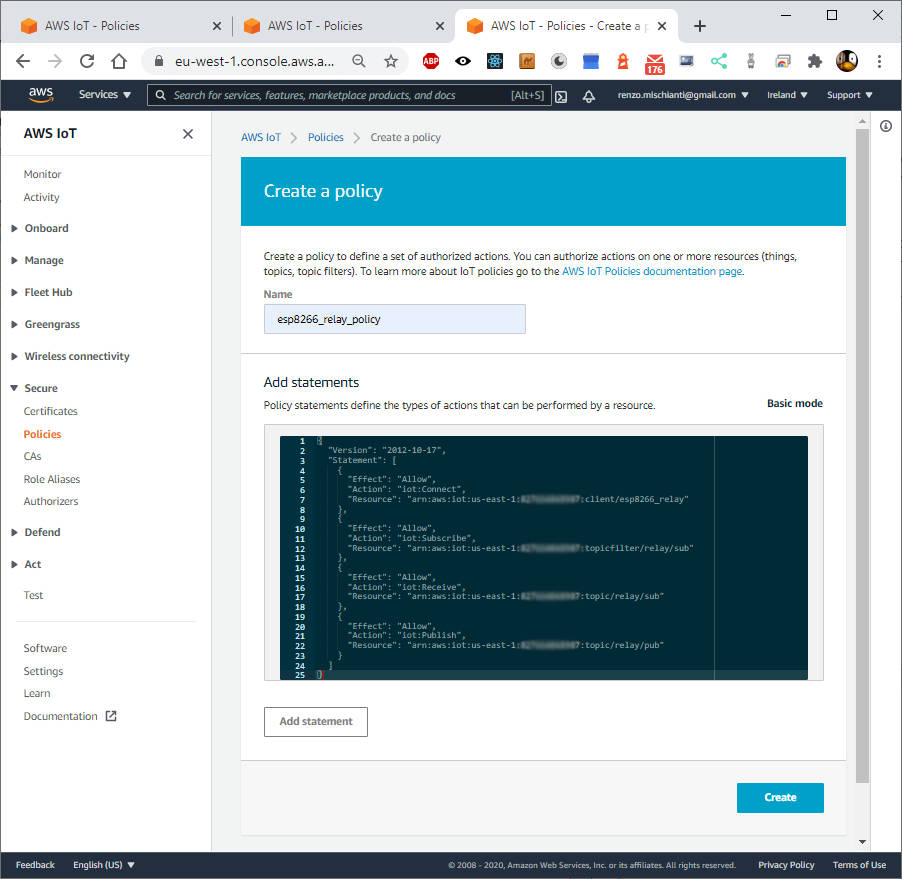
- Click on Create button on top right.
- Set name the policy esp8266_relay_policy. Choose the Advanced tab.
- Paste in the following policy template.
Generic template (check the tag surrounded by [] and substitute the values from setup.txt file).
{
  "Version": "2012-10-17",
  "Statement": [
    {
      "Effect": "Allow",
      "Action": "iot:Connect",
      "Resource": "arn:aws:iot:[Region]:[Account ID]:client/[Device name]"
    },
    {
      "Effect": "Allow",
      "Action": "iot:Subscribe",
      "Resource": "arn:aws:iot:[Region]:[Account ID]:topicfilter/relay/sub"
    },
    {
      "Effect": "Allow",
      "Action": "iot:Receive",
      "Resource": "arn:aws:iot:[Region]:[Account ID]:topic/relay/sub"
    },
    {
      "Effect": "Allow",
      "Action": "iot:Publish",
      "Resource": "arn:aws:iot:[Region]:[Account ID]:topic/relay/pub"
    }
  ]
}
Europe (look at the region)
{
  "Version": "2012-10-17",
  "Statement": [
    {
      "Effect": "Allow",
      "Action": "iot:Connect",
      "Resource": "arn:aws:iot:eu-west-1:XXXXXXXXXXXX:client/esp8266_relay"
    },
    {
      "Effect": "Allow",
      "Action": "iot:Subscribe",
      "Resource": "arn:aws:iot:eu-west-1:XXXXXXXXXXXX:topicfilter/relay/sub"
    },
    {
      "Effect": "Allow",
      "Action": "iot:Receive",
      "Resource": "arn:aws:iot:eu-west-1:XXXXXXXXXXXX:topic/relay/sub"
    },
    {
      "Effect": "Allow",
      "Action": "iot:Publish",
      "Resource": "arn:aws:iot:eu-west-1:XXXXXXXXXXXX:topic/relay/pub"
    }
  ]
}
North America (look at the region)
{
  "Version": "2012-10-17",
  "Statement": [
    {
      "Effect": "Allow",
      "Action": "iot:Connect",
      "Resource": "arn:aws:iot:us-east-1:XXXXXXXXXXXX:client/esp8266_relay"
    },
    {
      "Effect": "Allow",
      "Action": "iot:Subscribe",
      "Resource": "arn:aws:iot:us-east-1:XXXXXXXXXXXX:topicfilter/relay/sub"
    },
    {
      "Effect": "Allow",
      "Action": "iot:Receive",
      "Resource": "arn:aws:iot:us-east-1:XXXXXXXXXXXX:topic/relay/sub"
    },
    {
      "Effect": "Allow",
      "Action": "iot:Publish",
      "Resource": "arn:aws:iot:us-east-1:XXXXXXXXXXXX:topic/relay/pub"
    }
  ]
}
- Replace XXXXXXXXXXXX with your Account ID, which can be found in
setup.txt. - Choose Create.
Attach a policy to an object
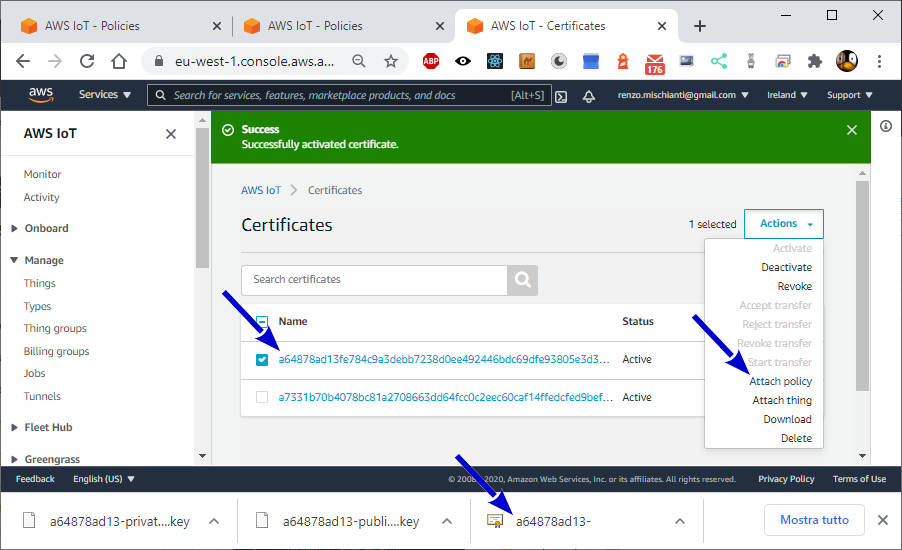
- In the AWS IoT console, choose Secure, Certification. Select the one created for your device, you can identify It by check the prefix of certificate file you had previous download, check the certificate and on Actions menu in the top right choose Attach policy.
- Choose esp8266_relay_policy, Attach.
Your AWS IoT device is now configured to have permission to connect to AWS IoT Core. It can also publish to the topic relay/pub and subscribe to the topic relay/sub. For more information on securing devices, see AWS IoT Policies.
Copi relay/pub and relay/sub respectively in [IoT MQTT publish topic] and [IoT MQTT subscribe topic] of our setup.txt file.
Thanks
- AWS IoT core and MQTT services: introduction and prerequisite
- AWS IoT core and MQTT services: creating AWS thing with certificate and policy
- AWS IoT core and MQTT services: connect esp8266 devices
- AWS IoT core and MQTT services: connect esp32 devices
- AWS IoT core and MQTT services: connect Arduino SAMD (WiFiNINA) devices
- AWS IoT core and MQTT services: test with console and MQTT.fx

